
drill your own water well with mud pump in stock

A mud pump represents a huge improvement in drilling over just using two hoses. It improves water flow. A typical mud pump will put out 100 gallons per minute whereas two hoses are only good for about 12 to 15 gallons per minute.
It saves water. Just as important, a mud pump allows you to employ a re-circulating system so you can use bentonite or other gelling material that will solidify the sandy, crumbly walls of your borehole long enough you can drill without worrying about your hole collapsing on your drillpipe.
Water is pumped, using the mud pump, down the drillpipe. At the bottom of the borehole it turns and goes back up outside the drillpipe carrying cuttings with it. When it reaches the top it goes out through the tee over to the portable mud pit.
The portable mud pit is continiously shoveled to get the mud out of the water. A water/mud mixture is then pumped out of the pit and back down through the PVC drillpipe.
Before we go further please take a look at the drawing below.It is from an excellent site, http://www.lifewater.ca/ that is dedicated to helping third world countries drill for water. The drawing shows their drilling rig, an LS-100 instead of our PVC apparatus but the mud pit arrangement is excellent. If you have time, it would be a good idea to go to https://www.lifewater.ca/drill_manual/Section_3.htm and browse around as well. They have many other excellent ideas.
The drilling fluid (water & bentonite) is pumped by the mud pump down the drilling pipe. At the bottom of the borehole it picks up cuttings and carries them to the top. At the top of the borehole the mixture of drilling fluid and cuttings go into a ditch that leads to a settling pit. The cuttings fall to the bottom in the settling pit while the drilling fluid goes over a small ditch into the the mud pit. During the drilling process, the cuttings are occasionally or continually shoveled from the bottom of the settling pit. From the mud pit, the mud pump pumps the fluid back into the drilling pipe and the process continues.
Note I am saying “drilling fluid” and not water. That is because bentonite or some other gelling agent is added to the water to make drilling fluid. As the hole is bored, this drilling fluid causes the sides of the borehole to harden. This is extremely helpful because the driller doesn’t have to worry (as much) about the borehole caving in on his drilling pipe. Any of you who have had a PVC drillpipe stick in a hole can appreciate how useful this trait is!!
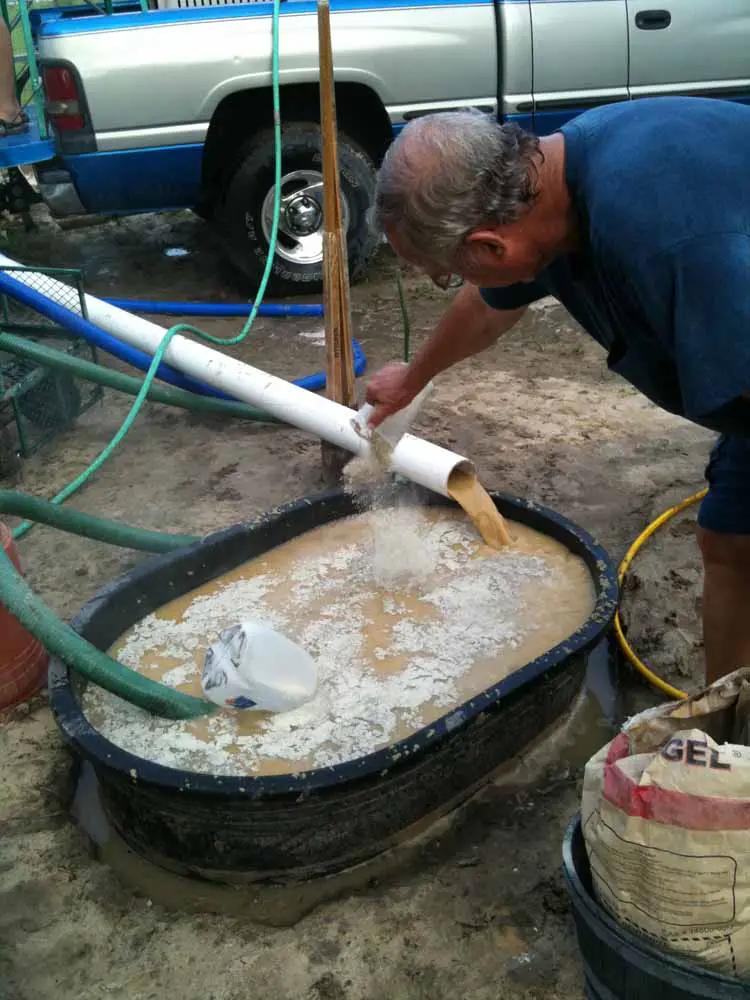
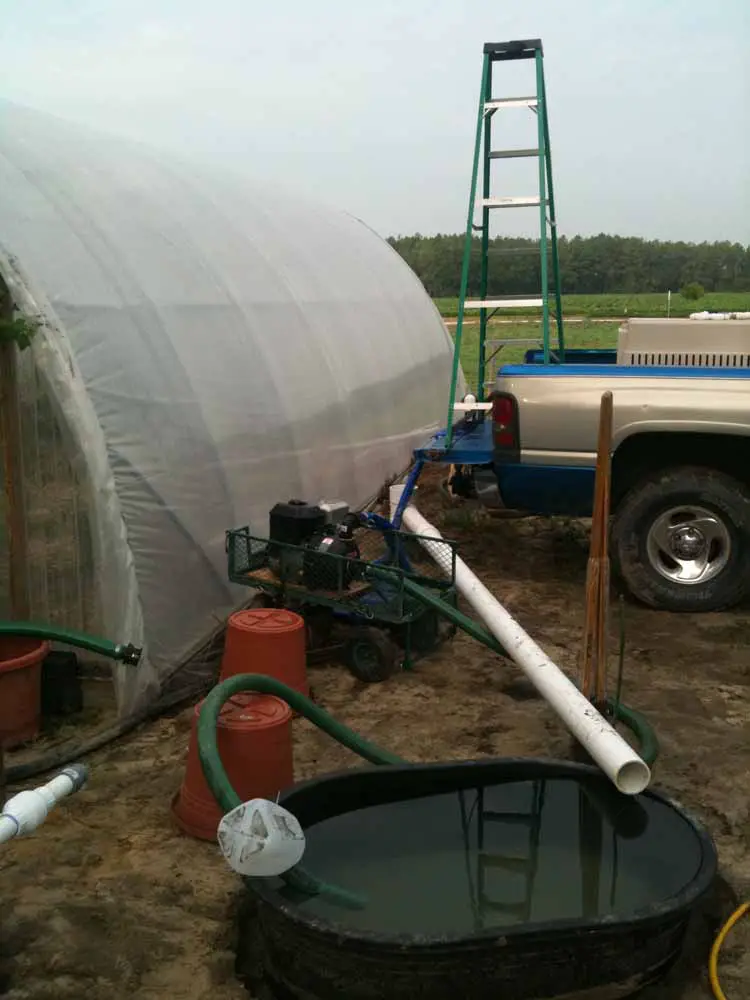
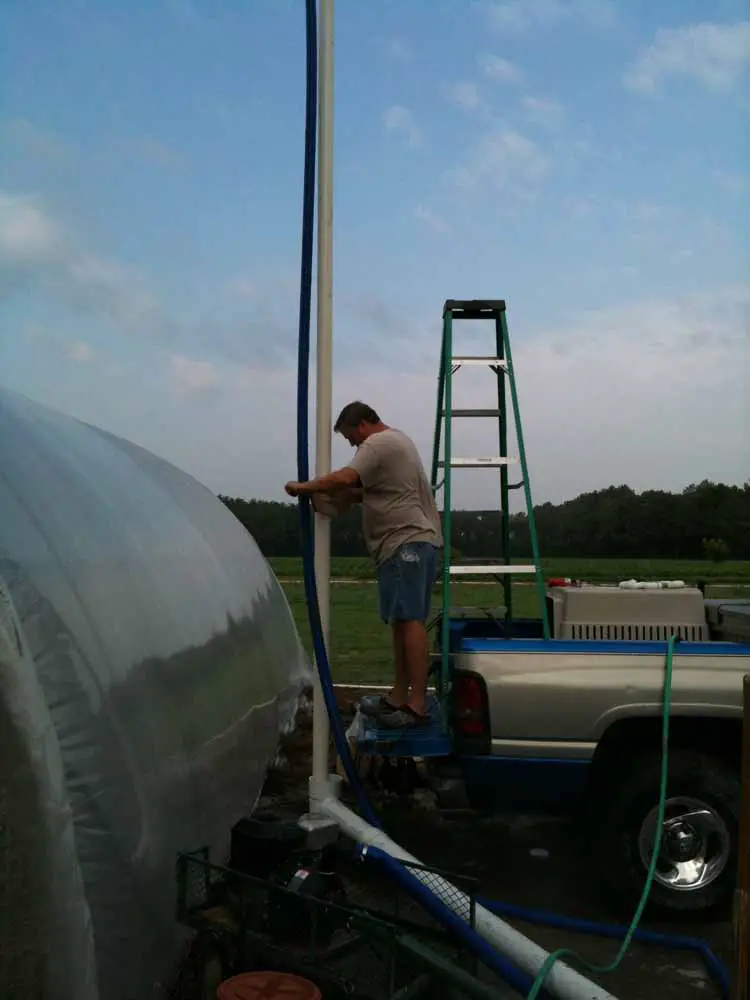
Now let’s move on to George’s arrangement. Rather than dig up his yard to make the settling and mud pits, he is using a portable mud pit. He has inserted a six inch diameter piece of PVC into the ground where he will be drilling. Then he attached a tee with a four inch pipe coming off the side. This four inch pipe leads to his portable mud pit
Below are a series of eMails George sent as he was drilling the well. As you can see, it took a bit of experimentation to find the right combination of size, speed, and drilling mud. He kept at it and his ultimate success is most impressive. I left off a couple of the first emails. As the story begins, George has a two inch pipe stuck in the ground from an effort using two water hoses as drilling fluid.
Using the mud pump method was GREAT ! I set everything up and had my neighbor over to help. I put the 20’ piece of 3″ pvc over my stuck 2″ pipe …. fired up the mud pump and got the water recirculating into my 110 gallon livestock tub. In less than 30 minutes, I had washed down to where the 3″ pipe was on top of the 2″ pipe. The 3″ pipe started wanting to stick in the soft sand, so I had my helper to add about 15 lbs. of “Aqua Gel” that I picked up at the plumbing store where I buy my well screens from. It’s a combination of bentonite and a vegetable polymer. Within a few minutes, I was able to easily slide the 3″ pipe up and down/side to side to enlarge my bore hole …… it quit caving in and sticking like it had been doingJ Instead of having to take the 2″ pipe out, both pipes washed down together ! At about 19’, I hit hardpan … so I decided to stop and pull out the 3″ pipe. After doing this, I had so much room left in the borehole, that I was able to pour 2 bags of pea gravel down the outside of my 2″ pipe all the way to the bottom …. without any caving in issues. I think I could have easily put down a 4″ pipe and well screen down that hole. The Aqua Gel was doing its job nicely.
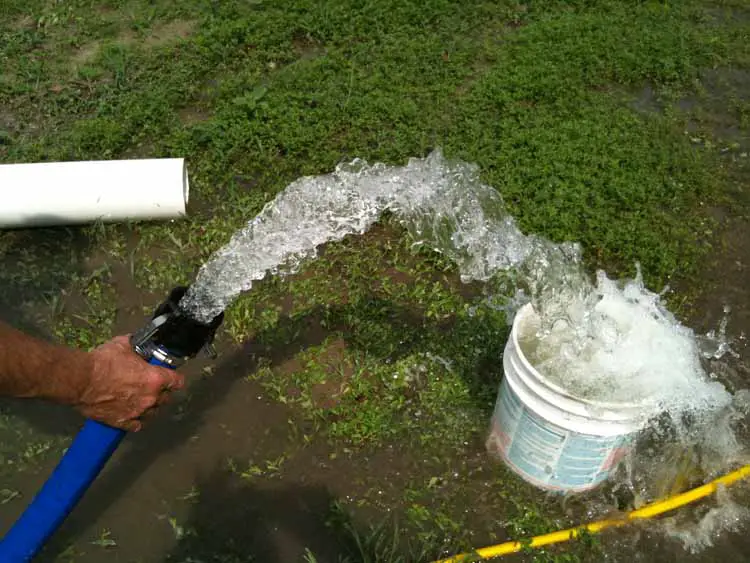
Total time using the mud pump from starting to when I finished putting in the gravel pack was only 1 hour ! The guy at the plumbing shop told me I would have to backwash the well to remove the Aqua Gel because it would stop up the aquifer. I did that using my 110 gallon sprayer tank that was standing by full of clean water. I then hooked up my mud pump to the well and pumped it for 10 minutes … only getting about 9 gallons/minute flow. During this time, I filled my 110 gallon sprayer tank back up with clean water. I back flushed the well again …. after this time, I got a 16 gal/min flow …. getting better J On the third time I back flushed the well, I surged the mud pump from slow to fast … back and forth as it back flushed. Hooked everything back up and started pumping from the well ….. now getting 30 gal/min !! I decided to quit while I was ahead …. plus the temperature was pushing 100 degrees !!
Next weekend, I’m moving over about 14’ and putting down a second well so that I can eventually combine the two for my irrigation. I’ll take pictures and email them to you. I used a 6″ tee that had a 4″ side port to recirculate back to my 110 gallon stock tub. I only put 3’ of 6″ pvc in the ground and packed around the pipe to prevent leakage. Everything worked great … just like in the PVC video you sent me where the guy was using two dug pits to recirculate from.
next eMail)We jetted down the second well this past Saturday morning. It took only one hour from the time we started the pump until I finished with the gravel pack !! I used a 3″ pipe to jet with …. dropped in my 2″ pipe with 5’ well screen …. then pulled out the 3″ casing. At this point, there is enough room to pour 2.5 bags of pea gravel down the hole beside the well pipe. By using the Quick Gel, the hole does not cave in on the well pipe. The big difference this time was that I immediately back flushed the well with 110 gallons of fresh water to clear out the Quick Gel …. instead of trying to pump from it at the beginning like I did with my first well. This second well pumps a huge 60 gpm !!! I was amazed … to say the least. Tied together, both wells produce 90+ gpm with the pump slightly above idle speed J I’ve included some photos in this email and will send you some short videos in a follow up email. I hope it does not clog up your Inbox.Thanks so much for your help …… and inspiration from your website which got me started on this project !
Here are the short video clips. One thing I forgot to mention earlier was that you really have to mound up and pack the dirt around the bottom of your 6″ tee. We had a couple of times when the circulating water tried to come up around the 2.5 foot piece of 6″ pipe we had in the ground below the tee. It would be better if you could drive that pipe in the ground maybe another foot, but I did not have anything to do that with. Using the Quick Gel gives you enough time to stop and fix your leaks as you go without risking a cave in on your pipe.

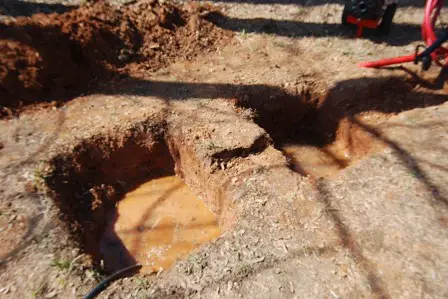
Historically, most drillers dug two pits prior to drilling a well. A first pit, called a settling pit, received the drilling fluid and cuttings from the drill hole via a short shallow trench. The cuttings settled down to the bottom of the the settling pit. A second pit, called a mud pit, was dug nearby and a second trench directed the overflow of the settling pit into the mud pit. Most of the cuttings settle to the bottom of the settling pit and the drilling fluid in the mud pit has a much higher liquid to cuttings ratio. In other words, the water in the second pit, the mud pit, is “cleaner.” Drilling fluid from the mud pit is then pumped, by a mud pump, back down the drillpipe. During the drilling process, cuttings are continuously shoveled from the settling pit so it does not become clogged with cuttings. Although most of the cuttings settle in the settling pit, it is also necessary to occasionally shovel cuttings from the mud pit as well.
Below is a photograph of mud pits prepared for drilling. This photograph is from the hydra-jett site. Hydra-Fab manufacturing http://hydra-jett.com/index.html sells small and medium sized drilling rigs and is worth looking at if you are considering moving up to a small rig.
As you might imagine, diggining mud pits is a significant undertaking and it makes an even bigger mess of your drilling site. Modern drillers, being both ingenious and capitalistic souls, have devised a way to avoid this costly, unpleasant step. They bring portable mud pits to the drill site. A portable mud pit is simply a container or series of containers that the drilling fluid from the hole is directed to where cuttings settle out prior to the fluid being pumped again down the drillpipe. Not only does it eliminate the time/money consuming digging but it leaves a cleaner drillsite upon completion of the well.
….but it frequently doesn’t work as well for those of us who have small portable mud pits. Using real mud pits results in more efficient drilling. There is no leakage around the guide tube with real mud pits.
Here is an example of a portable mud pit positioned at the back of a commercial drilling rig. Cuttings from the hole are directed into the settling pit on the right. Then drilling fluid passes through to the mud pit on the left and it is pumped back down the hole.
There is a wide variety of designs of portable mud pits. Here are just a few sketches I found to give you an idea of designs that folks have come up with.
So, by now your are probably wondering, where does all that leave us? We are not going to buy one of those $500 portable mud pits for our $200 project are we? Absolutely not, in fact you may just be better off digging your pits. If you are going to dig several wells you might want to consider using a portable mud pit with a mud pump. I made one out of wood and it works fine. It is not as efficient as the commercial mud pits but it does the job. Please take a look at the video below.
As you can see my portable mud pit is just a wooden box with a fitting for the suction line and a minor obstruction to keep the cuttings away from the suction. You can probably come up with a better design for a portable mud pit that I have. I probably could but it is already built and I’m not inclined to build another one – but – If I were doing another one, I’d probably build two boxes that fit inside one another for easier travel and storage, and then sat beside each other when drilling.
more at http://www.drillyourownwell.com This is an example of a Mud Pump Water Well Drilling Setup utilizing a Portable Mud pit. This particular well was ...
The objective in choosing a method to drill a water well is to use the least expensive method that can be successful given the type of material that must be drilled through and the depth that must be drilled to reach an acceptable source of groundwater.
Often, there are no options, and the choices we have are limited, maybe even non-existent. But the method used to drill a water well must match the geology.
Most manual well drilling methods have been adapted to use machine power instead of human power. Also, powered methods have been developed that can drill larger diameter boreholes much deeper and faster than any manual method. Machines used to drill a water well are typically called a "drill rig" or just a "rig".
This method employs a pump to force a flow of water down a drill pipe and out a narrow nozzle to make a ""jet"" of water that loosens the sediment. The return flow of water outside the drill pipe carries cuttings up to the surface and into a settling pit. The pump then returns the water back down the pipe. The drill pipe is suspended from a tripod and rotated by hand to keep the borehole straight.
This method only requires lengths of pipe and a water pump that can generate sufficient pressure. The pipe is often left in the ground to serve as the well casing.
The diameter of the borehole is only slightly larger than the drill pipe/casing. Therefore, it is difficult to install an adequate sanitary seal to protect the well from surface water contamination.
This is a mechanized version of manual percussion drilling. The heavy drill bit and related parts are called the ""tools"" and they are raised and dropped on a steel cable.
Cuttings are removed with a bailer. Several meters of water must be maintained in the borehole to keep the cuttings suspended. The machinery ranges from a very simple skid-mounted powered winch with a tripod to a complex set of pulleys and drums with a large mast.
A cable tool rig can drill through anything. The larger versions can drill a water well hundreds of meters deep. Compared with other powered drill rigs, the machinery is simple and has a relatively low rate of fuel consumption
Compared to other drill rigs of a similar size, a cable tool rig will drill a water wellvery slowly. When drilling in loose sediments, it is necessary to drive steel pipe behind the drill bit to keep the borehole from collapsing.
This method used to drill a water well starts with the basic concept of well jetting described above. Add a larger cutting bit, lengths of steel drill pipe with threaded joints, a motor to turn and lift the drill pipe, and a sturdy mast to support the pipe and you have the elements of a mud rotary drill rig. A further refinement is mixing bentonite clay or other materials in the water to improve its ability to lift cuttings out of the hole; this fluid is called ""drilling mud"" or just ""mud.""
There are many kinds of mud rotary drill rigs used to drill a water well. They fall in two basic categories; table drive, where the drill pipe is turned by a rotating mechanism near the base of the rig, and top-head drive, where the drill pipe is turned by a motor attached to the upper end of the pipe.
In both types, the upper end of the drill pipe is attached to a lifting mechanism that raises and lowers it along the mast. Both types of mud rotary rigs also have a swivel attached to the upper end of the drill pipe that allows drilling mud to be pumped down the drill pipe while the pipe is rotating.
The larger the rig, the faster and deeper it can drill. The LS100 and LS200 drill rigs are mud rotary rigs at the small end of the range of drill rig sizes.
Mud rotary drilling is also much faster than cable tool. A large mud rotary rig can drill a borehole 60 cm in diameter to 1,000 meters or more. Even a small rig like the LS200 can drill a 20 cm porthole to a depth of 60 meters.
As a result, mud rotary rigs use more fuel per hour than a comparable cable tool rig. Most drilling operations that use a large mud rotary rig also require support vehicles to haul water and drill pipe.
The mechanical elements of an air rotary drill rig are similar to a mud rotary rig; table drive and top-head drive are the two basic options for rotating the drill pipe. The principal difference is an air rotary rig uses compressed air to remove cuttings rather than drilling mud.
A type of ""foam"" can be added to the air stream to improve cuttings removal and provide some borehole stability. An air rotary rig can use the same type of drill bits as a mud rig, but it can also drill with a down-the-hole hammer.
This type of bit uses compressed air to break up rock and it can drill very fast. A large air rotary rig can drill a borehole 60 cm in diameter to 500 meters or more.
Because there is no drilling mud to mix or settling pits to dig, an air rotary rig can be set up very quickly. An air rotary rig also drills much faster than any other rig of a comparable size.
An air rotary drill rig requires a very large air compressor, especially if a down-hole hammer is used. This adds significantly to the cost of the rig, its maintenance needs, and its fuel use.
A large air rotary rig will consume 40-60 liters per hour of fuel, making it one of the most expensive types of drill rig to operate. Large air rotary rigs also require support vehicles.
Swiss Centre for Development Cooperation in Technology and Management (SKAT) has published a manual entitled "Drilled Wells" which covers additional topics and information on the subject of how to drill a well. The PDF of that manual can be downloaded here.

There are many different ways to drill a domestic water well. One is what we call the “mud rotary” method. Whether or not this is the desired and/or best method for drilling your well is something more fully explained in this brief summary.
One advantage of drilling with compressed air is that it can tell you when you have encountered groundwater and gives you an indication how much water the borehole is producing. When drilling with water using the mud rotary method, the driller must rely on his interpretation of the borehole cuttings and any changes he can observe in the recirculating fluid. Mud rotary drillers can also use borehole geophysical tools to interpret which zones might be productive enough for your water well.
The mud rotary well drilling method is considered a closed-loop system. That is, the mud is cleaned of its cuttings and then is recirculated back down the borehole. Referring to this drilling method as “mud” is a misnomer, but it is one that has stuck with the industry for many years and most people understand what the term actually means.
The water is carefully mixed with a product that should not be called mud because it is a highly refined and formulated clay product—bentonite. It is added, mixed, and carefully monitored throughout the well drilling process.
The purpose of using a bentonite additive to the water is to form a thin film on the walls of the borehole to seal it and prevent water losses while drilling. This film also helps support the borehole wall from sluffing or caving in because of the hydraulic pressure of the bentonite mixture pressing against it. The objective of the fluid mixture is to carry cuttings from the bottom of the borehole up to the surface, where they drop out or are filtered out of the fluid, so it can be pumped back down the borehole again.
When using the mud rotary method, the driller must have a sump, a tank, or a small pond to hold a few thousand gallons of recirculating fluid. If they can’t dig sumps or small ponds, they must have a mud processing piece of equipment that mechanically screens and removes the sands and gravels from the mixture. This device is called a “shale shaker.”
The fluid mixture must have a gel strength sufficient to support marble-size gravels and sand to the surface when the fluid is moving. Once the cuttings have been carried to the surface and the velocity of the fluid allowed to slow down, the fluid is designed to allow the sand and gravel to drop out.
The driller does not want to pump fine sand through the pump and back down the borehole. To avoid that, the shale shaker uses vibrating screens of various sizes and desanding cones to drop the sand out of the fluid as it flows through the shaker—so that the fluid can be used again.
When the borehole has reached the desired depth and there is evidence that the formation it has penetrated will yield enough water, then it’s time to make the borehole into a well.
Before the well casing and screens are lowered into the borehole, the recirculating fluid is slowly thinned out by adding fresh water as the fluid no longer needs to support sand and gravel. The driller will typically circulate the drilling from the bottom up the borehole while adding clear water to thin down the viscosity or thickness of the fluid. Once the fluid is sufficiently thinned, the casing and screens are installed and the annular space is gravel packed.
Gravel pack installed between the borehole walls and the outside of the well casing acts like a filter to keep sand out and maintain the borehole walls over time. During gravel packing of the well, the thin layer of bentonite clay that kept the borehole wall from leaking drilling fluid water out of the recirculating system now keeps the formation water from entering the well.
This is where well development is performed to remove the thin bentonite layer or “wall cake” that was left behind. Various methods are used to remove the wall cake and develop the well to its maximum productivity.
Some drillers use compressed air to blow off the well, starting at the first screened interval and slowly working their way to the bottom—blowing off all the water standing above the drill pipe and allowing it to recover, and repeating this until the water blown from the well is free of sand and relatively clean. If after repeated cycles of airlift pumping and recovery the driller cannot find any sand in the water, it is time to install a well development pump.
Additional development of the well can be done with a development pump that may be of a higher capacity than what the final installation pump will be. Just as with cycles of airlift pumping of the well, the development pump will be cycled at different flow rates until the maximum capacity of the well can be determined. If the development pump can be operated briefly at a flow rate 50% greater than the permanent pump, the well should not pump sand.
Mud rotary well drillers for decades have found ways to make this particular system work to drill and construct domestic water wells. In some areas, it’s the ideal method to use because of the geologic formations there, while other areas of the country favor air rotary methods.
Some drilling rigs are equipped to drill using either method, so the contractor must make the decision as to which method works best in your area, for your well, and at your point in time.
To learn more about the difference between mud rotary drilling and air rotary drilling, click the video below. The video is part of our “NGWA: Industry Connected” YouTube series:
Gary Hix is a Registered Professional Geologist in Arizona, specializing in hydrogeology. He was the 2019 William A. McEllhiney Distinguished Lecturer for The Groundwater Foundation. He is a former licensed water well drilling contractor and remains actively involved in the National Ground Water Association and Arizona Water Well Association.
To learn more about Gary’s work, go to In2Wells.com. His eBooks, “Domestic Water Wells in Arizona: A Guide for Realtors and Mortgage Lenders” and “Shared Water Wells in Arizona,” are available on Amazon.

When choosing a size and type of mud pump for your drilling project, there are several factors to consider. These would include not only cost and size of pump that best fits your drilling rig, but also the diameter, depth and hole conditions you are drilling through. I know that this sounds like a lot to consider, but if you are set up the right way before the job starts, you will thank me later.
Recommended practice is to maintain a minimum of 100 to 150 feet per minute of uphole velocity for drill cuttings. Larger diameter wells for irrigation, agriculture or municipalities may violate this rule, because it may not be economically feasible to pump this much mud for the job. Uphole velocity is determined by the flow rate of the mud system, diameter of the borehole and the diameter of the drill pipe. There are many tools, including handbooks, rule of thumb, slide rule calculators and now apps on your handheld device, to calculate velocity. It is always good to remember the time it takes to get the cuttings off the bottom of the well. If you are drilling at 200 feet, then a 100-foot-per-minute velocity means that it would take two minutes to get the cuttings out of the hole. This is always a good reminder of what you are drilling through and how long ago it was that you drilled it. Ground conditions and rock formations are ever changing as you go deeper. Wouldn’t it be nice if they all remained the same?
Centrifugal-style mud pumps are very popular in our industry due to their size and weight, as well as flow rate capacity for an affordable price. There are many models and brands out there, and most of them are very good value. How does a centrifugal mud pump work? The rotation of the impeller accelerates the fluid into the volute or diffuser chamber. The added energy from the acceleration increases the velocity and pressure of the fluid. These pumps are known to be very inefficient. This means that it takes more energy to increase the flow and pressure of the fluid when compared to a piston-style pump. However, you have a significant advantage in flow rates from a centrifugal pump versus a piston pump. If you are drilling deeper wells with heavier cuttings, you will be forced at some point to use a piston-style mud pump. They have much higher efficiencies in transferring the input energy into flow and pressure, therefore resulting in much higher pressure capabilities.
Piston-style mud pumps utilize a piston or plunger that travels back and forth in a chamber known as a cylinder. These pumps are also called “positive displacement” pumps because they literally push the fluid forward. This fluid builds up pressure and forces a spring-loaded valve to open and allow the fluid to escape into the discharge piping of the pump and then down the borehole. Since the expansion process is much smaller (almost insignificant) compared to a centrifugal pump, there is much lower energy loss. Plunger-style pumps can develop upwards of 15,000 psi for well treatments and hydraulic fracturing. Centrifugal pumps, in comparison, usually operate below 300 psi. If you are comparing most drilling pumps, centrifugal pumps operate from 60 to 125 psi and piston pumps operate around 150 to 300 psi. There are many exceptions and special applications for drilling, but these numbers should cover 80 percent of all equipment operating out there.
The restriction of putting a piston-style mud pump onto drilling rigs has always been the physical size and weight to provide adequate flow and pressure to your drilling fluid. Because of this, the industry needed a new solution to this age-old issue.
Enter Cory Miller of Centerline Manufacturing, who I recently recommended for recognition by the National Ground Water Association (NGWA) for significant contributions to the industry.
As the senior design engineer for Ingersoll-Rand’s Deephole Drilling Business Unit, I had the distinct pleasure of working with him and incorporating his Centerline Mud Pump into our drilling rig platforms.
In the late ’90s — and perhaps even earlier — Ingersoll-Rand had tried several times to develop a hydraulic-driven mud pump that would last an acceptable life- and duty-cycle for a well drilling contractor. With all of our resources and design wisdom, we were unable to solve this problem. Not only did Miller provide a solution, thus saving the size and weight of a typical gear-driven mud pump, he also provided a new offering — a mono-cylinder mud pump. This double-acting piston pump provided as much mud flow and pressure as a standard 5 X 6 duplex pump with incredible size and weight savings.
The true innovation was providing the well driller a solution for their mud pump requirements that was the right size and weight to integrate into both existing and new drilling rigs. Regardless of drill rig manufacturer and hydraulic system design, Centerline has provided a mud pump integration on hundreds of customer’s drilling rigs. Both mono-cylinder and duplex-cylinder pumps can fit nicely on the deck, across the frame or even be configured for under-deck mounting. This would not be possible with conventional mud pump designs.
Centerline stuck with their original design through all of the typical trials and tribulations that come with a new product integration. Over the course of the first several years, Miller found out that even the best of the highest quality hydraulic cylinders, valves and seals were not truly what they were represented to be. He then set off on an endeavor to bring everything in-house and began manufacturing all of his own components, including hydraulic valves. This gave him complete control over the quality of components that go into the finished product.
The second generation design for the Centerline Mud Pump is expected later this year, and I believe it will be a true game changer for this industry. It also will open up the application to many other industries that require a heavier-duty cycle for a piston pump application.

A: Well drilling completion times vary from a half day to three days or longer. Drilling time is affected by many factors including time to set up, difficult drilling formations and weather. All of these factors vary from site to site and well to well. These are also factors that we have no control over. In addition, the time it takes to develop each well is different. Because of these variables there is no way for us to give a fixed time for well completion.
Q: Yes. Artesian and Floridan Aquifer wells are permitted in your area. They can be drilled for several different purposes(home use, geothermal, irrigation, etc.). PWD drills many Floridan Aquifer wells and keeps a record of each one. Call our office for more information on Floridan Aquifer wells in your area.
A: Florida is fortunate to have one of the most porductive aquifers in the world, the Floridan Aquifer. When drilling a Floridan Aquifer well, PWD can guarantee the quantity of water the well will produce.
Unlike Floridan Aquifer wells, shallower wells access aquifers that have unpredictable characteristics. PWD will guarantee a minimum of 10 gallons per minute from wells other than Floridan Aquifer wells.
A: PWD has over 100 years of records of wells drilled in Northeast Florida. With your property address, we consult our records to see what wells are availble in your area.Floridan Aquifer wells are availble in all areas of Notheast Florida.
A: “Salt & Pepper” wells, or Intermediate wells are normally 3″ or 4″ in diameter and are drilled to depths of 220-320 feet. At this depth water is withdrawn from a aquifer that consist of clays and sands that resemble salt & pepper.
A: Part of the drilling process includes removing cuttings from the borehole we drill during well construction. To contain & dispose of the cuttings we usually dig two pits beside the drilling rig. These pits vary in size based on well size & depth. Generally they are +/- 3ft wide x 6ft long x 4ft deep. Drilling fluid is circulated through the pits where the cuttings settle out and the drilling fluid is reused. We will cover the pits when the well is complete.. For a period of time the covered pits will be soft.
If you do not want pits dug in your yard there is a solution. We can use portable above grade pits instead of digging the pits. When we use the above ground pits we also bring a vacuum tank to remove all of the drill cuttings and fluid from your yard. This does require an additional crew member, an additional truck, the vacuum tank to dispose of fluid and drill cuttings off site, therefore there is a charge for this service. We will be glad to price this service for you upon request.
A: Wells that “go dry” are generally shallow/surficial wells that are less than 50′. These wells depend on rainfall to replenish the water table. Partridge Well drills wells that are usually deeper and penetrate a confined aquifer. This means that our wells are not directly dependent on rainfall. The water level may rise and fall in these wells, but they do not go dry.
In cases where the power is lost or is not available and a pump is required to pull the water out of the well, PWD can install a pitcher pump or hand pump(pictured to the right) to access the water without power.
A: It is your choice. We have to mix a drilling mud for the drilling process and dispose of it when we are finished The mud(shown in this picture to the right) is composed of water, sand, and clay. Typically we pump this mud onto the property where the well is drilled. However, we do offer an upgrade where we can use a special truck to contain the drill mud and remove it from your property.
Drilling a well by hand is a lot of work, but it can be done with the right equipment. Whether you’re looking to drill a shallow or deep well, this skill is perfect for those seeking self-reliance.
Wells are normally drilled on private land where city or rural water isn’t available. It’s possible to hire a licensed professional to provide this service but you can expect to spend several thousand dollars. If you want to save money, you can do it yourself, but prior to getting started, you need to research local regulations.
Each state or county will have its own list of requirements and regulations. These can be found online or at your county courthouse. When asking about these regulations, make sure you explain that you will be drilling the well yourself and on your own land.
Once you receive a green light to move forward, it’s time to learn more about your land. Go to thecounty agriculture extension office to find out what soil type you have. This could include sand, clay, rock, or a combination.
The local courthouse may also have well drilling logs from professional well drillers. These will include things like when they hit first water, what type of soil condition they encountered, and how deep they drilled the well. This could be helpful information but do remember that every property is different. The very first step might be determining how deep you need to drill.
On most North American homesteads, water is typically present about anywhere you would dig, though in some areas that depth will be deeper than others.
Things to consider when choosing a well location are: convenience, a power source, and location. It’s very important the well be uphill from any septic system or barn runoff.
The final thing to do before drilling is to contact utility companies to make sure you don’t hit any underground pipes or lines. Sometimes this information can be found on your original land plot, but it’s always good to double-check.
Drilling a shallow well is a pretty simple task, going down about 25 feet or so when you hit first water (at least in my location). This type of well could be drilled in a weekend by hand using a general purpose, extendable post-hole auger.
This type of well can be cased off with a manual pump and used for irrigation. This would be more of an emergency setup that could also provide water needs at a weekend cabin in the countryside.
Shallow wells have a difficult time keeping up with average water usage. It’s estimated each person uses between 80 and 100 gallons of water a day. Imagine storing 20, 5-gallon jugs a day per person.
The majority of our water usage comes from flushing toilets and bathing. If you multiply that by a family of four, it’s easy to understand you would need a deeper well to keep up with demand.
Professional well diggers will often recommend a depth of 200 feet or more, but remember, for hundreds of years every well in this country was hand-dug and that’s how people survived.
Also remember, licensed well diggers get paid by the foot, so sometimes they drill further than they have to. So, if you decide to hire this out, do your research and make sure to write down where first water is normally hit in your area. And keep in mind that first water may not be the best, can dry up in some years, or may not be able to keep up with demand; all of these things need to be considered.
A pneumatic drill is like a giant eggbeater driven by compressed air. This tool can drill a 200-foot well in a matter of days or weeks, depending on the soil type, and can be purchased online.
In addition to the drill, you’ll also need a very powerful air compressor to run the equipment. These can easily cost two or three times as much as the drill. A couple of ways to keep costs down include purchasing a used compressor, or purchasing a new one and then after the project is completed, selling the almost-new equipment for a few hundred dollars less than what you paid.
You can choose between, gas, diesel or electric-powered compressors. An electric compressor will cost you less to run and be more dependable. We chose a compressor powered by gas because our well project was several miles away from the homesite.
This brings us to the drill setup. This will require a day of planning before drilling begins. Most home improvement stores will carry almost everything you need.
Step 1: After purchasing the necessary supplies and choosing the drill location, begin digging the main drill hole with an auger or post-hole digger. Dig about 4 or 5 feet. Then, if necessary, cut the 8-inch PVC to fit the hole, allowing 4 inches to stick above ground. In the side of the PVC pipe aligned with the settling pond (see Step 2), drill a hole large enough to insert the 2-inch connecting PVC pipe.
Step 2: Dig a shallow settling pond 10 feet behind the well, no less than 4 feet across. Then dig a shallow 8-inch ditch connecting the pond to the well hole. Connect these spaces with 2-inch PVC pipe and cover. This pipe will transfer clean water from the pond to the drill hole. The pipe opening in the pond will need covering with netting so debris doesn’t flow back into the well.
Step 3: Insert the 55-gallon drum at the edge of the pond, secure with stakes, and face the opening toward the well. The drum catches water from the well and empties into the pond where clean water will flow from the pipe back into the well.
Step 4: Attach 1-inch PVC pipe to the pneumatic drill using PVC glue and secure with duct tape to prevent leaks. Use a marker every 5 to 10 feet so you can keep track of how far down you have drilled. Rest the other end of attached PVC pipe in the 55-gallon drum. While the drill is running, mud and water will enter the pipe through small holes above the drill and be pushed up by the compressed air, traveling through the pipe into the drum and settling pond to be cycled back into the well hole.
Step 5: The air compressor will need to be set up and connected to the drill. Use duct tape to secure the air hose to the PVC pipe to keep it out of the way while drilling.
Note: Depending on your soil type, you may not need the 8-inch PVC. Our soil, for example, is hard clay and stable enough to keep the hole from collapsing without the pipe.
Drilling a well with this tool can take anywhere from 15 hours to weeks depending on the soil type, so make sure a chair is handy and you’re working with at least three people. One to operate the compressor, another to drill, and a third for breaks.
The air supply to the drill should never be turned off while the drill is underwater. If this happens, you’ll have to stop drilling and clean the motor before starting back up. This can take time and delay progress, which means it’s important that your drill team understands the process from start to finish.
Begin by filling the well hole with water. Turn the drill on before inserting, and then begin drilling. The bit will drill through all soil types, but when it hits clay or rock the process will slow down. Don’t get frustrated, just keep drilling and, before you know it, first water will be hit.
Move the drill in an up, down, and side-to-side motion as this will help the drill drive through the soil. The motion should be constant but not forceful; the drill will do the work. When you reach the point of needing to add more pipe, pull the running drill from the hole and, once it’s out of the water, turn the air pressure off. As you add pipe, secure each addition with PVC glue.
Add the next several feet of pipe and start again. Once the desired depth is reached, it’s time to case off the well. Casing is a matter of inserting SDR 35 pipe and securing in place with pea gravel and concrete. To do so, drill a hole through both sidewalls of the first piece of pipe, 2 or 3 inches from the bottom so you can attach the rope to lower the pipe into the well. When the top of the pipe is even with the ground, apply PVC glue and attach the next piece of pipe. Let dry for 15 minutes and then continue to lower down and add pieces as you go to meet the depth of the well. The last piece of pipe will be cut about 3 feet above ground level and capped off.
Pour pea gravel between the casing and the dirt. Next, mix the concrete and pour between the ground and casing. This will prevent the well from becoming contaminated from runoff. Once this is complete and you’ve added a well pump, you’ll need to run the well for a couple of days until the water is clear, and it’s always a good idea to get the water tested before using it for drinking.
Drilling a well can be a long process, but if you can save money and learn a new skill at the same time, why not give it a try? It’s a matter of getting back to basics and doing more for yourself.
Carole West is a freelance writer, photographer, author, and founder of the blog Garden Up Green. She lives in the north Texas countryside with her husband, Robert. They live a peaceful life where they spend most of their time establishing Quail Grove, a tiny homestead community.
Whether you live in a rural area or simply prefer getting your water from a private source, installing a well on your property has numerous benefits. You won’t have to pay a monthly water bill, and you’ll have some control over your water’s mineral and chemical contents. However, drilling deep enough to access clean water can be expensive, and you’ll need to store and purify the water once it gets to the surface.
On average, drilling a water well costs$3,500–$15,000, depending on several geological and technological factors. You may be able to dig a shallow well yourself, but it’s best to hire a professional contractor for a well that will provide water for an entire home. This guide outlines the well installation process and its costs.
Though $3,500 to $15,000 is a wide range, it’s hard to narrow it down without knowing the specifics of your property. The cost of your project depends on the following factors.
The deeper you need to dig, drill, or drive, the longer the job will take and the more labor it will require. Most residential wells need to be at least 50 feet deep and have an average depth of 300 feet, but how far you need to drill to hit water depends on geographic factors. Accessing state and local geological surveys and learning about existing wells in your area will give you a better idea of the depth you’ll need. The table below includes price ranges for various depths.
Shallow, residential water wells are the least expensive to dig or drill. Sand point wells, which are shallow and can be driven by hand or machine, are similarly inexpensive but don’t usually provide a home’s entire water needs. Geothermal wells are relatively inexpensive on their own, but installing one costs tens of thousands of dollars.
Artesian wells that drill into an aquifer are more costly to drill but less expensive to run. Irrigation wells are the most expensive because they handle the highest volume of water, though residential irrigation is much less pricey than commercial irrigation.
Digging is the least expensive way to create a well, but it’s limited to about 100 feet in depth. Digging can also be thwarted by highly compacted or rocky soil. You can create a shallow well of up to 50 feet by driving a small-diameter pipe into the ground and removing the soil from inside. However, most residential-scale well projects require a drill to excavate.
Modern well systems consist of much more than a hole in the ground and a bucket on a rope. Here are some mechanical components that go into a working water well.
Well-casing pipe supports and protects the well’s walls, so it needs to be sturdy. This pipe is typically made from polyvinyl chloride (PVC), the most affordable option ($6–$10 per linear foot). Galvanized or stainless steel casing is also available for a premium ($30–$130 per foot). Steel may be necessary for earthquake-prone areas, as it’s much less susceptible to cracking and breaking. Casing pipe costs $630–$2,400 depending on its length.
Most wells need electrical wiring to operate the pump and pressure switch. These components aren’t expensive ($50–$150), but a licensed electrician needs to install them, costing $150–$500.
Some people assume that well water is cleaner than municipal water, but municipal water goes through a strict treatment process that water from private wells doesn’t. If you’re using a well for drinking water or other residential applications, you’ll need a purification system to rid the water of contaminants before you can use it. Whole-home water treatment systems cost $500–$3,000, plus another $200–$400 for installation.
Once the water is brought to the surface and purified, it needs to be stored and pressurized so you can use it in your home. A 2-gallon water tank can cost as little as $100, but if you’re going to use well water for most of your needs, you’ll probably need a large pressure tank that costs between $1,400 and $2,400.
One of the most critical parts of the well system is thewater pump, which brings groundwater to the surface. A hand pump for a shallow well can cost as little as $150–$500, but most electronic pumps cost between $300 and $2,000, depending on how powerful they are. A shallow well can sometimes use an aboveground surface pump, but a deep well usually requires a powerful, more expensive submersible pump that sits below the water line and pushes the water up. Some artesian wells can get away without using a pump system since the groundwater is already under pressure and may be pushed to the surface naturally.
Your location determines your climate, water table depth, and type and condition of the bedrock. It will also affect labor costs. For example, Florida is a relatively inexpensive place to dig a well because it has a high water table and an average cost of living. The price is higher in desert states like California, Texas, and Arizona.
You’ll need to check with your state and local government about permits for any project that involves digging in the ground. Permits can cost anywhere from $5 to $500 depending on where you live, but a well drilling company can help you determine which ones you need.
The farther a well is located from your house, the more expensive materials and labor will be. You’ll require longer pipes and electric lines, usually at an additional cost of $50–$150 per linear foot.
Drilling an existing well deeper is less expensive than installing an entirely new well. Redrill fees are usually $300–$600, and a professional can typically complete the job in a day.
Dry and rocky soil conditions, as well as dense bedrock or heavy clay, can make well drilling more difficult and thus more expensive. You may require heavy or specialized machinery, which can add up to 150% of the base price to your total.
Before drinking water from your well, you’ll want to test its quality to make sure it’s safe. Do-it-yourself (DIY) water testing kitsare available for $50–$150, but if this is going to be your home’s primary water supply, you should hire a pro. This can cost between $100 and $500, but it’s well worth checking for the presence of viruses, bacteria, fungi, heavy metals, radon, pesticides, and other contaminants.
If you’re installing a well to live off the grid, you’ll also need a way of dealing with wastewater that doesn’t involve hooking up to the municipal water system. Many professional well drillers can install a well and septic system at the same time, which will save you money on labor. Aseptic tank installationcosts $2,000–$7,000 on its own or $5,000–$22,000 when combined with a well system.
One benefit of installing your own well is that you’ll no longer need to pay municipal water bills. You’ll only need to pay for the electricity to operate the pump (about $3–$4 per month), plus maintenance costs of $100–$250 per year. Compared to a monthly utility bill of $20–$40, you can save up to $500 a year.
It’s possible to install a well yourself, but it’s more complicated than digging or drilling a hole in the ground. Here’s what you can expect from the process, whether you do it yourself or hire a professional.
Well installation professionals have the tools and experience to drill plus install the casing, pump, well cap, and other hardware. They also know how to adjust the process if they encounter anything unexpected under the soil and can help you apply for permits. You’ll pay at least $1,500 in labor costs on top of the well equipment and may pay $10,000 or more for deep wells in poor soil conditions.
Digging or driving a shallow well in an area with a high water table is within the capability of dedicated DIYers. However, you must ensure you go deep enough to get to truly clean water beneath the contaminated runoff in the upper layers of soil. These shallow, driven wells also provide a limited water supply. You can rent a drill rig for $600–$800 per day for larger, deeper wells, but this will only give you the borehole; you’ll also have to install all the hardware yourself.
Wells require maintenance and occasionally require repair. Here are signs that you may need a professional well company to do an assessment. You may only have to pay a service fee if yourhome warranty covers well pumpsor well systems.
Drilled or dug wells can last as long as the walls hold up, but the equipment that runs them usually needs to be replaced every 20–30 years. The pump may fail, or the casing pipe may develop leaks. Replacements can cost up to $10,000 in materials and labor. You can extend your equipment’s lifespan by performing regular checks and maintenance or by hiring a well company to do these for you.
It’s also possible for a well to run dry. This isn’t likely or always permanent since aquifers and other sources may need time to fill back up. A well may fill with sediment over time, which will need to be pumped and cleaned out. In rare cases, you may need to dig deeper or find a different fracture to regain water flow.
It’s widely claimed that having a functional well will raise your property value, but there’s no data on how much of a return on investment (ROI) you can expect. The consensus is that a well that yields drinking water will add more value than an irrigation well, but a nonfunctional or contaminated well will be a liability. Wells are generally more valuable in rural areas or where people want to live off the grid.
Research your yard’s soil and the depth you’ll need to drill before purchasing a DIY well drilling kit. Just because the kit can go 100 feet into the ground doesn’t mean you’ll hit clean water.
It’s important to acknowledge that many DIY well drilling kits are sold within the “doomsday prepper” market. These kits are unlikely to be sufficient if you intend to use your well to fulfill most or all of your residential water needs. You’re better off at least consulting with local professionals who will know about your area’s geological features and water levels before starting the project. These professionals can help you make informed decisions about well installation.
A properly installed well can save you money on your utility bills and provide a private, unmetered water source. Make sure to budget for the drilling of the actual borehole and the equipment needed to pump and store the water, as well as water testing and purification if you intend to drink it. Your system should last for many years once it’s set up.
It can be worth it to install a well, depending on your needs and budget. Drilling a private well is a large investment, but if you live in a rural area or an area with poor water quality, it could increase your property value. Consult with local professionals before beginning to drill or dig.
The average well installation cost is $3,500–$15,000, including drilling and the casing, pump, and storage tank. Price can also depend on the depth of the borehole, ranging between $25 and $65 per foot.
The cost to hook a well up to a home’s plumbing system depends on the machinery used to pump and carry the water. Piping and electrical lines cost $50–$150 per foot, a purification system costs $300–$5,000, and a pressurized storage tank costs $1,400–$2,400.
The time it takes to install a well depends on its depth and the conditions of the soil and bedrock, but drilling can usually be completed in a day or two. Installing the pump system takes another day. After that, it depends on how long and extensive the pipes and electrical system need to be. The whole process should take about a week.
This is our new Terragrinder deluxe ready-to-drill kit! It contains everything you need to buy from us to drill your well, and it is available now for only a fraction of the cost of other well drilling kits on the market!

Explore the various water well drills with mud pump products available for wholesale at Alibaba.com. Get a water well drills with mud pump for drilling water wells, water exploration holes, geological exploration, coal mines, and other kinds of mining. Some water well drills with mud pump options use caterpillar tread to move. Others use rubber tires, while others require a separate means of transport. Caterpillar tread propulsion can climb up to 25 degrees inclination. Some products in the range are capable of drilling over 200 meters, while others are only used for open-pit mining with depths of around 3 meters. Drilling can be done vertically downwards, horizontally, or in a slanting direction. Drilling speed depends on the power of the machine and the general hardness of the surface. The hole diameter can vary from 90mm to 200mm.
water well drills with mud pump options also include an air compressor, a mud pump, drilling rods of various sizes, connectors, and a drilling tower. Drilling is done using drill bits of various shapes, sizes, and compositions. You can choose between diamond bits, alloy ring-shaped bits, 3-wing alloy bits, PDC bits, and hammer bits. Each drill bit uses different drilling methods, including rotary, percussion, blast hole, and core drilling.
Smaller products have a lifting power of around 25 kilonewtons and weigh about 2,500kgs. They’re ideal for small-scale drillings such as farms and homes. Larger ones are faster with more power, making them ideal for commercial use. Browse through Alibaba.com and find a water well drills with mud pump that’s ideal for your work scope. Buy mine drilling rigs for your wholesale business at competitive prices. Chinese wholesalers provide you with customization options and great after-sales services.


 8613371530291