
drill your own well mud pump quotation

Whether you live in a rural area or simply prefer getting your water from a private source, installing a well on your property has numerous benefits. You won’t have to pay a monthly water bill, and you’ll have some control over your water’s mineral and chemical contents. However, drilling deep enough to access clean water can be expensive, and you’ll need to store and purify the water once it gets to the surface.
On average, drilling a water well costs$3,500–$15,000, depending on several geological and technological factors. You may be able to dig a shallow well yourself, but it’s best to hire a professional contractor for a well that will provide water for an entire home. This guide outlines the well installation process and its costs.
Though $3,500 to $15,000 is a wide range, it’s hard to narrow it down without knowing the specifics of your property. The cost of your project depends on the following factors.
The deeper you need to dig, drill, or drive, the longer the job will take and the more labor it will require. Most residential wells need to be at least 50 feet deep and have an average depth of 300 feet, but how far you need to drill to hit water depends on geographic factors. Accessing state and local geological surveys and learning about existing wells in your area will give you a better idea of the depth you’ll need. The table below includes price ranges for various depths.
Shallow, residential water wells are the least expensive to dig or drill. Sand point wells, which are shallow and can be driven by hand or machine, are similarly inexpensive but don’t usually provide a home’s entire water needs. Geothermal wells are relatively inexpensive on their own, but installing one costs tens of thousands of dollars.
Artesian wells that drill into an aquifer are more costly to drill but less expensive to run. Irrigation wells are the most expensive because they handle the highest volume of water, though residential irrigation is much less pricey than commercial irrigation.
Digging is the least expensive way to create a well, but it’s limited to about 100 feet in depth. Digging can also be thwarted by highly compacted or rocky soil. You can create a shallow well of up to 50 feet by driving a small-diameter pipe into the ground and removing the soil from inside. However, most residential-scale well projects require a drill to excavate.
Modern well systems consist of much more than a hole in the ground and a bucket on a rope. Here are some mechanical components that go into a working water well.
Well-casing pipe supports and protects the well’s walls, so it needs to be sturdy. This pipe is typically made from polyvinyl chloride (PVC), the most affordable option ($6–$10 per linear foot). Galvanized or stainless steel casing is also available for a premium ($30–$130 per foot). Steel may be necessary for earthquake-prone areas, as it’s much less susceptible to cracking and breaking. Casing pipe costs $630–$2,400 depending on its length.
Most wells need electrical wiring to operate the pump and pressure switch. These components aren’t expensive ($50–$150), but a licensed electrician needs to install them, costing $150–$500.
Some people assume that well water is cleaner than municipal water, but municipal water goes through a strict treatment process that water from private wells doesn’t. If you’re using a well for drinking water or other residential applications, you’ll need a purification system to rid the water of contaminants before you can use it. Whole-home water treatment systems cost $500–$3,000, plus another $200–$400 for installation.
Once the water is brought to the surface and purified, it needs to be stored and pressurized so you can use it in your home. A 2-gallon water tank can cost as little as $100, but if you’re going to use well water for most of your needs, you’ll probably need a large pressure tank that costs between $1,400 and $2,400.
One of the most critical parts of the well system is thewater pump, which brings groundwater to the surface. A hand pump for a shallow well can cost as little as $150–$500, but most electronic pumps cost between $300 and $2,000, depending on how powerful they are. A shallow well can sometimes use an aboveground surface pump, but a deep well usually requires a powerful, more expensive submersible pump that sits below the water line and pushes the water up. Some artesian wells can get away without using a pump system since the groundwater is already under pressure and may be pushed to the surface naturally.
Your location determines your climate, water table depth, and type and condition of the bedrock. It will also affect labor costs. For example, Florida is a relatively inexpensive place to dig a well because it has a high water table and an average cost of living. The price is higher in desert states like California, Texas, and Arizona.
You’ll need to check with your state and local government about permits for any project that involves digging in the ground. Permits can cost anywhere from $5 to $500 depending on where you live, but a well drilling company can help you determine which ones you need.
The farther a well is located from your house, the more expensive materials and labor will be. You’ll require longer pipes and electric lines, usually at an additional cost of $50–$150 per linear foot.
Drilling an existing well deeper is less expensive than installing an entirely new well. Redrill fees are usually $300–$600, and a professional can typically complete the job in a day.
Dry and rocky soil conditions, as well as dense bedrock or heavy clay, can make well drilling more difficult and thus more expensive. You may require heavy or specialized machinery, which can add up to 150% of the base price to your total.
Before drinking water from your well, you’ll want to test its quality to make sure it’s safe. Do-it-yourself (DIY) water testing kitsare available for $50–$150, but if this is going to be your home’s primary water supply, you should hire a pro. This can cost between $100 and $500, but it’s well worth checking for the presence of viruses, bacteria, fungi, heavy metals, radon, pesticides, and other contaminants.
If you’re installing a well to live off the grid, you’ll also need a way of dealing with wastewater that doesn’t involve hooking up to the municipal water system. Many professional well drillers can install a well and septic system at the same time, which will save you money on labor. Aseptic tank installationcosts $2,000–$7,000 on its own or $5,000–$22,000 when combined with a well system.
One benefit of installing your own well is that you’ll no longer need to pay municipal water bills. You’ll only need to pay for the electricity to operate the pump (about $3–$4 per month), plus maintenance costs of $100–$250 per year. Compared to a monthly utility bill of $20–$40, you can save up to $500 a year.
It’s possible to install a well yourself, but it’s more complicated than digging or drilling a hole in the ground. Here’s what you can expect from the process, whether you do it yourself or hire a professional.
Well installation professionals have the tools and experience to drill plus install the casing, pump, well cap, and other hardware. They also know how to adjust the process if they encounter anything unexpected under the soil and can help you apply for permits. You’ll pay at least $1,500 in labor costs on top of the well equipment and may pay $10,000 or more for deep wells in poor soil conditions.
Digging or driving a shallow well in an area with a high water table is within the capability of dedicated DIYers. However, you must ensure you go deep enough to get to truly clean water beneath the contaminated runoff in the upper layers of soil. These shallow, driven wells also provide a limited water supply. You can rent a drill rig for $600–$800 per day for larger, deeper wells, but this will only give you the borehole; you’ll also have to install all the hardware yourself.
Wells require maintenance and occasionally require repair. Here are signs that you may need a professional well company to do an assessment. You may only have to pay a service fee if yourhome warranty covers well pumpsor well systems.
Drilled or dug wells can last as long as the walls hold up, but the equipment that runs them usually needs to be replaced every 20–30 years. The pump may fail, or the casing pipe may develop leaks. Replacements can cost up to $10,000 in materials and labor. You can extend your equipment’s lifespan by performing regular checks and maintenance or by hiring a well company to do these for you.
It’s also possible for a well to run dry. This isn’t likely or always permanent since aquifers and other sources may need time to fill back up. A well may fill with sediment over time, which will need to be pumped and cleaned out. In rare cases, you may need to dig deeper or find a different fracture to regain water flow.
It’s widely claimed that having a functional well will raise your property value, but there’s no data on how much of a return on investment (ROI) you can expect. The consensus is that a well that yields drinking water will add more value than an irrigation well, but a nonfunctional or contaminated well will be a liability. Wells are generally more valuable in rural areas or where people want to live off the grid.
Research your yard’s soil and the depth you’ll need to drill before purchasing a DIY well drilling kit. Just because the kit can go 100 feet into the ground doesn’t mean you’ll hit clean water.
It’s important to acknowledge that many DIY well drilling kits are sold within the “doomsday prepper” market. These kits are unlikely to be sufficient if you intend to use your well to fulfill most or all of your residential water needs. You’re better off at least consulting with local professionals who will know about your area’s geological features and water levels before starting the project. These professionals can help you make informed decisions about well installation.
A properly installed well can save you money on your utility bills and provide a private, unmetered water source. Make sure to budget for the drilling of the actual borehole and the equipment needed to pump and store the water, as well as water testing and purification if you intend to drink it. Your system should last for many years once it’s set up.
It can be worth it to install a well, depending on your needs and budget. Drilling a private well is a large investment, but if you live in a rural area or an area with poor water quality, it could increase your property value. Consult with local professionals before beginning to drill or dig.
The average well installation cost is $3,500–$15,000, including drilling and the casing, pump, and storage tank. Price can also depend on the depth of the borehole, ranging between $25 and $65 per foot.
The cost to hook a well up to a home’s plumbing system depends on the machinery used to pump and carry the water. Piping and electrical lines cost $50–$150 per foot, a purification system costs $300–$5,000, and a pressurized storage tank costs $1,400–$2,400.
The time it takes to install a well depends on its depth and the conditions of the soil and bedrock, but drilling can usually be completed in a day or two. Installing the pump system takes another day. After that, it depends on how long and extensive the pipes and electrical system need to be. The whole process should take about a week.

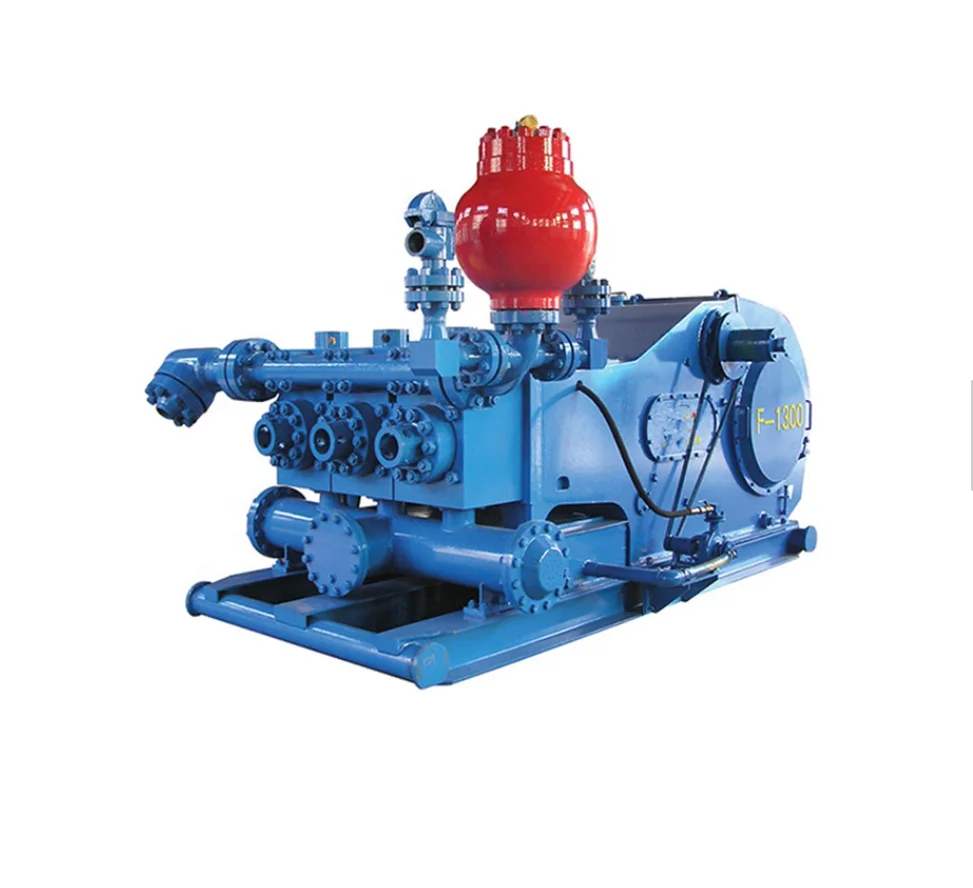
If you are supplying pump supplies, you can find the most favorable prices at Alibaba.com. Whether you will be working with piston type or diaphragm type systems, reciprocating or centrifugal, Alibaba.com has everything you need. You can also shop for different sizes drilling mud pump price wholesale for your metering applications. If you operate a construction site, then you could need to find some concrete pump solutions that you can find at affordable rates at Alibaba.com. Visit the platform and browse through the collection of submersible and inline pump system, among other replaceable models.
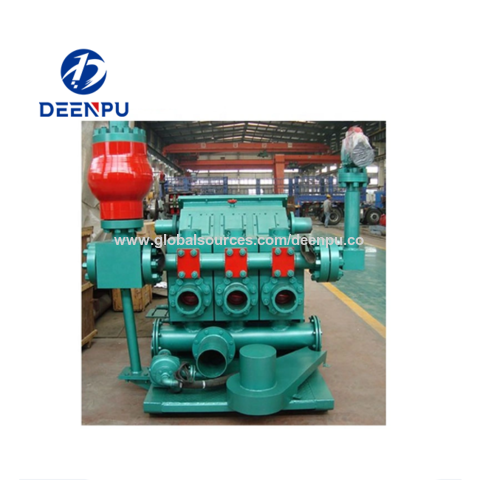
A drilling mud pump price comes in different makes and sizes, and you buy the tool depending on the application. The pump used by a filling station is not the one you use to fill up your tanks. There are high flow rate low pressure systems used to transfer fluids axially. On the other hand, you can go with radial ones dealing with a low flow rate and high-pressure fluid. The mixed flow pump variety combines radial and axial transfer mechanisms and works with medium flow and pressure fluids. Depending on what it will be pumping, you can then choose the drilling mud pump price of choice from the collection at Alibaba.com.
Alibaba.com has been an excellent wholesale supplier of drilling mud pump price for years. The supply consists of a vast number of brands to choose from, comes in different sizes, operations, and power sources. You can get a pump for residential and large commercial applications from the collection. Whether you want a water pump for your home, or run a repair and maintenance business, and need a supply of dr drill mud pump prices, you can find the product you want from the vast collection at Alibaba.com.ther it is for refrigeration, air conditioning, transfer, or a simple car wash business, anything you want, Alibaba.com has it.

Explore the various water well drills with mud pump products available for wholesale at Alibaba.com. Get a water well drills with mud pump for drilling water wells, water exploration holes, geological exploration, coal mines, and other kinds of mining. Some water well drills with mud pump options use caterpillar tread to move. Others use rubber tires, while others require a separate means of transport. Caterpillar tread propulsion can climb up to 25 degrees inclination. Some products in the range are capable of drilling over 200 meters, while others are only used for open-pit mining with depths of around 3 meters. Drilling can be done vertically downwards, horizontally, or in a slanting direction. Drilling speed depends on the power of the machine and the general hardness of the surface. The hole diameter can vary from 90mm to 200mm.
water well drills with mud pump options also include an air compressor, a mud pump, drilling rods of various sizes, connectors, and a drilling tower. Drilling is done using drill bits of various shapes, sizes, and compositions. You can choose between diamond bits, alloy ring-shaped bits, 3-wing alloy bits, PDC bits, and hammer bits. Each drill bit uses different drilling methods, including rotary, percussion, blast hole, and core drilling.
Smaller products have a lifting power of around 25 kilonewtons and weigh about 2,500kgs. They’re ideal for small-scale drillings such as farms and homes. Larger ones are faster with more power, making them ideal for commercial use. Browse through Alibaba.com and find a water well drills with mud pump that’s ideal for your work scope. Buy mine drilling rigs for your wholesale business at competitive prices. Chinese wholesalers provide you with customization options and great after-sales services.

When choosing a size and type of mud pump for your drilling project, there are several factors to consider. These would include not only cost and size of pump that best fits your drilling rig, but also the diameter, depth and hole conditions you are drilling through. I know that this sounds like a lot to consider, but if you are set up the right way before the job starts, you will thank me later.
Recommended practice is to maintain a minimum of 100 to 150 feet per minute of uphole velocity for drill cuttings. Larger diameter wells for irrigation, agriculture or municipalities may violate this rule, because it may not be economically feasible to pump this much mud for the job. Uphole velocity is determined by the flow rate of the mud system, diameter of the borehole and the diameter of the drill pipe. There are many tools, including handbooks, rule of thumb, slide rule calculators and now apps on your handheld device, to calculate velocity. It is always good to remember the time it takes to get the cuttings off the bottom of the well. If you are drilling at 200 feet, then a 100-foot-per-minute velocity means that it would take two minutes to get the cuttings out of the hole. This is always a good reminder of what you are drilling through and how long ago it was that you drilled it. Ground conditions and rock formations are ever changing as you go deeper. Wouldn’t it be nice if they all remained the same?
Centrifugal-style mud pumps are very popular in our industry due to their size and weight, as well as flow rate capacity for an affordable price. There are many models and brands out there, and most of them are very good value. How does a centrifugal mud pump work? The rotation of the impeller accelerates the fluid into the volute or diffuser chamber. The added energy from the acceleration increases the velocity and pressure of the fluid. These pumps are known to be very inefficient. This means that it takes more energy to increase the flow and pressure of the fluid when compared to a piston-style pump. However, you have a significant advantage in flow rates from a centrifugal pump versus a piston pump. If you are drilling deeper wells with heavier cuttings, you will be forced at some point to use a piston-style mud pump. They have much higher efficiencies in transferring the input energy into flow and pressure, therefore resulting in much higher pressure capabilities.
Piston-style mud pumps utilize a piston or plunger that travels back and forth in a chamber known as a cylinder. These pumps are also called “positive displacement” pumps because they literally push the fluid forward. This fluid builds up pressure and forces a spring-loaded valve to open and allow the fluid to escape into the discharge piping of the pump and then down the borehole. Since the expansion process is much smaller (almost insignificant) compared to a centrifugal pump, there is much lower energy loss. Plunger-style pumps can develop upwards of 15,000 psi for well treatments and hydraulic fracturing. Centrifugal pumps, in comparison, usually operate below 300 psi. If you are comparing most drilling pumps, centrifugal pumps operate from 60 to 125 psi and piston pumps operate around 150 to 300 psi. There are many exceptions and special applications for drilling, but these numbers should cover 80 percent of all equipment operating out there.
The restriction of putting a piston-style mud pump onto drilling rigs has always been the physical size and weight to provide adequate flow and pressure to your drilling fluid. Because of this, the industry needed a new solution to this age-old issue.
As the senior design engineer for Ingersoll-Rand’s Deephole Drilling Business Unit, I had the distinct pleasure of working with him and incorporating his Centerline Mud Pump into our drilling rig platforms.
In the late ’90s — and perhaps even earlier — Ingersoll-Rand had tried several times to develop a hydraulic-driven mud pump that would last an acceptable life- and duty-cycle for a well drilling contractor. With all of our resources and design wisdom, we were unable to solve this problem. Not only did Miller provide a solution, thus saving the size and weight of a typical gear-driven mud pump, he also provided a new offering — a mono-cylinder mud pump. This double-acting piston pump provided as much mud flow and pressure as a standard 5 X 6 duplex pump with incredible size and weight savings.
The true innovation was providing the well driller a solution for their mud pump requirements that was the right size and weight to integrate into both existing and new drilling rigs. Regardless of drill rig manufacturer and hydraulic system design, Centerline has provided a mud pump integration on hundreds of customer’s drilling rigs. Both mono-cylinder and duplex-cylinder pumps can fit nicely on the deck, across the frame or even be configured for under-deck mounting. This would not be possible with conventional mud pump designs.
Centerline stuck with their original design through all of the typical trials and tribulations that come with a new product integration. Over the course of the first several years, Miller found out that even the best of the highest quality hydraulic cylinders, valves and seals were not truly what they were represented to be. He then set off on an endeavor to bring everything in-house and began manufacturing all of his own components, including hydraulic valves. This gave him complete control over the quality of components that go into the finished product.
The second generation design for the Centerline Mud Pump is expected later this year, and I believe it will be a true game changer for this industry. It also will open up the application to many other industries that require a heavier-duty cycle for a piston pump application.
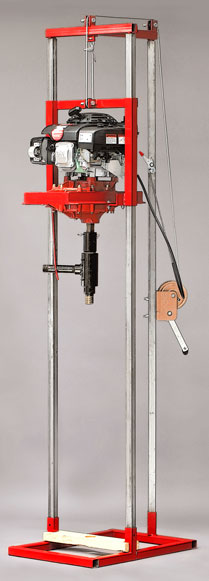
TheZX-1000 is a 16 HP Gravity Type (drilling pressure applied by the weight of the power head) portable drilling rig with many built-in standard features. It comes standard with 125" of 1-1/4" Drill Stem with wide thread machined tool joints, 2 Carbide Drill Bits (your choice of sizes), Adjustable Slip Assembly, High Capacity Water Swivel(The Key Feature, Our Own Proven Design), 12 Volt Electric Winch with Remote Control, 2X2 Mud / Trash Pump. It includes a choice of engine configurations, Import or Kohler Electric Start, and more. Please call for detailed spec sheet.
The PTO Rig is among our strongest drilling rigs, it is Fully Hydraulic, Chain Drive, 3 Point Hitch, it includes 200" of 1-1/4" Drill Stem with wide thread machined tool joints, 2 Carbide Drill Bits (your choice of sizes), Adjustable Slip Assembly (Our Own Proven Design), PTO Pump, Mud Pump, Built-In Hydraulic Resevoir, High Capacity Water Swivel(Our Own Proven Design). Please call for detailed Spec Sheet.
INSERT THE TESTIMONIAL TEXT HERE. FOR EXAMPLE:Thank you for providing such a valuable service. Your staff was extremely helpful and I am so happy with the outcome. I wish all businesses would treat their customers as you do and I will recommend you to all my associates. Thanks again for your help.
INSERT THE TESTIMONIAL TEXT HERE. FOR EXAMPLE:Thank you for providing such a valuable service. Your staff was extremely helpful and I am so happy with the outcome. I wish all businesses would treat their customers as you do and I will recommend you to all my associates. Thanks again for your help.
INSERT THE TESTIMONIAL TEXT HERE. FOR EXAMPLE:Thank you for providing such a valuable service. Your staff was extremely helpful and I am so happy with the outcome. I wish all businesses would treat their customers as you do and I will recommend you to all my associates. Thanks again for your help.
INSERT THE TESTIMONIAL TEXT HERE. FOR EXAMPLE:Thank you for providing such a valuable service. Your staff was extremely helpful and I am so happy with the outcome. I wish all businesses would treat their customers as you do and I will recommend you to all my associates. Thanks again for your help.

from http:www.drillyourownwell.com George of Fayetteville NC sent us this video which demonstrates the phenomenal success his crew had in drilling a well with a mud pump! From the Drill Your Own Well series
Greetings Tim & Charlott, below is a GPS link and information on the well we just installed in the honor of Tim & Charlott King! Your love and commitment has allowed our Clean Water 4 Life ministry to sink over 500 water wells for those in need here in the Solomon Islands! Here is a link to read my current newsletter with lots of pictures! http://www.rickrupp.com/newsletter.php
Togokoba SSEC Church & Community is approx 58 kilometers east of Honiara. It was a long bumpy drive to this village. I had to walk a long way to get to the place where they lived. They explained that their source of drinking water was the stream. They were so happy when I explained that our CW4L team was going to come sink a well right in their village. I tasted the well water several weeks later after our team had blessed them with a water well. It tasted so good! It was nice clean & cold water! It never ceases to amaze me that there is such a nice water table here in the rural areas of the Guadnacanal plains! I counted 10 houses in this community and the population is approx 80 people. Now they finally have a source of clean drinking water! These people have suffered for many years either drinking from an open hand dug well or from the stream. Togokoba SSEC Church & Community is very grateful to our CW4L sponsors.
from http:www.drillyourownwell.com George of Fayetteville NC sent us this video which demonstrates the phenomenal success his crew had in drilling a well with a mud pump! From the Drill Your Own Well series

There are many different ways to drill a domestic water well. One is what we call the “mud rotary” method. Whether or not this is the desired and/or best method for drilling your well is something more fully explained in this brief summary.
One advantage of drilling with compressed air is that it can tell you when you have encountered groundwater and gives you an indication how much water the borehole is producing. When drilling with water using the mud rotary method, the driller must rely on his interpretation of the borehole cuttings and any changes he can observe in the recirculating fluid. Mud rotary drillers can also use borehole geophysical tools to interpret which zones might be productive enough for your water well.
The mud rotary well drilling method is considered a closed-loop system. That is, the mud is cleaned of its cuttings and then is recirculated back down the borehole. Referring to this drilling method as “mud” is a misnomer, but it is one that has stuck with the industry for many years and most people understand what the term actually means.
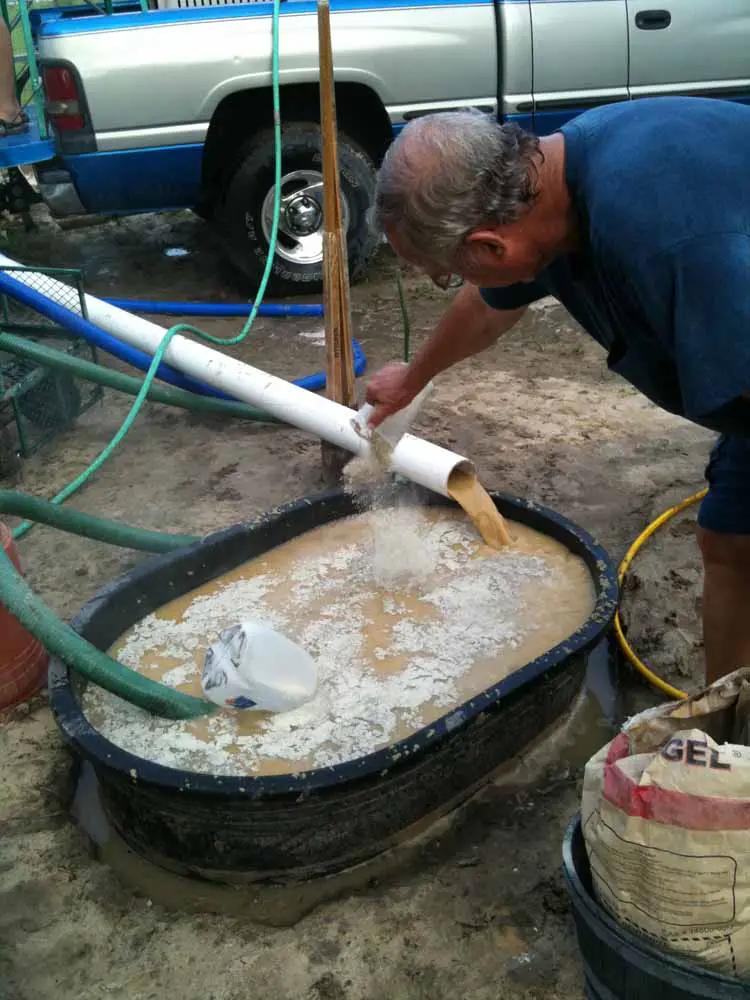
The water is carefully mixed with a product that should not be called mud because it is a highly refined and formulated clay product—bentonite. It is added, mixed, and carefully monitored throughout the well drilling process.
The purpose of using a bentonite additive to the water is to form a thin film on the walls of the borehole to seal it and prevent water losses while drilling. This film also helps support the borehole wall from sluffing or caving in because of the hydraulic pressure of the bentonite mixture pressing against it. The objective of the fluid mixture is to carry cuttings from the bottom of the borehole up to the surface, where they drop out or are filtered out of the fluid, so it can be pumped back down the borehole again.
When using the mud rotary method, the driller must have a sump, a tank, or a small pond to hold a few thousand gallons of recirculating fluid. If they can’t dig sumps or small ponds, they must have a mud processing piece of equipment that mechanically screens and removes the sands and gravels from the mixture. This device is called a “shale shaker.”
The fluid mixture must have a gel strength sufficient to support marble-size gravels and sand to the surface when the fluid is moving. Once the cuttings have been carried to the surface and the velocity of the fluid allowed to slow down, the fluid is designed to allow the sand and gravel to drop out.
The driller does not want to pump fine sand through the pump and back down the borehole. To avoid that, the shale shaker uses vibrating screens of various sizes and desanding cones to drop the sand out of the fluid as it flows through the shaker—so that the fluid can be used again.
When the borehole has reached the desired depth and there is evidence that the formation it has penetrated will yield enough water, then it’s time to make the borehole into a well.
Before the well casing and screens are lowered into the borehole, the recirculating fluid is slowly thinned out by adding fresh water as the fluid no longer needs to support sand and gravel. The driller will typically circulate the drilling from the bottom up the borehole while adding clear water to thin down the viscosity or thickness of the fluid. Once the fluid is sufficiently thinned, the casing and screens are installed and the annular space is gravel packed.
Gravel pack installed between the borehole walls and the outside of the well casing acts like a filter to keep sand out and maintain the borehole walls over time. During gravel packing of the well, the thin layer of bentonite clay that kept the borehole wall from leaking drilling fluid water out of the recirculating system now keeps the formation water from entering the well.
This is where well development is performed to remove the thin bentonite layer or “wall cake” that was left behind. Various methods are used to remove the wall cake and develop the well to its maximum productivity.
Some drillers use compressed air to blow off the well, starting at the first screened interval and slowly working their way to the bottom—blowing off all the water standing above the drill pipe and allowing it to recover, and repeating this until the water blown from the well is free of sand and relatively clean. If after repeated cycles of airlift pumping and recovery the driller cannot find any sand in the water, it is time to install a well development pump.
Additional development of the well can be done with a development pump that may be of a higher capacity than what the final installation pump will be. Just as with cycles of airlift pumping of the well, the development pump will be cycled at different flow rates until the maximum capacity of the well can be determined. If the development pump can be operated briefly at a flow rate 50% greater than the permanent pump, the well should not pump sand.
Mud rotary well drillers for decades have found ways to make this particular system work to drill and construct domestic water wells. In some areas, it’s the ideal method to use because of the geologic formations there, while other areas of the country favor air rotary methods.
Some drilling rigs are equipped to drill using either method, so the contractor must make the decision as to which method works best in your area, for your well, and at your point in time.
To learn more about the difference between mud rotary drilling and air rotary drilling, click the video below. The video is part of our “NGWA: Industry Connected” YouTube series:
Gary Hix is a Registered Professional Geologist in Arizona, specializing in hydrogeology. He was the 2019 William A. McEllhiney Distinguished Lecturer for The Groundwater Foundation. He is a former licensed water well drilling contractor and remains actively involved in the National Ground Water Association and Arizona Water Well Association.
To learn more about Gary’s work, go to In2Wells.com. His eBooks, “Domestic Water Wells in Arizona: A Guide for Realtors and Mortgage Lenders” and “Shared Water Wells in Arizona,” are available on Amazon.

Greetings Tim & Charlott, below is a GPS link and information on the well we just installed in the honor of Tim & Charlott King! Your love and commitment has allowed our Clean Water 4 Life ministry to sink over 500 water wells for those in need here in the Solomon Islands! Here is a link to read my current newsletter with lots of pictures! http://www.rickrupp.com/newsletter.php
Togokoba SSEC Church & Community is approx 58 kilometers east of Honiara. It was a long bumpy drive to this village. I had to walk a long way to get to the place where they lived. They explained that their source of drinking water was the stream. They were so happy when I explained that our CW4L team was going to come sink a well right in their village. I tasted the well water several weeks later after our team had blessed them with a water well. It tasted so good! It was nice clean & cold water! It never ceases to amaze me that there is such a nice water table here in the rural areas of the Guadnacanal plains! I counted 10 houses in this community and the population is approx 80 people. Now they finally have a source of clean drinking water! These people have suffered for many years either drinking from an open hand dug well or from the stream. Togokoba SSEC Church & Community is very grateful to our CW4L sponsors.

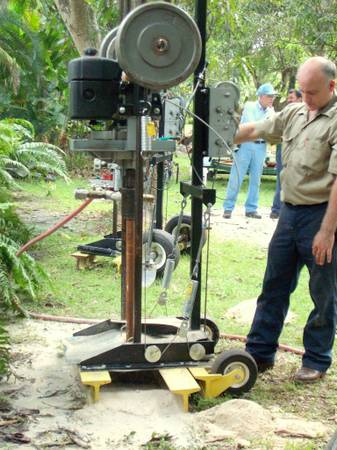
The Hydra-Drill is a small top-head rotary drilling rig powered by a 4, 5.5 or 6HP gasoline power head and a 5HP gasoline re-circulating pump ( mud pump ). The Hydra-Drill uses the method of drilling referred to as "mud rotary" drilling.
The power head engine turns the drill stem which has a drill bit screwed onto the end. As the drill bit drills down into the earth, the mud pump re-circulates a drilling fluid down the drill stem and out the drill bit.
The mud pit is a simple pit dug into the ground or made of some type of container for the purpose of settling the heavier cuttings from the drilling fluid.
After the cuttings (soil, sand, clays, etc., that are flushed up out of the bore hole) flow into the mud pit the heavier cuttings settle out of the drilling fluid and the mud pump pumps the drilling fluid back down into the bore hole to repeat this process.
In most areas the restrictions that apply to professional drillers do not apply to someone who wants to simply drill a well on his own property for his own use.
We recommend you have the water tested In most cases if the water is pumped from a natural aquifer it is pure, drinkable water but have it tested to make sure.

If you"ve chosen to move out to an undisturbed, rural location, or you"re concerned about the quality of your local municipal water and want a healthier alternative, you may be interested in digging a water well. How do you know where to get started or know what you need to do. To help you on this DIY journey, our well pump repair company in Raleigh is walking you through how to dig a well.
Every state has different guidelines and rules related to digging your own well. In North Carolina, Article 7, Chapter 87 of the General Statute outlines the Well Construction Act, and the guidelines of this law include:
Prior permission must be obtained from your local public health department, or, if it"s a 100,000 gallon a day well or are to be dug in a protected geographical area, the Environmental Management Commission needs to issue the permit.
Each county health department implements a water well permitting, inspection, and testing program, so your first step toward digging a well is reaching out to them to start the permit process.
Many people who are researching how to dig a well don"t realize how deep groundwater generally is below the surface of the earth as well as how difficult it can be to get to it. In North Carolina, most wells extend well beyond 100 feet deep and, because groundwater is filtered through silt, stone, and layers of minerals, you have to dig through all of that in order to access the groundwater in the first place. To know what you"re getting in to, it"s important to know what"s lying below the surface.
While you"re getting information about digging conditions, this is also a good time to know exactly where your septic or sewer lines are located. Contaminated groundwater can make you and your family dangerously sick, so it"s important to know exactly where the lines are located so you can dig your well at least 50 feet away from them. If you don"t feel confident where you are digging, it"s important to reach out to well drilling specialist, to ensure you don"t damage underground pipes.
This is a physically demanding, near impossible task that may be actually impossible if the soil is clay-heavy or has shallow bedrock. It involves literally pounding a length of pipe with a post digger down through the earth until it reaches the groundwater, which could be as much as 300 feet deep.
Using a pneumatic drill and an air compressor, you can literally drill through the dirt, rock, and other barriers and run as much as two or three hundred feet of PVC water pipe into the earth. This is still a long setup, sometimes taking days or even a few weeks to complete.
Because our groundwater is deep and driving a well is so challenging, we"re outlining what you"ll need to have on hand and what you"ll need to do to drill your own water well.
You may also need duct tape, measuring tape, and markers, plus equipment to keep your compressor and drill operating. Instead of buying the materials individually, you may want to purchase a DIY Well Kit which contains much of what you need except the PVC.
Using an auger or post-hole digger, dig down about five feet and cut the 8" PVC pipe to fit the hole with four inches sticking up from the ground. Next drill a 2" hole into the side of the exposed pipe and insert the 2" PVC.
Dig a shallow settling pond 10 feet away from the well that"s at least four feet wide and run an eight inch ditch connecting the pond to your well and run the 2" PVC pipe into the ditch and cover with dirt. This pipe"s job is to transfer clean water from the pipe into the drill hole.
Place the drum at the edge of the settling pond and face it toward the well. As the drum catches water from the well, it will empty into the pond and flow back in.
Attach PVC pipe to the drill and secure it to prevent leaks. and run the other end of the pipe into the 55 gallon drum. This creates a space where mud and water can empty out.
Fill your well hole with water and turn on the drill before placing it into the hole. Move the drill up, down, and horizontally to help break up the soil.
When you need to add more pipe, remove the running drill from out of the water, then turn the pressure off. Add more pipe, and continue to drill downward.
Once you get the appropriate depth, case off the well by lowering in SDR 35 pipe until it"s the full depth of the well plus 3 feet above ground. You"ll keep it in place with concrete and pea gravel to prevent runoff from contaminating your well water.
Drilling your own well can be done, but it"s a lengthy, exhaustive process that involves having to buy a large quantity of materials, and give up days or weeks of your time. Instead of doing this yourself, reach out to us for professional well drillingand well pump installation in Raleigh. With decades of experience and state-of-the-art equipment, we can tackle any well quickly and efficiently so you can enjoy clean, fresh water into your home effortlessly!

If you are a homeowner or building a home in Massachusetts or New Hampshire that has been considering installing a drilled water well to suit your home or an irrigation water well this article has been written to help you further understand the process. The first step when considering this type of project would be to gather quotes from contractors and once you have received them realizing that to most homeowners it seems like the well quotes are written in a foreign language. Do not panic this blog will help translate.
Phase one of any well drilling project is Drilling the water well. A drilled water well is constructed by drilling through the surface material into solid bedrock underground and lining the upper portion of the hole with a steel pipe which is referred to as casing. Casing must be set 10 -15′ into the bedrock by code depending on the state and 18″ above grade. If you have very sandy soil that does not hold formation like clay soils a process called mud drilling must be utilized to hold the hole open to allow the driller to seat the casing into the well. The Mud drilling process is only used to seat the casing and the pricing will mimic the casing depth. The typical average of casing depth is 20-40 feet in Massachusetts and New Hampshire but its important to understand that it is possible for the bedrock to be located deeper. In honesty i always tell my clients to prepare for 20′ best case 120′ worst case for our predominant service areas however pockets of Western, MA and South Eastern ,MA are notorious for deeper pockets of rock. Once the casing is firmly seated into bedrock by the driveshoe drilling will continue until an adequate water flow for your projects needs has been achieved.
The other terms when it comes to the drilling aspect of the project that tend to raise eyebrows are the retention pit and hydrofracturing. A retention pit is just what it sounds like a pit to retain water and drillings coming out of the well head during the drilling process. Depending on the lots layout this may or may not be necessary and typically during an initial site visit it will be understood if a pit will be needed. Hydrofracturing is the next term that due to recent issues in the oil drilling field has become a scary term to some homeowners. Water Well Hydrofracturing is a process used to clean out veins in the rock to allow water to flow freely into the well. During the drilling process the driller may notice large changes in the lithology of rock that indicate that hydrofracturing may be the best solution for achieving flow when drilling and that is when this process is recommended opposed to drilling deeper.
Phase two of a well drilling project would be the pumping system. Most Well Drillers in Massachusetts and New Hampshire start the base package off with a 1/2 hp pumping system set at up to 300′ a 20 gallon tank and up to a 50′ offset line all necessary accessories and a pitless adapter. To start off lets talk about the pumps first and foremost pumps run on curves now without getting to engineery on you this means that each pump can only be set at certain depths to preform the way you want them to. What this translates to is that if you end up with a deeper well a larger pump will be necessary to achieve the pressure you need for your system. Once the well is in place and the depth and flow have been determined your contractor will propose a final recommendation for approval based off of the prices detailed on your proposal. However this is why you will see multiple pump options on the well drillers quotation.
The first thing the pump crew will typically do when completing the pump installation is the offset line which is the electrical and water line from the well to the home. Most companies offer excavation services to dig this line or offer the homeowner the ability to supply the excavation themselves. The offset line connects to the well through an brass adapter called a pitless adapter. A pitless adapter is comprised of two pieces one connects to the water line in the offset and the other connects to the line going down the well holding the submersible pump this adapter is located 6′ under ground. The electrical line is run from the home through conduit which is a piping approved for direct burial up the side of the well casing into the well cap where the wire continues down the well attached to the water line by guides and tape to the water pump below. An item called a torque arrestor is used just before the pump within the well to hold the pump in place so that when the pump starts up it cannot slam against the sides of the well deep within the ground.
Now its time to do the inside work which includes the tank, gauge pressure switch and/orcontrollers. The offset line runs into the homes utility room in most cases where the technician will connect a pressure tank to the line. The water line is then connected to a tank T which is an adapter that goes into the water pressure tank and allows the offset line to be connected to the line that will eventually be tied into the home. In front of the pressure tank on the tee you will see two important items the gauge which will tell you the pressure of the system and the Pressure switch. The pressure switch controls the well pump and provides a signal to turn on or off the water. The water well system is now ready for final connections by the designated plumber and electrician.
We hope this blog was able to explain thecomponents of the water well system and how they relate to the quote you received from Northeast Water Wells. If you have any further questions on any certain component you will find that most of the main components and services have hyperlinks to their individual pages on our website but please do not hesitate to call with any further questions and one of our qualified specialist would be more than happy to assist you. If you have yet to receive a quote feel free to submit a contact us inquiry on the right side of this page or call into our office 1-800-562-9355. Northeast Water Wells has been providing quality water well systems to homes across Massachusetts and New Hampshire Since 1966. Thank you for reading and we hope you have a wonderful day!!

Drillers rely on the Geoprobe®/DRILLMAX® Southeast Service Center for stocking parts of a drill rig for routine rig maintenance or more extensive repairs and service to keep rigs operational.
Putting hands on controls and interacting with engineers and services technicians during water well drilling equipment factory tour provides incentive to invest in DRILLMAX® rig.
Overall power, available options, small top drive drilling rig size, and bigger jacks on latest DM250 models make slipping into lake lots , leveling up, and drilling through tough formations efficient even during frost laws.
Small DM250 outperforms larger rigs with faster rotation speed and head movement while offering easy operation and maneuverability on residential water well drilling sites.
DRILLMAX® DM450 provides remarkable power for its compact configuration. NEW rod carousel options accommodate drill pipe preference while it permits performing one-man operation.
Demand for geothermal energy has generated drilling industry growth. For many companies, geothermal drilling business is booming, while others weather fluctuations by diversifying their service lines with a single rig.
When it comes to water well drilling, a small rig doesn’t require sacrificing production. With today’s technology, small drill rigs provide just as much power – or more – than many larger rigs and offer additional business advantages.
Amplify production while allowing driller to focus on making the hole and helper to work on other job site duties with NEW options including rod carousel.
To ensure our website performs well for all users, the SEC monitors the frequency of requests for SEC.gov content to ensure automated searches do not impact the ability of others to access SEC.gov content. We reserve the right to block IP addresses that submit excessive requests. Current guidelines limit users to a total of no more than 10 requests per second, regardless of the number of machines used to submit requests.
We have a huge air compressor on the rig that blows air down the drill stem. The air comes back up the hole with enough force to move all cuttings up and out of the hole. If the well is producing water, the water will come too. Most of the time, we are actually pumping water into the air stream already, and we are really looking for an increase in the water. If we think we have hit water, we can turn off our water injection pump and check the flow of water with the air compressor alone.
There is no definite answer to this question. We are estimating the flow based on what we see flowing from the well. Sometimes, the air pressure in the well can “hold back” on the flow, causing us to underestimate the production capacity. To overcome this, we can release the air pressure for a few minutes, and then reapply it after the well has built up a large volume. We then would see the volume of water that the well produced after several minutes. Then with simple math, we can calculate the production capacity. But it is also important to understand that the well production can also vary over time. So the well may produce more or less water in the future than it does today.
We are not only looking for water. We are mainly looking for the rock that produces water. The depth of each layer of rock depends greatly on the location and elevation of the drill site. The formations are relatively flat below the surface. However, they may not be level. We use a gps to tell us the elevation of your drill site and we survey the area wells that we have drilled and compare their elevations. From this, we can estimate the depth that your well will need to be. However, we have found out on many occasions, that when God laid the foundations of the earth, He followed no rules. It is not uncommon to see formations rise or fall several hundred feet in a mile. For instance, we drill in one subdivision where the depth to the lower trinity is 760′ on one side of the road, and 840′ on the other. We can never be sure about the depth of your well until we actually drill.


 8613371530291