
overshot patterns free sample
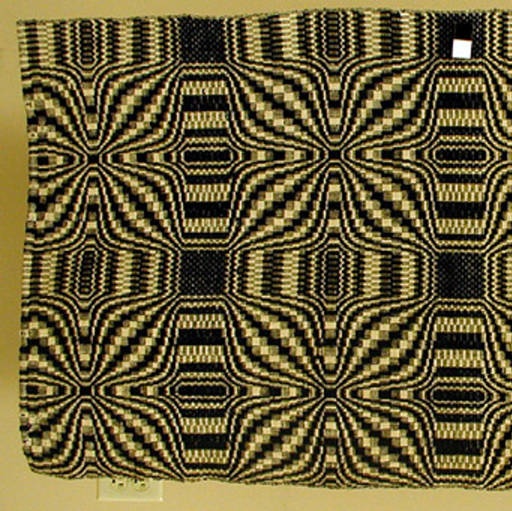
An old pattern in overshot weaving that has had many names over time: Muscadine Hills, Hickory Leaf, Blooming Leaf. The Double Bow Knot name comes from the leaf like square that forms the larger portion of the design. The dark square is called a table. #weaving #overshot #coverlet #history
With COVID-19 I lost my opportunity to demonstrate handweaving to the public by letting the new weavers try the looms for themselves, and have retreated into my studio. While being in the studio, I decided that I could once again concentrate on historic research and drafting of contemporary versions of old patterns. I discovered that many of the designs I had created earlier in my career were no longer accessible because of the software going out of production, or becoming so expensive you needed to be a production weaver to be able to afford it. I have been dedicating my free time to capturing what data I could from these drafts and I will be transferring them into a more usable format for future generations to enjoy. As I complete the task I will post them to the website. I can not list them for free, because I need to cover sample production and web hosting hosting costs.
If I offer an handwoven item in my shop for sale it is most likely to be a one of kind – if it is not, the size of the edition will be stated. I have no desire to weave long warps of the same pattern. It slows me down once I have solved the design problem, I like to move on to the next. I like efficiency, but I am far more likely to want to achieve accuracy, especially in complex structures. I have been known to weave, unweave and rethread multiple times until I get the loom to match the draft. I spend more time finding ways to warp and weave better. I am known to innovate. If someone asks me how long it took to weave this particular item, it is hard to answer directly because I have to determine if should I tell you about all of the samples I made before I achieved success. (Again, note, I am not a production weaver). What will make my hand woven gifts special is you can be certain that you will not find another one just like it anywhere. When I use my looms I use them as close to their full capability as possible. My personal patterns are complex on purpose, I have a special hand loom, a 100 shaft combination drawloom and I like to show what it can do. To purchase a handwoven piece from me, pricing includes the cost of overhead for maintaining full weaver’s studio, time spent learning about weaving, the cost of materials and fact the item is unique. Your purchase dollars support my research efforts directly. I reinvest my profit dollars into the website and new weaving history research opportunities.
I have been researching extensively for the past couple of yearsMary Meigs Atwater’s Shuttle Craft Guild – Lessons and her American Handweaving Book. Many of the documents I am working from are now in the public domain because their initial publication was 100 years ago, and are even more significant because they are her attempts to record information that was sent to her from other hand weavers throughout the United States. These items are truly meant to be preserved for the public because they came from the public. Since their initial publication, draft notation standards for these structures and patterns have changed significantly, usually it requires a bit of detailed reading to learn how to read the drafts from the manuscript.
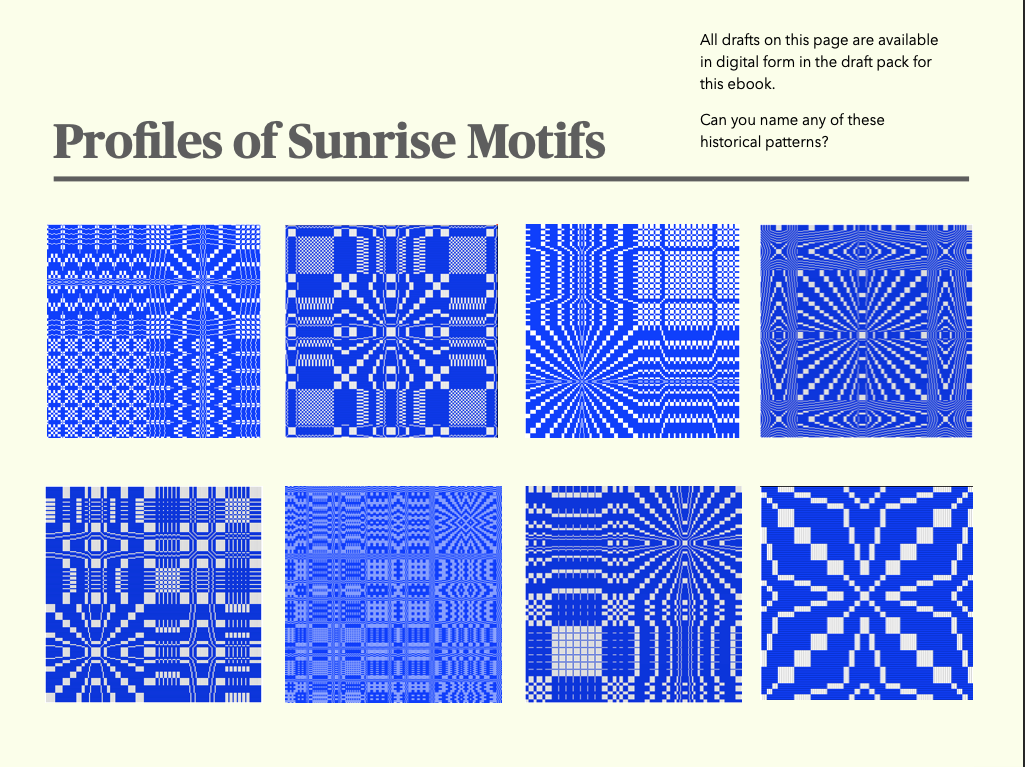
I have taken the time to record some of the larger coverlet radiating overshot pattern drafts in profile draft form making them more accessible to weavers who use drafting software. From the profile you can try different structures, colors and layouts to find a design that is pleasing to you. I have built instructions that show you how the draft is composed and how it can be modified. I would like to think of it as giving you design components more than a formal project plan. If you want the formal project plan approach use the Woven as Drawn in instructions. My goal in my presentation is to increase your understanding so that you can design your own projects and not not to restrict you to copying standardized patterns.
I added an eBook/PDF and draft package for Radiating Overshot Patterns – Sunrise, Blooming Leaf, Bow Knot and the Double Bow Knot. These designs include full drafts, profile drafts and woven as drawn-in drafts. This is the link to purchase the draft archive and the instruction ebook: https://historicweaving.com/wordpress/product/radiating-patterns-for-historic-overshot/
The Radiating Patterns ebook shows you how the drafts are related, the Draft Archive catalog details all of the profiles for easy reference to file names, and there are more than 68 drafts in the package. Included are the Lee’s Surrender, Sunrise and Blooming Leaf coverlets drafts. These drafts are the Series IV groups a,b,c and d – radiating patterns. From Mary Atwater’s original work combined with any examples I could find in digital museum collections that had no accompanying drafts with them.
I learned to weave on 8-shaft looms, so I went out and bought an eight-shaft loom, bought a book of eight-shaft patterns, and wove for several years without ever thinking about what could be done with four shafts. And then I bought a copy of Marguerite Porter Davison"s Handweaver"s Pattern Directory, full of 4-shaft loom weaving patterns, and was blown away by the possibilities. My creativity works best within parameters, so I welcomed the challenge of working with four shafts. But as I learned more about weaving, I began to see that the possibilities for creative cloth go far beyond patterning; with weave structure, color, texture, oodles of yarn choices, supplemental warps and wefts, and all the combinations thereof, I realized that four shafts present few boundaries and almost limitless possibilities. I also came to realize that some of the loveliest cloth is simple, working within one or two dimensions to produce something deeply satisfying.
There"s so much you can accomplish with just four shafts! 4-shaft loom weaving opens the door to weaving with great technique. And you won"t believe what you can accomplish: color and weave effects, twill, huck, lace, overshot and more!
In honor of the amazing, versatile four-shaft loom, we compiled four beautiful free 4-shaft loom weaving projects, available to you in this downloadable eBook. See the possibilities of 4-shaft weaving come to life with these patterns for handwoven dish towels and napkins.
Towels make an ideal format for studying different weave structures. Patterned borders and lace textures are yours for the experimenting! Practice overshot and turned monk"s belt in the two towels included in this eBook. These towels were selected from a project where a weaving study group wove a different towel every month for a year. Project includes tips for your own weaving study group!

Overshot is the most American and most Canadian of weave structures. I’m not saying that the U.S. and Canada are the only countries that can claim overshot or that they invented the structure. What I am saying is that weavers north and south took the overshot drafts brought over from Europe and made them their own.
To understand the reason for overshot’s popularity, you need to understand the weavers of pre-Industrial Revolution America and Canada. With the exception of those who worked on luxury, specialized fabrics, most weavers made household linens. The cloth needed to be strong and serviceable, and there was little room for experimentation or creativity—except, of course, for coverlets. Coverlets were functional items, but they also served the purpose of decoration. So, weavers of coverlets were free to play at the loom—and play they did.
The reason that weavers loved overshot then is much the same reason that many of us love it now—it’s a simple structure that produces complex patterning on just 4 shafts. With overshot, you can create circles, stars, flowers, and more. It’s also easy to take a draft and adjust it to create seemingly endless variations, which is exactly what happened during the 1700s and beyond. Household weavers would riff on drafts to create new designs, give them names, and then share the drafts with other weavers near and far.

Over three years ago, when my David Louet floor loom was still somewhat new to me, I wrotethis post on overshot. If you read it, you will discover that my initial relationship with overshot was not a very positive one.
The happy ending to the initial overshot sob story is that I can weave overshot now. Quite well, in fact! And I also teach it. And I happen to love it, very, very much. Don’t you love a happy ending?
I don’t think there was any particular moment where I thought to myself “I can weave overshot now!” I didn’t even weave any overshot for quite some time after that initial attempt. But slowly it tempted me back, and we started over. It was just a matter of sticking with it, employing some specific techniques and practice, practice, practice until it feels like an old friend.
My love of overshot has only increased with my more recent discovery of American Coverlets. I loved the look of the coverlets and the history behind them before I realised that so many of them were woven in the wonderfully humble 4 shaft overshot.
Now that I have quite a lot of experience weaving overshot, I want to share my best overshot tips with you in hope that you too will fall in love with this wonderful weave structure.
To weave overshot you need a warp yarn, a tabby yarn and a pattern weft yarn. Using the same yarn for warp and tabby works perfectly. For the pattern weft, I like to use a yarn that is twice the size of the tabby/warp yarn. I have experimented with using doubled strands of tabby/warp yarn in a contrasting colour, but it just doesn’t look as good. A thicker pattern yarn is the way to go.
What will the size of your item be? A miniature overshot pattern may get lost in a blanket, but may be perfect for a scarf. As a general rule, a good way to estimate the size of one repeat of your pattern just by looking at the draft is to see how many repeats are in one threading repeat. Also consider the thickness of your yarns and the sett you intend to weave.
This is a non negotiable for overshot if you want neat edges and less headaches! You get used to using floating selvedges very quickly, so don’t stress if you have no experience with them.
There are 6 treadles needed for overshot, even though you weave on 4 shafts. The two extra treadles are for the tabby weave. I always set up my pattern treadles in the centre of the loom – two on the left and two on the right. Then I set up a “left” tabby and a “right” tabby treadle. To do this on my 8 shaft loom I leave a gap between the pattern treadles and the tabby treadles so that my feet can “see” and differentiate between a pattern and tabby treadle.
I like to advance little and often. You will find your own preference or “sweet spot” for weaving, but I find that with overshot I advance a lot more frequently at a much smaller amount than I do usually.
An example of this is that I wove an overshot sampler right before Is started my main project (the throw). It was a narrow warp (around 8″) and a different overshot threading and treadling than I’m using for the project.
I personally do not use a temple. Some weavers will say they won’t weave without one. I’ve tried using a temple on many of my projects, particularly if I’m getting broken edge warp threads (signs of tension problems and too much draw in). But I will avoid using one wherever I can get away with it, and I don’t use one for weaving overshot.
This book features the original sample collection and handwritten drafts of the talented, early 20th century weaver, Bertha Gray Hayes of Providence, Rhode Island. She designed and wove miniature overshot patterns for four-harness looms that are creative and unique. The book contains color reproductions of 72 original sample cards and 20 recently discovered patterns, many shown with a picture of the woven sample, and each with computer-generated drawdowns and drafting patterns.
In this article, I focus on designing with overshot blocks in order to create flowing curves large enough to be seen at a distance. I will also discuss "weaving as overshot" which is a method of applying overshot techniques to other weave structures and, finally, finish up with some strategies for designing curves in any weave structure.
In the twill draft above, the diagonal lines are only three threads apart, which might be too subtle an effect. To make the scale of your design larger, you can use a diagonal progression of weave-structure blocks instead of individual threads. The following draft shows an example of a diagonal progression using overshot blocks on four shafts.
Overshot is a weave structure creating a plain-weave cloth with decorative supplementary weft floats. These floats lie on top of (float over) the ground cloth. If you pull out all of the pattern weft threads, you are left with a plain weave cloth formed by the warp and the tabby weft. There are never any warp floats because of the tabby weft.
Weaving software is very helpful for testing hues and values for weft yarns to use with your warp. If you choose to weave overshot with a single shuttle, choose a contrasting value to the warp for a subtle design but faster weaving.
If you put the curve in your threading, the waves travel across the fabric horizontally, in the direction of the weft. You can see this in the overshot draft below.
Another disadvantage to putting the curves in the threading is that it limits your ability to improvise curved designs organically at the loom. It"s easy to change treadling patterns during weaving. Changing the threading, however, is a much more involved process.
I learned how to make curves by studying a traditional overshot draft called Blooming Leaf (page 133 in A Handweaver"s Pattern Book by Marguerite Davison). In this draft, the treadling maintains a diagonal progression but the scale changes to make the shape "bloom" and undulate.
[Note: When I create overshot drafts, I place the first pattern block on treadle three; I like to weave the tabby picks with my left foot (alternating between treadles one and two) and use my right foot (on the remaining treadles) to weave the pattern weft and create the design.]
Now that you know how to create curves, undulations, and reflected curves, you have the tools you need to create any kind of curve or diagonal line in four-shaft overshot. For a challenge, try making a long curve followed by a short curve, like a meandering river.
The methods described above also work for overshot on six, eight, ten, or more shafts. As you add additional shafts to your design, you gain the ability to create smoother and more dramatic curves.
Below is an example of an eight-shaft overshot threading; in this case a diagonal progression with a point and mirror symmetry. My treadling in this draft is an S-shaped curve. This is just one example of the many different curves you can weave on this threading.
Because the underlying structure of overshot is plain weave, any threading which can produce plain weave can theoretically be woven as overshot, alternating tabby and pattern weft.
I wove the draft above using a 20/2 silk sett at 30 epi. I chose to sett the yarn this densely so I could weave both an overshot and twill version on the same warp. You can see the resulting cloth in the picture below.
How do I weave as overshot when my sett is more appropriate for twill? I use a tabby weft that is much finer than the warp, in this case 140/2 silk from Lunatic Fringe.
Other times I choose to weave as overshot because the floats show off the pattern-weft yarn, such as the handspun wool used as the pattern weft in the cloth below.
It is easy and fun to make up a curved treadling at the loom, especially when weaving as overshot. Even after forty-two years of weaving, I still enjoy working with long, non-repeating treadlings; watching the curves grow and change as I weave. Instead of memorizing a sequence and repeating it carefully, I watch the design and think about where I want the next curve to go.
A side benefit of weaving long, undulating curves instead of small, repeated patterns is that a small variation in a repeat will stand out, but design variations are normal in organic curves.
The drape of overshot fabric is not as fluid as that of a twill fabric. So for a scarf or shawl I might choose a structure other than overshot. Fine silk, however, has such nice drape that I can weave as overshot and still get good results.
With weaving software, it is easy to create curved overshot designs. Simply draw a freehand curve in the treadling—smoothing it out if necessary—and then add the tabby shots. Once you have the general idea from designing drafts, you can improvise new curved designs at the loom.
For other weave structures, creating a profile draft can be helpful. A profile draft is a design template that represents the woven design at one level of abstraction. To convert a profile draft into a weaving draft, you replace each block in a profile draft with the appropriate block of a given weave structure. You can, therefore, express a single profile draft in many different weave structures: overshot, summer-and-winter, Bronson lace, huck lace, double weave, etc.
I like smooth, flowing curves that are visible at a distance. So I look for structures that give me the maximum number of pattern blocks to design with. Generally I use weave structures where I have as many pattern blocks as there are shafts on my loom. On a four-shaft loom, I use crackle, overshot, advancing and network-drafted twills, advancing points, turned taqueté, rep, and shadow weave.

During the workshop, I found pickup seemed strangely familiar as my brain watched my fingers happily lifting and twisting threads for the various lace and decorative weave patterns. The other thing that my brain went “ooh this is cool!” was Overshot. It is a weave structure that requires a ground and a pattern thread, (two shuttles). One is fine like the warp and the pattern thread is thicker and usually wool. I was still reacting to wool so I used cotton for both. My original goal was to draft and weave a Viking textile for myself but I put that aside for a moment, I will get back to that later.
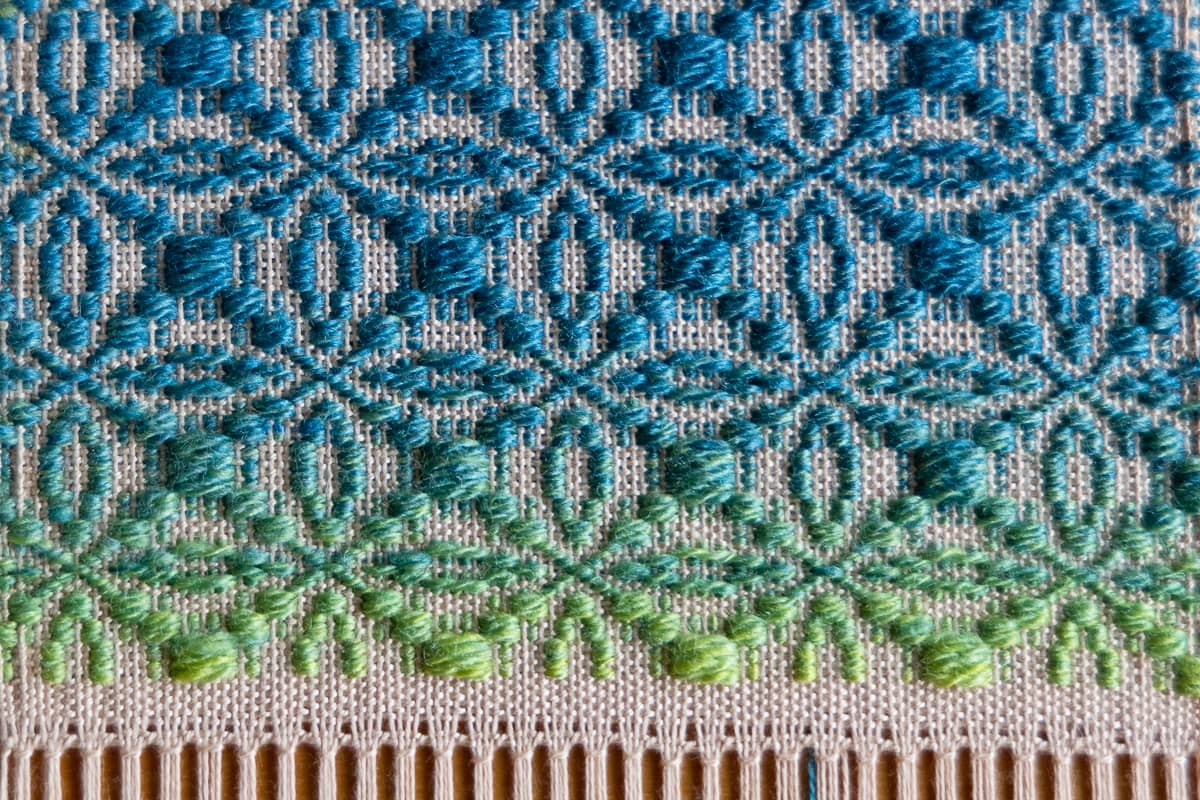
The first thing I wove after my instruction was a present for my Mom. she had requested fabric to make a vest. I looked through A Handweaver’s Pattern Bookby Marguerite Porter Davison and found an overshot pattern that I thought we both would like. I wove it in two shades of blue (Mom’s favourite colour), at a looser thread count than usual. (Originally the overshot weave structure was used to make coverlets, so were tightly woven and a bit stiff, while I liked the pattern I wanted the fabric to be much more drapey.) Even worse, I did not want it to be as hard-edged in the pattern as it was originally intended so I tried a slub cotton as a test and loved it.
In the Exhibition The Inkle band, hanging beside the overshot, I wove much more recently. I used an Inkle loom and a supplemental warp thread. This means weaving with an extra separate thread that was not part of the main warp on the loom. I used a yarn with a fuzzy caterpillar-like slub.


 8613371530291