
overshot titration supplier

Manual titrations are time consuming and can be inaccurate at times due to human error. Not to mention, important data can get easily lost due to improper tracking methods. The Thermo Scientific Orion Star T900 Series Automated Titrators are designed to make performing titrations easier, more reliable, and more reproducible than manual titrations.
These auto titrators expand the number of ions and compounds that can be measured beyond direct electrode analysis and offer dynamic process controls that adjust the titration to optimize analysis results.
Manual titration can be a time consuming and frustrating process. Watch how easy it is to find the endpoint, reproduce your workflow, and optimize your results. The auto-filling burette helps to minimize the handling of corrosive materials. Use of an auto titrator well help ensure a safer, more efficient lab.
A water treatment plant in the midwestern United States that ran up to 10,000 titrations each year improved their workflow. Learn how streamlining the workflow using an Orion Star Automated Titrator for low-level alkalinity titrations benefited the lab.
In this white paper, you’ll learn about the dispense accuracy and precision of the Orion Star T900 Series Automated Titrators. We’ll demonstrate that our auto titrators exceed well-established industry precision and accuracy specifications, providing users with greater confidence in their titration applications.
Streamline your manual titration workflows and increase efficiency and repeatability with an Orion Star T900 Series Automated Titrator. Review the applications chart below to find out if an auto titrator is for you.
We are currently unable to offer solutions for Karl Fischer, amperometric, stat, and dead stop titrations. For other questions please contact customer support to be connected to your local sales representative.
Get our top 10 tips for performing automated titrations, and methodologies for common uses of an auto titrator. Discover how to perform an acid/base titration for orange juice, water and petroleum in this ebook.
Performing manual titrations can be extremely tedious, requiring the operator to stand in one place, watching minuscule droplets drip into a sample container and diligently waiting for the color change or other endpoint indictor to occur before starting the process all over again, for possibly hours and hours of repeated sample titrations.
An automatic titrator allows you to start the titration and then walk away from the titrator to perform other tasks or tests while the titrator takes care of the titrant addition, endpoint detection and results calculations automatically without any involvement from the operator.
Manual titrations typically use a non-certified, Class B or Class A burette with stopcock to add doses of titrant to the sample. The operator uses the stopcock to start and stop the additions of titrant into the sample, often one drop at a time, until the endpoint is reached.
The precision of these additions, especially near the endpoint, is primarily determined by the operator’s skill level, experience and focus on the task at hand. All too commonly, an operator can allow too much titrant to flow out of the burette into the sample and overshoot the endpoint, requiring them to perform the entire titration all over again. Even highly skilled and experienced operators can be limited in the precision of their manual titration results by the last few drops of titrant, since each drop can vary in volume.
When using an automatic titrator, the titration is performed using a high-accuracy titrant delivery system that controls all titrant additions into the sample and will adjust the dose rate as it detects the endpoint approaching.
Once the endpoint is reached, the titrator uses the precisely measured volume of titrant added to the sample to automatically calculate the concentration results for the sample. The operator’s skill level, experience and focus on the task at hand is no longer a factor in the overall accuracy of the titration results and the possibility of missing the endpoint is greatly reduced.
Typically calculating titrations in the lab is done by calculating the sample concentration after the endpoint has been reached. There are many points in this calculation where human error can get in the way of consistent, reproducible results.
When using an auto titrator, it will automatically calculate the sample concentration from the entered parameters. Plus, on the automatic titrator, electrode, titrant and titration setup parameters can be saved as a method, so the exact same settings are used for each titration. These methods can be transferred between titrators for consistent procedures to be used on multiple titrators or multiple labs. This way you can save time with repeat titrations by running the exact same parameters each time without having to reenter any information.
Instead of manually logging the titration results in a notebook or scrap of paper, an auto titrator will automatically save the titration results in the data log with time and date stamp.
The endpoint of titration is overshot! Does this technique error result in an increase, a decrease, or have no effect on the reported percent acetic acid in the vinegar? Explain.
Titration is a quantitative analytical volumetric technique that permits the determination of the unknown concentration of an analyte with a known concentration of titrant. This is possible because the two react in a known stoichiometric manner allowing calculation of the unknown concentration.

A titration is a volumetric technique in which a solution of one reactant (the titrant) is added to a solution of a second reactant (the "analyte") until the equivalence point is reached. The equivalence point is the point at which titrant has been added in exactly the right quantity to react stoichiometrically with the analyten (when moles of titrant = moles of analyte). If either the titrant or analyte is colored, the equivalence point is evident from the disappearance of color as the reactants are consumed. Otherwise, an indicator may be added which has an "endpoint" (changes color) at the equivalence point, or the equivalence point may be determined from a titration curve. The amount of added titrant is determined from its concentration and volume:
A measured volume of the solution to be titrated, in this case, colorless aqueous acetic acid, CH3COOH(aq) is placed in a beaker. The colorless sodium hydroxide NaOH(aq), which is the titrant, is added carefully by means of a buret. The volume of titrant added can then be determined by reading the level of liquid in the buret before and after titration. This reading can usually be estimated to the nearest hundredth of a milliliter, so precise additions of titrant can be made rapidly.
Figure \(\PageIndex{1}\):The titration setup initially, before titrant (NaOH) has been added. NaOH is held in the burett, which is positioned above the beaker of acetic acid. Titrant (NaOH) is added until it neutralizes all of the analyte (acetic acid). This is called the equivalence point. Note: Unlike the picture, both substances are actually clear but are blue for visibility purposes in the picture.
The added indicator changes to pink when the titration is complete, indicating that all of the aqueous acetic acid has been consumed by NaOH(aq). The reaction which occurs is
Eventually, all the acetic acid is consumed. Addition of even a fraction of a drop of titrant produces a lasting pink color due to unreacted NaOH in the flask. The color change that occurs at the endpoint of the indicator signals that all the acetic acid has been consumed, so we have reached the equivalence point of the titration. If slightly more NaOH solution were added, there would be an excess and the color of the solution in the flask would get much darker. The endpoint appears suddenly, and care must be taken not to overshoot the endpoint.
After the titration has reached the endpoint, a final volume is read from the buret. Using the initial and final reading, the volume added can be determined quite precisely:
Figure \(\PageIndex{2}\)The figure above shows a completed titration, where the equivalence point has been reached. NaOH (the titrant) has neutralized all of the Acetic Acid, leaving Acetate in the beaker. At this point, the moles of NaOH added is equivalent to the moles of acetic acid initially in the beaker.
The object of a titration is always to add just the amount of titrant needed to consume exactly the amount of substance being titrated. In the NaOH—CH3COOH reaction Eq. \(\ref{2}\), the equivalence point occurs when an equal molar amount of NaOH has been added from the graduated cylinder for every mole of CH3COOH originally in the titration flask. That is, at the equivalence point the ratio of the amount of NaOH, added to the amount of CH3COOH consumed must equal the stoichiometric ratio
Titration is often used to determine the concentration of a solution. In many cases it is not a simple matter to obtain a pure substance, weigh it accurately, and dissolve it in a volumetric flask as was done in Example 1 of Solution Concentrations. NaOH, for example, combines rapidly with H2O and CO2 from the air, and so even a freshly prepared sample of solid NaOH will not be pure. Its weight would change continuously as CO2(g) and H2O(g) were absorbed. Hydrogen chloride (HCl) is a gas at ordinary temperatures and pressures, making it very difficult to handle or weigh. Aqueous solutions of both of these substances must be standardized; that is, their concentrations must be determined by titration.
A sample of pure potassium hydrogen phthalate (KHC8H4O4) weighing 0.3421 g is dissolved in distilled water. Titration of the sample requires 27.03 ml NaOH(aq). The titration reaction is
By far the most common use of titrations is in determining unknowns, that is, in determining the concentration or amount of substance in a sample about which we initially knew nothing. The next example involves an unknown that many persons encounter every day.
If titration of a dissolved vitamin C tablet requires 16.85 cm³ of 0.1038 M NaOH, how accurate is the claim on the label of the bottle that each tablet contains 300 mg of vitamin C?

A drift of zero can be a sign that the cell might be over-titrated. In combination with the mV signal (lower than end-point criteria) and the color of the working medium (darker yellow than usual), it is a clear indicator for over-titration. However, volumetric titrations sometimes exhibit a zero drift for a short time without being over-titrated.
If you have a real excess of iodine in the titration cell, the result of the next determination will most likely be erroneous. Therefore, over-titration should be avoided. There are various possible reasons for over-titration, like the sample itself (e.g., oxidizing agents which generate iodine from the working medium), the electrode (coating or invisible depositions on the Pt pins/rings), the reagent, and method parameters (e.g., the titration is rate too high), to name just a few.
Different factors can cause over-titration, however, the reagent is not always the reason behind this issue. The indicator electrode can also be the reason for overshooting the endpoint. In this case, regular cleaning of the electrode can prevent over-titration (see also questions 7 to 9 from Part 1 in this series on cleaning).
A low stirring speed also increases the risk of over-titration, so make sure the solution is well mixed. Depending on the type of reagent, the parameters of the titration need to be adjusted. Especially if you use two-component reagents, I recommend decreasing the speed of the titrant addition to avoid over-titration. Over-titration has an influence on the result, especially if the degree of over-titration changes from one determination to the next. So over-titration should always be avoided to guarantee correct results.
I recommend using the drift correction in coulometric KF titration only. You can also use it in volumetric titration, but here the drift level is normally not as stable as for coulometric titrations. This can result in variations in the results. A stabilization time can reduce such an effect. However, compared to the absolute water amounts in volumetry, the influence of drift is usually negligible.
If possible, use a larger sample size to increase the amount of water added to the titration cell with the sample. Furthermore, you should try to reduce the drift value in general. Perhaps the molecular sieve or the septum need to be replaced. You can also use a stabilizing time to make sure the drift is stable before analyzing the sample.
The sample is weighed in a headspace vial and closed with a septum cap. Then the vial is placed in the oven and heated to a predefined temperature, leading the sample to release its water. At the same time, a double hollow needle pierces through the septum. A dry carrier gas, usually nitrogen or dried air, flows into the sample vial. Taking the water of the sample with it, the carrier gas flows into the titration cell where the water content determination takes place.
Very often, the oven is used in combination with a coulometric titrator. The coulometric titration cell used in an oven system is filled with 150 mL of reagent. Theoretically, this amount of reagent allows for the determination of 1500 mg of water. However, this amount is too high to be determined in one titration and it would lead to very long titration times and negative effects on the results. We recommend that the water content of a single sample (in a vial) should not be higher than 10 mg, ideally around 1000–2000 µg water. For samples with water contents in the higher percentage range, you should consider the combination with a volumetric titrator.
Post written by Michael Margreth, Sr. Product Specialist Titration (Karl Fischer Titration)at Metrohm International Headquarters, Herisau, Switzerland.

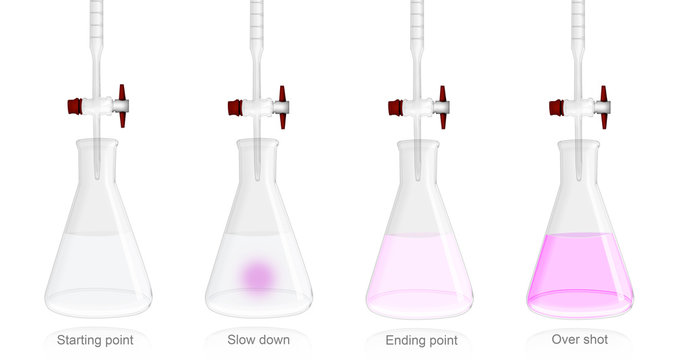
Overshooting your reading. I see conflicting results when I check your notes. As color change starts to appear SLOW DOWN. Continue mixing your sample with wrist action. Many times you have hit your target and it just takes two seconds of mixing to appear without adding another drop, If your titration equipment flows too quickly or steadily drips or leaks when off you cannot get accurate readings.
Is your standard titrant contaminated? I bring my own titration equipment and fluids when I test at your facility. When I see my numbers are largely different than yours we need to investigate. A few times I have found your titrants to be labelled incorrectly, contaminated or incorrectly formulated. Another way to validate is to test side my side with your technician. Here I can observe overshooting the color change, dirty glassware and other areas of concern as to accuracy.
Your customers want to see a titration log done by your team and they should be able to answer what is to be done if results are not to specifications then show that TIMELY corrections are made. Many rely on us for titrations and documentation. We are not there every day to monitor changes and it is difficult for your customer to accept our results since they do not have access to our procedures and equipment. We can help you write procedures and laminate instructions for each titration. We can also train your team on how to test and make corrections to your chemistry. Do they know what happens when a critical benchmark is missed and how it effects your parts?

Titration is the most common way to measure hypophosphite content in a plating bath. This method uses an oxidation-reduction (redox) reaction, where a known concentration of an oxidizing agent is added to oxidize all of the hypophosphite in the sample. In hypophosphite analysis, iodine is the oxidizing agent added to the sample. Easy enough, right? Not quite.
There is a bit of a twist here - hypophosphite does not react quickly enough with iodine to produce a sharp titration endpoint, making a direct titration difficult. Instead, a back titration is used. With a back titration, the iodine is added in excess so that there is more than enough for all of the hypophosphite in the sample to react with the iodine. The leftover iodine can be titrated with a reducing agent, sodium thiosulfate, to produce a sharp, accurate endpoint.
In order to perform the titration you must obtain the sample, and then add the iodine in excess. It is important to note the exact amount of iodine added to the sample as the volume will be used later in the calculation of hypophosphite. After adding the iodine, the sample must be sealed with a stopper and placed in a dark, cool place for approximately 25 minutes. This period is necessary to allow the iodine to react with hypophosphite.
In a manual titration, you must add the excess iodine by hand. After adding the iodine and waiting the time required for the iodine to react, the excess iodine is reacted with sodium thiosulfate. This time, the titrant must be carefully added to avoid overshooting the endpoint. The sodium thiosulfate is added until the solution is pale yellow. After that, a starch indicator is added and titrated until clear.
Automatic titration makes the calculations, titrant dosing, and endpoint detection all automatic. This saves bench time, eliminates user error, and makes measurements easier to perform.
Keeping records is easy with automatic titrators as well. Each titration performed on automatic titrators has a report generated that includes the date/time, result, and operating parameters. This makes record keeping easy for maintaining tight controls and for compliance with customer requirements.
Automating hypophosphite analysis is easy once you have the right materials. If you are performing this test manually, the switch to automatic titration is even easier since all of the same chemicals can be used. Here is a list of everything you need to perform hypophosphite automatic titrations:
Automating your hypophosphite analysis is easier than ever. Automated systems can easily be expanded to include other commonly performed tests such as acidity, nickel, and alkalinity. This way, you can benefit from increased traceability, accuracy, and repeatability in all of your titrations.

Unlike the vectors used to deliver viral-based genetic medicine, our non-viral ctLNP delivery system has been designed to avoid activation of the immune system in patients upon initial dose. This enables individualized patient titration whereby each patient can be redosed until they reach the expression level required to address their specific therapeutic needs.
Unlike the vectors used to deliver viral-based genetic medicine, our non-viral ctLNP delivery system has been designed to avoid activation of the immune system in patients upon initial dose. This enables individualized patient titration whereby each patient can be redosed until they reach the expression level required to address their specific therapeutic needs.

Auto Karl Fischer Titration ApparatusProviding you the best range of makler counting chamber, water bath shaker, prp centrifuge, ultrasonic baths, fogger and rotary incubator shaker with effective & timely delivery.
AutoKarlFischerTitrationApparatus finds applications in chemistry, research laboratories, pharmaceutical industries for testing to determine ACCURATE MOISTURE IN THE SAMPLE. We fabricate these products using finest quality materials based on latest versatile technology in accordance with the quality standards. These products are greatly admired owning to their significant features such as easy operation, corrosion resistance, long lasting and durable. IT IS HOUSED WITH BUILT IN MAGNETIC STIRRER AND ATTATCHED TITRATION STAND.


 8613371530291