
sett for overshot free sample

This post is the third in a series introducing you to common weaving structures. We’ve already looked at plain weave and twill, and this time we’re going to dive into the magic of overshot weaves—a structure that’s very fun to make and creates exciting graphic patterns.
Overshot is a term commonly used to refer to a twill-based type of weaving structure. Perhaps more correctly termed "floatwork" (more on that later), these textiles have a distinctive construction made up of both a plain weave and pattern layer. Requiring two shuttles and at least four shafts, overshot textiles are built using two passes: one weaves a tabby layer and the other weaves a pattern layer, which overshoots or floats, above.
Readers in the United States and Canada may be familiar with overshot textiles through woven coverlets made by early Scottish and English settlers. Using this relatively simple technique, a local professional weaver with a four-shaft loom could easily make a near-infinite variety of equally beautiful and complex patterns. If you’d like to learn more about overshot coverlets and some of the traditions that settlers brought with them, please see my reading list at the bottom of this article!
As it is twill-based, overshot will be very familiar to 4 shaft weavers. It’s made up of a sequence of 2-thread repeats: 1-2, 2-3, 3-4, and 1-4. These sequences can be repeated any number of times to elongate and create lines, curves, and shapes. These 2-thread repeats are often referred to as blocks or threading repeats, IE: 1-2 = block 1/A, 2-3 = block 2/B.
There are three ways weft appears on the face of an overshot cloth: as a solid, half-tone, or blank. In the draft image I’ve shared here, you can see an example of each—the solid is in circled in blue, the half-tone in red, and the blank yellow. Pressing down the first treadle (shafts 1 and 2), for example, creates solid tones everywhere there are threads on shafts 1 and 2, half-tones where there is a 1 or 2 paired with 3 or 4, and nothing on the opposite block, shafts 3 and 4. Of course, there’s not really nothing—the thread is simply traveling on the back of the cloth, creating a reverse of what’s on the face.
Because overshot sequences are always made up of alternating shafts, plain weave can be woven by tying two treadles to lift or lower shafts 1-3 and 2-4. When I weave two-shuttle weaves like overshot, I generally put my tabby treadles to the right and treadle my pattern picks with my left foot and my tabby with my right. In the draft image I’ve shared above, I’ve omitted the tabby picks to make the overarching pattern clearer and easier to read. Below is a draft image that includes the tabby picks to show the structure of the fabric.
Traditional overshot coverlets used cotton or linen for warp and plain weave wefts, and wool pattern wefts—but there’s no rule saying you have to stick to that! In the two overshot patterns I’ve written for Gist, I used both Mallo and Beam as my pattern wefts.
In the Tidal Towels, a very simple overshot threading creates an undulating wave motif across the project. It’s easy and repetitive to thread, and since the overshot section is relatively short, it’s an easy way to get a feel for the technique.
The Bloom Table Squares are designed to introduce you to a slightly more complex threading—but in a short, easy-to-read motif. When I was a new weaver, one of the most challenging things was reading and keeping track of overshot threading and treadling—but I’ve tried to make it easy to practice through this narrow and quick project.
Overshot works best with a pattern weft that 2-4 times larger than your plain weave ground, but I haven’t always followed that rule, and I encourage you to sample and test your own wefts to see how they look! In the samples I wove for this article, I used 8/2 Un-Mercerized Cotton weaving yarn in Beige for my plain weave, and Duet in Rust, Mallo in Brick, and Beam in Blush for my pattern wefts.
The Bloom Table Squares are an excellent example of what weavers usually mean when they talk about traditional overshot or colonial overshot, but I prefer to use the term "floatwork" when talking about overshot. I learned this from the fantastic weaver and textile historian Deborah Livingston-Lowe of Upper Canada Weaving. Having researched the technique thoroughly for her MA thesis, Deborah found that the term "overshot" originated sometime in the 1930s and that historical records variably called these weaves "single coverlets’ or ‘shotover designs.’ Deborah settled on the term "floatwork" to speak about these textiles since it provides a more accurate description of what’s happening in the cloth, and it’s one that I’ve since adopted.
Long out of print, this fabulous book covers the Burnham’s extensive collection of early settler textiles from across Canada, including basic threading drafts and valuable information about professional weavers, tools, and history.
Like all new weavers I tried many techniques. One technique, overshot, I have tried only twice. There is a pattern called Norse Kitchen on page 186 in the book. I wove this table runner on a four shaft table loom and only made one mistake! I was so proud of it. It is woven in cottolin.
I signed up for the Discover Color Weave-Along! last week. I am weaving mug mats in overshot on 8 shafts. Five thousand weavers have also joined the workshop which is free. This is a 3-week weave-along delivered via an online course with plenty of information. https://www.warpandweave.com/classes/discover-color/
I am using cottolin instead of 8/2 cotton sett at 18 epi. Here is my first attempt on the loom. I am using a double cottolin thread for the pattern weft. I have a useful shuttle which takes two bobbins.
The first mat was woven using a doubled red cottolin yarn for the pattern thread. I do not think that I beat hard enough. For the second mat I used a 3/2 cotton for the pattern weft. I beat as hard as I could.
The workshop indicates that the mug mats should be about 8" by 8" but perhaps the cottolin is making the dimensions different. The first red mat is 6.5 inches in width and 8.25 inches in length. Examining it closely I can see that the plain weave tabby has not been beaten in hard enough. The sett is 18 epi.
I need to wash them to check on the final size before I weave any more. Perhaps a sett of 20 epi might be more useful. They do seem rather large for a normal sized mug.

Jane has spent her life sampling and testing yarns on their own and in different combinations, for her workshops and production lines. She knows everyone doesn’t have time to sample to this extent so she is sharing the knowledge gained from that testing with everyone.
Jane’s Master Sett Chart encompasses more than 40 years of weaving experience, trial & error and extensive sampling with many of our yarns. This chart is an invaluable treasure trove of weaving advice.

One of the great things about having been a blogger for 12 years (did I actually just admit that?!) is that you occasionally get to look back and see how very far you’ve come.
Over three years ago, when my David Louet floor loom was still somewhat new to me, I wrotethis post on overshot. If you read it, you will discover that my initial relationship with overshot was not a very positive one.
The happy ending to the initial overshot sob story is that I can weave overshot now. Quite well, in fact! And I also teach it. And I happen to love it, very, very much. Don’t you love a happy ending?
I don’t think there was any particular moment where I thought to myself “I can weave overshot now!” I didn’t even weave any overshot for quite some time after that initial attempt. But slowly it tempted me back, and we started over. It was just a matter of sticking with it, employing some specific techniques and practice, practice, practice until it feels like an old friend.
My love of overshot has only increased with my more recent discovery of American Coverlets. I loved the look of the coverlets and the history behind them before I realised that so many of them were woven in the wonderfully humble 4 shaft overshot.
Now that I have quite a lot of experience weaving overshot, I want to share my best overshot tips with you in hope that you too will fall in love with this wonderful weave structure.
I know, I know, sampling takes time and yarn, it’s true. But it teaches you so, so much. It can also be more economical, as you can test your yarns out for suitability before committing to a larger project. Trust me, sampling is so well worth the time!
To weave overshot you need a warp yarn, a tabby yarn and a pattern weft yarn. Using the same yarn for warp and tabby works perfectly. For the pattern weft, I like to use a yarn that is twice the size of the tabby/warp yarn. I have experimented with using doubled strands of tabby/warp yarn in a contrasting colour, but it just doesn’t look as good. A thicker pattern yarn is the way to go.
What will the size of your item be? A miniature overshot pattern may get lost in a blanket, but may be perfect for a scarf. As a general rule, a good way to estimate the size of one repeat of your pattern just by looking at the draft is to see how many repeats are in one threading repeat. Also consider the thickness of your yarns and the sett you intend to weave.
Just to give you an idea, my current project is woven at 20 ends per inch with 8/2 cotton for warp and tabby and fingering weight wool for the pattern weft. The weaving draft has 50 threads in one threading repeat. My design repeats on the loom are around 2.5″ wide and just under 5″ long, which is a great size for the 30″ x 99″ throw I’m weaving.
I throw my picks gently to avoid drag on the selvedges and therefore preventing excessive draw in. I give a generous angle to the weft pick and keep it soft at the edges. I do adjust the picks at the edges before beating when necessary, but mostly I prefer to leave them alone and let them settle into place on their own.
This is a non negotiable for overshot if you want neat edges and less headaches! You get used to using floating selvedges very quickly, so don’t stress if you have no experience with them.
This is another selvedges tip. I’ve experimented with crossing the two weft yarns at the selvedge to see whether it gives a neater edge, but it doesn’t, at least for me. So, instead of twisting the two wefts at each selvedge when throwing a new pick, I just let them follow one another sequentially and my edges are much neater that way.
Besides the thickness of the pattern weft yarn, you will also want to consider what kind of bloom it may have after wet finishing. For example, I know that my fingering weight wool blooms beautifully, whereas a cotton of the same size would not bloom in the same way. I very much like the contrast of the 8/2 cotton background with the plump wool pattern weft.
There are 6 treadles needed for overshot, even though you weave on 4 shafts. The two extra treadles are for the tabby weave. I always set up my pattern treadles in the centre of the loom – two on the left and two on the right. Then I set up a “left” tabby and a “right” tabby treadle. To do this on my 8 shaft loom I leave a gap between the pattern treadles and the tabby treadles so that my feet can “see” and differentiate between a pattern and tabby treadle.
I like to advance little and often. You will find your own preference or “sweet spot” for weaving, but I find that with overshot I advance a lot more frequently at a much smaller amount than I do usually.
An example of this is that I wove an overshot sampler right before Is started my main project (the throw). It was a narrow warp (around 8″) and a different overshot threading and treadling than I’m using for the project.
But for my throw project, I am beating harder and sometimes having to beat twice. Because of the width of the project, I need to be careful that I’m beating evenly, and that is easier to do if I’m beating more firmly.
I personally do not use a temple. Some weavers will say they won’t weave without one. I’ve tried using a temple on many of my projects, particularly if I’m getting broken edge warp threads (signs of tension problems and too much draw in). But I will avoid using one wherever I can get away with it, and I don’t use one for weaving overshot.
This website is using a security service to protect itself from online attacks. The action you just performed triggered the security solution. There are several actions that could trigger this block including submitting a certain word or phrase, a SQL command or malformed data.

Over the past month or so, I’ve been slowly developing a project using a blended draft of huck lace and 2 overshot designs, Sweet and Lovely and Orange Peel, with the goal of having a towel warp that can be woven in a multitude of ways. I was inspired by Diane Pigg’s Hoosier Huck towels in Handwoven May/June 2020, in which she combined huck lace and Hoosier Talleyho, an overshot design by Bertha Gray Hayes.
I call my blend of 3 drafts, Sweet Orange Huck. The warp and weft will be natural and white 10/2 unmercerized cotton except for the overshot patterning. Combining like colors in a warp can add depth, but Tom Knisely’s book Huck Lace Weaving Patterns with Color-and-Weave Effects made me think it could be interesting to warp the 2 colors 5 ends at a time for some color-and-weave effects. I put on a narrow warp doing just that on one side and mixing the 2 colors on the other. I wasn’t concerned about sett. Based on the huck sampler I wove several years ago that I sett at 20 epi and some overshot and plain-weave napkins, I was sure 20 epi was the correct sett.
While weaving my sample, I noticed that I was inadvertently beating the huck areas too tightly. I tried not to, but I wasn’t successful. I’ve always found that the best sett is the one that comes naturally. That may not be the correct approach for a more exacting weaver, but for me it works. I’d rather enjoy the weaving process than second guess my beat as I treadle.
After I cut it off and wet-finished it, the huck portion seemed a little sleazier than you would want for a towel, so I resleyed in the same 10-dent reed (2-2-2-3) for an epi of 22.5. With the new sett, I found it easier to beat consistently and not overpack the weft. After cutting off and wet-finishing, I am also happier with the fabric’s hand—it seems more towel-like. With the remaining warp, I’m going to try one more sample, sett at 24 epi. Once it is woven and wet-finished, I’ll check the hand in the 3 structure types—overshot, plain weave, and huck—and choose my favorite sett. I can’t be certain, but I think it may be the switch from mercerized to unmercerized cotton that is causing the difference in beat and the fabric’s hand.

A feature of the new shopping cart are improvements for the home page and the ability to show more images in the ads. I have decided to make use of a single cart to keep things simple, this shopping cart will allow me to carry both handwoven, and downloadable products at the same time. I also like to print and do illustration work, and likely you will begin to see a greater diversity in my product line. Hopefully, you will see something that catches your eye and think; Here is a way to support this artist.
I am beginning my 30th year of handweaving, and find I am not a true “hard core” academic (I may not have that laser focus). I love to teach and love working with people in general. I excel at small groups and one on one, solving problems as we weave together. I love to research and curate information about weaving especially in the 1700s to early 1900s. I want to be part of the solution to identify and keep handweaving history and technical information in the accessible in public domain as much as possible. But, at the same time software is not free, and web servers cost money to run. Keeping something alive will require a business model that generates supportable income in to the future after I am gone. I know that I do not have the physical strength/endurance or the time to be a production weaver, I am a designer at heart. I love to solve problems, and then I move on to the next problem.
With COVID-19 I lost my opportunity to demonstrate handweaving to the public by letting the new weavers try the looms for themselves, and have retreated into my studio. While being in the studio, I decided that I could once again concentrate on historic research and drafting of contemporary versions of old patterns. I discovered that many of the designs I had created earlier in my career were no longer accessible because of the software going out of production, or becoming so expensive you needed to be a production weaver to be able to afford it. I have been dedicating my free time to capturing what data I could from these drafts and I will be transferring them into a more usable format for future generations to enjoy. As I complete the task I will post them to the website. I can not list them for free, because I need to cover sample production and web hosting hosting costs.
I have both 8 shaft looms, a computer-dobby 24 shaft loom, and a very large drawloom. I design for all three types of looms. In the shop I have decided to mark the number of shafts needed for a draft at the top of the description so as not to disappoint a weaver. You will know what you purchasing before you hit the download button. I also also elected to include weaving software files and manual draft files in the same draft archive packages so that people no longer have to choose one or the other.
A few more words about the work I believe I can deliver to the public. I like to design drafts and weave it before I post it to ensure accuracy, but at this point some days I do more designing than weaving. I think I would like to work out a system with a fellow weaver(s), I would like to see I if can afford to pay a weaver to weave samples of these designs that I can post on the website and give credit for the work that was done. I have no worries if you determine that you would like to weave the design for production and sell items. I am aware that drafts can not be copyrighted, and so will not chase you down if you use a my design for sale in your shop. As I have mentioned before, it is not my intent to be a production weaver. If a weaver were interested in this type of arrangement, I would ask that you email me directly with what your financial requirements might be for making samples and what type of loom (mostly number of shafts) you are using for sampling. Sample sizes should be 10″ x 10″ or larger if the draft requires it for a full repeat. I am interested in high contrast samples so that it is clear to the weaver what is happening between the warp and weft threads.
For weavers downloading designs, please understand you are supporting my ability to create and maintain self sustaining a database of information related to weaving for access by yourself and other weavers. Downloading once and sharing widely with others defeats the business case for website sustainability. The drafts will have less value, and we all lose the resources we need to keep historic weaving documents and drafts available to the public. I also believe that I do not want to require a subscription to access the draft data or the learning that I have gathered. So this website will always have a public front end that is useful and full featured that is free.
I do not feel that I am in competition with sites like some international pattern libraries or handweaving.net. Historicweaving.com as a website predates them. I am not intending to scan books, or digitize a drafts in that way. I want to use the historic drafts to study how and why they were made, what makes them look the way they do, and how they can be modified to make new designs that reflect our time and current tastes. Understand my statement above that I am not a pure academic, who is driven to study the past and document it a completely as possible. I want to see the past, and bring it to back to life in an approachable way for today’s weavers and looms. My site will be different than others as I am different weaver. I have had this dream for a long time, and have spent that time learning about weaving and weaving software. I like to use Facebook as my studio blog, because Facebook can moderate comments faster and more safely. I want this expanded website for its database potential, and the ability to generate revenue to keep it self sustaining. I use Pinterest as a visual catalogue of ideas (a designer’s morgue file) to explore in the future. I’m learning how to write and present full digital content, some video, some pictorial, some e-books and stories. I believe we all learn in different ways and I want to explore ways to help other weaver’s pass on their notes/journals/drafts to the future as well. I have taken a few months to reflect on what I really want to do and how I want to spend my time. I want to research and to weave. (Ideally, I would like to travel as well, but that will take time and a vaccine.)
If I offer an handwoven item in my shop for sale it is most likely to be a one of kind – if it is not, the size of the edition will be stated. I have no desire to weave long warps of the same pattern. It slows me down once I have solved the design problem, I like to move on to the next. I like efficiency, but I am far more likely to want to achieve accuracy, especially in complex structures. I have been known to weave, unweave and rethread multiple times until I get the loom to match the draft. I spend more time finding ways to warp and weave better. I am known to innovate. If someone asks me how long it took to weave this particular item, it is hard to answer directly because I have to determine if should I tell you about all of the samples I made before I achieved success. (Again, note, I am not a production weaver). What will make my hand woven gifts special is you can be certain that you will not find another one just like it anywhere. When I use my looms I use them as close to their full capability as possible. My personal patterns are complex on purpose, I have a special hand loom, a 100 shaft combination drawloom and I like to show what it can do. To purchase a handwoven piece from me, pricing includes the cost of overhead for maintaining full weaver’s studio, time spent learning about weaving, the cost of materials and fact the item is unique. Your purchase dollars support my research efforts directly. I reinvest my profit dollars into the website and new weaving history research opportunities.
I began with creating an Illustrated Weaving Glossary meant for beginning weavers – https://historicweaving.com/wordpress/product/illustrated-weaving-glossary/ – never get confused about when a word is used and what it is referring to.
I have been researching extensively for the past couple of yearsMary Meigs Atwater’s Shuttle Craft Guild – Lessons and her American Handweaving Book. Many of the documents I am working from are now in the public domain because their initial publication was 100 years ago, and are even more significant because they are her attempts to record information that was sent to her from other hand weavers throughout the United States. These items are truly meant to be preserved for the public because they came from the public. Since their initial publication, draft notation standards for these structures and patterns have changed significantly, usually it requires a bit of detailed reading to learn how to read the drafts from the manuscript.
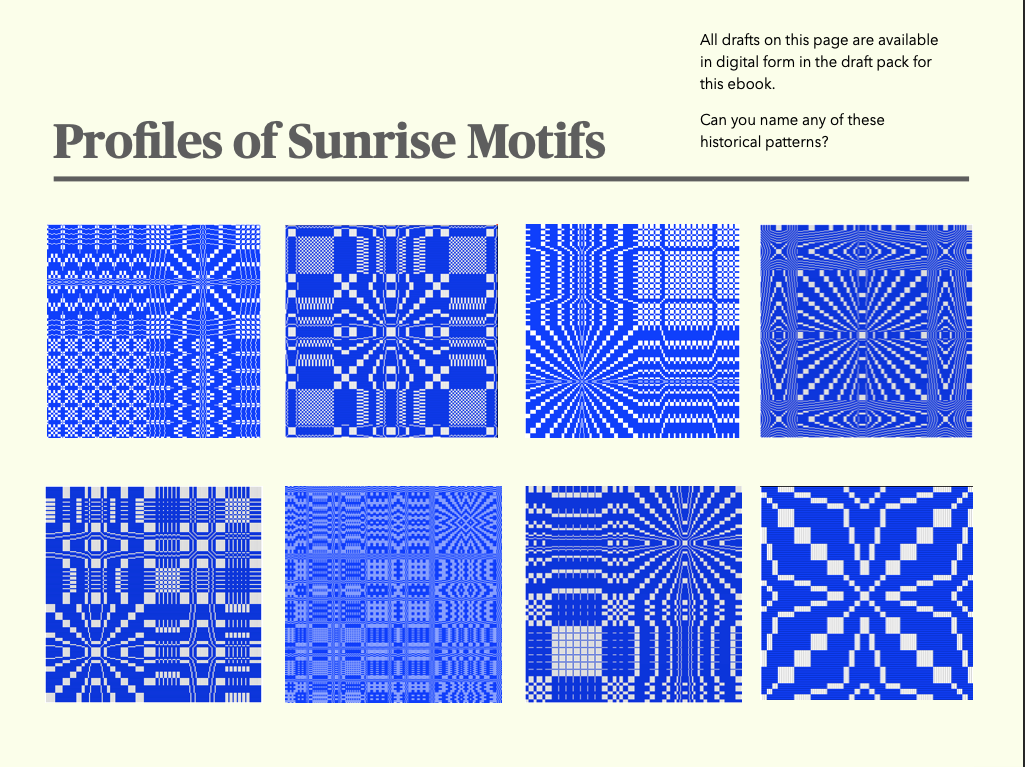
I have taken the time to record some of the larger coverlet radiating overshot pattern drafts in profile draft form making them more accessible to weavers who use drafting software. From the profile you can try different structures, colors and layouts to find a design that is pleasing to you. I have built instructions that show you how the draft is composed and how it can be modified. I would like to think of it as giving you design components more than a formal project plan. If you want the formal project plan approach use the Woven as Drawn in instructions. My goal in my presentation is to increase your understanding so that you can design your own projects and not not to restrict you to copying standardized patterns.
I added an eBook/PDF and draft package for Radiating Overshot Patterns – Sunrise, Blooming Leaf, Bow Knot and the Double Bow Knot. These designs include full drafts, profile drafts and woven as drawn-in drafts. This is the link to purchase the draft archive and the instruction ebook: https://historicweaving.com/wordpress/product/radiating-patterns-for-historic-overshot/
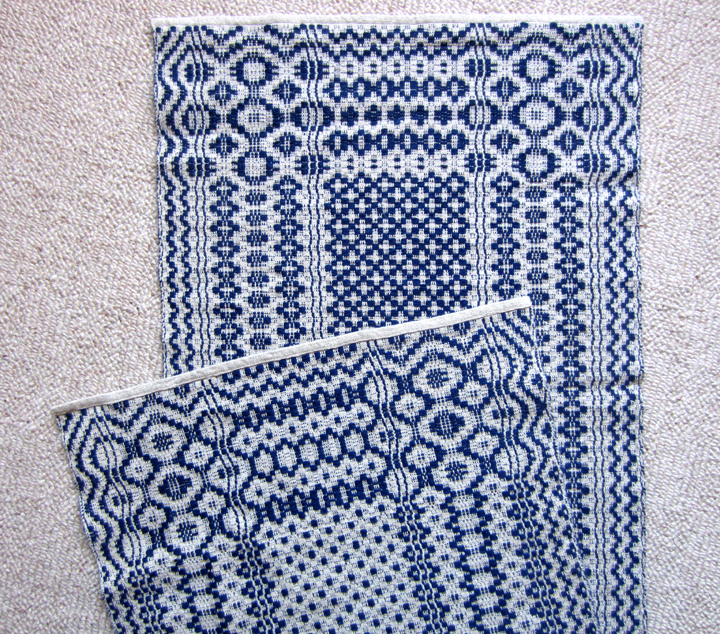
The Radiating Patterns ebook shows you how the drafts are related, the Draft Archive catalog details all of the profiles for easy reference to file names, and there are more than 68 drafts in the package. Included are the Lee’s Surrender, Sunrise and Blooming Leaf coverlets drafts. These drafts are the Series IV groups a,b,c and d – radiating patterns. From Mary Atwater’s original work combined with any examples I could find in digital museum collections that had no accompanying drafts with them.
Another bonus item from the American Handweaving Book, when published Mary Atwater made use of black and white photographs of historic coverlets she located in musuems. I have tracked the coverlets down and found color digital images from the current holding Museum’s digital collections. Use this link to download a copy of the original book manuscript and the link overlay to view the color images. https://historicweaving.com/wordpress/product/the-shuttle-craft-book-of-american-handweaving-updated-photo-links-in-pdf-format/
From the Mary Meigs Atwater’s Shuttle Craft Guild – Lessons, lesson 2 which concerns the Honeysuckle draft, I completed a copy of the Sampler Project that she requested as part of the lesson. That lesson encouraged me to create more than 50 unique treadlings to create the sampler assignment from Lesson 2, I named “Mournin’ Max” to honor the 100th anneversary of death of her husband Maxwell Atwater in 1919, an event that marked the beginning of her full time career in weaving that lasted for the rest of her life. Click on this link for the draft Archive. https://historicweaving.com/wordpress/product/draft-package-for-mournin-max-project/
I am turning my attention to the weaver’s draft books in the United States in the late 1700’s how they got here and the influence they had. I have in my hands access to most of these books and some scholarly research to guide my efforts.
Also I am doing work documenting the drafts for the early Jacquard coverlet designs and determining what designs and motifs can be woven on conventional looms. Those that can not I will be using my drawloom to complete a sample of the designs for posterity.

Many years ago, I finally got to try weaving. I took the Beginning to Weave workshop through the Ottawa guild. At that time, 1989, the OVWSG did not have a studio space to house what guild equipment we had acquired. (The Guild had an old second-hand 100 inch loom and 6 or 7 table looms. There may have been a floor loom too but I was distracted by the 100 inches of loom, so do not remember). All the looms lived in one of our guild members’ very big basements. On weekends, she either taught weaving workshops or hosted weavers working on the 100 inch loom. It sounded like a busy basement! I remember 4 weekends of driving to a little town just east of Ottawa. I took the table loom home each week to do homework. I still remember the sound of the mettle heddles rattling as I drove down the highway, back and forth to the classes. Then I think there were two more weekends of Intermediate weaving and Dona sent me off and I was weaving!
During the workshop, I found pickup seemed strangely familiar as my brain watched my fingers happily lifting and twisting threads for the various lace and decorative weave patterns. The other thing that my brain went “ooh this is cool!” was Overshot. It is a weave structure that requires a ground and a pattern thread, (two shuttles). One is fine like the warp and the pattern thread is thicker and usually wool. I was still reacting to wool so I used cotton for both. My original goal was to draft and weave a Viking textile for myself but I put that aside for a moment, I will get back to that later.
The first thing I wove after my instruction was a present for my Mom. she had requested fabric to make a vest. I looked through A Handweaver’s Pattern Bookby Marguerite Porter Davison and found an overshot pattern that I thought we both would like. I wove it in two shades of blue (Mom’s favourite colour), at a looser thread count than usual. (Originally the overshot weave structure was used to make coverlets, so were tightly woven and a bit stiff, while I liked the pattern I wanted the fabric to be much more drapey.) Even worse, I did not want it to be as hard-edged in the pattern as it was originally intended so I tried a slub cotton as a test and loved it.
So, for any sane weaver, it was all wrong! Wrong set, wrong fibre, wrong colour choices! It was fabulous and perfect. I kept the sample as a basket cover and at either the end of 1989 or the beginning of 1990, I gave Mom the yardage for her vest. “Oh this is too nice to cut” Mom Said, so it lived on the back of her favourite reading chair as a headrest until her most recent move (2015?) it never did get to be a vest but it has been well enjoyed.
In the Exhibition The Inkle band, hanging beside the overshot, I wove much more recently. I used an Inkle loom and a supplemental warp thread. This means weaving with an extra separate thread that was not part of the main warp on the loom. I used a yarn with a fuzzy caterpillar-like slub.
I was going to tell you about my original goal in learning to weave, the mysterious Fragment #10 from a Viking excavation from around the year 1000, but I have likely confused you with weaving enough for one day. So I will save that for another chat. (don’t forget the Inkle loom I would like to tell you a bit more about that in another post too. I promise I will get back to felting in the not-too-distant future)

A feature of the new shopping cart are improvements for the home page and the ability to show more images in the ads. I have decided to make use of a single cart to keep things simple, this shopping cart will allow me to carry both handwoven, and downloadable products at the same time. I also like to print and do illustration work, and likely you will begin to see a greater diversity in my product line. Hopefully, you will see something that catches your eye and think; Here is a way to support this artist.
I am beginning my 30th year of handweaving, and find I am not a true “hard core” academic (I may not have that laser focus). I love to teach and love working with people in general. I excel at small groups and one on one, solving problems as we weave together. I love to research and curate information about weaving especially in the 1700s to early 1900s. I want to be part of the solution to identify and keep handweaving history and technical information in the accessible in public domain as much as possible. But, at the same time software is not free, and web servers cost money to run. Keeping something alive will require a business model that generates supportable income in to the future after I am gone. I know that I do not have the physical strength/endurance or the time to be a production weaver, I am a designer at heart. I love to solve problems, and then I move on to the next problem.
With COVID-19 I lost my opportunity to demonstrate handweaving to the public by letting the new weavers try the looms for themselves, and have retreated into my studio. While being in the studio, I decided that I could once again concentrate on historic research and drafting of contemporary versions of old patterns. I discovered that many of the designs I had created earlier in my career were no longer accessible because of the software going out of production, or becoming so expensive you needed to be a production weaver to be able to afford it. I have been dedicating my free time to capturing what data I could from these drafts and I will be transferring them into a more usable format for future generations to enjoy. As I complete the task I will post them to the website. I can not list them for free, because I need to cover sample production and web hosting hosting costs.
I have both 8 shaft looms, a computer-dobby 24 shaft loom, and a very large drawloom. I design for all three types of looms. In the shop I have decided to mark the number of shafts needed for a draft at the top of the description so as not to disappoint a weaver. You will know what you purchasing before you hit the download button. I also also elected to include weaving software files and manual draft files in the same draft archive packages so that people no longer have to choose one or the other.
A few more words about the work I believe I can deliver to the public. I like to design drafts and weave it before I post it to ensure accuracy, but at this point some days I do more designing than weaving. I think I would like to work out a system with a fellow weaver(s), I would like to see I if can afford to pay a weaver to weave samples of these designs that I can post on the website and give credit for the work that was done. I have no worries if you determine that you would like to weave the design for production and sell items. I am aware that drafts can not be copyrighted, and so will not chase you down if you use a my design for sale in your shop. As I have mentioned before, it is not my intent to be a production weaver. If a weaver were interested in this type of arrangement, I would ask that you email me directly with what your financial requirements might be for making samples and what type of loom (mostly number of shafts) you are using for sampling. Sample sizes should be 10″ x 10″ or larger if the draft requires it for a full repeat. I am interested in high contrast samples so that it is clear to the weaver what is happening between the warp and weft threads.
For weavers downloading designs, please understand you are supporting my ability to create and maintain self sustaining a database of information related to weaving for access by yourself and other weavers. Downloading once and sharing widely with others defeats the business case for website sustainability. The drafts will have less value, and we all lose the resources we need to keep historic weaving documents and drafts available to the public. I also believe that I do not want to require a subscription to access the draft data or the learning that I have gathered. So this website will always have a public front end that is useful and full featured that is free.
I do not feel that I am in competition with sites like some international pattern libraries or handweaving.net. Historicweaving.com as a website predates them. I am not intending to scan books, or digitize a drafts in that way. I want to use the historic drafts to study how and why they were made, what makes them look the way they do, and how they can be modified to make new designs that reflect our time and current tastes. Understand my statement above that I am not a pure academic, who is driven to study the past and document it a completely as possible. I want to see the past, and bring it to back to life in an approachable way for today’s weavers and looms. My site will be different than others as I am different weaver. I have had this dream for a long time, and have spent that time learning about weaving and weaving software. I like to use Facebook as my studio blog, because Facebook can moderate comments faster and more safely. I want this expanded website for its database potential, and the ability to generate revenue to keep it self sustaining. I use Pinterest as a visual catalogue of ideas (a designer’s morgue file) to explore in the future. I’m learning how to write and present full digital content, some video, some pictorial, some e-books and stories. I believe we all learn in different ways and I want to explore ways to help other weaver’s pass on their notes/journals/drafts to the future as well. I have taken a few months to reflect on what I really want to do and how I want to spend my time. I want to research and to weave. (Ideally, I would like to travel as well, but that will take time and a vaccine.)
If I offer an handwoven item in my shop for sale it is most likely to be a one of kind – if it is not, the size of the edition will be stated. I have no desire to weave long warps of the same pattern. It slows me down once I have solved the design problem, I like to move on to the next. I like efficiency, but I am far more likely to want to achieve accuracy, especially in complex structures. I have been known to weave, unweave and rethread multiple times until I get the loom to match the draft. I spend more time finding ways to warp and weave better. I am known to innovate. If someone asks me how long it took to weave this particular item, it is hard to answer directly because I have to determine if should I tell you about all of the samples I made before I achieved success. (Again, note, I am not a production weaver). What will make my hand woven gifts special is you can be certain that you will not find another one just like it anywhere. When I use my looms I use them as close to their full capability as possible. My personal patterns are complex on purpose, I have a special hand loom, a 100 shaft combination drawloom and I like to show what it can do. To purchase a handwoven piece from me, pricing includes the cost of overhead for maintaining full weaver’s studio, time spent learning about weaving, the cost of materials and fact the item is unique. Your purchase dollars support my research efforts directly. I reinvest my profit dollars into the website and new weaving history research opportunities.
I began with creating an Illustrated Weaving Glossary meant for beginning weavers – https://historicweaving.com/wordpress/product/illustrated-weaving-glossary/ – never get confused about when a word is used and what it is referring to.
I have been researching extensively for the past couple of yearsMary Meigs Atwater’s Shuttle Craft Guild – Lessons and her American Handweaving Book. Many of the documents I am working from are now in the public domain because their initial publication was 100 years ago, and are even more significant because they are her attempts to record information that was sent to her from other hand weavers throughout the United States. These items are truly meant to be preserved for the public because they came from the public. Since their initial publication, draft notation standards for these structures and patterns have changed significantly, usually it requires a bit of detailed reading to learn how to read the drafts from the manuscript.
I have taken the time to record some of the larger coverlet radiating overshot pattern drafts in profile draft form making them more accessible to weavers who use drafting software. From the profile you can try different structures, colors and layouts to find a design that is pleasing to you. I have built instructions that show you how the draft is composed and how it can be modified. I would like to think of it as giving you design components more than a formal project plan. If you want the formal project plan approach use the Woven as Drawn in instructions. My goal in my presentation is to increase your understanding so that you can design your own projects and not not to restrict you to copying standardized patterns.
I added an eBook/PDF and draft package for Radiating Overshot Patterns – Sunrise, Blooming Leaf, Bow Knot and the Double Bow Knot. These designs include full drafts, profile drafts and woven as drawn-in drafts. This is the link to purchase the draft archive and the instruction ebook: https://historicweaving.com/wordpress/product/radiating-patterns-for-historic-overshot/
The Radiating Patterns ebook shows you how the drafts are related, the Draft Archive catalog details all of the profiles for easy reference to file names, and there are more than 68 drafts in the package. Included are the Lee’s Surrender, Sunrise and Blooming Leaf coverlets drafts. These drafts are the Series IV groups a,b,c and d – radiating patterns. From Mary Atwater’s original work combined with any examples I could find in digital museum collections that had no accompanying drafts with them.
Another bonus item from the American Handweaving Book, when published Mary Atwater made use of black and white photographs of historic coverlets she located in musuems. I have tracked the coverlets down and found color digital images from the current holding Museum’s digital collections. Use this link to download a copy of the original book manuscript and the link overlay to view the color images. https://historicweaving.com/wordpress/product/the-shuttle-craft-book-of-american-handweaving-updated-photo-links-in-pdf-format/
From the Mary Meigs Atwater’s Shuttle Craft Guild – Lessons, lesson 2 which concerns the Honeysuckle draft, I completed a copy of the Sampler Project that she requested as part of the lesson. That lesson encouraged me to create more than 50 unique treadlings to create the sampler assignment from Lesson 2, I named “Mournin’ Max” to honor the 100th anneversary of death of her husband Maxwell Atwater in 1919, an event that marked the beginning of her full time career in weaving that lasted for the rest of her life. Click on this link for the draft Archive. https://historicweaving.com/wordpress/product/draft-package-for-mournin-max-project/
I am turning my attention to the weaver’s draft books in the United States in the late 1700’s how they got here and the influence they had. I have in my hands access to most of these books and some scholarly research to guide my efforts.
Also I am doing work documenting the drafts for the early Jacquard coverlet designs and determining what designs and motifs can be woven on conventional looms. Those that can not I will be using my drawloom to complete a sample of the designs for posterity.

Many years ago, I finally got to try weaving. I took the Beginning to Weave workshop through the Ottawa guild. At that time, 1989, the OVWSG did not have a studio space to house what guild equipment we had acquired. (The Guild had an old second-hand 100 inch loom and 6 or 7 table looms. There may have been a floor loom too but I was distracted by the 100 inches of loom, so do not remember). All the looms lived in one of our guild members’ very big basements. On weekends, she either taught weaving workshops or hosted weavers working on the 100 inch loom. It sounded like a busy basement! I remember 4 weekends of driving to a little town just east of Ottawa. I took the table loom home each week to do homework. I still remember the sound of the mettle heddles rattling as I drove down the highway, back and forth to the classes. Then I think there were two more weekends of Intermediate weaving and Dona sent me off and I was weaving!
During the workshop, I found pickup seemed strangely familiar as my brain watched my fingers happily lifting and twisting threads for the various lace and decorative weave patterns. The other thing that my brain went “ooh this is cool!” was Overshot. It is a weave structure that requires a ground and a pattern thread, (two shuttles). One is fine like the warp and the pattern thread is thicker and usually wool. I was still reacting to wool so I used cotton for both. My original goal was to draft and weave a Viking textile for myself but I put that aside for a moment, I will get back to that later.
The first thing I wove after my instruction was a present for my Mom. she had requested fabric to make a vest. I looked through A Handweaver’s Pattern Bookby Marguerite Porter Davison and found an overshot pattern that I thought we both would like. I wove it in two shades of blue (Mom’s favourite colour), at a looser thread count than usual. (Originally the overshot weave structure was used to make coverlets, so were tightly woven and a bit stiff, while I liked the pattern I wanted the fabric to be much more drapey.) Even worse, I did not want it to be as hard-edged in the pattern as it was originally intended so I tried a slub cotton as a test and loved it.
So, for any sane weaver, it was all wrong! Wrong set, wrong fibre, wrong colour choices! It was fabulous and perfect. I kept the sample as a basket cover and at either the end of 1989 or the beginning of 1990, I gave Mom the yardage for her vest. “Oh this is too nice to cut” Mom Said, so it lived on the back of her favourite reading chair as a headrest until her most recent move (2015?) it never did get to be a vest but it has been well enjoyed.
In the Exhibition The Inkle band, hanging beside the overshot, I wove much more recently. I used an Inkle loom and a supplemental warp thread. This means weaving with an extra separate thread that was not part of the main warp on the loom. I used a yarn with a fuzzy caterpillar-like slub.
I was going to tell you about my original goal in learning to weave, the mysterious Fragment #10 from a Viking excavation from around the year 1000, but I have likely confused you with weaving enough for one day. So I will save that for another chat. (don’t forget the Inkle loom I would like to tell you a bit more about that in another post too. I promise I will get back to felting in the not-too-distant future)

When Susan E. Horton and I first decided to give our March/April 2019 issue of Handwoven an Americana theme, we knew there would be one weave structure that would probably reign supreme: overshot. What we weren’t expecting, however, were the ways in which our designers took traditional overshot drafts and patterns—the kinds that would look at home on a 19th-century coverlet—and reinterpreted them in new ways.
Perhaps the most traditional use of overshot in the magazine is in Nancy Dunlap’s A Job Made Easier Runner. Using the draft Kay’s Design from Marguerite Porter Davison’s A Handweaver’s Pattern Book, Nancy designed a set of runners with beautiful borders and an overshot “star” in each corner. She wove the runners in a very classic color palette, the kind that would look equally at home in a living history museum or on a modern dining-room table.
Just slightly less traditional is my own project, the Ancient Rose Scarf. I also looked to Davison for my draft, although, in this case, I took the Ancient Rose draft. While the patterning on the scarf is staunchly traditional, the yarns used take this scarf into the 21st century. First, I chose lyocell yarns (also known as Tencel), which wasn’t invented until 1972. Second, for my warp and tabby yarns I used black, a color that was difficult to produce in the time before synthetic dyes. The pattern weft, however, is an unintentional nod to tradition. The hand-dyed Tencel has a slight variegation similar to the naturally hand-dyed yarns used by early American weavers.
In her Rose Circles Bed Runner, Rosalie Neilson completely turns overshot on its head. For her design, Rosalie took motifs commonly found in overshot designs and then translated them into warp-faced rep weave. Although she wove them using modern machine-spun cotton yarns colored with synthetic dyes, she chose multiple slightly different shades of yellow, blue, and red to highlight the unevenly dyed yarns of the past. She also chose not to weave her design to square so that it would better mimic patterns woven with uneven handspun yarns. Her bed runner might not be overshot, but for weavers who are familiar with 19th-century weaving, it is a clear homage to the structure and coverlets of old.
For her table runner, Ann Weymouth chose to use tied overshot, a weave structure born in 1970s, making it a baby compared with most other structures. It’s similar to true overshot, although it’s more closely related to summer and winter (another popular structure during the 19th century). In her Tied Overshot Journey Runner, woven to honor Madelyn van der Hoogt, Ann wove her project using a modern structure done in the style of a modern weaver. It really is the perfect project to take this issue—devoted to the history of North American handweaving—full circle.

Overshot is a magical structure. The first time you weave it you can hardly believe the cloth that grows on your loom. Traditionally used to weave bed coverings, overshot has many beautiful applications in today"s world, from useful household textiles to breathtaking works of art. This versatile weave is subject to endless variations. Here are a few of our favorite tips and a few truly spectacular projects, too! If you are inspired, come visit us and learn from a master weaver, Joanne Hall. See details below about her workshop.
A slouchy bag by FiberMusings on Weavolution pairs leftover BFL singles with sturdy Cottolin to create a fashionable yet functional multi-colored bag. The draft is a design from Ann Weaver"s Handweavers Pattern Dictionary, and it"s a great way to integrate Overshot techniques while making an eye-catching accessory!
Another project that caught our eye recently was a shower curtain shared by GailR@30 shared on Weaving Today - it"s nothing short of amazing (click here to see for yourself)! Consisting of thirteen different overshot pattern threadings woven in thirteen different treadlings, 169 different design effects are created based on designs from Osma Gallinger Tod"s book The Joy of Handweaving. As Gail noted on her project page, a great way to make each design stand out is to separate them with twill bands (even though it might mean a little more work in the process!)
Or, you may choose to elevate your weaving like the work of art it most certainly is, as Evaweave did with her Overshot Study pieces. These two miniature silk rugs look lovely in a frame, don"t you think? The overshot pattern was adapted from Overshot Weaving by Ellen Lewis Saltzman, complementing one another perfectly.
Think overshot is too difficult to try? Deb Essen thinks otherwise! Fiber artist, designer, and teacher, Deb is a passionate weaver who specializes in using overshot name drafts to create "secret messages" in cloth.
On her website, she explains: "Overshot is a weave structure and a draft is the weaver"s guide to creating patterns in cloth. Overshot name drafts assign the letters of a name or phrase to the shafts on a loom, creating a pattern that is unique. The one-of-a-kind patterns become a secret hidden message in the cloth and only those knowing the secret can break the code."
Deb lets you in on the secret with her clever kits, each with a hidden message. We"re particularly fond of her That"s Doable kit, which features Mountain Colors hand-painted yarns and, as the name would imply, is our first choice for those new to overshot weaving.

As always, it’s been a busy couple of weeks. One of the members of my online weaving group on Our Unraveled indicated that she would like to make towels in the Lee’s Surrender overshot draft. Now Lee isn’t easy. It may be only a 4-shaft overshot draft, but it combines several elements, has a wicked border and isn’t for the faint of heart. Or at least isn’t for beginning weavers. The good news is that it is in Marguerite Porter Davison’s A Handweaver’s Pattern Book. The original book is from the 50’s and the draft is written out in the older format, but it still manageable. (Hint: beware of getting a new version of the book. I’ve heard that it has been gutted and has maybe half the drafts of the earlier editions.)
I don’t know where the original draft came from. In the book Davison says that it is adapted from an earlier pattern. Since weaving drafts, like quilt patterns, are frequently named for historical events, I assume this one is truly named for Lee’s Surrender of the Confederate troops at Appomattox Courthouse. If so, that would place it in the late 1800’s. The border is based on the Blooming Leaf pattern that appears in other overshot drafts, and this gives the border its intricate, eye-appealing size. The tables that form the center design are themselves quite simple – a star design commonly found in overshot. However, they allow the piece to be wider or narrower at the weaver’s discretion simply by adding or removing repeats.
Lee and I are no strangers. Many years ago I decided to tackle this draft in a very fine thread intending to make a set of four place mats in the classic blue pattern on white background. One must understand, however, that I am a Southerner. As nearly as I an tell, all eight of my great-great-grandfather’s fought for the Confederacy. So either some curse got thrown in my direction or I got a bad cone of white cotton, but it was one broken warp thread after the other. After two place mats and 20+ broken warp threads, I cut the piece off the loom. Still, the two place mats turned out beautifully.
I volunteered to make the draft for the requested towels and post it to the group. I also suggested that we use it as an overshot weave-a-long or WAL. Several people agreed and I think we’ll get going on the first of September. I was able to find the original notes and WIF (Weaving Information File) I entered when I made the place mats. I hadn’t finished the treadling diagram, but it wasn’t hard to finish up. I did all the calculations for two towels and wrote up the instructions. Unfortunately, I couldn’t test the towels prior to releasing the PDF. I’m hopeful that everything is fine and I didn’t make any mistakes. I suppose we’ll see.
Equally unfortunately, I decided to make the towels in Ashford’s 10/2 and 5/2 cotton. Sadly, we’re out of the colors I wanted at Yarnivore, Hopefully, the cones will be in before long and I’ll be able to get the towels on the loom. I’m planning to get the origami blouse fabric off the old Schacht Standard so the towels can go on.

One way to preserve the beauty of your painted warp is to make the fabric warp-dominant on both sides. Using a denser sett than usual will crowd the warp threads together, making the weft less visible.
A balanced plain weave would call for a sett of 24 ends per inch (10 ends/centimeter). But I chose a denser sett for this sample – 30 epi (12 ends/centimeter). The resulting fabric is slightly warp-dominant, and the painted warp glows. (Click the image to see the larger version.)
Because using a denser sett results in fewer weft threads per inch than warp ends per inch (in a balanced weave they would be equal), this method works best when weaving simple structures such as plain weave. More complex structures will appear to be stretched lengthwise. For example, twill angles will become steeper (more than 45 degrees), twill blocks that would be square in a balanced weave will become tall rectangles, and so on. The degree of distortion depends on how much denser the warp is sett than it would be for a balanced weave.
This is a painted warp in 10/2 cotton yarn, with a 20/2 cotton weft. The warp is roughly twice as thick as the weft.The sett is 30 epi (12 ends/cm), and the structure is plain weave.
Compared to the previous method, the finished cloth looks similar from a distance. However, viewed close up, the finer weft blends in more, while the thicker weft is more visible. The thinner weft also produces a thinner cloth with softer drape. Both methods work well; choose whichever method works best for your finished fabric.
Using a finer weft can stretch or compress a woven pattern depending on sett density and weft size. In addition, since this is a warp-emphasis fabric, more warp than weft will show in the finished fabric. So simple structures such as plain weave will work nicely, but if your pattern needs to weave square, or you want bold patterning, try other approaches first.
If only one side of your fabric will be visible, you can showcase the colors of your painted warp by choosing a weave structure that shows more warp on one side. For example, 3/1 twill will produce a warp-dominant fabric on the top of the fabric, since 75% of the warp is on top.
Here is an example showing the original warp, the top side, and the reverse side of a 3/1 twill fabric. The warp and weft yarns are 10/2 cotton, and the sett is 30 epi (12 epc) to achieve a balanced twill. (Click on the image to view the larger version.)
Both fabrics are beautiful, and you might choose either depending on your intent for the cloth, but the colors are more vivid in the sample with larger chunks of color. Both fabrics are reversible.
Black is often recommended for painted warps because – being the darkest color – it makes other colors look brighter and lighter by comparison. The eye pays more attention to light and bright colors than it does to dark, dull ones. So – woven into a painted warp – black will recede into the background, allowing your your painted warp to show clearly. A white warp will do the opposite – because it is lighter than all other colors, it will “come forward,” with the potential for dominating your warp.
Here are two samples, one woven with white and another with black weft. Both warp and weft are 10/2 cotton, at a sett of 30 epi. The structure is 3/1 vs. 1/3 twill blocks.
In the sample with white weft, the white areas dominate, and the warp appears hidden behind the patches of white. But in the black-weft sample, the black areas recede, while the intensely colored warp pops forward.
Gray can be an interesting choice – and is explored far less often than it should be – because it will likely be lighter than some of your colors and darker than others. When you weave using blocks of gray, the lighter colors “come forward” and the darker colors recede, giving the illusion of motion.
In the darker areas, the gray dominates. In the medium colors, such as the green, the gray blends in. In the lighter areas, the yellow comes forward. This produces a “hide and seek” effect with the warp colors.
In more evenly blended weave structures, black will darken the colors and white will bleach them. (See my blog article “How to use black to give handwoven fabrics pizzazz” for an explanation of how and why this works.) Grays, on the other hand, will soften the colors without lightening or darkening them as much as black or white. This can result in a pleasing watercolor effect.
To illustrate the different impacts of gray and black, here are two samples, each woven in 3/1 twill, one using black and the other a medium gray weft. Both warp and weft are 10/2 cotton, sett at 30 epi (12 epc). The middle sample shows the warp-dominant side; the right-hand samples shows the weft-dominant side.
None of these choices is intrinsically better than the others, of course – it all depends on your intent for the cloth. Black intensifies colors but also darkens them; gray softens the colors; and white bleaches them. Which you choose is up to you!
While you can and should experiment with strongly colored wefts, neutral wefts are a safe choice when you want to preserve the hues of your painted warp. Black is often used because it tends to intensify and “bring forward” the colors in your warp. However, black will also darken your colors and make them feel moodier. Gray will soften (and dull) the colors without darkening them as much as black would, and can add the illusion of motion to a piece. And white will tend to dominate and/or bleach your colors.
I hope you have found this post useful! If you would like to get notification of new blog posts and upcoming classes, please sign up for my newsletter (and my free e-book!) using the links below. And, of course, please feel free to share on social media, such as Facebook, Twitter, or Pinterest, by clicking on the buttons below this article.


 8613371530291