
sett for overshot in stock

I was recently weaving an overshot pattern that used 10/2 cotton for the warp/ground weft and 5/2 cotton for the pattern weft. I also have a few cones of 3/2 cotton, but I didn’t know if they’d be too big compared with the 10/2. I have a large collection of 8/2 yarn as well, would the 5/2 yarn be better suited as a pattern weft for a project that uses 8/2 for the warp/ground instead? Are there any guidelines about what size yarns work best as the pattern weft for overshot versus the warp/ground weft?
Too many variables (the yarns, the specific overshot draft, and the desired hand of the fabric) are involved to give a single rule of thumb for pattern-weft size vs ground warp and weft size in overshot. Probably the most common yarns/setts for contemporary overshot fabrics are 10/2 cotton for warp and tabby weft at 24 epi and either 5/2 pearl cotton or 3/2 pearl cotton for the pattern weft. The fabrics woven with these yarns/setts are usually sturdy fabrics in a weight suitable for placemats and towels. 3/2 pearl cotton would also work (and not be too heavy) for the draft you’re using with 5/2 cotton, unless the pattern-weft floats are very short (this would be for a delicate design, usually looking very twill-like). In that case, the 3/2 pearl cotton weft would not pack in well enough and you’d see streaks of the tabby weft between pattern picks. By the same token, if your overshot design has long pattern-weft floats with large blocks of pattern, a 5/2 pearl cotton pattern weft is likely to be too thin to cover the blocks; in that case, you’d also see streaks of the tabby weft between pattern picks.
Wool pattern wefts have the capacity to full to cover the blocks with wet-finishing, so their size can vary depending on the nature of the wool. With 10/2 pearl cotton warp and tabby weft, I like using Harrisville Shetland (its heathered colors add to the effectiveness of an overshot design) or other 8/2 wools. These fabrics (cotton ground cloth, wool pattern weft) are also usually sturdy, with a hand similar to colonial coverlets. If a soft fabric is desired, as for a shawl or scarf, wool, wool/silk, or silk would be good choices for warp and tabby weft. For a soft overshot fabric in all wool, the sett should be as for plain weave, but open enough that the wool threads have room to swell with fulling. For a wool pattern weft to show well on a wool ground cloth, it should be two to three times as heavy as the ground warp and weft. I’d follow that principle for silk, too: Sett the warp as for plain weave and choose a weft two to three times as heavy as the the ground yarns.
8/2 cotton is usually sett at 20 ends per inch for plain weave. 3/2 pearl cotton would be a good size for the patten weft, but it is mercerized whereas the 8/2 cotton is not. The contrast between the sheen of the pearl cotton and the matte finish of the 8/2 cotton might work well, or might not. You’d have to sample to see. Another option is to use the 8/2 cotton doubled for a pattern weft.

I am currently weaving a tablecloth with a 10/2 cotton warp, a 20/2 cotton tabby weft, and a 6/2 cotton pattern weft. I’d like to do a series of scarves with the remainder of the warp using a finer silk for the pattern weft but I am curious about the effect it will have on the pattern, Lee’s Surrender. I am assuming the pattern will be squished down and distorted rather than the neat exact squares and curves in the current piece, but it may make for an interesting effect in a scarf.
Usually, overshot is woven with a warp and tabby weft of the same size and a pattern weft that is two to three times heavier/thicker than the warp and tabby weft. In your tablecloth, you used a finer tabby weft than the warp yarn. Sometimes this is done in order to make it easier to beat in the tabby and pattern wefts so that the pattern weft covers the pattern area without showing streaks of tabby weft. This might especially help when weaving a wide piece like a tablecloth or coverlet (it takes more force to achieve the same number of picks per inch in a wider piece than in a narrower piece).
If you were to use the same warp yarn for a scarf and make the pattern weft finer, the pattern weft would be unlikely to cover the blocks showing pattern—you would see streaks of tabby weft between pattern picks (your 6/2 cotton pattern weft is already fairly fine for a 10/2 cotton warp). I"m assuming you would be using only a section of the warp for a scarf, since a scarf would be narrower than a tablecloth. What you could do is tie on a finer warp to the section of 10/2 warp you want to use for the scarf, and after the warp is beamed, re-sley to a closer sett. Overshot can make a lovely structure for a scarf, but usually in finer yarns than 10/2 cotton. The scarf shown here is woven with a 30/2 silk warp (at 28 epi), a 30/2 silk tabby weft, and a 20/2 silk pattern weft. A 20/2 cotton warp, 20/2 cotton tabby weft, and 10/2 cotton pattern weft would also make a beautiful scarf weight. If you do use your 10/2 cotton warp, I"d stick with the 6/2 cotton pattern weft.
The second part of your question has to do with whether or not using a finer pattern weft would distort the pattern. With overshot, you can always adjust the appearance of a pattern block (its height) by adding or subtracting pattern picks. Most overshot motifs are designed to be symmetrical (as tall as they are wide). Always allow some extra warp for sampling until you can determine the number of pattern picks (alternating with tabby) required to achieve symmetrical motifs ("weaving to square").

Note: Overshot and Summer & Winter often use a 16/2 cotton warp sett at 30 epi, and an 8/2 cotton or similar size for the pattern weft and 16/2 as the tabby weft.

You will also need to choose 3 cones of Zephyr for your weft and 3 skeins of 30/2 Bombyx silk for your weft. Jane used these combinations in her samples:
You will also need to choose 3 cones of Zephyr for your weft and 3 skeins of 30/2 Bombyx silk for your weft. Jane used these combinations in her samples.
In weft-faced fabrics, the warp is all but covered by the weft. To accomplish this, you have to space the warps far enough apart that the rows of weft will pack down and cover them. There is a method which can be used as a starting point for experimentation in finding this warp spacing. Use your ruler to wind both the warp and the weft threads together. Alternate the warp and weft threads. Keep them flat. Be careful not to twist or stretch them, but still, push them together until they just barely touch. Finally, count only the warp threads in your inch to get the approximate sett. See Figures A-C. You probably will use a thicker weft yarn than a warp yarn.
If you want a true plaid, then you’d want a precisely balanced sett, so that the warps and wefts are both showing equally. However, look at a machine woven plaid-the warps are denser than the wefts-for ease in weaving.
If a weave has weft emphasis, you can’t have the warp as dense as 80%. Examples are overshot and summer-and-winter fabrics. Use a plain weave sett here because plain weave is the basis for these two weaves. Then, as a starting point, take 60-70% of their maximum sett, depending on the purpose of your cloth.
To determine WPI you simply wrap the yarn around the sett checker in the one inch cut out. You want the yarn to touch but not overlap or be squished. Count how many times you wrapped the yarn and that is your WPI (wraps per inch)

One of the great things about having been a blogger for 12 years (did I actually just admit that?!) is that you occasionally get to look back and see how very far you’ve come.
Over three years ago, when my David Louet floor loom was still somewhat new to me, I wrotethis post on overshot. If you read it, you will discover that my initial relationship with overshot was not a very positive one.
The happy ending to the initial overshot sob story is that I can weave overshot now. Quite well, in fact! And I also teach it. And I happen to love it, very, very much. Don’t you love a happy ending?
I don’t think there was any particular moment where I thought to myself “I can weave overshot now!” I didn’t even weave any overshot for quite some time after that initial attempt. But slowly it tempted me back, and we started over. It was just a matter of sticking with it, employing some specific techniques and practice, practice, practice until it feels like an old friend.
My love of overshot has only increased with my more recent discovery of American Coverlets. I loved the look of the coverlets and the history behind them before I realised that so many of them were woven in the wonderfully humble 4 shaft overshot.
Now that I have quite a lot of experience weaving overshot, I want to share my best overshot tips with you in hope that you too will fall in love with this wonderful weave structure.
I know, I know, sampling takes time and yarn, it’s true. But it teaches you so, so much. It can also be more economical, as you can test your yarns out for suitability before committing to a larger project. Trust me, sampling is so well worth the time!
To weave overshot you need a warp yarn, a tabby yarn and a pattern weft yarn. Using the same yarn for warp and tabby works perfectly. For the pattern weft, I like to use a yarn that is twice the size of the tabby/warp yarn. I have experimented with using doubled strands of tabby/warp yarn in a contrasting colour, but it just doesn’t look as good. A thicker pattern yarn is the way to go.
What will the size of your item be? A miniature overshot pattern may get lost in a blanket, but may be perfect for a scarf. As a general rule, a good way to estimate the size of one repeat of your pattern just by looking at the draft is to see how many repeats are in one threading repeat. Also consider the thickness of your yarns and the sett you intend to weave.
Just to give you an idea, my current project is woven at 20 ends per inch with 8/2 cotton for warp and tabby and fingering weight wool for the pattern weft. The weaving draft has 50 threads in one threading repeat. My design repeats on the loom are around 2.5″ wide and just under 5″ long, which is a great size for the 30″ x 99″ throw I’m weaving.
I throw my picks gently to avoid drag on the selvedges and therefore preventing excessive draw in. I give a generous angle to the weft pick and keep it soft at the edges. I do adjust the picks at the edges before beating when necessary, but mostly I prefer to leave them alone and let them settle into place on their own.
This is a non negotiable for overshot if you want neat edges and less headaches! You get used to using floating selvedges very quickly, so don’t stress if you have no experience with them.
This is another selvedges tip. I’ve experimented with crossing the two weft yarns at the selvedge to see whether it gives a neater edge, but it doesn’t, at least for me. So, instead of twisting the two wefts at each selvedge when throwing a new pick, I just let them follow one another sequentially and my edges are much neater that way.
Besides the thickness of the pattern weft yarn, you will also want to consider what kind of bloom it may have after wet finishing. For example, I know that my fingering weight wool blooms beautifully, whereas a cotton of the same size would not bloom in the same way. I very much like the contrast of the 8/2 cotton background with the plump wool pattern weft.
There are 6 treadles needed for overshot, even though you weave on 4 shafts. The two extra treadles are for the tabby weave. I always set up my pattern treadles in the centre of the loom – two on the left and two on the right. Then I set up a “left” tabby and a “right” tabby treadle. To do this on my 8 shaft loom I leave a gap between the pattern treadles and the tabby treadles so that my feet can “see” and differentiate between a pattern and tabby treadle.
I like to advance little and often. You will find your own preference or “sweet spot” for weaving, but I find that with overshot I advance a lot more frequently at a much smaller amount than I do usually.
An example of this is that I wove an overshot sampler right before Is started my main project (the throw). It was a narrow warp (around 8″) and a different overshot threading and treadling than I’m using for the project.
But for my throw project, I am beating harder and sometimes having to beat twice. Because of the width of the project, I need to be careful that I’m beating evenly, and that is easier to do if I’m beating more firmly.
I personally do not use a temple. Some weavers will say they won’t weave without one. I’ve tried using a temple on many of my projects, particularly if I’m getting broken edge warp threads (signs of tension problems and too much draw in). But I will avoid using one wherever I can get away with it, and I don’t use one for weaving overshot.

You may remember that I recently returned from a visit to The Philippines. It may not surprise you that I am always on the lookout for interesting textiles, and especially handwoven fabrics. I don’t mean to do that; it just happens… Well, when I met sweet Beth at the Sunday market, I felt like I hit the jackpot! Beth and I had a common language – Handweaving! (She speaks fine English, too, of course; but you know what I mean.)
If you don’t have time to look at all the textile pictures today, at least scroll down and see my little granddaughter carrying her big umbrella on the way to the market. Umbrellas are always in season in Metropolitan Manila. For the rain in the rainy season (our visit), and for shielding your skin from the sun all the rest of the time. (You can always come back later and finish looking at the rest of the pictures. Smile.)

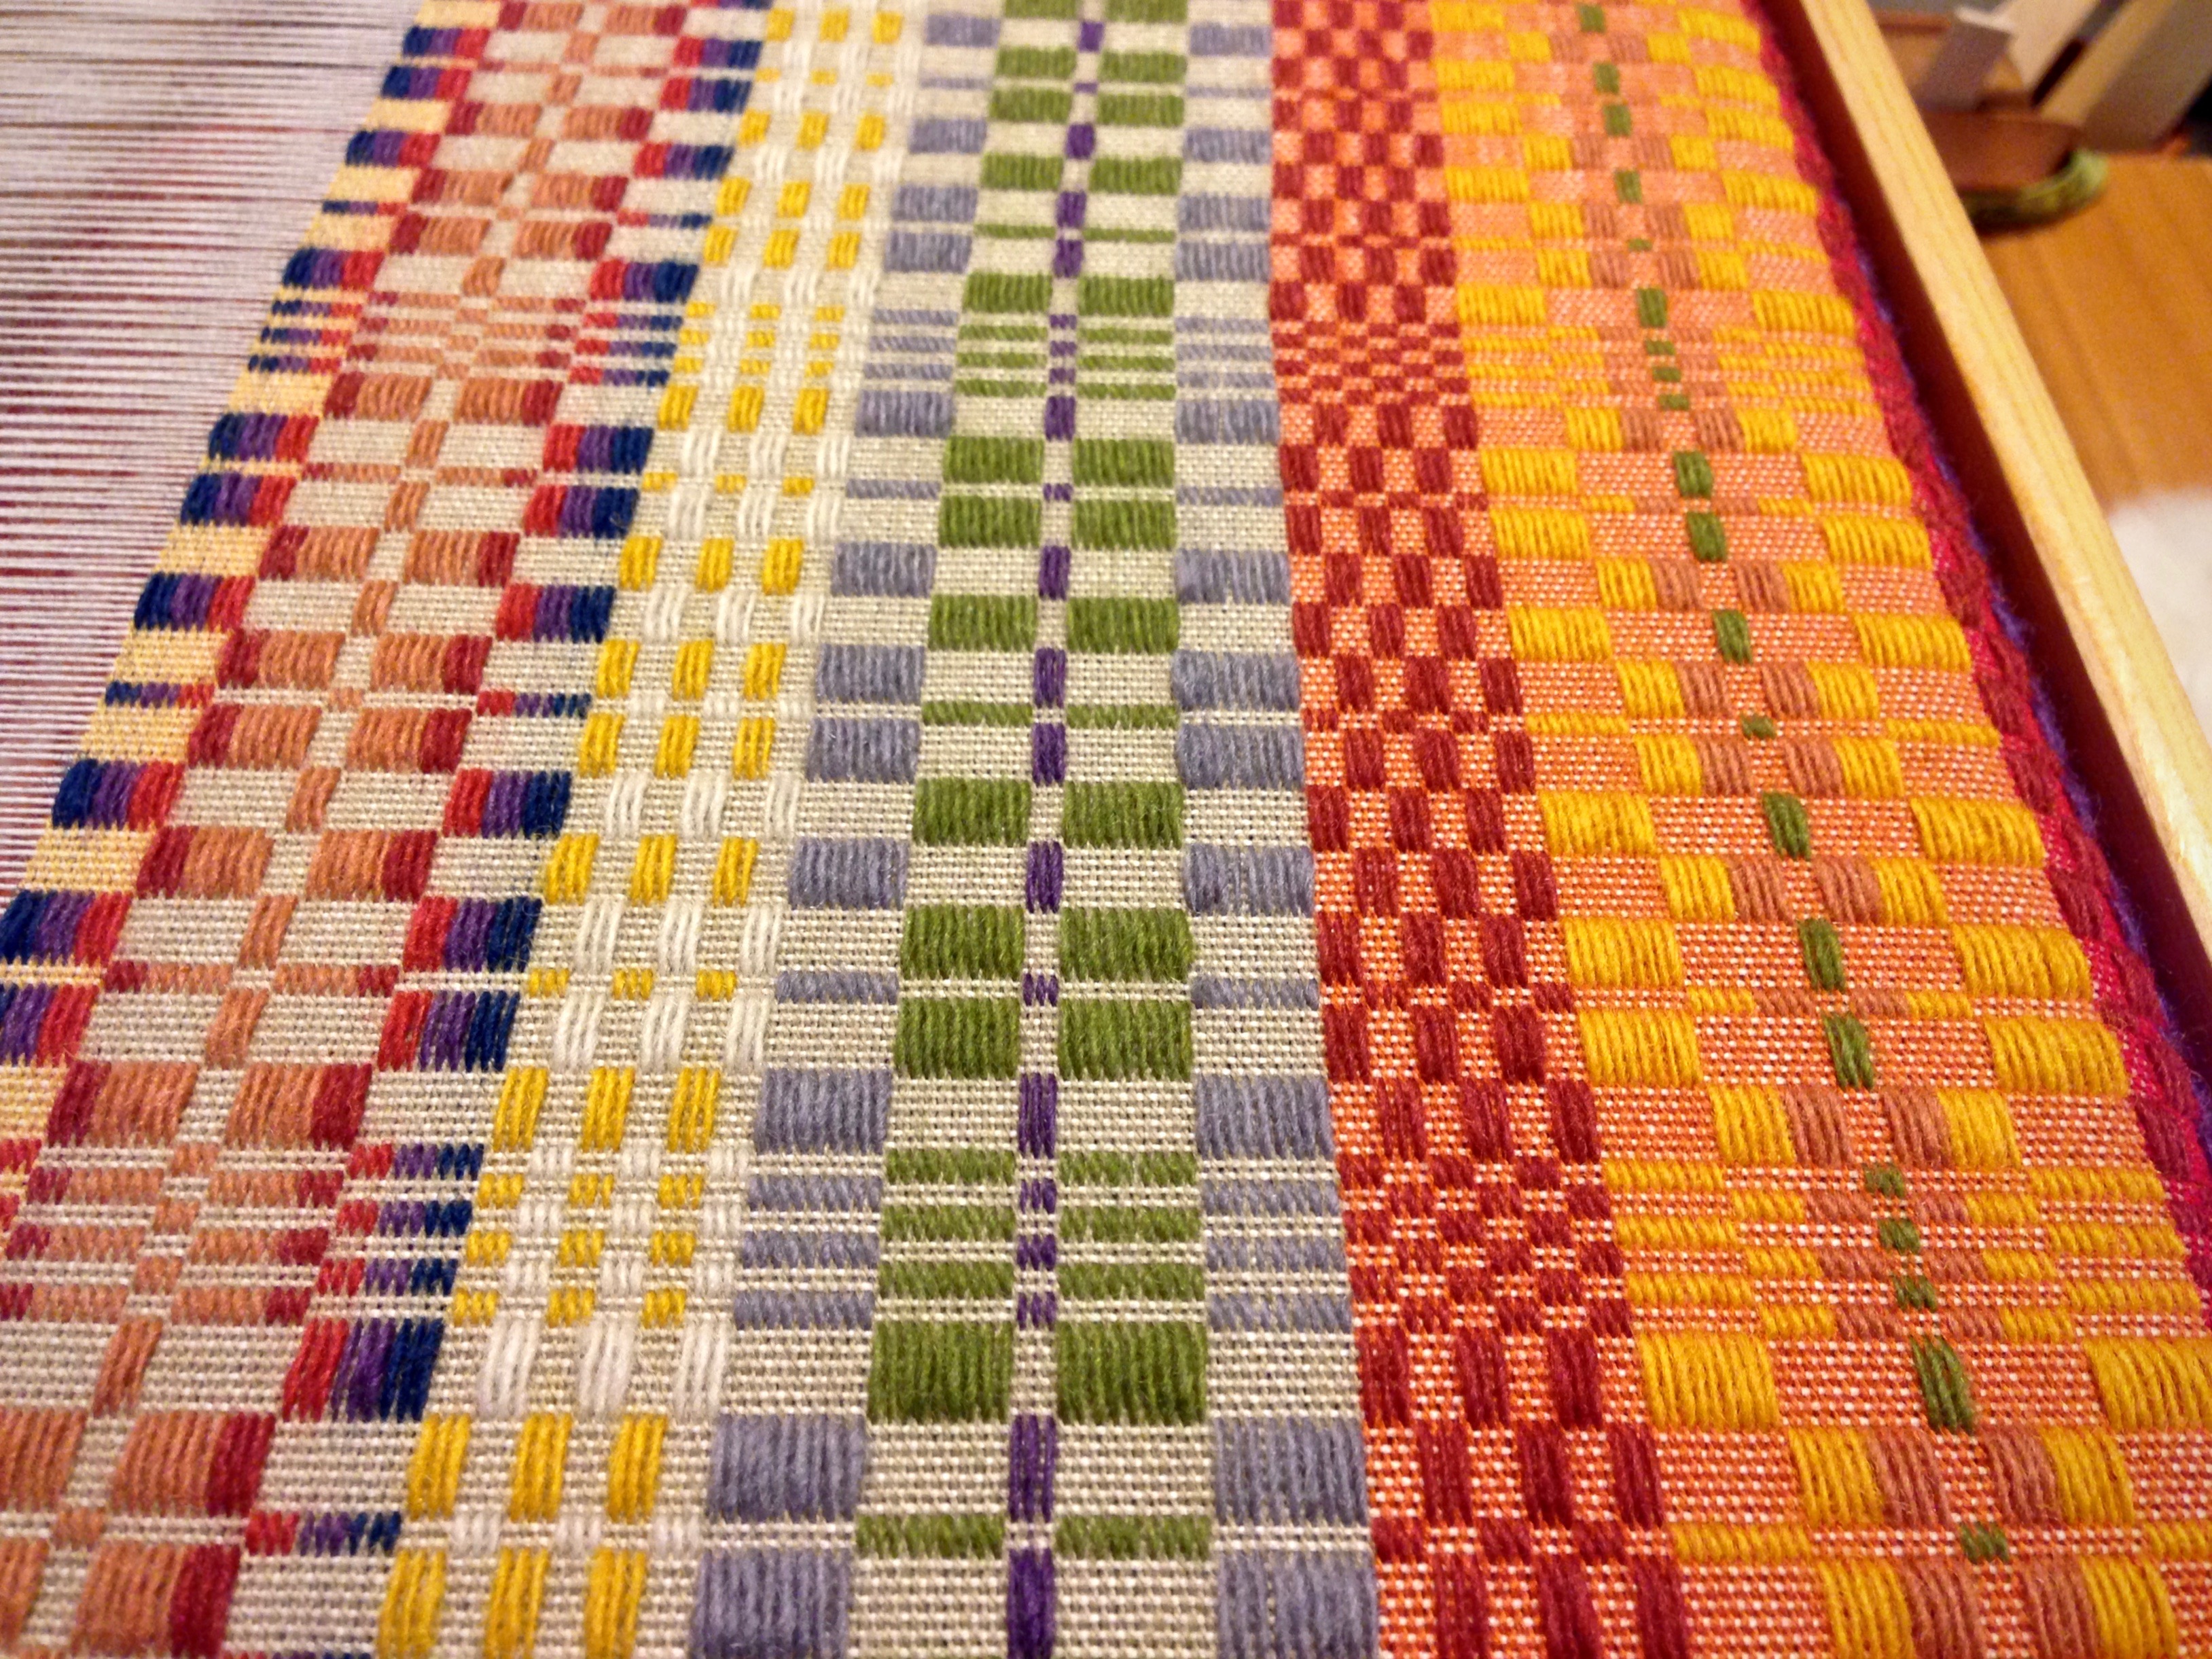
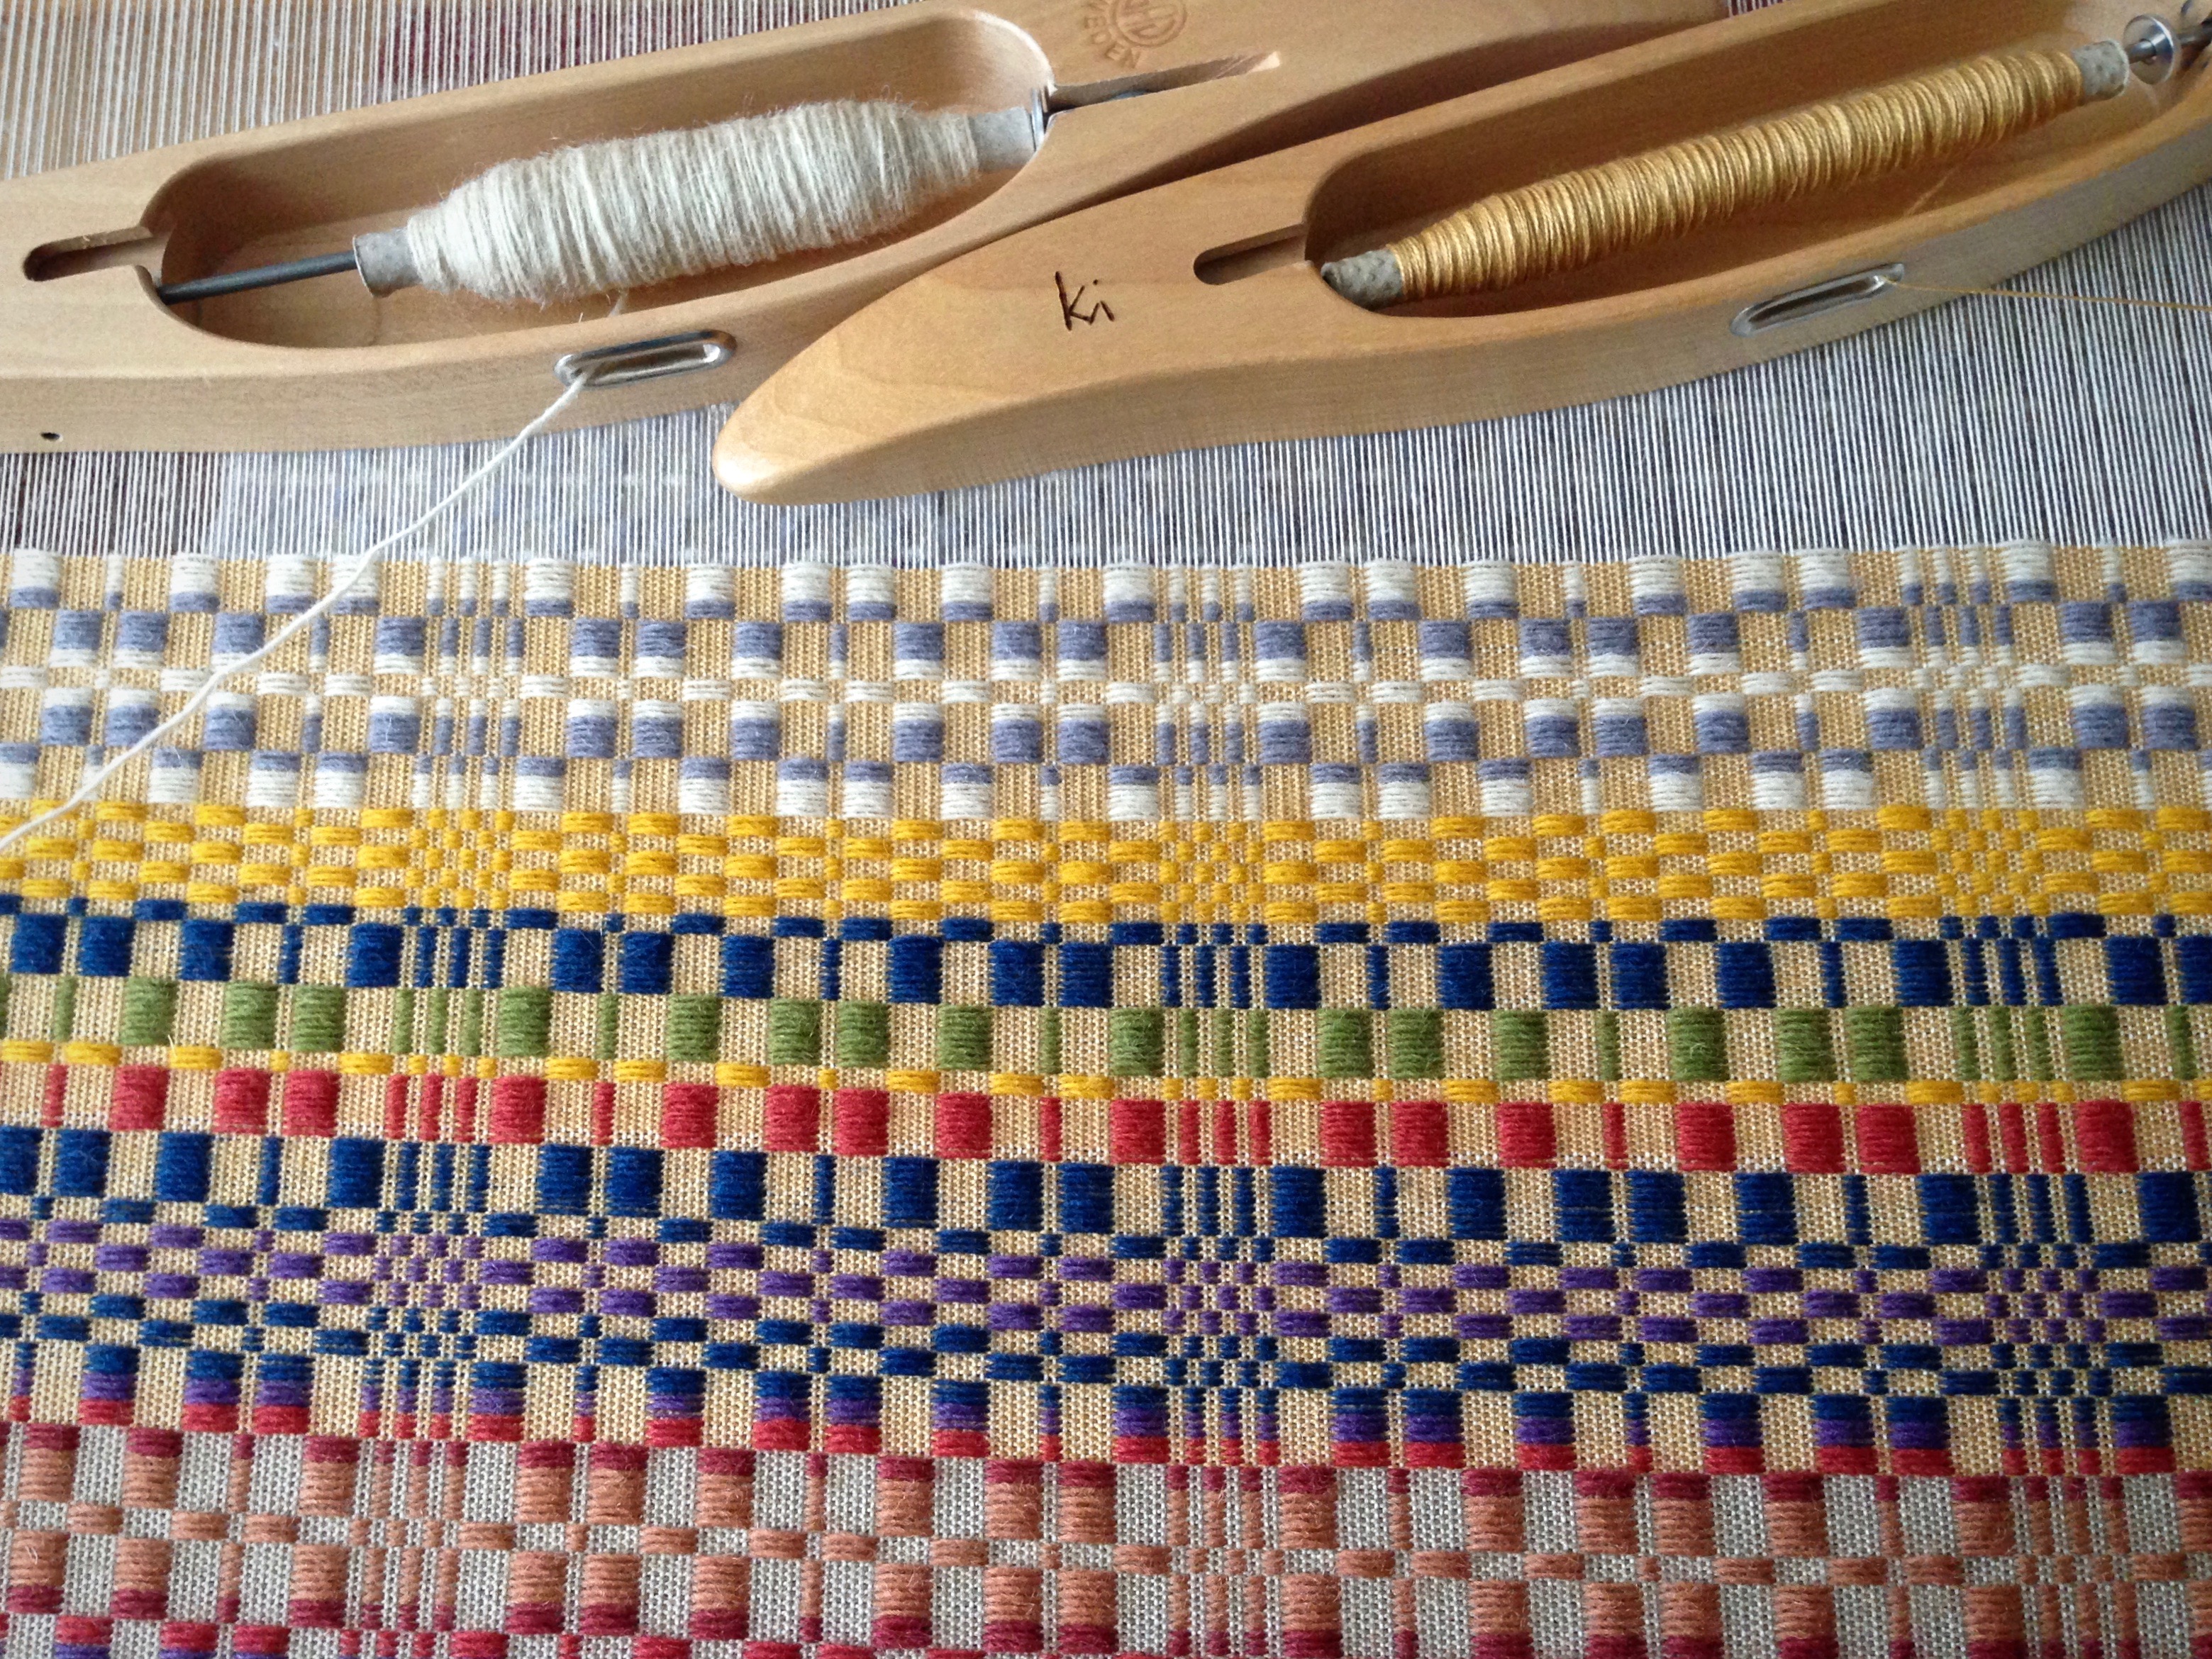
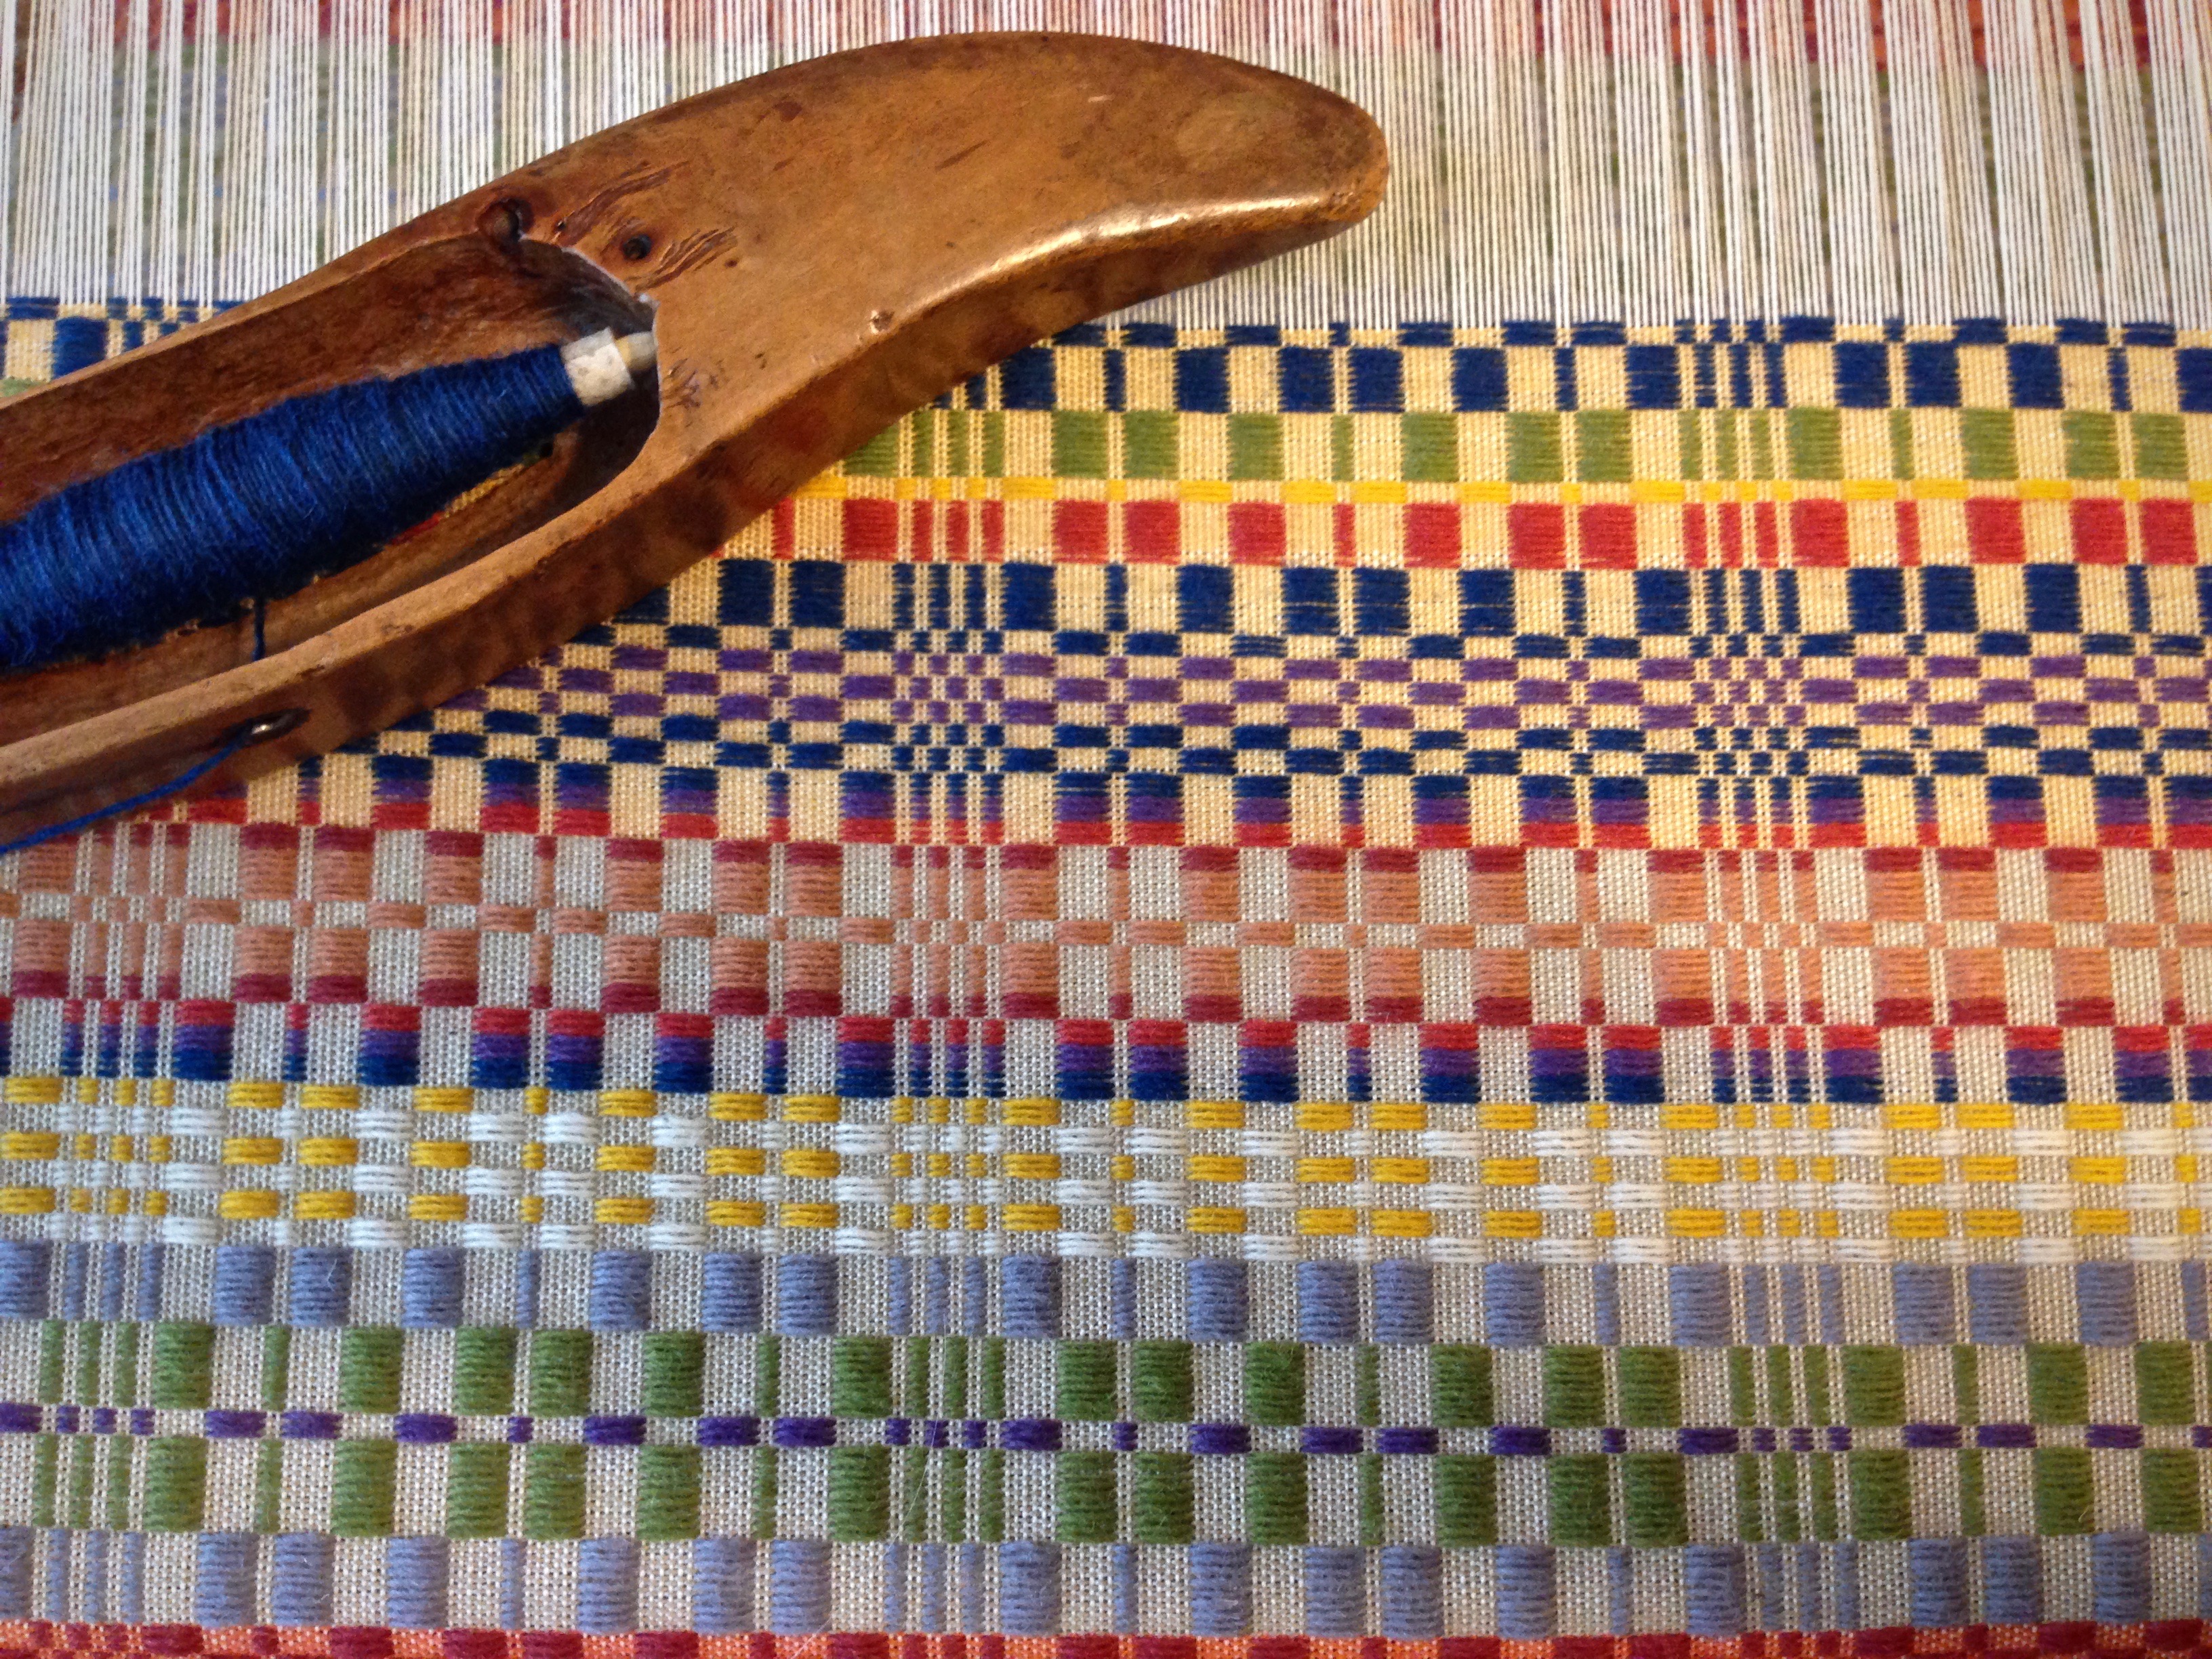
When weaving overshot, you may notice that sometimes the edges of blocks have pattern picks that spread apart or are snuggled together. In the Blue overshot sample above you do not see this occurring. The orange sample is linen and in a handwoven cloth from Estonia. Here the pattern weft is smaller in comparison to the tabby. In the blue overshot above the pattern weft is larger and hides the differences. In order to make the blocks appear symmetrical even with the spreading pattern ends — use an even number of pattern picks in turning blocks (or mirror points in the threading.)
Weave-as-drawn-in blocks will produce a draft in star fashion. To weave as drawn in: Look at the number of ends of each color and enter that number of weft picks for the block. The number of colored ends at turning blocks is even, the number of ends for non-turning blocks is odd. This mirrors the tabby at the turning points.
Once you have the blocks identified you can manipulate the draft to suit your project. It is also easy to see how to enlarge or miniaturize the draft. Do this by adding or subtracting pairs of ends to each blocks. Keep the block proportions the same. For example if you add ends to the larger red blocks, you should also add the same number of ends to the larger yellow blocks. You can look at the balance of the draft by looking for the color balance, figure 2.
5. Try different tie-ups using the ‘wrap feature’ in the software. Eight different treadlings possible. Once you have an overshot draft on the screen, you can manipulate the tie-up to see different designs.
Like all new weavers I tried many techniques. One technique, overshot, I have tried only twice. There is a pattern called Norse Kitchen on page 186 in the book. I wove this table runner on a four shaft table loom and only made one mistake! I was so proud of it. It is woven in cottolin.
I signed up for the Discover Color Weave-Along! last week. I am weaving mug mats in overshot on 8 shafts. Five thousand weavers have also joined the workshop which is free. This is a 3-week weave-along delivered via an online course with plenty of information. https://www.warpandweave.com/classes/discover-color/
I am using cottolin instead of 8/2 cotton sett at 18 epi. Here is my first attempt on the loom. I am using a double cottolin thread for the pattern weft. I have a useful shuttle which takes two bobbins.
The first mat was woven using a doubled red cottolin yarn for the pattern thread. I do not think that I beat hard enough. For the second mat I used a 3/2 cotton for the pattern weft. I beat as hard as I could.
The workshop indicates that the mug mats should be about 8" by 8" but perhaps the cottolin is making the dimensions different. The first red mat is 6.5 inches in width and 8.25 inches in length. Examining it closely I can see that the plain weave tabby has not been beaten in hard enough. The sett is 18 epi.
I need to wash them to check on the final size before I weave any more. Perhaps a sett of 20 epi might be more useful. They do seem rather large for a normal sized mug.

In its simplest form – overshot is a weaving technique that utilizes at least 2 different types of weft yarns and floats to create a pattern. These patterns are often heavily geometric.
Ground weft– plain weave pattern that is used between each row of your overshot pattern. This plain weave gives the textile structure and allows for large areas of overshot to be woven without creating an overly sleazy fabric. Without the use of a ground weft on an overshot pattern, the weaving would not hold together because there would not be enough warp and weft intersections to create a solid weaving.
They were most popular though in southern Appalachia and continued to be so even after textile technologies advanced. When other parts of colonial America moved to jacquard weaving, the weavers of southern Appalachia continued to weave their overshot coverlets by hand.
Since the overshot coverlets were most often woven at home on smaller looms they usually had a seam down the middle where two woven panels were sewn together.
The thing about overshot is that no matter the application, it is pretty impressive. Perhaps that is just my opinion, but due to how complex it can look, I feel that it is pretty safe to say.
Just because it was originally used for coverlets, does not mean it can only be used for coverlets. Changing aspects of the pattern like the colors used, or the way you use your ground weft can drastically change the look and feel of your weaving.
The discontinuous weft yarns will float onto the back of the weaving until you are ready for them in their next pick. This does make your overshot weaving one sided since it will have vertical floats on the back. Keep this in mind if you want to try this technique out.
Also seen in the image above, the overshot yarn that I used was not all one color! This is a really simple way to get extra dimension and interest in your overshot if that is something you are looking for.
This makes it simple to be able to only weave overshot in certain parts of your weaving. If you want to do this then you can continue to weave your plain weave across the entire width of your weaving, but only weave overshot in specific areas. This creates a overshot section that functions similar to inlay.
Since the overshot pattern is strongly influenced by the weft yarns that are used it is important to choose the right yarns. Your weaving will be set up to the specification needed for a balanced plain weave. Make sure you understand EPI in order to get the right warp sett for your overshot weaving.
The ground weft used is almost always the same yarn as your warp. This allows the overshot weft to really be able to shine without contrasting warp and weft plain weave yarns.
In order to get the full effect of the overshot, it must be thick enough that when you are weaving your pattern it covers up the ground weft between each pass. If it is not thick enough to do this, it will still be overshot, but the full effect will not be seen.
What this warp thread does is serve as an all-purpose selvedge that does not correspond with your pattern. Instead, you would make sure to go around this warp thread every time to make sure that you are able to weave fully to the selvedge. Without this, your overshot weft will float awkwardly on the back of your weaving whenever the pattern does not take it to the edge.
I have mentioned this book multiple times because it really is such a great resource for any weaver looking to weave patterns of all types. It contains 23 pages of different overshot patterns (among so many other patterns) that you can set up on your floor or table loom.
Like a lot of different types of weaving, it is possible to do it on almost any type of loom that you have. The difference being that it might take you a little bit longer or require a bit more effort than if you did it on a traditional floor loom.
Weaving overshot on a frame loom or rigid heddle loom will require the use of string heddles and pick-up sticks that you have to manually use to create a shed.

After returning from a fabulous time at the New England Weavers Seminar in July, I found myself rewriting the beginning of this article. I was so lucky to spend two days in a round-robin style class taught by Marjie Thompson entitled 18th & 19th Century High Fashion for the Middle Class. To say that Marjie knows an extraordinary amount about historic textiles seems to be an understatement. Oh, to have an hour swimming about in her brain!
There were ten of us in the class, and we rotated, weaving a new sample at each loom. Marjie shared her knowledge of the patterns we sampled, and I came away with an even greater interest in this subject in addition to a binder filled with samples. There really is no greater way to learn than a hands-on workshop. I am already preparing to wind a warp for a dimity project. I’ll keep you posted on my progress.
One interesting piece of information I learned is that overshot is a fairly modern term. Originally this type of weaving would have been referred to as floats or floatwork. It seems that many people are returning to this original terminology, though the weaving world has thus far shown little interest in making the change back. Personally, I like it. Floatwork sounds a bit less frenetic than overshot – as though I’m peacefully hitting my mark rather than missing it in a wild fashion.
Until recently, my floatwork experience was limited to one project. This was created using Cascade 220 back in April 2008. The pattern is Leaves on p. 118 of The Handweaver’s Pattern Directory by Anne Dixon. I was criticized for having floats that were too long and would easily snag, but I loved my fabric. I turned it into a little tote that fit perfectly into my bike basket and never experienced a snag. Thankfully I took a photo back then, as the bag is currently in storage and missing the bike paths of Boulder.
When I first considered writing this article, I wasn’t confident enough with my weaving vocabulary to write something that a true beginner might actually understand. The information out there assumed, and still assumes, a certain level of weaving knowledge. I learn best by seeing something demonstrated, not by trying to translate written instructions. So how does one write an article for people like me? Let’s start with some basic terminology.
Floatwork, formerly known as overshot which was originally known as floatwork, is a block design traditionally woven on four shafts where a heavier pattern yarn floats above a plain weave ground cloth and creates a raised pattern. Your plain weave background cloth is woven using a finer yarn in your warp and in every other weft pick (these weft picks being the ‘use tabby’ part of your pattern.)
This finer yarn is hidden in places by the thicker yarn floats, blended in places with the thicker yarn (as plain weave) creating areas that are shaded (referred to as halftone), and woven across itself to create delicate areas of plain weave. Most of us think of antique coverlets when we hear ‘overshot.’
For some reason the term tabby has always annoyed me. It made me think of cats (I’ve got two – one of whom decided to take my seat when I got up to get a quick snack – and I love them both dearly) not weaving until I looked up the origin of the word on etymonline.com.
Initially, the concept of a block was the toughest one for me to grasp because I was looking at the pattern as a complete unit rather than a combination of units. The block is simply a unit or part of a particular pattern in the shape of a rectangle or a square. There are usually at least four threads in a block, two pattern and two tabby. So you treadle the same pattern pick two or more times in sequence (alternating with your anchoring tabby picks) to create a solid shape in your pattern. Think about coloring in graph paper. If you color in four squares in a row, it just looks like a thick line, right?
Here is the thing about floatwork that really helped it to make sense for me. It is basically a twill weave. As Mary Black puts it, “An examination of an overshot draft shows it to be made up of a repetitive sequence of the 1 and 2, 2 and 3, 3 and 4, and 4 and 1 twill blocks”.
Choosing yarns to weave floatwork can be challenging. Generally speaking you want your pattern yarn to be about twice the diameter, or grist, of your tabby/warp yarn. Your tabby yarn and your warp yarn are generally the same yarn. I say generally because I can see so many non-traditional ways to weave floatwork that involve breaking the rules. Imagine, for example, taking a small part of a given pattern and blowing it up to a massive scale to do a wall hanging or using three different yarns to create a completely different visual experience!
When treadling a block pattern with tabby picks, I find it helpful to tie my tabby treadles on one side and my pattern treadles on the other. This way you can dance back and forth from left to right as the treadling sequence is always going to be pattern-tabby-pattern-tabby. It feels more like walking or pedaling a bicycle to alternate in this manner.
I used a pattern from Mary Meigs Atwater’s Shuttle-Craft book listed in the Resources section. The draft is No. 18 Name Unknown and is on various pages depending on which printing of the book you have. (See the Resources section on the next page for an image of the draft.)
You can find it listed in the chapter or sub-chapter entitled ‘Notes on the Overshot Drafts.’ As someone who generally cheers on the underdog, I was drawn to this pattern without a name.
Atwater’s patterns are written for a sinking shed loom. For a rising shed loom, like the Baby Wolf I used, simply tie up the shafts left blank in the draft instead of the shafts she tells you to tie up. For all of her traditional floatwork patterns, including the pattern I used, this tie-up would be 3-4, 1-4, 1-2, 2-3. Your tabby tie up should be 1-3 and 2-4.
I washed this in my front-loading washing machine on the wool setting and air-dried it on the clothesline. There was a note in the book that No. 18 Name Unknown, and its friend No. 17, are “plain patterns and suitable for couch covers or the coverlet for a man’s room, rather than for more frivolous purposes”. Perfect. I’m not much for frivolous, and I had been looking for the perfect fabric to re-cover an old chair.
Here is a list of books and magazines that might be of interest if you’d like to learn more about floatwork/overshot. Many of these references include patterns in addition to thorough instructions.
Atwater, Mary Meigs. The Shuttle-Craft Book of American Handweaving. New York: The Macmillan Company, 1928. Just scored a first edition on ebay for $9! I now have three copies and am seriously in love with this book (taken with a grain of salt as she is rather traditional.)
If you can find this issue anywhere, I’d recommend picking it up. It’s full of great information on historic weaving, but also has a super article on understanding and writing drafts by Debbie Redding (aka Deborah Chandler).
If you have a particular interest in old coverlets, Eliza Calvert Hall’s A Book of Hand-Woven Coverlets and The Coverlet Book by Helene Bress are both interesting resources, the later being particularly thorough. I can only imagine the time and research that went into this pair of tomes. And if you are simply looking for patterns, The Handweaver’s Pattern Book by Marguerite Porter Davison and The Handweaver’s Pattern Directory by Anne Dixon are just for you.
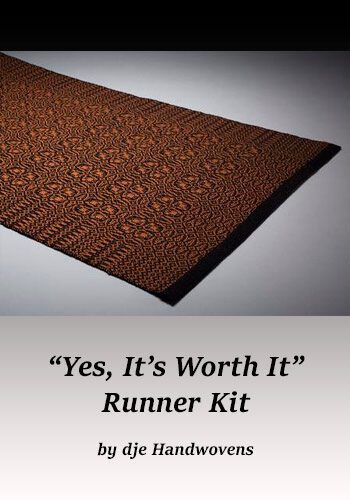
This fall, I set out to find a project that I could make as a housewarming gift for family friends. Due to time constraints, I needed something that was a manageable size and was something that our friends could use in their new home. With a name that included “celebration,” a size and scope doable in my time frame, and a gorgeous pattern to boot, I knew that Ute Bargmann’s Celebration Overshot Runner was it.
One cone of 10/2 mercerized perle cotton (for warp and tabby weft). I used Valley Yarns Valley Cotton #8176 (natural). The pattern calls for white for the tabby weft, but I thought natural worked well as both warp and weft.
Note:The treadling for this pattern was written with a rising shed loom in mind. If you have a sinking shed loom, like me, you’ll need to take some time to write out the pattern as its opposite. So, for instance, [3-4, 1-2, 1-4, 2-3] would be converted to [1-2, 3-4, 2-3, 1-4].
Indeed, this is one of the nice features of this pattern–you can customize how long you want the runner to be by adjusting how many times you repeat the center motif. The original pattern calls for 7 rows but I wanted a longer runner, so I wove 10. But you could also create more of a square mat if you did fewer—say, 5. Likewise, you could make the runner wider by adding extra columns of the center motif. (The pattern calls for 5 and I stuck with that.)
After I got to the end of the pattern and wove a few inches of plain weave for the hem, I then wove a couple of rows with a scrap yarn as a header to lock the runner in place once I took it off the loom (see above picture). I call this a “securing header” and I’ve found that it provides a tighter, more secure hem.
“I do think they overshot dramatically," said Friedman, co-founder of Canyon Partners hedge fund, whose comments came in the latest episode of Influencers with Andy Serwer.
The political calendar might have influenced Powell"s initial descriptions of inflation as merely fleeting, according to Friedman. "I think as soon as he was reappointed, [Powell] definitely stopped referring to transitory inflation at all,” Friedman says of Powell’s nomination for a second term as Fed chair.
"Once you are reappointed, he has a little bit more liberty in how he acts and can be subject to more criticism and maybe be able to take it better,” said Friedman, who worked at Goldman Sachs and Drexel Burnham Lambert before founding Canyon Partners.
In terms of the timeline, Friedman is broadly correct that Powell hasn’t discussed inflation as a transitory phenomenon in recent months. However, the Fed Chair first retreated from the term during a press conference on Nov. 3, 2021, about three weeks before Biden announced his re-nomination.
While the term appeared in that day’s Federal Open Markets Committee statement, it hasn’t popped up since. Powell more formally retired the term during congressional testimony on Nov. 30, eight days after President Joe Biden nominated him for another term. In March, Powell acknowledged that “hindsight says we should have moved earlier” in taking on inflation.
President Joe Biden looks on after announcing Jerome Powell as his nominee for Chair of the Board of Governors of the Federal Reserve System on November 22, 2021. (JIM WATSON/AFP via Getty Images)
“I have been critical of the Fed for the better part of a year on its failure to recognize that inflation became, as of last spring, the most serious short-run threat facing the American economy,” Summers recently told the Harvard Gazette.
William McChesney Martin, one of Powell’s predecessors, famously described the Federal Reserve as “in the position of a chaperone who has ordered the punch bowl removed just when the party is really warming up." That is to say, the Fed should raise interest rates before the economy begins to overheat.


 8613371530291