
the endpoint of the titration is overshot supplier
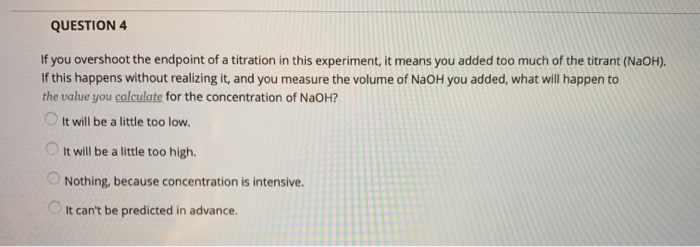
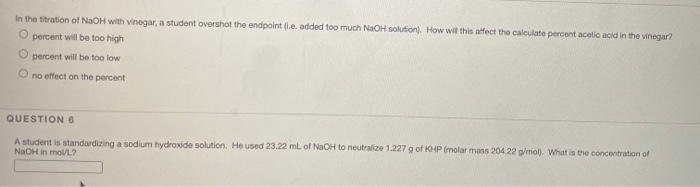
The endpoint of titration is overshot! Does this technique error result in an increase, a decrease, or have no effect on the reported percent acetic acid in the vinegar? Explain.
Titration is a quantitative analytical volumetric technique that permits the determination of the unknown concentration of an analyte with a known concentration of titrant. This is possible because the two react in a known stoichiometric manner allowing calculation of the unknown concentration.

A titration is a volumetric technique in which a solution of one reactant (the titrant) is added to a solution of a second reactant (the "analyte") until the equivalence point is reached. The equivalence point is the point at which titrant has been added in exactly the right quantity to react stoichiometrically with the analyten (when moles of titrant = moles of analyte). If either the titrant or analyte is colored, the equivalence point is evident from the disappearance of color as the reactants are consumed. Otherwise, an indicator may be added which has an "endpoint" (changes color) at the equivalence point, or the equivalence point may be determined from a titration curve. The amount of added titrant is determined from its concentration and volume:
A measured volume of the solution to be titrated, in this case, colorless aqueous acetic acid, CH3COOH(aq) is placed in a beaker. The colorless sodium hydroxide NaOH(aq), which is the titrant, is added carefully by means of a buret. The volume of titrant added can then be determined by reading the level of liquid in the buret before and after titration. This reading can usually be estimated to the nearest hundredth of a milliliter, so precise additions of titrant can be made rapidly.
Figure \(\PageIndex{1}\):The titration setup initially, before titrant (NaOH) has been added. NaOH is held in the burett, which is positioned above the beaker of acetic acid. Titrant (NaOH) is added until it neutralizes all of the analyte (acetic acid). This is called the equivalence point. Note: Unlike the picture, both substances are actually clear but are blue for visibility purposes in the picture.
As the first few milliliters of titrant flow into the flask, some indicator briefly changes to pink, but returns to colorless rapidly. This is due to a large excess of acetic acid. The limiting reagent NaOH is entirely consumed.
The added indicator changes to pink when the titration is complete, indicating that all of the aqueous acetic acid has been consumed by NaOH(aq). The reaction which occurs is
Reaction of acetic acid and sodium hydroxide to give acetate ion, sodium ion and water. The reaction is shown in terms of stick and ball diagram of each species.
Eventually, all the acetic acid is consumed. Addition of even a fraction of a drop of titrant produces a lasting pink color due to unreacted NaOH in the flask. The color change that occurs at the endpoint of the indicator signals that all the acetic acid has been consumed, so we have reached the equivalence point of the titration. If slightly more NaOH solution were added, there would be an excess and the color of the solution in the flask would get much darker. The endpoint appears suddenly, and care must be taken not to overshoot the endpoint.
After the titration has reached the endpoint, a final volume is read from the buret. Using the initial and final reading, the volume added can be determined quite precisely:
Figure \(\PageIndex{2}\)The figure above shows a completed titration, where the equivalence point has been reached. NaOH (the titrant) has neutralized all of the Acetic Acid, leaving Acetate in the beaker. At this point, the moles of NaOH added is equivalent to the moles of acetic acid initially in the beaker.
The object of a titration is always to add just the amount of titrant needed to consume exactly the amount of substance being titrated. In the NaOH—CH3COOH reaction Eq. \(\ref{2}\), the equivalence point occurs when an equal molar amount of NaOH has been added from the graduated cylinder for every mole of CH3COOH originally in the titration flask. That is, at the equivalence point the ratio of the amount of NaOH, added to the amount of CH3COOH consumed must equal the stoichiometric ratio
Titration is often used to determine the concentration of a solution. In many cases it is not a simple matter to obtain a pure substance, weigh it accurately, and dissolve it in a volumetric flask as was done in Example 1 of Solution Concentrations. NaOH, for example, combines rapidly with H2O and CO2 from the air, and so even a freshly prepared sample of solid NaOH will not be pure. Its weight would change continuously as CO2(g) and H2O(g) were absorbed. Hydrogen chloride (HCl) is a gas at ordinary temperatures and pressures, making it very difficult to handle or weigh. Aqueous solutions of both of these substances must be standardized; that is, their concentrations must be determined by titration.
A sample of pure potassium hydrogen phthalate (KHC8H4O4) weighing 0.3421 g is dissolved in distilled water. Titration of the sample requires 27.03 ml NaOH(aq). The titration reaction is
To calculate concentration, we need to know the amount of NaOH and the volume of solution in which it is dissolved. The former quantity could be obtained via a stoichiometric ratio from the amount of KHC8H4O4, and that amount can be obtained from the mass
By far the most common use of titrations is in determining unknowns, that is, in determining the concentration or amount of substance in a sample about which we initially knew nothing. The next example involves an unknown that many persons encounter every day.
Vitamin C tablets contain ascorbic acid (C6H8O6) and a starch “filler” which holds them together. To determine how much vitamin C is present, a tablet can be dissolved in water andwith sodium hydroxide solution, NaOH(aq). The equation is
If titration of a dissolved vitamin C tablet requires 16.85 cm³ of 0.1038 M NaOH, how accurate is the claim on the label of the bottle that each tablet contains 300 mg of vitamin C?
The 308.0 mg obtained in this example is in reasonably close agreement with the manufacturer’s claim of 300 mg. The tablets are stamped out by machines, not weighed individually, and so some variation is expected.
This website is using a security service to protect itself from online attacks. The action you just performed triggered the security solution. There are several actions that could trigger this block including submitting a certain word or phrase, a SQL command or malformed data.
White vinegar sold in a grocery store is usually about 5% acetic acid by mass_ This means that in 100 g of vinegar, there are 5 g of acetic acid and about 95 g of water_ In 2.02 g of vinegar (which is the same as 2.00 mL of "vinegar) _
(c) How many mL of an 0.100 M solution of NaOH(aq) are needed in order to supply the number of moles of NaOH calculated in part (6)2 This is the amount of NaOH that you can expect t0 add in order to reach the endpoint of your titration if the procedure is performed correctly. Write this number on this experiment "$ data sheet so you will have it with you after you turn in the prelab.
Look up the pH indicator using the link in the Resources section if you are performing an acid-base titration. The pH indicator is a chemical that changes color over a given pH range. Before beginning your titration, you should have added a couple drops of the indicator, so you"ll already know which one you are using. The link under the Resources section will tell you what color change to expect when your titration is complete.
Swirl the flask of analyte while adding titrant from the buret. (The analyte is the chemical you are testing in the titration, while the titrant is the standard you are adding.) Swirling will make sure the analyte remains well-mixed so that the color change (when it occurs) is an accurate reflection of the pH of the solution.
Try placing the flask containing the analyte on a piece of paper or a Kimwipe. The white background will help you see the color change when it occurs.
Add titrant slowly. If you add titrant too quickly, you could easily overshoot the end point of your titration, at which point you may need to repeat the entire experiment.
Watch the solution closely for the color change. Once the solution begins to change color and the new color persists for at least 30 seconds, you have reached the end point of your titration.
Tips The most common mistake is to add titrant too quickly and overshoot the end point. Try doing a "quick and dirty" trial run to get an idea of how many milliliters of titrant are needed to reach the endpoint. Once you know approximately where the endpoint is, you can go back and do a more careful second trial; this time, you can add titrant quickly until you begin to approach the volume you added in the first "quick and dirty" trial and then slow down and add titrant just a drop at a time.
1.A known quantity of the unknown solution (HCl) is pipetted into a flask and several drops of an indicator are added. If phenolphthalein is being used as an indicator, the solution should remain colorless at this point. The flask is placed on white paper to make the endpoint easier to see.
2.Make sure the buret stopcock is closed and then rinse the inside with several milliliters of titrant (NaOH). The buret should be held nearly horizontally and rotated so that all of the inside surfaces are contacted by the titrant. Some titrant should also be run through the stopcock to clean it as well. Cleaning is normally performed over a sink.
3.Make sure the stopcock is closed. Place the buret in a buret clamp and fill it carefully with titrant. Use a beaker with a spout or funnel to reduce the possibility of spilling titrant.
5.Read the volume of the buret. This is your initial volume (14.62 ml in this case). Reading is made easier by holding a piece of dark paper behind the buret.
6.Place the flask containing the unknown under the buret. Slowly open the stopcock and add some titrant (usually a milliliter or so). You may notice a temporary color change in the solution near where the titrant was added. Stir the solution thoroughly. Any color change should disappear.
7.Continue adding titrant in small quantities. As the titration progresses, the color change described in step 6 will take longer to disappear. This signals that the endpoint is getting closer and that the titrant should be added in smaller and smaller quantities. Titrant should be added dropwise very close to the endpoint.
8.The endpoint of the titration is signaled when a permanent color change is observed (longer than 30 seconds). It is possible to overshoot the endpoint by adding too much titrant. A correct endpoint is shown on the left, an overshot endpoint on the right.
9.Record the volume in the buret. This is your final volume (26.48 ml in this case). Subtract the initial volume (step 5) from the final volume to determine the volume of titrant added (26.48 - 14.62 = 11.76 ml).

This website is using a security service to protect itself from online attacks. The action you just performed triggered the security solution. There are several actions that could trigger this block including submitting a certain word or phrase, a SQL command or malformed data.
A drift of zero can be a sign that the cell might be over-titrated. In combination with the mV signal (lower than end-point criteria) and the color of the working medium (darker yellow than usual), it is a clear indicator for over-titration. However, volumetric titrations sometimes exhibit a zero drift for a short time without being over-titrated.
If you have a real excess of iodine in the titration cell, the result of the next determination will most likely be erroneous. Therefore, over-titration should be avoided. There are various possible reasons for over-titration, like the sample itself (e.g., oxidizing agents which generate iodine from the working medium), the electrode (coating or invisible depositions on the Pt pins/rings), the reagent, and method parameters (e.g., the titration is rate too high), to name just a few.
Different factors can cause over-titration, however, the reagent is not always the reason behind this issue. The indicator electrode can also be the reason for overshooting the endpoint. In this case, regular cleaning of the electrode can prevent over-titration (see also questions 7 to 9 from Part 1 in this series on cleaning).
A low stirring speed also increases the risk of over-titration, so make sure the solution is well mixed. Depending on the type of reagent, the parameters of the titration need to be adjusted. Especially if you use two-component reagents, I recommend decreasing the speed of the titrant addition to avoid over-titration. Over-titration has an influence on the result, especially if the degree of over-titration changes from one determination to the next. So over-titration should always be avoided to guarantee correct results.
I recommend using the drift correction in coulometric KF titration only. You can also use it in volumetric titration, but here the drift level is normally not as stable as for coulometric titrations. This can result in variations in the results. A stabilization time can reduce such an effect. However, compared to the absolute water amounts in volumetry, the influence of drift is usually negligible.
Negative values do occur if you have a high start drift and a sample with a very low water content. In this case, the value for drift correction can be higher than the absolute water content of the sample, resulting in a negative water content.
If possible, use a larger sample size to increase the amount of water added to the titration cell with the sample. Furthermore, you should try to reduce the drift value in general. Perhaps the molecular sieve or the septum need to be replaced. You can also use a stabilizing time to make sure the drift is stable before analyzing the sample.
In case the sample does not dissolve in KF reagents and additional solvents do not increase the solubility of the sample, then gas extraction or the oven technique could be the perfect solution.
The sample is weighed in a headspace vial and closed with a septum cap. Then the vial is placed in the oven and heated to a predefined temperature, leading the sample to release its water. At the same time, a double hollow needle pierces through the septum. A dry carrier gas, usually nitrogen or dried air, flows into the sample vial. Taking the water of the sample with it, the carrier gas flows into the titration cell where the water content determination takes place.
Many samples can be analyzed with the oven. Whether an application actually works for a sample strongly depends on the sample itself. Of course, there are samples that are not suitable for the oven method, e.g., samples that decompose before releasing the water or that release their water at higher temperatures than the maximum oven temperature.
Depending on the instrument used, you can run a temperature gradient of 2 °C/min. This means it is possible to heat a sample from 50 to 250 °C within 100 minutes. The software will then display a curve of water release against temperature (see graph).
From such a curve, the optimal temperature can be determined. Different peaks may show blank, adherent water, different kinds of bound water, or even decomposition of the sample.
This example curve shows the water release of a sample as it has been heated between 130 and 200 °C. At higher temperatures, the drift decreases to a stable and low level.
Generally, you should choose a temperature after the last water release peak (where the drift returns to the base level) but approximately 20 °C below decomposition temperature. Decomposition can be recognized by increasing drift, smoke, or a color change of the sample. In this example, there are no signs of decomposition up to an oven temperature of 250 °C. Therefore, the optimal oven temperature for this sample is 230 °C (250 °C – 20 °C).
In case the instrument you use does not offer the option to run a temperature gradient, you can manually increase the temperature and measure the sample at different temperatures. In an Excel spreadsheet, you can display the curve plotting released water against temperature. If there is a plateau(i.e., a temperature range where you find reproducible water contents), you have found the optimal oven temperature.
Very often, the oven is used in combination with a coulometric titrator. The coulometric titration cell used in an oven system is filled with 150 mL of reagent. Theoretically, this amount of reagent allows for the determination of 1500 mg of water. However, this amount is too high to be determined in one titration and it would lead to very long titration times and negative effects on the results. We recommend that the water content of a single sample (in a vial) should not be higher than 10 mg, ideally around 1000–2000 µg water. For samples with water contents in the higher percentage range, you should consider the combination with a volumetric titrator.
The standard vial for the oven method has a volume of approximately 9 mL. However, we do not recommend filling the vial completely. Do not fill more than 5–6 mL of sample in a vial. We offer the possibility to customize our oven systems, allowing you to use your own vials. Please contact your local Metrohm agency for more information on customized oven systems.
For liquid samples, we recommend using a long needle to lead the gas through the sample. Solid samples and especially samples that melt during analysis require a short needle. The tip of the needle is positioned above the sample material to avoid needle blockage.
Additionally, you should use a «relative blank value», i.e., taking only the remaining air volume into account for blank subtraction. You can find more information about the relative blank and how to calculate it in Application Note AN-K-048.
We recommend having at least 50 µg of water in the sample, if analyzed with coulometry. However, if conditions are absolutely perfect (i.e., very low and stable drift plus perfect blank determination), it is possible to determine even lower water contents, down to 20 µg of absolute water. For a sample with a water content of < 10 ppm (mg/L), this would correspond to a sample size of at least 2 g.
For the verification of an oven system, you can use a certified water standard for oven systems. With such a standard, you can check the reproducibility and the recovery. There are a few types of standards available for different temperature ranges.
I hope this collected information helps you to answer some of your most burning KF questions. If you have further unanswered questions, do not hesitate to contact your local Metrohm distributor or check out our selection of webinars.
Post written by Michael Margreth, Sr. Product Specialist Titration (Karl Fischer Titration)at Metrohm International Headquarters, Herisau, Switzerland.
It is a cost-effective testing method because it does not involve any specialist kit beyond the burette and other glassware containers, plus a colour indicator and the titrant.
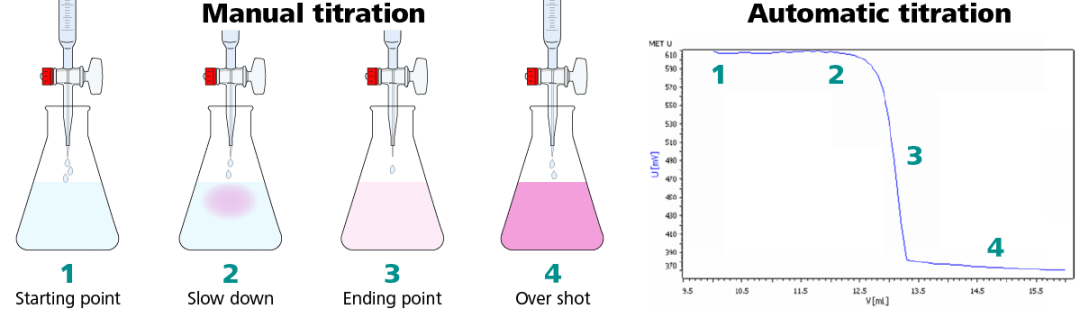
The automated system dispenses more precise, smaller doses of titrant, and many devices can also provide dynamic dosing where the amounts get progressively smaller when approaching an endpoint.
It is a time-saving approach that reduces the likelihood of human error during the titration process along with helping to prevent any overshooting of the endpoint.
Therefore if the testing reveals poor results for salt content, then anything produced during that time will either become waste or have to be put in quarantine.
Real-time measurement of seasoning while making snack food gives production line staff the opportunity to intervene and make adjustments without losing whole runs of a product.

An automatic potentiometric titrator pays for itself within the first few weeks of use by removing subjectivity, increasing accuracy, reducing testing times, saving labor, decreasing chemical consumption and costs, and increasing the precision of bath analysis.
Using a color indicator for manual titrations can be fast and simple, but there is a trade-off between time and accuracy. Color indicators are chemical dyes that change color based on the properties of a solution.
These color indicators are often used during manual titrations as an indicator of the consumption of a certain chemical, or the presence of a chemical in excess. The color change correlates to the titration endpoint.
What becomes tricky is where this color change occurs with respect to the eyes of the technician. Questions like “How pink is pink?” or “What shade of orange between yellow and red should I stop at?” are common.
This problem compounds when trying to detect this color change in a colored sample, such as a green nickel bath. These kinds of samples can be challenging even for skilled laboratory analysts to consistently reproduce, and are near impossible for someone who is colorblind.
In a potentiometric measuring system, a titration endpoint is determined based on a change in potential in the solution. A meter and sensor accurately determine the millivolt (mV) potential of the sample solution. The sensor, such as a pH, ORP, or ion selective electrode, behaves according to the Nernst equation.
The type of sensor used will determine which ion(s) in the solution are measured. The inner reference potential of the electrode’s cell is compared to the outer membrane potential. During a titration, the activity of the ion being titrated changes as the titration progresses. The titration endpoint can be detected by determining the point where the maximum potential change occurs.
A nickel titration can be determined potentiometrically. However, nickel is a special case in that a sensor to directly detect ion activity is not commercially available. Instead, the nickel concentration can be determined in a titration by monitoring the displacement of copper by nickel with a cupric ion selective electrode (ISE).
First, the pH of the sample is buffered to approximately pH 10. Next, a small amount of copper EDTA (CuEDTA) is added to the sample. At pH 10, nickel preferentially binds to EDTA, displaces the copper, and results in free copper ions in solution.
We then titrate with EDTA. As the titration progresses, EDTA first binds the nickel ions in solution. Once all the nickel is bound, the EDTA then react with the free copper ions in solution. When this happens, the activity of the copper ion drastically decreases, which is detected by the cupric ISE. This signals the titrator to detect the endpoint.
With potentiometry, we are monitoring the actual activity of the ion we are trying to measure rather than looking at a color change with our eyes. Tracking the titration this way allows the reaction to be monitored in a consistent manner that eliminates subjectivity and increases accuracy and consistency between analysts.
You might ask, “Why is this important?” Well, getting repeatability between shifts and technicians ensures consistent baths and a quality product. The risk of human error is drastically decreased.
Titrations by hand are tedious and the endpoint can easily be overshot. A manual burette stopcock can only dispense one drop (~50 µL) at a time, and it takes skill to do so. This is not the case with automatic titration. An automatic titrator can dose down to 5 µL per dose with a standard 25 mL burette installed, ensuring that the endpoint is precisely detected every time.
Automation also helps increase accuracy and repeatability without wasting time. By utilizing customizable and flexible dosing options offered by many automatic titrators, the titrator looks at the rate of mV change throughout the titration to determine the dosing speed and size.
By doing this, larger volumes will be dosed more frequently at the beginning of the titration since the potential change is small. As the reaction approaches the endpoint, the mV potential starts to change more dramatically per dose. As a result, the titrator proportionally scales down the dose size and increases the time between doses.
Dosing a larger volume of titrant in the beginning of the titration, and less at the end, keeps the speed of each titration to a minimum while ensuring high resolution around the endpoint. Automating the dosing and endpoint detection allows analysts to perform other lab duties.
Hanna Instruments recently worked with a manufacturer at a metal plating facility to automate their bath titration. The quality control analysts were performing manual titrations for the measurement of acidity in the chrome baths, as well as the acidity and nickel in the nickel baths.
Many of the baths had colored sample matrices such as a dark, murky hue, so the customer was forced to use a very small sample size to try and discern their endpoints using color indicators. This is a large facility, so multiple technicians work in the lab.
Since they used a color indicator, their titration results were open to interpretation between many different technicians. The lab manager noticed that they were obtaining inconsistent results across shifts, and this resulted in inconsistencies in their finished products.
This allowed them to run tests more frequently and maintain higher quality baths, while also reducing the amount of rejected finished products. Before, the lab would become backlogged with samples, causing the employees to have to stay late or rush through them. Now, the samples are titrated along with other analyses in a fraction of the time.
The Automatic Titrator Nickel Package HI902 offers everything you need to accomplish a smooth transition from manual titrations to automated titrations. Our HI902 package includes:The HI902 automatic potentiometric titrator with two stirring assemblies and two 40,000-step piston-driven dosing pumps and burettes
To find the concentration of an analyte in a solution, scientists turn to titration. Once a drop-by-drop-by-drop method, this can now be handled automatically with a titrator, but getting an accurate answer still takes some skill. Part of the needed skill depends on what is being tested. Nonetheless, some general information applies to virtually any titration situation.
“Titration issues are typically either systematic or random,” says Matthew Eby, application and technical support manager for the Mettler-Toledo NA division in Columbus, Ohio. “Systematic errors generate the same results, although incorrect, every time; random errors generate no results or various incorrect results without consistency.” Since systematic errors generate the same problems every time, they are the easiest to figure out. To see whether a problem is systematic, says Eby, “It is always advised before troubleshooting to run the sample or method with the issue multiple times to look for trends and to see the repeatability of the issue before attempting to address the problem.”
Scientists in research and industry use titration in so many ways that variety alone creates a challenge. “Depending on the type of reaction, whether it’s an acid-based, a redox, a complexometric, or a nonaqueous titration, using the right electrode can make all the difference,” says Lori Carey, product manager for titration at Metrohm USA in Riverview, Florida. “Metrohm has fine-tuned the electrode design for even the most difficult samples, and referencing our Metrohm titration monograph is very helpful as an overview for many titrations.”
The goal of titration is finding the end point, but that can be elusive. “There are many different reasons why an end point may not be obvious,” Carey says. “There are a few simple questions you can ask yourself to identify the cause.”
The questions, says Carey, include, is the correct titrant at the proper concentration being used? Is the electrode fully submerged in the sample? Is the sample completely dissolved, and is the analyte of interest available for titration? Are the increments in the titration method set properly? And did the titration just stop too soon?
Other experts also see users struggling at times with the titration end point. According to Alicia Guardado, technical adviser at Hach Company in Loveland, Colorado, “For titrations in which the user is looking for a visual end point, the most common issue is probably going to be overshooting the end point.” She adds, “This is usually caused by not completely mixing in each drop of titrant or dispensing drops that are too large.” Even for titrations that require a pH-change end point, Guardado points out, it can easily be overshot if the pH probe being used does not have a fast enough response.
Also, when titration runs into trouble, history impacts the troubleshooting. “If a titration method and procedure have been used for some time with success,” Eby says, “then that is the last thing one would want to modify; the fluctuations are most likely due to hardware, reagent, or sample inconsistencies.”
Even the sample can contribute to the problem. “With sample fluctuations, users should try to pretreat samples in a way that minimizes effects of interference, temperature, pH, etc., so that the results are consistent,” Guardado says. “Things like pH adjustment to a specified pH, dilution, and filtration are common pretreatment steps, and these will vary largely depending on the type of titration being performed.”
“The best way to deal with any fluctuations in system performance or sample results is to make sure you are taking care of your titration system,” Carey says. “Making sure the electrode is stored in the correct solution and calibrated properly will help reduce fluctuations.” In addition, she says, “Making sure that your dosing burettes are properly vented to the molecular sieve or ascarite will help protect the titrant concentration from degrading.”
Diminished reproducibility can really destroy results over time. “When reproducibility starts to fade, it’s time to verify a few things,” Carey says. For one thing, inspect the electrode for wear or blockage. “Two key components of every electrode system are the measuring membrane and the reference diaphragm,” she says. “If either of these areas becomes slightly blocked or scratched, the electrode won’t be able to respond properly and will give irregular results.”
Eby agrees that the electrode can often be the source of errors, and he points readers to Mettler-Toledo’s GTP Sensor Use and Maintenance on-demand webinar (www.mt.com/gtp-sensor). He adds, “Seeing [whether] a new sensor addresses the issue is the quickest way to troubleshoot the sensor, and operators must remember that electrodes are consumable items and will eventually wear out.”
The problem, though, might not be the device. “The other most common source of issues is the titrant or solvents used,” Eby says. “Changing titrant strength due to varying temperature or contamination, improper storage and protection of titrants, or contamination of solvents are the typical issues regarding reagents.” To find the source of this kind of problem, the user should exchange the reagents one by one and see whether that solves the problem.
To keep your automated titration running smoothly and accurately, Carey offers some valuable advice. “It’s always good to refresh your mind with how the electrode system works, because understanding the key functioning areas of an electrode will often lead you to the proper troubleshooting techniques,” she says. “Additionally, review the different modes of titration and how changes in titration parameters affect the shape of your titration curve.” To develop new titration knowledge or refresh it, Metrohm hosts several Titration Bootcamp courses. Carey says, “I would always recommend [these courses] to anyone working in the field of titration, regardless of their years of experience.”
So keeping up titration knowledge and the condition of the equipment go a long way toward preventing problems. Even an automated titrator needs care and skill to ensure ongoing accuracy in the results. The level of skill needed, however, depends on the task at hand.
In this webinar, learn how you can evaluate the quality of titrations in your lab and uncover potential financial and productivity improvements. http://www.labmanager.com/titrationsspotlight
For additional resources on Troubleshooting a Titrator, including useful articles and a list of manufacturers, visit http://www.labManager.com/titrators


 8613371530291