
the endpoint of the titration is overshot factory
The endpoint of titration is overshot! Does this technique error result in an increase, a decrease, or have no effect on the reported percent acetic acid in the vinegar? Explain.
Titration is a quantitative analytical volumetric technique that permits the determination of the unknown concentration of an analyte with a known concentration of titrant. This is possible because the two react in a known stoichiometric manner allowing calculation of the unknown concentration.

This website is using a security service to protect itself from online attacks. The action you just performed triggered the security solution. There are several actions that could trigger this block including submitting a certain word or phrase, a SQL command or malformed data.

Not sure what titration is or what you can do with it? Then you are in the right place! In this tutorial, you will find information on titration, including the chemicals that are commonly used and the chemical reactions that make titration work, as well as how titration is performed and some tips to get better results.
Titration is a method commonly used in chemistry to figure out the amount of a chemical in a solution. This chemical is called the titrand. To figure out the amount of titrand in the solution, a known amount of a different chemical is added to the titrand"s solution; this chemical— called the titrant, or titrating solution—reacts with the titrand. By measuring how much of the titrating solution is needed to react with all of the titrand in the solution, you can calculate how much titrand was in the solution. Simply put:
Titrant (titrating solution): A chemical you add, in a known quantity, to react with the titrand and to help you calculate the quantity of the titrand in your sample.
The point at which all of the titrand has reacted is called the endpoint, or equivalence point. How do you know when the endpoint has been reached? At the endpoint, there is usually a color change in the titrand"s solution. This is caused by an indicator, which is included in the titrand"s solution just so you can see when you have reached the endpoint. The unknown amount of titrand in the titrand"s solution can usually be determined by setting up a proportion with the known amount of titrating solution that was added. How this is done depends on the exact titrating reaction that is being used.
You can watch the video below, made by the Massachusetts Institute of Technology (MIT)"s Department of Chemistry, to see titration in action. Note: This video uses an indicator that turns light pink at the endpoint, but different indicators turn different colors at their endpoints. The next section contains more information about indicators.
There are many different types of indicators used in titration experiments. Which indicator is used depends on the chemistry of the reaction taking place between the titrand and the titrating solution. This titration tutorial will cover two commonly used indicators—starch and phenolphthalein—along with their associated reactions.
Starch is an indicator that reacts with iodine. When there is iodine present, starch reacts with it to create a blue chemical complex. This means the solution turns blue! How is this used in titration? Iodine is included in the titrating solution, and as it is added to the titrand"s solution (which includes the titrand and starch), the titrand reacts with the iodine to turn it into iodide ions (which do not react with the starch). However, as soon as all of the titrand has reacted with the iodine and the endpoint is reached, the addition of any more iodine will finally react with the starch and turn the titrand"s solution blue!
An example of titration using a starch indicator is the titration of vitamin C, which is technically ascorbic acid. Ascorbic acid reacts with iodine to make dehydroascorbic acid and iodide ions. (This reaction is technically an oxidation-reduction reaction, also called a redox reaction for short.) When ascorbic acid and starch are both in a solution, iodine will react with the ascorbic acid. So when titrating ascorbic acid, a titrating solution containing iodine is added to the titrand"s solution, which contains starch (the indicator) and ascorbic acid (the titrand), and when all of the ascorbic acid has reacted with the iodine, any more iodine added will react with the starch and turn the titrand"s solution blue! Figure 1, below, shows a picture of the endpoint of an ascorbic acid titration using starch and iodine. Because there is a known concentration of iodine in the titrating solution, by keeping track of how much solution is added, you can determine how much titrand there was.
Figure 1. The titrand"s solution turns blue-black when the endpoint has been reached in a titration using starch as an indicator (to react with iodine).
Phenolphthalein is an indicator that changes color depending on the pH of the solution it is in. The pH of a solution is a measure of how acidic or basic it is. (For a refresher, see the Science Buddies resource on
Acids, Bases, & the pH Scale.) Specifically, phenolphthalein is colorless when the pH of a solution is acidic or neutral, but when the solution becomes slightly basic, phenolphthalein turns slightly pinkish, and then darker pink as the solution becomes more basic. How is this used in titration? A base is included in the titrating solution, and it is added to the titrand"s solution, which contains an acidic titrand and phenolphthalein. As more base is added to the titrand"s solution, the pH changes, becoming more basic, and the solution changes color. Usually, with this indicator, when the titrand"s solution just starts to turn pink, you have reached the endpoint.
An example of titration usng phenolphthalein is the titration of vinegar, which is technically acetic acid. When titrating acetic acid, a titrating solution containing a base—normally sodium hydroxide—is added to the titrand"s solution, which contains phenolphthalein (the indicator) and acetic acid (the acidic titrand). (The acetic acid reacts with the sodium hydroxide in an acid-base reaction.) When the titrand"s solution becomes basic enough due to the addition of the basic titrating solution, the phenolphthalein turns the titrand"s solution slightly pink. Phenolphthalein is specifically colorless at a neutral or acidic pH, and becomes light pink as the pH becomes more basic (first turning slightly pink around a pH of 8.3). Figure 2, below, shows a picture of the endpoint of an acetic acid titration using phenolphthalein and sodium hydroxide. Because the number of moles of sodium hydroxide used to titrate the acetic acid equals the number of moles of acetic acid in the titrand solution, by keeping track of how much titrating solution is added, you can determine how much titrand there was.
Figure 2. The titrand"s solution turns slightly pink when the endpoint has been reached in a titration using phenolphthalein as an indicator (to show the change in pH).
There are many steps that should be taken to ensure that a titration is successful and that the results produced are accurate. Check out the video of best practices in titration. Here are some key points to follow and keep in mind when doing a titration:
Dissolving the starch. If you are using starch as an indicator, it is important to make sure that the starch dissolves well when you are preparing the starch solution. It may take about 15 minutes or more of stirring the starch (and crushing large pieces) in near-boiling water to dissolve the starch. If the starch does not completely dissolve, it can lead to inaccurate results.
Assembling the titration setup. Figure 3, below, shows what the general titration setup should look like. The buret is held in place by the buret clamp, which is attached to the ring stand. The titrand"s solution should be placed directly under the bottom of the buret, as shown in Figure 4, below. The buret, which can be moved up and down, should be adjusted so that it is just above the opening of the flask containing the titrand"s solution, as shown in Figure 4.
Figure 3. This picture shows a general titration setup. Note that the buret clamp is firmly attached to the ring stand. The buret shown here slides into place between the prongs of the buret clamp. The buret is held firmly in place, but can be moved up and down if needed.
Figure 4. The titrand"s solution is placed in an Erlenmeyer flask and set right below the bottom of the buret. An Erlenmeyer flask is used because its shape allows a person to swirl the solution to mix it without spilling.
Filling the buret. Before filling the buret with the titrating solution, make sure that the buret is closed at the bottom. Many burets are closed when their stopper is in the horizontal position, as shown with the red stopper in Figure 5, below. Other burets may close in different ways. Using a funnel, as shown in Figure 6, below, slowly pour the titrating solution into the top of the buret. Fill it somewhere between half full and the top mark. The exact position is not important, as long as the fluid level is not past the markings on the top of the buret. Then make sure there are no air bubbles in the funnel. To do this, put an extra beaker or flask below the buret and let a little bit of titrating solution flow into the container (or just let enough solution flow so that the entire tip of the buret is full of solution).
Reading the buret. Read the titrating solution level from the bottom of the meniscus, which is the curved surface of liquid. For example, in Figure 7, below, the level should be recorded as 21.85 milliliters (mL), since this is where the bottom of the meniscus is. Be sure to have your eyes level with the liquid level when you are reading it.
Figure 7. When reading the level of liquid in the buret, read from the bottom of the meniscus, which is being pointed to with a black arrow in this picture. For example, the level of the liquid in this buret should be read as 21.85 mL. (Note: The long white line at the top of the buret is the mark for 21 mL.)
Adding the titrating solution to the titrand"s solution. Using the red stopper at the bottom of the buret, slowly add the titrating solution to the titrand"s solution one drop at a time. It is important to only let the titrating solution be added one drop at a time because the titration reaction can be very sensitive. One drop may be enough to drive the reaction to completion (if it was near completion before). If more than one drop is added at a time, the data may not be as accurate as it could be. After each drop is added, swirl the flask to mix in the titrating solution. When adding the titrating solution, you may see a temporary color change that goes away when you swirl the flask, as shown in Figure 8, below. If this happens, continue adding one drop at a time; you have reached the titration endpoint when there is a more lasting color change throughout the entire titrand"s solution, as shown in
Figure 8. This example of titrating ascorbic acid using an iodine titrating solution shows how you may see a temporary (dark blue) color change when adding a drop of the iodine solution. The temporary color change goes away when the iodine solution is mixed in the flask by swirling it.
Watching for the endpoint. Add the titrating solution, mixing in one drop at a time by swirling the flask, until a color is seen throughout the solution that lasts for longer than 20 seconds. At this point, you have reached the endpoint and the titration is complete. If you are using starch as an indicator, your endpoint may look similar to Figure 1, whereas if you are using phenolphthalein as an indicator, your endpoint may look similar to Figure 2. Note that different indicators will cause the endpoint to have a different color; you should confirm the expected color of your endpoint before starting the titration. Lastly, it is important to not overshoot the endpoint (by adding too much titrating solution) because this can cause your results to be inaccurate.
Troubleshooting: No color change is seen. There are a number of reasons why a titration may not work. Here are the most common problems that can lead to a titrand"s solution not changing colors:
Using the wrong substances. Make sure that you are using Lugol"s iodine solution or another iodine solution sold as a starch indicator and not a pure potassium iodine solution. Also confirm that you are using a soluble starch.
Using incorrect concentrations. If you are performing an ascorbic acid titration and the standard solution is too concentrated, or your titrating solution is too diluted, or your indicator solution is not the correct concentration, it may require more than 50 mL of iodine solution to titrate the sample. Note: When doing an ascorbic acid titration, the most common problem here is an overly diluted iodine solution; sometimes the Lugol"s iodine solution sold in stores is already diluted and you do not need to dilute it more.
Using too much titrand. If there is a large amount of titrand in the titrand"s solution, it may require more than 50 mL of titrating solution for it to change color. You could try using a smaller amount of titrand.
The unknown amount of titrand in the titrand solution can usually be determined by setting up a proportion with the known amount of titrating solution that was added. How this is done depends on the exact titrating reaction that is being used.
For example, if you are titrating ascorbic acid using an iodine titrating solution, you need to titrate an ascorbic acid standard, which is a sample of ascorbic acid with a known amount of ascorbic acid in it. Knowing how much iodine titrating solution is needed to titrate this known amount of ascorbic acid, you can set up a proportion to determine how much ascorbic acid is in other samples that were titrated. See Equation 1, below, for how this can be done:
Equation 1 can be rearranged to directly solve for the unknown amount of ascorbic acid in the sample ("Ascorbic Acid2"). This gives us Equation 2, below:
As an example, if you were using 20 mL of a 1 mg/mL ascorbic acid standard solution, this means you had 20 mg of titrand in your standard solution ("Ascorbic Acid1"). If it took 8.5 mL of iodine titrating solution ("Iodine1") to titrate this 20 mg, but to titrate an unknown sample of ascorbic acid it took 6.8 mL of iodine titrating solution ("Iodine2"), you can use the equation to determine that the amount of ascorbic acid in the unknown sample ("Ascorbic Acid2") equals 16 mg.
In the example titration using phenolphthalein in the titration of acetic acid, the unknown amount of acetic acid (the titrand) can again be determined by setting up a proportion with the known amount of sodium hydroxide (the titrating solution). Specifically, the number of moles of sodium hydroxide used to titrate the acetic acid equals the number of moles of acetic acid in the titrand"s solution. For example, if you added 12.5 mL (0.0125 liters [L]) of a 0.1 molar (M, which is moles/L) sodium hydroxide to titrate the acetic acid, the number of moles of both sodium hydroxide and acetic acid would be 0.0125 L x 0.1 moles/L = 0.00125 moles. You could divide by the amount of the sample (in liters) to determine the molar concentration of the acetic acid. For example, if your sample volume was 1.5 mL (0.0015 L), it would have a molarity of 0.00125 moles / 0.0015 L = 0.833 M.
Tabacco, S. and Siddiqui, A. (2003). The Digital Lab Techniques Manual: Titration. Massachusetts Institute of Technology (MIT). Department of Chemistry. Retrieved November 8, 2013.
Shodor Education Foundation, Inc. (n.d.). Redox Reactions. The University of North Carolina at Chapel Hill. Department of Chemistry. Retrieved November 10, 2021.
This book provides information on the techniques needed to analyze foods in laboratory experiments. All topics covered include information on the basic principles, procedures, advantages, limitations, and applications. This book is ideal for undergraduate courses in food analysis and is also an invaluable reference to professionals in the food industry. General information is provided on regulations, standards, labeling, sampling and data handling as background for chapters on specific methods to determine the chemical composition and characteristics of foods. Large, expanded sections on spectroscopy and chromatography also are included. Other methods and instrumentation such as thermal analysis, ion-selective electrodes, enzymes, and immunoassays are covered from the perspective of their use in the analysis of foods. A website with related teaching materials is accessible to instructors who adopt the textbook.
B. If the vinegar is measured volumetrically, (e.g. pipet) what additional piece of data would be needed to complete the calculation for the experiment?
5. The buret is filled NaOH titrant and the initial volume reading is immediately recorded without waiting the recommended 10 t0 15 seconds. However, the 10 to 15 second time lapse does occur before the reading is made. Does this technique error result in an increase,a decrease, or have no effect on the reported percent acetic acid in the vinegar? Explain.
6.The endpoint of the titration is overshot! Does this technique error in an increase, a decrease, or have no effect on the reported percent acetic acid in the vinegar. Explain.
A) As a rule, in the analysis of vinegar, the mass fraction of acetic acid is determined. And to find the mass fraction of the component you need to know the mass of the mixture
B) It is inconvenient to use volume in this situation. Since to find the mass by volume, it will be necessary to measure the density, and additional measurements will introduce additional errors.

This website is using a security service to protect itself from online attacks. The action you just performed triggered the security solution. There are several actions that could trigger this block including submitting a certain word or phrase, a SQL command or malformed data.

1.A known quantity of the unknown solution (HCl) is pipetted into a flask and several drops of an indicator are added. If phenolphthalein is being used as an indicator, the solution should remain colorless at this point. The flask is placed on white paper to make the endpoint easier to see.
2.Make sure the buret stopcock is closed and then rinse the inside with several milliliters of titrant (NaOH). The buret should be held nearly horizontally and rotated so that all of the inside surfaces are contacted by the titrant. Some titrant should also be run through the stopcock to clean it as well. Cleaning is normally performed over a sink.
3.Make sure the stopcock is closed. Place the buret in a buret clamp and fill it carefully with titrant. Use a beaker with a spout or funnel to reduce the possibility of spilling titrant.
5.Read the volume of the buret. This is your initial volume (14.62 ml in this case). Reading is made easier by holding a piece of dark paper behind the buret.
6.Place the flask containing the unknown under the buret. Slowly open the stopcock and add some titrant (usually a milliliter or so). You may notice a temporary color change in the solution near where the titrant was added. Stir the solution thoroughly. Any color change should disappear.
7.Continue adding titrant in small quantities. As the titration progresses, the color change described in step 6 will take longer to disappear. This signals that the endpoint is getting closer and that the titrant should be added in smaller and smaller quantities. Titrant should be added dropwise very close to the endpoint.
8.The endpoint of the titration is signaled when a permanent color change is observed (longer than 30 seconds). It is possible to overshoot the endpoint by adding too much titrant. A correct endpoint is shown on the left, an overshot endpoint on the right.
9.Record the volume in the buret. This is your final volume (26.48 ml in this case). Subtract the initial volume (step 5) from the final volume to determine the volume of titrant added (26.48 - 14.62 = 11.76 ml).
A smooth titration graph and receiving results back from your titrator does not always guarantee that they are accurate. Always review your results, your calculations, and quality checks.
It is important when reviewing titration results to ask yourself, “Does this result make sense?”. This is especially the case when switching methodologies, i.e. from manual titrations to automatic titrations. It can be alarming to see an unfamiliar number, but it is important to take a closer look at your specifications to determine the cause of deviation. The four most important parts of a specification to examine are the units, significant digits, the range, and the methodology used to originate the specifications. We will talk about the significance of each.
There are many different ways to represent the results of titration. Units of specifications can vary, but specifications are commonly represented in %, ppm (mg/L or mg/g), or simply mL (milliliters) of titrant used to determine the endpoint. Results can be customized in the method options to match those of the specifications in more cases. Results that vary from the original specification by a common factor, like 10 or a 1000 are most commonly attributed to a difference in units and can be easily adjusted.
The other part of the unit is the analyte, or what specific chemical is being tested. In order to ensure that the results match the specification, it needs to be clear what form of the analyte is being represented.
In the example of a salt titration, some customers prefer that results be represented in sodium chloride, whereas some specifications represent the result in just chloride. The titration is exactly the same for both units, but the calculated results differ because of the difference in molar mass between sodium chloride and chloride. In the case of acidity, titration results are normally represented in units of the predominant acid. A specification that is written in % lactic acid, would differ greatly from a result represented in % citric acid. This is true, not only because of the differences in molar mass, but also the reaction ratio between the titrant and the specific acid. These deviations can easily be corrected in the method so that the results match the specification.
Usually, specifications are written as a range. For example, as discussed above, the sample should contain between 2.0% to 2.5% sodium chloride. Having a wide degree of tolerance in the range of a specification allows some leeway for time savings and sources of error. A very narrow specification range will require good lab technique and adherence to best practices to ensure that the results achieved are accurate.Specifications should be written with these limitations in mind, as well as being based upon the expected concentration of the analyte.The following are the AOAC guidelines for percent recovery and percent relative standard deviation (%RSD) based on the expected analyte concentration.
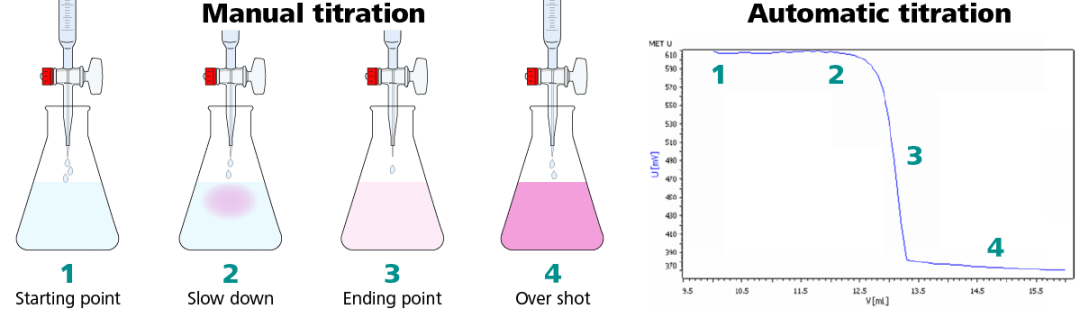
When possible, it is always a good idea to understand the methodology used to originate the specification. Different methods have varying degrees of accuracy and unique potential interferences. When moving from one methodology to another, i.e. from manual titration to automatic titration, there may be a slight difference in results. In the case of manual titrations, the endpoint is often overshot and the results can vary between operators. This leads to slightly higher numbers than the actual results. Specifications may need to be reevaluated when switching methodologies to improve the accuracy of the specification.
In summary, familiarity with specifications will make interpreting the results of titration much easier. Implementing quality checks, discussed below, will help to ensure that titration results are accurate.
Quality checks are typically used by labs to ensure the accuracy of their reported results. By implementing quality checks into your analysis procedure, you will not only have peace of mind but, you will also have documentation in case the results are called into question. There are several types of quality checks, but we will focus on blanks, laboratory control spikes, duplicates, and matrix spikes.
A blank is a sample of your solvent that is carried through the sample preparation procedure and then titrated to ensure there is no interference or contamination from the analysis procedure. Remember that any titrant that is being dosed is being calculated into the results. Titrant that reacts with your solvent should not be included in sample results and can be factored out in the method options of the titrator.
A Laboratory Control Spike, abbreviated LCS, is a standard of known analyte concentration that is carried through the sample analysis procedure to evaluate the accuracy of the titration method. For example, if we were titrating the concentration of nickel in a plating bath, we would use a nickel standard of verified concentration to validate the accuracy of the testing procedure. The AOAC has published guidelines on percent recovery as it pertains to the concentration of analyte which is listed above. Laboratory Control Spikes can be used to validate new methods or to ensure the continued accuracy of current methods.
A duplicate is a sample that is carried through sample analysis as two independent samples to ensure that the results of the method are repeatable. Often when validating new methods, multiple replicates are analyzed to determine the relative standard deviation (RSD) between samples. The AOAC also has guidelines for %RSD as they pertain to the analyte concentration.
A sample matrix spike, often abbreviated as MS, is a sample that is duplicated and to which a standard of known concentration is added to one of the replicates. Matrix spikes are useful in determining if the other components of your sample are interfering with the methods.
Note: Quality Checks are not limited to the titrator. Pipettes and balances can also be checked using reference material to ensure that they are maintaining their precision and accuracy. Quality checks can be performed as frequently as preferred, but are typically done at least daily or at the beginning of every shift.

Manual titrations are time consuming and can be inaccurate at times due to human error. Not to mention, important data can get easily lost due to improper tracking methods. The Thermo Scientific Orion Star T900 Series Automated Titrators are designed to make performing titrations easier, more reliable, and more reproducible than manual titrations.
These auto titrators expand the number of ions and compounds that can be measured beyond direct electrode analysis and offer dynamic process controls that adjust the titration to optimize analysis results.
Manual titration can be a time consuming and frustrating process. Watch how easy it is to find the endpoint, reproduce your workflow, and optimize your results. The auto-filling burette helps to minimize the handling of corrosive materials. Use of an auto titrator well help ensure a safer, more efficient lab.
A water treatment plant in the midwestern United States that ran up to 10,000 titrations each year improved their workflow. Learn how streamlining the workflow using an Orion Star Automated Titrator for low-level alkalinity titrations benefited the lab.
In this white paper, you’ll learn about the dispense accuracy and precision of the Orion Star T900 Series Automated Titrators. We’ll demonstrate that our auto titrators exceed well-established industry precision and accuracy specifications, providing users with greater confidence in their titration applications.
Streamline your manual titration workflows and increase efficiency and repeatability with an Orion Star T900 Series Automated Titrator. Review the applications chart below to find out if an auto titrator is for you.
We are currently unable to offer solutions for Karl Fischer, amperometric, stat, and dead stop titrations. For other questions please contact customer support to be connected to your local sales representative.
Get our top 10 tips for performing automated titrations, and methodologies for common uses of an auto titrator. Discover how to perform an acid/base titration for orange juice, water and petroleum in this ebook.
Performing manual titrations can be extremely tedious, requiring the operator to stand in one place, watching minuscule droplets drip into a sample container and diligently waiting for the color change or other endpoint indictor to occur before starting the process all over again, for possibly hours and hours of repeated sample titrations.
An automatic titrator allows you to start the titration and then walk away from the titrator to perform other tasks or tests while the titrator takes care of the titrant addition, endpoint detection and results calculations automatically without any involvement from the operator.
Manual titrations typically use a non-certified, Class B or Class A burette with stopcock to add doses of titrant to the sample. The operator uses the stopcock to start and stop the additions of titrant into the sample, often one drop at a time, until the endpoint is reached.
The precision of these additions, especially near the endpoint, is primarily determined by the operator’s skill level, experience and focus on the task at hand. All too commonly, an operator can allow too much titrant to flow out of the burette into the sample and overshoot the endpoint, requiring them to perform the entire titration all over again. Even highly skilled and experienced operators can be limited in the precision of their manual titration results by the last few drops of titrant, since each drop can vary in volume.
When using an automatic titrator, the titration is performed using a high-accuracy titrant delivery system that controls all titrant additions into the sample and will adjust the dose rate as it detects the endpoint approaching.
Once the endpoint is reached, the titrator uses the precisely measured volume of titrant added to the sample to automatically calculate the concentration results for the sample. The operator’s skill level, experience and focus on the task at hand is no longer a factor in the overall accuracy of the titration results and the possibility of missing the endpoint is greatly reduced.
Typically calculating titrations in the lab is done by calculating the sample concentration after the endpoint has been reached. There are many points in this calculation where human error can get in the way of consistent, reproducible results.
When using an auto titrator, it will automatically calculate the sample concentration from the entered parameters. Plus, on the automatic titrator, electrode, titrant and titration setup parameters can be saved as a method, so the exact same settings are used for each titration. These methods can be transferred between titrators for consistent procedures to be used on multiple titrators or multiple labs. This way you can save time with repeat titrations by running the exact same parameters each time without having to reenter any information.
Instead of manually logging the titration results in a notebook or scrap of paper, an auto titrator will automatically save the titration results in the data log with time and date stamp.
In the practical course in Analytical Chemistry during my first semester at university, I had to titrate a lot. Thinking back on it, I remember carefully dosing titrant with the glass buret, the cumbersome process of refilling the buret, and the constant suspicion that I hadn’t correctly chosen the endpoint.
Everyone in class kept getting different results—but we were never quite sure why. At the time, I wasn’t as experienced as I am now. Today, after 10 years of experience in titration, I’ve learned that the results of manual titration depend quite a lot on the person carrying it out. Here are the top error sources in manual titration and how you can avoid them.
I’m sure you’ve learned at some point that the pH value of the titration endpoint depends on the acid dissociation constant (Ka) of the acid and base that are used. If a strong base is titrated by a strong acid, the pH value at the endpoint is around 7. The titration of a strong base with a weak acid shifts the endpoint towards the alkaline range. The titration of a strong acid with a weak base will result in an endpoint in the acidic range. This explains why several different indicators are used in acid-base titrations. But which is the right one to choose?
The chart above shows some of the most frequently used pH indicators. You can probably imagine that you won’t get correct results when the pH of your endpoint is around 7, but you use crystal violet or methyl orange as the indicator. Luckily, most standards and SOPs specify an indicator. Follow the instructions, and you’re on the safe side!
Above, you see five stages of an acid-base titration of c(HCl) = 1 mol/L with c(NaOH) = 1 mol/L. The only difference between each image and its predecessor is one additional drop of titrant. Where would you choose the endpoint in this case?
Is the endpoint reached in picture 1, where only a faint pink is visible? Or is it reached in picture 3 where the color becomes more intense? Or even in picture 5, at which point the pink color is most vibrant? Between picture 1 and picture 5, just four drops of titrant were added. With the pharmaceutical definition of a drop as a volume of 50 µL, this corresponds to 200 µL of titrant or about 7.3 mg of hydrochloric acid—an enormous error.
Do you remember how to correctly read the buret? You have to stand on a footstool and make sure that you read the meniscus value horizontally. Do you know why?
The volume reading depends upon the angle from which you view the buret. In the case shown here, the readings vary up to 0.2 mL (200 µL) from the actual value, depending on the reading angle. The more your line of sight deviates from the horizontal, the more inaccurate the reading—and the result. You can assume an average error of 200 µL. This is a lot for a titration, as I showed in the previous example!
How can you eliminate these errors? The easiest one to overcome is the reading error. The solution for this is to use an electronic buret. When using an electronic buret, all you need to do is fill it with the titrant and then you press a button. The device automatically measures the volume and gives you a digital readout. Using an electronic buret ensures already a high level of objectivity for your results.
It also improves the accuracy of your results. I don’t have to tell you how important accuracy is in analytical chemistry, but I’ll give an example. Imagine you determined the purity of gold at 90%, but in reality, it’s 99% pure. You would lose a lot of money when selling your gold under this pretense!
Earlier, I showed that visual endpoint recognition using a color indicator can result in errors of up to 200 µL. An inaccurate buret reading can lead to an additional 200 µL error. While using an electronic buret doesn’t help you achieve a more objective endpoint recognition, it does reduce the minimum volume addition per drop: it’s no longer 50 µL, but can be as small as 0.25 µL depending on the cylinder volume you use. This substantially lowers the error resulting from endpoint recognition. The following minimum volume additions are common:
If you want to overcome all sources of error described in this post, you’ll have to switch to automated titration, or autotitration. In this case, you will use a sensor to measure pH change in the sample and a mathematical algorithm to detect the endpoint—an indicator isn’t required anymore. Additionally you have the same precision as with the electronic buret.


 8613371530291