
the endpoint of the titration is overshot brands
The endpoint of titration is overshot! Does this technique error result in an increase, a decrease, or have no effect on the reported percent acetic acid in the vinegar? Explain.
Titration is a quantitative analytical volumetric technique that permits the determination of the unknown concentration of an analyte with a known concentration of titrant. This is possible because the two react in a known stoichiometric manner allowing calculation of the unknown concentration.

This website is using a security service to protect itself from online attacks. The action you just performed triggered the security solution. There are several actions that could trigger this block including submitting a certain word or phrase, a SQL command or malformed data.
This website is using a security service to protect itself from online attacks. The action you just performed triggered the security solution. There are several actions that could trigger this block including submitting a certain word or phrase, a SQL command or malformed data.
Look up the pH indicator using the link in the Resources section if you are performing an acid-base titration. The pH indicator is a chemical that changes color over a given pH range. Before beginning your titration, you should have added a couple drops of the indicator, so you"ll already know which one you are using. The link under the Resources section will tell you what color change to expect when your titration is complete.
Swirl the flask of analyte while adding titrant from the buret. (The analyte is the chemical you are testing in the titration, while the titrant is the standard you are adding.) Swirling will make sure the analyte remains well-mixed so that the color change (when it occurs) is an accurate reflection of the pH of the solution.
Try placing the flask containing the analyte on a piece of paper or a Kimwipe. The white background will help you see the color change when it occurs.
Add titrant slowly. If you add titrant too quickly, you could easily overshoot the end point of your titration, at which point you may need to repeat the entire experiment.
Watch the solution closely for the color change. Once the solution begins to change color and the new color persists for at least 30 seconds, you have reached the end point of your titration.
Tips The most common mistake is to add titrant too quickly and overshoot the end point. Try doing a "quick and dirty" trial run to get an idea of how many milliliters of titrant are needed to reach the endpoint. Once you know approximately where the endpoint is, you can go back and do a more careful second trial; this time, you can add titrant quickly until you begin to approach the volume you added in the first "quick and dirty" trial and then slow down and add titrant just a drop at a time.
Manual titrations are time consuming and can be inaccurate at times due to human error. Not to mention, important data can get easily lost due to improper tracking methods. The Thermo Scientific Orion Star T900 Series Automated Titrators are designed to make performing titrations easier, more reliable, and more reproducible than manual titrations.
These auto titrators expand the number of ions and compounds that can be measured beyond direct electrode analysis and offer dynamic process controls that adjust the titration to optimize analysis results.
Manual titration can be a time consuming and frustrating process. Watch how easy it is to find the endpoint, reproduce your workflow, and optimize your results. The auto-filling burette helps to minimize the handling of corrosive materials. Use of an auto titrator well help ensure a safer, more efficient lab.
A water treatment plant in the midwestern United States that ran up to 10,000 titrations each year improved their workflow. Learn how streamlining the workflow using an Orion Star Automated Titrator for low-level alkalinity titrations benefited the lab.
In this white paper, you’ll learn about the dispense accuracy and precision of the Orion Star T900 Series Automated Titrators. We’ll demonstrate that our auto titrators exceed well-established industry precision and accuracy specifications, providing users with greater confidence in their titration applications.
Streamline your manual titration workflows and increase efficiency and repeatability with an Orion Star T900 Series Automated Titrator. Review the applications chart below to find out if an auto titrator is for you.
We are currently unable to offer solutions for Karl Fischer, amperometric, stat, and dead stop titrations. For other questions please contact customer support to be connected to your local sales representative.
Get our top 10 tips for performing automated titrations, and methodologies for common uses of an auto titrator. Discover how to perform an acid/base titration for orange juice, water and petroleum in this ebook.
Performing manual titrations can be extremely tedious, requiring the operator to stand in one place, watching minuscule droplets drip into a sample container and diligently waiting for the color change or other endpoint indictor to occur before starting the process all over again, for possibly hours and hours of repeated sample titrations.
An automatic titrator allows you to start the titration and then walk away from the titrator to perform other tasks or tests while the titrator takes care of the titrant addition, endpoint detection and results calculations automatically without any involvement from the operator.
Manual titrations typically use a non-certified, Class B or Class A burette with stopcock to add doses of titrant to the sample. The operator uses the stopcock to start and stop the additions of titrant into the sample, often one drop at a time, until the endpoint is reached.
The precision of these additions, especially near the endpoint, is primarily determined by the operator’s skill level, experience and focus on the task at hand. All too commonly, an operator can allow too much titrant to flow out of the burette into the sample and overshoot the endpoint, requiring them to perform the entire titration all over again. Even highly skilled and experienced operators can be limited in the precision of their manual titration results by the last few drops of titrant, since each drop can vary in volume.
When using an automatic titrator, the titration is performed using a high-accuracy titrant delivery system that controls all titrant additions into the sample and will adjust the dose rate as it detects the endpoint approaching.
Once the endpoint is reached, the titrator uses the precisely measured volume of titrant added to the sample to automatically calculate the concentration results for the sample. The operator’s skill level, experience and focus on the task at hand is no longer a factor in the overall accuracy of the titration results and the possibility of missing the endpoint is greatly reduced.
Typically calculating titrations in the lab is done by calculating the sample concentration after the endpoint has been reached. There are many points in this calculation where human error can get in the way of consistent, reproducible results.
When using an auto titrator, it will automatically calculate the sample concentration from the entered parameters. Plus, on the automatic titrator, electrode, titrant and titration setup parameters can be saved as a method, so the exact same settings are used for each titration. These methods can be transferred between titrators for consistent procedures to be used on multiple titrators or multiple labs. This way you can save time with repeat titrations by running the exact same parameters each time without having to reenter any information.
Instead of manually logging the titration results in a notebook or scrap of paper, an auto titrator will automatically save the titration results in the data log with time and date stamp.
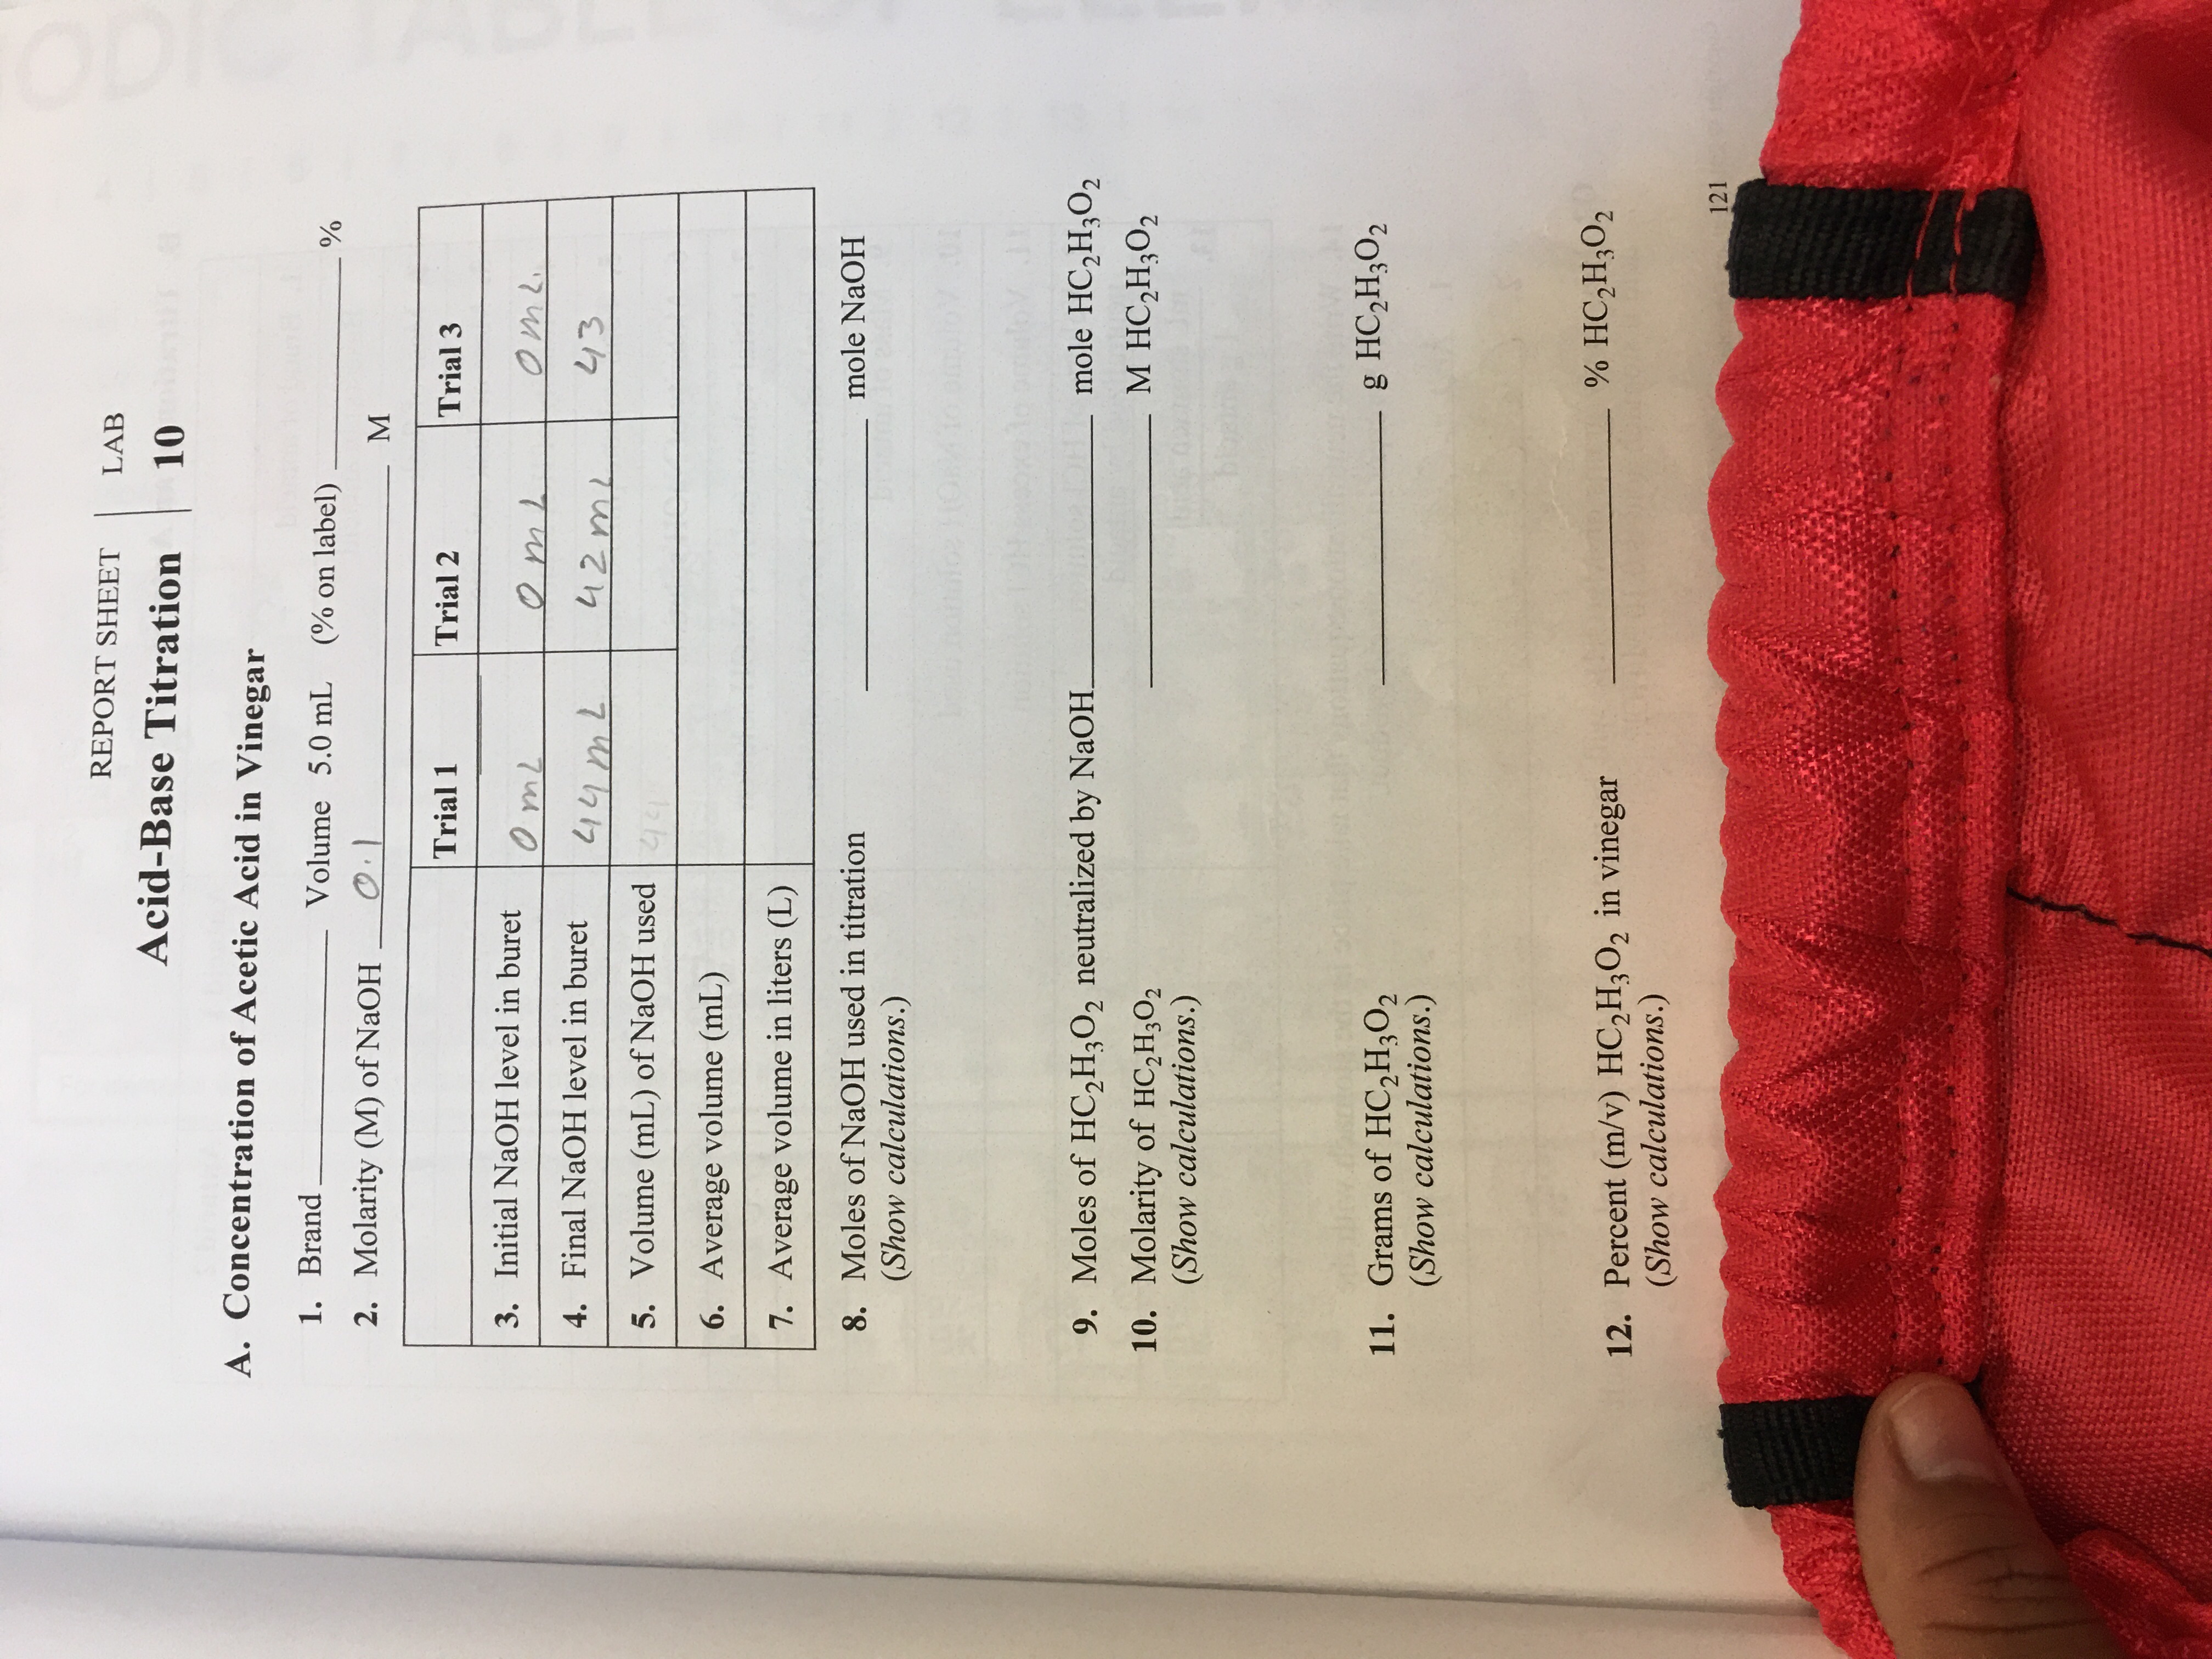
In a titration, the analyte (the substance whose concentration is unknown and sought in the analysis) is reacted with a standard (a substance that reacts with the analyte but whose concentration is known). The analysis uses just enough of the standard to react with all of the analyte, thereby allowing the amount of analyte present to be determined. In this experiment, acetic acid (CH3COOH) is the analyte and sodium hydroxide (NaOH) is the standard. The reaction is:
Usually it is the volume of the standard solution required to react with a given quantity of an analyte that is precisely determined during a titration.
Titration endpoint: The quantity of reactant in the standard solution added during the titration is stoichiometrically equivalent to the quantity of reactant in the analyte at the titration endpoint.

A. Acetic Acid in Vinegar А.I Brand Volume 5.0 mL (% on label) 0.100 kill use mih 3 sig fy. A.2 Molarity (M) of NaOH (stated on label) 个 Trial 1 Trial 2 Trial 3 0.00me 0.00 ml 41.90ml А.З Initial NaOH level 0.00ml in buret Y,00 me Me 41.00 tml Mat A.4 Final NaOH level 42.10ml in buret A C İnstructor REPORT SHEET LAB ORY GOALS Acid-Base Titration DDEA ns lo nobeiT A. Concentration of Acetic Acid in Vinegar 1. Brand Volume 5.0 mL (% on label) 2. Molarity (M) of NaOH M Trial 1 Trial 2 Trial 3 3. Initial NaOH level in buret 4. Final NaOH level in buret 5. Volume (mL) of NaOH used 6. Average volume (mL) 7. Average volume in liters (L) 8. Moles of NaOH used in titration (Show calculations.) mole NaOH noibulo TIOM to (J) onoiov Inni8 Brosns 1o 9. Moles of HC,H,O, neutralized by NaOH. mole HC2H;O2 M HC,H3O2 10. Molarity of HC,H3O2 (Show calculations.) gendrel rule for bios doamore Jm biosina g L 11. Grams of HC,H3O2 (Show calculations.) lg o ou g HC,H3O2 p oiltosa or otnW % HC,H3O2 12. Percent (m/v) HC,H3O2 in vinegar (Show calculations.) MOLObios dosmora ti bios OS HOM S BTure o1 On

1.A known quantity of the unknown solution (HCl) is pipetted into a flask and several drops of an indicator are added. If phenolphthalein is being used as an indicator, the solution should remain colorless at this point. The flask is placed on white paper to make the endpoint easier to see.
2.Make sure the buret stopcock is closed and then rinse the inside with several milliliters of titrant (NaOH). The buret should be held nearly horizontally and rotated so that all of the inside surfaces are contacted by the titrant. Some titrant should also be run through the stopcock to clean it as well. Cleaning is normally performed over a sink.
3.Make sure the stopcock is closed. Place the buret in a buret clamp and fill it carefully with titrant. Use a beaker with a spout or funnel to reduce the possibility of spilling titrant.
5.Read the volume of the buret. This is your initial volume (14.62 ml in this case). Reading is made easier by holding a piece of dark paper behind the buret.
6.Place the flask containing the unknown under the buret. Slowly open the stopcock and add some titrant (usually a milliliter or so). You may notice a temporary color change in the solution near where the titrant was added. Stir the solution thoroughly. Any color change should disappear.
7.Continue adding titrant in small quantities. As the titration progresses, the color change described in step 6 will take longer to disappear. This signals that the endpoint is getting closer and that the titrant should be added in smaller and smaller quantities. Titrant should be added dropwise very close to the endpoint.
8.The endpoint of the titration is signaled when a permanent color change is observed (longer than 30 seconds). It is possible to overshoot the endpoint by adding too much titrant. A correct endpoint is shown on the left, an overshot endpoint on the right.
9.Record the volume in the buret. This is your final volume (26.48 ml in this case). Subtract the initial volume (step 5) from the final volume to determine the volume of titrant added (26.48 - 14.62 = 11.76 ml).
A titration is a technique where a solution of known concentration is used to determine the concentration of an unknown solution. Typically, the titrant (the know solution) is added from a buret to a known quantity of the analyte (the unknown solution) until the reaction is complete. Knowing the volume of titrant added allows the determination of the concentration of the unknown. Often, an indicator is used to usually signal the end of the reaction, the endpoint.


 8613371530291