
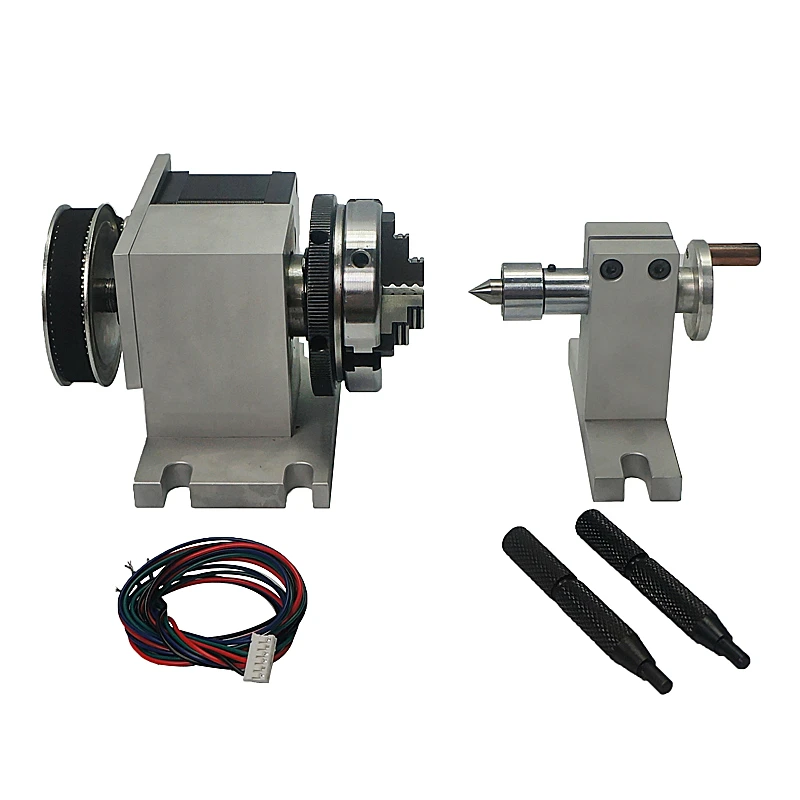
diy 4th axis rotary table made in china

399.0US $ |Cnc 4th Axis Stepper Motor Rotary Table With 3-jaw Chuck For Cnc Router Lathe Milling Drilling Machine - Woodworking Machinery Parts - AliExpress
Shop stepper motor rotary table online with free shipping and fast delivery. Stepper motor rotary table is suitable for cnc lathes, milling machines and engraving machines.

About 3 years ago I bought a cheap rotary table that I converted by taking off the handle and replacing with stepper motor. I used thrust bearings and whatever I could think of to minimize the backlash but it was a big FAIL. The internal worm gear mechanism was so sloppy that backlash was measured in degrees. Its been sitting on the shelf collecting dust. Since then I found out about Harmonic Drives and what high end CNC/Robotic systems use for rotational axis. A new harmonic drive is big $$$$ so eBay to the rescue. The gear head I used is planetary but made by Harmonic Drive Systems so it is very precise. It’s simple and just the right size for my small cnc. Since the stepper motor, gecko drive and gearhead was bought off eBay, it wasn’t that expensive. Under $150. I had upgraded my mini lathe to a bigger 5″ 3 jaw chuck. The 3″ chuck wasn’t being used anymore so I put it on the gearhead.

Whether you use mills, presses or lathes, machine tools are often only as useful as the accessories that come with them. Take care of repair tasks and add extra functionality with the machine tools accessories at Alibaba.com. If you need new 5 axis rotary table or are seeking to replenish your component stocks, our wholesale store is the ideal place to look. We stock accessories for every type of machine tool, with multiple options in most cases. So add resilience to your operations and be ready for any production challenge with the machine tools accessories in our store.
Machine tools come in all shapes and sizes, and so do the accessories that make them tick. For instance, CNC and manual lathes can be customized with jaw chucks, shanks, woodworking knives, drill chucks, rotary chucks, clamps, and turning tools. Add brushes and sanding discs, and turn your machine tool into a multi-purpose machining center. Add a range of cutting tools to milling machines, pick the right drum sanders for your drills, or add a lathe dog to make turning much easier. There are accessories for hydraulic presses, add-ons like drag chains, and many other machine tools accessories. And if you need replacement 5 axis rotary table, Alibaba has everything you need.
Our machine tools catalog is packed with accessories. Search the listings for your preferred tool and zero in on accessories that can enhance its functionality. From control handles to tool holders, thread holders and saw blades, the whole panorama of machine tools accessories is here and ready to order. There"s no better way to add extra stocks and renovate machinery when the time comes. When new 5 axis rotary table are required, head to the Alibaba wholesale store and give your machinery a new lease of life.
Rotary table in market mainly includes 4 kinds of mechanism that is worm gear, roller cam, DD driver and harmonic structure. The following is the introduction:
1. worm gear: it’s one of the most popular structrue in NC rotary table because of its irreversibility and costs.The worm is generally made of bronze, but the wear resistance is poor. In order to improve the service life, some manufacturers use the alloy steel.
3.DD motor: it’s the most efficient rotary table with the highest precision. It has the highest precision because it has no mechanical structure, which is directly driven by motor , no reducer. It has high technical difficulty and high price. It is generally used for five axis machine tools.

When I got my first 3D printer I was extremely happy with all the new possibilities to create things but after some time I noticed the limitations of 3D printing. Plastic is easy to melt, sometimes it"s not mechanically resistant enough and most importantly sometimes doesn"t look good. Don"t take me wrong here, I love 3D printing and I like plastic (except plastic waste) but there are things that look, work or feel way better when made out of nonplastic material. Imagine all your furniture made out of plastic. Sometimes I prefer wood, when I need strength, metal (mostly aluminum) is a way to go. That"s where CNC milling machines are used. Usually, the cost of such machine is really high, most of the hobbyist, small makers can"t afford such expensive equipment. That"s why the idea of building my own CNC machine sparked in my head. Of course building with bare hands wasn"t an option for me, that"s hard not only to make but also to document. I wanted to create an easy to replicate machine that anyone can make. I spent a lot of time on the design of it to make assembly simple and keep the price low. Then there was a lot of testing, redesigning and modifying to make it the best I could. I used as popular and easy to buy components as I could: Dremel, LMU12 bearings, Nema17 motors, Arduino, aluminum profiles and only free software. That"s how I managed to keep the price of my machine under $300. I already published 6 youtube videos about this project and it is quite popular on Thingiverse so you may ask why I am posting instructable that late? That"s because I wanted to finish my machine completely and make the most detailed instructable I have ever done. This project is the biggest one for me for a lot of reasons, I will talk about them through this instructable. Enjoy :)
This instructable is as detailed as it could be but it"s always good to see a video of how to make something or how stuff works. Above you can find my 6 videos about DIY Dremel CNC, maybe I will make some more in the future, I will also add them here, but you can subscribe to my channel to don"t miss any of this videos and my fututre projects.
To make things easier we will start with the assembly of the Z axis. Put two rods in Z-axis carriage but not all the way through we have to put there Dremel holder too. Dremel holder should move freely on the linear bearings. 608zz beating should be already in place in the hole on the bottom of Z-axis carriage. Now we can install a stepper motor with a lead screw and 3D printed coupler. Fix the motor with M3 screws and make sure that both rods are secured with a screw at the bottom. To make it easier for further use point the stepper motor connector backward because that"s where we will install electronics.
Tighten brass nuts to both 3D printed parts. Grab one of the X-axis carriages and join two rods to it. Then put a Z-axis carriage on those rods and close with the other X-axis carriage on the opposite side. Attach a motor with a lead screw to 3D printed part with M3 screws.
Y-axis is directly connected to the main frame of this machine. It"s made out of 20x20mm aluminum extrusion profiles connected together with screws to ensure rigidity. I choose 20x20mm profiles because those are easy to get, not that expensive and fit the size of this machine. Bigger profiles could be used but for such a small machine it wouldn"t make a lot of difference. Because this machine is modular you don"t have to use specific lengths of the profiles. Do you want to make a big machine? -> use longer profiles. Do you want to make a smaller machine? -> use shorter profiles. I cut my profiles to 60cm (we need two of them) and 30cm (we need 4). Once you have profiles cut to a length that you want we can start drilling holes. We need to drill holes on the ends of longer profiles, to make that easier I designed 3D printable tool that you can put on the profile and then drill a hole with 6.5mm drill bit. It"s 3D printable so made out of plastic, it"s easy to drill it out but we only need to make 4 holes with this tool so that shouldn"t be a big problem. On both ends of 2 shorter profiles, we have to make a thread with a tap. It"s a good idea to pre-drill a hole for the tap with 5.2mm drill bit and then create an M6 thread.
We already installed Y-axis motor supports and lead screw support, right now we have to attach lead screws and Y-axis rods. Again thanks to the modularity of this machine it"s up to you how long rods and lead screws will be (You have to figure out good length so that it will work with the length of your aluminum profiles).
It"s time to connect X axis with the Y-axis, grab the X-axis (with Z-axis already installed) and put it on the rods and lead screws, you will have to rotate lead screws with your fingers to push the X-axis back a little bit
I had to find something that would be good for a table of the CNC. Table with slots would be great but it is expensive. I could make it out of aluminum plate or even steel but that"s hard to cut (especially to cut it straight with an angle grinder). As most of us (makers) I don"t have a huge CNC plasma, waterjet or laser that can cut such materials but I have a jigsaw so I can make it out of plywood. I finally used table saw to cut it straight but corners should be cut with jigsaw or handsaw. Plywood is strong enough, it"s easy to cut and you can easily buy it anywhere so it seems to be a perfect choice.
I also added threaded inserts to the table so that I can use M5 screws to attach material to the table of CNC. You can buy something like this online, you need to drill a hole and put it in place with a hammer, simple and cheap upgrade that is really useful.
Wasteboard - a piece of material that you can mill in when you mill all the way through the material and you don"t want to destroy table of your CNC. It should be replaced after some time.
As the name of this project insists as a spindle I use a Dremel tool model 3000, there are already some people that successfully use a different model like 4000 or even completely different spindles. At the end of this instructable, I also write a little bit about the different spindle that I want to use with this machine. That"s because Dremel limit"s you only to 1/8 inch bits and also because of high rpm and low torque it"s not ideal for machining for example aluminum (but it"s possible). As long as you only want to machine wood, MDF, acrylic and even for delicate aluminum job Dremel works fine but there is no way to use bigger bit"s for faster machining, there are not as many bits with a 1/8 inch shank as others and Dremel is relatively hard to mount.
Before we will plug 4 stepper drivers to the CNC shield (there are only three on the schematic but we need 4), we need to connect jumpers because connectors for those are under stepper drivers. Those jumpers enable micro stepping we need to have all 3 connectors connected so that"s the total of 12 jumpers but we also need 2 of them to mirror the movement of Y axis motor to the A motor and we can do so by putting two jumpers on the left side of the shield. Now you can plug stepper drivers and then stepper motors. How to plug stepper motors? It depends on the motors that you have there is no easy answer. If you notice that your motor is going in the oposite direction than it should you need to plug the motor the other way around (disconnect it, rotate 180 degrees around Z axis and plug back in place). Some people also use endstops in their Dremel CNC but I don"t, if you want you can connect endstops to the right side of the CNC shield. And in the end, we can connect the power supply or the connector to the shiled to the screw terminal labeled as 12-36V. And that"s all for the connection, really not that hard :)
Safety is a very important aspect of CNC machining, there is a lot of dangerous things that can damage you, you don"t want to be damaged so here are my tips on how to stay safe with such machine. Fortunately, NEMA 17 motors aren"t crazy fast and torque is as great as with some servo motors used in industrial CNC machines. But there is still a fast spinning spindle and danger of crushing your fingers. While machining there are chips flying all over the place so we need to have a safety glasses (because safety is number one priority) and depends on the material that we are machining (wood, MDF) we may need a mask. It"s also a good idea to build an enclosure for DIY Dremel CNC and some people already build one, I am also planning to do this in the near future. Another safety improvement would be to add a big red safety switch so that in case something bad happens you can easily stop the machine (we can also do that in CNCjs but it takes more time and isn"t that reliable). Keep in mind that material and bit may be hot after machining and make sure that machine finished its operation before putting your hands in the working area. Machining for a longer period of time is very uncomfortable for ears so some kind of hearing protection is recommended. I also thought about using active noise canceling headphones, should be perfect for a CNC machine because noise is very consistent but I don"t have any headphones like this and those are quite expensive. Keep in mind that those are just some tips from me about safety while dealing with a CNC machine, there is a lot of things that can go wrong and you always have to be careful and think in order to be safe.
The result of this project just blows my mind! When I started it I just wanted to see if it is possible to create a 3D printed CNC machine, I wanted to build a tool that I will be able to use in my further projects. Right from the beginning of it, I knew that I will publish online all of the files and the instruction but I had never thought that this project will be so popular and that so many people will build it (check out next step). That"s the biggest project of mine so far! Because of some problems and a lot of upgrades and tweaks that I did to the machine, it took me a long time before finishing this instructable, but I wanted it to be perfect and as detailed as possible so that everyone will be able to easily build an inexpensive CNC machine. Above you can see the newest images of the Dremel CNC with nice cable management and some small upgrades. There are also images of stuff that I milled on my machine. If you want to see what others made on Dremel CNC joint the Facebook group!
That"s it for this project! I hope you enjoyed this instructable :) If you have any question ask them in the Facebook group or in the comments below! I would also love to hear what you think about the project :D
Hi there, It"s a wonderfull project and i going to build one of my own. Only the dimentions I need to expand, so i thought to make the rods thicker and the steppers bigger. The 500w spindel is also a big improvement. Only i can"t find the file to print the Z-axis carrige for the 500w spindel. Could you post it on instructables, please. I realy like to upgrade the cnc the you developed. Lots of thanks.
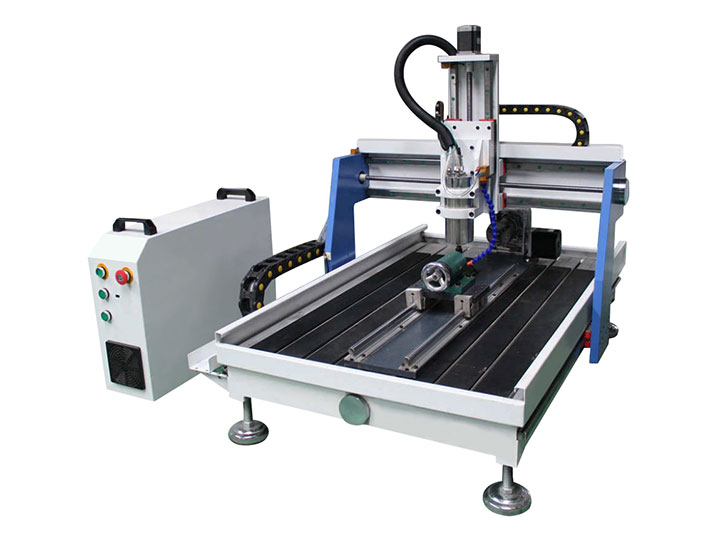
2022 top rated 4 axis CNC router 1325 with 4x8 rotary table (4th axis) is popular for woodworking, cabinet making, home decorations, mold making, sign making, arts, and crafts, now the best budget 4x8 CNC wood router machine for sale at affordable price.
1325 refers to the CNC router table size of 1300mm x 2500mm, someone may name it as 4" x 8" by feet or 48" x 96" by inches. 1325 is the most common used model in CNC machines to make a full sheet project. As the name implies, it is named by the manufacturer according to the table size of the machine. The maximum table size is 2500mm in length, 1300mm in width, and 200mm in height. It is widely used in popular woodworking plans and projects, such as cabinets making, door making, home decoration, advertising, and sign making. CNC router 1325 is designed as 1325 single spindle, 1325 dual head, 1325 multi head, 3-axis 1325, 4th-axis 1325, 4-axis 1325, 5-axis 1325, and 1325 ATC CNC router with automatic tool changer spindle based on the configuration level.
4 axis is based on 3 axis, and the 4th axis (A axis) is added to the rotation axis. In addition, 4 axis is divided into four-axis three-linking and four-axis four-linking CNC machines, adding a rotating axis and the control system is also a four-axis linkage system to be called a true four-axis linkage CNC machine. Because of the rotary motion of the 4th rotary axis, 3D machining of cylindrical, arc, and circular surfaces is realized.
If the 4 axis you purchased has only three feed axes (X, Y, Z), the Y axis can be manually replaced with a rotary axis, and only a maximum of three axes can be linked. This is a four-axis three-link CNC machine, which is also known as 4th axis.
If the 4 axis you bought has four feed axes (X, Y, Z, A), it can be processed by four-axis linkage, and it can process planes, reliefs, cylinders, non-standard three-dimensional patterns, corner repair of 3D patterns, etc.
The rotary axis CNC router kit uses a DSP handle industrial control system. The four-axis linkage control has excellent and stable quality, good maintainability, and usability. It can control the completion of the 3D machining of the cylinder and the rotation of the tetrahedron. It is suitable for three-dimensional sculpture of figure statues and legs of European furniture. The cylinder engraving machine has the following advantages:
Woodworking industry: 3D wave board, furnitures, solid wood door, kitchen cabinets, wardrobe cabinets, tables, beds, computer desk, table legs, sofa legs, wood crafts, paint door, screen, windows, shoe polisher, game cabinets and panels, mahjong table, auxiliary machining.
4 axis CNC machine can do all 3 axis CNC machine can do. The 4 axis spindle (B axis) can rotate ±90 degree, which is suitable for side milling, drilling, cutting, lock slot and so on. It is especially designed for processing on different 3D curved surface carving.
We will offer you with our detail quotation according to the consulted 4x8 CNC machine. You will get the most suitable specifications, the best accessories and the affordable price.
All the CNC routers can be shipped worldwide by sea, by air or by international express logistics via DHL, FEDEX, UPS. You are welcome to get a free quotation by filling up the form with name, email, detailed address, product and requirements, we will shortly contact you with the full information including the most suitable delivery method (fast, secure, discreet) and freight.

I designed this for use with my Mostly Printed CNC, which is an awesome design by Allted featured on Thingiverse http://www.thingiverse.com/thing:724999 and http://www.vicious1.com/. This 4th axis works well with laser and light cuts on wood with a...
This drop in fixture for Mitsubishi LXP 2512 is trammed in parallel to the "X" axis, and utilizes the SMW (SMW - ACCU SMART 55 FOURTH AXIS Rotary / Indexing table) rotary axis. ...The sub-assembly is based on a sine block for setting the compound angle...
This project details the design of a 4th axis that I constructed for my home CNC mini-mill. The YouTube video below details the steps necessary to construct this 4th axis.This 4th axis uses a harmonic drive-based precision digital servo from a French...
4th axis for CNC plasma cutter - rotation CNC plasma cutter with rotation stepper motor type: Nema 23 stepper motor 3A 2 phase 4 wires Chuck type: 80mm 3 claws centring chuck center height:50mm total height: 110mm Total length: 220mm Rated torque:...
It"s a mount for an inductive NPN sensor with an M8 threaded shaft like the "Finglei Electric LJ8A3-2-Z/BX-5V" I"m planning to use to a chinese 4th axis containing a 50:1 harmonic drive.
This is a very simple steady rest to support parts mounted in the 4th (rotational) axis of a CNC mill. It supports the stock while milling from the top using a down-spiral or straight flute cutter.
final version of my 4th and5th axis for my CNC router the timing belts are still missing it"s not the optimal construction but had these steppers and I"ve used them the ratio between the pulleys is 1:6
A simple 4th axis for lightweight CNC and 3D printing applications (go on, someone wants to try printing using a 4th axis). Designed to use a NEMA 23 stepper
A 4th Axis I designed for a CNC router. It works quite well but may be too large for most people. The bearings are preloaded correctly by large spring washers. It has a large opening for bar stock. ... It would make a nice reference for anyone...
Budget-CNC 4th Axis (Rotational A-Axis) with Longworth-Chuck Aims to be the cheapest Rotational-Axis you can build. BOM: NEMA23 Stepper 3A 608zz Bearings "XL"-Style timing belt "XL"-Style pulley for NEMA23 / 6.35mm center hole M8 Screws & Nuts...
2 Rotary Axes Table for 5 Axis CNC. ...Used as AC-Table or BC- Table, depends on the direction mounted on the 3 Axis CNC routerSee Details and the real thing @Work here : http://www.masdrive.ch/myprojects/?page_id=572
In order to give tires of my model cars a final touch I was thinking of using a 4th axis for rotary engraving. For the vague idea, the intense investment and due to harsh software requirement it did not get a professional 4th axis set. It came in...
In order to give tires of my model cars a final touch I was thinking of using a 4th axis for rotary engraving. For the vague idea, the intense investment and due to harsh software requirement it did not get a professional 4th axis set. It came in...
For a quick and easy WCS in Fusion4th and 5th axis Trunnion from the China CNC 3040 5 axis sold by automation technologies.I did not go into detail on the bearings. Measurements wise, everything else is to spec.Enjoy, hope it helps! ...Will upload a...
This is a prototype design for a gang rail attachment to the A-axis of a CNC Milling machine. Its a kind of maker beam attachment for holding parts while rotational CNC milling. You can attach different work-pieces to each side, or on opposite...
For more information you can read my blog post about this project: https://blog.jpoles1.com/2021/02/27/designing-a-4th-axis-for-engraving-rings-on-the-cnc-2418-3018/ Note: In order to edit the original FreeCAD design you will require the LinkStage 3...

If you’d asked me up until very recently whether 5 axis was practical for the CNC DIY’ers and Makers, I would’ve said “No!” without hesitation. Not only is the hardware complex, but 5 Axis CAM was expensive. Much of this has now changed fairly recently. Yes, the hardware is complex and most 5 Axis CAM is still expensive, but there are an increasing number of proof points that is is possible to have a go at 5 axis CNC for the hobbyist. Let’s have a look at recent developments in this area, but first:
Given that 5 Axis is not at all easy or common, even for Pros, why would a hobbyist want 5 axis? Sure, there’s always the desire to push the envelope, to do something the mainstream hasn’t done yet. That’s primal Maker juice at its best, and we’ll trot out this popular 5-axis video just to get those juices flowing:
But there are sound practical reasons to want to do 5 Axis as well. We’ve written about the advantages of 5 Axis CNC before, but a quick recap here is in order. Here are the most important bits:
– Fewer Setups: When you can get at nearly every face of the part except for the very bottom, you have fewer setups needed. This is especially helpful for the hobbyist who may only be trying to make a one-off part. No need for complex fixturing and lots of setups with 5 axis giving the cutter better access.
– Machine Parts Not Otherwise Possible: Let’s face it: something like the helmet shown in the video wouldn’t even be possible without 5 Axis CNC. Many parts that require a lot of undercutting will be much more difficult without 5 Axis CNC. It isn’t even just a question of something curvy like the helmet. With 5-axis, a part can be tilted to allow a shorter tool to get down in a pocket, thus allowing for more rigidity and less tendency for the tool to deflect and chatter. On a lightweight hobby machine, any increase in rigidity is welcome.
With linear rails, a sweet high speed spindle, and trunion table, the Pocket NC looks the part. It’s even set up as a horizontal mill, which no doubt gives it greater rigidity than might otherwise be the case. 280 backers pledged $355,833 on Kickstarter to help bring this project to life. The Kickstarter closed just a couple of weeks ago, so it’s way too early to tell much, but this mill looks extremely promising. Early signs are good as the Kickstarter sold out 3 weeks early and this enabled them to get a head start making parts for the machines:
As mentioned, the Kickstarter sold out. We’ll have to wait until they’ve delivered all the machines to that crowd to see whether there will be a Pocket NC for the rest of us, as well as what the reaction of the first group of owners may be. Personally, I’m hoping everyone loves the machine and that it will be available at their target price of $3500. That would be quite an accomplishment to be able to purchase a high quality 5 axis desktop CNC mill at such a price.
There have been other desktop 5 axis machines shown, even some on Kickstarter, but the Pocket NC is the first one that seemed so polished. These things are a bit like the 4 minute mile. Until someone actually ran a 4 minute mile, it seemed impossible. Once it had happened, quite a few managed to run it not long after.
The main reason I would have said “No” to 5-Axis for hobbyists up until recently was not hardware, it was software. Talented hobbyists have been modifying a 4th axis to turn it into a 4 axis trunion table for quite some time. Here is one such:
Building a 5-axis mill is hard enough, but programming it is nearly impossible without CAM, and until recently, 5-axis CAM was very expensive. Before the advent of true 5-axis CAM, about the best that was available were toolkits to help simplify the hand programming, such as CNC-Toolkit. While extremely useful, such software was still too hard for most people to tackle. Just visualizing true 5-axis tool paths is nearly impossible for most.
The Fusion 360 Ultimate version includes full simultaneous 5-axis CAM, and is actually approachable for the Hobby-level market for the first time. Here is a video of the PocketNC showing how they did a duck call in 5-axes:
It’s premature yet to declare that DIY 5-Axis is here for the masses, but I don’t think it’s premature to suggest that it isn’t far away or that it is almost within reach. Talented hobbyists can get there today, thanks to the availability of suitable software. The rest who want to be able to buy an off-the-shelf machine that’s ready to make parts will have to wait a little while longer.


 8613371530291