
floor jack safety valve adjustment made in china

You can have the best-equipped garage with the best tools in the world, but none of it will matter if you can’t get to the components of your vehicle that need to be fixed or replaced. A floor jack should be in your toolbox if you need to change your oil, replace a flat tire, or make other repairs to your car or truck.
Unfortunately, no matter which floor jack you choose, there might be a time when it doesn’t work like intended, and you’ll need to do some troubleshooting.
Locate the Gross Vehicle Weight (GVW) on the sticker in your driver’s door jamb to find out the right tonnage capacity for your vehicle. The weight of most vehicles is also divided into front and rear weights. Make sure that the jack you purchase can lift more than the heavier of the two weights. For example, if you need 3100 pounds in the front (just over 1-1/2 tons), get a floor jack that can bear at least 2 or 2-1/2 tons.
One of the most common reasons a jack won’t lift is incorrect fluid levels. First, remove the oil plug and look into the chamber to check the oil level. The suggested level for most floor jacks is 3/16 to a quarter above the reservoir. If you need to replenish, make sure you have the highest-grade oil possible.
If the jack’s oil level is higher than the required level, you will need to drain it. When a jack has more fluid than necessary, it risks blowing out seals, producing internal leaks, and causing the jack to lose pressure.
A jack with a low oil level will generally work correctly, but the low fluid level will significantly reduce the jack’s height. Hydraulic systems are closed-loop, which means the fluid level should never fall below zero. If it does, there’s most likely a leak someplace, which you’ll need to rectify before using your jack.
A jack can be tilted during shipping, allowing air to enter the cylinders. As a result, when you first pull a new jack out of the box, it’s critical to bleed out the air before using it.
Additionally, it would be best to repeat this practice monthly or whenever you notice any lapses in lifting capacity. Bleeding the jack every month will help your jack perform at its best. To bleed your lift, follow the steps below:
Most of the time, this will completely bleed the jack. If not, gently pull the oil fill plug on the side after the cylinder has been freed and lowered to help remove any trapped air.
Check the valve for leaks and make sure it’s airtight. If it isn’t, it will let the pressure out and allow air back into the system when you try to raise something.
You should look for cracked welds, destroyed parts, oil leaks, and anything else that isn’t in working order. You should also check the jack’s ram by flipping it on both sides. Always inspect it in both the retracted and extended states. If the floor jack has rusty pistons, this could indicate a problem.
Regular inspections are necessary for your lift. For example, examine where the jack was stored for any fluid leaks and inspect the housing for any cracking or rust and the piston rod for scoring or other damage. You should also look to determine if excessive wear in any areas could cause problems. Finally, keep an eye out for any foreign things (metal shards, dirt, rocks, etc.) that could harm the device.
It’s also essential to clean the hydraulic jack after each use before storing it. Wash the jack’s exterior using a gentle soap solution. Make sure that you do NOT CLEAN the hydraulic components that move. Oil your parts regularly to avoid premature wear. It would be best to grease the caster wheels, the front axle, the elevator arm, handle base pivot bolts, and the release mechanism with a general-purpose lubricant. After each use, inspect the seals for possible oil leakage and replace them as soon as possible.
Hopefully, this guide has helped you understand how to fix a jack that won’t lift. Regular maintenance is, once again, the most straightforward approach to avoiding malfunctions and future difficulties. Maintain your jack as much as possible by regularly keeping it clean and dry and lubricating it.Should you need parts for your lift or a new jack altogether, SVI is here to help you. We have everything that you might need for a safe and reliable floor jack. Contact us today at (800) 321-8173 and we can offer you same-day shipping on in-stock parts!
This is a 1 1/4 ton hydraulic floor jack my father passed on to me. He bought it new during the 1970s. It began to leak down a little a few months ago. The lift arm no longer rises when the handle is pumped up and down. (I was able to pull the lift arm up by hand and it settled slowly enough that I could make a photo with the arm partially raised.)
I checked to be sure it was adequately filled with fluid, but that was not the problem. A few months before this problem, there were bubbles coming up through the vents at the filler plug. At that time I raised the lift arm with the handle, released the jack"s valve, and let the arm fall slowly several times to purge air from the system. Finally, one day, the lift arm would not rise at all. If filling with fluid and purging air from the system do not restore function, there is probably internal leakage, even though fluid is not leaking from the jack. From what I have read, forty years of service is a reasonable time for a hydraulic jack to operate before it needs a rebuild.
A word of caution: Rebuilding this jack presented several challenges that seemed almost insurmountable at the occurrence of each. Rebuilding this jack was much more difficult than simply replacing a few "O" rings, and it required more than the very few hours some say are required for rebuilding a jack. Further, I had to make several special tools to get the job done. If you want to attempt rebuilding a jack and you are not a member of Instructables, I would encourage you to pick a password and a screenname, and join. Doing that will allow you to download a PDF of this Instructable for printing, or to view at any time later on your computer, assuming you wish to consult what I have done as a guide.
When putting fluid into a jack never use anything other than hydraulic jack fluid. Do not use motor oil or brake fluid. Brake fluid makes the seals swell.
At this link you will find one man"s description of how he rejuvenated his twenty-five year old jack by flushing its insides with a solvent, letting it dry completely, and filling it with fresh hydraulic jack fluid. It could be worth a try. I did find one manual for a floor jack that said the fluid should be changed every year. The procedure is to place the jack over a large pan, remove the filler plug, turn the jack on its side and let it drain. Then fill it again.
Several firms sell rebuild kits for hydraulic jacks. I found Blackhawk Parts and ordered parts on-line. My jack came with the Fleet brand name. It was sold through NAPA Auto Parts. It should have been easy to find my jack among the listings for Fleet jacks on the Blackhawk Parts web page and order the appropriate rebuild kit, but it was not. So, I sent an e-mail to Blackhawk Parts with the name of the manufacturer and the model number. It is good that I did. The kit I need is not the one I would have thought, but is actually for a Lincoln/Walker jack. Although my jack has the Fleet name, it was actually made by someone else. I paid about $45 for the parts kit, plus $11 shipping. That is a fairly typical price for a rebuild kit.
I decided not to open the parts kit until I was certain the parts it contains match what I see on my jack as I dismantle it. I will have less difficulty exchanging an unopened parts kit than I would have trying to exchange a kit I had opened, in case the wrong one was shipped to me. In the photo you can also see the paperwork that came with the parts kit. It will help, too, if an exchange were necessary. And, I do not want to risk losing any parts by opening the bag early and having something roll out.
The rebuild kit does not include any instructions. The Blackhawk Parts web page offers a few cautionary and a few safety notes, but no helps on the rebuild procedure for the Saturday mechanic. e-How does offer a step-by-step procedure for rebuilding a hydraulic jack in text, but it is quite general. There is avery helpful link at the e-How page that takes you to a set of photos and some useful notes on critical stages for doing work on a low price imported hydraulic floor jack. Some of these things would be very helpful for the proper assembly, too. Floor jacks are remarkably similar, despite small differences. See the next step for information on helpful videos on-line.
The graphic for this step is an exploded diagram of a hydraulic jack and a list of parts. This one is from aHarbor Freight jack. Diagrams like this one are easy to find on the Internet. Just search for "hydraulic jack manual." Diagrams like this one help with the names of parts and with a visual understanding of how the parts fit together. You can enlarge images in your browser to see more detail, or save them in PDF and do the same. But, if you are able to watch the videos linked in step 3, you will see how the parts fit together, too. (The day may come when those videos are no longer available on the Internet.)
There are many videos related to hydraulic jacks at YouTube, but most of those are not really very helpful for a rebuild, even though their titles are enticing. A floor jack is a really a bottle jack laid over onto its side and installed inside a frame equipped with casters, a handle, and a lift arm. This video shows how to remove the bottle jack unit from the frame. The floor jack in the video is my Fleet jack with a different name and paint color on it. Some jacks are the least bit different. You may also want to view this video.
If you do not want to rebuild the bottle jack unit yourself, you can use either of these videos to remove the bottle jack unit from the frame of the jack and simply take it to a repair shop near you. The cost of a rebuild at a shop is said to be around $150 to $200 plus parts. The e-How article linked in step 2 contains a word of caution. If your jack is a cheap import, it may not be worth a rebuild. The machining is not always as good as on the older models made in the USA. Further, the correct parts kit may be impossible to get. You may find it more economical simply to buy a new jack. Classic jacks made in the USA are generally considered worth the expense and effort of a rebuild.
First photo--The halves of the jack frame will need to be spread to get the bottle jack unit out for repair. Loosen the nuts on the axle for the lift arm considerably, but do not remove them. There is one on each side of the jack frame. The nuts on my jack are 15/16 inch in size.
Second photo--Two bolts on each side hold the body of the bottle jack unit to the frame. Remove all four. (One is partially backed out already.) Although the man in the video from step 3 removed the casters, that is not really necessary to access the bolts on this jack. I did fine without removing the casters.
Fourth photo--A universal joint twists to open and close the release valve. The upper end of the universal joint is a piece of hex stock. It fits into a hex socket in the bottom of the handle.
Fifth photo--Lift the jack frame and the bottle jack unit remains on the work surface, even though attached to the lift arm by hinged extensions. Use a pair of pliers to remove the end of the return spring from the pin.
Sixth photo--The rams from the jacks shown in the videos attach to the frame with a cotter pin. On this jack a pin both holds the end of the spring and secures the block in the photo to the top end of the ram. Flip the bottle jack unit over and drive the pin most of the way out with a hammer and a punch.
Place the bottle jack unit into a pan and drain the oil as best you can. On the bottle jack unit in one of the videos it was easy to work the plunger in order to extract more of the oil. The spring on the plunger is too strong for that on this jack. Be aware that additional oil will pour out of the jack in coming steps. Have a pan or newspaper available to catch it and minimize the mess.
The first photo shows the ram and ram nut (or tank nut, also top nut) at the end of the bottle jack. Most ram nuts are hexagonal. This one has two slots for a special spanner wrench. In the video from step 3 showing a man taking the ram nut off of a bottle jack, the ram nut came loose quite easily. On my jack the nut was stuck on very hard. I placed the bottle jack unit into my vise and tried to loosen the ram nut with a very large pipe wrench. I only did a little cosmetic damage to the nut. It would not loosen. I soon realized that my workbench and vise were not equal to the task, either.
The third photo shows the tool in use. Check the yellow text boxes. My vise did not have enough leverage to hold the bottle jack unit, so I bolted it upright into the jack frame and used the jack frame as my own long bar for leverage. In order to make that work, I planted my foot against the end of the frame that is not shown in the photo. I had to strike very hard with a 16 ounce ball peen hammer, but after about five or six strikes, the ram nut began to move. My tool worked and I was able to loosen the ram nut with the ram for removal from the bottle jack unit.
First photo--Unscrew the ram nut until it and the ram can be pulled from the bottle jack unit. The ram nut simply pulls off of the top end of the ram.
The outer shell of the oil tank appears to be securely fastened to the base of the bottle jack unit, but it is not. Press against its side and it tips off to one side immediately. There will be some oil that runs out onto the work surface. Put down some newspaper or a pan to catch it.
Third photo--Unscrew the universal joint assembly for the release valve. Insert a magnetic tool and pull out the cone-shaped plug. The hole from which it came is visible behind the magnet tool.
Fourth photo--Place the bottle jack unit in a vise and use a wrench to remove the plunger mechanism. I had to tap on the end of the wrench with a hammer to loosen it. On my jack a 1 inch wrench was required.
Move your cursor over the text boxes in the first photo. for part names, etc. The cylinder would normally be removed for a rebuild. But, this one is stuck very tightly. Remember how much difficulty there was in removing the ram nut in step 6. It screws to the cylinder, so the cylinder should be difficult to remove, too. It is not as easy as the video linked in step 3. I tried, but could not get it to loosen. There actually are no "O" rings or seals below the cylinder on this jack. Removing it does not give access to any removable parts. I did notice some oil at the bottom of the cylinder appears dirty.
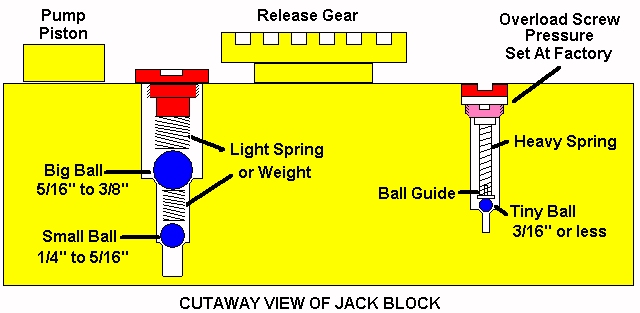
There are two metal plugs in the body of the bottle jack unit. Two large screws are below them. See the text boxes again. This site warns NEVER EVER to open these. It also has a diagram of what is inside. (Scroll down to the middle of the web page.) The author"s concern is that the small balls in the valves can be lost, and the jack would become useless. Get a shallow cardboard box with no holes in the bottom or a large pan and work inside of either one. If any balls roll away, they will be contained inside the box or the pan. Also, extra balls are included in my kit. Even if the balls were not included in the kit, precision steel balls can be purchased at a bicycle shop in a series of sizes. Check the link in this paragraph for the sizes normally used. The ball sizes in my jack are: 5/16 inch (7.94mm), 7/32 inch (5.55mm), and 5/32 inch (3.96mm). I measured them with a caliper through the plastic parts bag. I want to do as complete a rebuild as possible. Dirt may have found its way into the passageways where the balls are. The balls could also have rough surfaces through years of use.
If I turn the jack body back and forth I can hear metal balls rolling inside passageways. I drilled a hole in the center of each of the metal plugs. Then I inserted a slightly larger sheet metal screw into the hole until the threads bound against the hole I drilled. I placed a pair of pliers under the head of the screw and pounded against the pliers with a hammer to pull the metal plug out of the jack"s body. I repeated the process with the other plug. New plugs are included in the parts kit.
The second photo shows the bottle jack unit"s body, but inverted so it was easier to hold while operating the camera. The metal plugs have been removed. Both holes have a large screw inside them. The one on the right is recessed so far that it is not visible. It is the safety overload valve. This valve protects the jack"s seals from failing under a load heavier than the jack"s rating. When the safe range of the jack is exceeded, the safety overload valve opens like a pressure regulator to allow oil to return to the tank rather than entering the chamber for the ram. This screw has to be set so the safe level of pressure is not exceeded. In order to do that at home, I carefully turned this screw and counted by half-turns until it bottomed out. My screw was set to 1 3/4 turns above or looser than the bottoming out point. When it is time for reassembly, I will turn the screw gently until it bottoms out, then I will back it off 1 3/4 turns. The safety overload valve should then be set very close to the original factory calibration. One author noted that some jacks fail because the safety overload screw unscrews itself, which sets the jack"s lifting ability to a much lower threshold, and the arm may not lift what you want to jack. I found this screw turned with enough resistance that it is not likely to shift its position by itself. That same author also said most safety overload screws are about two turns looser than the bottoming out point.
The fourth photoshows another special tool I made. The screw for the check valves is quite tight. I tried the largest screwdriver I had (3/8 inch wide blade) with a wrench on its square shank. The blade on the screwdriver broke! The screw slot is 1/2 inch across the diameter of the screw and almost 1/8 inch wide. I bought a short bolt 5/8 inch in diameter. It is #8 on the hardness scale. Near the end I ground the diameter down until it fit nicely inside the recess for the screw. I kept a cup of cold water near my grinding wheel to avoid softening the bolt with heat. I ground a rough profile by sight. I moved the bolt to a vise and finished cutting the profile of the screw slot by means of a hand file. I checked the dimensions with a digital caliper. When my improvised screwdriver fit the screw and its slot, I tapped on the bolt"s head to be certain it had fully seated in the slot. I used a wrench on the bolt head and the screw came out with no difficulty, at all. I had tried to buy a large screwdriver, but could find none this large. This improvised solution cost me $1.65 for the bolt and a few minutes of time.
The first photo shows a paper towel I pressed into the cylinder and rotated with a screwdriver without letting the screwdriver touch the sides of the cylinder. (Be careful not to scratch the inside of the cylinder. A 1/2 inch dowel pin would have been a safer tool to use.) Jack fluid is clear. The towel shows how much dirt was in my jack"s oil. In addition to sopping up some dirty oil still in the cylinder, I poured a little clean jack oil into the openings and passageways. Most of it collected in the opening for the plunger. At first this oil was cloudy. After a few tries, it was clear. I think this should adequately clean the jack so that it can be reassembled.
Inspect the seats in the bottle jack unit"s body for signs of rust and pitting. The seats need to be clean and smooth. When I let sunlight shine into the recesses where there are seats, I saw more dirt. I used a wooden dowel rod to scrape and break loose any dirt I could find. I poured some jack oil into the holes to flush the dirt away.
Second photo--Clean the groove that receives the tank"s outer shell. It has some brown dried oil residue. Something brass would be ideal. It would be tough enough to remove the residue, but would not scratch the machined surface. Someone said jack oil is a vegetable oil. The oil residue is certainly like what I have seen in the kitchen from vegetable oils.
I kept the bag of parts inside the same shallow pan in which I assembled the bottle jack unit. This is so I am less likely to lose parts, especially the steel balls.
First photo--This shows the plunger body and the plunger parts. At the left three leather seals are shown. My jack does not use these. Several different parts came in more than one version. I think the same parts kit is sold for several similar, but different jacks. I have some parts I will not use on my jack. In the center area of the parts are the steel washer and the locking nut. The other two parts at the right are the old seal I removed. It has an oily sheen. Just below it is the replacement part my jack requires.
Second photo--Coat the new neoprene seal with fresh jack oil. During the installation of all parts, double check for any grit or dirt sticking to the oily parts and remove it before the installation of that part. Install the new neoprene seal, rounded end first. Install the steel washer and the locking nut. I will discuss how tight to tighten the locking nut after treating how to install the spring assembly onto the plunger body. I made a special tool for putting the plunger assembly back together. It is made from steel wire about 1/8 inch in diameter. The wire came from stubs of concrete reinforcement wire broken off from a friend"s foundation for his new garage.
The third photo shows how this special tool is used. I chucked this tool in my small drill press. The circle of wire at the end of the tool fits over the top of the cap for the plunger assembly. The two straight pieces welded crosswise allow the quill of the drill press to exert pressure downward and to collapse the spring so the "C" ring can be attached. Notice that the bottom end of the plunger body presses against wood so the smooth machined surface is not scratched. I used an adjustable pliers to close the "C" ring. My drill press has limited adjustment. I used a couple of pieces of wood on the drill"s base in order to achieve the desired distance between the chuck and the surface supporting the smooth end of the plunger.
Check the plunger for dust and particles of wood. Thread the plunger into the base of the bottle jack unit. Tighten with a wrench and hit the wrench several times with a hammer to make a good seal, since there is no "O" ring or copper washer to make the seal.
First photo--I have a dental pick I can use to remove old seals. This "O" ring shows cracks from age when stretched a little. Match the new "O" ring from the parts kit to the old "O" ring. Coat it with jack oil. Install the new "O" ring.
Second photo--Install the conical metal seal in the hole for the release valve. The pointed end goes in first. Tamp on it with a small screwdriver to make sure it seats at the bottom of the hole. Thread the release valve into the hole.
First photo--The hole for the check valves has a copper sealing washer inside it. The old washer is barely visible in the hole. Note its color. A new copper washer is supplied in the parts kit. The old washer has compressed to fit very tightly. There is no good way to remove it. I did not want to fill the passageways in my jack with copper shavings from digging it out in pieces. I decided simply to place the new washer on top of what is left of the old washer. (This photo was made before the plunger and the release valve were installed.)
Second photo--Install the parts in the order shown in this photo from step 8. (The release valve and the plunger are not shown in this photo.) Use the new balls from the parts kit. Do all of this inside a pan or shallow cardboard box so none of the balls are lost if one gets away from you. Tamp the parts down with a small screwdriver so they settle down as far as possible in their hole. Carefully start the screw plug with a screwdriver. It is easy to crossthread. Use the special screwdriver made from a hardened bolt to tighten the screw plug with a wrench.
Third photo--Install the parts shown in this photo from step 8. Drop the new ball into the hole. Insert the spring into the open end of the cap and drop both into the hole. Insert the screw plug. Carefully turn the screw plug until the valve assembly bottoms out. Back it off 1 3/4 turns.
I chose not to install the metal plugs that close the valve holes yet in case I would need to open one of the valves during testing of the jack to correct a problem.
Coat the inside of the cylinder with jack oil before inserting the ram. You should be able to pull the ram up and push it down with your hand. A seal too large in size makes the ram very difficult to install and to move.
Second photo--Clean the tank shell, both on the edges that mate to make a seal and inside. I found quite a bit of dirt inside mine. The dirt had not entered the jack from the outside, but appeared to be residue that had formed from changes in the oil. I applied some jack oil to the inside of the tank and wiped it with a clean paper towel. I did this several times until I could no longer feel anything gritty with my fingertips.
Retrace what you did in step 4, but in reverse, to bolt the bottle jack unit back into the jack"s frame. (The photo is from that step.) While the bolts are still loose, put the handle"s yoke in place.
I used about 20 ounces of jack fluid. Around 12 ounces was used to fill the jack. The rest was used for cleaning and flushing the bottle jack unit. The fill hole is 1/4 inch in diameter. Even though the bottles for the jack oil have a pointed end, some spurts out while trying to get the bottle end to the hole, and it makes a mess. Get a funnel with a very narrow end. This is one I made specifically for this job from some sheet metal.
I filled the reservoir in small steps. The jack"s release valve was open. Occasionally I pumped the yoke for the handle. When oil was at the level below the plug hole, I pulled the lift arm up and let it fall two or three times. This is to draw oil through the jack. I pumped the yoke between five and ten times to remove any air lock in the check valves. I checked the oil level again a couple of times. Then I returned the reservoir cap. The reservoir cap appears to be open, but actually has a small felt filter inside it.
Update: After using my jack a few times, it tends to throw off extra oil through the felt filter in the reservoir cap. I do not have the original instructions for this jack, so I do not know exactly what the recommended fill level is for it. From what I have read, some jacks are to be filled to the bottom of the hole while the floor jack is level on a floor. Others vary between just covering the cylinder with oil to slightly below the fill hole. At first I thought I might have a leak, but it was just the jack throwing off extra oil. This extra oil may also be due to the jack evacuating air trapped inside the jack. There are bubbles in the oil vented. One source suggested raising the jack fully and lowering it slowly twenty or so times to remove all air that might be trapped inside the jack"s passageways. Check the oil level to keep it at the desired level.
My jack worked as it should immediately. The real test is to lift something heavy with the jack. I left the jack in this position for a few minutes. It did not leak down that I could see. Now I can use a hammer to tap the metal caps into the holes for the safety overload valve and for the check valves. I will check the fluid level again after I have used the jack several times. I will also watch for signs of leakage. It is also a good idea to oil or grease all moving parts on the jack now and regularly in the future.
Troubleshooting--What do you do if you have rebuilt your jack, but it still does not work under load? Be certain the oil level is correct. Here are instructionson properly filling a floor jack. The jack could be air locked. This site says to open the release valve and pump the handle rapidly 10 to 15 times in that case. Here is a link to a document on troubleshooting hydraulic systems, like a jack. If necessary, check to be certain all check valve balls were installed properly. Check for leaks.
Conclusions--I did not find any clearly damaged seals in my jack, other than cracks in an "O" ring on part of the release valve, but it was a non-critical part. I did find dirt in the oil. I expect the seals were just old and less efficient. It feels good to have my jack working again, especially since it once belonged to my father. Rebuilding a hydraulic floor jack was much more difficult and a lot more work than I expected from information I had gathered before I began. I found some parts were not as easy to remove as I expected from videos and other helps that I linked earlier in this Instructable, and I had to make several special tools. I first had to develop those in my mind. Then I had to design them and build them with materials I already had. Fortunately, I have a welder and was able to do that without too much difficulty.
I can easily understand why many suggest a person ought simply buy a cheap jack and replace it with another when it fails. I have a hard time doing that, no matter how much financial sense it might make, That seems like the waste of a good tool containing numerous carefully machined parts. An imported floor jack comparable in capacity to mine lists for around twice the cost of the parts kit I bought, sometimes even less than twice the cost of the parts kit. I do not know if my Fleet jack will last longer than an import jack.
Knowing all I know now, I might suggest flushing out old jack oil every decade and replacing it with fresh, clean fluid. Even then, I am not sure draining the old fluid and refilling the jack with new fluid would have removed all of the dirt I found. Some of it was in places that seemed to hold the dirty oil in that particular place. The oil in the reservoir had always appeared clear and clean. Still, neoprene seals used in hydraulic jacks do harden or crack and will fail to seal properly in time.
Owning and using a hydraulic jack is often a necessity. But, it has costs over time. Those costs mean the eventual repair or replacement of a jack. If you choose to repair your jack, you have the option of doing it yourself or of taking it to a shop. If you choose to do it yourself, you will learn a lot, but it may require more of your time and be more difficult than you expected. If you take it to a shop, there will be a cash outlay that will likely be a fair amount greater than the cost of a new imported jack.
Several times I feared I had ruined a vital part on my jack, or was about to do so, simply because I was without knowledge and experience related to rebuilding a floor jack. It is my hope that this Instructable will enable others who wish to do so to rebuild a hydraulic jack with confidence and without some of the near mishaps I experienced. I wish someone had published this before I began to rebuild my jack. It would have saved me time and trouble.
Thank you. That is what I expected you have. I suppose you could also try to collect names of jacks using those gesrs and inquire of them to see if the gears are available as replacement parts.0
My CRAFTSMAN floor jack has 3 ports (valves)..... could you tell me what each one is and how to set them ? It was made around 2005...... (MADE IN CHINA) model #214.50145
I rebuilt this with new parts no problem...... I just did NOT check the turns for the check valve and safety overload valve and a 3rd one ??? ( factory settings) Any help would be greatly appreciated !
Thank you for your gracious comment. I hoped someone like you might see this and comment, especially in case I might have given totally false information, and you would correct me. This is my first intrusion into hydraulics, other than replacing a couple of brake lines on a previous family automobile and bleeding air from the system afterward. As I mentioned in the Instructable and in response to a previous comment, I needed to rebuild my jack; but, could not find all of the information I felt I needed. I wanted to document what I did, should I ever need it again, and also make it available to anyone else in the situation in which I found myself.
What would be your recommendation on the type of solvent to use and how long would let it soak inside the jack prior to rebuilding the 45+ year old hydraulic floor jack:
Ajack does not get hot and accumulate burned residue. Most parts will wipe clean with a rag. Sometimes there was residue where oil dried out. A wooden popsicle stick cut off square makes a good tool for removing oil residue without scratching the steel.0
There is one thing I learned that is worth knowing. Rebuild kits for hydraulic devices, even pneumatic devices, sometimes include two nearly identical O-rings, but one is slightly larger. One works, but the other does not. If an O-ring does not seem to fit, or the device does not seem to work, check for a nearly identical O-ring. A couple of years ago, my son-in-law rebuilt a nail gun. It did not work after rebuilding. He asked me to look at it. I replaced an O-ring with a nearly identical O-ring that was just a little different, and suddenly the nail gun worked just fine. I ran into something similar on rebuilding my jack.0
Very very good posting on rebuild of floor jack.Will be helpful with much detail for anyone wanting to complete a jack rebuild Thanks for all your suggestions, KneeWalker0
I understand. My life situation has changed. I am retired with a car that gets about all of its service at the dealership. We moved across the country and I left my floor jack with a brother-in-law. Here there is a son-in-law who will lend me a floor jack when I need one, but that has not happened. But, it is something you can check on your bucket list.More CommentsPost Comment

Maxton recommends that if you aren’t successful in troubleshooting or adjusting a valve setting in 20 minutes, stop and call Maxton tech support 1-775-782-1700.
Proper valve adjustment optimizes the energy efficiency, ride, performance of the pump, motor and overall hydraulic elevator system. Add life to your elevators…make sure the elevator control valves are adjusted within optimal ranges using files below or download the Maxton Mobile Mechanic app.
Every vehicle owner deserves a dependable hydraulic jack to lift automobiles to change a flat tire or fix issues underneath the car. Although most people pick a bottle jack because it’s compact, lightweight, and affordable, I prefer a floor jack because it’s more stable and effortless to position under the automobile. Unfortunately, there are many floor jack choices.
For me, the ideal trolley jack must have an impressive lifting height range, allowing me to raise any vehicle from a road-hugging convertible to a terrain-conquering lifted truck. Only the best low profile floor jack fits this requirement to the tee. If you’re also looking for such a floor jack, I’ve reviewed ten of the market’s best options to help you determine the best low-profile trolley jack to use in your vehicle.
One disadvantage of low-profile jacks is their price compared to conventional bottle hydraulic lifts. This trolley jack won’t hurt your budget while giving you commendable vehicle lifting performance.
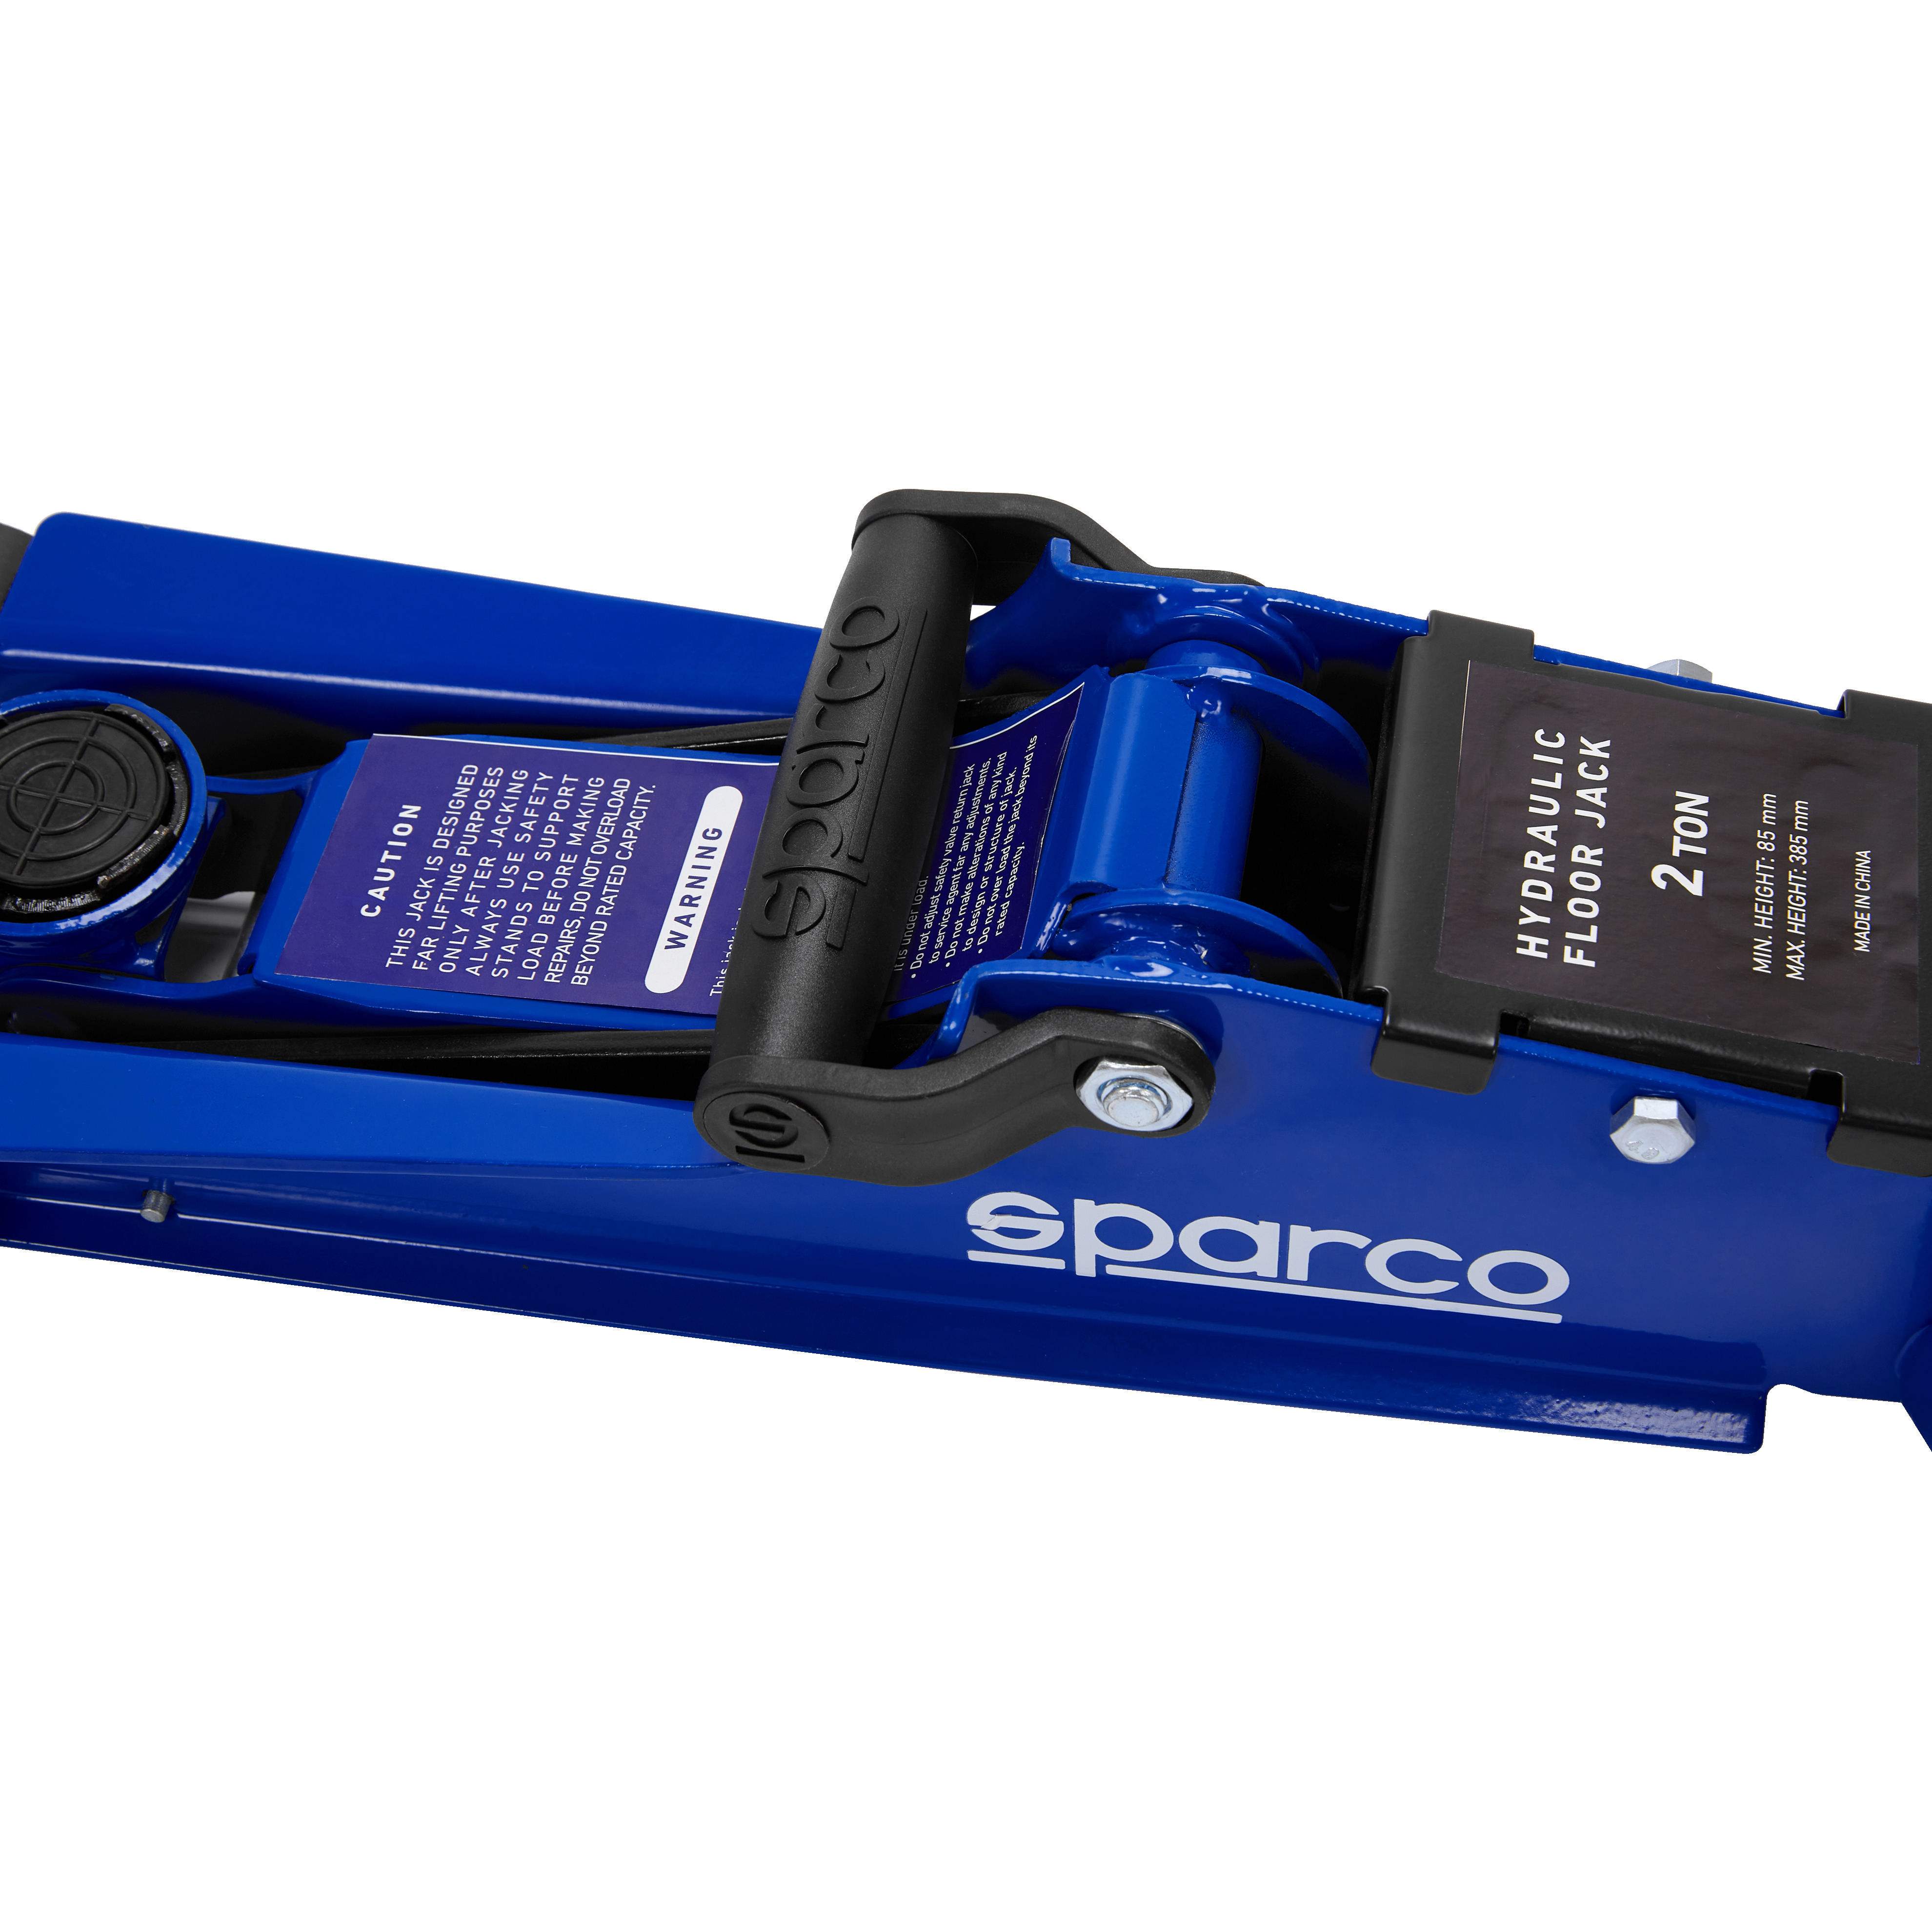
Any automobile with a 2.75-ton maximum gross weight should be compatible with this 2-ton floor jack. Owners of sedans, small-sized pickup trucks, and SUVs will find this service jack more than capable of lifting their vehicles 13 inches off the ground.
It’s comforting to know that underneath its shiny blue paint is a solid steel alloy construction, allaying any fears about this trolley jack failing after only several uses. Each component is as robust as high-end brands, adding to the confidence in this device.
Positioning this service jack under the car is a breeze because it has oversized front wheels and the rear casters never snag. Its lever is long enough to facilitate precision maneuvering, while the saddle is adequately broad to guarantee correct lift point alignment.
I’m also impressed with this service jack’s quick-start technology. Most floor jacks require at least 20 pumps to raise the lifting arm. This product’s proprietary system ensures three times faster lift arm elevation, allowing operators to finish faster.
Although this trolley jack has an admirable lifting performance, its minimum lifting height might be insufficient for low-clearance cars. At 5.125 inches, you’ll find it challenging to slide this floor jack under a Porsche, Ferrari, or other ground-hugging, ultra-low cars.
It’s not as low-profile as most people would want, but its lifting performance and affordability make this hydraulic floor jack a good option for average vehicle owners.
I call it thebest low profile floor jack for the moneybecause of its unbeatable lifting performance, exceptional craftsmanship, and sweat-free maneuverability.
Sliding this three-ton floor jack under a Ferrari, Porsche, Mustang, or other low-clearance sports cars is a cinch with its 3.125-inch minimum lifting height.
Raising trucks, vans, SUVs, 4x4s, ATVs, and trailers 20 inches off the floor is also never a problem, making this floor jack as handy in the home garage as it is in professional auto shops.
Its lifting height range isn’t this trolley jack’s only admirable attribute. Its load capacity also deserves mention. Capable of lifting any 4-ton vehicle, this floor jack is the last device you’ll buy if you have a thriving auto repair shop.
The extra-wide saddle facilitates precise lift point positioning and guarantees a non-marring surface for the vehicle’s under-chassis. Maneuvering this service jack is sweat-free, thanks to its swivel casters and two-foot jack lever.
Torin never fails to impress with its thoughtfully designed products. This low-profile trolley jack continues the brand’s untarnished reputation in cutting-edge vehicle-lifting technologies.
This 4-ton hydraulic jack delivers exceptional vehicle-lifting performance like any other Torin device. It’s like the Torin TCE ATZ830026XU but with a higher load capacity.
This floor jack is also perfect for SUVs, trucks, vans, and trailers, raising them 20 inches off the floor. Any automobile with a 5.35-ton maximum gross weight should be compatible with this vehicle-lifting device.
Maneuvering and operating this floor jack is hassle-free because of the carefully designed wheels, handle, safety valve, and lifting arm. Its steel alloy frame offers confidence in its use, while its dual piston pump guarantees more effortless pumping.
Although this low-profile floor jack is impressive, it’s hefty. At 100.8 pounds, I wouldn’t dare put this in my trunk. The truck bed should be more suitable for this device, although leaving it at home sounds more reasonable.
You can still buy this low-profile floor jack if you don’t mind its heft. It should make roadside emergencies more manageable with its superior lifting performance.
Its heft is the only thing preventing this low-profile floor jack from earning five stars. You should still give it a thumbs up if weight isn’t an issue.
With an impressive 15.75-inch lifting range from 3.5 to 19.25 inches, this floor jack can accommodate a power-hungry Ford F150, a road-hugging Mustang, and every high-performance machine in between.
Four-ton vehicles will sit nicely on this floor jack’s extra-wide saddle, relying on its robustly-constructed steel-reinforced lifting arm to elevate vans, trucks, SUVs, off-roaders, trailers, and sedans.
Tipping the scale at only 58 pounds, handling, maneuvering, and storing this trolley jack isn’t a concern. The lever is extra-long, and the wide-track wheels offer excellent maneuverability.
High-quality rubber seals protect the device’s hydraulic chamber against contaminants, while the safety bypass valves prevent over-pumping. Although marketed as an aluminum trolley jack, this automotive tool has steel reinforcements to increase its structural strength and rigidity.
You might want to check your order before use and inform customer service of any defect. You deserve only thebest low profile aluminum floor jackfor your needs.
Quality control issues aside, this aluminum floor jack impresses vehicle owners with its lifting performance and sturdy craftsmanship. If these don’t soothe you, you might want a low-profile jack from American brands.
With a lifting arm that extends two feet into the air, this hydraulic floor jack makes its case as one of the best vehicle-lifting devices for backyard auto shops and home garages. Small trucks, vans, SUVs, dirt machines, and tiny campers will be up in the air without a glitch.
Surprisingly, its minimum lifting height also blows the mind. You can slide this trolley jack under a sports car with a three-inch ground clearance. Even the Torin TCE ATZ830026XU’s 3.125-inch ultra-low-profile design cannot match this floor jack’s 2.75-inch ground clearance.
The Bugatti Veyron’s under-chassis sits 3.54 inches above the ground, putting this into perspective. On the other hand, the 2010 Mercedes-Benz E-Class has an astonishingly low ground clearance of three inches, and this trolley jack will still handle it.
I’m impressed with this low-profile trolley jack’s unusually lengthy frame and 45.25-inch pump handle, making it one of the best on this list. Sliding this service jack under a 2.75-ton or 6,060-pound vehicle shouldn’t make you sweat.
I don’t mind stowing this low-profile floor jack in my trunk because its lifting capabilities are beyond comparison. It’s one of those products that never reneges on its “low-profile” labeling.
This low-profile floor jack has a slightly higher minimum lifting height than the TCE ATZ830026XU at 3.7 inches and a somewhat lower maximum lifting height of 18.7 inches. Still, you shouldn’t have any problems sliding this device under your low-clearance vehicle.
Like many Torin floor jacks, you’ll never break a sweat to maneuver this trolley jack into position. The extended lever allows operators to position the extra-wide saddle underneath the vehicle’s lift point, wherever it is. I like the foam padding on the handlebar for more comfortable positioning.
I’m surprised to learn this steel alloy trolley jack has an aluminum frame reinforced with premium-quality steel. That’s another reason to get this low-profile hydraulic jack for automobiles.
I have two issues with this low-profile floor jack. First, it’s 9.1 pounds heftier than the Torin TCE ATZ830026XU. Second, its single-piston pump design makes this floor jack’s price seem more unreasonable than other 3-ton trolley jacks.
This product would have been thebest 3 ton low profile floor jackon this list if not for its single-piston pump design and hefty build. Hence, I recommend the Torin TCE ATZ830026XU because it has a broader lifting range and a lighter-weight form.
Although this low-profile floor jack’s lifting range isn’t as impressive as the K Tool International KTIXD63105’s 2.75- to 24-inch limits, it should still be invaluable for owners of vehicles with a ground clearance of at least 3.5 inches.
Two tons might seem inadequate for most people, but the average household only has an average-sized sedan. This trolley jack is sufficient in such instances, allowing car owners to lift their vehicles and perform under-chassis repairs or change a flat tire.
The craftsmanship looks solid, and its design is more modern than other floor jacks I have seen. I trust this trolley jack will last many years, giving vehicle owners the chance to pass it down to their kids and grandkids.
I’m astonished to learn this trolley jack only weighs 30 pounds, 68 pounds lighter than the K Tool KTIXD63105 but 8.8 pounds heftier than the Aain AA51G. Keeping this floor jack in the trunk shouldn’t be a concern, and neither is carrying it around the house.
Surprisingly, this floor jack is four times more affordable than the K Tool International KTIXD63105, making it an excellent option for thrifty yet quality-minded vehicle owners.
Is a 3-ton trolley jack too much for your vehicle-lifting demands, while a 2-ton floor jack is somewhat short? If you’re in such a dilemma, I recommend this 2.5-ton low-profile floor jack.
This second-generation low-profile trolley jack can slide under vehicles with a ground clearance of 3.15 inches, making it almost at par with the 3.5-ton Torin TCE ATZ830026XU’s 3.125-inch minimum lifting height.
I recommend testing the low-profile jack after unboxing to check the lifting arm’s operation. You don’t need a replacement if everything works fine. As for its low maximum lifting height, wood blocks on the saddle should do the trick.
A bridge between a 2- and 3-ton low-profile floor jack, this trolley jack is worth having if you have a vehicle that weighs no more than 3.25 tons. In hindsight, I would still recommend a 3-ton unit for your automobile.
There’s little difference between this ultra-low-profile trolley jack and the K Tool KTIXD63105 because both have an impressive 21.25-inch lifting height range. The minimum lifting height is 2.75 inches, extending to two feet.
Operators can lift exotic supercars, hypercars, and similar low-clearance vehicles within seconds. Raising compact SUVs and lightweight trucks only requires as few as 6.5 pumps to reach the 24-inch maximum jack height.
This floor jack’s principal advantage over the K Tool KTIXD63105 is its reach. The latter only has a 45.45-inch handle, while this product has a 50-inch lever for better maneuverability under a low-clearance car. Its three-foot-long frame and 19-inch throw also span a vehicle’s cross-section more efficiently, making it thebest low profile long reach floor jackon this list.
As the K Tool KTIXD63105’s direct competitor, this floor jack’s slightly steeper price and heftier form make it less appealing. Regardless of which floor jack you choose, I’m confident you’ll be the winner.
Its weight rating should make it a cinch to lift vehicles with a maximum gross weight of 4.7 tons or 10,300 pounds, such as campers, trailers, pickup trucks, sedans, SUVs, and others. This versatility makes this low-profile floor jack an excellent choice for shop owners and professional mechanics.
The trolley jack’s steel frame and lifting arm look solid. It should give vehicle owners peace of mind about this floor jack’s durability. Maneuvering it under the automobile is also more convenient than other trolley jacks because it has a 15-inch-wide body and wide-track wheels.
I understand this floor jack’s 90.6-pound heft because of its 3.5-ton weight capacity. Although it’s more reasonable than the 2-ton Sunex 6602LP’s 103.7-pound heft, it’s still heavy for most vehicle owners.
Perfect for shops, this low-profile trolley jack never fails to impress. It offers a good blend of lifting performance, maneuverability, and durability, as any reputable floor jack should.
A low-profile trolley jack is a mechanical device that allows operators to lift or raise low-clearance vehicles to facilitate tire replacements or under-chassis repairs. It’s ideal for coupes, convertibles, sports cars, and other automobiles with a ground clearance of not more than four inches.
Professional pit crews and racing mechanics use low-profile service jacks because they are more convenient to maneuver under long-slung race cars and other professional vehicles. These devices have a tapered front and an extra-wide saddle to facilitate more efficient vehicle lifting.
Everything depends on your car. Indeed, a low-profile floor jack is better for low-clearance vehicles, such as sports cars, muscle cars, roadsters, coupes, convertibles, and similar automobiles. The device’s slim-tapered front section allows for nearly effortless sliding and positioning under the car’s jack points.
It would be impossible to slide a standard-height floor jack under such vehicles. The device’s leading edge will hit the automobile’s underside and damage it.
The good news is that a low-profile floor jack is versatile, accommodating other vehicles within the trolley jack’s load capacity and maximum lifting height.
US Jack makes thebest low profile floor jack made in USA.It’s an authentic American-made trolley jack, unlike other brands with American-sounding names yet sources their products overseas, mainly in China.
However, US-branded low-profile floor jacks made in China can still be of good quality. Excellent examples are Torin, JEGS Professional, K Tool International, Liftmaster, Pro-Lift, Sunex, and PT (Performance Tool).
Using a low-profile floor jack is similar to operating a standard-height trolley jack. Start by determining your vehicle’s lift points and maneuver the floor jack to ensure its saddle is directly underneath the automobile’s jack point.
Next, pump the floor jack lever to raise the lifting arm, slowing down as it reaches the vehicle’s lift point. Align the saddle to the frame sill and continue pumping the trolley jack to raise the car.
The best low-profile floor jack depends on your vehicle’s gross weight and ground clearance. You could escape with a low-profile trolley jack specific to your automotive parameters if you have several automobiles of similar tonnage and clearances. On the other hand, auto repair shops require a versatile low-profile floor jack to accommodate as many vehicle types as possible.
Being a professional, you would have multiple tasks like a tire changing or repairs and want to complete them at once, which becomes problematic for you. For accomplishing these tasks, choose American-made floor jacks that are quick and easy to use.
Bearing the best floor jacks made in USA or American-made hydraulic floor jacks will privilege you to lift the vehicle efficiently and quickly. First, it is crucial to consider the quality of afloor jack when you purchase it.
People rate the quality of a floor jack based on its country of origin. The USA manufactures high-quality jacks compared to other Asian countries. It might be challenging to understand why American products are considered high quality.
Besides, before entering the market, every automotive product in the country must adhere to the Buy American Act (BAA) and Federal Acquisition Regulation (FAR). There is a specific manufacturing process for making these jacks, ensuring quality, long-term reliability, user safety, and durability.
Well, you are so lucky to be here and reading this buying guide for thebest floor jack made in USA! This article will tell you what to consider when buying a high-gradeAmerican-made floor jack. And also to look for to avoid cheap knockoffs. Let’s explore the buying guide for American-made floor jacks!
Before starting with this detailed and comprehensive analysis of some of the best American-made floor jacks, you should know a few things. Unfortunately, there are few manufacturers making floor jacks in the United States. So we have investigated dozens of them, some retailers, and third-party sites, but we came up with a few brands.
The manufacturers can keep the production cost to a minimum while using high-quality accessories and materials. Unfortunately, it’s pretty challenging to find details which means your best option is to purchase 100% American-made floor jacks.
These floor jacks are still superior to those entirely made in China, but they often struggle to compete with genuine American-made standards. Pay attention to the labels and beware of counterfeit products.
So they make and assemble all the components in the United States are genuine “American-made floor jacks.” Therefore, in this article, you will get a few of the Best Floor Jacks Made In USA.
Few manufacturers make floor jacks in the United States, and most of them are small companies that rarely sell their products online. Amazon sells it, and they are doubtlessly American-made.
Also worth mentioning, various reputable brands such as Hein-Werner manufacture both kinds of floor jacks. According to the Company, they assemble the HW93652 3-Ton Floor/Service jack purely in the United States with “domestic and global components,” according to the company.
Contrary to this, the 4 Ton chassis service jack (model HW93657) is an American-made product. Hein-Werner’s responsibility is to present the facts straightforwardly for the buyers’ benefit.
Also worth mentioning, Hein-Werner is an excellent example here. With instruments, such as the best floor jacks made in USA or American-made floor jacksare the greatest and way ahead!
The Blackhawk B6350 Fast Lift Service Jack is a genuinely American-made floor jack and deserves consideration. This device is entirely professional. As a result, it is the most suitable
The reason is this steel floor jack is highly durable and one of the most vigorous floor jacks available on the market. Additionally, the Blackhawk floor jack incorporates fast lift technology to get your vehicle in the air quickly so you can finish the task soon.
Also, you get the 3-tons load capacity with a minimum lifting range of 5.5-inches and a maximum lift of 22-inches, which is quite enough for your vehicles. So it is another excellent feature of this Jack to give a high lift range and offer enough clearance underneath lower and higher vehicles.
Besides, they include tons of other safety features in this Jack to keep you safe. These attributes comprise an internal safety valve that protects the Jack from overloading. Plus, its swivel saddle provides comfort and user safety and ensures a snug, level fit.
Pittsburgh Automotive’s aluminum-framed 3-ton steel ultra-low profile floor jackis heavy and sturdy and can fit under low-profile cars and lift them in just three strokes.
Like other American-made floor jacks, the Pittsburgh Automotive Heavy Duty Low-Profile Steel Floor Jack is in our top 10 best jacks, making it an outstanding choice. It’s a highly durable option, which means it will last you a long time.
The company has used forged alloy steel for design to ensure high quality and durability. Combine that with its ability to lift heavier loads rapidly. You can use this Pittsburgh Automotive Heavy Duty Steel Jackfor about any vehicle in your repair shop or personal car.
It keeps a minimum of 2.8-inches in height, which means that you can use it under low-profile vehicles. While its maximum lift of 19.7-inches means it works fine on more oversized cars and trucks. Besides the big vehicles, you can lift the lowered cars because you can easily use this low-profile Jack.
It is much better for you because it has a vast base with the maximum conceivable stability. The overload safety and universal joint release make it one of the safest and most precise jacks you can buy and use.
This 3-ton steel auto jack features a protective foam bumper on the floor jack that keeps your vehicle or materials damaged while lifting or lowering. It is best for your Mercedes C300, and even racing cars have all sung its praises, but it also performs impressively on higher cars.
The Shinn Fu Company of America Inc. manufactures the Pro-Lift Floor Jack 2.5 Ton Hydraulic Trolley Jack.This product has a 5000-pound weight lifting capacity, potency, long-lasting, and high performance.
This light-weighted Pro-LifT SG-5625 Car Hydraulic Trolley jack is just 23.3 pounds in weight but the monster in performance. The dimension of this Jack is 22.5 x 9.13 x 5.75-inches, which will give fantastic stability when you are under the vehicle. This low-profile Jack bears a minimum lifting point from 3.38-inches to the maximum threshold of 14.78 inches.
It is constructed from heavy-duty steel to enhance stability and features a hydraulic trolley. Front and rear caster wheels allow for easy maneuverability. Swivel saddles feed you easy jack positioning, which keeps you safe.
ThisPro-LifT SG-5625 low-profile Jack features an overload valve bypass system that prevents the user’s damage to the Jack and injury. The SG-5625 Jack has a compact design with carrying handles that make it easier for transportation.
Before using the Jack, you have to insert it into the handle sleeve and then pump the handle six to eight times. In this way, you will unleash the air pressure from the reservoir. It is ideal for auto repair work in your garage. The warranty is also one year following the purchase.
BAOSHISHAN 3-Ton Hydraulic Double Ram Bottleis about the size of a 12-ounce soda can, and it weighs about 5.5 pounds. This compact bottle jack with a high-quality alloy steel structure guarantees long-lasting performance.
You can easily fit this Jack under cars and small SUVs. The 6.5-inches starting height fits most car clearance, and the jacks fully extend up to 16.5-inches.
Because of its double-ram design, you can get it into places where a traditional 2-4 ton jack would fit. Therefore, you have almost double lifting height since the second tube does not extend until the first one has reached its highest elevation.
This high lift bottle jack has a double ram design with an extension screw. When fully extended, the Jack can reach 16.5-inches if the capacity and volume remain constant. Dual extending rams make it easy to set up the Jack, which extends far enough to lift high-clearance cars easily.
When using this 3-ton Jack, make sure it’s screwed the tip up to 2.3 inches. It will allow you to adjust the height of the hydraulic jack to your accurate level. Its top has a diameter of 0.8 inches. We can easily store the bottle jack away in a vehicle or garage with the case included.
Accordingly, like other American-made floor jacks, the Powerbuilt 620479E Xtra Low Profile Floor Jackhas a 2-tons weight capacity and is the perfect machine for any professional. Its patented design allows it to work as a jack stand and Jack. It would be a terrific bonus to your toolbox or your home garage.
Once it has reached its highest elevation, this Jack has solid safety features that prevent it from lowering. It is user-friendly, suitable for any home or professional garage. It is ideal for vehicles and trucks on off-road terrain. It comes with a safety bar so you can lock it at a specific height.
This 620479E Xtra Low Profile Floor Jackis perfect for various functions. It’s highly durable and has a broad steel base for stability under load. Thus, the Powerbuilt lifting range starts from 3.34-inches, the lower point, and goes to the highest point, 15.5 inches, providing excellent stability to your vehicles.
The Powerbuilt 620479E Floor Jackhandles a wide range of vehicles. You can take this jack anywhere you go, thanks to its portable design. Safety is also a priority for this device to use confidently.
It is another racing brand from Pittsburgh Automotive and a purely American Made floor jack with rapid pump technology lifting. It features a compact design with a durable aircraft aluminum body. It is lightweight and weighs 26.8 Pounds.
This floor jack also contains a universal joint release system for steady and precision lowering. It has a compact design for leisurely storage and transportation. It also features a compact design and has a tubing handle of 37.3-inches.
Also, this 1.5-tons Jack has minimum lifting points is 3.38-inches and goes to a maximum height of up to 14.34-inches. Plus, it has a dimension of 22.3 x 19.69 x 9.7-inches, is big enough, and will offer excellent stability when under the vehicle.
Hein-Werner stands out on the top of the list for American-made floor jacks. Model HW93652 from the brand is a robust forged steel floor jack rated at 3,000 pounds, suitable for light trucks, SUVs, and cars.
The Hein-Werner HW93652 Hydraulic Jack is a 3-Ton floor jack that is purely made in America. They made the lift arm and pump base of cast iron to give it greater strength. A wider frame and flanged side plates provide stability and strength.
Because of its solid and durable material, you won’t have to replace it for a long time. You wouldn’t consider an American-made floor jackif you wanted to save money.
Thanks to its extra-long chassis and high weight capacity, the Hein-Werner HW93660 is perfect for all kinds of vehicles, including trucks and pickups, etc. This floor jack is ideal for anyone who works with such cars regularly.
At first glance, the price may seem lofty, but you may not need to purchase a floor jack again. The company also made this Jack in the United States, like the previous Hein-Werner model.
AL2300 is an American Lifting 3 Ton heavy duty floor jack assembled in the USA with the USA and global components built with strength and durability. These jacks will deliver reliable, heavy-duty lifting power anywhere in the shop.
The Jack has a unique design with a heavy-duty frame and an extended chassis ideal for trucks and SUVs. The flanged side plates enrich strength, while the broader base boosts stability.
Its lifting ranges from 5-inches to 23.5-inches. It has a more extended chassis ideal for trucks and SUVs. Their internal stabilizing cylinder ensures stable, solid positioning, and dual safety valves prevent over-inflation and uncontrolled deflation.
Its heavy gauge steel construction, cast iron lift arm, and flanged side plates for stability and sturdiness. It also owns a large swivel saddle having a diameter of 6.34-inches gives you comfortable jack positioning and a safe operating experience.
With its in-line pump assembly, the AL2300 service jack offers a long lifespan and eliminates centering forces, making it easier to pump, align, and reduce wear and tear. The closed hydraulic pump counts for more durability.
Hein-Werner HW93657 Service Jack is another American-made floor jack with a 49-inches extended chassis and has the capacity of 4-Ton. It is excellent for lifting trucks and vehicles. Because of its extended chassis, the Jack slides easily under the car reaching hard-to-reach points.
The cast lift arm provides the extra strength for lifting heavy loads. At the same time, the Jack is featured with the dual piston action to give the speed to the contact point and the power to lift your heavy loads.
This model (HW93657) of the Hein Werner is too heavily weighted (222pounds), which might be an issue for some users. On the other hand, the hydraulic unit is sealed to keep out the debris, grime, and moisture. This feature of the Jack will extend the lifespan of this hydraulic unit.
Moreover, the casters deliver easy maneuverability when positioned near the lifting point. This Jack has a low point of 5-inches, and the highest raising point for the vehicle is up to 25.34-inches which is a high clearance for you to work underneath.
A product’s stability is crucial for both safety and performance. Whenever you choose a floor jack, make sure it meets all safety requirements and has an overweight valve and a solid base. It


 8613371530291