
neon wire rope free sample
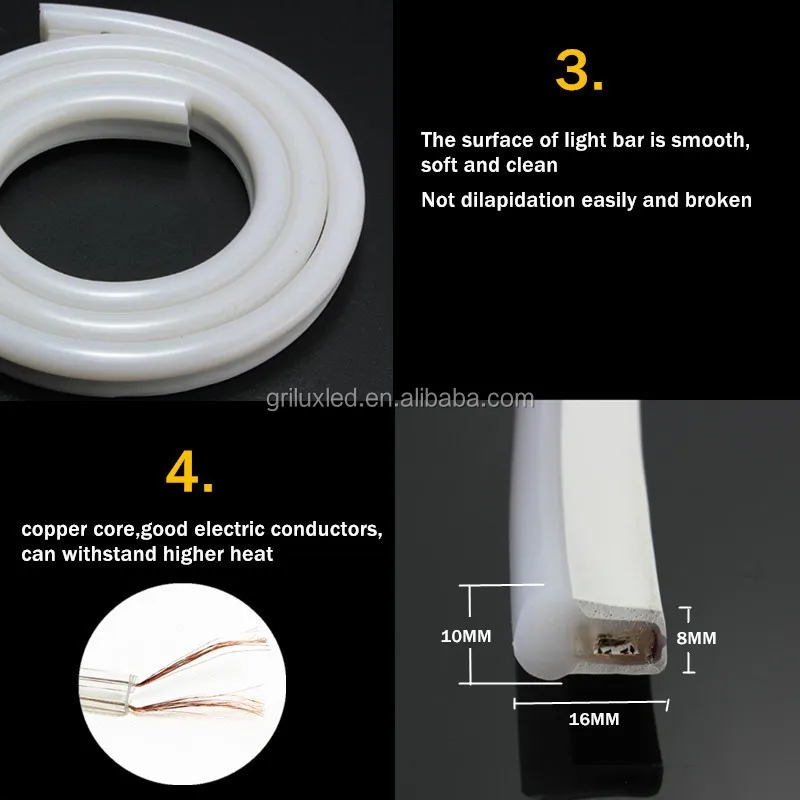
Our revolutionary, one-of-a-kind OptiTuff Mini Fiber Cable utilizes advanced, ruggedized thermoplastic material as a cost-effective, top-quality alternative to traditional metal armored cable. Compared to non-armored fiber cables, this all-dielectric armor provides superior durability and crush resistance, making it one of the most versatile fiber cables on the market. The cable maintains excellent mechanical properties while being more flexible and easier to handle and install than metal armored cable—with no grounding or conduit required. This distinctive set of characteristics makes it an optimal solution for projects requiring easy-to-install fiber, including small spaces, raceways or environments with lots of tight and challenging turns.

Nantong Fasten Metals Products Co., LTD is located in the coastal open city—Nantong which is in the lower area of the Yangtze River. We are a professional corporation which produces a variety of standards and types of galvanized steel wire rope, ungalvanized steel wire rope, steel-wire, stranded wire and spring steel wire. Our products mainly exported to Southeast Asia, the United States, Europe, the Middle East, Africa and other countries.
When it comes to delivering the most innovative and cutting-edge lighting, Ellumiglow is the consistent choice for designers, retailers, stage performances, events, safety and wearables. Laser wire™ cable, a brand new technology in the lighting industry, is the perfect next generation to the ever-popular EL Wire, or E-wire lights, due to the increased brightness, massive flexibility increase, ability to integrate lightweight and long lasting materials, and low cost of ownership. In fact, Laser Wire when compared to any other linear accent lighting, including EL Wire, EL Tape, LED Tape, Plastic Optical Fiber (POF) or Neon, Laser Wire is anywhere between 1/4th to 1/100th the cost.
Ellumiglow spends a great deal of effort on research and development to provide the best in LED glow wire like the EL light tape, as well as Laser Wire, e-wire lights and el wire clothing. Designers and Engineers love working with Ellumiglow, as we have artists, software and hardware engineers, and all around lighting enthusiasts on staff to help work through projects both big and small. Our custom division takes on projects ranging from personal parties and displays to major entertainment events throughout the world, like EDC, Tomorrowland, Ultra, and more. Futures Divisions and Prototyping shops love working with our products as we are able to design custom inverters, laser modules and lighting elements rapidly in our shop, and we dedicate one person on our team to help throughout the journey of the project until completion. Fast is great, but what happens when you need production volumes of Lasers, VynEL™ or EL Inverters? Our overseas facilities in China and Taiwan can accommodate millions of products and keep even the largest jobs on track and on budget.
You"ll find a variety of e-wire lights that have been the most reliable, high quality, and brightest products in the industry, and each one passes rigorous testing before it leaves our Portland, Oregon facility. We take pride in the products we sell and as such, many of our products glow brighter, make your products last longer, and are safer to use than the competition. We know that special events have one shot to make a lasting impression, and low grade products that are proven to be unreliable are not sold at our store. We want our customers to have peace of mind while shopping at Ellumiglow, knowing their Laser Wire® cable and LED glow wire needs are met with reliability and ease
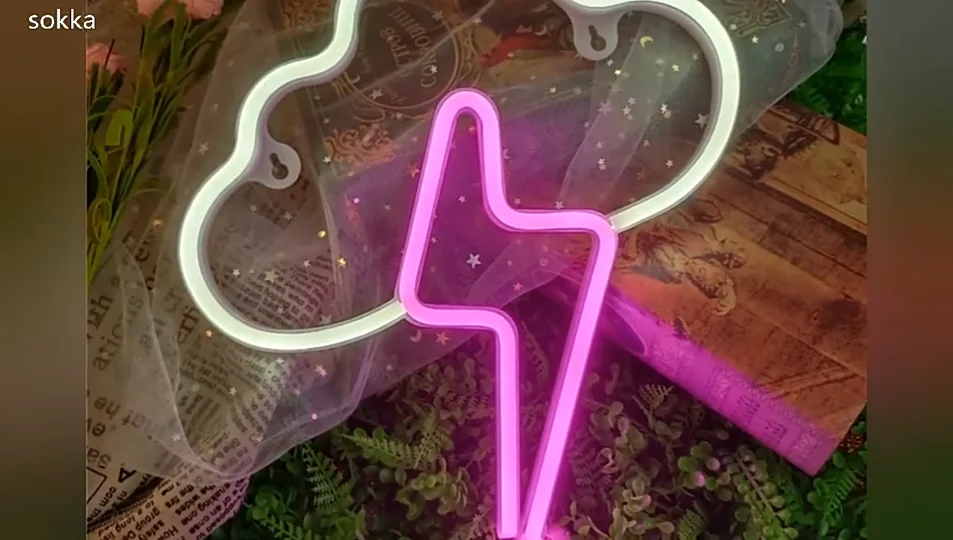
This year the APW staff collectively lost its shit over neon signs (can you blame us?). They were everywhere, they were awesome, and we decided we each needed one of our own, because who doesn’t need a neon sign in their office? (Neon is the new glitter, you heard it here first.) After seeing cheeky neon signs pop up in workspaces and at conferences, I kept eagerly waiting for them to make an appearance at real life weddings (because that’s usually how these things go) until I realized something: neon signs are expensive. Like, can’t even buy on Craigslist expensive. I know, because I’ve tried.
So earlier this year, I made it my personal mission to see if I could figure out a way to… fake a neon sign. Preferably one that doesn’t require a degree in electrical engineering. And a few weeks ago, I found it: a magical little tool called EL wire. If you haven’t heard of EL wire, that’s because it’s typically sewn into fabrics and employed at places like Burning Man (and the occasional Tron cosplay). EL wire is a thin, pliable wire that glows almost exactly like a neon sign, but costs a fraction of the real thing (as in, less than $150 for the big sign). So I begged LA-based wedding designer Tabitha of Winston & Main to see if she could take this awesome EL wire stuff and turn it into something befitting an APW wedding, and the result is way cooler than I ever pictured it. Bonus: it’s totally self-contained, so you don’t even have to plug it into the wall. Double bonus: it would look amazing above a dessert table, just saying.
2.Figure out where you will need to drill holes to make your words. The obvious ones, are at the beginning and end of every word or unconnected letter. To figure out where else to drill holes, play with your EL wire (or a piece of string), bending it over your word and seeing where it piles up too much and would be “cleaner” if you could get rid of a bit of the wire (or where it is unable to bend into the shape you need.) So the “obvious” ones in our “Love” Sign are the beginning of the “L”, end of the “e” and beginning of the “o” because it isn’t attached to any of the other letters. Tabitha drilled another hole to connect the “o” to the “v” because it made it easier to read than if there was a third piece of EL wire between the two letters. Mark the places you’ll drill with an “x”.
5. Pull all of your EL wire through the first hole from back to front (at the beginning of the “L”) leaving just the black wire that connects it to the battery pack on the back of the sign. You can secure it with a little piece of gaff tape to keep it in place.
6. Now just trace your word with the EL wire, bending it over itself at the curves and securing them with a couple drops of super glue gel. You’ll have to hold it in place for a minute or two until it sticks and then you can use a piece of painters tape to hold it down while it dries completely (about ten minutes). I found it best to walk away and do something else for those ten minutes and then come back and do the next curve.
7. Continue gluing your EL wire at all the curves and loops (you will start to tell where it naturally meets the plexiglass when you bend it, and that’s where you want to glue it) and whenever you come to one of your holes, drop the EL wire to the back of your plexiglass, then pull it through the next hole and continue.
8.When you get to the last letter, drop the EL wire through to the back of your plexi and flip it over. You can cut off the extra EL wire now—just snip it with regular scissors!
9.Wrap any extra EL wire on the back with gaff tape. (Tabitha used black because she had some on hand, but white would work too.) This step ensures that you don’t see these “extra” bits shining through when the sign is lit up.
EL wire kits come in all different sizes, colors, and lengths, so you can really go nuts here and make whatever you can imagine! (Tabitha is planning on doing portraits next, which I can’t wait to see.) You can use a different material for the base of your sign too. Wood would work much like plexi, or you could use canvas and sew the EL wire right through it rather than drilling holes.
Most EL wire (but especially the 5mm EL wire Tabitha used) cannot bend to ninety-degree angles—so take that into account when choosing a font or image to create. The smaller EL wire (2.6mm) can get much closer to a ninety-degree angle, but you’ll want to experiment because forcing it can cause a black spot at the bend. Also, don’t be intimidated by the drill or the EL wire—with a little practice, they’re both actually really easy to work with. Tabitha suggests getting a scrap of acrylic to practice on (one that is the exact same material as your big piece). It’ll most likely be free or only cost a few extra dollars and it will be totally worth it for the practice.
Practice drilling into acrylic. Go slow. Depending on your acrylic, it’ll heat up and maybe even melt a little as you drill. So you’ll want to brush away any shavings after each hole so they don’t stick to your sign. Test out your glue too (cut a small bit of EL wire and then test it with your chosen glue to make sure actually sticks to your acrylic). Acrylic is tricky stuff to stick; Tabitha told us she tried three different glue options before settling on the super glue gel she recommended for this project. With the glue, you have to be patient—it really does take a minute or two to bond and then another ten minutes or so to be pretty sturdy and it’ll take a whole day before you can tell if it works. You will notbe able to get it off if it works, but that’s what you want! Tabitha initially used a different type of acrylic for this project, and had really good luck with 3M plastic glue (a 2 part solution) with that material, so that might be an option for you too. The bottom line: experiment and see what works!

The price for custom LED neon signs start at $112 for a sign with two letters. Our handmade LED neon signs, lamps and wall decor are affordable and we are very competitive on price! In addition to great prices, our experienced team also offers unparalleled customer support, from the design stage through to delivery and aftercare.
All of our LED neon light signs are handmade from LED neon light tubes that are kid-safe and both economical and ecologically friendly! Some great reasons to choose a custom LED sign from us are:
Lightweight - Our custom designed signs are lightweight and portable, making them perfect as LED neon signs for weddings, events, home or business, or truly unique gift ideas.
Our LED Neon is available in 8/9/10mm thickness, and the minimum letter height is approximately 3-4 inches for simple/non-cursive fonts and 4-5 inches for cursive fonts.

During the first lockdown, my friend was converting her garage into a home gym and wanted help finding a neon sign to complete the makeover. Seeing how much custom signs were going for online, I decided to do some research into how to make a neon sign yourself.
Tip: I found calligraphy-style fonts much easier to do as it requires fewer connections (in most cases), so bear in mind how each letter will flow to the next and how all the pieces of rope light will all join up when choosing your font.
You can mount rope light on pretty much anything using superglue – wood, metal, plastic, whatever your design requires. I chose to mount mine on clear Perspex/sheet acrylic. I also cut mine to shape around my design and used a jigsaw, clamping the sheet between wood to prevent it shaking and cracking. You can file the edges smooth to give it a clean finish.
The first step in wiring the lights is to think of it like a long string, even though you need to cut the rope light to make each letter, there must not be any breaks in the circuit. Using your template, use your pen to draw this ‘string’ from the first letter to the last, thinking about how the wire will be hidden behind the letters and at what point they will join onto the next letter.
Once you have this all planned, it’s time to start using your template. If you’ve chosen a solid colour backing, you’ll want to cut out the letters and place the template on top. If using a clear acrylic, you can place the template behind it. Where the ends of the letters are (your entry and exit points for the wires), you’ll want to drill holes with your 4mm drill bit.
Grab your wire strippers and Stanley knife and separate the positive and negative wires. The positive will have a white stripe. If you have coloured wire, positive is red. Strip the ends to expose a centimetre of bare wire and twist the ends so all the little wires are intertwined. Using the holes you drilled, work out how much wire your first light will need to connect to the second, allowing about 5-10cm of wire extra to come up through the holes.
Turn on your soldering iron on. Once hot, dab a bit of solder on the end of each of the wires. To do this, hold the tip hold your iron against the solder to melt off a small bead of metal, then hold it on the end of your wire to transfer the solder. It will set solid very quickly. Do this for both the positive and negative wires and add your end cap to the wire before you attach it to the light.
Repeat the above steps for each letter, using your string diagram to know where the wire is to go, adding end caps and feeding the wire through the holes as you go, using your power cable and adapter to check the connection for each one. You can do this by holding the red wire against the positive and black wire against the black. If it doesn’t light up, check your connections.
If you have a letter with a sharp corner like an E or a T for example and the rope won’t bend easily, you can cut out a small triangle on the blank side of the rope (not the side that shows you where to cut) to allow it to bend.
If you"ve done two or more lines of text on separate wires, you can finish each line with a metre or two long pieces of wire, depending on how far away your plug is from where your light will hang. To connect your light up to the adapter, you"ll need to connect all the positives and all the negatives together. You can do this by soldering them together – connecting the positives to the red wire and the negatives to the black wire of the adaptor. Wrap each set of wire in electrical tape or a shrink-wrap sleeve and ensure they don’t touch.

Thank you for your interest in Allied Wire & Cable products. Please complete the form below to order your free sample. An Allied Sales Representative will contact you to discuss your requirements. During the regular business week, we do our best to respond within 24 hours. All samples will be shipped via UPS or another ground service unless otherwise specified.

Neon signs are a cool, stylish, and versatile type of signage. As one of the bestbedroom cabinet designessential, especially for small space or bedroom, they catch the eye with their colorful illuminated designs and stand out both during the day and the night.
LED neon signs are made using the same basic concept as neon signs. The difference is, they are made of. Nevertheless, they look just as good as ordinary neon signage. The best part? You can make an LED neon sign all on your own by following some quick and easy steps.
Typical neon signs are made using glass tubes filled with inert gases such as neon or halogen. When an electric current passes through these gases, their atoms get activated and become illuminated.
LED neon signs solve the design problems of typical neon lighting. As opposed to using glass tubes, they are made using LED neon flex lights which are, flexible, and durable. They also offer more consistent lighting unlike inert gas which can be more intense in some parts than others.What Do You Need To Make an LED Neon Sign?
You can draw your sign sketch on the substrate by hand or use other methods like CAD or. Be sure to space your letters sufficiently given as LED neon flex lights are jacketed and thus are slightly thick.
Once you have gathered everything that you need, it is finally time to bring your LED neon light sign to life. Below is a step-by-step guide to help do just that.Place your sign sketch on a work surfaceUse the thread to outline the sketch-this will help you know the approximate length of LED neon flex lights that you will need.Using the estimate, cut a portion of the LED neon flex lights– you will likely find markings on the light strip to guide you on where you can cut. Misplaced cuts could damage the lights.Place the LED neon flex lights on the sketch –make a cut each time you run the length of a letter or shape.Drill holes– the holes should be at the end of each strip; the point where it connects to the next.Solder the conductor wire between each section of LED neon flex lights –each time you cut, an edge of wire in the light strip got exposed. Join the connecting wire to it and solder them together.Conceal the connection– each time you solder a connection, guide the soldering wire to the back of the substrate and thread it back out at the next letter/shape. This keeps the connections concealed at the base/substrateGlue the LED neon flex lights in placePlug and play –once all sections are firmly and safely connected to the power source, turn on your sign, and enjoy.Conclusion
The right LED flex neon lights are the secret to great LED neon flex signs. Once you find a top-notchLED neon flex lights supplier,everything else will fall into place. Your signs will be the envy of many.

The following instructions are here to help you learn how to work with your rope lights and their accessories. Be sure to adapt these instructions as necessary to accommodate the particular type of rope light you are working with, LED vs. incandescent, 2-Wire vs. 3-Wire, etc.
How do rope lights work? A rope light is comprised of bulbs (LED or incandescent) spaced along a set of inner wires. Rope lights are divided into sections and are wired in "series parallel". This means that if a bulb fails, only the section it is in will go dark; the rest of the rope light will stay lit. Due to this wiring method, rope lights can only be cut at the dividing points between sections.
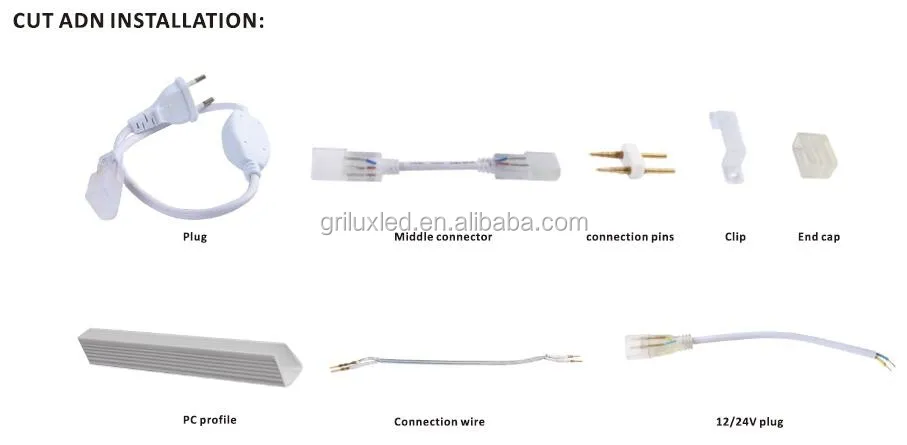
A basic run of rope light consists of four main parts. First is the power cord, which plugs your rope light into an outlet to give it power. Next is the power connector, a small plastic unit with metal pins that connect the power cord to the actual rope light. Then there"s the rope light itself, followed by the final piece, an end cap, which terminates the run.
One of the most important rules of rope light installation is that rope lights can only be cut in specific intervals. Depending on the type of rope light you"re using, this can range anywhere from every 18 inches to every 72 inches. After you have figured out what the ideal amount of rope light is that you are going to need for your project, take a second to make sure this length is divisible by the "cuttable interval" of your particular type of rope light. If it is not, you"ll want to round up or down to the nearest interval. (Make sure this new length will still work with your project.)
When it comes time to cut your rope light, you will find that at every cuttable interval, there will be tiny scissor icons, dashed lines, or other marking imprinted on the plastic outer tubing indicating where it is safe to cut the rope light. These marks are very small and may be hard to locate at first, but rest assured, they are there. If a rope light is cut in any location other than these pre-designated locations, it will damage that section of rope light and cause it to fail. When you are ready to cut your rope light, use a sharp pair of heavy-duty scissors, garden clippers, or a utility knife to make the cut. Be sure to make a smooth and clean vertical cut. The sharper your cutting blade is, the easier it will be to cut the rope light. Once you have made your cut, you will need to trim the inner wires to allow room for the connectors to insert correctly. Bend the end of the rope light sharply to the side. As you do this, you will see the wires inside the rope light protrude out. Trim off the ends of these wires so that when bending the rope light back again, the wires no longer stick out. This completes cutting the rope light and has prepared the end to receive any accessories that might be attached.
The power connector is the key component that links the power cord (along with various other accessories) to the rope light. The easiest way to begin is to attach the connector to the power cord first, then plug the power cord/connector assembly into the rope light. Plug in the "female" end of the power cord into the "male" pins of the power connector and secure with the attached threaded collar. Then separate the screw compression cover from the power connector and slide the cover over the rope light. Align the sharp pins of the connector with the small wire holes of the cut rope light end. Firmly and carefully push the connector and its pins into the rope light, making sure all the pins make contact with the corresponding rope light wires. Then slide the compression cover back over the top of the power connector and screw on. This will compress the power connector and secure it to the rope light. The power cord is designed to be plugged into a standard wall outlet. If you need to hardwire your rope light, simply cut off the plug and strip the outer jacket to expose the wires.
If you are using LED rope lights, note that LEDs are polarized and require the electrical current to be flowing in a particular direction. So if you plug in the power cord and the rope lights do not work, simply remove the power cord from the rope light and connect it to the opposite end.
End caps are a simple, but important, component of a rope light run. They shield the exposed end of the rope from debris as well as protect any protruding rope light wires from getting snagged. To attach an end cap, simply push it into place around the plastic tubing of the rope light until it stops. Optionally, you can further secure and waterproof the connection using PVC sealant.
There are many accessories that you can incorporate into your rope light design to help shape your rope light vision. These include inline splices, T-connectors, extensions, Y-connectors, etc. While they all provide different functions, the basics of how they attach to the rope lights is the same. Once you understand the basics of how a power cord attaches to a rope light, through the ubiquitous power connector and the alignment of its pins with the wires of the rope light, you"ll understand how to attach just about any other accessory. The power connector is the common component in every rope light accessory, and once you know how it works, there"s no limit to what you can do.
Knowing the basics of how to plug in rope lights makes it easy to hang rope lights in a straight line. But what if you need to trace around curves or attach various sections together? More complex rope light designs, such as outlining architectural features or highlighting landscaping, requires accessories. The most common rope lighting accessories are:
Rope lights can be mounted just about anywhere you can imagine, using a variety of methods, creating unlimited forms and shapes. But no matter how you chose to mount your lights, there are a few guidelines you"ll need to follow. After unspooling your rope light, not only should you plug it in to test it, but it is a good idea to keep it plugged in for a few minutes to warm up the outer plastic tubing, making it more pliable. (Be sure to unplug it again before installation.)
Rope lights are very flexible products, but they do not bend at 90-degree angles. Always provide a curved radius of at least 3-4 inches when turning a corner. Also, all rope lights generate some heat during operation and they need to be able to dissipate this heat throughout their length. When mounting, do not crowd the rope light and be sure to allow ample "breathing room" around it. This is also applicable in installations where two or more rope lights might run parallel to each other. Again, allow some ventilation room for heat dissipation and do not let the rope lights touch each other as this could potentially cause them to melt or fuse together. (This is the same reason why you should always unspool your roll of rope light before plugging it in.)
When installing rope light into place, it is very important that you do not pull on, tug on, stretch, or excessively flex the rope light! This can stress the inner wires and damage them, the result of which will be immediately burned out sections. And nobody wants that. Rope lights are a very flexible product, but please use care when handling and installing them.
If using rope lighting outdoors, be sure to use waterproof PVC or silicone sealant to secure all connections, power cords and end caps. Add a small bead of sealant on the inside of the connector, slide the rope light in place and then place another small bead along the outside rim to seal the connection. Remember to secure your end caps in the same manner. For added protection, we recommend using dielectric grease on all metal pins prior to inserting into both the rope light and connectors/power cord. This will prevent corrosion of the metal due to any residual moisture present in the connection.
Mounting clips are a general-purpose accessory that can be secured to just about any surface. Using screws or nails, place the clips at constant intervals along the path of the rope light and carefully snap the light into place, making sure the bulbs are facing outward for the best light.
Mounting tracks are very popular when you"re looking to mount the rope lights in a nice, straight line. Like the clips, they can be secured to a variety of surfaces with nails, screws, or even strong adhesives. After positioning the tracks into location, carefully snap the rope light into place.
Lastly, the common zip tie is a good choice when neither the mounting clips nor the mounting track are applicable for where the rope lights will be going. There"s really no rules to using zip ties. Just secure them to whatever you can, wherever you can, to hold your rope lights in place.
These three methods of mounting rope lights are certainly not the only ways to do it; they are just the three most common. You are certainly open to use your own methods if you like. Just be sure to observe the common mounting guidelines described above.
If you"re looking to introduce some special effects to your rope light creation, it"s time to look at controllers. By itself, a rope light will be in a solid, or "steady-on", state. With the use of a controller, you can have your rope lights flash, fade, chase, and more. Certain controllers will only work with certain types of rope lights. For example, two-wire rope lights can be used with fading or flashing controllers, but not with a chasing controller. Three or more wires are required for advanced effects such as chasing. Refer to the particular controller to see what rope lights it can work with. Attaching rope lights to a controller will usually occur in one of two ways. There can be a standard outlet in the back of the controller into which you simply plug in your rope light power cord. Or there may be an integral rope light power cord and power connector attached to the controller to which you will attach to rope light similar to how you would attach it to a normal power cord.

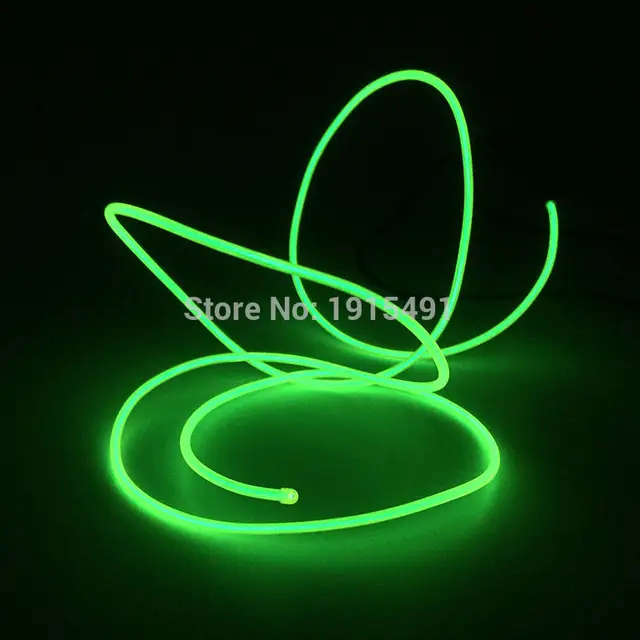
Electroluminescent wire (often abbreviated as EL wire) is a thin copper wire coated in a phosphor that produces light through electroluminescence when an alternating current is applied to it. It can be used in a wide variety of applications—vehicle and structure decoration, safety and emergency lighting, toys, clothing etc.—much as rope light or Christmas lights are often used. Unlike these types of strand lights, EL wire is not a series of points, but produces a 360 degree unbroken line of visible light. Its thin diameter makes it flexible and ideal for use in a variety of applications such as clothing or costumes.
EL wire"s construction consists of five major components. First is a solid-copper wire core coated with phosphor. A very fine wire or pair of wires is spiral-wound around the phosphor-coated copper core and then the outer Indium tin oxide (ITO) conductive coating is evaporated on. This fine wire is electrically isolated from the copper core. Surrounding this "sandwich" of copper core, phosphor and fine copper wire is a clear PVC sleeve. Finally, surrounding this thin and clear PVC sleeve is another clear, colored translucent or fluorescent PVC sleeve.
An alternating current electric potential of approximately 90 to 120 volts at about 1000 Hz is applied between the copper core wire and the fine wire that surrounds the copper core. The wire can be modeled as a coaxial capacitor with about 1 nF of capacitance per 30 cm, and the rapid charging and discharging of this capacitor excites the phosphor to emit light. The colors of light that can be produced efficiently by phosphors are limited, so many types of wire use an additional fluorescent organic dye in the clear PVC sleeve to produce the final result. These organic dyes produce colors like red and purple when excited by the blue-green light of the core.
A resonant oscillator is typically used to generate the high voltage drive signal. Because of the capacitance load of the EL wire, using an inductive (coiled) transformer makes the driver a very efficient tuned LC oscillator. The efficiency of EL wire is very high, and thus up to a hundred meters of EL wire can be driven by AA batteries for several hours.
In recent years, the LC circuit has been replaced for some applications with a single chip switched capacitor inverter IC such as the Supertex HV850; this can run 30 cm of angel hair wire at high efficiency, and is suitable for solar lanterns and safety applications. The other advantage of these chips is that the control signals can be derived from a microcontroller, so brightness and colour can be varied programmatically; this can be controlled by using external sensors that sense, for example, battery state, ambient temperature, or ambient light etc.
EL wire - in common with other types of EL devices - does have limitations: at high frequency it dissipates a lot of heat, and that can lead to breakdown and loss of brightness over time. Because the wire is unshielded and typically operates at a relatively high voltage, EL wire can produce high-frequency interference (corresponding to the frequency of the oscillator) that can be picked up by sensitive audio equipment, such as guitar pickups.
There is also a voltage limit: typical EL wire breaks down at around 180 volts peak-to-peak, so if using an unregulated transformer, back-to-back zener diodes and series current-limiting resistors are essential.
EL wire sequencers can flash electroluminescent wire, or EL wire, in sequential patterns. EL wire requires a low-power, high-frequency driver to cause the wire to illuminate. Most EL wire drivers simply light up one strand of EL wire in a constant-on mode, and some drivers may additionally have a blink or strobe mode. A sound-activated driver will light EL wire in synchronization to music, speech, or other ambient sound, but an EL wire sequencer will allow multiple lengths of EL wire to be flashed in a desired sequence. The lengths of EL wire can all be the same color, or a variety of colors.
The images above show a sign that displays a telephone number, where the numbers were formed using different colors of EL wire. There are ten numbers, each of which is connected to a different channel of the EL wire sequencer.
Like EL wire drivers, sequencers are rated to drive (or power) a range or specific length of EL wire. For example, using a sequencer rated for 1.5 to 14 meters (5 to 45 feet), if less than 1.5m is used, there is a risk of burning out the sequencer, and if more than 14m is used, the EL wire will not light as brightly as intended.
There are commercially available EL wire sequencers capable of lighting three, four, five, or ten lengths of EL wire. There are professional and experimental sequencers with many more than ten channels, but for most applications, ten channels is enough. Sequencers usually have options for changing the speed, reversing, changing the order of the sequence, and sometimes, to change whether the first wires remain lit or go off as the rest of the wires in the sequence are lit. EL wire sequencers tend to be smaller than a pack of cigarettes and most are powered by batteries. This versatility lends to the sequencers" use at nighttime events where mains electricity is not available.
By arranging each strand of EL wire into a shape slightly different from the previous one, it is possible to create animations using EL wire sequencers. EL wire sequencers are also used for costumes and have been used to create animations on various items such as kimono, purses, neckties, and motorcycle tanks. They are increasingly popular among artists, dancers,maker culture, and similar creative communities, such as exhibited in the annual Burning Man alt-culture festival.
Govee has exploded into the smart lighting scene in recent months with an array of relatively low-cost lamps and light strips, but their newest entry sets itself apart in several big ways. The rope seems a lot like par-cooked spaghetti noodles, if those noodles had a light-diffusing cover over LED lights. The strip itself is split into two sections: The bottom half, which hides all of the wiring and doesn’t light up, and the top section which houses the LEDs.
The Govee Neon Rope Lights are a lot like the Philips Hue Ambient light strip, but they’re significantly more affordable at $66 versus $180. They’re also more flexible and allow you to write out messages on the wall or make a variety of different patterns to suit your personality. Best of all, these lights work without the need for external accessories, and over both Bluetooth and Wi-Fi. Thanks to the huge number of colors, scenes, and features, the Neon Rope Lights are a great way to add a little bit of light-up artto your home.
If you’ve ever used a Govee light before, then you already know the options available to you. The Neon Rope Light has the same features as other Govee strip lights, as well as the same color options.
The Neon Rope Light has more than 16 million colors available and 15 different light segments to choose from. Each segment can be individually controlled, from the color to the relative brightness. You can also choose whether the segments should be well-defined or transition between one another on a gradient. This level of customization means you can create a nearly endless number of scenes to fit the mood of your room.
The Govee Neon Rope Light works with both Alexa and Google Assistant. Alexa automatically detected the light and added it to the network. With Google Assistant, I had to link my Govee account with my Google account. After that, it was as simple as selecting each light and choosing the room to add it to. From the assistants, I can set up schedules, timers, and more. I can also ask Alexa or Google Assistant to change the colors, modes, and more. Alexa even provides access to all of Govee’s built-in scenes from within the Alexa app, but Google Assistant does not.
Govee has made many inroads into the smart lighting space with everything from indoor strip lights to smart lamps, and more. The company even has other lesser-known smart devices to pick from. The Govee Neon Rope Light adds a splash of style to your wall in the shape of a word or a pattern.
The Philips Hue Ambient light strip is a similar product, but its higher cost and the requirement for a hub make it less appealing. You might also consider the Twinkly Flex for just $100. It serves a similar purpose, can be arranged into writing, and provides a slew of different color options to pick from. However, on the budget front, it’s hard to beat the $65 Govee Neon Rope Light.
Yes. Govee is a quality budget brand. While there are a few hiccups here and there, the lights work well and integrate easily with smart assistants. It’s not going to revolutionize your smart home, but the Neon Rope Light is a good addition to add a bit of style to any room.

Polyester rope and cord, also commonly called Dacron, will provide similar strength to Nylon rope with less stretch and better abrasion resistance. It is perfect for demanding applications that call for excellent UV resistance, abrasion resistance, high strength or low stretch.
Applications polyester rope is well-suited for include boating and marine use, rigging, outdoor use, and general purpose. Polyester rope does not float. QNR offers multiple colors and sizes, including 1/8", 3/16", 1/4", 5/16", 3/8" and more. Question? Feel free to ask.


 8613371530291