
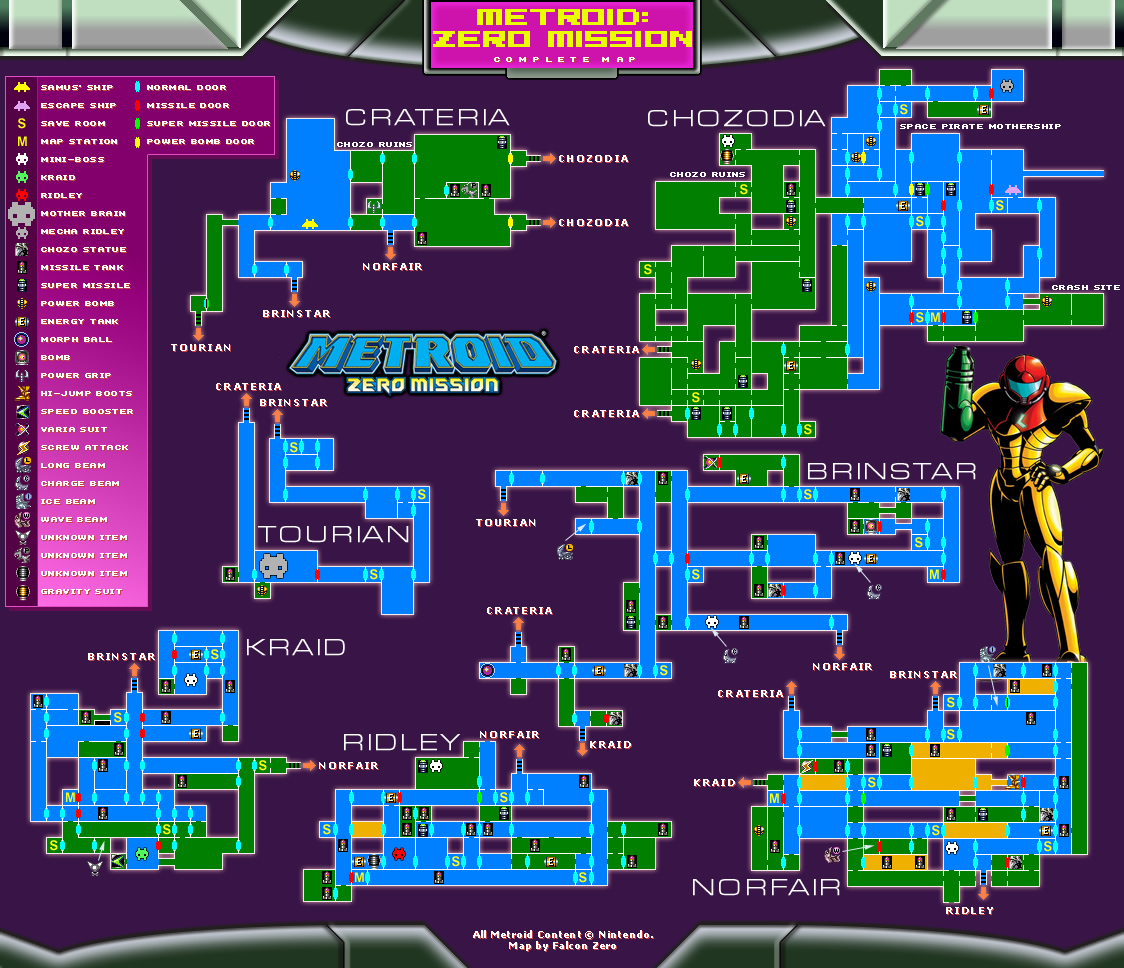
metroid zero mission parts of the map flash made in china
Metroid: Zero Mission(メトロイドゼロミッション, Metoroido Zero Misshon is a remake of Metroid series and replacing the former in the canon. It was designed to "retell the story of Samus Aran"s original mission".
Zero Mission was developed by Nintendo"s internal team, Nintendo Research & Development 1, under the direction of Yoshio Sakamoto. Zero Mission features the same plot as the original Metroid, but is slightly modified with the addition of new areas.
The game was re-released on the Wii U eShop between 2014 and 2016 in all regions. Sales of Zero Mission on the eShop increased following the announcement of Dread"s release.
Planet Zebes...I called this place home once, in peaceful times, long before evil haunted the caverns below. Now, I shall finally tell the tale of my first battle here.... My so-called Zero Mission.
In the year 20X5 of the Cosmic Calendar, the Space Pirates attacked a deep-space research vessel and seized capsules containing samples of an unknown species that had been discovered on planet SR388. The Space Pirates" objective was to acquire these life-forms; known simply as Metroids, these floating organisms were incredibly dangerous as they could latch onto any other organism and drain its life-energy. Furthermore, it was possible to replicate Metroids in vast numbers by exposing them to beta radiation. The hypothesis that the Metroids were responsible for one of the greatest mysteries in the entire galaxy — the extinction of all life on planet SR388 — was generally accepted as fact.
If the Space Pirates were able to breed the Metroids and use the creatures as biological weapons, the destruction of all galactic civilization would be inevitable. After a desperate search, the Federation Police discovered the Space Pirates" base of operations on the planet Zebes. They launched a full assault on the planet, but the Pirate resistance was strong, forcing the Federation Police to retreat. Meanwhile, in a room hidden deep within the center of the Pirate fortress, the preparations for multiplying the Metroids were steadily progressing.
As a last resort, the Federation Police decided to send a lone Bounty Hunter to penetrate the Pirate base and destroy Mother Brain, the mechanical life-form that controlled the fortress and its defenses. Samus Aran, considered by many to be the greatest of all Bounty Hunters, was chosen for the mission. Samus had successfully completed numerous missions that others had thought impossible, making her an excellent candidate. However, despite her accomplishments, much of Samus" true identity remained wrapped in mystery.
Samus Aran eventually landed on the surface of Zebes and began exploring the planet; it was, in fact, the same planet where she had been raised as a child by the Chozo. Eventually, after making it through all of the various caverns and regions of the planet, Samus took down Mother Brain"s generals, the gargantuan Kraid and her nemesis, Ridley, before finding and destroying Mother Brain herself. However, upon leaving the planet after her successful mission, Space Pirate vessels attacked her Starship. The ship crash-landed back on Zebes near the Space Pirate Mother Ship; Samus survived, but her Starship and Power Suit were destroyed, leaving her virtually defenseless.
While searching the Space Pirate Mother Ship for a way to escape, Samus discovered the nearby ruins of an ancient Chozo temple known as Chozodia. There, she passed the Ruins Test and gained a new and more powerful Power Suit. With her Power Suit restored, Samus returned to the Space Pirate Mothership, where she eventually encountered Mecha Ridley, a robot crafted by Ridley in his own image, that had taken command of the ship during Ridley"s absence. Upon defeating it, Samus was able to successfully escape the planet (and the self-destructing Mother Ship) by using one of the Escape Ships. All of the Space Pirates" research on Metroids was destroyed in the explosion.
As a remake of Metroid, Zero Mission"s general layout is very similar to the original. However, new items (such as the Power Grip, Gravity Suit, Charge Beam, Plasma Beam, Speed Booster, Space Jump, Super Missiles, and Power Bombs), mini-bosses, and areas (such as Crateria, Chozodia, and the Space Pirate Mother Ship) have been added. In addition to the new equipment, the Ice and Wave Beams can now stack, and will no longer remove each other from Samus"s arsenal. The game is also visually similar to Zero Mission can be a linear game, much of it can be completed in a non-linear fashion via Sequence Breaking making it possible to complete the game by collecting as little as 9% of all items. As with most Metroid games, the player can save in Save Rooms and can open a map to help with navigating around the planet.
Zero Mission also differs from the original Metroid and the other Metroid games in that the player can play as Samus without her Power Suit (not counting the Justin Bailey password in the NES version of the original), making her more vulnerable to damage. This form is known as Zero Suit Samus. This marks the second time (the first was in the first Metroid) she has been playable during the course of normal game play without her suit, whereas in each previous Metroid game, seeing Samus without her armor has been a feature in one or more of the game"s endings or an easter egg.
If Normal Mode is completed, then Hard Mode is unlocked. In Hard Mode, damage taken is doubled, enemies are often multiplied or replaced with tougher versions of themselves, and upgrades are less effective -- Energy Tanks only add 50 energy to Samus"s total instead of 100, normal Missile Tanks add 2 rather than 5 Missiles, and Super Missile Tanks and Power Bomb Tanks add just a single of each to Samus"s supply. Additionally, there are some minor map changes, most notably the removal or blockage of certain Save Stations.
If Zero Mission is connected to Game Boy Advance Game Link cable, it unlocks a Gallery showcasing many images of Samus from Metroid Fusion that were only available in the Japanese version of Fusion. Also, images of her past are displayed graphically telling her story from the raid of K-2L, her home planet, to her training with the Chozo.
Pressing Up, Left, Right, and Down on the Start Game option of a file that has been beaten in Normal Mode unlocks Time Attack Mode, which is set on Normal difficulty but will save the best time for clearing the game when using this setting. Time Attack is also available for Hard Mode by starting a new game on the Hard difficulty, exiting it, then entering the Time Attack mode.
If Time Attack Mode is cleared, a menu in the options category is unlocked that will display the best Time Attack times for both 100% cleared and less than 100% cleared.
Unused sprites for Crocomire exist in the internal data of Zero Mission. The sprites have ambient animations but Crocomire is incapable of moving, attacking, or taking damage. It is unfinished and has no death animations, indicating that it was going to be included but was later dropped. It is notable that this rendition of Crocomire does not have its signature rough skin, possibly indicating that the injury was intended to be inflicted in this game.
Zero Mission is the first game that has part of the story take place while playing without the Power Suit (discounting the original Justin Bailey as an unlockable cosmetic variant).
An unused ability ability to toggle items on and off, much like Zero Mission through datamining. Unlike in Super Metroid, suits cannot be disabled, and the Bombs and Power Bombs can only be disabled when the Morph Ball is. Additionally, Red Hatches would have taken five Missiles to open (as in past games) instead of the single Missile required in the final version of the game. The ability to toggle the items on and off can be used with a cheating device or hacking.
The game makes a cameo appearance in an episode of House M.D. titled "Occam"s Razor", where House can be seen playing it during several parts of the episode. Notably, the sound effects are different, possibly due to copyright issues. There are mentions of "Level 4" and "space bunnies", and apparently turning into the Morph Ball in a Chozo Statue"s hand causes the player to lose.
^ Darren. Shinesparkers. "Metroid tops Wii U eShop best sellers." June 25, 2021. Retrieved June 26, 2021. https://shinesparkers.net/metroid-tops-wii-u-eshop-best-sellers/
^ Shinesparkers (Shinesparkers). "An update from the eShop sales chart in the United Kingdom as it stands, on 11th October 2021. ¶ SWITCH: #1 Metroid Dread ¶ WII U: #1 Metroid Fusion #2 Metroid Zero Mission #7 Metroid Prime Trilogy #9 Super Metroid ¶ 3DS: #3 Metroid: Samus Returns" 11 October 2021 8:02 a.m. Tweet. https://twitter.com/Shinesparkers/status/1447533111408041987
^ Sakurai, Masahiro (Sora_Sakurai). "2004年のきょう『メトロイド ゼロミッション』(Metroid: Zero Mission)発売!! 一作目のリメイク作品ですが、ゼロスーツサムスが現在の形で初登場します。 その呼び名は『スマブラX』登場時に決まりました。本来ゼロスーツサムスは強いものではなく、逃げたり隠れたりするのが主体。 #スマブラSP" 27 May 2021 2:00 a.m. Tweet. https://twitter.com/Sora_Sakurai/status/1397794697242873856
The original Metroid was first released on the Famicom Disk System in 1986 and on the NES a year later. Localization and hardware limitations meant that the NES and Famicom Disk versions have several differences. The most notable difference between the two versions is the inclusion of game file saving in the Famicom Disk version, which came on a floppy disk that could be easily written to. At the time, saving to a game cartridge was effectively impossible without the inclusion of an internal battery, a high-cost solution Nintendo opted not to use for Metroid in order to produce more copies of the battery-backed The Legend of Zelda, which Nintendo viewed as the stronger game with higher sales potential. Thus, the NES version of Metroid uses a password system. Future Metroid games would include saving in all versions.
The letter O in the NES version includes a dot in the center, and the number 0 appears to be slashed. This is likely to distinguish between the two better.
During a Game Over, the words "Game Over" are centered and white in the Famicom version, but higher in frame in the NES version, with reduced spacing as well. The color scheme changes depending on the area (for example, if Samus died in Brinstar it will be blue).
The Samus Data Screen in the Famicom version includes counters measuring the number of times a file has been played and the amount of hours, or "days", played.
The NES version includes a New Game + feature in which Samus retains all of her power-ups, but not Energy Tanks or Missile Tanks. If the better endings were scored, she will also be wearing her Justin Bailey suit. In the Famicom version, when restarting, the game simply restarts with no power-ups and armorless Samus is not playable.
In the Famicom version, the Missile Counter digits have a blue drop shadow, which also appears on the timer during the countdown at the end of the game. This does not appear in the NES version.
When fighting Mother Brain in the Famicom version, the entire lower half of the Control Capsule will shatter when struck with a Missile; in the NES version, only a small hole will appear in it, through which Samus can attack Mother Brain.
The ending text is yellow in the English version, and blue in the Famicom version. The line "In the space" from the Famicom version is changed to "In space" in the NES version, but the text is overall still poorly translated.
The credits in the FDS version are blue, and cyan in the NES version, which also changes "Main Programmed By" to "Main Programmers" and "Chief Directed By" to "Chief Director". The credit "Tohryu Mako Benkei" is removed and replaced with "Converted by T . Narihiro". When the credits end, the words "The End" appear. In the FDS version, "Push Start Button" appears underneath, which it does not in the NES version.
The directional patterns of attacks from Squeepts, Sidehoppers and Dessgeegas, Polyps, Dragons, Kraid and Ridley vary between versions. They have set patterns in the NES version, but varying patterns in the FDS version. For example, Polyp projectiles are fired erratically and randomly to both the left and right in the FDS version, but only one of the two in the NES version. This is because the FDS version uses the random number generator in the FDS BIOS, while the cartridge version uses a poorly programmed replacement.
The FDS version has short loading times when moving between the areas of Zebes to load the different tilesets for the graphics. When starting or saving the game and right before the ending, the disk must be flipped.
The FDS version has much less slowdown than the NES version, most notably during boss battles, in Tourian, and when using the screw attack. This is because the lack of wavetable on the NES requires dedicating more CPU time to making replacement sound effects.
The logo and text have also been compressed, and in Zero Mission, the year is changed from 1986 to 1986-2004, the year Zero Mission was released. Furthermore, "Push Start Button" has been repaired to simply "Press Start"
Like all other 3DS Virtual Console games, players may touch the touch screen to access the Virtual Console menu, which allows them to resume the game, create a restore point, load a restore point, or reset the game.
Like all other Game Boy games on the 3DS Virtual Console, pressing Y while holding the L and R shoulder buttons will swap the game"s color palette from black and white to black and green, emulating the appearance of the original Game Boy.
The European version changes "Press Start" on the Title Screen to "Start Game" and adds a Language option. The Screw Attack logo in the Japanese version has a duller color scheme than that of North America and Europe and replaces the ™ with an ®. The word FUSION is also noticeably larger in the Japanese version.
The North American and European versions do not have a customizable difficulty setting, with the game locked to Normal Mode. The Japanese version includes an Easy and Hard Mode.
The Japanese and Chinese versions include an Adult Mode and Child Mode, which changes the text to kanji or hiragana. This also affects which endings are displayed. Child Mode"s endings depict events from Samus"s past, and Adult Mode"s endings depict Samus in increasingly revealing outfits. The Child Mode endings are inaccessible in Western versions of the game but can be unlocked by connecting the game to Zero Mission.
The Japenese version, in addition to the 5 extra endings obtained through child mode, has 3 additional ending received for completing the game in under 2 hours with 100% on Hard, achieving 1% completion on Normal, and achieving 1% on Hard. These endings also can be unlocked in the Fusion Gallery by linking the game to Zero Mission.
A Gallery of unlocked ending images becomes available in the Japanese version after completing the game, and can be accessed on the Title Screen, replacing the "Language" option. Obtaining all 13 ending images adds stars on either side of this option.
In the Japanese version, the central Morph Ball tunnel in the room outside the Sector 4 Data Room is removed, and the other two Powamps are moved further away.
If the camera gets stuck when performing a double Bomb Jump on a ledge in the underwater version of Biohazard Containment, it will reset when Samus touches the bottom of the room.
A softlock in Research Core Access was removed, where if Samus entered from Research Core and stood next to the door, killed the Sentry Drones, then walked forward, the doors would lock, sealing her in the room.
The game demos are different in the Japanese version, likely because they had to include the Japanese text. Although they take place in the same areas, the gameplay is noticeably different.
The introductionWhen loading a save file, the narrator will announce the name of the current area: Frigate Orpheon, Tallon Overworld, Chozo Ruins, Lava Caves, Ice Valley, Phazon Mines, or Impact Crater.
Samus"s suit has vocalized dialogue for different scenarios, replacing the sounds that play when a Logbook entry is added or a hint is received. The suit also warns Samus of her malfunctioned power-ups on the Frigate Orpheon, if she steps into a superheated room without the Varia Suit, and when she is near Phazon or meta-viprium gas, among other hazards.
There are three types of Missile Ammo that restore 3, 5 and 10 Missiles instead of just one type that restores 5. The old 5-Missile pickup is used for the 3-Missile pickup.
Damage incurred from touching Phazon is reduced by 13% with the Varia Suit and 20% with the Gravity Suit and Phazon Suit, but damage incurred from touching toxic water in the Chozo Ruins is more than doubled.
A rocket blast effect is added when Samus jumps off of her Gunship upon docking at the Orpheon. A projection shadow is also added under her when she lands.
When shooting the switches on the Exterior Docking Hangar with lock-on, the lock-on effect will end and the Targeting Reticule will no longer be displayed afterwards.
If Samus stands near the wall where the Sheegoth appears, it will no longer try to attack her with a close range breath attack when she is teleported away after the cutscene.
The Grapple Beam acquisition cutscene now shows Samus using it, rather than showing the cutscene that plays after collecting a Chozo Artifact, where Samus merely stands still.
The stalagmite in the Geothermal Core used to obtain the Plasma Beam early is removed, and the metal ring running around the outside of the room was made unmountable. Also, Bendezium was added in front of the door to Plasma Processing.
After defeating the Omega Pirate, Fission Metroids will begin to appear in the Phazon Mines, including Elite Quarters and Phazon Processing Center, as opposed to just in the Impact Crater.
His attacks destroy a pillar entirely. The pillars take 3 hits to be destroyed from his non-physical attacks. This also applies during the first part of the fight.
Optimized to run on PAL TVs and GameCubes, this version uses the new "slower" loader which prevents crashing. 50Hz and 60Hz refresh rates are available; the game asks when booted if it should switch to 60Hz mode from 50Hz mode, which it will do automatically after several seconds if nothing is selected.
Four Pirate Data logbook entries found in Elite Control (Metroid Prime, Prime Breach, Prime Mutations, and Chozo Artifacts) are replaced (Impact Crater, Gate System, Artifact, The Key) in an attempt to fix a plot hole with the Space Pirates interacting with Metroid Prime, who is encountered in the Impact Crater behind an impenetrable barrier. Despite this, Metroid Prime still utilizes Space Pirate technology.
The Samus Data Screen is redesigned so that its user interface resembles that of Metroid Prime 3: Corruption. It is now possible to copy files from one slot to another.
There are three difficulty levels, Normal, Veteran and Hard. The Normal difficulty is a new, easier difficulty, while Veteran reproduces the Normal difficulty in the original GameCube release. Hard still requires beating the game to unlock.
The game has a control scheme similar to Corruption. The Spring Ball is also included and can be used by flicking the Wii Remote up, but only once the Morph Ball Bomb ability has been regained.
Due to the availability of the Spring Ball, some Morph Ball platforming passages become easier (or even safer) to navigate than in the GameCube version. For example, Transport Tunnel A in Magmoor Caverns contains some blocks in the lava in front of a ledge that would give way and cause Samus to fall (and scorch herself) after they are hit with two Morph Ball bombs, which would punish those who did not properly use the Morph Ball bombs to jump in the GameCube version. This can be easily bypassed with the Spring Ball in the Wii version.
During the Orpheon"s self-destruct sequence, the tutorial prompt for the Grapple Beam that should show up in Biotech Research Area 2 is missing, due to an apparent bug.
During the boss fight against Hive Mecha, the doors will lock, even as the acid water rises, to fully prevent players from trying to escape the Hive Totem until the battle is finished.
8 Chozo Lore entries are slightly altered again. Notably, the Chozo describe the Phazon corrupting the planet at a much quicker pace, which is more consistent with the rapid effects seen in Corruption. The 12 Chozo Artifacts are also mentioned more prominently.
New concept artwork and model galleries, as well as a Soundtrack Gallery, are included, the majority of their contents being unlocked by completing requirements throughout the game.
These requirements include: collecting each of the primary power-ups (excluding Energy Tanks and expansions), completing 25% of the Logbook and Item Collection ratios each time, defeating Meta Ridley and Metroid Prime, and completing the game on the Normal and Hard difficulties.
The Tallon Metroid"s scan refers to it specifically as a "Tallon Metroid" instead of simply "Metroid", retroactively adopting the name introduced in Echoes.
The Plasma Beam has visible magma on the Arm Cannon (resembling its appearance in the prototype build of the original game) and the beam"s charged shots now appear as a swirling beam of energy similar to the Wave Beam"s shots from
During the ending scene where Samus watches the Artifact Temple, she no longer removes her helmet with her left hand, instead dissolving it in a similar fashion to how she removes her helmet in
The credits are updated to feature the remaster"s development team, and not the original team. This led to criticism from Zoid Kirsch and Jack Mathews.
In the European version of the game, two missile blocks in the Space Pirate Mother Ship are changed. Instead of coming back after being destroyed and leaving the room they were in, they stay destroyed.
It is no longer possible to Ghetto Jump from the half-pipe in Meeting Grounds onto the top of the wasp nest, as the dimensions of the structure were changed.
It is no longer possible to boost through the bottom right corner of the 2nd and 3rd Luminoth Webbings, which resulted in the webs disappearing and the sacs suspended in mid-air.
It is no longer possible to bypass having to drop the first and second lenses in the Portal Terminal, where only the third lens was needed to trigger the cut-scene that powers up the Portal.
The glitch where Samus receives a massive boost in jumping height by standing in Dark Water before shooting off the last part that keeps the Chykka Larva attached to the wall is fixed.
The Samus Data Screen is redesigned so that its user interface resembles that of Metroid Prime 3: Corruption. It is now possible to copy files from one slot to another.
There are three difficulty levels, Normal, Veteran and Hard. The Normal difficulty is a new, easier difficulty, while Veteran reproduces the Normal difficulty in the original GameCube release. Hard still requires beating the game to unlock.
The game has a control scheme similar to that of Corruption. The Spring Ball is also included and can be used by flicking the Wii Remote up, but only once the Morph Ball Bomb ability is regained.
Worker Splinters will still appear in the GFMC Compound upon revisits, scavenging the trooper corpses. Additionally, the bodies of defeated Dark Troopers in this room no longer remain.
During the Ready Room cutscene, Admiral Dane says "No!" when he realizes that the Space Pirates are targeting the defense system on Norion, as opposed to "Damn!". The subtitles remove the word completely.
During the Norion countdown, if the game is played in any language other than English, "Meteor impact in # minutes" will flash onscreen in red text on every minute. This is because the voice warning, like the rest of the dubbing, is only in English.
Exclusive to the Japanese version, the difficulty selection is removed in favor of a Galactic Federation survey that occurs before major gameplay. Depending on the choices, the game sets its difficulty.
Some of the NCL credits are rearranged compared to the English version. Japanese developers have their names written in Japanese first, with the romanizations in parentheses. Additionally, Tomoko Ichikawa (Japanese text art), Yuji Ichijo (localization support), Tomoaki Kuroume, Shigeo Kimura and Super Mario Club (all special thanks) are credited in the Japanese version exclusively.
The Metroid Battle Theme and Bryyo Thorn Jungle themes have been removed from the Soundtrack Gallery, and replaced with the Berserker Lord and Aurora Unit 313 themes.
The inactive terminal in Data Storage B on Norion can now be scanned, providing the codes to hear the secret messages on the Transmission Console in Samus"s Gunship.
The final scene in the SkyTown migration cutscene is changed to a lower, wider shot of the facility moving towards the Leviathan Seed (it was originally a top-down distant view).
The glowing effect of the Hazard Shield (which indicates that Samus is being shielded from a hazardous substance) is removed while standing in Phazon.
When Dark Samus is defeated, the sound heard when receiving her Gold Credit is now the same as when other bosses are killed; before, it was the same sound when receiving a Friend Voucher.
The English version of Other M allows the player to select French or Spanish subtitles, but the Japanese voice dub is not accessible. The voices and subtitles can be changed between English and Japanese in the Japanese version. It is likely that Japanese voices cannot be selected in the American version because of licensing issues with the voice actors. In the European version, French, Spanish, German and Italian subtitles can be selected.
A video uploaded to YouTube in late May 2020 outlines the differences in plot between the Japanese and English versions of the game, and makes the case that changes to the game"s dialogue during localization may have contributed to fan criticism of the story. The Japanese version also includes multiple references deepening its connection with Galactic Federation Army in both the BOTTLE SHIP and BSL research station, and differentiates the Army"s involvement from the Galactic Federation as a whole, which the English version makes less clear.
The Head Quarantine Officer"s assessment of Samus"s abilities in Japanese is less condescending than it is in English. In Japanese, the officer suggests that although Samus returned from Zebes wounded, her combat proficiency was better than ever. In English, he says she took "quite a bit of damage", and "it"s unbelievable how well you"ve held up."
The Head Quarantine Officer informs Samus in English that she is to appear before "the big dogs" in the meeting room. In Japanese, he specifies that the room is where Galactic Federation parliament meets. Anthony Higgs says in Japanese that his orders came from the "Head of Parliament" (i.e. Prime Minister), while in English he identifies the executive as the chairman of the Galactic Federation, a title also used in the (unofficially translated) English version of the Metroid manga.
Samus"s description of Adam in her monologue in the Cargo Hold is more detached, i.e. "This is Adam Malkovich, a commanding officer in the Federation Army, and the man who was in charge of me in my army days."
Samus takes Adam"s remark that she is an outsider less personally in Japanese. In English, she says it "pierced my heart", while in Japanese, where Adam calls her "unaffiliated", she says the word slightly stung.
In English, Samus muses that her behavior as a Federation Army soldier was "childish", "inexperienced" and "naive". In Japanese, Samus always references herself as a "child", states that she faced ageism and sexism in the military, and that she hated being called "Lady" by Adam (but didn"t hate him for it). This was because she did not want to be made to feel weak. Instead of saying she hated being called "Lady" in English, Samus says she was "grateful for the nod". The references to sexism are more subtle in the English version; ironically, it was Western players who accused Nintendo of portraying Samus in a sexist way.
Samus is more concerned about Adam"s perception of her in English than in Japanese. In English, she wonders how he feels about her, and in Japanese, she wonders if sparing the baby negatively impacted how he saw her.
In Samus"s monologue in the long elevator shaft (Japanese), she questions whether Adam"s presence on the BOTTLE SHIP, where the Army was developing bioweapons, was a coincidence. This indicates she has doubts about him, although he is a strong opponent of bioweapons in both versions. In English, she merely questions if he came there knowing the Federation (i.e. the organization itself) was doing so.
As Samus enters the "red-lit corridor", Adam tells her in Japanese to limit her search to areas accessible with her current equipment. In English, he tells her start her search by accessing such areas. In short, Adam is asking Samus in Japanese to explore "safe" rooms and avoid superheated areas without her Varia Suit. Adam finally authorizes the Varia Suit at the top of the Crater Interior, with an uncharacteristic urgency in Japanese: "Samus! Activate the Varia Feature right now!" Many Western fans derided the "Hell Run" - their term for the game"s forced run through Pyrosphere"s heated areas without the Varia Suit - as a negative of the game"s authorization system, and blamed Adam for his seemingly refusing to let Samus use her Varia Suit until the last minute. The Japanese localization implies that Samus subverted his order by exploring the hot Pyrosphere without the Varia Suit"s protection, and fans misinterpreted Adam"s intentions.
This sequence was subverted in Fusion, where the computerized Adam specifically orders Samus to avoid the extremely cold Sector 5 (ARC) until she regains her Varia Suit.
Regarding the death of Adam"s brother, Samus says in English that she questioned his authority and made things for difficult, while in Japanese she blamed him for what happened. She pleads with Adam to let her save Ian in English, while in Japanese she is more assertive in asking him to order a rescue. When reflecting on the incident, Samus says in Japanese that Adam made the right call, but if a similar incident would happen again, she would stubbornly keep betting on a small chance she could still save everyone. In English, she says she "would hold fast to that glimmer of hope and try for redemption", either meaning she would not act in the way she did on that day, or she would ensure to save the person"s life.
The Japanese version makes a clear distinction between the Galactic Federation itself and the Federation Army when the characters are speaking about both factions" role in the events aboard the BOTTLE SHIP. For example, in English, the BOTTLE SHIP begins to intercept "Galactic Federation orbit" near the end of the game. In Japanese, the P.A. Announcer and Adam state that the BOTTLE SHIP is on course to reach the Galactic Federation home planet"s orbit, which is indicated to be Earth. Adam suggests in Japanese that the minimum that would happen is the ship could collide with the planet, while in English he says "some sort of attack is clearly imminent."
Adam states that he was asked to write the Metroid military program report from "Galactic Federation Headquarters" in English, but in Japanese he says "parliament" (possibly the Supreme Council) enlisted him to do it. In English, he says "HQ listened", in Japanese, he is clearer in stating that parliament agreed with his conclusions. In English, he says his report was co-opted by a "small group within the Federation", and in Japanese he identifies the ringleaders as a "splinter group in the Federation Army".
In addition, the English version of the ending and post-game indicated that the ringleaders were still at large and operating, while the Japanese version explicitly states that the group was shut down, with most if not all of its known members being arrested.
In English, Madeline Bergman suggests her presence on the day MB was detained "caused a disturbing reaction in her". In Japanese, she says her attitude - her seeming indifference to the fact she was to be reprogrammed - made MB snap.
In the Japanese version of Metroid Fusion, Nightmare is said to have been created by the "old/former" Federation Army. This indicates that by securing a witness, Samus was able to expose the activities of the splinter group in Other M, and it was restructured as a result. In English, Nightmare is simply said to have been built for "military applications".
At the end of Fusion, the Army is said to be on its way to the BSL station to collect the SA-X and X Parasites. This, along with the presence of Nightmare and Ridley"s clone, which were both removed from the BOTTLE SHIP after the Army"s intervention, suggests that some within the splinter group were able to remain undetected, and subverted the Biologic Space Laboratories" study of life-forms for peaceful applications. They are presumed to remain in power after Fusion.
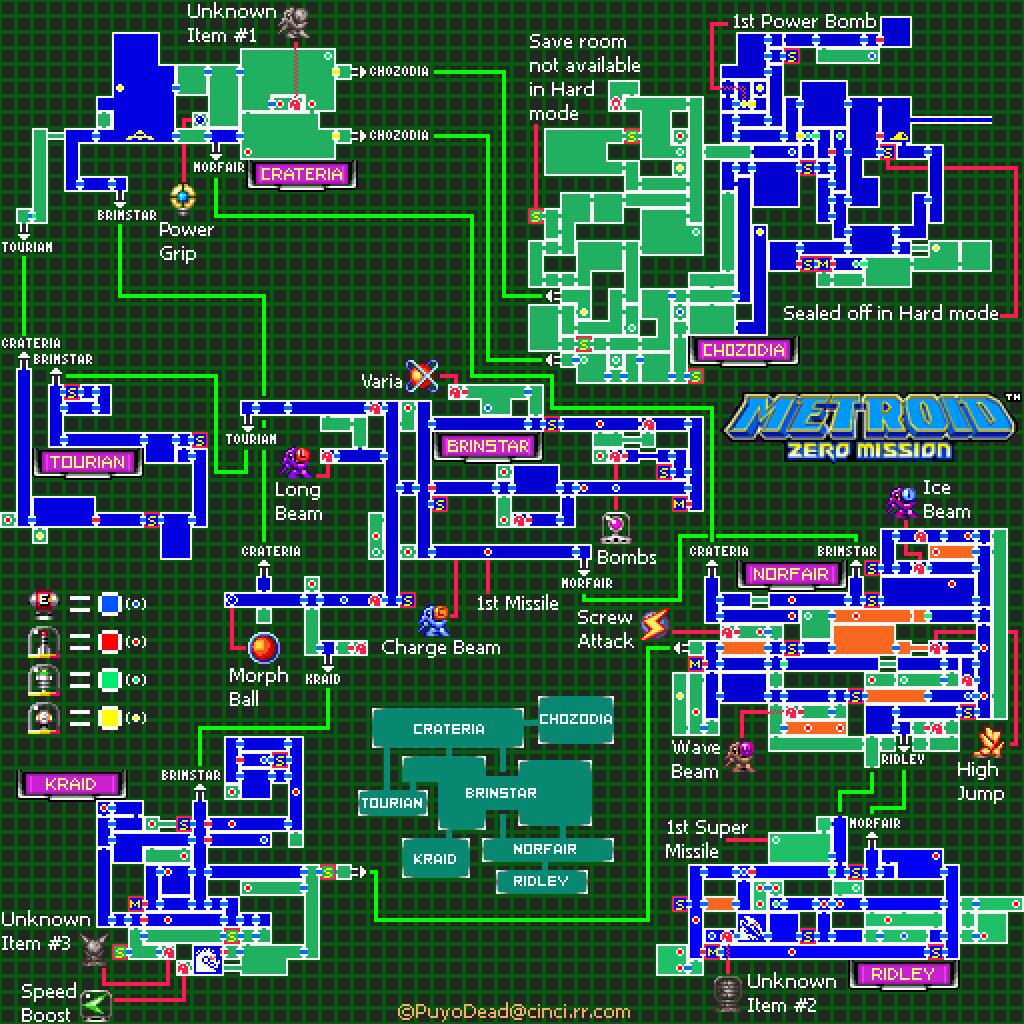
Walkthrough: Part OneadvertisementBrinstar (Morph Ball, Long Beam, Bombs, Missiles)After our heroine lands on the planet Zebes, you will take control of her in this epic mission to foil the plans of the evil Space Pirates. That said, make your way left, blasting the Zoomers as you go. Jump over the rock formation and continue until you see a giant red ball on a pedestal. Claim the Morph Ball as your own, blast some Zoomers out of your armored way, and roll under the rock formation. Continue right until you reach your very first Blue Hatch. Blast it open and head into the tiny room, where a lone Zoomer is lurking. Shoot it, and then the rocks it was crawling on. Shoot the floor to reveal that it is made out of Bomb Blocks; since you don"t have Bombs yet, go through the next hatch, into a rocky cavern. Bat-like creatures, or Skrees, will be on the ceiling in here; if they spot Samus they will drop down and drill a hole in the ground near her until they explode, causing a fairly unwanted bit of damage. Run under them until you reach a narrow passage. Now, before you get all ballsy to go under it, look at your map, which will indicate the there is an upgrade in this area. Jump up and shoot the ceiling until you reveal Energy Tank #2. Obviously you cannot reach it just yet, but you can most certainly keep this area in mind for later. Roll under the narrow passageway and run up the Chozo Statue that is blocking your path. Jump into its welcoming hands to refill your energy and reveal the location of your next power suit upgrade. The statue will sit down, allowing you to continue toward your new goal. Run through the Blue Hatch and into the room across the way -- this is your very first Save Room, mate! Save your game and get ready to go back out into the wilderness.Start climbing up the shaft by way of hopping from platform to platform, blasting the Zoomers you meet out of your way. Eventually you will see an armored bug floating back and forth. This little bugger is called Ripper (like Giles back in his young and wild days, for all you Buffy fans) and he is impervious to everything, so avoid him and keep on climbing. Eventually you will see a Blue Hatch on the right side of the shaft, obstructed by a narrow passage filled with blocks. You won"t be able to get to the hatch until you have the Long Beam, so ignore it for now and keep on climbing until you reach a Blue Hatch on the left. Go through it, roll under the narrow passage, and avoid the Skrees as you make your way to the room on the left. Inside is a lone Chozo Statue, holding some kind of weird looking blob-thing. Shoot it to reveal the Long Beam, and take your prize. When you go back outside, you will be able to shoot the Skrees before they can rip into you, so go ahead and do that, as it will make you feel all warm and fuzzy inside. The narrow passage in which you initially rolled through is now blocked off by some blocks, so take the high road into the unknown.Shoot the rocks blocking your path, and climb upward until you reach a couple of Skrees hanging out on the ceiling. Shoot them down, and continue left before jumping up into a new area. Head into the Blue Hatch on the left and check out the giant, two-headed statue blocking the way to Tourian. Shoot at it and jump on it all you want -- it won"t budge. Head back outside and go right, avoiding the lava pools as you go. When you reach the very end of the corridor (which is home to a Gray Hatch), a creepy spider thing will jump from the ceiling, inflicting some major damage on contact. Blast the creepy bastard until it is no more, and blast through the hatch once it starts flashing. Jump into the welcoming hands of the Chozo Statue in this next room, and it will reveal the location of yet another Power Suit Upgrade that is seemingly in the middle of nowhere. When the statue sits down, continue to the right. This will bring you back to the long shaft you had to climb to in order to reach the Long Beam. Drop down, until you reach the previously inaccessible Blue Hatch to the right, blast a new path, and roll to the door.In the next cavern, you will come across a Zoomer and your very first Red Hatch, which you obviously cannot open just yet. Drop down and enter the Save Room on the right to record your progress before continuing down the proverbial Rabbit Hole. When you reach the very bottom of the area, go into the area on the right (the only place you can go). As you go toward the right, the room will begin to rumble -- surely, not a good sign. Shoot or avoid the Zebs flying out of the lava and continue right until you pick up your very first Missile Tank. With these babies in your possession, Red Hatches will be no problem, so go back to the left, where the ground will shake, and a really gross, really huge bug will emerge.Boss Fight: King Worm Defeating the King Worm is simple, really: just fire a Missile into its eye three times (when the eye is open), and that will not only kill the Worm, but it will give you the mighty useful Charge Beam. However, if you do not defeat the beast, it will run away and you will not get the Charge Beam just yet. If this happens, don"t worry -- it will be back later, in a different room. It moves between just two rooms - each time you fail to defeat it, it reappears in the alternate room.Go back the way you came, climbing up the platforms and blasting Zoomers until you reach the Red Hatch on the right. Use a Missile to blast it open, and go through the door. In the next tiny room, you will notice a swarm of space flies, which will do nothing short of bugger and annoy you (as well as take some of your health). Shoot them down and continue into the next cavern. Jump onto the platforms until you see a nest of space flies blocking your path. Blast them into oblivion so that they cannot annoy you anymore, and jump onto the ledge behind you (to the left of the screen). Another nest of space flies will be there, blocking the path to a missile tank. Destroy the nest, take the missiles, and head to the right once more. Destroy another nest of flies and drop down to a Blue Hatch on the other side of it. Make your way into the next cavern, where a wall of rocks will block your way. Shoot the rocks and the Skrees and go onto the other side of the rocks. Crouch down and shoot the rock to reveal a hidden Missile Tank. Take it and continue to the right; if you did not defeat the King Worm, the ground will tremble before it pops up to annoy you once more. Remember: three missiles to the open eye is all it takes to get rid of it.Continue to the right and pick up Energy Tank #1 along the way as you avoid some more lava pools and Skrees. Drop to the bottom of the shaft here and blast the Red Hatch with a missile in order to open it. Go through it to reach the self-explanatory Map Room. Download the map of Brinstar, leave the room, and start your climb upward. Blast through the hatch on the left, and enter the leftmost room to save your game. When you are ready to go back out into the world, blast the Zoomers and climb up the short shaft. Enter the door on the left and roll through the narrow passage until you come across a Red Hatch. Blast it open to claim your Bombs and refill your health and weapons if needed.Roll under the Chozo Statue and set off a couple of Bombs in order to roll into a secret room. Explode the blocks and set some Bombs to launch yourself from platform to platform until you reach a hearty tank of Missiles. Go back out the way you came, and take note that the previously Blue Hatch that lead into this area has now turned Grey. Bomb the wall to release an army of space parasites. Roll into ball form and plant some Bombs to get rid of the nasty little buggers (if four of them are on you at once they start to drain your health, so dispose of them quickly) and the door will flash, letting you know that you are free to go.Retrace your steps to area near the Save Room, obliterating the Zoomers as you go. Go back through the corridor where you found your Energy Tank; when you reach the small room with past the Skrees, set a Bomb to destroy the blocks in the floor and drop into this new area. Get rid of the creepy crawling monsters as you drop to the bottom of this cavern. Go through the door and blast away at the creatures flying toward you before continuing left to a Red Hatch. Shoot it open to reveal a standing Chozo Statue, who is waiting to embrace Ball Samus. Hop into its claw-like hands to reveal that the next goal to work toward is somewhere in Norfair.Make your way back to the room with the space flies and their nests, exterminating the critters as you go. When you reach the small room leading to this area, break through the floor and drop down to see a Missile Tank in-between two platforms and a Bomb Block to the right. Getting this upgrade will require some speed as well as patience, b/c not only will the Bomb Block respawn after about 30 seconds of it being destroyed, but space flies will annoy you to death the entire time you are in here (if you kill them they just keep on coming to make getting these Missiles hell). Another, easier way to go about getting this Missile Tank is to come back once you have acquired the Power Grip upgrade. Regardless of what you decided to do concerning the Missiles, make your way left, back to the vertical shaft, save your game, and get ready to do a little exploring before going to Norfair.From the vertical shaft, make your way north until you come to a Blue Hatch all the way at the top of the area. Go through it, blast through some baddies, and roll under the strange missile shaped contraption. Jump the gap and blast the next missile shaped thing in order to make it rise. Roll under it and make your way to a bunch of pipes. Blast up via your trust Bombs to the top-most pipe and roll through it. Make your way to the right, through a Save Room, and past some Zeb spewing pipes until you come to a Missile Tank. Continuing right will only lead to a dead end, so go back the way you came, down to the very bottom of the shaft, and through the door to the left. Roll into the Chozo"s hands, if need be, and roll under the narrow passage to the left. Shoot the Skrees down and reveal Energy Tank #2 in the ceiling. Roll into Ball Form directly under the tank and set Bombs in quick succession, launching Samus upward until she makes contact with the upgrade. Now that your energy capacity has been increased, you can safely make your way back through the caverns of Brinstar, and into Norfair.NorfairAfter viewing a cut scene of the uber-creepy Mother Brain viewing Samus through what looks way too much like the Eye of Saruman, go into the room to the right to save your game. Continuing right through the Save Room will bring you to a room that you cannot advance in just yet, so go back to the elevator shaft and go through the hatch on the left. Go through the lava filled room, blasting the Gamets and Novas as you go until you reach a Missile Tank above. Use your Bombs to launch upward and collect the tank. Keep going left, blasting the fire-bat things (called Melia) as you go. When you reach the rock wall, bomb your way through it and roll through the narrow passage to the other side. Keep going until you reach an elevator shaft; go up the elevator to take a quick detour through Crateria.CrateriaGo to the right, shooting through the rock wall, and through the hatch into a room half filled with water. Drop into the water and bomb through the wall on the left. Roll through and shoot through the rocks (and the big space shark) until you reach a Missile Tank. Claim your prize and then go back to where you bombed through. Wait for the breakable block to reform and then use it to jump out of the water. Jump to the platform on the right, jump right once more, and then to the left. Bomb through the rocks and make your way left, into the Chozo Ruins.advertisementChozo Ruins (Unknown Item #1 and Power Grip)Make your way right, as that is the only direction you can go at the moment, until you reach a room with a Missile Tank under a gigantic block that you cannot destroy. Continue to the right until you see a Chozo Statue; blast the thing in its hand to reveal Unknown Item #1, and take what"s yours. Upon claiming this item, the giant blocks will begin to glow, signaling that they can now be destroyed. Get rid of the blocks, take the Missile Tank, and go back through the door. Destroy the block leading to the surface of the ruins and go left, jumping platform to platform until you reach the giant head, which has an entryway in its open beak. Go through the door and as you walk forward, the floor under you will crumble, dropping Samus into a very long, very wide space. Now that you are apparently stuck in the middle of nowhere, go to the wall on the left and shoot it to reveal a hidden path. Climb in and shoot some more blocks out of your way before going into Morph Ball mode. Use a Bomb to blast yourself up and to the left, and quickly roll through the narrow passage into a room where a giant statue holds the Power Grip. Leave this room and watch in awe as a giant statue complete with its own platforms rises from the floor. Start jumping and Power Gripping until you reach the top, where you will go through a door to the left.Jump down to the left, jump some platforms until you reach another Blue Hatch, and go through it. Take a leap of faith to the left to land on or near Samus" ship; replenish your health and weapons, save your game, and head to the right until you reach the elevator back to Norfair.
Walkthrough: Part ThreeadvertisementBack to BrinstarAs soon as you arrive in Brinstar run to the right, where the wall will crumble, allowing access to a Chozo Statue at the end of the dumpy corridor. Jump into its arms to reveal the location of the Hi-Jump upgrade on the map. It"s in Norfair -- argh!Okay, so now that we have determined that running around in giant circles is going to be an integral part of this game, leave this room and make your way to the shaft on the left side of the map. Go up this bad boy until you reach a Blue Hatch on the right; go through here make your way to the right, into one of Brinstar"s super long shafts. Climb into the hidden passage on the right side of the wall and continue to the right. Go through the Blue Hatch in here, all the way to the right until you reach the elevator to Norfair.Norfair Yet Again (Hi-Jump)All right, now that we"re back in Norfair for the umpteenth time, go down the shaft and run through the Save Room in order to charge up your Speed Booster. Fire your beam as you go in order to open hatches without sacrificing your Boost. When you reach the end of the ledge, kneel to stop and then tap the A Button and hold right to fly through the walls. Shoot and zoom your way through the hatch and into the next room, where the sheer speed of the Speed Booster will destroy the blocks in the floor, allowing the exploration of a new area. Woo-hoo!In this lower area, go into the room on the left and clear all of the enemies out as you make your way to the far left side. Run to the right to charge your Boost, blast through the hatch, and destroy the blocks in the next shaft over. Proceed to the left, vaporizing everything in your path, open the Red Hatch with a Missile (duh), and go inside the room to take the ever-useful Hi-Jump.A new area can be accessed by rolling under the Chozo Statue, but the hot air here will basically melt you, so don"t even try navigating the area. Instead, keep this in mind for later and leave the room the way you came. Once in the bubbly shaft, put the Hi-Jump to use in order to grab the Missile Tank to the right (unless you found an alternate method of acquiring this tasty treat) and fall to the bottom of the shaft. Go through the second hatch from the bottom (the very bottom hatch leads to a dead end at the moment) to find another Chozo Statue. Rolling into its hands will not only restore your health and Missile supply, but it will show you the location of the much needed Varia Suit, which just happens to be in the upper reaches of Brinstar. Now that you have this valuable information go back to Brinstar.Brinstar (Varia suit)Brinstar, once more, with feeling! When you reach Brinstar, climb up the long shaft on the right and go through the hatch at the top right. In this pipe filled room (yeah, you remember being here earlier, don"t you?), roll through the very top pipe, and roll to the other side. You"ll reach a creepy pulsating barrier which you can"t destroy yet. Instead jump to the ledge above the barrier where you can see another pipe at the top - morph into a ball and roll through the pipe, then go through the door on the other side. Save your progress in the Save Room.Go back outside the save room via the door on the left (the door you came in through). Shoot the ceiling to reveal a hidden path and climb into it. Proceed upward and go into the hatch to the left. Two creepy barriers block the path, but wait! Watch in awe as the space parasites eat them away in their quest to feed off of you. When the barriers are gone, destroy the parasites with some trusty Bombs and advance to the left. Jump up and roll into the path near the ceiling, where you will eventually fall on a breakaway block. Jump up and off of it quickly and continue to the left in order to avoid certain acid death. When you reach the other side, you will have to deal with another creepy, pulsating barrier. Watch the parasites chow down, get rid of them, and open the Red Hatch. Go inside and get that Varia Suit!When you leave the room, drop into the acid pool (now that you can handle it), and bomb through the floor to reveal a narrow passage. Roll through it, all the way to the left to grab an Energy Tank #5.Go back through the small shaft and into the Save Room on the right to save your progress. Exit through the hatch on the right and drop into the depths of the acid to see a creepy barrier blocking your path. Look up and you"ll see there are a few destructable blocks just below the surface of the acid. Destroy them, then go back out of the acid and head to the right above the acid pool. You"ll come to a movable gate: blast the red stripe so it raises, then collect some parasites on Samus. Don"t worry about Samus, she"s a badass so she"s not bothered by the parasites swarming her. Bring the parasites back to the creepy barrier and the parasites will destroy it and Samus can pass through.Go through the door, down the shaft, and into the hatch just above the Map Room. If you have not defeated the King Worm yet, you will go for another round in this corridor. Either way, keep going left, grab the Missile Tank below the middle corridor if you haven"t done it already, and drop down the right shaft (of the two large vertical shafts in the center of Brinstar). For those of you who still have yet to defeat the King Worm, it will appear for a final showdown in the long corridor leading to Norfair. If you do not defeat it here, you will lose out on the Charge Beam and a 100% completion rate. Regardless of if you have or have not defeated it, continue to the right and go back down to Norfair.Norfair (Super Missiles, Wave Beam, Unknown Item #3)Norfair, once more...without much feeling. Now that you are back in Norfair, go right, through the Save Room and up the shaft to the right. Go into the second room from the top (on the left hand side) in order to grab a Missile Tank. Grabbing this item was previously unheard of, as going into this room without the protection of the Varia Suit meant bad things. When you are ready to continue onward, go back down the shaft, through the Save Room, and charge up your Speed Booster in order to break through the barriers in the floors, as you did during your previous visit to this area. Go back to where you got the Hi-Jump and roll into the passage under the Chozo Statue. Continue on to the left, bombing the floors and hopping onto the paths until you reach the hatch on the other side.In the next room, Bomb and shoot the rocks obstructing the path in order to make an even surface. From the right side of the room, once all the obstacles are cleared, charge up your Speed Booster and take off to the left. When the time is right, jump, and you will blast through a barrier and land on the far ledge. Go left through the hatches until you find yourself in a Save Room. From here, you have two options to reach the next area: you can take the high road or the low road. For speed purposes, the route outlined here is the low road, as it is a more direct path, but either way is fine. Hell, take both if you want.advertisementOkay, so exit the Save Room from the left and Bomb through the floor between the two Blue Hatches to open up a path. Drop down, through the Blue Hatch to the left, and blast your way past the critters emerging from pipes. Exit this corridor to find yourself across from a Red Hatch. Shoot the hatch, go into the new room, and download the Map Data for Norfair. After you have the map, return to the corridor and drop into the lava pool; as soon as you jump in, the substance will disappear -- it was all a clever illusion, designed to keep you out of here! Anyway, destroy the floors as needed and go through the hatch to the right and start hopping from column to column, destroying your foes as you go, and avoiding the lava. When you reach the one screen wide room on the other side, destroy the floor and fall into a corridor with hot air. Make your way to the right, and fire at the wall to collect a Missile Tank. Keep going to the right to grab another Missile Tank, and turn around, going back the way you came.Continue through the Blue Hatch to the right of where you bombed the floor and go through the strange corridor. Destroy the vines with your beam, and use Missiles to take down the ones that have monsters tangled in them. In the next area, destroy the floor above the lava pit and drop into another illusion. Drop to the bottom of the shaft and go left, through the Blue Hatch. In this next room, destroy the wall (and the creature, too) and proceed to the left until you come to a Red Hatch. Open the door, go inside, and take the Wave Beam for yourself. Exit the area and go back the way you came. Use your new weapon to take on the creature in here through the wall, without being hurt! Yay! Go back up the short shaft and enter the Save Room to the right. When you are ready, exit through the hatch to the right; run to the right, blasting as you go in order to break some blocks while charging your Speed Booster. This will allow you to break through the Booster Blocks near the end of the hallway to get to the next room.As soon as you set foot in the next passage, the hatch you came through will turn Gray, indicating that you can"t leave until you meet some kind of requirement. Look at the giant larva and wonder what that requirement could be. Go to the path under the larva and use your Wave Beam to blast the ugly thing without taking any damage. When the creature is gone, jump up to where it was and go down the path it previously obscured. Dropping into the next area, you will face an angry larva that will charge at you and attempt to smother you in its space larva fatty tissue. Blast the beast to make it back up and plant some Bombs on the ground as you roll back to the left. As the beast charges, the Bombs will detonate and hurt it. Continue this process until the worm is gone; when it leaves its crusty shell behind, shoot the ceiling above to reveal Energy Tank #6 and jump up (in Ball Form) to take it. Once you have the tank, go to the left corner (where the larva cornered you) and run to the right, blasting as you go in order to open the hatch. In the next room, your Speed Boost will be charged, allowing you to zip through the floor to a Missile Tank. Drop to the bottom of the corridor and save your game. Head left through the Save Room, shooting your way through tentacles as you go. When you reach the end of the path, go into Ball Form and drop through the floor, to a trapped larva.Boss Fight: Larva Ensnaring Space Tentacles So, this really isn"t your typical boss, but listen up. See that Ripper floating around the room in a strange pattern? That armored bugger is your key to success, as your objective is to free the larva from the six tentacles that have it trapped. There are three tentacles on each side, making this quite simple, if you follow. Avoid the projectiles being shot out, or shoot them for Energy and Missiles. When the Ripper is positioned just right, use your beam to freeze him in place; jump on top of him and jump up once more to blast the tentacles with your trusty Missiles. Make sure you pay attention to the Ripper, as he will thaw out pretty quickly, causing you to repeat the process.When the tentacles are gone, the larva will fall through the floor, revealing a passage that leads to the right. Taking this path will lead you to Ridley"s lair, but you will not get far without Super Missiles, as there is a Green Hatch down here. But still go down to Ridley, then go back to up to Norfair and go left, back to where you freed the larva from the evil tentacles. Drop into the tunnel and make your way left this time. In the next chamber, there will be several small eggs strewn about. Breaking the leftmost egg will trigger a boss battle.Boss Fight: Imago Imago is a gigantic space bee that hates you and would like to have you for lunch. All it does is fly around the room, from left to right, right to left. It does shoot projectiles at you, as all bosses do, but defeating it shouldn"t be a problem. Simply chase it around and hit its stinger with charged beam shots or Missiles until it expires.When the Imago is defeated, its stinger will fall off, leaving the rest of the body to crash into the left wall, granting access to your very first tank of Super Missiles. Run through the Gray Hatch to the right, and use a Missile to blast a hole in the floor. Drop down to the Green Hatch and crack it open with one of those Super Missiles of yours. Proceed to the left, past the enemies (which can be avoided by bombing through the floor and following a narrow passage) and blast through the Red Hatch on the other side. In the small chamber, Energy Tank #7 sits across the way, with not a single obstacle in sight. If you try to run across the room in a straight shot, the floor underneath you will break, and you will have to work your way back up from a neighboring shaft. Instead, run four blocks in, to the middle of the room, and then jump across from there. If done correctly, you should be able to grab the edge of the floor and take the Energy Tank.After you get the Energy Tank, go left, down the shaft, and into the first hatch on the left to use a Save Room to your advantage. When you are ready to continue, leave the room and continue down the shaft in Ball Form. Grab the Missile Tank on the way down and then blast open the Red Hatch to gain access to the Map Room. Download the Ridley Map Data and go through the hatch to the right. In this next corridor there is a long, flat walkway along the ceiling; blast through the breakable blocks to the walkway and go all the way to the right. Run left to charge up your Speed Booster and fire at the blocks to break them. Kneel to stop at the ledge and jump down. Blast open the hatch and tap the A Button to hop up, then hold left to blast off through the doorway and into the Map Room. Blast the hatch in here while maintaining your charge (this may take a little practice) and run into the next room, where the Booster Blocks will be destroyed and a secret area revealed.Once in the secret area, start running to the left to charge up your Speed Booster again. Shoot the blocks as you go, and when you reach the corner, kneel down to stop, and then tap the A Button to fly upward and through a pair of blocks. From this corner, roll right, drop down, and straighten yourself out as you fall to grab the ledge on the right. Pull yourself up, roll to the right again, and fall once more. When you reach the collapsing block, quickly straighten yourself out and jump up to the next ledge. Roll to the right and tap Up to straighten as you fall; grab onto the ledge to the left and aim a Missile at the block on the right. Jump into the newly opened passage and go right. The floor will collapse one block left of the rightmost corner. Straighten out as you fall, fire to the left to clear the ledge, and then grab the ledge and roll up to it in one motion. Roll left quickly to grab Missile Tank number 1 of 2 in this area.When you roll to the midsection of the path holding the first Missile Tank, the floor will collapse under you. Straighten out as you drop and hang onto the ledge; aim upward and fire a couple of Missiles to obliterate the blocks above you. Jump up, grab the ledge, and then fire more Missiles above to break into the next path. Keep doing this until you reach Missile Tank number 2. Now that you have your goodies, go back up to the room with the long walkway along the ceiling and proceed to the right to collect yet another Missile Tank. Go through the hatch and into a Save Room to record your progress.A really tricky series of Boosts will allow you to blast your way into a secret area in the shaft outside of the Save Room, so read carefully. Go back to the lower corridor right outside of the Save Room and run to the left along the passage near the ceiling. Now, run right to charge up your Speed Booster and fire at the breakable blocks as you run. Kneel down to stop and the edge, jump down, and blast that hatch leading to the Save Room open. Once inside the Save Room, blast the hatch on the other side, tap A and hold Right to blast off into the next room. As soon as the screen turns black to load up the next room, hit down in order to stop while maintaining your charge. Climb up to the third platform and blast through the wall, into a new area. Getting this right the first time is a little difficult, but be patient -- you will get it eventually.In the secret hallway, charge your Speed Booster once more and use it to blast through a hole in the ceiling. When you reach the top, go open the hatch to the right and run inside to charge up the Speed Booster yet again. Open fire on the blocks as you run (first with your normal beam and then with a Missile at the last block) and jump through the blocks to the right in order to collect another Missile Tank. Keep in mind that this, too, is easier said than done.Getting the Missile Tank in the lower region of this unmapped area is n


 8613371530291