
metroid zero mission parts of the map flash price
Metroid: Zero Mission(メトロイドゼロミッション, Metoroido Zero Misshon is a remake of Metroid series and replacing the former in the canon. It was designed to "retell the story of Samus Aran"s original mission".
Zero Mission was developed by Nintendo"s internal team, Nintendo Research & Development 1, under the direction of Yoshio Sakamoto. Zero Mission features the same plot as the original Metroid, but is slightly modified with the addition of new areas.
The game was re-released on the Wii U eShop between 2014 and 2016 in all regions. Sales of Zero Mission on the eShop increased following the announcement of Dread"s release.
Planet Zebes...I called this place home once, in peaceful times, long before evil haunted the caverns below. Now, I shall finally tell the tale of my first battle here.... My so-called Zero Mission.
In the year 20X5 of the Cosmic Calendar, the Space Pirates attacked a deep-space research vessel and seized capsules containing samples of an unknown species that had been discovered on planet SR388. The Space Pirates" objective was to acquire these life-forms; known simply as Metroids, these floating organisms were incredibly dangerous as they could latch onto any other organism and drain its life-energy. Furthermore, it was possible to replicate Metroids in vast numbers by exposing them to beta radiation. The hypothesis that the Metroids were responsible for one of the greatest mysteries in the entire galaxy — the extinction of all life on planet SR388 — was generally accepted as fact.
If the Space Pirates were able to breed the Metroids and use the creatures as biological weapons, the destruction of all galactic civilization would be inevitable. After a desperate search, the Federation Police discovered the Space Pirates" base of operations on the planet Zebes. They launched a full assault on the planet, but the Pirate resistance was strong, forcing the Federation Police to retreat. Meanwhile, in a room hidden deep within the center of the Pirate fortress, the preparations for multiplying the Metroids were steadily progressing.
As a last resort, the Federation Police decided to send a lone Bounty Hunter to penetrate the Pirate base and destroy Mother Brain, the mechanical life-form that controlled the fortress and its defenses. Samus Aran, considered by many to be the greatest of all Bounty Hunters, was chosen for the mission. Samus had successfully completed numerous missions that others had thought impossible, making her an excellent candidate. However, despite her accomplishments, much of Samus" true identity remained wrapped in mystery.
Samus Aran eventually landed on the surface of Zebes and began exploring the planet; it was, in fact, the same planet where she had been raised as a child by the Chozo. Eventually, after making it through all of the various caverns and regions of the planet, Samus took down Mother Brain"s generals, the gargantuan Kraid and her nemesis, Ridley, before finding and destroying Mother Brain herself. However, upon leaving the planet after her successful mission, Space Pirate vessels attacked her Starship. The ship crash-landed back on Zebes near the Space Pirate Mother Ship; Samus survived, but her Starship and Power Suit were destroyed, leaving her virtually defenseless.
While searching the Space Pirate Mother Ship for a way to escape, Samus discovered the nearby ruins of an ancient Chozo temple known as Chozodia. There, she passed the Ruins Test and gained a new and more powerful Power Suit. With her Power Suit restored, Samus returned to the Space Pirate Mothership, where she eventually encountered Mecha Ridley, a robot crafted by Ridley in his own image, that had taken command of the ship during Ridley"s absence. Upon defeating it, Samus was able to successfully escape the planet (and the self-destructing Mother Ship) by using one of the Escape Ships. All of the Space Pirates" research on Metroids was destroyed in the explosion.
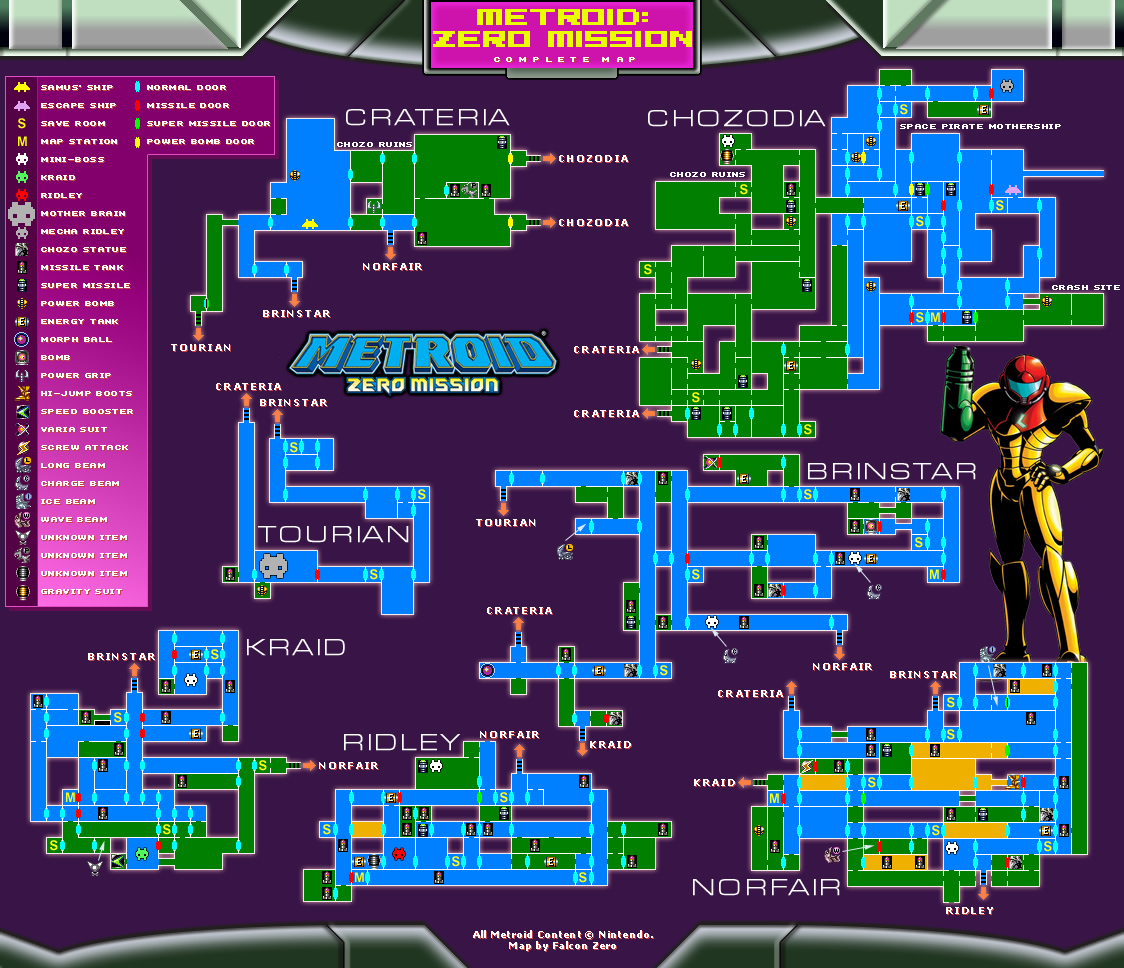
As a remake of Metroid, Zero Mission"s general layout is very similar to the original. However, new items (such as the Power Grip, Gravity Suit, Charge Beam, Plasma Beam, Speed Booster, Space Jump, Super Missiles, and Power Bombs), mini-bosses, and areas (such as Crateria, Chozodia, and the Space Pirate Mother Ship) have been added. In addition to the new equipment, the Ice and Wave Beams can now stack, and will no longer remove each other from Samus"s arsenal. The game is also visually similar to Zero Mission can be a linear game, much of it can be completed in a non-linear fashion via Sequence Breaking making it possible to complete the game by collecting as little as 9% of all items. As with most Metroid games, the player can save in Save Rooms and can open a map to help with navigating around the planet.
Zero Mission also differs from the original Metroid and the other Metroid games in that the player can play as Samus without her Power Suit (not counting the Justin Bailey password in the NES version of the original), making her more vulnerable to damage. This form is known as Zero Suit Samus. This marks the second time (the first was in the first Metroid) she has been playable during the course of normal game play without her suit, whereas in each previous Metroid game, seeing Samus without her armor has been a feature in one or more of the game"s endings or an easter egg.
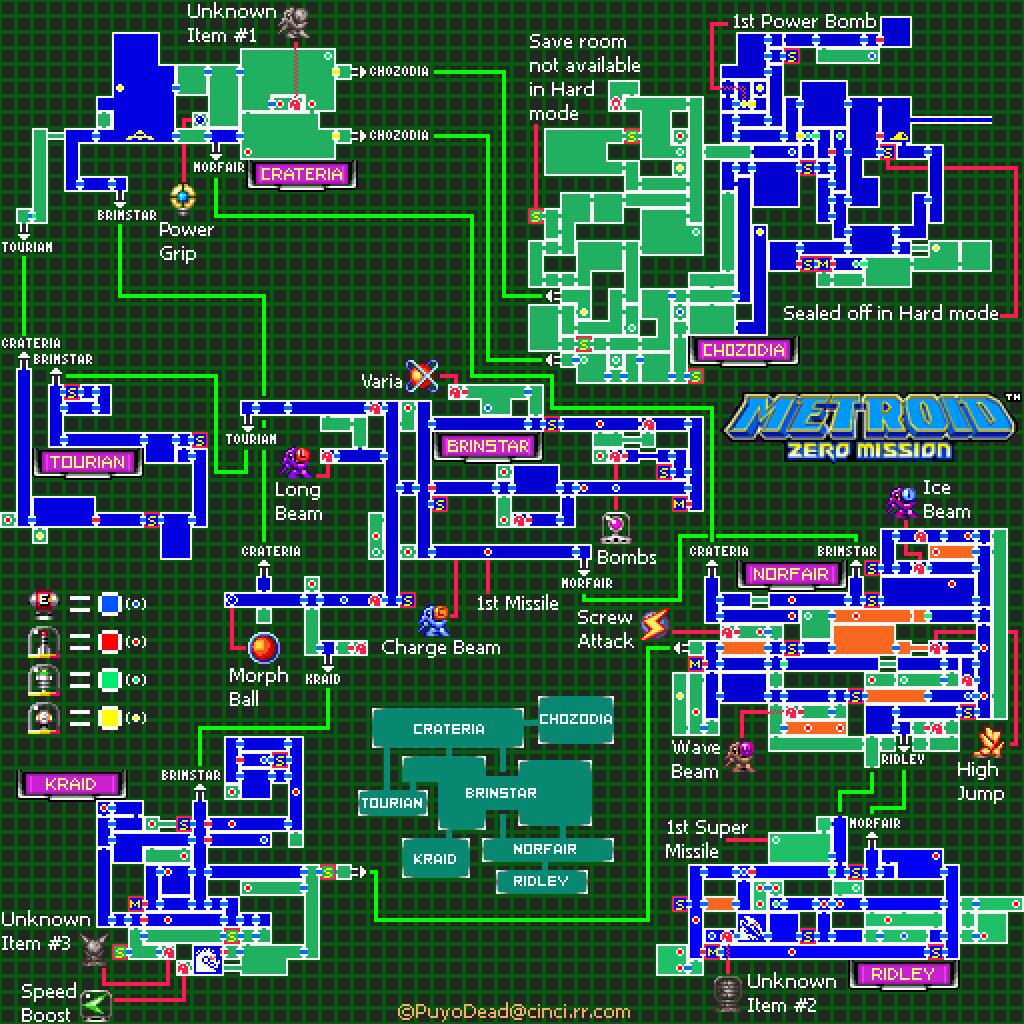
If Normal Mode is completed, then Hard Mode is unlocked. In Hard Mode, damage taken is doubled, enemies are often multiplied or replaced with tougher versions of themselves, and upgrades are less effective -- Energy Tanks only add 50 energy to Samus"s total instead of 100, normal Missile Tanks add 2 rather than 5 Missiles, and Super Missile Tanks and Power Bomb Tanks add just a single of each to Samus"s supply. Additionally, there are some minor map changes, most notably the removal or blockage of certain Save Stations.
If Zero Mission is connected to Game Boy Advance Game Link cable, it unlocks a Gallery showcasing many images of Samus from Metroid Fusion that were only available in the Japanese version of Fusion. Also, images of her past are displayed graphically telling her story from the raid of K-2L, her home planet, to her training with the Chozo.
Pressing Up, Left, Right, and Down on the Start Game option of a file that has been beaten in Normal Mode unlocks Time Attack Mode, which is set on Normal difficulty but will save the best time for clearing the game when using this setting. Time Attack is also available for Hard Mode by starting a new game on the Hard difficulty, exiting it, then entering the Time Attack mode.
If Time Attack Mode is cleared, a menu in the options category is unlocked that will display the best Time Attack times for both 100% cleared and less than 100% cleared.
Unused sprites for Crocomire exist in the internal data of Zero Mission. The sprites have ambient animations but Crocomire is incapable of moving, attacking, or taking damage. It is unfinished and has no death animations, indicating that it was going to be included but was later dropped. It is notable that this rendition of Crocomire does not have its signature rough skin, possibly indicating that the injury was intended to be inflicted in this game.
Zero Mission is the first game that has part of the story take place while playing without the Power Suit (discounting the original Justin Bailey as an unlockable cosmetic variant).
An unused ability ability to toggle items on and off, much like Zero Mission through datamining. Unlike in Super Metroid, suits cannot be disabled, and the Bombs and Power Bombs can only be disabled when the Morph Ball is. Additionally, Red Hatches would have taken five Missiles to open (as in past games) instead of the single Missile required in the final version of the game. The ability to toggle the items on and off can be used with a cheating device or hacking.
The game makes a cameo appearance in an episode of House M.D. titled "Occam"s Razor", where House can be seen playing it during several parts of the episode. Notably, the sound effects are different, possibly due to copyright issues. There are mentions of "Level 4" and "space bunnies", and apparently turning into the Morph Ball in a Chozo Statue"s hand causes the player to lose.
^ Darren. Shinesparkers. "Metroid tops Wii U eShop best sellers." June 25, 2021. Retrieved June 26, 2021. https://shinesparkers.net/metroid-tops-wii-u-eshop-best-sellers/
^ Shinesparkers (Shinesparkers). "An update from the eShop sales chart in the United Kingdom as it stands, on 11th October 2021. ¶ SWITCH: #1 Metroid Dread ¶ WII U: #1 Metroid Fusion #2 Metroid Zero Mission #7 Metroid Prime Trilogy #9 Super Metroid ¶ 3DS: #3 Metroid: Samus Returns" 11 October 2021 8:02 a.m. Tweet. https://twitter.com/Shinesparkers/status/1447533111408041987
^ Sakurai, Masahiro (Sora_Sakurai). "2004年のきょう『メトロイド ゼロミッション』(Metroid: Zero Mission)発売!! 一作目のリメイク作品ですが、ゼロスーツサムスが現在の形で初登場します。 その呼び名は『スマブラX』登場時に決まりました。本来ゼロスーツサムスは強いものではなく、逃げたり隠れたりするのが主体。 #スマブラSP" 27 May 2021 2:00 a.m. Tweet. https://twitter.com/Sora_Sakurai/status/1397794697242873856
Walkthrough: Part OneadvertisementBrinstar (Morph Ball, Long Beam, Bombs, Missiles)After our heroine lands on the planet Zebes, you will take control of her in this epic mission to foil the plans of the evil Space Pirates. That said, make your way left, blasting the Zoomers as you go. Jump over the rock formation and continue until you see a giant red ball on a pedestal. Claim the Morph Ball as your own, blast some Zoomers out of your armored way, and roll under the rock formation. Continue right until you reach your very first Blue Hatch. Blast it open and head into the tiny room, where a lone Zoomer is lurking. Shoot it, and then the rocks it was crawling on. Shoot the floor to reveal that it is made out of Bomb Blocks; since you don"t have Bombs yet, go through the next hatch, into a rocky cavern. Bat-like creatures, or Skrees, will be on the ceiling in here; if they spot Samus they will drop down and drill a hole in the ground near her until they explode, causing a fairly unwanted bit of damage. Run under them until you reach a narrow passage. Now, before you get all ballsy to go under it, look at your map, which will indicate the there is an upgrade in this area. Jump up and shoot the ceiling until you reveal Energy Tank #2. Obviously you cannot reach it just yet, but you can most certainly keep this area in mind for later. Roll under the narrow passageway and run up the Chozo Statue that is blocking your path. Jump into its welcoming hands to refill your energy and reveal the location of your next power suit upgrade. The statue will sit down, allowing you to continue toward your new goal. Run through the Blue Hatch and into the room across the way -- this is your very first Save Room, mate! Save your game and get ready to go back out into the wilderness.Start climbing up the shaft by way of hopping from platform to platform, blasting the Zoomers you meet out of your way. Eventually you will see an armored bug floating back and forth. This little bugger is called Ripper (like Giles back in his young and wild days, for all you Buffy fans) and he is impervious to everything, so avoid him and keep on climbing. Eventually you will see a Blue Hatch on the right side of the shaft, obstructed by a narrow passage filled with blocks. You won"t be able to get to the hatch until you have the Long Beam, so ignore it for now and keep on climbing until you reach a Blue Hatch on the left. Go through it, roll under the narrow passage, and avoid the Skrees as you make your way to the room on the left. Inside is a lone Chozo Statue, holding some kind of weird looking blob-thing. Shoot it to reveal the Long Beam, and take your prize. When you go back outside, you will be able to shoot the Skrees before they can rip into you, so go ahead and do that, as it will make you feel all warm and fuzzy inside. The narrow passage in which you initially rolled through is now blocked off by some blocks, so take the high road into the unknown.Shoot the rocks blocking your path, and climb upward until you reach a couple of Skrees hanging out on the ceiling. Shoot them down, and continue left before jumping up into a new area. Head into the Blue Hatch on the left and check out the giant, two-headed statue blocking the way to Tourian. Shoot at it and jump on it all you want -- it won"t budge. Head back outside and go right, avoiding the lava pools as you go. When you reach the very end of the corridor (which is home to a Gray Hatch), a creepy spider thing will jump from the ceiling, inflicting some major damage on contact. Blast the creepy bastard until it is no more, and blast through the hatch once it starts flashing. Jump into the welcoming hands of the Chozo Statue in this next room, and it will reveal the location of yet another Power Suit Upgrade that is seemingly in the middle of nowhere. When the statue sits down, continue to the right. This will bring you back to the long shaft you had to climb to in order to reach the Long Beam. Drop down, until you reach the previously inaccessible Blue Hatch to the right, blast a new path, and roll to the door.In the next cavern, you will come across a Zoomer and your very first Red Hatch, which you obviously cannot open just yet. Drop down and enter the Save Room on the right to record your progress before continuing down the proverbial Rabbit Hole. When you reach the very bottom of the area, go into the area on the right (the only place you can go). As you go toward the right, the room will begin to rumble -- surely, not a good sign. Shoot or avoid the Zebs flying out of the lava and continue right until you pick up your very first Missile Tank. With these babies in your possession, Red Hatches will be no problem, so go back to the left, where the ground will shake, and a really gross, really huge bug will emerge.Boss Fight: King Worm Defeating the King Worm is simple, really: just fire a Missile into its eye three times (when the eye is open), and that will not only kill the Worm, but it will give you the mighty useful Charge Beam. However, if you do not defeat the beast, it will run away and you will not get the Charge Beam just yet. If this happens, don"t worry -- it will be back later, in a different room. It moves between just two rooms - each time you fail to defeat it, it reappears in the alternate room.Go back the way you came, climbing up the platforms and blasting Zoomers until you reach the Red Hatch on the right. Use a Missile to blast it open, and go through the door. In the next tiny room, you will notice a swarm of space flies, which will do nothing short of bugger and annoy you (as well as take some of your health). Shoot them down and continue into the next cavern. Jump onto the platforms until you see a nest of space flies blocking your path. Blast them into oblivion so that they cannot annoy you anymore, and jump onto the ledge behind you (to the left of the screen). Another nest of space flies will be there, blocking the path to a missile tank. Destroy the nest, take the missiles, and head to the right once more. Destroy another nest of flies and drop down to a Blue Hatch on the other side of it. Make your way into the next cavern, where a wall of rocks will block your way. Shoot the rocks and the Skrees and go onto the other side of the rocks. Crouch down and shoot the rock to reveal a hidden Missile Tank. Take it and continue to the right; if you did not defeat the King Worm, the ground will tremble before it pops up to annoy you once more. Remember: three missiles to the open eye is all it takes to get rid of it.Continue to the right and pick up Energy Tank #1 along the way as you avoid some more lava pools and Skrees. Drop to the bottom of the shaft here and blast the Red Hatch with a missile in order to open it. Go through it to reach the self-explanatory Map Room. Download the map of Brinstar, leave the room, and start your climb upward. Blast through the hatch on the left, and enter the leftmost room to save your game. When you are ready to go back out into the world, blast the Zoomers and climb up the short shaft. Enter the door on the left and roll through the narrow passage until you come across a Red Hatch. Blast it open to claim your Bombs and refill your health and weapons if needed.Roll under the Chozo Statue and set off a couple of Bombs in order to roll into a secret room. Explode the blocks and set some Bombs to launch yourself from platform to platform until you reach a hearty tank of Missiles. Go back out the way you came, and take note that the previously Blue Hatch that lead into this area has now turned Grey. Bomb the wall to release an army of space parasites. Roll into ball form and plant some Bombs to get rid of the nasty little buggers (if four of them are on you at once they start to drain your health, so dispose of them quickly) and the door will flash, letting you know that you are free to go.Retrace your steps to area near the Save Room, obliterating the Zoomers as you go. Go back through the corridor where you found your Energy Tank; when you reach the small room with past the Skrees, set a Bomb to destroy the blocks in the floor and drop into this new area. Get rid of the creepy crawling monsters as you drop to the bottom of this cavern. Go through the door and blast away at the creatures flying toward you before continuing left to a Red Hatch. Shoot it open to reveal a standing Chozo Statue, who is waiting to embrace Ball Samus. Hop into its claw-like hands to reveal that the next goal to work toward is somewhere in Norfair.Make your way back to the room with the space flies and their nests, exterminating the critters as you go. When you reach the small room leading to this area, break through the floor and drop down to see a Missile Tank in-between two platforms and a Bomb Block to the right. Getting this upgrade will require some speed as well as patience, b/c not only will the Bomb Block respawn after about 30 seconds of it being destroyed, but space flies will annoy you to death the entire time you are in here (if you kill them they just keep on coming to make getting these Missiles hell). Another, easier way to go about getting this Missile Tank is to come back once you have acquired the Power Grip upgrade. Regardless of what you decided to do concerning the Missiles, make your way left, back to the vertical shaft, save your game, and get ready to do a little exploring before going to Norfair.From the vertical shaft, make your way north until you come to a Blue Hatch all the way at the top of the area. Go through it, blast through some baddies, and roll under the strange missile shaped contraption. Jump the gap and blast the next missile shaped thing in order to make it rise. Roll under it and make your way to a bunch of pipes. Blast up via your trust Bombs to the top-most pipe and roll through it. Make your way to the right, through a Save Room, and past some Zeb spewing pipes until you come to a Missile Tank. Continuing right will only lead to a dead end, so go back the way you came, down to the very bottom of the shaft, and through the door to the left. Roll into the Chozo"s hands, if need be, and roll under the narrow passage to the left. Shoot the Skrees down and reveal Energy Tank #2 in the ceiling. Roll into Ball Form directly under the tank and set Bombs in quick succession, launching Samus upward until she makes contact with the upgrade. Now that your energy capacity has been increased, you can safely make your way back through the caverns of Brinstar, and into Norfair.NorfairAfter viewing a cut scene of the uber-creepy Mother Brain viewing Samus through what looks way too much like the Eye of Saruman, go into the room to the right to save your game. Continuing right through the Save Room will bring you to a room that you cannot advance in just yet, so go back to the elevator shaft and go through the hatch on the left. Go through the lava filled room, blasting the Gamets and Novas as you go until you reach a Missile Tank above. Use your Bombs to launch upward and collect the tank. Keep going left, blasting the fire-bat things (called Melia) as you go. When you reach the rock wall, bomb your way through it and roll through the narrow passage to the other side. Keep going until you reach an elevator shaft; go up the elevator to take a quick detour through Crateria.CrateriaGo to the right, shooting through the rock wall, and through the hatch into a room half filled with water. Drop into the water and bomb through the wall on the left. Roll through and shoot through the rocks (and the big space shark) until you reach a Missile Tank. Claim your prize and then go back to where you bombed through. Wait for the breakable block to reform and then use it to jump out of the water. Jump to the platform on the right, jump right once more, and then to the left. Bomb through the rocks and make your way left, into the Chozo Ruins.advertisementChozo Ruins (Unknown Item #1 and Power Grip)Make your way right, as that is the only direction you can go at the moment, until you reach a room with a Missile Tank under a gigantic block that you cannot destroy. Continue to the right until you see a Chozo Statue; blast the thing in its hand to reveal Unknown Item #1, and take what"s yours. Upon claiming this item, the giant blocks will begin to glow, signaling that they can now be destroyed. Get rid of the blocks, take the Missile Tank, and go back through the door. Destroy the block leading to the surface of the ruins and go left, jumping platform to platform until you reach the giant head, which has an entryway in its open beak. Go through the door and as you walk forward, the floor under you will crumble, dropping Samus into a very long, very wide space. Now that you are apparently stuck in the middle of nowhere, go to the wall on the left and shoot it to reveal a hidden path. Climb in and shoot some more blocks out of your way before going into Morph Ball mode. Use a Bomb to blast yourself up and to the left, and quickly roll through the narrow passage into a room where a giant statue holds the Power Grip. Leave this room and watch in awe as a giant statue complete with its own platforms rises from the floor. Start jumping and Power Gripping until you reach the top, where you will go through a door to the left.Jump down to the left, jump some platforms until you reach another Blue Hatch, and go through it. Take a leap of faith to the left to land on or near Samus" ship; replenish your health and weapons, save your game, and head to the right until you reach the elevator back to Norfair.

Walkthrough: Part ThreeadvertisementBack to BrinstarAs soon as you arrive in Brinstar run to the right, where the wall will crumble, allowing access to a Chozo Statue at the end of the dumpy corridor. Jump into its arms to reveal the location of the Hi-Jump upgrade on the map. It"s in Norfair -- argh!Okay, so now that we have determined that running around in giant circles is going to be an integral part of this game, leave this room and make your way to the shaft on the left side of the map. Go up this bad boy until you reach a Blue Hatch on the right; go through here make your way to the right, into one of Brinstar"s super long shafts. Climb into the hidden passage on the right side of the wall and continue to the right. Go through the Blue Hatch in here, all the way to the right until you reach the elevator to Norfair.Norfair Yet Again (Hi-Jump)All right, now that we"re back in Norfair for the umpteenth time, go down the shaft and run through the Save Room in order to charge up your Speed Booster. Fire your beam as you go in order to open hatches without sacrificing your Boost. When you reach the end of the ledge, kneel to stop and then tap the A Button and hold right to fly through the walls. Shoot and zoom your way through the hatch and into the next room, where the sheer speed of the Speed Booster will destroy the blocks in the floor, allowing the exploration of a new area. Woo-hoo!In this lower area, go into the room on the left and clear all of the enemies out as you make your way to the far left side. Run to the right to charge your Boost, blast through the hatch, and destroy the blocks in the next shaft over. Proceed to the left, vaporizing everything in your path, open the Red Hatch with a Missile (duh), and go inside the room to take the ever-useful Hi-Jump.A new area can be accessed by rolling under the Chozo Statue, but the hot air here will basically melt you, so don"t even try navigating the area. Instead, keep this in mind for later and leave the room the way you came. Once in the bubbly shaft, put the Hi-Jump to use in order to grab the Missile Tank to the right (unless you found an alternate method of acquiring this tasty treat) and fall to the bottom of the shaft. Go through the second hatch from the bottom (the very bottom hatch leads to a dead end at the moment) to find another Chozo Statue. Rolling into its hands will not only restore your health and Missile supply, but it will show you the location of the much needed Varia Suit, which just happens to be in the upper reaches of Brinstar. Now that you have this valuable information go back to Brinstar.Brinstar (Varia suit)Brinstar, once more, with feeling! When you reach Brinstar, climb up the long shaft on the right and go through the hatch at the top right. In this pipe filled room (yeah, you remember being here earlier, don"t you?), roll through the very top pipe, and roll to the other side. You"ll reach a creepy pulsating barrier which you can"t destroy yet. Instead jump to the ledge above the barrier where you can see another pipe at the top - morph into a ball and roll through the pipe, then go through the door on the other side. Save your progress in the Save Room.Go back outside the save room via the door on the left (the door you came in through). Shoot the ceiling to reveal a hidden path and climb into it. Proceed upward and go into the hatch to the left. Two creepy barriers block the path, but wait! Watch in awe as the space parasites eat them away in their quest to feed off of you. When the barriers are gone, destroy the parasites with some trusty Bombs and advance to the left. Jump up and roll into the path near the ceiling, where you will eventually fall on a breakaway block. Jump up and off of it quickly and continue to the left in order to avoid certain acid death. When you reach the other side, you will have to deal with another creepy, pulsating barrier. Watch the parasites chow down, get rid of them, and open the Red Hatch. Go inside and get that Varia Suit!When you leave the room, drop into the acid pool (now that you can handle it), and bomb through the floor to reveal a narrow passage. Roll through it, all the way to the left to grab an Energy Tank #5.Go back through the small shaft and into the Save Room on the right to save your progress. Exit through the hatch on the right and drop into the depths of the acid to see a creepy barrier blocking your path. Look up and you"ll see there are a few destructable blocks just below the surface of the acid. Destroy them, then go back out of the acid and head to the right above the acid pool. You"ll come to a movable gate: blast the red stripe so it raises, then collect some parasites on Samus. Don"t worry about Samus, she"s a badass so she"s not bothered by the parasites swarming her. Bring the parasites back to the creepy barrier and the parasites will destroy it and Samus can pass through.Go through the door, down the shaft, and into the hatch just above the Map Room. If you have not defeated the King Worm yet, you will go for another round in this corridor. Either way, keep going left, grab the Missile Tank below the middle corridor if you haven"t done it already, and drop down the right shaft (of the two large vertical shafts in the center of Brinstar). For those of you who still have yet to defeat the King Worm, it will appear for a final showdown in the long corridor leading to Norfair. If you do not defeat it here, you will lose out on the Charge Beam and a 100% completion rate. Regardless of if you have or have not defeated it, continue to the right and go back down to Norfair.Norfair (Super Missiles, Wave Beam, Unknown Item #3)Norfair, once more...without much feeling. Now that you are back in Norfair, go right, through the Save Room and up the shaft to the right. Go into the second room from the top (on the left hand side) in order to grab a Missile Tank. Grabbing this item was previously unheard of, as going into this room without the protection of the Varia Suit meant bad things. When you are ready to continue onward, go back down the shaft, through the Save Room, and charge up your Speed Booster in order to break through the barriers in the floors, as you did during your previous visit to this area. Go back to where you got the Hi-Jump and roll into the passage under the Chozo Statue. Continue on to the left, bombing the floors and hopping onto the paths until you reach the hatch on the other side.In the next room, Bomb and shoot the rocks obstructing the path in order to make an even surface. From the right side of the room, once all the obstacles are cleared, charge up your Speed Booster and take off to the left. When the time is right, jump, and you will blast through a barrier and land on the far ledge. Go left through the hatches until you find yourself in a Save Room. From here, you have two options to reach the next area: you can take the high road or the low road. For speed purposes, the route outlined here is the low road, as it is a more direct path, but either way is fine. Hell, take both if you want.advertisementOkay, so exit the Save Room from the left and Bomb through the floor between the two Blue Hatches to open up a path. Drop down, through the Blue Hatch to the left, and blast your way past the critters emerging from pipes. Exit this corridor to find yourself across from a Red Hatch. Shoot the hatch, go into the new room, and download the Map Data for Norfair. After you have the map, return to the corridor and drop into the lava pool; as soon as you jump in, the substance will disappear -- it was all a clever illusion, designed to keep you out of here! Anyway, destroy the floors as needed and go through the hatch to the right and start hopping from column to column, destroying your foes as you go, and avoiding the lava. When you reach the one screen wide room on the other side, destroy the floor and fall into a corridor with hot air. Make your way to the right, and fire at the wall to collect a Missile Tank. Keep going to the right to grab another Missile Tank, and turn around, going back the way you came.Continue through the Blue Hatch to the right of where you bombed the floor and go through the strange corridor. Destroy the vines with your beam, and use Missiles to take down the ones that have monsters tangled in them. In the next area, destroy the floor above the lava pit and drop into another illusion. Drop to the bottom of the shaft and go left, through the Blue Hatch. In this next room, destroy the wall (and the creature, too) and proceed to the left until you come to a Red Hatch. Open the door, go inside, and take the Wave Beam for yourself. Exit the area and go back the way you came. Use your new weapon to take on the creature in here through the wall, without being hurt! Yay! Go back up the short shaft and enter the Save Room to the right. When you are ready, exit through the hatch to the right; run to the right, blasting as you go in order to break some blocks while charging your Speed Booster. This will allow you to break through the Booster Blocks near the end of the hallway to get to the next room.As soon as you set foot in the next passage, the hatch you came through will turn Gray, indicating that you can"t leave until you meet some kind of requirement. Look at the giant larva and wonder what that requirement could be. Go to the path under the larva and use your Wave Beam to blast the ugly thing without taking any damage. When the creature is gone, jump up to where it was and go down the path it previously obscured. Dropping into the next area, you will face an angry larva that will charge at you and attempt to smother you in its space larva fatty tissue. Blast the beast to make it back up and plant some Bombs on the ground as you roll back to the left. As the beast charges, the Bombs will detonate and hurt it. Continue this process until the worm is gone; when it leaves its crusty shell behind, shoot the ceiling above to reveal Energy Tank #6 and jump up (in Ball Form) to take it. Once you have the tank, go to the left corner (where the larva cornered you) and run to the right, blasting as you go in order to open the hatch. In the next room, your Speed Boost will be charged, allowing you to zip through the floor to a Missile Tank. Drop to the bottom of the corridor and save your game. Head left through the Save Room, shooting your way through tentacles as you go. When you reach the end of the path, go into Ball Form and drop through the floor, to a trapped larva.Boss Fight: Larva Ensnaring Space Tentacles So, this really isn"t your typical boss, but listen up. See that Ripper floating around the room in a strange pattern? That armored bugger is your key to success, as your objective is to free the larva from the six tentacles that have it trapped. There are three tentacles on each side, making this quite simple, if you follow. Avoid the projectiles being shot out, or shoot them for Energy and Missiles. When the Ripper is positioned just right, use your beam to freeze him in place; jump on top of him and jump up once more to blast the tentacles with your trusty Missiles. Make sure you pay attention to the Ripper, as he will thaw out pretty quickly, causing you to repeat the process.When the tentacles are gone, the larva will fall through the floor, revealing a passage that leads to the right. Taking this path will lead you to Ridley"s lair, but you will not get far without Super Missiles, as there is a Green Hatch down here. But still go down to Ridley, then go back to up to Norfair and go left, back to where you freed the larva from the evil tentacles. Drop into the tunnel and make your way left this time. In the next chamber, there will be several small eggs strewn about. Breaking the leftmost egg will trigger a boss battle.Boss Fight: Imago Imago is a gigantic space bee that hates you and would like to have you for lunch. All it does is fly around the room, from left to right, right to left. It does shoot projectiles at you, as all bosses do, but defeating it shouldn"t be a problem. Simply chase it around and hit its stinger with charged beam shots or Missiles until it expires.When the Imago is defeated, its stinger will fall off, leaving the rest of the body to crash into the left wall, granting access to your very first tank of Super Missiles. Run through the Gray Hatch to the right, and use a Missile to blast a hole in the floor. Drop down to the Green Hatch and crack it open with one of those Super Missiles of yours. Proceed to the left, past the enemies (which can be avoided by bombing through the floor and following a narrow passage) and blast through the Red Hatch on the other side. In the small chamber, Energy Tank #7 sits across the way, with not a single obstacle in sight. If you try to run across the room in a straight shot, the floor underneath you will break, and you will have to work your way back up from a neighboring shaft. Instead, run four blocks in, to the middle of the room, and then jump across from there. If done correctly, you should be able to grab the edge of the floor and take the Energy Tank.After you get the Energy Tank, go left, down the shaft, and into the first hatch on the left to use a Save Room to your advantage. When you are ready to continue, leave the room and continue down the shaft in Ball Form. Grab the Missile Tank on the way down and then blast open the Red Hatch to gain access to the Map Room. Download the Ridley Map Data and go through the hatch to the right. In this next corridor there is a long, flat walkway along the ceiling; blast through the breakable blocks to the walkway and go all the way to the right. Run left to charge up your Speed Booster and fire at the blocks to break them. Kneel to stop at the ledge and jump down. Blast open the hatch and tap the A Button to hop up, then hold left to blast off through the doorway and into the Map Room. Blast the hatch in here while maintaining your charge (this may take a little practice) and run into the next room, where the Booster Blocks will be destroyed and a secret area revealed.Once in the secret area, start running to the left to charge up your Speed Booster again. Shoot the blocks as you go, and when you reach the corner, kneel down to stop, and then tap the A Button to fly upward and through a pair of blocks. From this corner, roll right, drop down, and straighten yourself out as you fall to grab the ledge on the right. Pull yourself up, roll to the right again, and fall once more. When you reach the collapsing block, quickly straighten yourself out and jump up to the next ledge. Roll to the right and tap Up to straighten as you fall; grab onto the ledge to the left and aim a Missile at the block on the right. Jump into the newly opened passage and go right. The floor will collapse one block left of the rightmost corner. Straighten out as you fall, fire to the left to clear the ledge, and then grab the ledge and roll up to it in one motion. Roll left quickly to grab Missile Tank number 1 of 2 in this area.When you roll to the midsection of the path holding the first Missile Tank, the floor will collapse under you. Straighten out as you drop and hang onto the ledge; aim upward and fire a couple of Missiles to obliterate the blocks above you. Jump up, grab the ledge, and then fire more Missiles above to break into the next path. Keep doing this until you reach Missile Tank number 2. Now that you have your goodies, go back up to the room with the long walkway along the ceiling and proceed to the right to collect yet another Missile Tank. Go through the hatch and into a Save Room to record your progress.A really tricky series of Boosts will allow you to blast your way into a secret area in the shaft outside of the Save Room, so read carefully. Go back to the lower corridor right outside of the Save Room and run to the left along the passage near the ceiling. Now, run right to charge up your Speed Booster and fire at the breakable blocks as you run. Kneel down to stop and the edge, jump down, and blast that hatch leading to the Save Room open. Once inside the Save Room, blast the hatch on the other side, tap A and hold Right to blast off into the next room. As soon as the screen turns black to load up the next room, hit down in order to stop while maintaining your charge. Climb up to the third platform and blast through the wall, into a new area. Getting this right the first time is a little difficult, but be patient -- you will get it eventually.In the secret hallway, charge your Speed Booster once more and use it to blast through a hole in the ceiling. When you reach the top, go open the hatch to the right and run inside to charge up the Speed Booster yet again. Open fire on the blocks as you run (first with your normal beam and then with a Missile at the last block) and jump through the blocks to the right in order to collect another Missile Tank. Keep in mind that this, too, is easier said than done.Getting the Missile Tank in the lower region of this unmapped area is not possible until you have the Space Jump, so leave through the way you came (this means crashing through the blocks you initially came through) and go through the hatch on the left side of the shaft, above the Save Room. Climb up into the next room and go to the left. Drop into the last gap of the center passage and grab onto a ledge. Roll through the narrow passage to the right and fall into a phony lava pit; destroy the block in the lower right corner to reveal a Missile Tank. Leave this area the way you came, and go into the next hatch on the left of the shaft. Go left through the hall, and when you reach the next room, fire through the wall to defeat some enemies. When they are all gone roll left and detonate a Bomb to gain access to another Missile Tank. When you reach the left side of this room, set off a Bomb to clear a passage to the upper left of this area. Hop up the ledges until you have to use a Super Missile to go forward. Roll into the next area and set off another Bomb to trigger a chain reaction that will give you access to a Super Missile Tank. Drop back down to the main hallway and go through the hatch to the left. In this small room, freeze the creature when it reaches the right side of the pillar and use it as a platform to grab the Missile Tank. Freeze the creature to the left of the tank to use it as a platform to the other side. Continue to the left, blasting anything that gets in your way (or not -- it"s up to you) until you come to a room holding a Super Missile Tank.After you take the Super Missiles, jump up to the right to grab a hidden ledge and pull yourself up. Open fire on the block to reveal another Missile Tank; take it and go through the hatch to the left. Roll through the narrow passage and fall down; destroy the breakable block to grab the first of two Missile Tanks in here. Go back up and destroy the breakable blocks to the left. Jump up, grab onto the ledge, and roll up to get the second tank. With Missiles in tow, go back to the small room where you had to freeze the creatures to make platforms and fall through the floor near the pillar. Run to the right to build up your Speed Booster and blast your way through the blocks on the floor of the corridor. Open the next hatch and plant a Bomb in the corner of the short green wall to open up a hidden passage that holds an Energy Tank #8. Once you have this item, go back to the left and start toward Ridley"s Room. Save your game in the Save Room right outside of the room and go into the hatch to the left. Falling through the collapsing block means that there is no turning back until after Ridley is D-E-D dead, so make sure you are absolutely ready to do this thing.Once on the other side of the collapsing block, the eye blocking the door will open up and fire an energy blast at you. Jump over the attack and hit it with one Super Missile or three standard Missiles to get rid of it. Go through the hatch and to the left of the empty room to grab Unknown Item #3 from the Chozo Statue. Break through the big block behind the statue to reach Energy Tank #9. Go back out, recharge your weapons and energy, and step out into the large room.Boss Fight: Ridley Upon re-entering the large chamber, run to the right and stop short of the last support on the platform, as it will break away once the cut scene is over. When Ridley arrives on the scene, he will start sending fireballs your way. Avoid them or shoot them and then open fire with Super Missiles and standard Missiles. Stay away from Ridley"s tail and try not to let him grab you; if you do in fact end up in his clutches, roll into Ball Form and shake free if you are low on energy, or keep pelting him with Missiles until he lets go. The 100% easiest and quickest way to beat him is to run under him as soon as he swoops into the room and fire Super Missiles and then standard Missiles into him from below. This method will keep you away from his claws, tail, and fireballs as well as do away with him in record time.advertisementLeaving Ridley"s lair may seem like a bit of brainteaser, but IGN Guides has all of the answers. Go out to the pipe that keeps spewing space bees and freeze one of the bugs as it emerges. Use it as a platform to get to reach a high ledge on the right. Blast through the big Chozo block and run through the right path to be deposited near in front of the Blue Hatch from which you entered. Make your way to the right shaft of Ridley"s lair, climb up, and dispose of another Chozo Block. Run to the left to expose a hidden section of the shaft, rise, and then run to the right and drop into the passage leading to the top of the shaft. In the next room (through the blue hatch to the left of the shaft), go to the pipe that is spitting out space bees in the upper right section. Jump up to fool the bee into rising high above the pipe and freeze it to create a ghetto space platform. Climb up to a high ledge to grab a Missile Tank. Continue to the left of the room and fire a Missile at the block in the lower left corner. Bomb through the floor to be taken to the room to the right of the elevator shaft leading back to Norfair.

So, you saw the Metroid Dread trailer and thought to yourself “You know, maybe it’s time I tried out one of them there Metroid games.” That sentiment seems to be going around a lot these days, and that’s great! Metroid has always been one of Nintendo"s highest quality franchises, but it’s never really managed to gain the same foothold as Zelda or Mario. Those winds seem to be changing with Dread’s potential popularity being at an all time high, but the franchise has also been around since 1986, so there’s some history there.
Now, Nintendo says that you don’t NEED to have played the previous games in the franchise because the game supposedly explains itself pretty well. That said, a little history couldn’t hurt.
So we’re going to go through the entire Metroid franchise in timeline order and rate how important it is to play each one specifically in terms of preparing for Metroid Dread’s October release. We’ll also discuss the best ways to play them, including some relevant links to products we sell right here at Stone Age Gamer.
It’s worth mentioning that to me personally, every single Metroid game is worth your time. Some are better than others to be sure, but even the worst of the worst have enough interesting stuff in them to be worth the trip. But I recognize that I’m a crazy person, and that not everyone wants to dedicate dozens of hours of their time to a mediocre game just because of its historical context. That"s where this list comes in. Hopefully it helps.
What is it? This is where it all started, but maybe not necessarily where you should. The thing about the original Metroid is that while it was revolutionary for its time, it’s got some issues that can be a little harder to overlook today. There’s no in-game map of any sort, and a lot of the rooms look the same so it’s very easy to get yourself turned around. It’s also tough as nails, and not always in a fair way.
There are a couple of fun remedies for this though. First and foremost, the game was remade into the brilliant Metroid: Zero Mission for Game Boy Advance, which we’ll talk about in a bit. So you could skip this one entirely and just play the remake, but if you"re really keen on seeing what this game has to offer but you don’t have the patience for its obtuse nature, there are tons of passwords you can enter for various abilities. My recommendation would be to enter the NARPAS SWORD code and bring a map up on your tablet or laptop to keep nearby while you play. Then just go through the game without having to worry about the countless cheap deaths.
Metroid tells the story of how Samus Aran, renowned intergalactic Bounty Hunter, came to be hired by the Galactic Federation to travel to Planet Zebes and eliminate Mother Brain and her space pirates. They have captured and gained control of an alien species known as Metroids, space jellyfish that suck the life out of anything they touch, which could spell disaster for civilization as they know it. This is where we first meet the space pirate generals Ridley and Kraid, and get the basics of Samus’s arsenal including the iconic Morph Ball, Screw Attack, Missiles, Ice Beam, and more.
Should you play it? Maybe. It’s still very much worth seeing at the very least, so maybe turn it on and just kind of jump around for a bit? Once it gets its teeth into you it’s a very good game, but all things considered, if you skipped this one completely in favor of Zero Mission, you wouldn’t be missing out too much.
How can you play it?This game is absurdly accessible. There’s obviously the original NES cart, but that can be a bit on the pricey side these days. So if you’re looking to play the game on original hardware, an excellent way to do so would be on the EverDrive N8.
If emulated versions are more your speed, you can always track down a copy of Metroid Fusion for Game Boy Advance, which has the full game as an unlockable, or just the NES Classic Series GBA cart. It was on the Wii Virtual Console, but that’s sadly no longer an option. The Wii U Virtual Console is though, and it’s readily available there. However, NES emulation on the Wii U is bloody awful, so I’d only go that route if it’s your last resort.
A slightly better option would be the 3DS Virtual Console, which is perfectly serviceable if you’re still rocking the 3DS. But probably the best way to play would be on Nintendo Switch Online. With its built-in rewind feature and suspend states, it takes the sting out of the game’s inherent obtuse nature. You can also create yourself a free Japanese account on the Switch and download Famicom Nintendo Switch Online so you can play the original Famicom Disk System version, which has a bunch of different sound effects and some unique sounding music.
What is it?Zero Mission is a remake of Metroid for NES. It’s also the gold standard for remakes. This one basically does everything the NES game does, but better. It adds a ton of modern quality of life improvements from decades of game design, and it’s just plain fun. Heck, it even has a whole extra story segment at the end of it exclusive to this release.
Should you play it? Absolutely. This is without a doubt the best way to start off a Metroid journey. Yes, it does change a lot of the iconic imagery which takes a little away from Super Metroid’s remarkable visual cues, but even without those in place Super Metroid is still incredible. Get this game any way you can.
How can you play it?Tracking down this original Game Boy Advance cart has become quite the endeavor. It’s gotten VERY expensive. Thankfully, if you want to play it on an actual Game Boy Advance, or even a Game Boy Player for GameCube, the EverDrive-GBA exists.
As for emulation, Zero Mission was officially released on the Wii U Virtual Console, and it’s a fantastic way to experience the game. It doesn’t suffer at all from being blown up for TV play, and remains one of the best-looking Game Boy Advance games there is. So if you have a Wii U, that’s the place to be. In fact, if you"re really serious about Metroid, the Wii U is just about the best Metroid Machine out there.
What is it?So, before we get to Metroid II, we have a whole side story to explore first. Metroid Prime is actually the second game in the timeline, and while this whole situation is nowhere near as confusing as something like say, the Wonder Boy series, or even The Legend of Zelda, this is where things get a tiny bit weird. Metroid Prime and all of its own sequels and spinoffs take place between Metroid/Zero Mission and Metroid II: Return of Samus/Samus Returns. Since they’re their own thing, you could skip them entirely if you’re just out to prep for Dread, but you’d be doing yourself a disservice. Not only are these games quite good, but Metroid Prime 4 is on its way too, so taking even a small look in Prime’s direction is recommended.
Following the destruction of Mother Brain, Samus is contracted once again to investigate more space pirate hijinx. Seems they’ve come in contact with an incredibly powerful yet corrosive substance called Phazon, and they’re using it to do all sorts of bad stuff, including breeding super powered Metroids. This takes Samus on a trip through the memorable planet of Tallon IV, where she fights a whole mess of Space Pirates, finds out Ridley survived their last encounter and is now enhanced with cybernetic parts while he regenerates, and faces off against the titular Metroid Prime which once destroyed, merges with Samus’s Phazon power suit (a suit you get in the game that allows you to survive Phazon stuff) and becomes Dark Samus, who you may know from Super Smash Bros. Ultimate.
A quick side note, this is the second time I’ve mentioned Ridley (who you may also know from Smash Bros.) and that’s because he’s a pretty pivotal character in Samus’s past, even though it’s never really explained in the games.
As established in the official Metroid manga, Samus grew up on the planet K-2L with her parents. The major export there was something called Afloraltite, and Samus’s Dad worked in the mines. One day, the space pirates came to K-2L to steal said Afloraltite, and in the process murdered everyone there, including Samus’s parents. Samus survived though, and was rescued by the Chozo, a race of bird people who took her in, infused her with their blood which gave her super strength and durability, and designed her super cool suit. So yeah, Samus hates Ridley.
Anyway, Prime is also the franchise’s first and arguably best foray into 3D. It plays out as a First Person Adventure, and while the controls are a bit weird, they’re completely manageable no matter which iteration of the game you play.
Should you play it? Absolutely. This game probably won’t have much of anything to do with Metroid Dread’s story, but it still does a lot in terms of world building, and it’s also just a spectacular game in its own right. It’s filled with all manner of Chozo lore and stuff, and well, it just rules.
How can you play it? This one can be a bit tricky. It was originally released as a GameCube game, and it isn’t exactly tough or super expensive to track down, especially if you don’t mind buying it loose. However, like I mentioned above, the controls are a bit odd. For all intents and purposes, it’s a first person shooter, but it doesn’t control like one. All movement is handled by the left analog stick, with the right stick relegated to weapon management. It works, but it will frequently leave you wishing that you could look one way and walk another, especially if you’ve spent any time playing other FPS games with more standardized controls.
Your other option comes in the form of the much sought after Metroid Prime Trilogy for Wii. This will obviously work in a Wii or a Wii U, and it includes all three numbered Prime games, but again with slightly weird controls. In my opinion, they’re better than the GameCube ones since they play more like a traditional keyboard and mouse or dual analog setup, but the Wii Remote and Nunchuck combo isn’t for everyone. They had to make some concessions to make it work with a controller with so few buttons too, and while it does work, it will again make you wish you could just play it with a regular controller.
That disc is crazy expensive too, so probably the best option would be in the form of the digital download version of Metroid Prime Trilogy on Wii U. It’s only $20, and it actually runs better than the physical version with a slightly more consistent framerate and drastically reduced loading times.
What is it?This one was the original flagship title for the Nintendo DS launch. A demo for the game was included with the initial console release, and it really is an impressive feat to see running on the hardware.
The final game was delayed a bunch though, and ultimately didn’t really do a whole lot. Like Metroid Prime, this is a first person shooter, except it uses stylus controls which work pretty well all things considered. But while it takes place in the Metroid Prime timeline, it doesn’t actually have anything to do with Metroids or Metroid Prime/Dark Samus. It does introduce you to a bunch of other intergalactic Bounty Hunters, which all have pretty cool designs, and none of which are as interested in being good guys as Samus is.
Some sort of big telepathic message was sent out from an unknown location talking about an ultimate weapon for anyone who can figure out where to find it. The Galactic Federation hires Samus to go get it for them, while these other bounty hunters are chasing it for themselves. In the end it was all a trap set by some big space monster to get itself freed from its prison (or something like that, it’s all a bit weird). Samus gets the weapon, saves the day, and destroys it in the prices.
Should you play it? Probably not. It’s not a bad game by any means, but it isn’t exactly a super memorable one, nor does it have any lasting effects on the rest of the franchise as a whole, with the exception of maybe the secret 100% ending in Metroid Prime 3, but even that’s unclear. Unless you’re really out to play every single Metroid game, you can safely skip this one.
How can you play it? Tracking down an original DS cartridge isn’t terribly expensive, though it is slightly more pricey than you might expect considering its level of popularity, even among Metroid fans. Still, playing it on original hardware isn’t too tough, and it obviously works on both the original Nintendo DS or 3DS, one of which you likely have lying around somewhere.
However, the coolest and most interesting way to play it would be on the Wii U Virtual Console. Because of that system’s unique nature, Nintendo DS games were actually released on the eShop for download, and they’re pretty cool. It doesn’t hurt that it also only costs a couple of bucks as opposed to the original cart.
Hunters also contains a lot of small stuff that can be somewhat difficult to follow on the small screen, and the game actually looks pretty decent blown up on a big TV. Kind of like a PS one game. The controls aren’t great though, but that’s the case no matter which platform you’re on. Jumping is mapped to double tapping the screen with the stylus since all other buttons aren’t accessible thanks to the touch screen controls. It once again leaves you wishing someone would just port these games to a system with a regular controller.
What is it?This game is pretty solid overall, but we’re definitely squarely in the territory of games that likely have very little if anything to do with Dread. This time, you travel to the planet Aether which has been hit with Phazon poisoning so hard it’s split into a light and dark dimension. It’s much tougher than the first Metroid Prime, but it also gives us our first proper introduction to Dark Samus, which is pretty darn cool. It"s also the first 3D Metroid game to feature the Screw Attack.
Should you play it? Probably not. Like Hunters, there’s an incredibly slim chance any aspect of this game will even be referenced in Dread, but it’s a pretty cool game on its own. If you liked Metroid Prime a whole lot and really want more, this is still a good time, albeit not quite as memorable overall as its predecessor. Still Metroid Prime 4 is eventually coming out, so it might be good to brush up on these games before that one arrives, but for the case of prepping for Metroid Dread, this one can be left alone for now.
How can you play it?This falls in the exact same pool as Metroid Prime. It’s a bit pricier to get the GameCube disc, and if that’s where you want to play you’re going to have to use those wacky single stick controls again. It’s obviously included in the Prime Trilogy, and works the same way as the first game there.
What is it? This is another really cool game, but it"s unfortunately riddled with unnecessary motion control gimmicks. They don’t break the game, and they’re actually super cool at first, but they get old fast.
This game effectively wraps up the Phazon storyline, and also features Samus working more directly with the Galactic Federation than we’ve seen her do before. She’s in regular contact with a GF Commanding officer, and she’s also working alongside a trio of other bounty hunters who they called in to help Samus take down the space pirates once and for all. It’s a really fun game overall, and it’s got an incredibly cool boss battle with a slightly less cybernetic Ridley that takes place falling down a giant shaft.
Should you play it? Probably not. Like Prime 2, this likely won"t have anything at all to do with Dread, so it can safely be skipped for now. Also like Prime 2, it will probably have a LOT to do with Metroid Prime 4, so, you know, be prepared to come back to it someday.
How can you play it? This was a Wii game, so you can go out and get the original disc for relatively inexpensive, and that will work on a Wii or a Wii U. It"s also on the Metroid Prime Trilogy, but as we said before, that"s a pretty pricey endeavor. Your best option here is to play it on a Wii U with the eShop version of Prime Trilogy. The original version suffers from some pretty nasty load times, which have been greatly reduced in the digital Trilogy version.
We’re going to stop here for now. Check back next week for the rest of the series’ entries, and why you should or shouldn’t play them. In the meantime, there’s no better time than now to give Metroid a chance. Have fun!

"Planet Zebes... I called this place home once, in peaceful times, long before evil haunted the caverns below. Now, I shall finally tell the tale of my first battle here... My so-called Zero Mission." - Samus Aran
Metroid: Zero Mission is a remake of the Nintendo Entertainment System classic game Metroid, but with significant enhancements, including new areas, power-ups, and enemies as well as a few surprises.
Secrets: Check here for Metroid: Zero Mission unlockables, a code for the original Metroid game included with Metroid: Zero Mission, and a sampling of the Metroid: Zero Mission gallery.
This section provides general strategies for Metroid: Zero Mission, including performing special maneuvers like wall jumping and bomb jumping, and tips on completing the game as quickly as possible.
The Metroid enemies are certainly there to get in your way and be a hassle but many of them are little more than keepers of health and ammunition. Most dead enemies will reappear after you"ve returned to the location. There"s no need to defeat every enemy every time you move through the same room (unless of course you need some health or ammo). In fact, if you"re looking to beat the game quickly, ignoring most enemies is one of the important keys.
Whenever you see a pipe coming from the ground (think Mario type pipe), expect some Metroid enemies to emerge. These enemies are excellent sources of health and ammo. The enemies that emerge from pipes reappear even if you don"t exit the room completely. If you"re low on health or ammunition and need some easily, move around the pipe and eliminate the enemies that emerge.
One of the most impressive ways to complete the game is by collecting as few power-ups and items as possible. Some power-ups are mandatory, such as the morph ball and bomb. Others, however, are optional and can be skipped such as the charge beam.
If you"re looking to finish the game quickly or collect items as soon as possible, then you should master the art of the wall jump. In Metroid: Zero Mission, you can scale a wall by jumping alongside the wall. Perform a jump into the wall then tap the opposite direction and hit the jump button again. It will look like you"re literally spinning up the wall.
The bomb jump is another maneuver you can use to collect items as early a


 8613371530291