
diy well drilling mud pump in stock

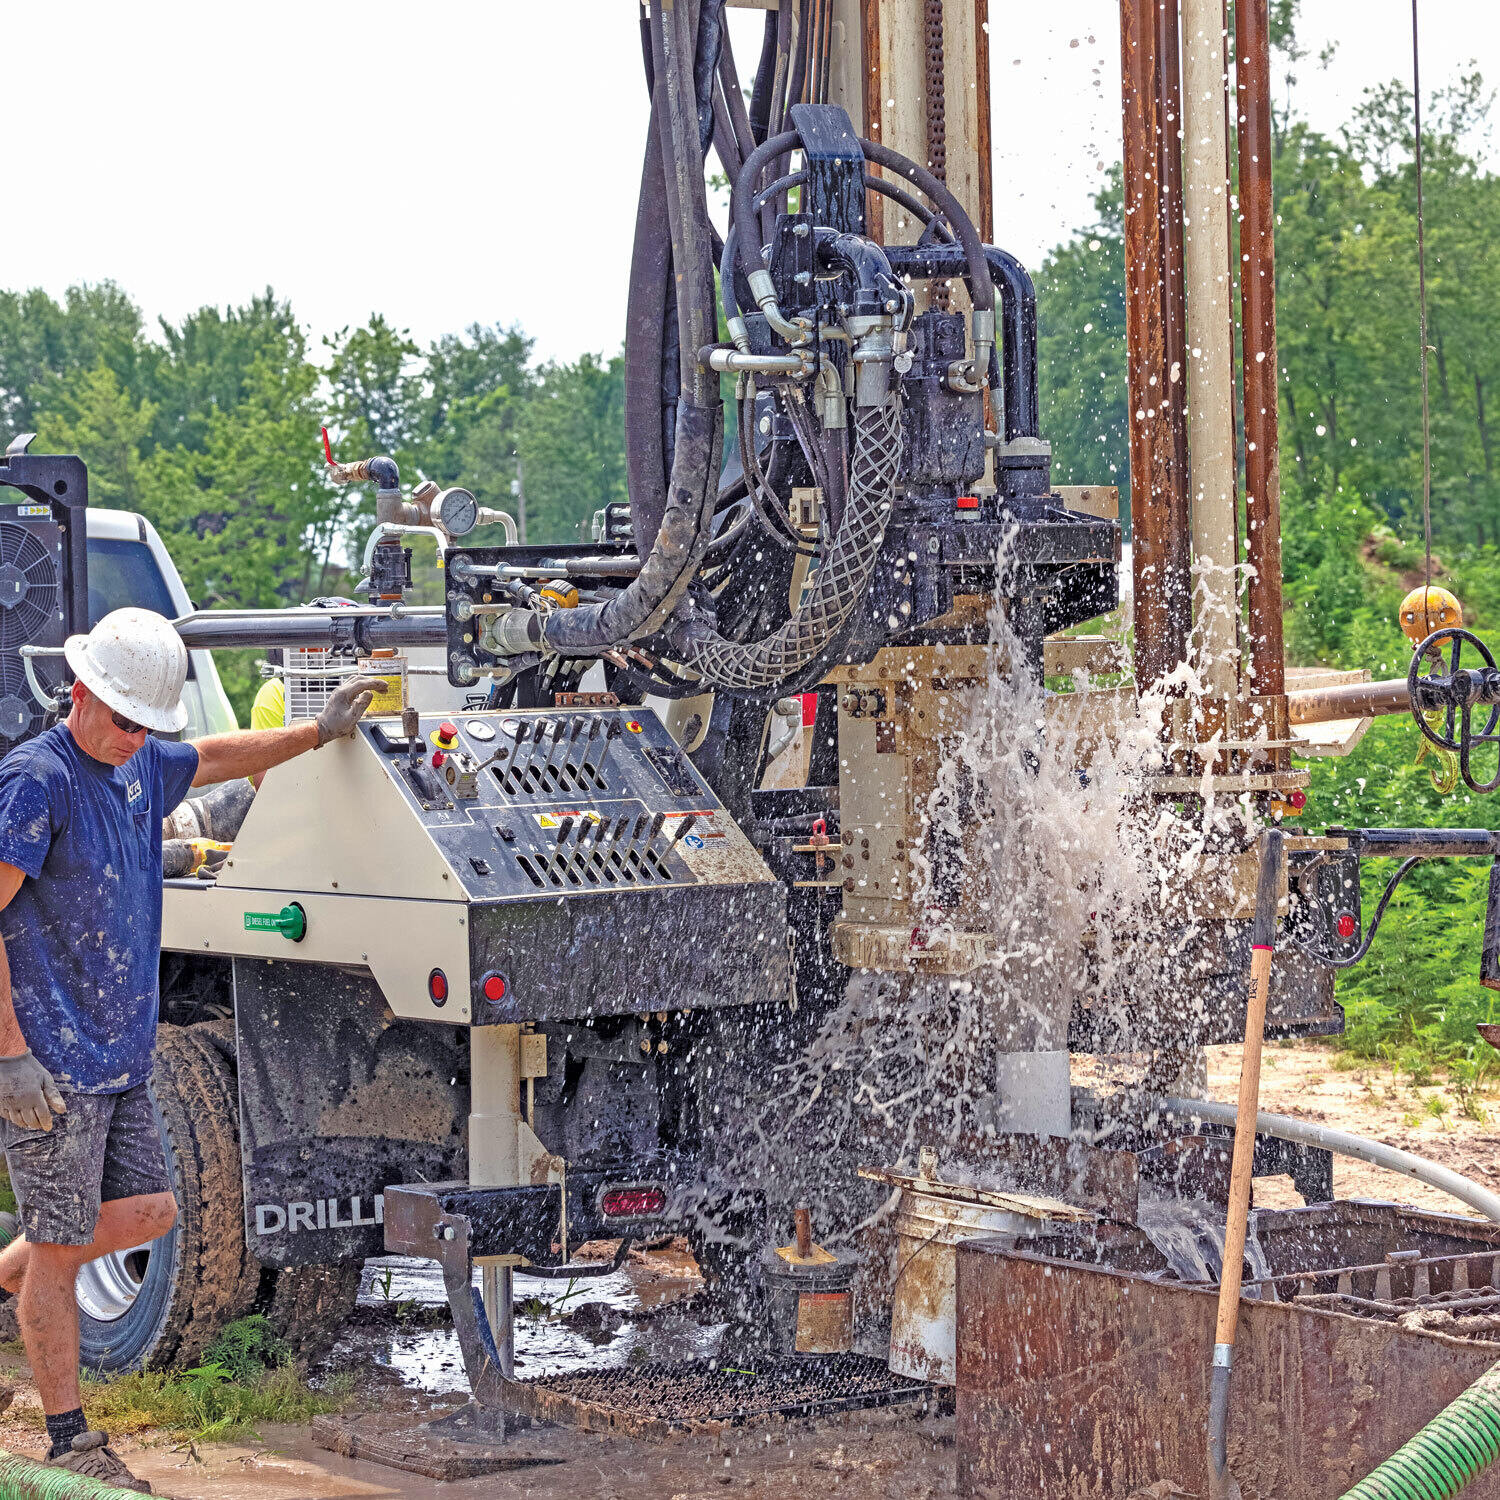
A mud pump represents a huge improvement in drilling over just using two hoses. It improves water flow. A typical mud pump will put out 100 gallons per minute whereas two hoses are only good for about 12 to 15 gallons per minute.
It saves water. Just as important, a mud pump allows you to employ a re-circulating system so you can use bentonite or other gelling material that will solidify the sandy, crumbly walls of your borehole long enough you can drill without worrying about your hole collapsing on your drillpipe.
Water is pumped, using the mud pump, down the drillpipe. At the bottom of the borehole it turns and goes back up outside the drillpipe carrying cuttings with it. When it reaches the top it goes out through the tee over to the portable mud pit.
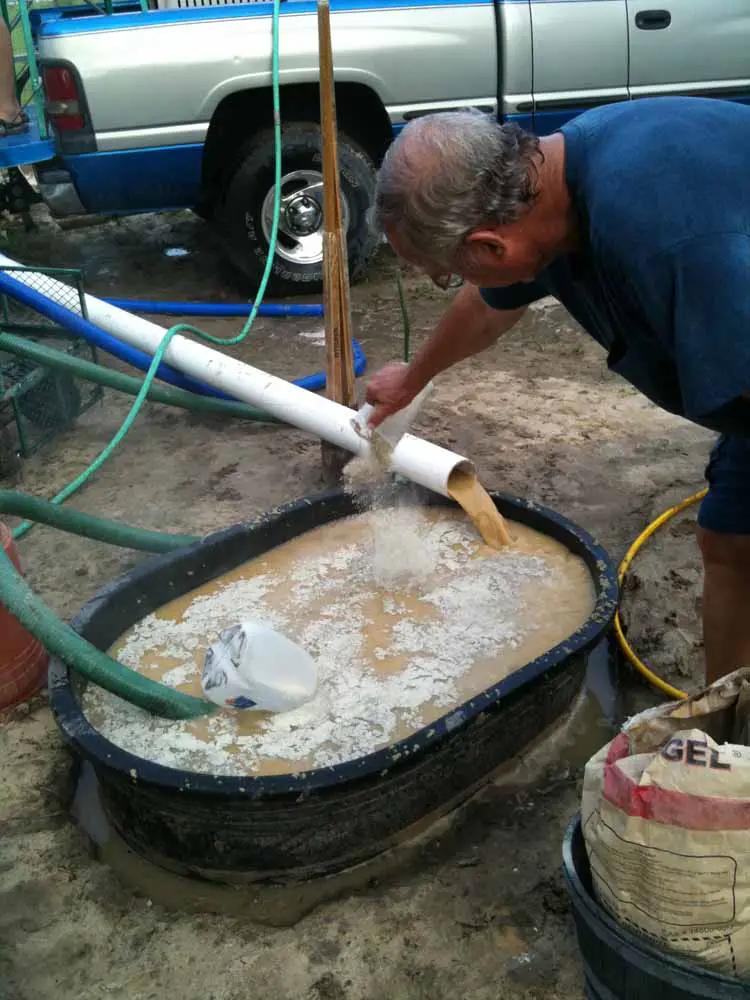
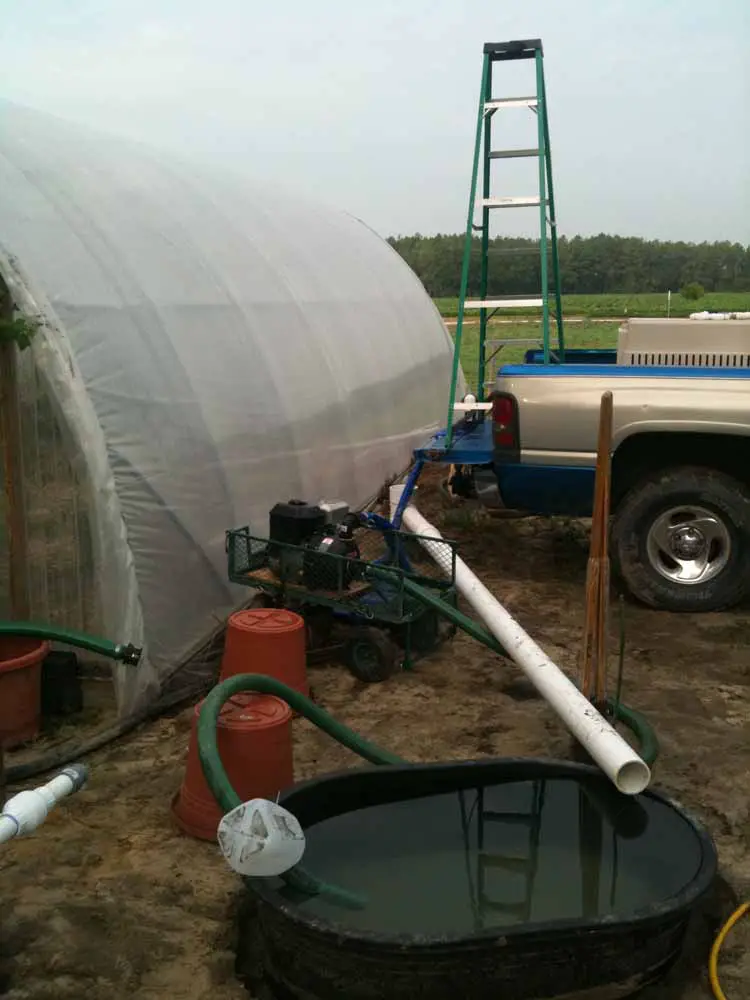
The portable mud pit is continiously shoveled to get the mud out of the water. A water/mud mixture is then pumped out of the pit and back down through the PVC drillpipe.
Before we go further please take a look at the drawing below.It is from an excellent site, http://www.lifewater.ca/ that is dedicated to helping third world countries drill for water. The drawing shows their drilling rig, an LS-100 instead of our PVC apparatus but the mud pit arrangement is excellent. If you have time, it would be a good idea to go to https://www.lifewater.ca/drill_manual/Section_3.htm and browse around as well. They have many other excellent ideas.
The drilling fluid (water & bentonite) is pumped by the mud pump down the drilling pipe. At the bottom of the borehole it picks up cuttings and carries them to the top. At the top of the borehole the mixture of drilling fluid and cuttings go into a ditch that leads to a settling pit. The cuttings fall to the bottom in the settling pit while the drilling fluid goes over a small ditch into the the mud pit. During the drilling process, the cuttings are occasionally or continually shoveled from the bottom of the settling pit. From the mud pit, the mud pump pumps the fluid back into the drilling pipe and the process continues.
Note I am saying “drilling fluid” and not water. That is because bentonite or some other gelling agent is added to the water to make drilling fluid. As the hole is bored, this drilling fluid causes the sides of the borehole to harden. This is extremely helpful because the driller doesn’t have to worry (as much) about the borehole caving in on his drilling pipe. Any of you who have had a PVC drillpipe stick in a hole can appreciate how useful this trait is!!
Now let’s move on to George’s arrangement. Rather than dig up his yard to make the settling and mud pits, he is using a portable mud pit. He has inserted a six inch diameter piece of PVC into the ground where he will be drilling. Then he attached a tee with a four inch pipe coming off the side. This four inch pipe leads to his portable mud pit
Below are a series of eMails George sent as he was drilling the well. As you can see, it took a bit of experimentation to find the right combination of size, speed, and drilling mud. He kept at it and his ultimate success is most impressive. I left off a couple of the first emails. As the story begins, George has a two inch pipe stuck in the ground from an effort using two water hoses as drilling fluid.
Using the mud pump method was GREAT ! I set everything up and had my neighbor over to help. I put the 20’ piece of 3″ pvc over my stuck 2″ pipe …. fired up the mud pump and got the water recirculating into my 110 gallon livestock tub. In less than 30 minutes, I had washed down to where the 3″ pipe was on top of the 2″ pipe. The 3″ pipe started wanting to stick in the soft sand, so I had my helper to add about 15 lbs. of “Aqua Gel” that I picked up at the plumbing store where I buy my well screens from. It’s a combination of bentonite and a vegetable polymer. Within a few minutes, I was able to easily slide the 3″ pipe up and down/side to side to enlarge my bore hole …… it quit caving in and sticking like it had been doingJ Instead of having to take the 2″ pipe out, both pipes washed down together ! At about 19’, I hit hardpan … so I decided to stop and pull out the 3″ pipe. After doing this, I had so much room left in the borehole, that I was able to pour 2 bags of pea gravel down the outside of my 2″ pipe all the way to the bottom …. without any caving in issues. I think I could have easily put down a 4″ pipe and well screen down that hole. The Aqua Gel was doing its job nicely.
Total time using the mud pump from starting to when I finished putting in the gravel pack was only 1 hour ! The guy at the plumbing shop told me I would have to backwash the well to remove the Aqua Gel because it would stop up the aquifer. I did that using my 110 gallon sprayer tank that was standing by full of clean water. I then hooked up my mud pump to the well and pumped it for 10 minutes … only getting about 9 gallons/minute flow. During this time, I filled my 110 gallon sprayer tank back up with clean water. I back flushed the well again …. after this time, I got a 16 gal/min flow …. getting better J On the third time I back flushed the well, I surged the mud pump from slow to fast … back and forth as it back flushed. Hooked everything back up and started pumping from the well ….. now getting 30 gal/min !! I decided to quit while I was ahead …. plus the temperature was pushing 100 degrees !!
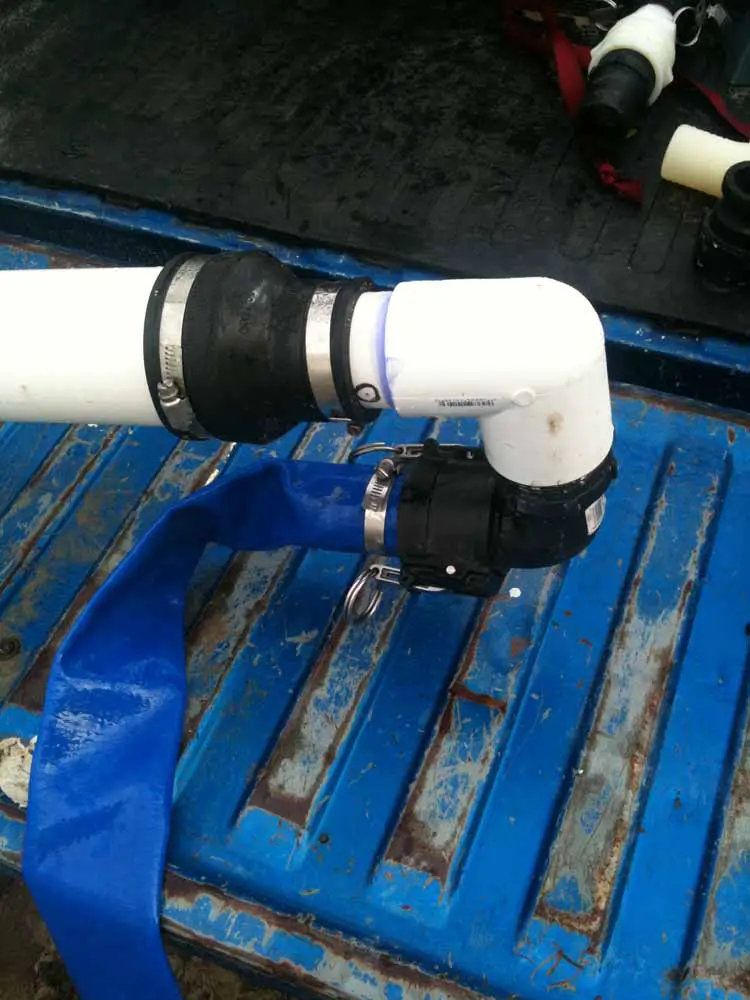
Next weekend, I’m moving over about 14’ and putting down a second well so that I can eventually combine the two for my irrigation. I’ll take pictures and email them to you. I used a 6″ tee that had a 4″ side port to recirculate back to my 110 gallon stock tub. I only put 3’ of 6″ pvc in the ground and packed around the pipe to prevent leakage. Everything worked great … just like in the PVC video you sent me where the guy was using two dug pits to recirculate from.
next eMail)We jetted down the second well this past Saturday morning. It took only one hour from the time we started the pump until I finished with the gravel pack !! I used a 3″ pipe to jet with …. dropped in my 2″ pipe with 5’ well screen …. then pulled out the 3″ casing. At this point, there is enough room to pour 2.5 bags of pea gravel down the hole beside the well pipe. By using the Quick Gel, the hole does not cave in on the well pipe. The big difference this time was that I immediately back flushed the well with 110 gallons of fresh water to clear out the Quick Gel …. instead of trying to pump from it at the beginning like I did with my first well. This second well pumps a huge 60 gpm !!! I was amazed … to say the least. Tied together, both wells produce 90+ gpm with the pump slightly above idle speed J I’ve included some photos in this email and will send you some short videos in a follow up email. I hope it does not clog up your Inbox.Thanks so much for your help …… and inspiration from your website which got me started on this project !

Historically, most drillers dug two pits prior to drilling a well. A first pit, called a settling pit, received the drilling fluid and cuttings from the drill hole via a short shallow trench. The cuttings settled down to the bottom of the the settling pit. A second pit, called a mud pit, was dug nearby and a second trench directed the overflow of the settling pit into the mud pit. Most of the cuttings settle to the bottom of the settling pit and the drilling fluid in the mud pit has a much higher liquid to cuttings ratio. In other words, the water in the second pit, the mud pit, is “cleaner.” Drilling fluid from the mud pit is then pumped, by a mud pump, back down the drillpipe. During the drilling process, cuttings are continuously shoveled from the settling pit so it does not become clogged with cuttings. Although most of the cuttings settle in the settling pit, it is also necessary to occasionally shovel cuttings from the mud pit as well.
Below is a photograph of mud pits prepared for drilling. This photograph is from the hydra-jett site. Hydra-Fab manufacturing http://hydra-jett.com/index.html sells small and medium sized drilling rigs and is worth looking at if you are considering moving up to a small rig.
As you might imagine, diggining mud pits is a significant undertaking and it makes an even bigger mess of your drilling site. Modern drillers, being both ingenious and capitalistic souls, have devised a way to avoid this costly, unpleasant step. They bring portable mud pits to the drill site. A portable mud pit is simply a container or series of containers that the drilling fluid from the hole is directed to where cuttings settle out prior to the fluid being pumped again down the drillpipe. Not only does it eliminate the time/money consuming digging but it leaves a cleaner drillsite upon completion of the well.
….but it frequently doesn’t work as well for those of us who have small portable mud pits. Using real mud pits results in more efficient drilling. There is no leakage around the guide tube with real mud pits.
Here is an example of a portable mud pit positioned at the back of a commercial drilling rig. Cuttings from the hole are directed into the settling pit on the right. Then drilling fluid passes through to the mud pit on the left and it is pumped back down the hole.
There is a wide variety of designs of portable mud pits. Here are just a few sketches I found to give you an idea of designs that folks have come up with.
So, by now your are probably wondering, where does all that leave us? We are not going to buy one of those $500 portable mud pits for our $200 project are we? Absolutely not, in fact you may just be better off digging your pits. If you are going to dig several wells you might want to consider using a portable mud pit with a mud pump. I made one out of wood and it works fine. It is not as efficient as the commercial mud pits but it does the job. Please take a look at the video below.
As you can see my portable mud pit is just a wooden box with a fitting for the suction line and a minor obstruction to keep the cuttings away from the suction. You can probably come up with a better design for a portable mud pit that I have. I probably could but it is already built and I’m not inclined to build another one – but – If I were doing another one, I’d probably build two boxes that fit inside one another for easier travel and storage, and then sat beside each other when drilling.

more at http://www.drillyourownwell.com This is an example of a Mud Pump Water Well Drilling Setup utilizing a Portable Mud pit. This particular well was ...
OK, all y’all air drillers just thumb on over to Porky’s column or something. This is for mud drillers. On second thought, I know a lot of you air guys drill about three mud wells a year, and consider it a hassle to rig up mud. So, maybe something I say will be interesting …
The mud pump is the heart of the circulating system, and mud is the blood circulating in the hole. I’ve talked about mud before and will again, but this month, let’s talk about the pump.
Historically, more wells, of every kind, have been drilled with duplex pumps than any other kind. They are simple and strong, and were designed in the days when things were meant to last. Most water well drillers use them. The drawbacks are size and weight. A pump big enough to do the job might be too big to fit on the rig, so some guys use skid-mounted pumps. They also take a fair amount of horsepower. If you were to break down the horsepower requirements of your rig, you would find out that the pump takes more power than the rotary and hoist combined. This is not a bad thing, since it does a lot of the work drilling. While duplex pumps generally make plenty of volume, one of the limiting factors is pressure. Handling the high pressures demanded by today’s oil well drilling required a pump so big and heavy as to be impractical. Some pretty smart guys came up with the triplex pump. It will pump the same — or more — volume in a smaller package, is easy to work on and will make insane pressure when needed. Some of the modern frack outfits run pumps that will pump all day long at 15,000 psi. Scary. Talk about burning some diesel.
The places that triplex pumps have in the shallow drilling market are in coring and air drilling. The volume needs are not as great. For instance, in hard rock coring, surface returns are not always even seen, and the fluid just keeps the diamonds cool. In air drilling, a small triplex is used to inject foam or other chemicals into the air line. It’s basically a glorified car wash pump. The generic name is Bean pump, but I think this just justifies a higher price. Kinda like getting the same burger at McDonald’s versus in a casino.
One of the reasons water well drillers don’t run triplex pumps, besides not needing insane pressure, is they require a positive suction head. In other words, they will not pick up out of the pit like a duplex. They require a centrifugal charging pump to feed them, and that is just another piece of equipment to haul and maintain.
This brings me to another thought: charging. I know a lot of drillers running duplex pumps that want to improve the efficiency of their pumps. Duplexes with a negative suction head generally run at about 85 percent efficiency. The easy way to improve the efficiency is to charge them, thus assuring a 100 percent efficiency. This works great, but almost every one of them, after doing all that work and rigging up a charging pump, tells me that their pump output doubled. Being the quiet, mild mannered type that I am, I don’t say “Bull,” but it is. A duplex pump is a positive displacement pump. That means that it can deliver no more than the displacement it was designed for. You can only fill the cylinder up until it is full. It won’t take any more. The one exception to this is when you are pumping at very low pressure. Then the charging pump will over run the duplex, float the valves and produce a lot more fluid. Might as well shut off the duplex and drill with the charging pump.
Another common pump used in the water well industry is the centrifugal. You see them mostly on air rigs that don’t use mud too often. They have their place, but are a different breed of cat. They are not positive displacement. Flow is a function of speed and horsepower up to the limits of the pump. After that, they just dead-head. With large diameter drill pipe they make a lot of mud, but after the hole gets deeper, friction losses — both inside and outside the drill pipe — build up. This means that the deeper you go, the less circulation you have. This slows the whole process. Positive displacement pumps don’t do this; they pump the same per stroke regardless of pressure. It just takes more horsepower. Also, displacement calculations like bottoms-up time and cement placement are just about impossible. One way to get around the limited pressure of centrifugal pumps is to run two of them in series. I’ve seen a few of these rig-ups and they work very well for large diameter drilling. They will make almost the same pressure as a big duplex for a lot less money. They are still variable displacement, but they roll so much fluid that it doesn’t seem to matter. And run at pretty reasonable depths, too: 300 to 400 psi at 400 gpm is not uncommon with two 3 x 4 centrifugal pumps in series.
I reckon there are pumps for every type of drilling. It is just a matter of using the right one correctly. I once drilled a 42-inch hole 842 feet deep with a 5½ x 8 duplex. Talk about long bottoms-up time … but we got the casing in with less than two feet of fill on bottom! Took time, but we got-er-done.

The 2,200-hp mud pump for offshore applications is a single-acting reciprocating triplex mud pump designed for high fluid flow rates, even at low operating speeds, and with a long stroke design. These features reduce the number of load reversals in critical components and increase the life of fluid end parts.
The pump’s critical components are strategically placed to make maintenance and inspection far easier and safer. The two-piece, quick-release piston rod lets you remove the piston without disturbing the liner, minimizing downtime when you’re replacing fluid parts.
Preferred Pump offers the best rewards program in the water well equipment industry. Check out our social media pictures to see what you"ve been missing!

The 42-year-old, family-owned American Drilling Services in Florida, relied on homemade drill rigs to complete primarily 2- to 4-inch residential water wells. With demand increasing, they began looking for newer technology in order to complete more mud pump well drilling.
“Technology is always changing. We used to drill galvanized steel with cable drilling. Now we’re exclusively rotary drilling,” said William Diaz, driller, who has been with the company for seven years. “The technology gets better, and things get easier.”
“We used to do one well per day, occasionally two. The DM250 has helped us keep up with the workload by being able to drill quicker,” Diaz said. “The pulldown power of the top head is significantly stronger than our previous rigs. With the mud pump, we can clean out the hole a lot faster, which means less waiting around.”
“We’re not breaking down all the time, which is a huge advantage compared to our older rigs,” Diaz said. “Overall it’s a great rig. I recommend the DM250 to anyone doing 2- to 4-inch wells. It makes me happier because I’ve now got air conditioning, and I love the self-feed carousel. It’s a fast, great rig.”
Whether drilling a 25-foot screen well or a 400-foot artesian rock well, customers appreciate the added benefit DRILLMAX® water well drilling rigs bring to their fleet. The compact size of the water well drilling rigs makes mobilization to the water well drilling job and into tight drilling locations easier – and less costly. The combination of torque, mast speed, pumps and rod loader make water well drilling fast and easy. Customers brag their DRILLMAX® water well drilling rigs are a big rig in a little package.
“Our industry has a hang up on bigger is better,” said Ricky Cosnahan, owner, DJ Pump Service, Georgia. “If a 24-inch wrench will break pipe loose, then you get the 36-inch to make sure you have the power. Just because it’s little doesn’t mean it doesn’t have power.”
Driller Chris Adkison attributes their success to the top head speed of the DM250 for cleaner, straighter well development in significantly less time - cutting the hole in hours instead of days.
“Where we drill wells there’s a lot of limestone and blue marl. It would take four days to drill 260 feet and then make a well on the fifth day,” Adkison said. “Now we’re doing it in a day and a half. The blue marl is a dense clay that swells and the DM250 cuts it really well.”
Versatility combined with creature comforts like deck-mounted Mudslayer® make the DM450 the driller"s choice on a wide-range of water well drilling jobs.
Our team of engineers thrives on collaborating with drillers while they continually innovate new designs on our water well drill rigs for sale. Our goal is to help maximize your success by making your job faster, safer, and easier. Partner with us and we"ll work to decrease your water well drilling rigs" downtime while increasing your family time.
“The rig doesn’t use much fuel and per foot it’s cheaper to operate. Upfront cost is less, and maintenance is less because parts are cheaper and it’s easier to work on. Maintenance wise, it’s really simple. Essentially it’s maintenance free. I can use hand tools to fix what I have to fix. If a hydraulic hose breaks, you can use common stuff you find at an auto parts store.” - Steve Simmons, owner, Roy Simmons & Son Well Drilling, Michigan

This video shows a DIY Mud Pump Water Well Drilling Setup utilizing a Portable Mud pit. A typical mud pump will put out 100 gallons per minute whereas two hoses are only good for about 12 to 15 gallons per minute. A mud pump allows you to employ a re-circulating system so you can use bentonite or other gelling material that will solidify the sandy, crumbly walls of your borehole long enough you can drill without worrying about your hole collapsing on your drill pipe.The portable mud pit is continuously shoveled to get the mud out of the water. A water/mud mixture is then pumped out of the pit and back down through the PVC drill pipe.
Liberty Process offers pumping and well businesses drop-in replacement progressive cavity pumps and parts for all the popular sizes used in today"s onsite drilling applications from the most popular brands of pumps in use today.
From water well drilling rigs and well trucks to geothermal and geotechnical pumping applications, Liberty Process Equipment has the pumps and parts you need to pump drilling mud with entrained solids in stock ready to ship same day.
Even difficult drilling applications like grouting or mud jacking are possible with a progressive cavity pump with its non-pulsating flow capability. Contact a Liberty Process Sales engineer today for more information on pumps or parts to keep your business working!

Okay, so winter came and went, and I"m back to this boneheaded well drilling project that I was last working on in the fall. I have a small 13hp rotary hydraulic well drilling machine. It"s a small machine, but an upgrade from the post-hole digger DIY machines. It uses a hydraulic power head and a 13hp engine and hydraulic pump, and uses 1.5" plumbing pipe as drill stock. The swivel that came with the DIY rig was very light duty, so over the in winter I constructed my own heavy duty swivel that works like a charm. I also upgraded from the low quality pump that came with the rig to a decent quality Wacker pump. I"m using a fairly think bentonite mixture for drilling mud.
Anyhow, I have fairly easy drilling for the first 10 feet through sand and fine gravel (small pieces about 1/4 - 1/2 inch). The next two feet we start running larger gravel and then at about 13 feet I"m into pretty big gravel. What"s coming out of the hole looks like broken up pieces of golf-ball size river rock. The machine frequently binds and has to be backed off from this large gravel. It just doesn"t seem to have the power to break it up, and the trash pump I"m using (a contractor-grade wacker pump) doesn"t seem to have the power to lift that large of material unless it"s first broken up. It"s unclear whether I"m making progress or not. An hour worth of drilling might get me down a foot or so, but then we seem to have a cave-in and lose that foor of progress.
I installed a 3" casing and a pitcher pump to this depth of about 13" below surface. I can get water flow; the static water depth is only a couple feet below the surface. Problem is, I just dont get much recovery. A dozen pumps or so on the pitcher pump and the hole is dry and I have to wait 5 minutes for it to recover. My gut feeling is that this area of large size river rock is exactly the water bearing layer that I need to punch into. So close and yet so far away...
I know I can get someone out here to drill a well for me commercially, and probably save money doing so at this point. However, I"m stubborn, I hate being defeated, and want to find some way through this project.

Before you remove the first cuttings there are lots of items on the checklist to verify. Like making sure you have the right drill rig for the project. If you are working at a remote site, it is important to gather your materials. It is also a good idea to make sure your portable well drilling rig is ready for operation, like setting up the mud pump for mud rotary drilling. When you are eager to get started, these steps can seem tedious, but by taking your time, you will be more successful and efficient when it is finally time to start the dirty work and drill a water well.
Despite your efforts to select an appropriate site, there is no guarantee you will hit water with every bore. That is why most drilling projects should start with a pilot hole. Use the small pilot bit to bore a 4in diameter hole. Depending on your well drilling equipment and site conditions, the time for this process will vary. Carefully collect and record the cutting samples from this exploratory hole to develop a boring log - which will help you design your well if the site pans out.
Once you have found an aquifer, use the information from your cuttings to determine the best depth for the well screen. Cut the necessary amount of well screen with a hacksaw and set aside until you prepare your casing.
To avoid borehole collapse, complete reaming, casing installation and gravel pack in a continuous operation. However, make sure you have enough fuel, drilling water and time before you start this step.
Flush out drilling mud. Certain drill rigs, like the LS200, include a casing flushing tool to make this job easier. If your rig does not include this feature, slowly pump clear water down the well casing to force drilling mud out the borehole. This might require multiple drums of water, so be sure to have extra readily available.
With a very low flow of clear flushing water, gradually add the gravel pack to the hole by hand. Use clean, round gravel — like that produced from streams, rivers, and beach deposits — approximately .125 to .25in (3 to 6mm) in diameter. Never use crushed rock, as grains will lock together over time and reduce the flow of water into the well. You will need to have enough gravel on hand to bring gravel up to a point 3ft (1m) above the top of the well screen.
If you have chosen your site wisely and managed to avoid hole collapse by reaming, installing casing and placing gravel all in one go, you are about to find out if your hard work has paid off. It is time to test your well yield.
After measuring the initial water level, use a bailer to draw out as much water as you can in 10 minutes and pour it into a bucket for further measurements. Once you are done bailing, check the water level a second time. If you are able to bale around 2.6 gallons (10L) per minute with little or no drop in water level, congratulations, your well is likely to produce enough water to supply a hand pump. If the well went dry in just 10 minutes, though, do not panic. It is not unusual for an undeveloped well to produce very little water. Repeat the process for two to four days. If the well is still dry with a brief bailing at that point, there is probably not sufficient flow to support a well.
Depending on the results of your tests, you have a decision to make. Do you develop the well and install a pump or start over at a new site? Poor water quality can affect the health and safety of people, plants and animals relying on the well, so use the parameters outlined by the test kit to determine if you move forward with development. Additionally, if your well is not producing at least two to four gallons per minute, it will not be able to keep up with a hand pump, and you are better off trying again.
Once you have reached a decision, there is still a lot of work to be done. If the well has potential, it is important to protect it from surface contamination by sealing, developing and sanitizing it. If, on the other hand, you chose to look for a new location, be sure to seal the borehole to prevent injury or cross-contamination.
Hello, this is Marvin Glotfelty, here with another in NGWA: Industry Connected video. I am a hydrogeologist from Arizona and also a licensed well driller. And a lot of the workshops I’ve given on different drilling techniques, and I’ve talked in this video series previously about dual rotary drilling. There’s a lot of different types. But another couple of the standard types that are pretty universal are direct rotary drilling. There’s direct mud rotary and direct air-rotary. Oh, I want to show you some of the slides here. I’m going to share my screen, show you some information that we can then consider.
First with mud rotary drilling, it of course has advantages and disadvantages, just like all drilling types. So the advantage is, while we’re drilling, we are keeping the borehole full to the brim, full to the land surface, with drilling fluid, also called drilling mud. So what does that do? That stabilizes the borehole. It keeps it from caving in on us, even if it’s loose, unconsolidated material. And we can adjust the properties of this drilling fluid to make sure that that happens. And so that also means that we’re going to collect good, reliable cuttings and other data from the borehole as we go. That’s important.
And we can address problems with, like I said, adjusted drilling fluid. If we have swelling clays, if we have lost circulation where our drilling fluid is seeping into a porous formation. If we have hard drilling and all these different things, if there’s different properties in the formation, which there will be, we can just change the drilling fluid to address them.
So what are the downsides? The downsides is, these drilling fluids are not given away for free, they cost some money. So as long as we can manage that, the overall cost will not be exorbitant, but it is an additional cost because it’s a consumable material that we require during the drilling in mud rotary. And the other thing is we can’t tell where the water table is because the borehole’s full to the brim, not until we’ve completed and isolated a portion of the aquifer from the land surface.
So that’s okay. Here’s a cartoon of the drilling fluid circulation. So you can see that we have a mud pump shown on the back of this truck, and of course the silly colors on the truck are just so we can point out different parts of the rig. I don’t think anybody would ever paint a rig like this. But we can pull the drilling mud up through the mud pump, up through the stand pipe, the Kelly hose, and down to the drill bit. And then as it circulates up the borehole outside of the drill pipe, it’s going to carry the cuttings with it which can be deposited in that mud pit.
Now the mud pit can be below ground as shown, or it can be above ground. Either way, it’s the same difference. So this means that we can control our properties and collect our cuttings and really have a lot of good information as we go. So the big part of this though, is the drilling fluid, being able to control that and change it.
So let’s consider what that drilling fluid does. If we look close there’s in, at the microscopic level, there’s a bunch of platelets that are like little tiny sheets of paper, that are the bentonite clay. They’re not shaped like a little ball, they’re shaped like a little sheet of paper. And so if they’re dispersed, they’re floating around in the fluid mixture, in the water, and there’s a little bit of soda ash and things like that mixed in there with other chemicals perhaps.
But then when they flocculate, they stick together. And that means that the thickness, the viscosity, of the drilling fluid can be higher, even though we didn’t add additional bentonite, that’s cost some money. So that means that we can carry cuttings out of the borehole better and things like that. So that’s, when you hear people talking about the benefits of flocculation of drilling fluid, this is what we’re talking about. It had the property where it can pick it up, so at the same uphole velocity we can carry more cuttings out of the borehole, which is what we want to do.
The other thing that happens with drilling fluid is some of the water seeps out of the drilling mud and leaves behind these clay partlets stuck to the borehole wall, and this is how we form a wall cake. What we like is to have a little bit of water, not too much flow out to their formation, and make a relatively thin and hard wall cake. If we have a thin, hard wall cake, it’ll be very stable and easy to remove later on when we’re going to develop the well and finalize it. If it’s a thick, fluffy wall cake, it’s the opposite. It won’t be as stable and it’ll be more difficult to remove.
So this is a property of the drilling mud, not a property of the formation, so we can control it. And so it’s one of the things that we measure, one of many things. And I’ve got photos of how we measure things. In the upper left is a mud scale, so we’re just measuring the weight of the drilling mud. Usually, of course, water weighs about 8.3 pounds per gallon. Drilling mud might weigh 8.8, maybe nine pounds per gallon. But if we get it real heavy, like 9.4, 9.5 pounds per gallon, unless we’re intending that, and sometimes we are, but unless we’re intending that, that means that what we’re doing is recirculating solids. Fine solids that are the native silts and clays from the formation, and we’re not getting them removed as we recirculate and recirculate this drilling fluid.
That’s bad because that means our wall cake, for one thing, will be getting not as thin and hard as we’d like it. To measure that amount of water that goes out, called filtrate or water loss, that’s what’s shown in the device in the center there with the green frame. That’s a filter press, so we’re just measuring how the drilling fluid responds. And then on the right, you see the young lady with a marsh funnel measuring the viscosity or thickness of the drilling fluid.
So the mud engineer can come to the drilling site, as you see on the lower left, with a pickup truck or some sort of a vehicle to check all these things and some others too. In addition to the weight and viscosity, the mud engineer can look at chemical properties, such as pH, maybe calcium content, chloride content, things like that. They have titration devices and so they can measure these things. They can measure the rheology, the flow properties called plastic viscosity, yield point, gel strength, things like that. So there’s a lot of stuff that’s kind of exotic, but the mud engineer can tell all the folks and the parties involved whether that’s a problem or not.
And then the filtrate, that’s what we’re measuring with the filter press in the middle of the screen. And the solids content can be directly measured with a small Imhoff cone, but also is reflected by how heavy the drilling mud is. So all that stuff is good, that means we have control to some extent, as we interact with mother nature as we’re drilling in the well. And that’s a good thing, so this is a good … That’s why direct mud rotary is a very commonly used approach and it’s very successful.
But there’s other alternatives with almost the same drilling rig, such as direct air-rotary. What if we’re drilling at a place where we want … We’re going to have a stable borehole, no matter whether we have drilling fluid or not, and we’d like to give the advantages of air rotary. So with air rotary, we have a very rapid penetration rate compared to other drilling types, and we have quick bottoms-up time.
So that means, to the geologist, that when we drill cuttings at say a thousand feet, they will be at the land surface almost immediately, very quickly. So we don’t have to wonder how long it’ll take or calculate how long it’ll take for the drilling fluid to bring them to the surface. This happens very fast with compressed air. And we can identify where the water table is as we drill, can’t do that with mud rotary but we can do it air rotary.
And of course the wall cake in this case, it’s only really there because of some soap and because of natural formations, not because of any introduced material. And so it’s thin and basically minimal. So the disadvantages, I’ll show you in a cartoon that’s coming up next why it’s not feasible in some unconsolidated or unstable formations. We have to switch to mud in some cases. Or if the borehole makes water faster than the air compressor can remove it, well, then it keeps the bit from adequately turning on that formation rock. And so it makes it a problem called water logging or flooded out bit where we’ve got too much water coming in. Good problem to have, but it can be a limitation to this type of drilling.
So here’s what the cartoon looks like. Very similar to the mud rotary rig you noticed, except that instead of being … Once we label things are a little bit different. This brown device on the back of our drill rig is now an air compressor instead of a mud pump. So we blow compressed air through our stand pipe and Kelly hose, directly down the bit to remove the cuttings. And they come up and now, instead of we’re calling our discharge line a flow line, we just rename it as the blewie line.
And so notice that the borehole is not full of fluid to the land surface. This is the water table somewhere down here. And so we can fill this with foam, but we can’t fill up with water because we’re drilling with compressed air. So that means that if the upper borehole is wanting to cave in on us, that’s when we might have to switch to mud. But there are a number of things we can do to generally stabilize the bore hole while we drill, and it is a good and efficient way. And of course, I’m showing a rotary tricone drill bit cartoon on the bottom, but we can also use a down-the-hole hammer and have a pneumatic hammer type drilling, which in a hard or brittle formation is really effective.
So we have these different levels of viscosity, even in air-rotary drilling, that we can do. And once we’ve added some foam, some detergent, we’re going to have a little bit of a surfactant surface on that borehole wall. It’s going to slightly stabilizes. We have some help there, and so if it’s a hard rock formation, no problem. But if it’s a unconsolidated formation, depending on the nature, we may or may not be able to drill.
Either way, I really advocate both mud rotary and air rotary for drilling. It’s just a good way to go. I’m sharing my screen there. So with that, that’s a primer, mud and air rotary drilling 101 for you. So I hope you have a great day and we’ll talk to you next time. Thanks.


 8613371530291