
drill your own water well with mud pump pricelist

TheZX-1000 is a 16 HP Gravity Type (drilling pressure applied by the weight of the power head) portable drilling rig with many built-in standard features. It comes standard with 125" of 1-1/4" Drill Stem with wide thread machined tool joints, 2 Carbide Drill Bits (your choice of sizes), Adjustable Slip Assembly, High Capacity Water Swivel(The Key Feature, Our Own Proven Design), 12 Volt Electric Winch with Remote Control, 2X2 Mud / Trash Pump. It includes a choice of engine configurations, Import or Kohler Electric Start, and more. Please call for detailed spec sheet.
The PTO Rig is among our strongest drilling rigs, it is Fully Hydraulic, Chain Drive, 3 Point Hitch, it includes 200" of 1-1/4" Drill Stem with wide thread machined tool joints, 2 Carbide Drill Bits (your choice of sizes), Adjustable Slip Assembly (Our Own Proven Design), PTO Pump, Mud Pump, Built-In Hydraulic Resevoir, High Capacity Water Swivel(Our Own Proven Design). Please call for detailed Spec Sheet.
INSERT THE TESTIMONIAL TEXT HERE. FOR EXAMPLE:Thank you for providing such a valuable service. Your staff was extremely helpful and I am so happy with the outcome. I wish all businesses would treat their customers as you do and I will recommend you to all my associates. Thanks again for your help.
INSERT THE TESTIMONIAL TEXT HERE. FOR EXAMPLE:Thank you for providing such a valuable service. Your staff was extremely helpful and I am so happy with the outcome. I wish all businesses would treat their customers as you do and I will recommend you to all my associates. Thanks again for your help.
INSERT THE TESTIMONIAL TEXT HERE. FOR EXAMPLE:Thank you for providing such a valuable service. Your staff was extremely helpful and I am so happy with the outcome. I wish all businesses would treat their customers as you do and I will recommend you to all my associates. Thanks again for your help.
INSERT THE TESTIMONIAL TEXT HERE. FOR EXAMPLE:Thank you for providing such a valuable service. Your staff was extremely helpful and I am so happy with the outcome. I wish all businesses would treat their customers as you do and I will recommend you to all my associates. Thanks again for your help.
from http:www.drillyourownwell.com George of Fayetteville NC sent us this video which demonstrates the phenomenal success his crew had in drilling a well with a mud pump! From the Drill Your Own Well series

When choosing a size and type of mud pump for your drilling project, there are several factors to consider. These would include not only cost and size of pump that best fits your drilling rig, but also the diameter, depth and hole conditions you are drilling through. I know that this sounds like a lot to consider, but if you are set up the right way before the job starts, you will thank me later.
Recommended practice is to maintain a minimum of 100 to 150 feet per minute of uphole velocity for drill cuttings. Larger diameter wells for irrigation, agriculture or municipalities may violate this rule, because it may not be economically feasible to pump this much mud for the job. Uphole velocity is determined by the flow rate of the mud system, diameter of the borehole and the diameter of the drill pipe. There are many tools, including handbooks, rule of thumb, slide rule calculators and now apps on your handheld device, to calculate velocity. It is always good to remember the time it takes to get the cuttings off the bottom of the well. If you are drilling at 200 feet, then a 100-foot-per-minute velocity means that it would take two minutes to get the cuttings out of the hole. This is always a good reminder of what you are drilling through and how long ago it was that you drilled it. Ground conditions and rock formations are ever changing as you go deeper. Wouldn’t it be nice if they all remained the same?
Centrifugal-style mud pumps are very popular in our industry due to their size and weight, as well as flow rate capacity for an affordable price. There are many models and brands out there, and most of them are very good value. How does a centrifugal mud pump work? The rotation of the impeller accelerates the fluid into the volute or diffuser chamber. The added energy from the acceleration increases the velocity and pressure of the fluid. These pumps are known to be very inefficient. This means that it takes more energy to increase the flow and pressure of the fluid when compared to a piston-style pump. However, you have a significant advantage in flow rates from a centrifugal pump versus a piston pump. If you are drilling deeper wells with heavier cuttings, you will be forced at some point to use a piston-style mud pump. They have much higher efficiencies in transferring the input energy into flow and pressure, therefore resulting in much higher pressure capabilities.
Piston-style mud pumps utilize a piston or plunger that travels back and forth in a chamber known as a cylinder. These pumps are also called “positive displacement” pumps because they literally push the fluid forward. This fluid builds up pressure and forces a spring-loaded valve to open and allow the fluid to escape into the discharge piping of the pump and then down the borehole. Since the expansion process is much smaller (almost insignificant) compared to a centrifugal pump, there is much lower energy loss. Plunger-style pumps can develop upwards of 15,000 psi for well treatments and hydraulic fracturing. Centrifugal pumps, in comparison, usually operate below 300 psi. If you are comparing most drilling pumps, centrifugal pumps operate from 60 to 125 psi and piston pumps operate around 150 to 300 psi. There are many exceptions and special applications for drilling, but these numbers should cover 80 percent of all equipment operating out there.
The restriction of putting a piston-style mud pump onto drilling rigs has always been the physical size and weight to provide adequate flow and pressure to your drilling fluid. Because of this, the industry needed a new solution to this age-old issue.
Enter Cory Miller of Centerline Manufacturing, who I recently recommended for recognition by the National Ground Water Association (NGWA) for significant contributions to the industry.
As the senior design engineer for Ingersoll-Rand’s Deephole Drilling Business Unit, I had the distinct pleasure of working with him and incorporating his Centerline Mud Pump into our drilling rig platforms.
In the late ’90s — and perhaps even earlier — Ingersoll-Rand had tried several times to develop a hydraulic-driven mud pump that would last an acceptable life- and duty-cycle for a well drilling contractor. With all of our resources and design wisdom, we were unable to solve this problem. Not only did Miller provide a solution, thus saving the size and weight of a typical gear-driven mud pump, he also provided a new offering — a mono-cylinder mud pump. This double-acting piston pump provided as much mud flow and pressure as a standard 5 X 6 duplex pump with incredible size and weight savings.
The true innovation was providing the well driller a solution for their mud pump requirements that was the right size and weight to integrate into both existing and new drilling rigs. Regardless of drill rig manufacturer and hydraulic system design, Centerline has provided a mud pump integration on hundreds of customer’s drilling rigs. Both mono-cylinder and duplex-cylinder pumps can fit nicely on the deck, across the frame or even be configured for under-deck mounting. This would not be possible with conventional mud pump designs.
Centerline stuck with their original design through all of the typical trials and tribulations that come with a new product integration. Over the course of the first several years, Miller found out that even the best of the highest quality hydraulic cylinders, valves and seals were not truly what they were represented to be. He then set off on an endeavor to bring everything in-house and began manufacturing all of his own components, including hydraulic valves. This gave him complete control over the quality of components that go into the finished product.
The second generation design for the Centerline Mud Pump is expected later this year, and I believe it will be a true game changer for this industry. It also will open up the application to many other industries that require a heavier-duty cycle for a piston pump application.

Drilling a well by hand is a lot of work, but it can be done with the right equipment. Whether you’re looking to drill a shallow or deep well, this skill is perfect for those seeking self-reliance.
Wells are normally drilled on private land where city or rural water isn’t available. It’s possible to hire a licensed professional to provide this service but you can expect to spend several thousand dollars. If you want to save money, you can do it yourself, but prior to getting started, you need to research local regulations.
Each state or county will have its own list of requirements and regulations. These can be found online or at your county courthouse. When asking about these regulations, make sure you explain that you will be drilling the well yourself and on your own land.
Once you receive a green light to move forward, it’s time to learn more about your land. Go to thecounty agriculture extension office to find out what soil type you have. This could include sand, clay, rock, or a combination.
The local courthouse may also have well drilling logs from professional well drillers. These will include things like when they hit first water, what type of soil condition they encountered, and how deep they drilled the well. This could be helpful information but do remember that every property is different. The very first step might be determining how deep you need to drill.
On most North American homesteads, water is typically present about anywhere you would dig, though in some areas that depth will be deeper than others.
Things to consider when choosing a well location are: convenience, a power source, and location. It’s very important the well be uphill from any septic system or barn runoff.
The final thing to do before drilling is to contact utility companies to make sure you don’t hit any underground pipes or lines. Sometimes this information can be found on your original land plot, but it’s always good to double-check.
Drilling a shallow well is a pretty simple task, going down about 25 feet or so when you hit first water (at least in my location). This type of well could be drilled in a weekend by hand using a general purpose, extendable post-hole auger.
This type of well can be cased off with a manual pump and used for irrigation. This would be more of an emergency setup that could also provide water needs at a weekend cabin in the countryside.
Shallow wells have a difficult time keeping up with average water usage. It’s estimated each person uses between 80 and 100 gallons of water a day. Imagine storing 20, 5-gallon jugs a day per person.
The majority of our water usage comes from flushing toilets and bathing. If you multiply that by a family of four, it’s easy to understand you would need a deeper well to keep up with demand.
Professional well diggers will often recommend a depth of 200 feet or more, but remember, for hundreds of years every well in this country was hand-dug and that’s how people survived.
Also remember, licensed well diggers get paid by the foot, so sometimes they drill further than they have to. So, if you decide to hire this out, do your research and make sure to write down where first water is normally hit in your area. And keep in mind that first water may not be the best, can dry up in some years, or may not be able to keep up with demand; all of these things need to be considered.
A pneumatic drill is like a giant eggbeater driven by compressed air. This tool can drill a 200-foot well in a matter of days or weeks, depending on the soil type, and can be purchased online.
In addition to the drill, you’ll also need a very powerful air compressor to run the equipment. These can easily cost two or three times as much as the drill. A couple of ways to keep costs down include purchasing a used compressor, or purchasing a new one and then after the project is completed, selling the almost-new equipment for a few hundred dollars less than what you paid.
You can choose between, gas, diesel or electric-powered compressors. An electric compressor will cost you less to run and be more dependable. We chose a compressor powered by gas because our well project was several miles away from the homesite.
This brings us to the drill setup. This will require a day of planning before drilling begins. Most home improvement stores will carry almost everything you need.
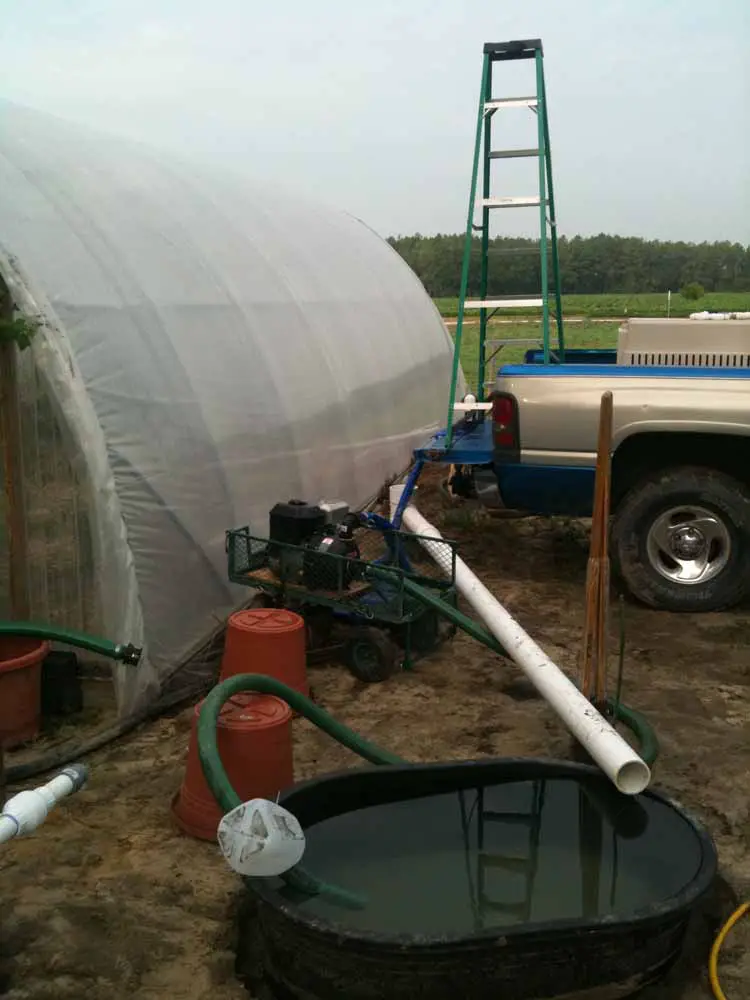
Step 1: After purchasing the necessary supplies and choosing the drill location, begin digging the main drill hole with an auger or post-hole digger. Dig about 4 or 5 feet. Then, if necessary, cut the 8-inch PVC to fit the hole, allowing 4 inches to stick above ground. In the side of the PVC pipe aligned with the settling pond (see Step 2), drill a hole large enough to insert the 2-inch connecting PVC pipe.
Step 2: Dig a shallow settling pond 10 feet behind the well, no less than 4 feet across. Then dig a shallow 8-inch ditch connecting the pond to the well hole. Connect these spaces with 2-inch PVC pipe and cover. This pipe will transfer clean water from the pond to the drill hole. The pipe opening in the pond will need covering with netting so debris doesn’t flow back into the well.
Step 3: Insert the 55-gallon drum at the edge of the pond, secure with stakes, and face the opening toward the well. The drum catches water from the well and empties into the pond where clean water will flow from the pipe back into the well.
Step 4: Attach 1-inch PVC pipe to the pneumatic drill using PVC glue and secure with duct tape to prevent leaks. Use a marker every 5 to 10 feet so you can keep track of how far down you have drilled. Rest the other end of attached PVC pipe in the 55-gallon drum. While the drill is running, mud and water will enter the pipe through small holes above the drill and be pushed up by the compressed air, traveling through the pipe into the drum and settling pond to be cycled back into the well hole.
Step 5: The air compressor will need to be set up and connected to the drill. Use duct tape to secure the air hose to the PVC pipe to keep it out of the way while drilling.
Note: Depending on your soil type, you may not need the 8-inch PVC. Our soil, for example, is hard clay and stable enough to keep the hole from collapsing without the pipe.
Drilling a well with this tool can take anywhere from 15 hours to weeks depending on the soil type, so make sure a chair is handy and you’re working with at least three people. One to operate the compressor, another to drill, and a third for breaks.
The air supply to the drill should never be turned off while the drill is underwater. If this happens, you’ll have to stop drilling and clean the motor before starting back up. This can take time and delay progress, which means it’s important that your drill team understands the process from start to finish.
Begin by filling the well hole with water. Turn the drill on before inserting, and then begin drilling. The bit will drill through all soil types, but when it hits clay or rock the process will slow down. Don’t get frustrated, just keep drilling and, before you know it, first water will be hit.
Move the drill in an up, down, and side-to-side motion as this will help the drill drive through the soil. The motion should be constant but not forceful; the drill will do the work. When you reach the point of needing to add more pipe, pull the running drill from the hole and, once it’s out of the water, turn the air pressure off. As you add pipe, secure each addition with PVC glue.
Add the next several feet of pipe and start again. Once the desired depth is reached, it’s time to case off the well. Casing is a matter of inserting SDR 35 pipe and securing in place with pea gravel and concrete. To do so, drill a hole through both sidewalls of the first piece of pipe, 2 or 3 inches from the bottom so you can attach the rope to lower the pipe into the well. When the top of the pipe is even with the ground, apply PVC glue and attach the next piece of pipe. Let dry for 15 minutes and then continue to lower down and add pieces as you go to meet the depth of the well. The last piece of pipe will be cut about 3 feet above ground level and capped off.
Pour pea gravel between the casing and the dirt. Next, mix the concrete and pour between the ground and casing. This will prevent the well from becoming contaminated from runoff. Once this is complete and you’ve added a well pump, you’ll need to run the well for a couple of days until the water is clear, and it’s always a good idea to get the water tested before using it for drinking.
Drilling a well can be a long process, but if you can save money and learn a new skill at the same time, why not give it a try? It’s a matter of getting back to basics and doing more for yourself.
Carole West is a freelance writer, photographer, author, and founder of the blog Garden Up Green. She lives in the north Texas countryside with her husband, Robert. They live a peaceful life where they spend most of their time establishing Quail Grove, a tiny homestead community.

The drilling rig is built on the basis of a diesel engine. The hydraulic circuit is divided into three streams, each with its own hydraulic pump. When using multiple drives at the same time and increasing the load, the operating parameters are retained.
The drilling rig has a compact, versatile design. It can be installed on different types of chassis: trailer, pickup, truck, tracked chassis, etc. At the same time, a flow switch is provided in the hydraulic system of the unit to control the movement of the chassis.
Pump for supplying drilling fluid to the bottom of the well. The piston is driven by a hydraulic cylinder, which is controlled by an electrically controlled hydraulic valve. The mud pump provides a pressure of 15 atm and pumps 400 l / min.
The trailer wheels are rotated by two hydraulic motors. A hydraulic cylinder is used to hold down the clutches. The friction drive allows for maneuvers and turns for precise positioning of the drilling rig.

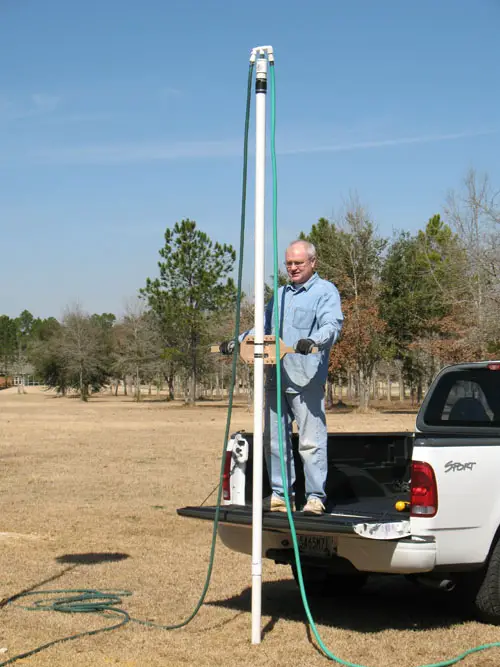
You can drill your own shallow water well using PVC and household water hoses. It is a cheap and effective way to dig your own shallow water well. Water well drilling isn’t just for the pros with huge commercial drilling rigs. Digging a water well yourself is both interesting and fun.
The water well drilling methods described here work well in digging/drilling through dirt, and clay, including really hard clay. They will not work if you need to drill through rock but, if the area you live in is flat or relatively flat, it is definitely worth a try. Many folks think they have to dig or drill their well into an aquifer. For irrigation and lawn watering, reaching an aquifer isn’t necessary. You only have to drill under the standing water level. It is very likely that you can drill your own well. Many successful wells have been drilled using this well drilling method. It is cheap. You can expect the “drilling” portion of the project to cost about $200.
In these pages the “do it yourself water well drilling” technique is referred to as well drilling, but many call this technique “washing” or “jetting” a well. It is somewhat similar to the rotary bit method which most real water well drillers use for water bore drilling.
The DIY technique involves water pumped down the center of a PVC schedule 40 pipe used as both a drill stem and a drill bit. At the bottom end of the PVC pipe a “drill bit” is fashioned by cutting teeth into the end of the PVC pipe. The pipe is rotated back and forth as the PVC pipe is slowly worked into the ground while the cuttings are brought to the surface by the upward flow of water in the annular space around the pipe. If you want to dig your own well, try this technique.
Installing a well and a pump can save a lot of money, especially if you are now paying the local utility for irrigation water. You have probably noticed that just watering the lawn can get expensive. You can spend less money watering the lawn. Actually, you can spend almost no money watering the lawn. It is great for gardeners, too.
If you are a first time visitor to the site you will probably want to start out with either the “Background” or the “Basic Well Drilling Steps” pages. The bulk of the site is dedicated to drilling water wells using just two hoses for drilling fluid. Inexpensive PVC is used for the drill pipe, the drill bit, and the well screen. This DIY water well drilling technique is very cheap and many successful shallow wells have been installed using this technique.
When drilling a well by hand, it can be very helpful to at least be familiar with the techniques used by real well drillers – the kind with big powerful trucks and huge water tanks. What we do is extremely similar, almost identical. We can’t dig holes as wide or as deep but it is the same process. A local well drilling company was kind enough to let me video their process. Check it out at “Real Well Drilling.”
There are several enhancements you can make to the basic DIY well drilling technique. To make the technique even more effective you can use the techniques described on the pages, “Drilling Deeper with BENTONITE” and “Drill 10 Feet Deeper.” Additionally, converting to a metal drill bit will make your drilling more productive. These are all techniques that were sent in by users of the site and discovered as they drilled their wells.
A gravel pack can increase a well’s production so there is a section on them. I don’t recommend you include a gravel pack on your first well but after you get the hang of the technique this is something you will probably want to check out the pages on gravel packs.
Don’t go shopping for a pump without reading this page: Which Pump? You want a shallow well pump, also known as a suction pump. Pool pumps and other types of transfer pumps will not work.
In the “Videos” section, you will find videos that show techniques used world wide. Some of these techniques, like the Baptist Method, require very little drilling fluid and have been used for centuries.
We’ve been fortunate enough to receive some input from Bob Tabor, a real well driller who has been drilling wells all of his life. Please be sure and check out the page – “Advice from a REAL Well Driller.”
Bill Granade in Tampa, Florida has developed a very similar DIY water well drilling technique. He has been wildly successful. Bill has helped his neighbors drill a bunch of wells his protocols may be useful to you. Look under “Another Home Driller.”
Several users of this site have been kind enough to send pictures and info about wells that they have drilled. Check out “Success Stories” in the menu. For example, one of our recent success stories, Steve in South Jersey is interesting. Steve needed a way to water his Christmas tree farm and he successfully drilled his own well. Very impressive effort! We even got a wonderful email from Greg in Australia about his successful well.
For drillers interested in moving up to the next level: be sure and check out the page on Mud Pump Drilling. It is absolutely the way to go if you can buy or borrow a mud pump (sometimes called a trash pump). It costs more than the two hose method but is still a lot less expensive than hiring a driller.
There is a section for Questions and Answers where I have posted the most common questions I receive. I hope it helps you. There are also sections on Source of Supply, Well Drilling Manuals as well as Well Drilling Links.
Commercially drilled water wells tend to be very expensive. This DIY well drilling technique is very cheap. It will almost definitely work if you live near the coast and will likely work if you live in a flat inland area.It is great for saving money on watering your lawn and irrigating a garden.
As I mentioned in the video, the most interesting things I have experienced in posting this website are the enhancements and improvements that YOU, the viewers and users of this site have submitted. I figured out a few improvements to the Brady Well Kit early on and I managed to drill a functional well after several tries and that is why I posted the site. And then – users started writing me and showing me things they had discovered! At this point, I can safely say that most of the techniques presented here are not mine. They are yours! I hope they help you. I hope that if you discover an improvement or an enhancement that you will send it to me so I can post it for others to use.
Below is a video submitted by one of the users of this site. Please take a look at the DIY water well drilled by Travis of Mobile, Alabama. Travis used a 10 foot long 1.25 inch well screen. Congratulations, Travis!

What does it take to maintain a successful business? If you said profit, you hit the critical component to any good business. However, if you said the right equipment and team, your thought process drills deeper. I bet the rest of you were shouting, “Customers is what it takes!”
Maintaining a successful business was a top discussion point at the recent Mountain States, Maryland-Delaware, and Virginia groundwater conferences I attended as a presenter. To get a well-rounded perspective on this important topic, I interviewed a driller within our community and a custom home-builder connected to our community.
First up, Charles “Buddy” Sebastian of Sebastian and Sons Well Drilling based in Michigan is a long-time industry friend and president of the Michigan Ground Water Association. Sebastian has presented talks on job costs, company sustainability and the future of drilling companies at the MGWA’s annual conference. He also just presented at the Montana Water Well Drillers Association Convention & Trade Show.
A. The first talk I did on knowing your cost at MGWA, I had a question from the audience that said: “You have your business figured out. What"s your exit plan?” I said, the day you start your business is the day you start planning to sell your business. What I mean is, to be able to sell your business you have to be able to set your market. You can either be the market setter or market followers. You have to be able to set the market that your business is solvent. To be solvent, you have to have enough money in your profit margin to maintain, repair and replace equipment. Then, beyond sustaining the business, you can’t just work for beer and pizza. So you have to have enough profit in there to pay the team and yourself.
A. Well, we have to set the going rate for drilling in our area to have enough profit dollars to complete the job, maintain the equipment, pay the team and invest in the future.
A. First of all, we have to stop pricing our product according to our competitor. We fix that by knowing our cost per hour and cost per day for equipment and project. That thinking that my competitor is drilling for $18, so I need to drill for $17 needs to go away. We need to know our costs on the first job and be profitable because it isn’t going to get any better if you don’t.
A. It is based on how many wells you do a year. I figure today’s drilling equipment’s life as 10 to 15 years, and yes, some older conventional rigs had a longer lifecycle. You know I did a cost analysis of some of my older table-drive rigs to replace belts, bearings, bushing and drivelines. What I saw was [that having] bushing and bearing that were relatively cheap to repair was no longer the case. Replacement parts were not built as good as the originals; importing cost had increased and, overall, these parts were becoming obsolete due to American manufacturers no longer making them. Conventional rigs are not as easy or cheap to repair as they were. You have to take into consideration downtime versus complete replacement.
That’s the per-hour cost to own that rig. That’s not interest, maintenance, repairs, tires, mud pumps or wearables. It’s just the cost to own the rig. Next, you have to take into account everything to operate and maintain the rig, including the labor to repair, update and replace. A good number to start with for a new $800,000.00 rig is about $75,000 a year to own and maintain it. The best advice I can give to a new rig owner is to save $25 an hour for every hour of rig operation to replace that rig.
Q. How does the industry value water at a cost that makes the drilling business sustainable? How do we change the stigma that a water well must cost X but even interior amenities such as cupboards can cost so much more?
A. First, we, as an industry, must start teaching the end-user the same statement. Water is a necessity for life. We, as an industry, have more invested in equipment overhead than any other construction trade. I have quickly over a million and a half dollars invested in providing water; often the homes we drill wells for do not have that in the building materials and builder labor. We need to sell that point to our customers that we are invested in them, and they need to invest in us to be sustainable to continue to provide water.
Next, I turned to Cameron Fox, owner of Fox Custom Builders in Kalamazoo, Michigan. Fox has built custom homes in West Michigan, all requiring private water wells. He helped me visualize how customers and homebuilders view new water wells.
A. Homeowners view their water wells as a non-negotiable necessity. Our customer usually addresses this part of the contract to the extent of “how will you make sure I get exceptional water pressure.”
A. Pricing is consistent throughout our area, so pricing is not outrageous. The drilling companies’ professionalism and expertise exclusively drive my priority when choosing an installer.
A. It is all about location. Location of the well may seem like a no brainer, but choosing a site, particularly on nonconforming lots or lake homes, can be somewhat problematic. Distance from property lines, septic systems and sewage ejection pumps can often become a balancing act. A drilling company willing to work with the footprint I have is invaluable.
A. Similar to any skilled trade, you can pay a premium for a professional company to complete premium work, or you can find an inexpensive alternative and deal with the consequential headaches. You get what you pay for.
A. I have had very positive experiences with the two drilling companies I use. Both are excellent, and overall I had similar experiences. The estimates and proposals aligned, and they both researched well logs on adjacent properties to present reasonable estimated well depths. One thing that makes me use one company over the other is when they go the extra mile to educate my customers on the process and me. I have a backup drilling company just because of schedules.
A. Every homeowner has a different pricing tolerance based on what is important to them. When building a vacation home, the money will be spent to upgrade materials requiring less maintenance. Homeowners with large families are more focused on added square footage than premium kitchen cabinets or heated floors. Ultimately, each homeowner is unique, and their money is allocated toward their “must-have” items.
A. With the significant increase in the cost of wood over the last 10 years paired with the massive jump in labor costs, framing the home is typically the most expensive component of new construction. Other added costs come from the special footing or extensive land improvements/excavation.
A. We build custom homes that meet each client’s specific wants and needs. Not only do we accomplish this but at the same time we build quality homes. Energy-efficient and structurally sound homes are the starting point for our homeowners. These are our core values and a starting point from where we build to create a functional and architecturally pleasing home that exceeds our homeowners’ expectations. Building a home is like entering into a serious relationship with someone you just met. You are going to spend hundreds of hours with them, answer multiple calls a day and then respond to their weekend emails. You have to get along, or you’ll both walk away from the process drained and upset. I have found the best way to get along is to require perfection from my employees and my subs. That’s it. I do not allow mediocrity; my customers know it, and it establishes a basis for trust.
We need customers and builders, and they 100% require the drilling industry to provide water. We have to establish our message of value to our customers. The problem cannot be solved with one company or region that cannot solve our image; it will take the entire community discussing how we make the change together. In the end, we need the same thing our builder requires, to be able to recruit and pay good men and women to progress our industry, buy the right technology to be successful, and provide the consumer with a quality product that they value.
more at http://www.drillyourownwell.com This is an example of a Mud Pump Water Well Drilling Setup utilizing a Portable Mud pit. This particular well was ...

Digging your own shallow well with the sand point or auger method can cost as little as $100. but will likely cost at least $700 plus the cost of the well pump and your own labor.
However, unless you only have loose, sandy soil and a high water table, a DIY well will likely cost you considerably more. Aside from the cost aspects, it simply isn’t feasible to dig your own well in many situations.
Look at your local laws before you look deeper into drilling your own well. Most states in the USA have strict laws which allow only certified well drillers to dig wells. There are sometimes exemptions that allow homeowners to drill their own wells on their own properties though.
Even if it is legal to drill or dig your own well, it still might not be a good idea. While I don’t want to discourage people from taking the DIY approach, it’s still important to be realistic.
For example, you could get surface water in the water table if not done correctly. Not only would you contaminate yourwell, but the water of everyone else in that table.
“My dad decided to drill on our land when I was a kid. He heard the neighbors hit water at a certain depth (800ft or so), so he bought a kit and went at it. Many grueling man hours later, much sand and water and clay and bedrock… he discovered that our land doesn’t have a pocket of water for 1,300ft.
We eventually had to pay over $13K for a well in another area of the property, since he screwed up the area where he first started digging. Then it cost more to plumb into the house, since the well is now out 20′ further than it should be.”
DIY wells can be hazardous. Hand-dug wells are especially dangerous as it only takes a small cave in to get buried alive in the well. There are also risks associated with using new machinery.
Most DIY wells are shallow wells. At these low depths, the water quality can be very poor. It might be fine for watering your yard, but you’d need intensive treatment to make it potable or even use it on edible plants.
The drill rig holds the other well drilling equipment. It can be a simple triangle construction but is usually a vertical stand. If using a hand auger for a very shallow well, you might not need a drill rig at all.
While it is certainly possible to drill a shallow well by hand, a motor will make the job easier. I’ve heard of people adapting post-hole digger machines to dig wells.
You’ll need a pneumatic drill and an air compressor for deeper wells. These can usually be rented. If you want an even deeper well or have difficult soil, you’ll need to rent a truck-mounted drilling machine.
The well drill bit or point is the part that bites into the soil. There are various types of well bits depending on the soil and rocks. It’s possible to make your own drill auger bit by cutting teeth into the end of a PVC pipe.
The stem connects the drill bit to the rig. The stem usually comes in multiple pieces. As you dig deeper into the earth, you attach another piece of the stem so you can go deeper.
The well screen is located at the bottom of the well hole. It has hundreds or even thousands of tiny slits which allow water to pass through but prevents debris like sand from getting through.
There are a lot of companies that sell DIY well drilling kits. Auger well kits usually cost around $500 to $700. Sand point well kits usually cost around $325 to $650. These kits do notinclude additional tools and supplies you may need, like motors or rigs.
It depends. They are a great solution for people who have ideal drilling conditions and only need a simple well for watering their lawn (or maybe an emergency water source). But, if you think you can drill a 25+ foot deep well through rocky soil with one of these DIY well kits, you will be very disappointed.
If you need a reliable water source, you will likely need to pay for professional well digging. However, that doesn’t mean you can’t have a backup water source.

Bedrock wells are drilled below the topsoil and groundwater into bedrock, tapping the cracks in the rock that carry water deep underground. The average bedrock well in New Hampshire is between 100-feet and 500-feet deep, but drilling depth can go up to 1,000 feet.
To access the water, a pipe is installed into the bedrock, called a casing, and a pump to carry the water to the surface and into the home. The casing protects the well from possible contaminants at or near the level of ground water. Learn more about well drilling.
A drill bit at the end of a long pipe is rotated into the ground. It crushes the rock as it goes until the right depth is reached. A water and mud slurry is pumped down through the drill bit to clear the crushed rock out of the well. This rotary process is the most common and least expensive way to drill a bedrock well. A well can also be drilled using the percussion process which uses a falling weight to pound and pulverize the rock at the bottom of the well.
When you decide to install a bedrock well, you should set aside a few days for the work. It usually takes about a day to complete drilling, and another day to install the pump.
How deep the drilling company must dig determines the basic cost, since most companies charge by the foot. A well drilling company can get a good idea of how deep the bedrock well will need to be by examining your property, the average well depth for your area, the geology and other factors. If after an initial drilling, there is adequate water available for your family’s needs, then the drilling can stop. If not, the drilling will continue until an adequate water source is found.
During the drilling process we monitor the water flow to ensure there is enough water available at the source to provide adequate water for your family, lawn or business. We constantly monitor the water flow, so you can be confident that we will never drill a well that is deeper than it has to be.
The state also requires well drillers to conduct a 30-minute yield test of each new well to determine if the water removed is being adequately replenished. By measuring how much water flows from the well each minute, the homeowner can tell if the yield will meet the family’s needs.
In New Hampshire, the median yield for a bedrock well is 6.5 gallons per minute. The average American household needs 100 to 120 gallons per person per day, and a flow rate of about 6 to 12 gallons per minute.
If the well does not meet these standards, there are ways to try to get more yield from the well. Hydrofracking was originally created for the oil industry, but has become a useful tool in well repair and drilling. A bit is inserted into the well which blasts the bedrock with highly pressurized water to open cracks in the bedrock in hopes of creating new paths for the water inside. This method uses no chemicals. Skillings & Sons has a 98 percent success rate with fracking, a record so good we offer a guarantee.
Some municipalities have requirements relating to location, construction and water quality of private wells but there are no state requirements regarding well water quality or quantity in New Hampshire for private domestic wells. If you are selling or buying a home with a well, remember that the owner is required to disclose the location of the well, its age, any malfunctions, date of the most recent water test and any problems with water quality that test may have uncovered.
In 1984, the state began keeping records of all new wells. The information is available to the public in an online database. If you want to know about your well or those in your surrounding area, the database can help.
Most bedrock wells in New Hampshire deliver safe drinking water, but the geology of the state and other factors do sometimes lead to contaminants in water. Some of the most common, naturally occurring contaminants are arsenic, bacteria, radon, radium and uranium. You can determine the presence of these contaminants by conducting tests, which Skillings & Sons can help you with.
Other naturally occurring water quality issues can include hard water, corrosive water and iron, sand or sediment in your water. There are water treatment solutions to all of these issues.
Of course, there is sometimes a risk of man-made contamination, which can be revealed in a water quality test. Homeowners with wells should be mindful of the activities on and around their property to ensure the well does not become contaminated. Improperly applying fertilizer or pesticides, inappropriate disposal of motor oil, solvents and other harmful substances, or living close to an industrial area could all put your well at risk.For more information about bedrock well water contamination in your area, contact the NH Department of Environmental Services.
In New Hampshire, well-drilling contractors must be licensed, but homeowners can drill a well with the help of a contractor if it is on their own property. Skillings & Sons believes that it is vital the water coming into your home is clean and plentiful. Hire a licensed professional to do the work, as it will affect your life for years to come. Contact us for a water well drilling or water pump replacement estimate.

The objective in choosing a method to drill a water well is to use the least expensive method that can be successful given the type of material that must be drilled through and the depth that must be drilled to reach an acceptable source of groundwater.
Often, there are no options, and the choices we have are limited, maybe even non-existent. But the method used to drill a water well must match the geology.
Most manual well drilling methods have been adapted to use machine power instead of human power. Also, powered methods have been developed that can drill larger diameter boreholes much deeper and faster than any manual method. Machines used to drill a water well are typically called a "drill rig" or just a "rig".
This method employs a pump to force a flow of water down a drill pipe and out a narrow nozzle to make a ""jet"" of water that loosens the sediment. The return flow of water outside the drill pipe carries cuttings up to the surface and into a settling pit. The pump then returns the water back down the pipe. The drill pipe is suspended from a tripod and rotated by hand to keep the borehole straight.
This method only requires lengths of pipe and a water pump that can generate sufficient pressure. The pipe is often left in the ground to serve as the well casing.
The diameter of the borehole is only slightly larger than the drill pipe/casing. Therefore, it is difficult to install an adequate sanitary seal to protect the well from surface water contamination.
This is a mechanized version of manual percussion drilling. The heavy drill bit and related parts are called the ""tools"" and they are raised and dropped on a steel cable.
Cuttings are removed with a bailer. Several meters of water must be maintained in the borehole to keep the cuttings suspended. The machinery ranges from a very simple skid-mounted powered winch with a tripod to a complex set of pulleys and drums with a large mast.
A cable tool rig can drill through anything. The larger versions can drill a water well hundreds of meters deep. Compared with other powered drill rigs, the machinery is simple and has a relatively low rate of fuel consumption
Compared to other drill rigs of a similar size, a cable tool rig will drill a water wellvery slowly. When drilling in loose sediments, it is necessary to drive steel pipe behind the drill bit to keep the borehole from collapsing.
This method used to drill a water well starts with the basic concept of well jetting described above. Add a larger cutting bit, lengths of steel drill pipe with threaded joints, a motor to turn and lift the drill pipe, and a sturdy mast to support the pipe and you have the elements of a mud rotary drill rig. A further refinement is mixing bentonite clay or other materials in the water to improve its ability to lift cuttings out of the hole; this fluid is called ""drilling mud"" or just ""mud.""
There are many kinds of mud rotary drill rigs used to drill a water well. They fall in two basic categories; table drive, where the drill pipe is turned by a rotating mechanism near the base of the rig, and top-head drive, where the drill pipe is turned by a motor attached to the upper end of the pipe.
In both types, the upper end of the drill pipe is attached to a lifting mechanism that raises and lowers it along the mast. Both types of mud rotary rigs also have a swivel attached to the upper end of the drill pipe that allows drilling mud to be pumped down the drill pipe while the pipe is rotating.
The larger the rig, the faster and deeper it can drill. The LS100 and LS200 drill rigs are mud rotary rigs at the small end of the range of drill rig sizes.
Mud rotary drilling is also much faster than cable tool. A large mud rotary rig can drill a borehole 60 cm in diameter to 1,000 meters or more. Even a small rig like the LS200 can drill a 20 cm porthole to a depth of 60 meters.
As a result, mud rotary rigs use more fuel per hour than a comparable cable tool rig. Most drilling operations that use a large mud rotary rig also require support vehicles to haul water and drill pipe.
The mechanical elements of an air rotary drill rig are similar to a mud rotary rig; table drive and top-head drive are the two basic options for rotating the drill pipe. The principal difference is an air rotary rig uses compressed air to remove cuttings rather than drilling mud.
A type of ""foam"" can be added to the air stream to improve cuttings removal and provide some borehole stability. An air rotary rig can use the same type of drill bits as a mud rig, but it can also drill with a down-the-hole hammer.
This type of bit uses compressed air to break up rock and it can drill very fast. A large air rotary rig can drill a borehole 60 cm in diameter to 500 meters or more.
Because there is no drilling mud to mix or settling pits to dig, an air rotary rig can be set up very quickly. An air rotary rig also drills much faster than any other rig of a comparable size.
An air rotary drill rig requires a very large air compressor, especially if a down-hole hammer is used. This adds significantly to the cost of the rig, its maintenance needs, and its fuel use.
A large air rotary rig will consume 40-60 liters per hour of fuel, making it one of the most expensive types of drill rig to operate. Large air rotary rigs also require support vehicles.
Swiss Centre for Development Cooperation in Technology and Management (SKAT) has published a manual entitled "Drilled Wells" which covers additional topics and information on the subject of how to drill a well. The PDF of that manual can be downloaded here.


 8613371530291