
mud pump concrete slab free sample

The process of raising concrete pavement slabs and filling voids under them is known as "mudjacking", or more recently referred to as "slab jacking". This operation requires the use of a special machine commonly called a mudjack which pumps a grout mixture under the pavement to fill the voids. Another method of filling voids and stabilizing concrete slabs involves the use of a polyurethane material. When either of these methods are used, it can accomplish two jobs very well. It can be used to raise a concrete pavement slab that has settled and to fill holes or cavities which have been formed beneath a concrete slab by pumping action or by settlement of the subgrade, such as to cause bridging by the concrete slab. Generally due to the cost of the material, polyurethane is only used to raise and stabilize the pavement or fill small voids. The polyurethane material should not be used to fill large voids.
When a mudjack is used, the work must be done by an experienced crew under careful supervision. When polyurethane is used the work is usually contracted, since specialized equipment is required to mix and pump the components of the urethane mixture.
Badly cracked or broken slabs cannot be raised effectively, and bituminous patches or decks should be considered for these sections. Pavement leveling or mudjacking to raise settlements is normally done during cool weather in the spring and fall when joints are open, but may be done at any time to fill voids. Mudjacking must be done as soon as settlements or voids are evident. Oil streaks on the pavement or shoulder settlements are usually indicative of voids or settlements. Consideration should be given to mudjacking the most abrupt and deepest settlements and voids. Long gradual settlements are usually not objectionable.
Asphaltic concrete upper deck on concrete sections may be mudjacked, but a longer nozzle will be required and care must be exercised so that the slurry is not pumped between the concrete surface and the asphaltic deck.
Mudjacking pavement with polyurethane involves injecting polyurethane material under the pavement at specific locations to fill voids and raise the pavement back to it original elevation.
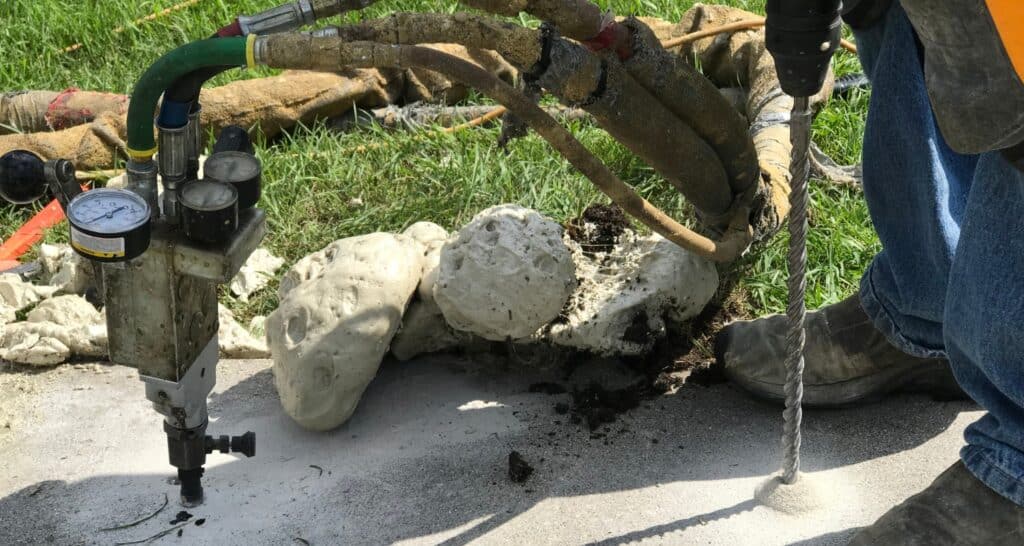
The equipment used for undersealing generally consists of pumping unit designed and capable of injecting the high density polyurethane material beneath the pavement. The pumping unit is equipped with a dial gauge having pressure increments in 0.1 pound to allow for controlling the rate of flow of material as well as the rate of rise of the pavement. In addition to the pumping unit, pressure and temperature control devices are used to maintain the proper temperature and proportionate mixing of the polyurethane component materials as they are pumped under the pavement.
The actual work of mudjacking is performed by a crew of 5 workers plus flagmen under the supervision of a Special Maintenance Supervisor. The crew consists of a skilled nozzle handler, a pump operator, two material feeders and one worker to watch the slab and plug the holes. After start up and when pressure starts to build one material feeder should help the nozzle handler. Mudjacking equipment and hoses should be kept in good condition at all times and cleaned after each use. It should be reconditioned during the winter and hoses replaced on a regular basis to prevent hose "blow outs" on the job.
Holes for mudjacking are generally 2 5/8 in. in diameter and spacing should be done by experienced personnel. Each settlement to be raised may vary and joints and cracks must be considered. A normal spacing for two lane (24 ft. pavement) where both lanes have settled would be to place holes approximately 6 ft. apart and 36 in. from the centerline and edges of the pavement in both lanes. Holes along both sides of the centerline should be staggered. Past experience and field conditions provide the best guide.
If a slab is down on only one side or at only one end and only a few holes in the settled part would be needed to raise that part, it is desirable to locate the holes as if it were necessary to raise a much larger portion of the slab. When this plan is adopted, the holes that are drilled first will fit into the regular arrangement of holes in case further settlement should make it necessary to drill and pump a larger area at a later date.
When grout is pumped through the hole, it will tend to flow about the same distance in all directions form the hole and will; thus fill a circular area with the hole in the center. It is, therefore, desirable to space all the holes so that they will be about the same distance apart or will lie in circular patterns about one another. Holes in adjacent slabs can be located so as to conform to this arrangement in a general way, although it may be necessary to shift the holes at the end of the slab from the regular pattern. If the slab is badly broken, or the portion to be raised is amll, it is advisable to locate the holes at about the spots at which jacks would be placed if it were possible to insert jacks under the slab.
Mudjacking is usually done with a mixture of selected top soil or loam, free from stones, roots, and other foreign material which would clog the equipment, and Portland cement and water. The soil should have a low shrinkage factor and 9 sacks of cement per cubic yard of soil is to be added to reduce the percentage of shrinking, making it less permeable to free water, and to serve as a hardening agent. Where a suitable loam or top soil is not available, "fine blow" sand, commercial agricultural lime, mineral filler or other fine sands, having well rounded particles may be used. However, these materials will accelerate wear of the mudjack cylinders. If finely ground limestone is used, it should contain a minimum of 90% calcium carbonate with 100% passing the #50 sieve, and not less than 60% passing the #200 sieve. The recommended proportion of cement to these other materials is 6 sacks of cement to one cubic yard of material. The amount of water needed in the mixture will vary with the consistency desired.
When a mudjack is used to correct pumping of a concrete slab, it is best to fill the holes under slab with a thin grout. This grout should be a little more fluid than that used for raising a slab so that it will seek out and fill the cavities more readily.
When the mudjack is employed for raising a slab which is settled, it is necessary to use a somewhat stiffer mix than that which is used for the correction of pumping. Great care must be taken, however, to make sure that the slurry is not too stiff. The use of a mix that is too stiff can cause "stools" (build-up) to form under the slab around each drill hole. This leaves an unsupported slab area between drill holes which will probably result in damage to the slab. In other words, a grout that is too stiff will not flow far enough from the point of entry at the drill hole.
After all holes have been drilled, the next step is to raise the settled slab. In this operation, care must be taken to make sure that the slab is raised only a very small amount and not more than 1/4 in. at each hole at a time, and that the grout is applied under the settled portion in such a way that no great strain is developed at any one place. It is usually necessary to proceed back and forth along slab. As a portion of the slab under which grout is being pumped is brought back to its original shape, the pumping is extended in each direction until the entire dip is at the desired elevation.
It is not advisable to bring the portion of the slab near the middle of the dip up to the level indicated by the straight dotted line in the side view of the Order of Pumping figure below. A sharp bend would then be produced at Section B and the slab would crack there. Naturally, the middle portion must be raised faster than a portion nearer an end of the dip, but lifting must be carried on along the dip in such a way as to give the shape shown on Line C at an intermediate stage.
Because of the many changeable factors, no definite order of pumping can be followed strictly in lifting a slab. However, good results will be obtained if a certain system is followed in a general way. For example, the condition shown in the figure could be corrected by use of a mudjack. The holes would be located as shown in the top view. As stated above, raising must be started at the middle of the dip. The numbers near the holes indicate the order in which the holes are used for pumping grout under the slab.
Because of the shape of the dip, the holes through which grout is pumped first must receive more than the holes on either side. Pumping may be started at either edge of the pavement. In the sample shown, it will be assumed that the edge shown towards the top of the page is raised first. After some grout has been pumped through the hole where the no. 1 is placed, the next pumping is done through the hole at 2. This pumping at 2 will relieve the strain that was set up in the slab by the pumping at 1. As indicated by the position of the no. 3, the next pumping is again at the first hole. Then the positions of the nos. 4, 5, 6, 7 and 8 show that the raising proceeds back and forth on each side of the starting hole. Thus, there will be four pumpings at the starting hole while there are only two at each hole next to it. The nos. 4 and 2 in circles represent the numbers of pumpings at the holes. As previously stated, only a small amount of grout is pumped through a hole at one time, not more than enough to raise the slab 1/4 in.
The portion of the slab in the middle of the pavement width is now raised by pumping the grout through three or four holes in that area. The holes must be used in proper order. If both edges of the slab were about the same elevation, the next pumping must be done at the other edge shown near the bottom of the figure above. As indicated by the sequence of numbers from 1 to 13, the raising procedure is similar to that near the other edge, but it is carried a little farther. The pumping can be continued by going back to the middle of the pavement and then to the edge first raised. The operations are repeated in a similar manner until the entire slab has been brought to the desired elevation.
If raising were started by using one hole near each edge of slab and one hole near the center of the width, the slab would probably crack. The slab must be carefully watched at all times during the raising operations because the amount of lift cannot always be determined by the amount of grout pumped and serious cracking will certainly develop if the slab is raised too far in one place at any time. The procedure for pumping just described is intended to serve only as a somewhat general guide. On a particular job, the elevation must be checked with a stringline or a straight edge or by sighting.
The last hole at each end of a dip is never used until the slab is at the desired grade. Then a very thin grout is pumped through each end hole to assure completely filling of the thin wedge shaped opening, which will have then formed at this part of the dip. Slabs that are not badly cracked before or during mudjacking operations can be raised several inches.
The best time for pumping is in cool (not cold) weather, while the slabs are not at maximum expansion. Before pumping is started, the surface of the pavement should be wetted. This will make the clean-up work much easier.
During the raising operation care must be taken to select the order of using the hole so that cracking of the slab will be prevented. A hole may be used as many times as necessary.
Pumping must proceed from the area of greater lift to the area of lower lift by rotation. If a portion of a slab being raised ends at a joint, it is usually advisable to cross over the joint and drill two holes in each lane about 2 in. from the joint. These holes must be filled last.
The maximum permissible rate of pumping is 1 ft3 per minute for a thick mixture and about 3 ft3 per minute for a grout of average consistency. Be certain that the slab is not raised more than 1/4 in. at any one hole during one pumping. A surveyor"s level should be used if necessary to ensure this.
After all pumping has been completed all drill holes must be cleaned out and filled with a mortar composed of one part of cement to three parts of concrete sand by volume.
When a mudjack hose shows signs of excessive wear, it must be replaced promptly. Failure of a hose under pressure may cause personal injuries and damage to passing traffic. The man who handles the hose during the pumping operation must wear goggles.

Concrete raising is typically about half the cost of replacing the same concrete. Ultimately, the cost of raising or stabilizing concrete is a direct reflection of how much leveling material the project will require. In general terms, concrete raising can cost between $2-$5 per square foot.
For example: a 10 ft. x 10 ft. section, that needs to be raised, figures to 100 square feet. This job would cost somewhere between $200 and $500 to repair. How far the slab is settled, if there are voids present, or if other sections need to be involved in the repair, will determine where in that scale the job would cost. This is why we offer FREE estimates, so our experienced crew member can come to your home or business, and provide you with an accurate estimate for completing your specific project.
Mudjackingmaterial is a sand based grout that will not lose its density. Combined with Portland cement this non-organic mixture is pumped under the slab of concrete. Different from organic material, RaiseRite’s slurry will not decompose or breakdown.
The RaiseRite trucks remain parked on the street, while the concrete repair crew maneuvers the equipment to the site requiring repair. The hydraulic mudpump is roughly the size of a riding lawn mower. Armed with many lengths of hose, the mudjacking crew can reach just about anywhere.
If you are using polyurethane to repair your concrete, a hose is ran straight from the truck/trailer to the repair site without driving a single piece of equipment on your lawn.
Foam plugs help RaiseRite patch the holes, and act as a shock absorber, when slabs are affected by the frost cycle. Holes that are not patched with foam can pop out, when the material and earth under the slab expand from freezing.
When concrete is raised with polyurethane foam (FoamJacking), these plugs are not used. The material used for raising the slab replaces the inserted foam plug as a shock absorber.
Preventing water from going under the slab is key to preserving the repaired slab. Make sure that your downspouts are correctly placed, to assure water runs away from your concrete slabs or foundation.
Solid slabs of concrete can be raise and stabilized. Gravel areas or blacktop are unable to be repaired, and need to be replaced or re-installed to remedy settling issues. Slabs of concrete that are badly cracked may also be too damaged to lift.
If you are not sure if your concrete can be raised, call us for a Free Estimate. Raising settled concrete can be half the cost of replacing it with less damage to your landscaping and downtime. Our expert estimators will be able to assess and provide you with an accurate, FREE estimate for your project.
Both methods of concrete lifting will achieve the same results. Mudjacking concrete leveling and polyurethane concrete raising will raise and support sunken or unstable concrete slabs by drilling holes and pumping material under the slab.
Mudjackinguses a sand based material that is infused with Portland cement. This slurry is hydraulically pumped under the slab to fill voids and raise the concrete. Mudjacking material weighs on average 100 lbs per cubic foot.
After the slab has been raised, the only visible evidence that the concrete has been repaired are the holes. For this reason, polyurethane has gained HUGE popularity because of the nearly invisible 5/8″ holes that remain after the job is completed.
Polyurethane concrete raising drills a nearly invisible 3/8 or 5/8″ hole and the process calls for considerably fewer holes than traditional mudjacking.
Concrete raising is typically half the cost of replacing your concrete slab. When large voids are present, this can increase the cost of the repair. While polyurethane material is more expensive than mudjacking material, the smaller hole size, lighter material weight, and fewer injection holes, make the investment in polyurethane over mudjacking well worth it.

Slabjacking is an awesome method for lifting concrete slabs that have sunk into the ground. In a few minutes or a couple of hours, using a polyurethane foam injection, your patio or sidewalk can be brought back up to level. This process makes very little mess and costs significantly less than new concrete.
Acculevel has been repairing and waterproofing foundations since 1996. We have repaired thousands of concrete slabs over the years and in our experience, slabjacking is the most reliable method. (Full disclosure: we previously used the mudjacking method. After a great deal of research, we transitioned to slabjacking in 2015.)
We’ve written about slabjacking before, in articles aboutwhat causes a slab to sink. We’ve also compared differentrepair methods and their respective costs.
There is one common question we often encounter that we haven’t addressed yet, and there are multiple variations on the same theme.Is slabjacking a good fit for me?
If any of these sound familiar, this is the guide for you.The following are images that clearly demonstrate when slabjacking is NOT a good fit, and you should have the concrete replaced.
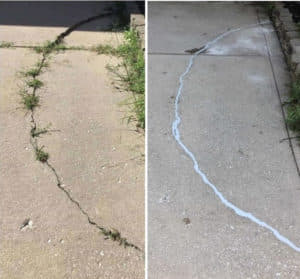
In this example, the slab has too many cracks. Lifting this slab can cause more splitting and widen the cracks. Each crack creates a separate piece of concrete, and when you have multiple pieces it becomes difficult to keep them aligned with one another.
This is a porch that is sinking- but cannot be slabjacked because the concrete is deteriorating. A hole is clearly visible between the first and second stair.
There are some additional circumstances that may preclude slabjacking. We explore those in a companion piece, What Are the Biggest Problems with Slabjacking?
If slabjacking is not a good fit, should you still have a contractor come to your home for an appointment? Possibly! Evaluate the area where the concrete is settling.Is it in a location that may also be damaging other areas of your home’s structure or foundation?The closer the slab is to your house, the more likely it is that you have other issues. A sinking or sloping concrete slab can direct water towards your house, instead of away from it.
Erosion and poorly compacted soil are the primary causes of sinking concrete. And as the slab settles, it begins to slope and collect water. This is what leads to water pooling around your home’s foundation.

Mudjacking (also referred to as slabjacking, grout pumping, slab leveling, etc.) has been the common method used for lifting sinking concrete and is still widely used by contractors for concrete slab restoration. Mudjacking can be an effective solution, but in some cases may only be temporary. While mudjacking and polyurethane injection achieve similar results, the process and overall performance and lifespan of the two products are very different.
DryZone, LLC provide a superior concrete leveling alternative to mud jacking using the PolyLevel® system. PolyLevel provides a less invasive, longer lasting fill that will stabilize your concrete for years to come. If you"re interested in concrete lifting and leveling for your home, call us today at 1-855-554-5001 or click below to get a free quote in Lewes, Berlin, Easton and nearby.
Mudjacking uses a mixture of sand, water and cement which helps solidify the material. The mortar-based mixture, or "slurry," is pumped through large holes in the concrete using hydraulic pressure, which lifts the sunken slab.
While mudjacking is a common option for repair, there are several problems which make it a less desirable alternative. The mixture takes several days to cure before any weight can be placed on it. The mixture is very heavy, weighing an average of 100-150 lbs. per cubic foot and can add additional unwanted weight, potentially making the problem worse. While mudjacking is more affordable and less invasive than concrete replacement, the material can eventually erode and wash out, causing the slab to eventually settle again.
Rather than using a mixture of concrete and mud, polyurethane concrete raising utilizes environmentally-safe polymer foam that is injected through penny-size holes in the concrete. Through a chemical reaction the high-density foam expands to stabilize the loose soils and lift the sunken concrete. After approximately 15 minutes, the polyurethane material is fully cured and can be driven on or walked on.
The polyurethane weighs only about 2 lbs. per cubic foot, which doesn"t add any additional weight to the soil. Polyurethane foam is an inert, stable product that is made from 100% recycled materials. It is impervious to moisture and decay ensuring that your concrete repair will last. The expansive polymers allow lifting of heavier loads such as stoops and slab foundations.
At DryZone, LLC, we use the proven, engineered PolyLevel® System to stabilize and re-level foundation slabs and exterior concrete in Lewes, Berlin, Easton, Middletown, Newark, Rehoboth Beach, Wilmington, Bear, Dover, Salisbury and the surrounding areas. Call us today at 1-855-554-5001 or contact us online to get a free quote on our concrete lifting and leveling services.
The greatest advantage to raising and leveling concrete with polyurethane foam compared to replacement is cost. While the price for each job varies, a good rule of thumb is that raising and leveling concrete is usually around 50%-80% less than cost of replacement! So in example a typical $4,000 concrete driveway replacement may cost around $800 – $2,000 to raise and level. Keep reading to get a better idea of what your concrete project may cost.
To give you a more realistic understanding of the average price for raising concrete here are some typical projects and average costs for each. Understand that these are just to give you a ballpark range to get a general idea. Most concrete lifting companies have minimum starting prices that can be anywhere from $400 – $1,500 depending on the area, time of year and how busy the company is.
Also, concrete that can be a challenge to lift such as slabs that require saw cutting or the use of jacks or concrete with lots of cracks can be tricky to lift and the price may reflect that extra time required.
A common issue we see are patios sinking along the foundation causing water to drain towards the home – not good. Raising three 8’ x 8’ sections of patio along the home up 2” would cost around $850- $1,200. Along with concrete raising, there are other improvements you can do to fix-up your patio. Here is a good example of a complete patio make-over on this St Charles raising and repair project. Here is another patio raised and repaired in Naperville.
The size of the slab and the amount needed to be lifted are the main factors that determine price. Since there are fixed costs to each job no matter how big it is, such as travel and set-up, larger projects will cost less per square foot than smaller ones. A single section of sidewalk may cost $250-$450 to raise. Whereas that same section may only cost $60 if it’s completed with 10 other sections. Also, the location of the raising project can affect what you pay. You may pay less if you are closer to the contractors shop or other jobs they have. Finally, the difficulty of the job will impact the price. Slabs that are hard to reach or have many cracks will take longer and cost more.
Lastly, most reputable concrete raising companies have job minimum requirements to cover travel time, set-up and clean-up. We have seen most minimums around $450 -$950. So if you have a small job such as a singe walkway section to raise it will typically cost you what the minimum is, unless you can bundle your job with a neighbor.
Be skeptical of contractors who don’t specify the type of material they will be injecting below the concrete or are very vague about it. Materials such as sand, cement, and limestone will reduce the cost of the job but the repair may not last long. Ensure that only geotechnical polyurethane specifically engineered for raising concrete is being used. Anyone who tries to sell anything else and claims it’s the best is either misinformed or being dishonest. Read more about why polyurethane is the best here: polyurethane vs mudjacking
Some concrete leveling companies will charge additional fees if the project requires more polyurethane than what was estimated. There is nothing wrong with this practice assuming the company was realistic with the original estimate and the additional fees are fair. Unfortunately that’s not always the case and some companies attract customers with low estimates and later charge excessive amounts based on “extra material” that was needed. A $600 patio leveling project can turn into a $900 project to complete.
Its can be tempting to save a few bucks and go with the lowest quote on a concrete leveling project. However, if the company doing the work only offers a 1-2 year warranty or no warranty at all, those saving will be short lived if the work will need to be redone a few years later. Make sure to read and understand the terms and conditions of the warranty to ensure your investment will last.
To prevent your concrete from settling again, the cracks and gaps around the raised sections need to be sealed with a high quality sealant. Crack and Joint repair is typically not included as part of the standard raising process. Never assume its part of the job. If its not listed, its most likely not included. Learn more about crack and joint repair.
If you are still reading then you can see that giving a standard price for concrete lifting services can be difficult and the only true way to know is to have a professional concrete raising contractor visit your home to inspect the concrete in person to determine the price. We at Concrete Hero typically wont give a price over the phone for this reason.

Are you confused about the buzz around getting a rat slab installed in your crawl space? Worry not! In this article, we will cover everything you need to know about rat slabs. We will give you a clear idea of what it is and why it is important along with other necessary information to cater to your doubts and questions regarding this home maintenance service.
Rat slab also called mud slab is a few inches layer which constructors put on the foundation. Rat slab is a thin layer of some concrete poured over the floor or your crawlspace. It is a fine, poorly finished area that is not at a very smooth level. The purpose of this concrete slab poured on the ground is to seal the dirty floor and prevent potential problems especially the rats which is why it is named rat slabs.
Your crawlspace is an overlooked area that might be prone to many potential problems. Rat slab is a proven technique to prevent multiple problems at a time in the area below the building or a house. Here is why it is important:-
Restricting the formation of moles in your crawl space, rat slabs keep your place clean, dry and away from the moisture which is the major cause for the mold formation.
The thickness of a slab is important to decide its longevity. Very thin slabs are prone to cracks if they get much traffic. On the other hand, very thick rat slabs can be a little expensive and become a hindrance.
Rat slab installation is indeed worth every penny since it not just builds the foundation of your house but also takes care of your crawl space in the best way by saving you from many problems in advance.
Above, we learned that slabs are crucial for your floor. Based on various factors the mud slabs can be of multiple types like one-way slabs, two-way slabs, grade slabs, flat plate slabs, hollow core slabs, hard slabs, precast slabs, etc.
This is a piece of basic information about the Rat slabs and their importance. For any specific queries ask us in the comment below. We will be happy to answer your questions
To get slab installation services in Tacoma, contact Ratslab, one of the best contractors in your city specialized in rat slab installation. Call us at (855) 728-7522 and get started right away.
Rat slab is a proven technique to prevent multiple problems at a time in the area below the building or a house. If you are looking to understand more about Crawl Space Encapsulation, please click.

The reason your concrete is ugly (or soon will be) is because you haven’t had it sealed in years probably since it was installed…right? Go ahead, pour some water on it – what do you see? If your concrete darkens-up and absorbs water and turns brown, it"s UNSEALED.
By allowing water to get into your concrete, you are most certainly asking for trouble. Water expands up to 9% when it freezes and pushes against the concrete around it, leading to cracks, which absorb more water and leading to even larger cracks. This process repeats over and over until your concrete is cracked, broken, chipped, and flaked. Prevent all of these problems with our penetrating hydrophobic concrete sealer, the best concrete sealer on the market today.
In addition to freeze-thaw cycles and damage caused by salt and other ice melting chemicals, driveways are threatened by a host of other common hazards, including lawn fertilizer, oil, gas, anti-freeze, UV rays, and acidic rain, among others. An unsealed driveway will definitely become a major problem in the future due to rotting, broken, and cracked concrete. By this stage, you’re looking at complete tear-out and replacement, which is admittedly expensive. Save yourself some money and use our penetrating hydrophobic concrete sealer to protect your driveway and keep it looking great.
Unlike acrylic sealers that form a film on the concrete surface, this penetrating sealer chemically alters the concrete’s surface by glassifying it to create a clear waterproof resistant membrane protecting the surface from water penetration that causes damage. At the same time, the appearance (color) and texture of the surface is not changed in any way like other sealers do.
Our penetrating sealer is the highest quality hydrophobic concrete sealer on the market today. In addition to its superior performance, it is also formulated, packaged, and delivered with the environment in mind. Compliant with all federal and local VOC laws, this penetrating sealer is an environmentally friendly concrete sealing option.
Concrete isn’t a single material; it’s a mixture of cement, water, and an aggregate material such as sand or gravel. The strength of concrete, also called its grade, depends on the ratio of these ingredients and is measured with numbers ranging from M5 to M70. Concrete mix with a grade of M10 to M25 is typically strong enough for residential use and less expensive than higher grades. (Higher numbers are used in large-scale commercial projects).
The word “grade” can also refer to concrete poured over an incline, like for a driveway that goes up a hill. A concrete contractor may charge more if the incline is steep since working with heavy machinery on a slope can be difficult. Your cost will also be higher if the ground grade needs to be increased or lowered before pouring the concrete.
Concrete is quite versatile. It can be stained, stamped, or sealed to create a variety of appearances, though this will cost more than pouring basic concrete. Stain or dye to change the concrete’s color costs an additional $3.50–$7.50 per square foot. Stamping a design such as tiles or cobblestones into the wet concrete costs $10–$14 per square foot, though more elaborate designs and engraving can cost $18–$20 per square foot. A smooth epoxy finish or a weather-resistant concrete sealer will each add about $4.50 per square foot.
The $4–$8 per square foot average usually includes professional labor at about $50 per hour. However, some projects require extra labor. For example, if you’re replacing an old concrete pad, it will need to be demolished and removed before the new concrete is poured. This can cost anywhere from $500–$1,800. You may also need to hire a pump truck for about $900 if the concrete needs to be poured in an area that’s difficult to access.
Depending on how much your new concrete slab will change your yard’s layout, you may need to hire a landscaping service to move or replace trees, shrubs, or turf. Many landscapers can also change the incline of the subgrade soil surface if necessary. These services can cost up to $200 per hour for design and implementation.
Additional materials are usually needed for slabs that hold a great deal of weight, particularly concrete foundations. Wire mesh ($0.35 per square foot) and steel rebar ($2–$3 per square foot) both add strength, particularly when the ground underneath the concrete is poor. Additionally, some home improvement projects require reinforced concrete slabs with thicker edges that can hold more weight. These edges add $1–$2 per square foot. Chemical additives also increase the strength of the concrete mixture itself.
Finally, house foundation costs are higher than other concrete slab projects because most require a 2-inch styrofoam under-slab insulation layer at the cost of $0.50– $2 per square foot. Adding a vapor barrier to keep moisture out is also a good idea, which adds about $0.50 per square foot.
Concrete is a highly durable material that can expand and contract with changing temperatures, but excessive weight, shifting soil, and obstacles such as tree roots can create cracks over time. It may be possible to repair an existing concrete slab in some cases. For example, a driveway or walkway with cracks or chips in only the top layer can sometimes beresurfacedrather than entirely replaced. Cracks may cost between $500 and $2,500 to repair, and driveway resurfacing can cost anywhere from $1–$10 per square foot.

You might wonder where the term “mudjacking” came from. It describes the mix of materials used to hydraulically lift sagging concrete slabs and restore their original alignment.
Resembling mud, the material is usually a blend of soil, portland cement and other granular ingredients that can be liquefied and pumped underneath a settled slab to force it upward.
One important thing to know about mudjacking is that it’s not just a technical repair. There’s a combination of art and science that goes into lifting tilted or sagging concrete. You have to get the mix just right for local conditions, know exactly where to apply the material for optimum results, use just the right amount of hydraulic force, and have the experience to assess the condition of original concrete and how it will respond to the mudjacking process.
Fortunately, many concrete settlement issues can be fixed inexpensively, but it’s important to get a professional inspection at the first sign of trouble. This is a problem that won’t go away by itself, and left unaddressed, can lead to bigger and more costly structural failures later on.
Offices and commercial spaces are often built on concrete slab foundations. They’re great for speed and efficiency and help to lower total cost of ownership. For investment properties, it means more affordable leases for the occupants.
Other concrete structures — mudjacking can be ideal for driveways, garage floors, pool decks, patio slabs, common areas and walkways. Often cracks and erosion can be superficial and easily repaired, but mudjacking also works well when you need more extensive restoration.
If you’re thinking about mudjacking as a repair option to restore business or residential property, you might wonder what causes concrete slabs to sink or tilt. Even under the best of circumstances, with the best materials and building practices, virtually every concrete slab is subject to some amount of natural settling over time.
The ability of the supporting soil will change depending on the local soil types, the natural ebb and flow of groundwater, and gradual erosion due to unpredictable weather and seismic activity. When you add variations in site preparation and construction methods to the mix, the odds go up that the supporting soil will gradually fall away and lose its ability to hold the slab in its original alignment and elevation.
Any one or a combination of these contributing factors can cause the slab under your house or office to sink or tilt. Some small variations are normal and relatively harmless, but they don’t go away by themselves.
Whether the slab in question serves as a home or office foundation (or whether it’s in an exposed area like a driveway, patio, pool deck, walkway or public area), ripping out existing concrete and replacing it with a new pour can be prohibitively expensive. For around half the cost of replacement, you can have the slab expertly restored with mudjacking technology.
Mudjacking uses the laws of physics to gently and accurately bring the slab back into its original alignment with controlled hydraulic pressure from below.
The process is fast, affordable, minimally invasive, and causes far less disruption to your personal or business life. Cleanup is quick and simple, and you can be back to your regular routine in a fraction of the time it takes to demolish, remove and replace an entire concrete slab.
Before you move ahead with any concrete slab repair option, talk with a reputable professional who will give you a complete assessment of your situation and show you the best repair options for your needs and budget.
Brown Foundation repair stands on decades of successful experience in all forms of concrete remediation. We literally wrote the book on this kind of restoration and we’ll help you make an informed decision. Contact us today for a no-obligation evaluation.
A nozzle is secured to the hole to carry slurry set to the proper consistency. The voids are filled and the slab is raised to acceptable tolerances. The small hole is patched and the room is restored and problem resolved.
A slurry of mud and cement is pumped under the slab (depending on the amount of lift) to fill the voids created by raising the slab. All pier areas are then backfilled with sand and top soil and plants are replaced.

Mudjacking is an alternative to replacing concrete. We drill holes in the existing concrete slab and use a sand slurry mixture to raise the existing slab back to its original elevation. It normally costs significantly less that concrete replacement and can fix a host of problems, including drainage issues, trip hazards, steps that are too big and many other liabilities.
Our slurry is a specially prepared blend of several types of earth that is the densest fill material we can get our hands on. It is denser than the existing ground on which your concrete sits and is ideal for the mudjacking application.
When mudjacking first started, it was thought that adding concrete improved the quality of the job. This has actually been proven false as the industry has developed over the years. The single most important part of mudjacking is to completely fill the voids under a slab in order to stabilize it. Adding concrete to the slurry mix actually increases the drag as the slurry travels under the concrete. This in turn means the slurry doesn’t flow as well and, as a result, doesn’t fill the voids as well. A straight sand, slurry mix with no concrete added actually flows much better under the slab resulting in a complete fill of voids under the slab which insure a better job that will last longer.
While it varies based on the size of the job, virtually all residential jobs can be complete in a day or less. Mudjacking is a relatively quick process and the area is ready for immediate use again. The only exception being areas on which cars park (garage floors and driveways). We ask the customers keep their cars off of these areas until the next morning. Having said this, you will not hurt the work if you MUST drive your car on it immediately afterwards – we simply tell customers the day as an added precaution.
We start by drilling a series of holes in the concrete with a rock drill. After mixing up our mud slurry (the consistency of it is determined by the requirements of each individual job), we load it into our pump and then use large mud hose and something called “the wand” to pump the mud into the holes we have drilled and underneath the slab. As the slurry is pumped in, the slab slowly begins to rise. We continue this until the slab is at its proper elevation. After the slab has been raised, we wash everything down and then plug the holes we cement.
The most important step in raising concrete is not the actually raising of the slab. Instead, the critical component is making sure all the voids under the concrete are filled after it has been raised. This includes the voids that were present before the slab was raised, as well as, any voids created during the raising process. Too many contractors doing our work will raise the slab on pillars or columns of material (whether a traditional slurry or the newer poly foam products) and leave voids in between these columns. Imagine holes that are 5 feet apart with 18” diameter pillars underneath them, for example. There will be a large void, or cavity, between these pillars that is not filled in. A job that is done like this (i.e. raised but not stabilized) will fail. To insure a job that lasts, a contractor must not only raise the slab but also fill the voids created during the raising process.
We drive a full size semi-truck with a big box on the back that carries 10 yards of material. We also have a 30 foot equipment trail hooked up behind. The full rig is almost 60 feet long and carries twice as much material as anyone else doing this work. All that material insure that we always have enough material to not only raise your concrete but make sure that all the voids are filled, the single most critical step to a complete, lasting mudjacking job.
Yes, we do! If your concrete has a void, cavity or empty space under it, but has not yet sunk, one of the best things you can do is get that void filled. This way you will get a solid support underneath it to insure that it does not sink in the future.

The base floor within a building may simply be a cast-in-place concrete slab-on-grade with limited design considerations for structural support or environmental control functions. The base floor may also be comprised of a mud or structural foundation slab complete with waterproofing and wearing slab with the overall system designed to carry structural hydrostatic pressure loads and maintain a controlled environment. Floor slabs are often the source of leakage into the building with slab cracking of common concrete materials being a primary cause. Issues of controlling soil gas emissions such as radon may also be of importance.
Because the cost penalty to correct a foundation or slab on grade waterproofing failure is either extraordinarily expensive (up to 7 times the initial cost of waterproofing) or practically impossible to correct at all after construction is complete, it is better to err on the side of caution on the initial installation. Approach critical areas that will later be buried in construction with extreme conservatism. The recommendation is to raise the quality of approach one degree more than the existing condition reports suggest, that is, use the higher quality material and detail it with additional reinforcements and belt and suspenders precautions applied at each level of risk perceived.
This section provides specific description of materials and systems common in floor slab systems. Descriptions and guidelines are provided in the following sections:
Depending on the interior space the finish floor covering may be the exposed concrete surface itself or various floor coverings such as wood, vinyl floors or carpet. Many adhesives used in applying floor coverings are sensitive to moisture requiring the use of a waterproof system or lengthy drying times if a poly vapor retarder is used.
In typical office environments, the concrete floor slab itself is comprised of 4" to 6" thick concrete reinforced with one layer of welded wire fabric at mid depth, unless below the water table, when hydrostatic heads may exert upward pressure, requiring stronger construction.
Under slab vapor retarders may include polyethylene sheets, polyolefin sheets, high density bonded polyethylene, and asphalt/polyethylene composite sheets or polymer modified bitumen sheets. Poly sheets are usually 15 mils thick with taped seams, edges, and penetrations. Vapor retarders should be selected in accordance with ASTM E 1745 and E 1993 and installed and inspected in accordance with ASTM E 1643.
Where high water tables create contact with the slab on grade, it is necessary to waterproof the slab on grade to resist hydrostatic pressures. A mud slab can be utilized to facilitate the installation of vapor retarder membranes and waterproofing membranes. Mud slabs are usually a 2" to 3" unreinforced concrete slab with a float finish. They provide a flat surface for the membranes, which are then fully supported and much less likely to be punctured by subsequent construction activities.
Capillary break layers under floor slabs are typically comprised of 6 to 8 inch thick layer of 3/4 inch granular material that is gap graded to increase drainage rates. The granular material serves as a capillary break and a place to "store" the water until it can be absorbed back into the surrounding soil.
Figure 3 contains an overall schematic that characterizes the four functions i.e. Structural Support, Environmental Control, Finish, and Distribution as they relate to the below grade enclosure element of floor slabs.
The four function categories, i.e. Structural Support, Environmental Control, Finish, and Distribution, are expanded in general terms for floor slab systems.
Structural Support Functions—The floor slab of the below grade building enclosure must be designed to carry downward vertical gravity loadings as well as any upward soil or hydrostatic pressure loadings.
Downward vertical gravity loadings exist from the dead weight of the floor slab and any occupancy live loads. In many deeper structures the floor slab may also be a mat foundation slab carrying significant building column and wall loads.
Floor slabs may also resist upward soil or hydrostatic pressure loadings. Upward soil pressures may be applied to the floor slab in situations where it is acting as a matt foundation and the building point loads on the foundation results in an upward pressure on the floor slab.
In areas such as crawlspaces and unoccupied basement areas the structural support component involving a concrete slab may not be needed. In these areas, environmental control functions may still need to be addressed.
Environmental Control Functions—The exterior environment that the floor slab is subjected to includes environmental control loadings such as thermal, moisture, insects, and soil gas. The interior environment that the floor slab is subjected to includes environmental control loadings such as thermal and moisture. The performance of the floor slab system depends on its ability to control, regulate and/or moderate these environmental control loadings on the interior of the floor slab to desired levels.
As with foundation wall systems, the control of moisture is likely the most important environmental control function. Moisture control is dealt with in a drainage and barrier type of design approach. For cases with hydrostatic pressure from ground water levels the first phase of control of moisture can be accomplished through pumping and dewatering systems to artificially drive down the natural water table level. The second component of the moisture control system includes a granular aggregate capillary break layer below the floor slab to allow an area for moisture to accumulate and dissipate or to be pumped out or drained into an exit drain or sump system. In many floor slab situations with low water table elevations or dry conditions, the granular aggregate capillary break layer (with exit drain if required) will control the majority of the water. There may be no need for an active pumping system.
The key question that remains is whether to provide a waterproof membrane or a vapor retarder below the floor slab. A vapor retarder resists vapor migration in the absence of hydrostatic pressure. Waterproofing resists both vapor migration and hydrostatic pressure. Generally, a vapor retarder can only be eliminated on well drained sites with water tables well below the floor slab surface and the use of floor finishes unaffected by vapor migration. However, most building codes require a vapor retarder be installed between the granular drainage and the floor slab. This layer has the added benefit of minimizing shrinkage stresses and cracking in the floor slab due to the reduction in shrinkage restraint.
Waterproofing membranes are needed in situations with hydrostatic pressure or moisture sensitive interior environments. Waterproofing membranes are typically applied to a mud slab cast on a granular aggregate capillary break or applied to compacted earth. Protection of the waterproofing membrane from damage during construction is critical. Protection is typically provided with a protection board application directly to the waterproofing membrane soon after membrane installation. Detailing of waterproofing at all terminations and penetrations are critical. Top side waterproofing of floor slabs is not recommended for any situation.
Finish Functions—With floor systems the only finish of concern is to the interior space. This finish is dependent on the interior use whether it be a controlled office environment or a non-controlled parking environment. Typical finish systems may include carpet, tile or adhered flooring. The proper control of vapor migration loadings is critical with tile or adhered flooring applications that need proper adhesion. In some applications such as interior parking or storage space the interior finish is simply the interior surface of the concrete floor slab. In others, such as crawlspaces, the finish may be the vapor retarder.
Distribution Functions—The floor slab may contain distribution systems such as electrical feeders, electronic conduit, mechanical piping or heating systems.
A typical base floor slab where the design criteria includes controlling water vapor transmission into the interior space but is not concerned about waterproofing the base floor due to hydrostatic pressure loads can be referred to as an imperfect barrier system. The components of the system include a well compacted yet well draining granular aggregate capillary break system placed directly on unexcavated, undisturbed ground. The granular aggregate capillary break system provides a collection area for moisture to accumulate and dissipate as well as a firm support for slab loadings. A vapor retarder (see Description, above) is placed between the granular drainage system and the concrete slab to minimize moisture vapor transmission or soil gas transmission into the occupied space. The concrete floor slab itself provides structural support for floor loads and suitable backup for floor coverings and finishes.
A typical base floor slab where the design criteria include controlling moisture migration and water vapor transmission into the interior space can be referred to as a waterproof system. The components of the system include a well compacted yet well draining granular aggregate capillary break system placed directly on unexcavated, undisturbed ground. The granular aggregate capillary break system provides a collection area for moisture to accumulate and dissipate as well as a firm support for slab loadings. To provide a solid base material on which to apply the waterproofing membrane a mud slab or compacted earth layer is provided. In some instances with significant hydrostatic pressure or to accommodate building loadings a matt foundation slab is used in lieu of the mud slab. The waterproofing is then applied directly to the mat foundation slab and protected with protection board. In this case a wearing floor slab is poured on top of the protected waterproofing system.
A general element that is common to all buildings yet frequently not fully detailed or addressed during design is penetrations and edges. These penetrations are any openings in floor slabs that provide an avenue of breech for moisture entry into the building. Sewer pipe penetrations, water line entry penetrations, drain basins in the floor slab or sleeves for electrical, gas or communication are all common penetrations, typically with their own design or detailed features. These features, however, leave much to be desired with respect to sealing and waterproofing. Penetrations can also become quite exotic such as steam penetrations or other features that require special treatment. The edges of slabs need to be made vapor-tight/watertight, too.
When rising water tables frequently contact the bottom of the slab on grade, it may be necessary to consider installing a drain tile system of either parallel, perforated, drain tile pipes or a grid of such piping to drain off the rising water and maintain the water table below the slab on grade, by pumping the drain tile sump away from the building.
Isolation joints accommodate minor movements between structural elements and/or fixtures that penetrate through or around them. Both a prime and a back-up seal are effective as a means of reducing leakage. Raising the slab profile also works well. As with expansion joints, the detailing of concrete gradients or slope at isolation joints to prevent direct accumulation of any transient moisture is also highly effective. The same rules concerning drainage grid material or a flow path continuation from joints to drain basins should be considered during the design process.
Floor drains in floor slabs require treatment by proper design for back flow valves or special treatment for flow capacity depending upon the use of the structure. Where sump pumps are installed special back water valves or back pressure valves are needed to prevent flow back. The application or installation of pump assemblies and certain sumps requires proper coordination and effective treatment of the discharge system to avoid leakage through mechanical penetrations.

If you want to know why mudjacking DIY projects are a bad idea, you’ve landed on the right page. In this short article, you’ll learn about the major issues with mudjacking DIY projects, why mudjacking itself is not an effective concrete leveling solution, and the solution that skilled professionals recommend.
Mudjacking is a concrete lifting and leveling solution that uses a mixture of sand, cement, and topsoil. This combination of materials is called a “slurry” or “mud” and was created in the 1930s as a cheap alternative to lift and level concrete slabs. Contractors have also been known to include other additives into mudjacking in order to increase cure times or strengthen the mud, such as clay-bentonite, fly ash, pond sand, pea gravel, masonry segments, and crushed limestone.
Like all DIY projects, mudjacking is no exception to human error. Most mudjacking DIY projects fail because homeowners don’t have the right tools or expertise to level a concrete slab without causing further damage or creating new issues. We’re going to break down a typical mudjacking DIY process, so we can show you what you’re up against.
Cutting the slab – Some blog articles recommend cutting your concrete slab to raise it with mudjacking. Real professionals will never advise you to do this since this can crack your slab and potentially ruin its structural integrity.
Drilling holes – In order to pump the slurry under the slab, you need to drill two-inch holes into the concrete using a hammer drill with a diamond drill bit. If done incorrectly, you could crack your concrete or drill holes in the wrong places.
Creating the slurry – Unless you buy slurry from your local concrete supplier, you’ll need to make the mix yourself using water, sand, clay, topsoil, and Portland cement.
Pump the slurry – Once you’ve made the slurry, you’ll need to transfer it to a hydraulic pump with a hose and nozzle. Next, you need to pump the slurry into the holes while holding down the nozzle with your foot. If your foot slips or you pump too much slurry under the slab, the whole process can be ruined. If you do this project yourself, pump the slurry slowly until your slab is leveled. Remember, you can always add more slurry, but you can’t remove it once it’s under your slab.
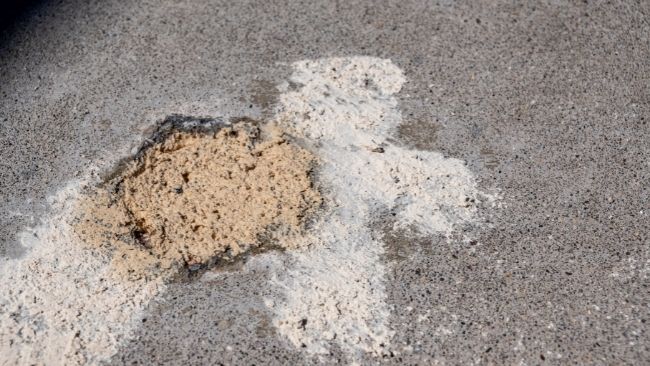
Fill any cracks and holes – Once your slab is leveled, stop pumping the slurry and rinse the surface with a hose. Then, patch the holes and any cracks with a patching compound or repair caulk.
Wait for the slurry to dry – You’ll need to wait 24 to 72 hours before walking over a mudjacked concrete slab. Otherwise, you could sink your slab again.
It’s heavy – Mudjacking slurry can weigh around 100 pounds per cubic foot. When concrete slabs sink, it’s usually because the soil underneath can’t hold its weight. If you add this heavy slurry over weak soil, it will settle again and allow the slab to sink.
It’s messy – When you pump the slurry into your concrete, you need to hold the nozzle down with your feet. If you can’t hold the weight of the slurry being pumped into the hole, mud could spill everywhere and leave a huge mess. This can also happen if the slurry shoots out the sides of the slab, such as a sidewalk.
It’s old – Mudjacking was invented almost 100 years ago. Even though it’s a somewhat-effective solution, better inventions have come out, such as polyjacking.
The flaws we listed are not exclusive to DIY projects. Even professional mudjacking companies still have these issues. So, if mudjacking doesn’t work, what does?
Polyjacking is a better alternative concrete leveling method than mudjacking. This durable and long-lasting solution uses an expanding polyurethane foam rather than a heavy and weak mud-based slurry. Unlike mudjacking slurry, polyurethane foam is hydrophobic and will not erode if it comes in contact with water. If water is draining toward your concrete slab, there’s a chance another void can form in another area, which is why you should always install a proper water drainage system, such as a French drain.
Polyjacking is less likely to crack your concrete during the process since the holes required to inject the foam are smaller than mudjacking holes. Contractors don’t need to use their feet to inject the foam since it uses a hand-held injection gun rather than just a hose. Overall, polyjacking is a cost-effective and lasting concrete leveling solution that saves you from the stress and risks of mudjacking.
We wrote this article not to scare you but to inform you of all the risks of professional or DIY mudjacking projects. If you want a concrete leveling solution that actually works, call The Real Seal and ask about polyjacking. Our team of experts will inspect your concrete slab, find out why it’s sinking, correct the settlement, and offer you a wide range of solutions to prevent any future issues. For example, we also offer foundation waterproof solutions such as drain tile systems and French drains, which can prevent water from eroding the soil under your slab. Call today for your free inspection and more.
One contractor is suggesting that the dirt/mud under my house be graded so that the rainwater flows quickly through the crawl space, a vapor barrier (6 ml plastic) be placed on top of the graded dirt/mud and a 2″ cement reinforced slab by poured over the vapor barrier.
I have a question about adding a vapor barrier to a slap the will be used as patio for a year or so prior to the addition being built. Do I still install a vapor barrier? Will it have the opposite effect out in the weather? Same for foundation wall for a dug out portion of the addition. I feel it should be built as if it will be interior slab and wall. Then run dehumidification once built to draw moisture out of the slab as soon as it is dried in from its year or two out in the rain. Thanks for you wisdom. Jason Spangler says:
Thanks for the question. In my opinion, if the slab is planned to have a finished interior floor on it at any time now or in the future, you should install a vapor retarder directly under the slab.
Thank you for all of this! I am about to build a concrete “prefablock” house in Costa Rica with concrete slab. Building materials aren’t always easy to find here and builders aren’t always the most knowledgeable. We also have a rainy season here for about 6 months where the ground is almost surely never dry. I am very worried about moisture and mold in the house as humidity also rarely gets under 80 or 90%. If I cant find an actual vapor barrier for below the slab, do you think any type of plastic liner would be worth a try? If its in a roll would you tape the seams or overlaps? If no barrier is put underneath, would it be sufficient to just have a roll on sealant barrier on the top surface of the slab? We plan to just have bare polished concrete floors.
If I could also ask about the walls? I plan on putting some type of roll on sealant/barrier on the inside and outside of my walls as w


 8613371530291