
mud pump inspection checklist supplier

Created specifically for drilling equipment inspectors and others in the oil and gas industry, the Oil Rig Mud Pump Inspection app allows you to easily document the status and safety of your oil rigs using just a mobile device. Quickly resolve any damage or needed maintenance with photos and GPS locations and sync to the cloud for easy access. The app is completely customizable to fit your inspection needs and works even without an internet signal.Try Template
Fulcrum helps us improve our processes and make our work environment safer by streamlining inspections, surfacing inspection-related insights, and managing follow-up actions. Once you close the loop from action to insight to further action, the possibilities are limitless.
03/05/2011 8:19 AMHello my friendsDo you know any standard for inspection a pump ? ( when it is on service) thatexplain what is important parameter of inspection a pumpCan you upload it ?Thank you
• #2 "Re: Question About Inspection A Pump" by Noudge79 on 03/05/2011 7:36 PM (score 1) • #5 "Re: Question About Inspection A Pump" by brich on 03/06/2011 7:34 AM (score 1)
Re: Question About Inspection A Pump 03/05/2011 10:19 AM Contact the pump manufacturer. What means, "on service"?
Re: Question About Inspection A Pump 03/05/2011 7:36 PM 1)Install a Differential Pressure gauge between suction and discharge line. Head delivered of the pump is the Pressure difference between those points. You monitor it. Normal pump would maintain a constant DP (Head). If DP is lowering that means somethings wrong with your pump. (Check the impeller, motor, bearings)
Re: Question About Inspection A PumpJoin Date: Jun 03/05/2011 11:10 PM2008 Need more details . General inspection includes physicalLocation: Oman inspection, abnormal sound, vibration, controls etc. Ensure that the preventive maintenance is carried out as per the manufactures recommendation.Posts: 347
Join Date: Oct 2. the OEM hand book for installation and servicing2009 3. check the RPM, intake & discharge pressure with the OEMLocation: UK pump curve
Posts: 314 and if the pump is still under the OEM warrantee, then ask them for the EXACT specifications you need & if you are havingGood Answers: problems then get them to honour their contact commitment to fix your problem (if you have one), if not covered by the24 OEM then still ask for the details, pump curves etc.. so you can compare you findings with that of the pump curve.
As for standards... that will depend on what type of pump you have, who made it and what standard they made the pump too! You can try API standards for pumps.. google it..
Pump manufacturer curves, flow meter and a current probe are your best bet. supposing that the pump is working normally.Join Date: Aug 2006 __________________Location: Santiago Never trade luck for skill.Chile.
praneethsuddapall #7Browser Re: Question About Inspection A Pump 03/07/2011 6:32 AMJoin Date: Nov 2010 simply you go to a mechanic give him his fare and sayPosts: 6 your problem thats it there ends the matter
Pump maintenance is the process of keeping your pumps in good working condition. A thorough checklist that guides the maintenance engineer for pump maintenance can be very beneficial as pump maintenance is essential to keep your pumps running smoothly and prevent them from breaking down. This includes regularly checking and cleaning your pumps and replacing any parts that are worn out.
Modern pumps are essential equipment in the industrial and manufacturing sectors. These devices allow companies to move liquids and gases from one place to another, which can be crucial to operations. While modern pumps are reliable and rarely need maintenance, they require some attention over time.
The ideal way of classifying pump maintenance is through the method used for drawing out the maintenance plan. Based on this, the following are the four significant types of pump maintenance:
Corrective maintenance is the most reactive type of pump maintenance, and it involves repairing or replacing parts as needed to keep a pump functioning properly. While this approach may be necessary for some situations, it is often not ideal due to its high cost and disruption of operations.
Preventive maintenance is another common approach to pump maintenance that focuses on proactive measures such as regular inspections and adjustments. This can help avoid potential problems and keep pumps operating at peak efficiency. Using a reliable checklist for pump maintenance, engineers conduct a thorough checking and carry out the needful maintenance as and when needed. This approach is widely used in industries.
Predictive maintenance uses advanced sensors and equipment to monitor the condition of pumps and other components in real-time. This enables users to detect potential problems before they become serious issues that require extensive repairs or replacements. However, this type of maintenance is cost-intensive and unsuitable for small-scale pump systems.
This type of pump maintenance is a newer type of pump maintenance that uses data collected from sensors to assess the condition of pumps and other equipment. This information is then used to develop a customized maintenance plan tailored to the equipment’s specific needs. This approach can be more effective than traditional pump preventive maintenance plans and can help to reduce downtime and costs. But setting up a CBM system can prove to be a costly affair.
Whether you are using one of these approaches or a combination of them, it is essential to ensure that your pump maintenance program is adequately designed and implemented to optimize the performance and longevity of your pumps. Pump maintenance plans are also created based on the system they target, including mechanical, electrical, and hydraulic. Mechanical maintenance typically involves replacing parts that have worn out or broken down due to normal wear and tear. Electrical pump maintenance requires checking the wiring for any signs of damage and replacing fuses if necessary. And hydraulic pump maintenance may involve changing fluid levels or upgrading the oil viscosity depending on the level of use.
The strength and effectiveness of your pump preventive maintenance plan depending on how robust your checklist is. While you would want to include all possible checks in the plan, it is impractical and inadvisable for all routine checks. Therefore the checklist is divided based on the frequency of checks making it more sustainable and effective:
Please note that the pump preventive maintenance schedule for each pump would depend on its design and application, and hence you should always consult the pump manufacturer for the same. However, the above checklist is a general checklist that can guide the process of pump preventive maintenance. A well-maintained pump will last longer and perform better than one not correctly cared for.
Check the manufacturer’s recommendation for service interval schedules. Depending on the type of pump, different servicing may be required at different intervals.
Maintain the proper records for all pump maintenance activity. Good data collection will give you the correct information about the pump’s health and operational condition.
Based on the checklist, pump maintenance may seem a simple task that needs to be done regularly. However, this is not true. Understanding the pump behaviour and performing suitable maintenance activities requires years of experience. Therefore, it is always advisable to hire a qualified expert to carry out pump maintenance due to the following reasons:
Safety – Pump maintenance through a qualified expert, ensures that all safety hazards are identified and eliminated. This keeps you, your equipment, and your employees safe from harm.
Efficiency – Qualified experts know how to service and maintain pumps to operate at peak efficiency. This can save you money on your energy bills and help prolong the life of your pump.
Peace of Mind – Pump maintenance can be a complex task. By entrusting it to a qualified expert, you can rest assured that the job will be done correctly and on time.
Avoid Downtime – Downtime is costly, both in terms of lost productivity and repair costs. Pump maintenance through a qualified expert can help minimize the risk of unexpected downtime.
Compliance – Pump maintenance through a qualified expert can help ensure that your pump complies with all relevant safety and environmental regulations. This can save you from costly fines or penalties.
The majority of reliable pump manufacturers offer pump maintenance as a part of their service. Therefore, it is always a good practice to hire them to execute the pump maintenance of your site. They will also be able to create an effective schedule and an exhaustive checklist that your site engineers can follow for pump inspection. Ensuring that pump preventive maintenance is done at the right time in the right way will make your overall system more reliable and efficient.

Instead of using paper checklists when out in the field, drilling contractors and rig inspection services can generate a new inspection form from anywhere and the results are saved electronically.
Specifically designed for drilling companies and others in the oil and gas industry, the easy to use drilling rig inspections app makes it easy to log information about the drill rigs, including details about the drill rigs operators, miles logged and well numbers. The inspection form app covers everything from the mud pump areas and mud mixing area to the mud tanks and pits, making it easy to identify areas where preventative maintenance is needed. The drilling rig equipment checklist also covers health and safety issues, including the availability of PPE equipment, emergency response and preparedness processes, and other critical elements of the drilling process and drill press equipment.

As it is the case with most equipment, pumps require regular maintenance to keep within peak performance benchmarks. The benefits of preventive maintenance in the HVAC industry have proven to improve asset life cycle, boost CRM, cut excessive repair costs and reduce unplanned equipment downtime.
When talking about pump failure the best remedy is having a great schedule and maintenance checklist in place. In a pump’s life cycle, environmental conditions can often be a major factor in its performance. Some other important maintenance tasks and factors to consider include:
All of these issues can be detrimental to a pump’s performance and cause defects if not resolved with regular maintenance. When considering what to include in your regular maintenance checklist a great place to start is the warranty and manufacturer standards as per pump type. Pump manufacturers often set requirements to follow to ensure the best life cycle for your equipment.
Pump efficiency point is the result of hydraulic, mechanical and volumetric parts to ensure performance is within a desired level. The level of efficiency in a pump is drawn from the units of energy that is required for performance.
However in centrifugal pumps, the inner workings of the pump will drive the motor. Essentially this means the mechanical energy is transformed to hydraulic energy and electrical energy is transformed to mechanical energy. This means that for a centrifugal pump you will find your level of efficiency sits at either 75% or higher in larger pumps and around 60% in smaller pumps.
As a part of your work order management for your pump maintenance schedule, you need to do some research behind what factors you need to consider that will be most detrimental to your pump’s health. When you create your ultimate guide to maintenance, your aim is to reduce your unplanned downtime and improve your standard of service by keeping a regular schedule.
When trying to determine the frequency of your maintenance checklist, you need to consider the factors that will impact your pump listed in the beginning of this article. If you have a higher quality pump that is used every day and is largely impacted by elemental factors, you will need to have more regular services in place. The warranty and safety standards will also have an impact here, depending on your pump type and according to the manufacturer’s instructions.
The more thorough your maintenance is, the better service you can provide. While a large maintenance schedule can seem daunting to your maintenance team, the assistance of checklists can ensure no step is missed no matter how big or small. Having a checklist in place will also provide consistency across your team and ensure each pump may receive the correct care it needs.
The main area for concern in centrifugal pumps is the lubrication. As centrifugal pumps rely heavily on correct lubrication to work, maintenance is important to ensure pumps aren’t under or over lubricated, which can cause damage. When you have over lubrication your pump will create too much heat and can result in frothing the oil.
Getting your maintenance plan right means you consider all these above factors and are able to incorporate them into your pump checklist and schedule.
For this checklist, you want to schedule a quick inspection of your pumps to avoid damage and wear. The main reason for having a daily checklist in your schedule is to catch those pesky issues that can turn into defects and pricey repairs if not caught early on.
Generally your quarterly maintenance will be done with the change of the season and can include varying tasks due to elemental factors. The severity of your pump environment will also affect the consistency and schedule of your pump maintenance program. Will your pump be exposed to extreme heat or extreme cold temperatures?
In your annual preventive plan, you will generally go into more detail and evaluate pump performance. Each year you should take a record of your annual operations and benchmarking data that might include:
For your routine maintenance schedule for your centrifugal pumps you need to make sure you have a solid system in place where you can reliably plan and train your team. Having a great software in place will also give you the ability to structure your maintenance program according to the manufacturer’s instructions and adhere to your customer contracts.
Job management software like FieldInsight gives you the ability to keep your centrifugal pump maintenance in perfect balance. With FieldInsight, you also gain access to the five primary automations in your business:

Drilling rigs are complex and expensive machinery used for oil drilling, exploration, and extraction. Therefore, proper management and oversight are essential to ensure the drilling rig functions correctly. To this end, drilling rigs undergo detailed inspections before commissioning to accept them for use. For that purpose, drilling rig inspection checklists are employed to outline the criteria and parameters for proving drilling rig efficiency.
This article will provide a full guide on drilling rig inspection checklists, including what they are, why they’re important, how to write one effectively, and some tips for successful implementation.
A drilling rig inspection is assessing the rig to determine if it is safe and suitable for drilling operations. This inspection includes examining the drilling rig’s structural and mechanical integrity, as well as its drilling components. It is also the primary method for ensuring drilling rigs meet safety regulations and industry standards before drilling operations begin.
A drilling rig inspection is critical for drilling operations, as it ensures that the drilling rig is safe and suitable for drilling operations. Many companies have lost much money from drilling rig failure due to poorly maintained drilling rigs. By conducting a drilling rig inspection, you can mitigate the risks and ensure your drilling operations are conducted safely and efficiently.
A drilling rig inspection checklist is a document that outlines the criteria and parameters for proving drilling rig efficiency. This checklist helps ensure drilling rigs can meet safety standards and drilling requirements. At the same time, drilling rig inspection checklists help identify potential problems with drilling or production operations.
Creating a drilling rig inspection checklist is an essential part of drilling operations. It helps to ensure that drilling rigs are inspected thoroughly and that any necessary repairs or modifications can be done in a timely manner. In addition, drilling rig inspection checklists can help to reduce the risk of unexpected downtime, equipment failure, and other issues that could result in costly losses.
Creating a practical drilling rig inspection checklist is essential to ensure personnel safety, production efficiency, and adherence to industry standards. When creating a drilling rig inspection checklist, follow the steps outlined below.
Start by obtaining a copy of the drilling rig’s original documentation, which includes all information about the drilling rig—specifications, maintenance, and operation information. This document will serve as a baseline for the drilling rig inspection checklist.
Develop a drilling rig inspection template based on the drilling rig’s documentation. This template should include areas such as drilling parameters, safety protocols and procedures, drilling parameters, mud systems, and other components.
Make sure to include an inspection checklist for drilling rig personnel. This should consist of qualifications and certifications, as well as drilling experience.
Once the drilling rig inspection checklist is completed, it should be reviewed by a qualified drilling engineer or drilling consultant to ensure accuracy.
During the drilling rig inspection, review and compare all drilling parameters to the drilling rig’s original documentation. Document discrepancies or potential issues during drilling operations and note them in the drilling log.
By following these steps, drilling operators can ensure the drilling rig is inspected promptly and accurately. An effective drilling rig inspection checklist will help identify potential issues before they become safety or production issues while also providing drilling personnel with the information they need to safely and efficiently operate the drilling rig safely and efficiently.
Paper-based drilling rig inspection checklists can be cumbersome and inconvenient. Instead, use a low-code platform to streamline drilling rig inspections. DATAMYTE is an excellent solution as it provides low-code features that will help you create and implement checklists. It’s a quality management platform with low-code capabilities.
The DataMyte Digital Clipboard, in particular, is a low-code workflow automation software that features a checklist builder. With this tool, drilling operators can easily create drilling rig inspection checklists. With low-code features such as a drag-and-drop interface, drilling operators can quickly and easily create drilling rig inspection checklists tailored to their specific drilling rigs.
With DATAMYTE, you have an all-in-one solution for creating and implementing drilling rig inspection checklists. Book a demo with us today to learn more about how DATAMYTE can help you create drilling rig inspection checklists.
There’s no denying that drilling rigs are complex units of machinery and technology. To ensure their safe operation and efficient commissioning, it is essential to create a drilling rig inspection checklist. By following the guidelines in this article, drilling contractors can create a comprehensive drilling rig inspection checklist to ensure that all aspects of the drilling process are properly inspected.

Cavitation is an undesirable condition that reduces pump efficiency and leads to excessive wear and damage to pump components. Factors that can contribute to cavitation, such as fluid velocity and pressure, can sometimes be attributed to an inadequate mud system design and/or the diminishing performance of the mud pump’s feed system.
Although cavitation is avoidable, without proper inspection of the feed system, it can accelerate the wear of fluid end parts. Over time, cavitation can also lead to expensive maintenance issues and a potentially catastrophic failure.
When a mud pump has entered full cavitation, rig crews and field service technicians will see the equipment shaking and hear the pump “knocking,” which typically sounds like marbles and stones being thrown around inside the equipment. However, the process of cavitation starts long before audible signs reveal themselves – hence the name “the silent killer.”
Mild cavitation begins to occur when the mud pump is starved for fluid. While the pump itself may not be making noise, damage is still being done to the internal components of the fluid end. In the early stages, cavitation can damage a pump’s module, piston and valve assembly.
The imperceptible but intense shock waves generated by cavitation travel directly from the fluid end to the pump’s power end, causing premature vibrational damage to the crosshead slides. The vibrations are then passed onto the shaft, bull gear and into the main bearings.
If not corrected, the vibrations caused by cavitation will work their way directly to critical power end components, which will result in the premature failure of the mud pump. A busted mud pump means expensive downtime and repair costs.
To stop cavitation before it starts, install and tune high-speed pressure sensors on the mud suction line set to sound an alarm if the pressure falls below 30 psi.
Although the pump may not be knocking loudly when cavitation first presents, regular inspections by a properly trained field technician may be able to detect moderate vibrations and slight knocking sounds.
Gardner Denver offers Pump University, a mobile classroom that travels to facilities and/or drilling rigs and trains rig crews on best practices for pumping equipment maintenance.
Severe cavitation will drastically decrease module life and will eventually lead to catastrophic pump failure. Along with downtime and repair costs, the failure of the drilling pump can also cause damage to the suction and discharge piping.
When a mud pump has entered full cavitation, rig crews and field service technicians will see the equipment shaking and hear the pump ‘knocking’… However, the process of cavitation starts long before audible signs reveal themselves – hence the name ‘the silent killer.’In 2017, a leading North American drilling contractor was encountering chronic mud system issues on multiple rigs. The contractor engaged in more than 25 premature module washes in one year and suffered a major power-end failure.
Gardner Denver’s engineering team spent time on the contractor’s rigs, observing the pumps during operation and surveying the mud system’s design and configuration.
The engineering team discovered that the suction systems were undersized, feed lines were too small and there was no dampening on the suction side of the pump.
Following the implementation of these recommendations, the contractor saw significant performance improvements from the drilling pumps. Consumables life was extended significantly, and module washes were reduced by nearly 85%.
Although pump age does not affect its susceptibility to cavitation, the age of the rig can. An older rig’s mud systems may not be equipped for the way pumps are run today – at maximum horsepower.

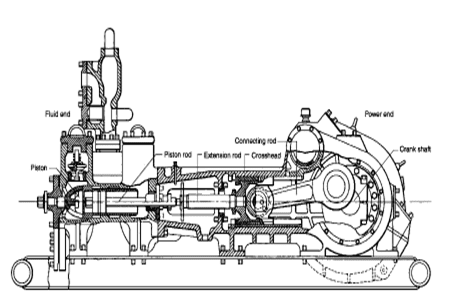
The 2,200-hp mud pump for offshore applications is a single-acting reciprocating triplex mud pump designed for high fluid flow rates, even at low operating speeds, and with a long stroke design. These features reduce the number of load reversals in critical components and increase the life of fluid end parts.
The pump’s critical components are strategically placed to make maintenance and inspection far easier and safer. The two-piece, quick-release piston rod lets you remove the piston without disturbing the liner, minimizing downtime when you’re replacing fluid parts.
![]()
A pump that lets you down when you need it most causes obvious losses of time and money. Not so obvious, but every bit as costly, are losses you can incur with pumps that operate at less-than-peak efficiency. A pump laboring under the handicap of a suction line air leak, a corroded discharge line or a clogged impeller uses excessive energy, takes longer than necessary to do the job, and subjects parts to undue stress, causing premature failure.
A 6-inch gasoline-driven, self-priming centrifugal pump operating at 25% less than peak efficiency through an eight-hour day uses approximately 8.8 gallons more fuel than a pump operating efficiently. At $2.00 per gallon over a 40-hour week that’s $80.00 per week LOST! And that figure doesn’t include additional service costs!
Gorman-Rupp wants to keep your pump performance efficient. If you already own Gorman-Rupp pumps, you know how easy they are to service, so there is really no reason to let them deliver less than their best.
If you don’t own Gorman-Rupp pumps, you’ll find our 9-point checklist helpful because today every penny of profit counts, and we want your pumps to work as efficiently as possible.
Indications that your pump isn’t operating at peak efficiency may not be dramatic, but they’re easily recognized. Look for these signs of inefficiency:
There is a noticeable difference in pump flow. Has the discharge flow visibly decreased? Is it taking your pump longer to do the same job than it used to? The slow-up might be caused by a collapsed suction hose lining, a leaking gasket, a plugged suction line, or a damaged or worn impeller or wear plate.
Your pump isn’t re-priming as rapidly as it once did. Most commonly, slower re-prime can be attributed to excessive face clearance. If this is not the cause of your slowdown, check the following: Is the seal leaking? Are all hardware at gaskets tight? Is the suction check valve sealing properly? Is the cutwater section of the volute badly worn? Is the recirculating port clogged?
Your pump is making excessive noise. Does it sound like a bunch of marbles rattling in a can? This may be an indication of cavitation and could be caused by a suction lift that’s too high, a suction hose that’s too long or plugged or that has a collapsed lining, a clogged strainer, a combination of any of these, or perhaps a problem on the discharge side of the pump. Failing bearings can also cause excessive noise.
Your pump is clogging frequently. The suction check valve may be clogged, the strainer may be too large or too small, face clearance could be too wide, or the strainer may be stuck in mud, plugging the suction side.
Your pump is overheating. Very likely the flow of liquid into or out of the pump is being restricted. Improper impeller clearance could be slowing re-priming, or the suction strainer may be clogged.
Although this list is not a complete guide to pump inspection and service, it does cover the more common conditions that can impair pump efficiency. Keep in mind that excessive wear could also be the cause of any of the problems in the above paragraphs.
Check for air leaks. Using a vacuum gauge, make sure that the suction line, fittings and pipe plugs are airtight. Most Gorman-Rupp pumps have a tapped hole for easy connection of a vacuum gauge. Use pipe dope to seal gauge threads and pipe plugs. Replace leaky seals and badly worn hoses.
Check the suction hose lining. The rubber lining in a suction hose can pull away from the fabric, causing partial blockage of the line. If the pump develops a high vacuum but low discharge pressure, the hose lining may be blocking suction flow. Replace the hose.
Check the suction strainer. Frequent inspection and cleaning of the suction strainer is particularly important when pumping liquids containing solids. Always use the proper size strainer to prevent the pump from clogging.
Check the impeller vanes, wear plate or wear rings. The removable cover plate on many Gorman-Rupp pumps provides quick, easy inspection of the impeller and wear plate. These components should be inspected every six months or sooner, depending on pump application. They are subject to faster wear when pumping abrasive liquids and slurries. Gorman-Rupp wear plates and wear rings can be replaced without replacing expensive castings.
Check the impeller clearance. Pumping efficiency will be reduced if the clearance between impeller and wear plate or wear rings is beyond the recommended limits. If the clearance is less than recommended, components will wear by rubbing, causing excess work for the engine or motor. Check the impeller clearance against the pump manual specifications and adjust it if necessary.
Check the seal. Many Gorman-Rupp pumps are equipped with a double seal which is lubricated under pressure by a spring-loaded grease cup, or an oil-lubricated seal for long, trouble-free service. Some pumps are equipped with a single seal that is lubricated by the liquid being pumped. Sand or other solids can cause rapid wear of the seal faces. Check and replace the seal if worn. Replace the seal liner or shaft sleeve if they have scratches.
Check the bearings. Worn bearings can cause the shaft to wobble. Eventually the pump will overheat, and sooner or later it will freeze up and stop. Replace bearings at the first sign of wear.
Check the engine or motor. The pump may not be getting the power it needs to operate efficiently. The engine may need a tune-up, or the motor may need service.
If your submersible pump is operating at a reduced capacity, it could be caused by a worn impeller, excessive impeller clearance, low or incorrect voltage, or it could be running backward. A discharge head that’s too high, a clogged or kinked hose, or a clogged strainer could also be responsible for reduced flow. Use an amp meter and volt meter to determine if the pump is getting the proper power it needs to operate efficiently. Normal amp readings are provided in the manual accompanying your pump.
If your diaphragm pump isn’t pumping as it should, check the diaphragm, suction and discharge check valve flappers and seats, and replace any worn parts. Check suction hose fittings for leaks, and check the plunger rod for proper adjustment.


 8613371530291