
oil rib mud pump free sample

Created specifically for drilling equipment inspectors and others in the oil and gas industry, the Oil Rig Mud Pump Inspection app allows you to easily document the status and safety of your oil rigs using just a mobile device. Quickly resolve any damage or needed maintenance with photos and GPS locations and sync to the cloud for easy access. The app is completely customizable to fit your inspection needs and works even without an internet signal.Try Template

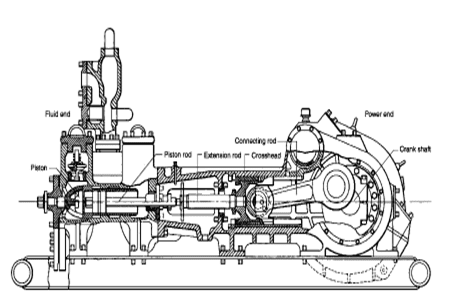
The 2,200-hp mud pump for offshore applications is a single-acting reciprocating triplex mud pump designed for high fluid flow rates, even at low operating speeds, and with a long stroke design. These features reduce the number of load reversals in critical components and increase the life of fluid end parts.
The pump’s critical components are strategically placed to make maintenance and inspection far easier and safer. The two-piece, quick-release piston rod lets you remove the piston without disturbing the liner, minimizing downtime when you’re replacing fluid parts.

Specifically designed for drilling companies and others in the oil and gas industry, the easy to use drilling rig inspections app makes it easy to log information about the drill rigs, including details about the drill rigs operators, miles logged and well numbers. The inspection form app covers everything from the mud pump areas and mud mixing area to the mud tanks and pits, making it easy to identify areas where preventative maintenance is needed. The drilling rig equipment checklist also covers health and safety issues, including the availability of PPE equipment, emergency response and preparedness processes, and other critical elements of the drilling process and drill press equipment.

I’ve run into several instances of insufficient suction stabilization on rigs where a “standpipe” is installed off the suction manifold. The thought behind this design was to create a gas-over-fluid column for the reciprocating pump and eliminate cavitation.
When the standpipe is installed on the suction manifold’s deadhead side, there’s little opportunity to get fluid into all the cylinders to prevent cavitation. Also, the reciprocating pump and charge pump are not isolated.
The suction stabilizer’s compressible feature is designed to absorb the negative energies and promote smooth fluid flow. As a result, pump isolation is achieved between the charge pump and the reciprocating pump.
The isolation eliminates pump chatter, and because the reciprocating pump’s negative energies never reach the charge pump, the pump’s expendable life is extended.
Investing in suction stabilizers will ensure your pumps operate consistently and efficiently. They can also prevent most challenges related to pressure surges or pulsations in the most difficult piping environments.
If you run a mud rig, you have probably figured out that the mud pump is the heart of the rig. Without it, drilling stops. Keeping your pump in good shape is key to productivity. There are some tricks I have learned over the years to keeping a pump running well.
First, you need a baseline to know how well your pump is doing. When it’s freshly rebuilt, it will be at the top efficiency. An easy way to establish this efficiency is to pump through an orifice at a known rate with a known fluid. When I rig up, I hook my water truck to my pump and pump through my mixing hopper at idle. My hopper has a ½-inch nozzle in it, so at idle I see about 80 psi on the pump when it’s fresh. Since I’m pumping clear water at a known rate, I do this on every job.
As time goes on and I drill more hole, and the pump wears, I start seeing a decrease in my initial pressure — 75, then 70, then 65, etc. This tells me I better order parts. Funny thing is, I don’t usually notice it when drilling. After all, I am running it a lot faster, and it’s hard to tell the difference in a few gallons a minute until it really goes south. This method has saved me quite a bit on parts over the years. When the swabs wear they start to leak. This bypass pushes mud around the swab, against the liners, greatly accelerating wear. By changing the swab at the first sign of bypass, I am able to get at least three sets of swabs before I have to change liners. This saves money.
Before I figured this out, I would sometimes have to run swabs to complete failure. (I was just a hand then, so it wasn’t my rig.) When I tore the pump down to put in swabs, lo-and-behold, the liners were cut so badly that they had to be changed too. That is false economy. Clean mud helps too. A desander will pay for itself in pump parts quicker than you think, and make a better hole to boot. Pump rods and packing last longer if they are washed and lubricated. In the oilfield, we use a petroleum-based lube, but that it not a good idea in the water well business. I generally use water and dish soap. Sometimes it tends to foam too much, so I add a few tablets of an over the counter, anti-gas product, like Di-Gel or Gas-Ex, to cut the foaming.
Maintenance on the gear end of your pump is important, too. Maintenance is WAY cheaper than repair. The first, and most important, thing is clean oil. On a duplex pump, there is a packing gland called an oil-stop on the gear end of the rod. This is often overlooked because the pump pumps just as well with a bad oil-stop. But as soon as the fluid end packing starts leaking, it pumps mud and abrasive sand into the gear end. This is a recipe for disaster. Eventually, all gear ends start knocking. The driller should notice this, and start planning. A lot of times, a driller will change the oil and go to a higher viscosity oil, thinking this will help cushion the knock. Wrong. Most smaller duplex pumps are splash lubricated. Thicker oil does not splash as well, and actually starves the bearings of lubrication and accelerates wear. I use 85W90 in my pumps. A thicker 90W140 weight wears them out a lot quicker. You can improve the “climbing” ability of the oil with an additive, like Lucas, if you want. That seems to help.
Outside the pump, but still an important part of the system, is the pop-off, or pressure relief valve. When you plug the bit, or your brother-in-law closes the discharge valve on a running pump, something has to give. Without a good, tested pop-off, the part that fails will be hard to fix, expensive and probably hurt somebody. Pop-off valve are easily overlooked. If you pump cement through your rig pump, it should be a standard part of the cleanup procedure. Remove the shear pin and wash through the valve. In the old days, these valves were made to use a common nail as the shear pin, but now nails come in so many grades that they are no longer a reliable tool. Rated shear pins are available for this. In no case should you ever run an Allen wrench! They are hardened steel and will hurt somebody or destroy your pump.
One last thing that helps pump maintenance is a good pulsation dampener. It should be close to the pump discharge, properly sized and drained after every job. Bet you never thought of that one. If your pump discharge goes straight to the standpipe, when you finish the job your standpipe is still full of fluid. Eventually the pulsation dampener will water-log and become useless. This is hard on the gear end of the pump. Open a valve that drains it at the end of every job. It’ll make your pump run smoother and longer.

The preferred embodiment of the present invention is particularly able to form an indication of the angle of inclination of the tool. In addition to that, it forms an output signal indicative of the heading relative to magnetic north. Other outputs are incorporated. One of the best and most desired sensors is a mechanism indicating the inclination of the tool. This is particularly useful in determining whether or not the tool is oriented vertically or at some other angle departing from the vertical. In the drilling of oil wells, it is often necessary to control their drift or direction.
Other sensors can be used. In any event, without regard to the specific nature of the sensors, it is very helpful to further incorporate devices which form two calibration pulses. The calibration pulses serve as references or standards against which the variables can be calibrated. Two are especially helpful. This is helpful to calibrate the output which is read in the mud pressure line connected to the drill string. The attenuation varies as the well drills deeper and deeper. As it drills deeper, it is necessary to compare the calibration signals available. The mud column viscosity encountered as the well becomes deeper may change and thereby vary the signals sensed at the surface, but, as long as the calibration output signals are available, they serve as a comparative standard, and correct data can be read at the surface.
The preferred embodiment is a drill collar type device in external appearance. It is connected in a drill string, having standard API pin or box connections. It is hollow through its length to provide a flow path for drilling mud. It derives its power from the drilling mud by exposing a pressure responsive piston to the mud so that each drop in the mud pressure on stopping and then restarting the pump pressurizes the movable piston and the hydraulic oil system. The hydraulic oil powers the equipment. The output signal is created by modulating a plug in the mud flow path through the tool. It opens and closes to constrict the mud flow path, creating an upstream pressure variation which is sensed back at the surface.
The embodiment which is illustrated in the drawings serves as a downhole, dynamic data capture and signal transmitting device which functions devoid of batteries, electronic components and the like. Restated, it is passive in the sense that it does not require a positive power source. Each time the mud pumps at the surface are shut off and mud pressure drops, this device samples all the data. When the pumps are restarted and mud flow begins anew, data is transmitted to the surface along with two calibration signals. The calibration signals represent the minimum and maximum values of each of the data being transmitted. After transmitting all the data and the two calibration signals, the device shuts off and remains dormant until the mud flow is again stopped, and then the process is repeated.
In Fig. 1 of the drawings, the apparatus is identified by the numeral 10. It is open at the upper end ii to define an axial passage where drilling mud flows. The drilling mud flows through the tool and out the bottom. The entire tool has a diameter which matches the drill collars in the drill string. It has a cross section area sufficient to enable the mud to flow through it without creating undue back pressure. It does, however, include a plug which selectively restricts the outlet passage so that it is pulsed to thereby form an output signal. The mud, of course, flows through the tool shown in Fig. 1 from top to bottom, and, as it flows out through the- bottom, it flows into the next connected member in the drill string. The tool 10 is typically installed among several drill collars just above a drill bit.The number, size and weight of the drill collars can be varied depending on the specifics of the drilling program. In any case, this invention appears on the exterior as a drill collar and functions somewhat as a drill collar. It may not have the same weight, but it does include the apparatus to be described hereinbelow for measuring certain variables during drilling, and, to this end, it is preferably placed relatively close to the drill bit.
In Fig. 3A, the measuring tool 10 incorporates the axial passage 11 which opens below the standard threaded joint. The opening 11 communicates into a concentric passage 12 extending along the tool to deliver the mud. The total cross sectional area of the passage 12 is sufficient to prevent blockage of the flow of drilling mud. A tubular body 13 is closed off by a cap 14 at the top end. The body 13 is hollow, cylindrical and concentrically located in the annular passage 12. The cap 14 closes it off completely. A lifting eyelet is shown at the upper end. The cap 14 closes over an internal cavity or chamber 15. The chamber 1 5 is adapted to receive and store oil. The oil fills the chamber 1 5.
A constriction controls mud passage. It is formed by the shoulder 1 6. The shoulder 1 6 is attached to the outer body 17. The body 17 is an elongate, tubular body which encases or houses the measuring tool 10. Moreover, it is the exterior which handles all the wear and tear that is encountered by the present invention.
3A. There, it will be observed that the tubular members 13 and 19 have overlapping or latched shoulders. The shoulders catch against one another to limit upward travel. Thus, the cap 14 can be forced downwardly by mud pressure. It is returned upwardly by a spring 20. The spring 20 is a return spring which brings the interlocking shoulders at 21 together. The shoulders 21 thus limit upward travel, and this is shown in Fig. 3A.
The rod 24 is positioned in the spring so that the spring is held concentric of the tubular housing 23. The tubular housing 23 moves down before the outer tubular housing 13 moves down. On upstroke, they move together. The tubular housing 23 is chamfered at 25 to enable it to surround the coil spring 20, functioning somewhat as a funnel.
The measuring tool 10 further incorporates an annular passage 31 which carries the drilling mud on the outside of the moving parts. Suitable O-ring seals at 32 prevent leakage.
The chamber 1 5 is an oil reservoir. The chamber 1 5 is reduced in volume when the cap 14 moves downwardly. The chamber 1 5 opens into a small passage 33 shown in Fig. 3B. The passage 33 is a relatively narrow, concentric, annular, flow space. The flow space is on the exterior of a solid, cylidrical sub 35. The member 35 joins to the rod 24. Moreover, it is externally threaded so that a threaded joint is made at 36 for attaching the fixed tubular member 26. The sub 35 is hollow with an axial passage 37 which opens into two or three lateral ports opening around the base of the probe 24. The ports 38 connect to the axial passage 37 which opens into the central tubular member 23.
The sub is additionally joined to an outer tubular sleeve 40. The sleeve 40 is centered by lugs 41 spaced around it. It is centered within the outer body 1 7. The lugs 41 interrupt the external mud flow path. Three or four lugs of relatively thin construction are all that are needed. They hold and center the tubular member 40. The tubular member 40 is a type of mounting for the various concentric members described hereiribefore. It is threaded to the internal sub 35 by a threaded connection 42. The tubular member 40 additionally anchors the external, fixed, tubular member 1 9 by means of a threaded joint at 43. It will be observed that the joint 43 is protected by
and it incorporates a reservoir at 48. A fitting 49 is appended to the lower end of the central sub 35, and it connects with a tube 50. The oil flowing through the passage 37 and the tube 50 will be termed low pressure oil. It is low pressure compared to the pressure in the reservoir 48.
It will not, however, be described in terms of a hydraulic system which is better and more easily described referring to the hydraulic schematic incorporated in the drawings. However, concerning placement of the components, this can be fairly well set forth. The components located in the lower part of Fig. 3B, all of Fig. 3C, and the top portion of Fig. 3D are connected in an hydraulic circuit where plural lines are located adjacent the inside wall of the cavity or chamber 48. They are all provided with oil under pressure as will be described.
Fig. 38. The container seals and encloses the transducer in the housing 54 which is affixed by a flange 55 to a transversely extending mounting rib 56. The rib 56 is perforated to enable oil flow past it. The rib 56 additionally supports a bracket 57 on its lower side which is joined to the mounting rib 56 by suitable bolts 58. The bolts 58 pass through the rib and also affix the flange 55. The rib 56 is not solid across the apparatus but has openings in it as will be described in Fig. 4.
Fig. 4 is an enlarged sectional view through the means 52. The means 52 serves as a heading indicator. The apparatus shown in Fig. 4 thus begins with an inlet line 60 where oil is supplied under pressure from a source to be described. It is delivered to a sleeve 61 which surrounds the tip end of a hollow, tubular fitting 62. The fitting 62 has an axial passage for receiving a tube 63. The tube 63 extends into a transverse end closure plate 64. The plate 64 is the top end of the cabinet or housing and further supports a wall portion 65.
Oil is introduced under pressure through the line 60 and flows into the line 63. It is fed outwardly through a lateral passage 68. The passage 68 selectively connects into an annular space 69 and to a radial passage 70. The passage 70 voids hydraulic oil under pressure flowing through a check valve 71 which, in turn, conducts oil from the chamber 66. The cylindrical space 66 is varied in size by movement of the piston 67.
travel. Its upward travel is limited by the concentric step drilled into the piston 67. The piston 72 carries an extending probe 74 which is concentric at its center and which extends downwardly to a tip. It passes through an opening in the transverse rib 56. The rib 56 is centrally drilled to provide adequate internal clearance for the probe to extend through it, and the lower housing 57 is, of course, affixed to the lower side.
The mounting rib 56 secures a transverse plate 75. The plate 75 is centrally, axially drilled to permit the probe 74 to extend past it. In addition, a bearing assembly 76 mounts a stub shaft 77 on a drum 78. The drum 78 supports a helix cam 79.
As will be described later, the probe 74 travels downwardly. Its downward stroke is limited by the cam 79. Dependent on the location of the cam as a result of rotation, the probe may move a short distance, or, alternately, it may extend a significant distance. In any event, the cam 79 encompasses 3600 around the drum 78. The shortest movement is equal to a zero value, and the longest stroke is equal to 3600.
The probe 99 is shown in the lower portions of Fig. 38. There, a mounting rib 101 spans the interior of the chamber. The rib 101 is parallel to the rib 56 previously mentioned. Both ribs are positioned on the interior of a thin walled long tube inside a hollow, tubular member 102 which is threadedly joined at 103 to the tubular sleeve 40 previously mentioned. The threaded joint is protected by suitable O-ring seals to prevent leakage. The tubular sleeve 102 is on the interior of the outside body member 17 to define an annular space 105. The annular space 105 is the annular space where the mud flows through the tool.
Attention is next directed to Fig. 3C where the numeral 106 identifies the housing for the inclination encoding device which is affixed to the transverse mounting rib 101. The device is identical to the heading apparatus 52 previously discussed. Again, it is equipped with a suitable hydraulic feed line 107. The connection of this line will be described in detail later.
The numeral 108 identifies yet another hydraulic line similar to the line 107. It connects through the rotatable bushing similar to the one found at the top portions of Fig. 4. It provides hydraulic oil for operation of an orientation device 111. The orientation device 111 is supported on a transverse mounting rib 112. It has a closed housing which is similar in construction and operation to the apparatus better shown in Fig. 4.
That is to say, it utilizes a piston within a piston arrangement having a protruding probe. The probe extends adjacent to a drum 113 on which a helix cam 114 is supported. The helix cam is rotated to a specified position determined by a pendulum arm 115. The arm 115 is supported on a shaft with suitable bearings aligning the shaft and the drum 113 for rotation. Again, the same construction as that shown in Fig. 4 is used to support the drum 113. To this end, a mounting bracket 11 6 extends from the lower side of the mounting rib 112. It includes suitable bearing assemblies for reducing friction.
Five of the seven valves are associated with the five signal generators. A sixth valve serves as a fill valve, and the seventh valve is a dump valve. The tubular member 132 is open at the lower end. The enlargement 127 travels the full length of the tubular member 1 32. It is returned by forcing the piston 125 back to the top end of its stroke as shown in Fig. 3D. It is moved upwardly by introducing oil under pressure in a line 136. The line 136 is input to a choke 137. In addition to the choke 137, the line 136 forks to another input choke 139 and a series check valve 140 input to the chamber beneath the piston 125. This arrangement of the check valve 140 and two inlet chokes allows a faster upstroke and controlled downstroke.
Attention is momentarily directed to Fig. 2 of the drawings. There, the piston 125 and the enlargement 127 moved by it are identified. The line 1 36 is input to the cylindrical member 124 to urging the piston 125 back to the top end of its stroke. The enlargement 127 is aptly positioned relative to the seven valves, and the most remote of the seven from it in the schematic is the dump valve 145. The dump valve is normally closed when the enlargement 127 encounters it at which time it is opened. When it is opened, hydraulic oil from the check valve 146 flows to the line 136 and to the sump. The line 136 delivers hydraulic oil beneath the piston 125 (see Fig. 3E) to force it back to the top end position. As it moves, it strikes all of the detents and triggers every valve. It travels until it reaches the extremity of its stroke.
Returning now to Fig. 3E of the drawings, all of the detent operated valves, except those associated with filling and dumping, connect to a common manifold line 1 50. The line 1 50 passes adjacent to the detent operated valves on the left side of the drawing. The line 1 50 is input to a control means 151.The control means 151 is enclosed in a sealed cannister or housing which is supported by the transverse mounting rib 1 52 shown at the top of Fig. 3F. For an understanding of this equipment, attention is directed to Fig. 5 of the drawings.
The control means 151 incorporates a closure or cap plug 1 54 at the top end. The plug 1 54 is held in position by a snap ring. A suitable O-ring seal around its exterior prevents leakage between it and the surrounding cylindrical body 1 55. The line 1 50 opens through a port into a chamber. The line 150, being a collective manifold, inputs oil adjacent to a piston 1 57. The piston 157 is received in the tubular container or external housing 1 55. It is forced upwardly by a coil spring 1 59. The spring bears against a surrounding lip on the piston. The spring is supported on a shoulder 160. The shoulder 160 is at the bottom of an enlarged chamber within the hollow, cylindrical member 155.
The portion 163 is a relatively long, hollow tubing affixed to the bottom end of the piston. The enlargement 162 defines a shoulder to an abutting coil spring 1 65. The coil spring 165 bears against a sliding ring 1 66. The ring 1 66 is carried on the probe 163. Because it moves with the enlargement 162 which has the other shoulder confining the coil spring 165, the spring ordinarily has a fixed extension. It does not flex or elongate.
In operation, a variable quantity of oil is dumped from a transducer when it is interrogated and is delivered through the detent operated valves shown in Fig. 2, delivered through the manifold 150 and input above the piston 157. The piston 157 is moved when oil is introduced to it.
The conduit 136 opens into the tubular housing 1 55 at a fitting 1 80. The fitting introduces oil on the exterior of the piston 1 57. Oil flows from the conduit 1 J6 and into the passage 1 72. If the piston is up, the face seal ring 1 66 is raised, and oil is permitted to flow through the passage 182, which is the annular space surrounding the tubular extension 163 at the bottom of the piston. Thus, there are two passages in the assembly shown in
Fig. 5. One is on the inside at 172, and one is on the exterior at 182. The exterior passage is made operative by upward movement of the face seal ring 166. Oil flows through the annular space 182 from the enlargement 183.The enlargement 1 83 is formed in the lower tubular member 178 which has the same external diameter as the cylindrical housing 1 55. The enlarged ring-like receptable 1 83 connects through a lateral port 184 to a tube 185. The tube 185 delivers oil from below as will be described. The tube 1 85 connects through a suitable fitting which is secured by a snap ring into a counterbored opening in the body 178.
From the foregoing, it will be understood how the line 136 always carries oil to the sump. The line 1 85 is valve controlled which occurs when the face seal ring 1 66 is in the up or illustrated position, and such communication is prevented when it is in the down position.
This hydraulic oil is under pressure, and the source serves as a reservoir. Oil is introduced under pressure into an enlarged counterbore passage 1 87. The passage 187 has an upper shoulder 188 and a lower shoulder 1 89. These facing shoulders confine face seals 190 and 191 between them.
The cap 202 has a rather long skirt with threads to form the threaded connection 205. The cap threads up against the shoulder 201. The shoulder 201 further serves as a seat for a movable seal ring 206. Seal ring 206 bears upwardly against the shoulder. It is forced upwardly by a coil spring 207. The coil spring is supported on a washer 208 which, in turn, is received on a snap ring 209.
There, it connects to a centralized adaptor fitting for converting the three conduits into concentric conductors. In the lower portions of Fig. 3F, the numeral 213 identifies the adaptor. It is provided with three separate conduits. It connects them together so they form concentric conductors. One conduit is identified by the numeral 203 which is input to a port 211 which, in turn, connects with a set of small passages 212. These passages extend downwardly and open into a closed hydraulic oil reservoir at 215. Three of four passages 212 are spaced around the converter 213.
The port 216 opens to an axial passage 217 which extends through the converter 213. The passage 21 7 continues along the tool, extended by the center concentric tubing 21 8 at the bottom of the drawing. The passage 21 7 thus utilizes the conduit 21 8 to extend therebelow. A large conduit 219 is concentric around the conduit 218. It is connected to the tubing 1 85. The tubing 1 85 is input at a port 220 formed in the side of the converter 21 3. That port communicates with a set of internal passages at 222, the several passages 222 coming together to introduce hydraulic oil on the exterior of the conduit 21 8 and the interior of the conduit 219.
Going to Fig. 3G, the numeral 215 identifies the oil reservoir. It is enclosed by an outer tubular wall 230 which extends upwardly to the lower portions of Fig. 3F where it is welded to the fitting 225. The conduit 21 9 passes through the center. A seal member is found at 231. The seal member 231 is a doughnut shaped plug which surrounds the tubing 219. The seal 231 has an upper O-ring seal 232 and a similar lower seal ring 233. It has a fairly broad outer surface. This outer surface is recessed slightly to form a slight encircling indention 234. Similar seals and a shallow dished out area are on the seal ring 231 adjacent to the internal conduit 219.
The seal is energized with heavy lubricating grease under high pressure. An alemite fitting 236 at the lower end of a movable plunger 237 permits lubricating or packing grease to be introduced through the axial passage in the plunger to a chamber 238. The chamber 238 is pressurized. The plunger 237 is surrounded by a coil spring 239, and the coil spring forces the plunger upwardly to compress packing grease in the chamber 238. The chamber 238 communicates by an external port 240. The port 240 opens to the exterior of the seal ring 231 between the O-ring seals 232 and 233. The same lubrication is accomplished on the interior adjacent to the conduit 21 9.
The small port 240 enables packing grease under pressure to flow to a place between the outer seals. Hydraulic oil is stored above the seal ring 231. It is exposed to drilling mud below. It is very important to prevent mud from intruding into the area where the hydraulic oil is located. The packing grease is pla-ce in the seal ring 231, and, with adequate pressure, it prevents any intrusion.
Fortunately, the packing grease is soluble in the hydraulic oil. Because this is so, the hydraulic oil is maintained at a specified pressure, while the packing grease is maintained at a higher pressure.
The tubular member 219 is connected into a top fitting 244 of a crossover connector 245. The crossover connector 245 is threaded to the tubular member 230. The tubular crossover connector 245 has an external diameter equal to that of the tubular member 230 which, in turn, equals that of the member 102. This defines a smooth and consistent cross sectional area on the interior of the drill collar body 17. Again, it must be kept in mind that the mud flows in the annular space between these members.
The tubing 218 thus delivers hydraulic oil under pressure in series with the passage 246. In like manner, hydraulic oil flows under pressure on the exterior of the tubing 21 8 and the interior of the conduit 219. A crossover is achieved for delivery of this oil under pressure to a parallel passage 247. The passage 247 is parallel to the passage 246, and the two of them both extend downwardly as will be described.
In Fig. 3H, the solid tubular crossover connector 245 is shown positioned on the interior of the drill collar body 17. Mud still flows in the annulus around the crossover body 245. The passage 247 opens into a hollow chamber above a piston 250.
The piston 250 is located axially centrally of the crossover body 245. The piston 250 is received snugly in the chamber, and a suitable O-ring seal around the piston prevents leakage. The piston 250 has an upwardly extending stub 252 which is positioned in the passage 246. The centralized stub 252 is hollow. It seals with the passage 246 by a suitable O-ring seal thereabout. The passage 246 is in fluid communication with an additional passage 253 opening downwardly to the bottom side of the piston 250. The piston seals at a seal member 254. The passage 247 opens above the seal or on the top side of the piston. The passage 253 extends to the bottom side of the piston where the passage 253 branches at an outlet opening 255. The lateral opening 255 is duplicated at two or three locations. The passage 255 introduces fluid under pressure below the piston.A chamber 257 is defined in this vicinity. It is defined on the interior of the chamber 258 of the tubular body 245. It is located below the piston head 250. It is located above a shoulder 259 of a threaded plug 260 found at the bottom of the tubular crossover body 245. The piston 250 is biased upwardly by a coil spring 261. Oil under pressure which is introduced through the passage 253 flows into the chamber 257 to thereby force the piston to the upward extremity of its stroke, this being shown in Fig. 3H.
The piston 250 is driven downwardly when suitable pressure is applied to it through the passage 247. When it moves down, it compresses the spring 261. Moreover, the lower end portion of it extends into the narrow choke passage 280. The passage 280 is a constraint on the flow of drilling mud flowing through the tool. The body 260 is supported on two, three or four positioning vanes 281. The positioning vanes define angled passages 282 which focus into the narrow passage 280. When the piston 250is moved downwardly, it positions the tip 283 in the passage 280. The passage is significantly closed.
Attention is next directed to Fig. 6 of the drawings. There, one of the identical valves is shown. The valves are duplicated. The valves 145 and 147 of Fig. 2 are identical and differ only in function. Accordingly, a description of one will suffice for all of them. The reference numerals are generic and do not specifically describe any particular valve. Thus, the reference numerals 145 and 147 are specific, while the numerals above 300 are generic.
The numeral 300 identifies a particular detent protruding into the tubular member 132. The detent is in the form of a rounded push rod 301 where it protrudes into the passage. It is rounded and relatively short. It has a length which, when depressed by the passing enlargement 127, causes the rod 301 to move to the left of Fig. 6. Its movement is opposed by a coil spring 302. An inlet is provided at 303. The inlet delivers oil under pressure to a chamber 304. The chamber is exhausted by a passage 305 through the valve body 306. The body 306 incorporates a shoulder immediately around the inlet opening of the passage 305, and the rod 301 extends through the passage and is positioned immediately adjacent to the shoulder to support a large disklike member 307. The disk 307 is equipped with a seal means in one face which contacts against the shoulder to thereby serve as a face seal.When the rod 301 is to the right at the urging of the spring 302, a seal is maintained. As the pressure in the line 303 increases, the seal is all the more effective.
Fig. 2 of the drawings, although certain components are shown in other views. In any event, the pressure of the mud flow against the coil spring 20 compresses it. When it is compressed, the oil which is in the tubular member 23 is pumped to the bottom end and flows out through the passage 37 and into the line 50. The line 50 is connected to the reservoir 21 5 shown in Fig. 3G. This reservoir is a low pressure reservoir. It has a large supply of oil under minimum pressure for the equipment.
The line 136 (Fig. 3E) is input to one side of the piston 125 as shown in Fig. 2. In addition, the line 1 36 also connects to the topmost detent operated valve shown in Fig. 3E, this connection being a branch line 148 shown in Fig. 3E. This is the first or topmost of the several valves, and it is a fill valve. This valve is in Fig. 2 at 147. It is normally closed. It is not able to open until the detent for this valve is operated by movement of the enlargement 127 at the urging of the piston 125 shown in Fig. 2. When the enlargement 127 moves up, the fill valve 147 opens from its closed position and delivers oil through a check valve and outlet line 149 to fill all five of the transducers shown. The filling is not simultaneous; it is sequential. All of the transducers are identical in construction.Their construction is set forth in the top portions of Fig. 4. Each one is filled, introducing hydraulic oil through the top or end port as shown in Fig. 4. When the oil is introduced, the piston shown in Fig. 4 is driven downwardly. It travels for a distance determined by the closure of the small piston in the large piston. The piston thus moves until the face seal ring closes, this contact being achieved between the two pistons and sealing the two pistons against the further introduction of oil. A specified volume of oil will fill each piston if the maximum is permitted, and a prorated portion will fill each transducer dependent on the measurement which it achieves.
Continuing on with the operation of the apparatus shown in Fig. 2, each of the five transducers is filled. The filling is proportionate to the signal formed by each. In the illustrated construction, oil is trapped in each transducer and is held there. It is held there indefinitely. It remains there until the enlargement 127 strikes the detent for the particular valve which releases the particular transducer. As shown in Fig. 2, the enlargement 127 moves past the several transducer valves and strikes the detents one after another. The operation of one transducer valve is duplicated in all the others.
When a particular transducer valve is operated, its output flow is connected through the manifold shown in Fig. 2. The line 1 50 is input at the top end of Fig. 5. The oil moves the piston 154 proportionate in time (not stroke) to the variable measurement. This movement is coupled through the valve apparatus shown in Fig. 5. It forms output signals in the conduits 1 85 and 200. These conduits extend downwardly through the equipment as shown in Fig. 3F, extending through the portion of the equipment shown in Fig. 3G and operate the piston 250 shown in Fig. 3H. That piston is slaved to the piston 1 54. It is extended downwardly by a specified stroke. It is held down for a duration dependent on the transducer oil capacity to encode the particular variable.This modulates the mud flow through the orifice 280.
Eventually, the enlargement 27 travels the full length of its travel. As shown in Fig. 3E, the last detent encountered is the dump valve at the very bottom most location. The dump valve is also connected to the line 136. The line 136 is a low pressure line. When the dump valve is opened, it dumps oil from the line 136 to a low pressure reservoir 215. When this occurs, pressure in the line 136 drops markedly, and the cap 14 drops below the constriction 14.
This is repeated in cyciical fashion. That is to say, the piston 125 is moved to the top end of its stroke and thereafter restroked. During its return, each transducer adjusts to a new value as exemplified by rotation of the magnet. This resets each transducer physically and thereby enables it to refill with a different quantity of oil. The cycle is repeated each time the pumps are stopped and restarted.
The foregoing description of operation is an accurate statement of the operation of the tool, but it is not complete in that it does not describe every movement. It is submitted that understanding is enhanced by breaking up the description into different descriptive segments of operation. With this in view; perhaps a good beginning point for the next descriptive sequence is to focus on the top end of the tool. It will be understood that the tool is used continuously to deliver mud as long as the mud pumps are operative at the well head. The mud flows through the drill string and through the measuring tool 10. It will be recalled that the upper end of the tool shown in
When the pumps are operative, the spring 20 is compressed as the cap 14 is forced downwardly below the constriction 1 6. This downward telescoping movement pressurizes the oil in the tool. The cap stays down indefinitely dependent on mud pressure. When the mud pressure is high, which is associated with continued operation, the cap 14 remains down. When the pumps are stopped for any reason whatsoever, the cap 14 will rise. Typically, the mud pumps are stopped to add another joint of pipe. They might also be stopped to permit directional measurements to be made very intentionally. In any case, the fluid force holding the cap 14 below the constriction 1 6 terminates, and the spring 20 forces the cap upwardly.When this movement occurs, the chamber 23 is enlarged, reducing its internal pressure, and the lower sump 215 delivers oil under pressure. The drop of pressure is also sensed in the chamber 1 5 and the chamber 23.
enlargement 1 27 into contact with the detent for the fill valve. The fill valve permits communication with the sump 215 to the top of the tool. Oil then flows from the sump 21 5 without restriction until full extension of the cap 14 is achieved by locking contact with the shoulders 21.
At this time, the mud flow has been stopped while the measurements are made by the transducers. Each measurement is expressed by a quantity of oil in the chamber 66 of the various transducers. The components of the tool achieve the positions shown in Fig. 3. They may hold this position for a short or long interval dependent on how long the mud pumps are stopped. When the mud pumps are restarted, mud flows past the cap 14 and is constricted by the ring 1 6. This creates hydraulic pressure acting on the cap 14. As the mud pressure increases, the pressure within the upper end of the tool increases. It serves as the power source for energy to take the tool through the sequence of operations whereby signals are transmitted to the surface. This increase in pressure acts on the chamber 23 to compress the spring 20 and force the chamber downwardly.
Movement of the cap 14 thus compresses the oil, increases its pressure and acts directly on top of the piston 125. The oil in the cylinder 124 below the piston 1 25 is forced out of the cylinder 124 through the choke 137. The choke delivers oil into the sump 215. The choke 137 controls the rate at which the piston 125 moves downwardly. Its downward stroke is accompanied by movement of the enlargement 127 which opens each of the valves assigned to the various transducers in sequence. When each valve is opened, the oil is in the chamber 66 where the particular transducer is forced through the check valve 71 and into a line 60 by the oil surrounding the transducer and acting on the bottom side of the pistons 67 and 72.The oil captured in the chamber 66 passes through the open valve, the line 150, the control valve 151, the choke 169 and then into the sump 21 5. As the oil flows through the choke 169, there is a pressure drop across the choke which forces the piston 1 57 to compress the spring 1 59. The piston 1 57 seats on the shoulder 1 60. No oil flows through the check valve 170 at this moment because it permits flow only from the passage 1 72 to the line 150, and not in the reverse direction. As the piston 1 57 moves down to the shoulder 160, the seals 166 and 191 close, while the seals 190 and 206 open.This permits oi[ under pressure to be routed into the mechanism 1 51 through the port 1 86. The port 186 opens through the seal 1 90 to the line 185, and oil flows to the top of the piston 250. This drives the piston 250 down. Oil from under the piston 250 moves up through the passage 218 and the line 200. The line 200 returns to the control means 1 51 through the open seal 206 and into the line 203. It finally terminates in the sump 215.
Downward movement of the piston- 250 is accompanied by movement of the plunger 283 which moves into the bore or passage 280. This restricts the flow of mud, but it does not completely stop mud flow. The restriction is sufficient to create a chamber pulse which travels up to the surface through the mud column flowing in the drill string. This is a back pressure surge at the surface. The duration of the signal is related to the magnitude of the measured variable.
Referring to each transducer, oil in the chamber 66 is pumped out as the piston 67 moves upwardly to the top closure plate 64. When this happens, the spring 1 59 forces the piston 1 57 upwardly against the plug 154. This forces a small volume of oil between the piston 1 57 and the plug 154 to the choke 169. This causes the seals 166 and 1 91 to open. Conversely, the seals 190 and 206 close. The oil, under elevated pressure entering the port 186, is flowed through the line 200 to the chamber below the piston 250, and oil above the piston is removed therefrom to the sump 215. The piston 250 is positively driven upwardly by the power supplied below it, and the plunger 283 is retracted from the constricted bore 280. This ends the pressure pulse.The bore or constricted passage 280 then delivers full flow of mud.
The enlargement 1 27 has a continued downstroke until it opens the dump valve at the bottom end of the stroke. The dump valve was theretofore closed. Oil under pressure from the top end of the tool is dumped through the dump valve to the sump 215. The cap 14 is then permitted to drop below the constriction 1 6. At this time, the cap 14 might be elevated above the constriction as it continues its downstroke. Because it is hydraulically driven in its downward movement, the beginning point at full extension which results in movement toward the constriction 1 6 serves as a pump providing oil under elevated pressure. The opening of the dump valve drops the pressure in the chamber at the top end of the tool, relieves the oil in it and fills the sump 21 5. The pressure in the upper end of the tool is then equalized with the pressure in the lower end of the tool, while the spring 261 holds the piston 250 and its associated plunger 283 in the up position to avoid creating meaningless pressure pulses.
The duration of a pressure pulse is indicated by oil f"ow through the choke 169 and the pressure drop across this choke. This pressure drop is approximately equal to the pressure difference between the oil in the sump and the elevated pressure of oil at the upper end of the tool. In order to maintain the pressure drop constant during each cycle of measurement, the spring 20 was incorporated in the chamber 23 which was dumped to the sump 215. This act of dumping accompanied compression of the spring 20.
Consequently, the compressed spring 20 had no subsequent effect on pressure of the oil in the elevated system. With this in view, the constriction 169 is converted from a choke 1 69 to a flow control valve. Flow control valves are readily available which provide constant flow even though the pressure drop across the valve may vary. By incorporating this, it eliminates the need for isolating the influence of the spring 20. The spring chamber 23 can then be eliminated. This can be easily accomplished by simply putting a port in the chamber 23. If this is done, the line 50 is then eliminated. Elimination of the line 50 still permits oil to flow from the top chamber 15 to the chamber 122, which is the void area in the tool itself. The structure of Fig. 7 remains the same in other regards.

The drilling mud which is pumped into a well during drilling frequently is returned to the surface carrying dissolved or suspended gases as well as sand and cuttings all of which must be removed from the mud before it can be safely fed back into the well. The apparatus heretofore provided for this purpose frequently is complicated, expensive, and bulky and requires piping for leading the gas-cut mud from the collection tank to the degasser unit and thence back to a clean mud tank. For instance, conventional drilling mud degasser units weigh as much as 6,000 lbs. and have multiple moving parts, such as a vacuum pump, a mud transport pump, floats, and switches. Futhermore, such equipment, because of its bulk, usually must be individually erected at the well site.
Accordingly, it is an object of the present invention to provide a drilling mud degasser apparatus which is very much simplified, less bulky and less expensive than previous devices for a similar purpose and which, nevertheless, is even more efficient than such devices.
Another object is to provide such apparatus including a rotor body so arranged as to avoid the necessity of a separate stirring element to eliminate caking of mud on the equipment.
Another object is to provide such a degasser which is relatively mobile so as to be adapted for mounting with existing mud systems, either in or connected to a contaminated mud tank or in a return mud pond.
The present invention comprises a casing for submergence in a tank or pond of gas-cut mud or other liquid, or for connection to a pipeline containing such mud or liquid. A hollow rotor body is rotatably mounted within the casing and a centrifugal blower is mounted above the casing and with its inlet connected to the interior of the rotor body. The blower impeller or impellers and the rotor body are rotated as a unit by a motor, conveniently mounted on top of the impeller casing. A liquid inlet is provided at the bottom of the rotor body. During rotation of the rotor body, the liquid and suspended solids are centrifugally thrown outwardly and upwardly and discharged through peripheral outlet ports, while the released gas is sucked into the blower and thence discharged outwardly of the apparatus. The casing may be supported by a flotation collar or otherwise for maintaining the apparatus at substantially uniform submersion, or may rest on a platform.
FIG. 1 shows a mud tank 5 of the type customarily provided at a well drilling site, suitable connections being provided for receiving the gas-cut mud and delivering conditioned mud to the clean mud tank preparatory to reinjection into the well during the drilling operation. An annular flotation collar 6 within the tank is pivotally connected to a link 7 clamped at 9 to the upper edge of the tank wall. Mounted and supported within the flotation collar is a casing 12 having an open bottom 13 and a top 14 with a central opening 15 from which projects upwardly a neck 16. Mounted on neck 16 is a toroidal blower housing 17 on top of which, in turn, a motor 18 is mounted on legs 19.
The blower impeller 22 is sealingly secured to and carried by the motor shaft 18a. The impeller is of any desired type and discharges, in the present instance, peripherally into the toroid outlet 23 and thence to a collection point or into the atmosphere. The impeller has a central bottom inlet 24 from which depends a tube 25 extending through and secured to top wall 26 of the hollow rotor body 27. Body 27 has a bottom 28 with a central inlet 29 having an annular shelf portion 30 upon which a top plate 31 is supported by radial or helical vanes 32. At the outer edge of shelf portion 30 there is provided an annular sharp-edge rib 33 between which and plate 31 a narrow egress passage is provided. The wall 36 of the rotor body extends upwardly and outwardly from bottom 28, as shown, but may be cylindrical or otherwise shaped. Substantially at the intersection between side wall 36 and top 26 of the rotor there are provided annularly disposed, downstream facing vents, as at 37 in FIG. 2, which serve to discharge sand and cutting chips centrifugally driven upwardly along wall 36, as will be explained. This solid material is discharged into the open face of a three-sided ring 38 carried by casing 12 and thence is led by piping 39, passing through an opening 40 in the flotation collar 6, and a hose 40 to a collection box 41 from whence the collected material may be washed out from time to time through a valved outlet 42.
The form in FIG. 4, while operating similarly to that in FIG. 1, is designed for inclusion in a pipeline through which the gas-cut mud or other liquid flows. Casing 12a has a reduced lower inlet opening 13a provided with a flange 50 for attachment to a flanged mud inlet pipe 51. The outlet pipe for clean mud is shown at 52, while the impeller casing discharges the released gas through a pipe 53. No provision is made in this form for separate discharge of sand and cutting, although, obviously, this feature could be added, as in FIG. 1.
The form in FIG. 5 has several refinements added for still better separation of gases from the liquid and suspended solids in gas-cut drilling mud. The casing 60 may be adapted for support by a flotation collar, as in FIG. 1, or may rest upon a suitable platform or other stationary support. The bottom plate 61 of the casing has a central journal bearing sleeve 62 within which is rotatably received the lower extremity of an inlet pipe 63 having inlet facing 64 and a sealing bushing 65. A slight clearance is provided at 66 for admitting between the bearing parts a thin sheet of ambient fluid. Pipe 63 has a threaded lower extremity for receiving nuts 67 which bear against the bottoms of the rotating bearing part 64 and 65, and a top plug 74 with an aperture 138. At the left side of bottom plate 61 there is shown the exit pipe 68 for the degassed mud. A collar 69 extends around the inner wall of the casing at the bottom and has welded to its bottom edge an outwardly extending flange 70 with perforations for receiving long bolts 71 with nuts 72 for securing casing bottom plate 61 in position, as will be explained.
The rotating hollow body, in this instance, has a cylindrical side wall which, as stated, could be of any suitable shape, for instance, frusto conical, as in FIG. 1, or paraboloid in vertical section. A plate 76 forms the bottom of the rotating body and has its outer periphery machined to receive the lower edge of the rotor body side wall. A central orifice 77 in plate 76 is snugly received about inlet pipe 63 and the plate about this orifice rests upon a shoulder 78 in pipe 63. Plate 76 is provided with reinforcing ribs 79 which are welded to the plate and also to inlet pipe 63. The ribs slightly clear the outer wall of the rotating body, as at 80, for releasing liquids upwardly into the interior of the body. Projecting outwardly from bottom plate 76 are the axial flow impeller blades 81 which partially traverse the annulus 82 between casing wall 60 and the outer wall of rotor body 75 for a purpose to be described.
An annular series of holes 84 near the top edge of the side wall of the rotor provides for discharge of solids into annulus 82, the position of the holes being such as to cause the discharged mud to strike against the casing wall 60 for additional degassing effect. Sand discharge openings 85 may be provided in the rotor body side wall somewhat below mud discharge openings 84. These openings may have outwardly extending nipples, as at 86, which rotate within a hollow ring 87 supported from the casing wall by means of a plurality of radial ribs, one of which, as at 88, is hollow and provided with a suitable fitting for connection with a sand discharge pipe 89.
A plate 91 rests upon the upper edge of the rotor wall and forms the top of the rotor. This plate also forms the bottom of the toroidal chamber 92 of a first-stage centrifugal suction pump and has inlet openings 93 leading into the throat of the stage. Formed on the upper surface of plate 91, as by welding, are ribs, as 94, extending radially or tangentially outwardly from an inner ring 95 nearly to the outer annular wall 96 and forming a centrifugal impeller. Plate 91 likewise extends outwardly from inner ring 95. A top plate 100 rests on ribs 93 and closes the impeller passages. The ribs may be welded to plates 91 and 100 and to inner ring 95. Extending across the top of annulus 82 is an annular rib-like wall 98 having gas release holes 99 opening into the toroidal chamber 92.
Resting on the centrifugal first stage is a secondary stage including a horizontal bottom plate 102 with a central inlet orifice 103 in which is secured a throat-forming collar 104. A concave plate 105 extends from collar 104 nearly to outer peripheral wall section 106, aligned with and surmounting first stage peripheral wall 96. Tapered radial or tangential ribs 107 extend along the upper surface of concave wall 105, from an inner ring 108, which rests upon and is coextensive and concentric with lower inner ring 95, to the outer edge of concave plate 105 and nearly to peripheral wall 106. A horizontal plate 109 is welded to the tops of ribs 107 and forms with the ribs and lower plate 105 the second-stage centrifugal impeller passages. Eight additional centrifugal blower devices, similar to the secondary blower just described, are stacked above the latter, so as to multiply the gas separating suction applied to the interior of the rotor body. The path of gases sucked from the rotor body through inlet openings 93 is illustrated by the arrows 110.
The stacked inner rings 95, 108, etc., have aligned central openings 111, 112, etc., which are snugly received upon the axial drive shaft 113. A key 114 is received in complementary keyways in the drive shaft and impeller hubs and drives the impellers. An intermediate portion of the drive shaft is threaded as at 115, and receives a nut 116 for securing the pump. Nut 116 underlies the lowermost inner ring 95 and centrally supports the impellers.
At the top of the uppermost pump stage is the top wall 120 carrying a bearing 123. The entire assembly of the ten centrifugal pump housings and casing wall 60 is firmly secured together by the long vertical bolts 71 extending through apertures in the peripheries of top plate 120 and bottom plate 61. The outer peripheral wall 128 of the top pump stage forms the gas outlet orifice connection 129.
An electric drive motor 134 is supported on top plate 120 and has a splined shaft 136 coupled to the complementary upper extremity of drive shaft 113 thereof. The assembly of inner collars 95, 112, etc., with the impellers is secured together and to rotor body top wall 91, for unison rotation, by nut 116. The threaded lower extremity 137 of the drive shaft 113 extends through orifice 138 in top plug 74 in inlet pipe 63 and carries nuts 139 which support the inlet pipe. Pipe 63 has a bottom inlet 140, for mud to be treated, and egress holes 141.
The degasser unit is assembled by successively stacking the pump stages about inverted drive shaft 113, tightening nut 116 against bottom plate 91, then adding the rotor body 75 and the casing. Inlet pipe 63 is then inserted and nuts 139 and 67 added and tightened. Finally, nuts 72 are threaded onto long bolts 71 to complete the securement of the assembled parts. Where the desanding function is to be utilized, collection ring 87 with its radial support ribs and connection pipe 88 will be assembled in the annulus between casing 60 and the rotor body. When the assembled unit is placed upright, motor 134 may be added and connected by coupling 136 to drive shaft 113.
FIGS. 8 and 9 illustrate a primary gas release feature which is particularly useful in case there should be a "gas kick," that is, in case there should be such an increase of pressure in the well as to cause the blowout preventer to close diverting the well fluid through the choke manifold leading from the preventer. The line from the choke manifold is shown at 160 connecting tangentially with casing 71 so as to direct the heavily gas cut well fluid around the annulus 82 between the casing and rotary body 75. The released gas tends to remain in the inner portion of the annulus and to rise therein and pass through vent holes 99 into the surmounting suction pump. The liquid and solid constituents cling centrifugally to the casing wall, descending somwhat in passing about the annulus and emerging through tangential pipe 161 leading to a flare stack or other region. Some of the energy of the well fluid stream is applied to ribs 162, projecting outwardly from the rotor body turbine fashion, to assist in rotating the body.
The form in FIGS. 6 and 7 substantially shortens the rotor body and therefore the unit. The shortened rotor body 145 has degassed mud discharge openings 146 in its lower corners, instead of at the top, as previously. Mud inlet pipe 147, 148, casing 149, and stacked centrifugal blowers 150, 151, etc., are generally similar to corresponding parts in previous forms. The impeller blades terminate at their inner ends in somewhat thicker hub rings 152 which are secured against rotation on drive shaft 153 by a long, circular section key 154. FIG. 6 shows impeller ribs 155 extending tangentially from impeller hub ring 152.
To compensate for the shallowness of rotor body 145, inlet pipe 147 and discharge pipe 156 are of such length in relation to the height of the inlets 157 relative to the mud surface, the density of the mud, and the suction produced by the stacked blowers, that the mud can not be lifted into the blowers.
All forms of the invention operate similarly in general. In FIG. 1, the unit is supported by the flotation collar to maintain inlet 29 immersed to the proper depth in the gas-cut mud. In FIG. 4, inlet pipe 31 will be connected to a pond or tank of contaminated mud. In FIGS. 5 and 7, the degasser unit will be supported in any suitable manner. Contaminated mud enters the bottom of bell-like casing 12 (FIG. 1), or inlet pipe 13a (FIG. 4) or 63 (FIG. 5), or 147 (FIG. 7), whence it is drawn into the rotor body by the pressure head of the liquid, and/or the suction developed by rotation of the rotor body as well as the suction pump. In FIG. 1 the mud enters through rotor inlet 29 and is dispersed in a thin sheet laterally toward rotor wall 36. Some gas is released exteriorly of the rotor and travels upwardly through the casing and neck 16 to toroid 17 and gas exit 23. The remainder of the gas released from inlet 32, 33 is drawn into tube 25 and thence into impeller 22 and exit 23.
The purged mud and other heavier components are thrown centrifugally against and upwardly along rotor wall 36, as indicated by the arrows 54. Sand, being heavier than the mud, clings to wall 36 and exits through vents 37 and pipe 40. The sand tends to hold the mud away from wall 36 and vents 37 so that the mud travels to upper vents 45.
The forms of FIGS. 5 and 7 are intended either to be supported partly immersed, as on a flotation collar, or mounted on a platform with inlet 63 and outlet 68 connected respectively, to a gas-cut and a clean mud pond or tank. In FIG. 5, the mud is driven outwardly and upwardly, as before, by centrifugal force as well as the depression in the rotor. Only sufficient suction will be supplied by the multi-stage blowers to release and extract gas from the gas-cut mud in the rotor body, while avoiding back-flow into the rotor through inlets 93. The degassed mud will discharge through openings 84, preferably striking the casing wall for additional gas separation, then flowing downwardly through annulus 82. At the bottom of the annulus, the mud will be given impetus by axial flow vanes 81 and, ultimately, will egress through passage 68. Gases released in annulus 82 may pass upwardly through vents 99 into the suction pump. Finally, the gases will exit at the top through outlet 129.
In case of a well "kick (FIGS. 8 and 9)," well fluids diverted through line 16 from the blowout preventer will be directed tangentially into annulus 82, where it will be centrifuged and expanded causing release of the gas into the suction pump, the action of which will be aided by the turbine action of the high pressure well fluid on vanes 162.
In the FIG. 7 form, the mud will rise in the rotor near the level of the suction inlet ports 157 leading to the blowers, the elevation of these ports above the external gas-cut mud level preventing drawing of the mud into the blowers. The degassed mud will exit laterally through lower peripheral holes 146 and downwardly through discharge pipe 156.
The novel degasser, as indicated previously, has many advantages over conventional degassers now in use. For instance, where the unit is immersed in the contaminated mud tank or pond itself, no additional piping is needed for conducting the contaminated mud to the degasser. The provision of the rotating separator body provides for constant stirring of the mud which prevents caking on the apparatus with the necessity of frequent cleaning. The device in an exemplary form weighs in the neighborhood of 500 lbs., whereas a conventional degasser apparatus as now in use may weigh as much as 6,000 lbs. The device has only one moving part, whereas conventional devices usually embody a vacuum pump, a mud transporting pump, floats, and switches. Nevertheless, the


 8613371530291