
plasterers quick fill mud pump factory

The Wallboard Tools Speed Filler Pump is an economical, mechanical loading and filling solution. It features a specially shaped flat nozzle end that fits the mouths of Flat Boxes for fast filling – and the best part? It rinses clean in just seconds.

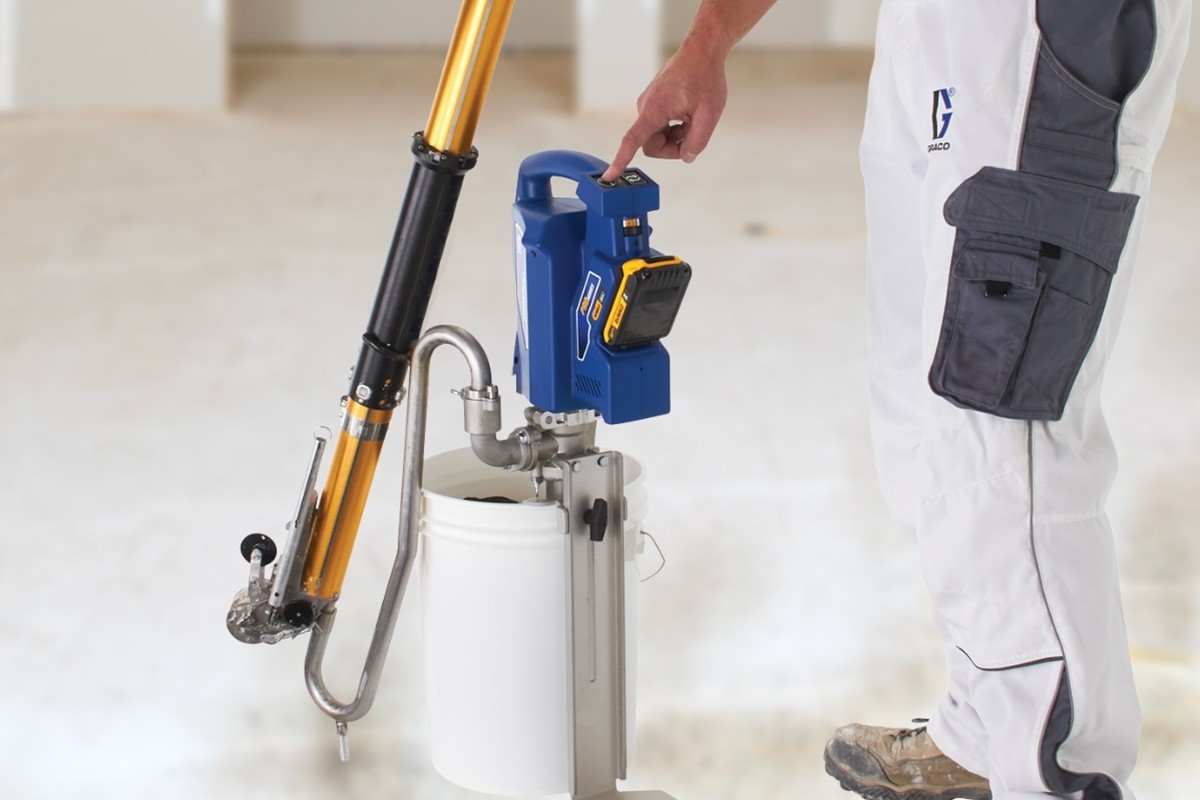
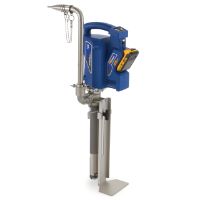
Finish every job more quickly and eliminate the need to hand pump again. Graco Cordless Drywall Mud Pumps let you fill all of your taping tools with the push of a button. With Standard Series or Pro Series pumps, there is a PowerFill for every business.

{"links":[{"url":"https://www.graco.com/us/en/contractor/solutions/articles/how-to-mix-drywall-mud-for-texture-spraying.html", "anchor_text":"How to Mix Drywall Mud for Texture Spraying"},{"url":"https://www.graco.com/us/en/contractor/products/drywall-finishing-interior-texture/interior-texture-sprayers.html", "anchor_text":"Interior Texture Sprayers"},{"url":"https://www.graco.com/us/en/contractor/products/drywall-finishing-interior-texture/drywall-finishing-tools-accessories.html", "anchor_text":"Drywall Finishing Tools & Accessories"}]}

The Level5 Tools Compound Pump comes with a FREE filler nozzle and is the only pump on the market that is ready to use right out of the box. This compound pump is made of high quality, corrosion-resistant, anodised aluminium to ensure long wear life and ease of clean.
The pump has a urethane cup seal which lasts longer than traditional rubber seals found in competitive compound pumps. The precision moulded flapper valve and seal assembly minimizes pump priming and is compatible with most competitive pump designs. Composite top handle bushing virtually eliminates bearing wear seen on competitive pumps that use soft brass. Our seal and bushing assembly has been lab tested to more than 250,000 cycles without the need for replacement parts or repair.

The Columbia Quick Clean Mud Pump fills your favorite automatic tools with compound while reducing work fatigue. This mud pump features a smooth solid leg for easy cleaning, a 20-degree angled handle for enhanced leverage, and an increased gooseneck diameter for faster filling. Use the Gooseneck attachment for filling automatic tapers. Use the standard box filler for Flat Boxes, Corner Finisher Boxes, Nail Spotters.Columbia offers standard and hot-mud pumps. Both are built to air-tight standards, making them the easiest pump to prime. They"re fabricated with an anodized aluminum cylinder, durable stainless-steel shaft, a precision machined cast aluminum head, and a tough, smooth solid aluminum leg. Whether you are using quick-set mud or any other type of joint compound, we have the pump for your bucket.
The PumpMaster PG-35 is an innovative grout pump and is the machine of choice for masonry block fill jobs. Compact and powerful, the PG-35 empties a ready mix truck in an hour, reducing labor costs as it increases efficiency and portability. The PG-35 masonry grout pump can be transported on a trailer or in a typical pickup truck; contractors can use existing mixers and material silo systems. The PG-35 features electronic proxy-switch hydraulic technology, variable speed pumping with forward and reverse capabilities, and fork slots are included for convenience. The PumpMaster PG-35 grout pump can also be ordered as skid mount or with an electric power option; contact one of our experts for more details.
Complete grout material delivery packages are available for the masonry contractor for use with PumpMaster grout pumps. Various size grout hose, block fill nozzles (steel wall hook pipe) and all clamps (heavy-duty or grooved) complete the system. Other accessories, such as grout hose primer and cleanout devices ensure your complete setup.
“Mudding,” the process of applying multiple thin coats of drywall compound to the joints and screw indentations in newly hung drywall, sounds messy, and it is. When done correctly, the result is a wall so flat that you cannot spot the seams.
While professional drywall tapers make mudding look easy, do-it-yourselfers find that it takes practice, skill, and—of course—the right gear (in this case, the mud itself and the tape that prevents cracks from appearing in the seams). This guide to how to mud drywall outlines the materials required for the job, and walks DIYers through the process step by step.
There are two main types of drywall mud: premixed and powdered. There are variations on each type, too, which can make it tough to choose the right product for your job. Here’s the lowdown on the types of drywall mud you might find at the home improvement store:
Premixed joint compound is just that: The mud has already been mixed with water to a smooth consistency and is ready to be applied. Within this category, you’ll find all-purpose mud, topping mud, and lightweight all-purpose mud.All-purpose mud goes on smoothly and usually begins to harden in a couple of hours, depending on the temperature and humidity in the room. It’s suitable for all mudding applications, and is the best drywall mud for beginners.
Topping mudis used as a final top coating. It dries to a bright white and is easy to sand, making it a good choice for walls that will be painted a light color. Topping mud has fewer adhesion properties than all-purpose mud, so it’s not suitable for first and second coats.
Lightweight all-purpose mud also dries to a lighter hue, which makes it suitable for walls that will be painted a light color. Some pros use all-purpose mud for the first mudding application and then switch to lightweight all-purpose mud for the second and third applications.
Powdered drywall mud, also called “setting mud” or “hot mud,” contains chemicals that hasten hardening time when water is added to the powder. This type of mud tends to shrink less than all-purpose premixed mud, but it hardens very quickly. Quick-setting mud works well for pre-filling large gaps in walls, or smoothing over crushed drywall corners before starting the actual mudding process.Timed drywall mud: Setting mud is labeled by the maximum amount of time you have to work with it before it hardens. You can choose from 5-minute mud, 20-minute mud, or longer-hardening times, depending on your needs. If you use setting mud, mix only as much as you need, and wash your tools frequently as you work.
Easy-to-sand setting mud: The chemicals in some types of hot mud harden into rock-like ridges on your walls, and you can spend hours trying to sand them smooth. Avoid this by choosing an easy-to-sand variety.
During the mudding process, tape acts as a bond to keep the finished wall from developing cracks along the drywall seams. The different types of tape are paper, mesh, and preformed—and all three have their pros and cons.Paper tapeis used almost exclusively by the pros because it’s very thin, which helps create imperceptibly smooth drywall joints. Paper tape comes with a crease down the center that allows you to bend it along the crease to form sharp wall corners. It takes practice, however, to correctly bed paper tape in the first coating of wet mud without creating bubbles underneath.
Mesh tapeis made from fiberglass threads in an open-weave pattern and comes with adhesive on the backside. While it’s fairly simple to position mesh tape over a dry joint and then apply your first coat of mud on top, mesh tape is thicker than paper tape and can result in more noticeable joints when the wall is painted.
Primed with an understanding of mudding materials, it’s time to familiarize yourself with the process as outlined here. Because paper tape offers the most professional results, we’ll detail how to mud sheetrock using paper tape. If you’re using mesh tape, you’ll find some tips below that will help you use it correctly.
Cover the floor with a canvas drop cloth (plastic drop cloths can become dangerously slick) and don goggles and old clothing. Mudding is a messy process, and splatters can sting if they get in your eyes.
Remove the lid from the bucket of premixed mud. If using powdered setting mud, mix as recommended by the manufacturer, beating until smooth with a heavy duty drill fitted with a paddle bit.
Drywall panels come with slight bevels on both of their long sides. When the bevels are fitted together, they form a small indentation, about 2 inches wide, along the joints. Use the 6-inch taping knife to smooth and work the mud evenly into the joint, filling the entire indentation and wiping away excess mud.
Cut and fit a piece of paper tape over the joint while the mud is still wet for a process called “bedding.” Use the 6-inch taping knife to gently smooth the paper onto the wet mud, working out bubbles as you go. Wipe away excess mud with the knife.
With the 6-inch knife, apply a thin coat of mud to both sides of an inside corner, making sure to work it all the way into the center. Cut, fold, and fit a strip of pre-creased paper tape in the corner over the wet mud. Smooth the paper tape carefully in the wet mud, using either a 6-inch taping knife or an inside-corner taping tool that features a preformed 90-degree shape for easy bedding. Use light stroking movements to bed the tape without dislodging it from the corner. Wipe excess mud from the walls.
If using preformed tape corners, attach them as recommended by the manufacturer, and then smooth mud over the corners, using long vertical strokes on both sides to form a sharp, uniform corner.
You can avoid butt joints, which occur when un-tapered ends of a drywall panel are fitted together, by using sheets of drywall that span the entire room. But if dealing with ends that have no beveled indentations, it’s more challenging to get a smooth finish. Mud them as you did the beveled joints, taking care to use only as much mud as necessary to fill the joint and bed the tape.
Let all the mud dry before applying the next coat. Apply a second coat of mud to the screw indentations, beveled joints, and inside and outside corners in the same order as the first coat—only this time, use only mud. No need to add more tape! Just apply a thin layer of mud and wipe off all excess.
To do a second coat for butt joints, take the 10-inch taping knife, apply two swaths of mud, approximately 8 inches wide, along both sides of the first joint coat, but not on top of the original joint. This imperceptibly builds up the wall depth over a wider area to reduce the appearance of a bulky butt-joint seam. Feather out the edges of the swaths well with the knife for a smooth look.
Apply a third very thin coat of mud after the second coat dries. Use the 10-inch knife for all screw indentations, seams, and corners. The wider knife allows you to feather out the edges of the mud to a razor-thin application. Follow the same procedure for beveled joints and corners as before. On butt joints, apply a thin coat of mud over the previous swaths and the original mud joint. It’s not unusual for the mud swath on butt joints to be 2 feet wide or wider.
When the mud dries, apply one last thin coat only over the butt joints. Feather out the edges very well and let the mud dry. Before moving onto the final step, an important question to ask is, “How long does drywall mud take to dry?” Approximately 24 hours is the answer for most types of drywall mud, but refer to your product’s label for specifics on drying time.
Unlike paper tape that requires bedding in wet mud, self-adhesive mesh tape is applied over seams and then, when mud is applied, an adequate amount seeps through the mesh into the seam beneath. The order of taping is the same: Do screw indentations and beveled joints first, inside and outside corners next, and butt joints last. If you use mesh tape on flat joints, note that it’s not suitable for corners. Use pre-creased paper tape for inside corners and preformed tape for outside corners.

Examine pool surfaces to identify conditions that might interfere with the proper bonding of coating. Look for algae, mold, mildew, dirt, paint, mortar droppings, efflorescence, patching compounds, loose tile, cracked plaster, et cetera. Identify hollow spots in plaster by sounding. Clean pool surfaces of all material that might interfere with the proper bonding of coatings. Clean with high-pressure water or by sandblasting. Wash with chlorine until algae, mold, and mildew are gone. Wash oil and grease spots using tri-sodium phosphate or equivalent and water; soak if necessary. Remove all cleaning solutions via high-pressure washing. Remove and repair all hollow and de-laminated plaster. Saw cut an area three (3) inches around bad spots and remove plaster inside the saw cut. Undercut the edges of the remaining plaster. Fill holes with specified patching cement SGM HSR High Strength Render to a level of existing plaster. Remove loose tile and fittings; undercut existing plaster two (2) inches below the tile line, and around return lines and fittings to a depth of 3/8 inch. Stop water penetration from the outside pool. Plug cracks and leaks around fittings using hydraulic cement (SGM Dynamite Pool Patch). Etch clean the surface with a muriatic acid solution. Use concentration necessary to clean and roughen the surface; smooth surfaces may require higher concentration. Neutralize surface with a solution of baking soda and water to eliminate acid residue, which can cause bond failure. Remove remaining acid solutions via high-pressure washing. Plug pool inlets and outlets to prevent clogging with expandable plugs or threaded caps. Mark location of fittings using tape on coping or on a measured drawing. Place the sump pump at the main drain to remove all running and standing water. Do not begin installation until the concrete pool shell has cured at least 28 days. For renovation projects (plastering over an existing plaster pool finish) and poured or formed concrete shells apply SGM BOND-KOTE™ as directed. Allow BOND-KOTE to cure for at least six (6) hours before plastering. The plaster should be applied to BOND-KOTE within three (3) to five (5) days. If left for a longer period before the finish is applied, ensure Bond Kote is clean and free of dirt, efflorescence, and other contaminants. If necessary, clean BOND-KOTE by brushing vigorously while spraying with water; chlorine may be used as needed.
Jobsite additives, such as calcium chloride solutions, pump-aides, or bonding agents can affect the color of this product. For best results mix product using only cool clean, potable water. If adding any other approved additives, hold a portion of the mix water to dissolve the additives, screen and add the final amount to mixer. Additives should be introduced at the end of the mixing process. Ensure that the additives are mixed with water and pre-dissolved.
The shelf life of Diamond Brite is up to one (1) year in the unopened properly stored container. Diamond Brite can be mixed by using a low-speed paddle mixer, low RPM drill with mud paddle, ribbon blender, or concrete plaster mixer. Measure and add 1½ to two (2) gallons (5.7 to 7.6 L) of clean potable water to mixer.
Check mix water for metals, minerals, hardness, and alkalinity before use. Start the mixer and add Diamond Brite as quickly as possible to ensure that all the material has the proper mix time. Mix for a minimum of five (5) minutes but no more than ten (10) minutes. This ensures even distribution of aggregates and increases the working time of the plaster. Insufficient mix time will result in uneven setting and shade variations. Too much mix time will produce an overall weaker plaster and may entrain undesirable air bubbles. As a rule of thumb, mix for only the amount of time required to produce a consistent, homogenous mix. Calcium Chloride may be used as an accelerator. It must be fully dissolved in the water allowing impurities to settle out. Pour off the solution from the top being careful not to add impurities to the mix. The impurities found in calcium chloride flake and pellets have been known to cause discoloration in pool plaster. No more than 2% by weight of cement (about 1/2 lb. per bag) can be used. Overuse may cause discoloration.
Although it is not necessary to use a plaster pump, many contractors do. Included here are some helpful hints for successful pumping. Increase the size of the pump manifold from three (3) inches to four (4) inches. Change the valve ball from plastic to steel to improve longevity. Set a plaster pump to the lowest gear by moving the belt. Always begin pumping with a full stroke on the main piston. This is accomplished by advancing the wheel until the cam is at its highest position. Prepare a slurry of cement and water or pump aid and run it through the pump first to prime the pump and lubricate the hoses. Pour the mixed plaster slowly into the pump hopper. Do not pour all the material in at once. Agitate the material in the hopper to prevent separation of the cement and aggregate. Avoid unnecessary stopping during the pumping process. Diamond Brite aggregate will tend to settle in the pump manifold and hoses when the pump is stopped. Agitate the remaining material left in the hopper to reduce clogging. Do not try to clear a blockage using the pump. Disassemble and clean the manifold and hoses when clogged. Do not over-water mix. This will only cause the material to separate, clogging the pump and hoses.
The substrate should be cool and damp but not dripping wet. Mist the shell with cool, clean potable water. Non- absorbed water may be removed by using sponges and/ or air. Standing water will weaken Diamond Brite and may cause washouts. Note: Hot, dry shells will cause the rapid setting of the plaster and result in check or shrinkage cracking and de-lamination. All materials and effected areas should remain above 50°F / 10°C (fifty degrees Fahrenheit / ten degrees Celsius) or below 100°F / 38°C (100 degrees Fahrenheit / 38 degrees Celsius) 24-hours prior and 72-hours after placement. Discard unmixed material (lumps). Apply plaster liberally with the flat side of the trowel using sufficient pressure to key in a scratch coat on the vertical surfaces. Beginning with the shady walls and working to the sunny walls, trowel a scratch coat onto the walls and allow to set up until it becomes tacky. The set time will vary according to temperature and humidity. Once the scratch coat has become tacky, apply a finish coat to the entire pool surface beginning in bowl area and working toward the shallow end, troweling and blending walls and floor together to achieve a seamless appearance while working to a final thickness of 3/8″ to one-half inch (½”) (10 mm — 12 mm). Uniform troweling will help to ensure even exposure, reduce washouts and produce a comfortable slip-resistant finish. The technique of “slick troweling” is recommended. During application make several passes with pool trowels to compact the aggregate and ensure a smooth dense finish. In this process, the cement paste is brought to the surface during troweling, then removed with the trowel. This produces a slick surface and minimizes the exposure needed. Small amounts of lubrication water may be necessary for smoothing out and compacting the finish in this process. The aggregate can be seen through a thin film of cement paste after troweling is complete. Special attention must be given to the filling in of spike holes. The applicator must be careful to fill all spike holes with Diamond Brite aggregate to avoid visible spike holes. Extra care must be taken to ensure proper troweling in the coves and corners. Specialty trowels are required for these areas. Insufficient troweling in these areas will result in roughness and washouts (loss of cement and aggregate) during the exposure process.
When the Diamond Brite has lost its sheen or is no longer damp, it may be ready for exposure with soft bristle brushes and water. The material must be sufficiently set up to allow applicators to walk on the floor without leaving footprints. Wear white cotton socks or foam shoes when exposing Diamond Brite. Boots and bare feet are not recommended. Test the plaster for readiness by carefully washing a small area with a soft bristle brush. If the cream washes away without losing aggregate the exposure process may begin. Starting with sunny or fast setting areas begin washing away cement paste with water and brushes. Use a bucket first then progress to a soft flow of water from a garden hose as the material begins to harden. Begin using stiff bristle brushes as the set progresses. Examine the plaster for hot spots that may be set quickly. Mist these areas with water to allow longer exposure time. Over-cured cement paste will not remove easily and may require stiff bristle brushes to remove. Avoid slow setting areas like shady walls and the bowl. Washing too soon in these areas will cause washouts. If an area washes out it must be re-troweled immediately. Keep some extra Diamond Brite mixed up for use in patching washout areas. Keep a sump pump running in the main drain at all times to discharge the wash solution. Dispose of wash as directed by local requirements. Avoid leaving hoses, buckets or any other items on the plaster during exposure. Any object left on the plaster during this critical phase may leave a “shadow” on the surface. In the event of shadowing heat may be carefully applied to remove the discoloration. When all of the cement paste has been removed from the surface uniformly, the brush phase is complete. If done thoroughly, this will complete the exposure process. The process of acid washing as described below is optional. If desired, an acid wash may now be performed using a 25% solution of muriatic acid (higher concentrations may be needed for stubborn areas) and water to remove the thin film that may remain on the surface. Proper safety equipment must be worn at all times. Begin washing the bowl first and work up to the shallow end. Following this procedure will minimize “rivers” or streaks on the floor. The use of an acid wash additive to reduce fumes and ensure uniform coverage is highly recommended. Neutralize and discard the wash solution according to local requirements. Neutralize acid remaining on the Diamond Brite with Soda Ash and water to avoid discoloration.
NOTE: This technique is commonly used in cold climates or when the plasterers lack sufficient experience to undertake water washing. It is easier to do but can produce a less uniform finish. Use this technique when applying the Quartz Series.
After troweling, allow the plaster to fully set up. This may take anywhere from one to a few hours or overnight, depending on local job site conditions. Begin acid washing by using a 25% solution of muriatic acid (higher concentrations may be needed for stubborn areas) and water to remove the cement film that may remain on the surface. Increase the concentration of the acid solution as needed. Proper safety equipment must be worn at all times. Begin washing the bowl first and work up to the shallow end. Following this procedure will minimize “rivers” or streaks on the floor. Acid wash walls and steps last. Do not allow acid wash solution to puddle in the bowl area. Use a sump pump to constantly discard the runoff after it is diluted and neutralized. The use of an acid wash additive to reduce fumes and ensure uniform coverage is highly recommended. Neutralize and discard the wash solution according to local requirements. Neutralize acid remaining on the Diamond Brite with Soda Ash and water to avoid discoloration.
NOTE: Also called Acid Start-Up or No Drain Acid Wash. This technique is sometimes used after water washing. It is also used in areas where the fill water is high in alkalinity and or hardness. When used alone without water washing this technique produces the least desirable results. It will not remove all of the cement paste evenly and may result in a streaked appearance.
Remove all metal such as ladders and lights from the pool and turn off the circulation system. After filling the pool test the alkalinity to determine the amount of muriatic acid needed to lower the Total Alkalinity to zero. Distribute the acid evenly throughout the pool. Brush the pool thoroughly over the entire surface twice daily for three (3) days. Add a sequestering agent and raise the pH to the proper level with soda ash. Start the circulation system and follow the start-up instructions.
Powerwash Exposure Technique: Hard trowel pool to a uniform smooth finish. Let finish air dry for 1-3 hours after completion. Begin the acid wash process by filling a pool with eight (8) to ten (10) inches of water. This water will buffer the acid solution during the exposure process. Acid wash with 100% muriatic acid starting with walls working down to the bowl. Leave acid on for approximately one (1) to two (2) minutes before rinsing off with a hose. Keep constant water on the floor to diffuse acid solution avoiding streaks. Keep acid-washed areas wet through the entire process or cement paste will re-set. Complete the acid wash on the floor and the bowl of the pool, finish by pumping out water. Begin the power-washing phase with 2,500 psi machine using a 45-degree nozzle. Keep tip twelve (12) to eighteen (18) inches away from the surface perpendicular to the plaster finish. Power wash surface with approximately 20% of overlap to ensure complete exposure. Start power-washing walls from tile line thru cove of the pool, finish with the floor. Pump out remaining water; install main drain covers, lights, and fittings.
In accordance with the National Plasterers Council, Inc. (“NPC”) standards, it is recommended that the following pool and spa water chemistry conditions be maintained on an ongoing basis for the longevity of the interior pool and spa finish. These values are important to prevent corrosion, deterioration, discoloration, scaling or other problems. For more information refer to your local agency having jurisdiction or NPC.
Follow recommended fill and balancing procedures to ensure a successful start-up. Fill pool completely and without interruption with clean, potable water. The use of a filter during fill is strongly recommended. The initial fill water is the most important water that the pool will receive and must be tested, recorded and adjusted according to the following parameters by an experienced pool professional. For the first thirty days (30) the pH and alkalinity must be monitored and adjusted (if applicable) every three (3) to five (5) days. All other chemicals monitored and adjusted (if applicable) every seven (7) to ten (10) days. The pool water must be tested regularly and documented monthly by a reputable company using a computerized system. Monitoring the pool water regularly will not only affect the new finish but will keep it looking new. Improper water chemistry will void the limited residential / commercial warranty. It is recommended that a quality sequestering agent be used in the initial start-up in accordance with the manufacturer’s instructions and then a recommended maintenance dosage per the sequestering agent’s manufacturer instructions.
FIRST DAY: Add sequestering agent upon initial fill per manufacturer’s instructions. Adjust pH to 7.2 – 7.6 and total alkalinity to 80 -120 PPM. Maintain calcium hardness at a minimum of 125 PPM for the first three days, then adjust to 200-400 PPM thereafter. Dissolve chemicals completely in water and disperse throughout pool.
Adjust circulating pump timer to normal operating hours. Brush the pool walls and floor daily for the first two (2) weeks. Do not vacuum pool with wheeled vacuum for 14 days. Putting a wheel cleaner in the pool prematurely can cause wheel marks/ tracks to show up on the pool finish. Do not install an automatic pool cleaner for 28 days. No salt should be added for 28 days. Please make sure the water pH and alkalinity is balanced prior to the use of salt chlorine generators.
What a workhorse this tool is. Built to perform in the toughest environment, our pump smoothly and quickly fills your tools. With a 20 degree angle, the handle acts as a lever and keeps the operator from having to reach as far as other models on the market.FEATURES:

You just gotta love plaster. That rock-hard substance, which was applied to the walls and ceilings of nearly every house in this country until the 1950s, gives us surfaces that are seamless, mold resistant, fire resistant, and noise deadening. But what to do when plaster cracks, buckles, and pops loose? It"s a perplexing question for many of our readers, including Tim Thorp, whose house in Providence, Rhode Island, is filled with badly blemished plaster.
Put on safety goggles and disposable gloves, then spray-pump a stream of the acrylic conditioner into each of the holes (but not into any you"ve marked). One or two squeezes should be enough.
Place the adhesive tube"s nozzle in one of the primed holes. Gently squeeze the caulking-gun trigger until the creamy glue fills the hole and a little backs out around the nozzle.
Slip a 2-inch plastic washer over a 1 5/8-inch drywall screw, and drive it into the lath through one of the adhesive-filled holes. The screw pulls the lath against the plaster"s back side while the washer gives the screwhead a wide clamping surface.
Mix up a small batch of setting-type joint compound and use it to fill the crack and all the holes. Smooth the wet compound with a trowel; then, as it begins to harden, wet it and smooth it again.
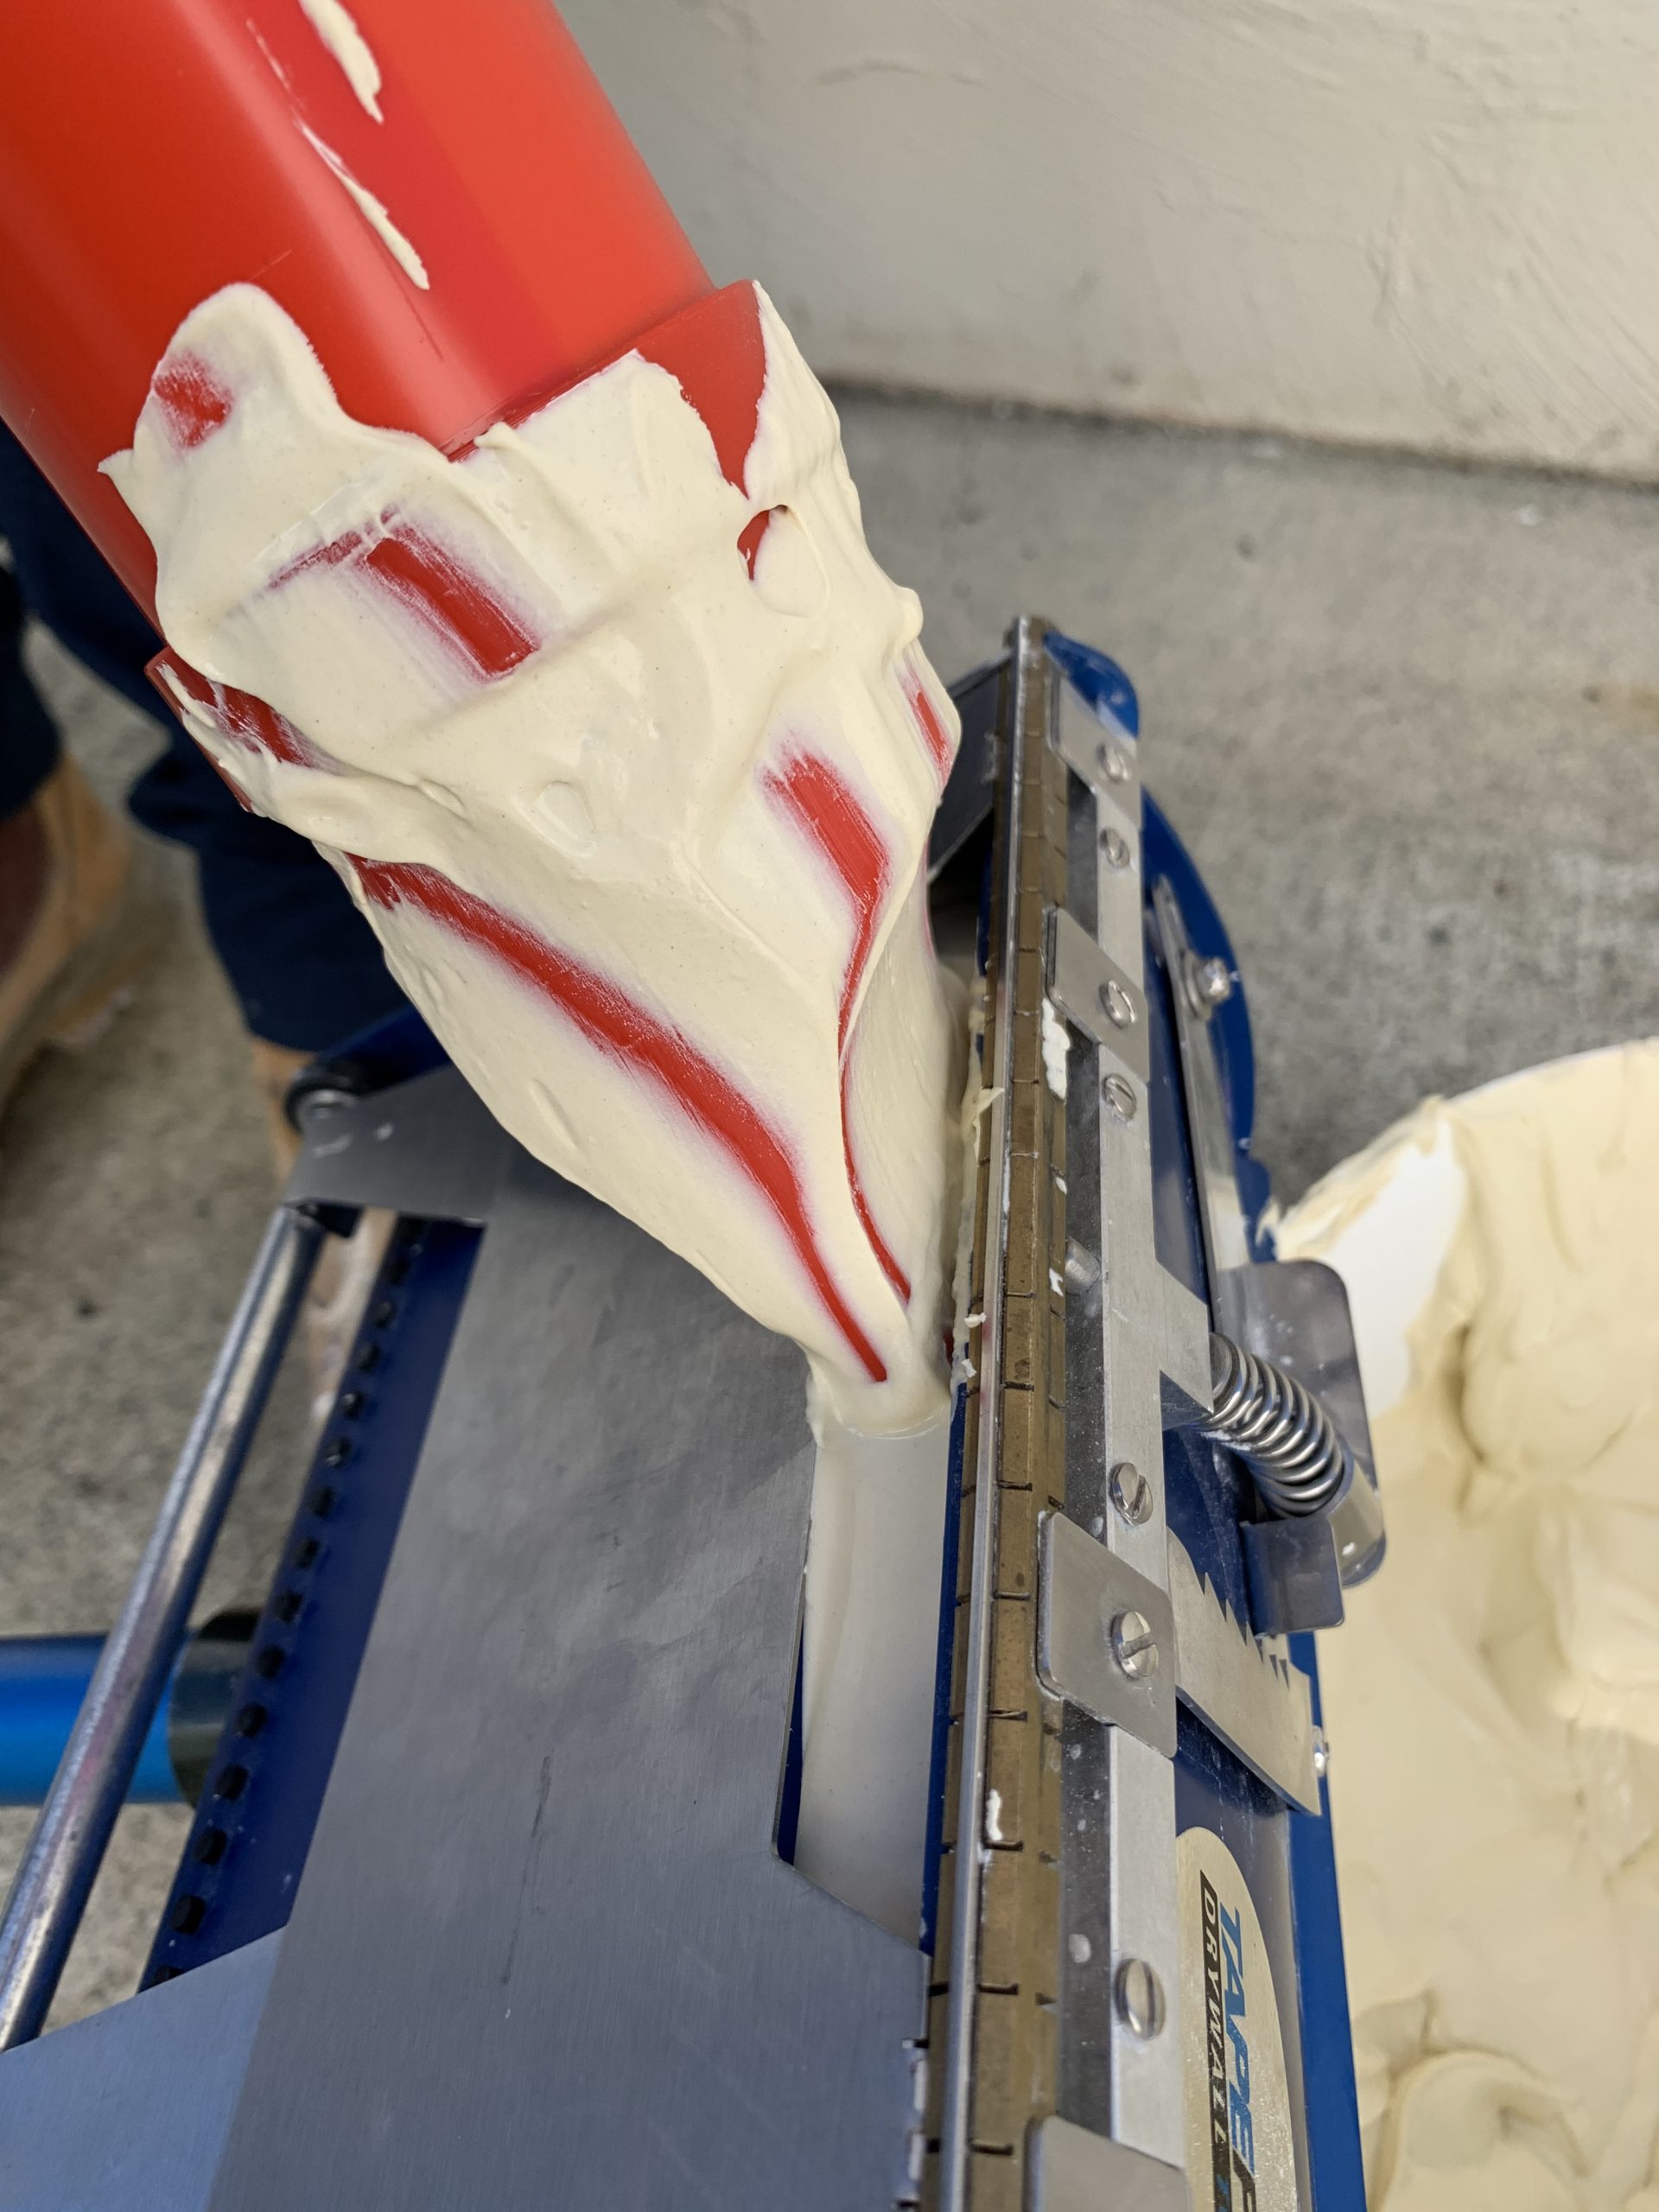
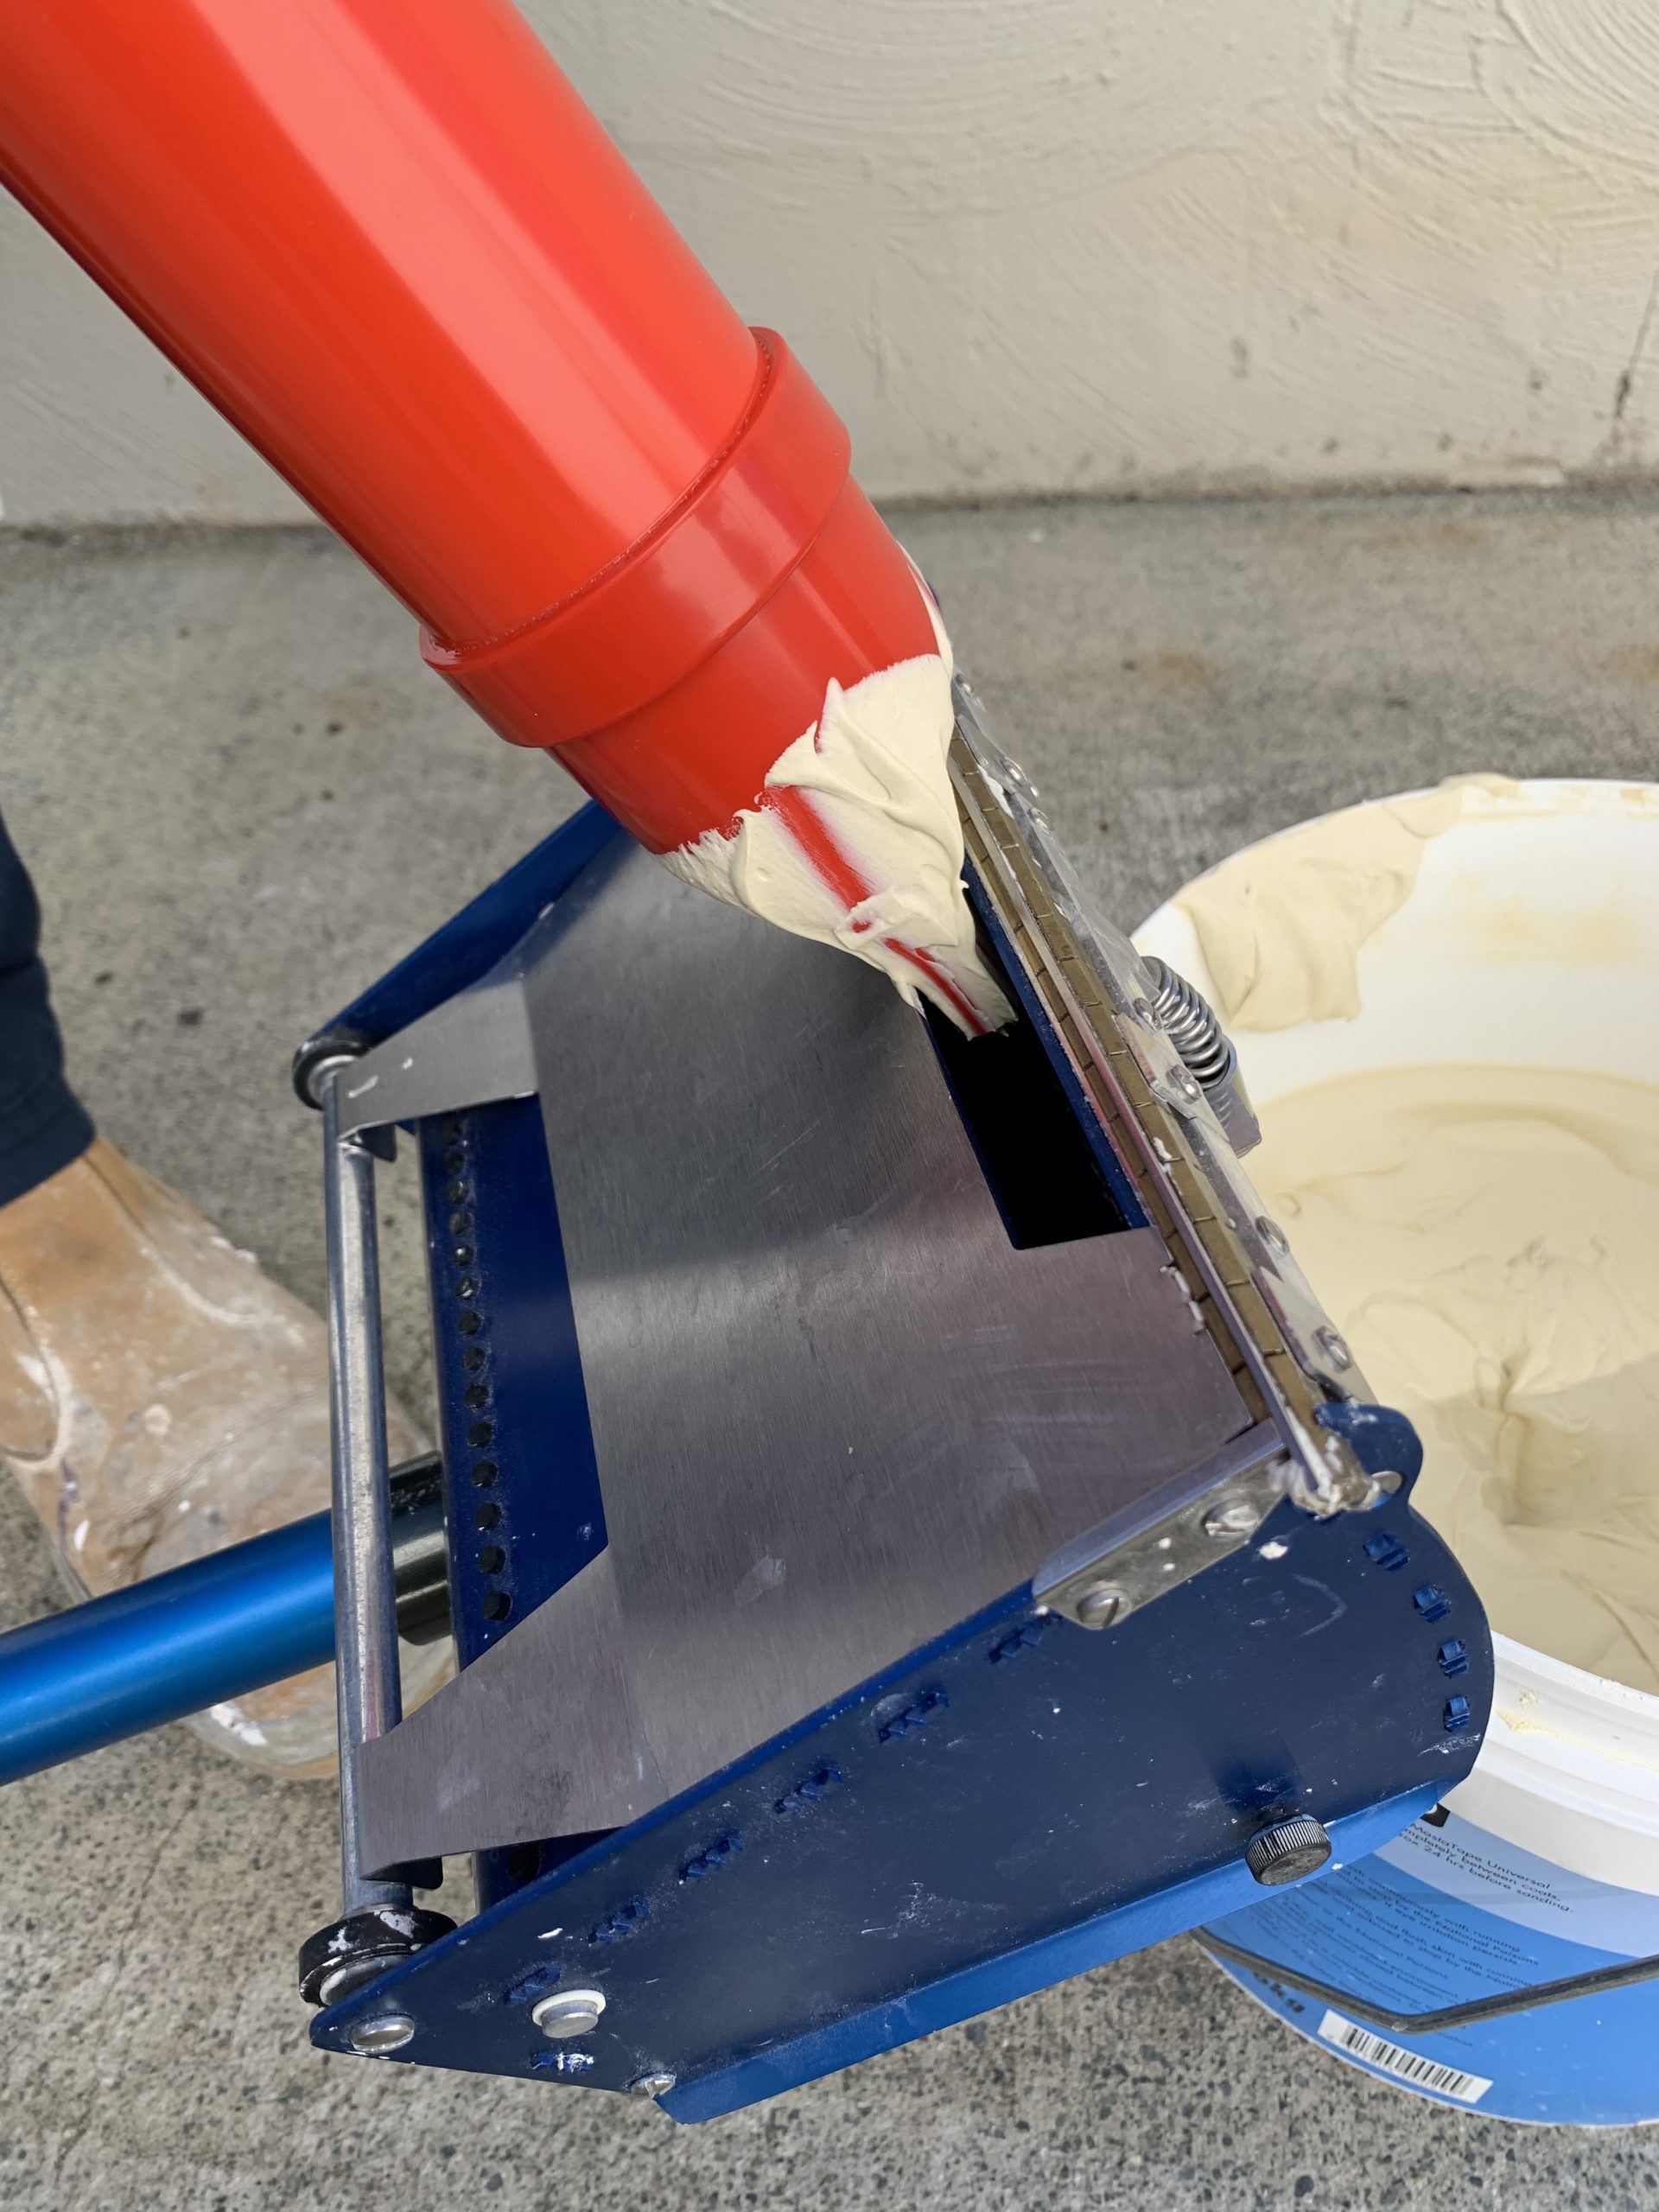
The TapeTech EasyClean Loading Pump combines reliability with innovation. It features the slim tube design preferred by professional finishers and robust construction for dependable performance and long life. The TapeTech EasyClean Loading Pump has a redesigned head and a new twist-lock foot valve that provides secure attachment and easy removal for cleaning and maintenance and does not require a paper gasket for the filler adapter or gooseneck due to an innovative, integrated O-Ring that provides a terrific seal with fewer headaches from lost, worn or damaged paper gaskets. The TapeTech EasyClean Loading Pump accepts the standard TapeTech Gooseneck (85T) and TapeTech Filler Adapter (90T), both of which are sold seperately.
The filler attachment is secured to the EasyClean Loading Pump by aligning the slots of the filler over the studs on the pump housing and tightening the two hex nuts
The EasyClean Loading Pump can now be cleaned by using a water hose or water and a brush to remove the joint compound from the pump housing and plunger
To keep your EasyClean Loading Pump in top working order, you may need to replace the screen and O-rings. These items should be checked when you clean your EasyClean Loading Pump
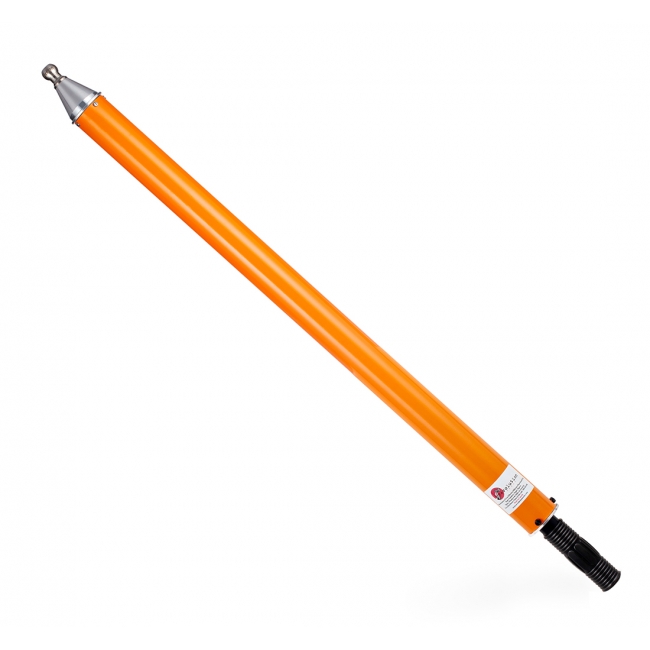
Plasterers Quick Fill Mud Pump. 700mm Tube Length 10mm Nozzle. Lightweight. Plasterers Quick Fill Mud Pump. 700mm Tube Length 10mm Nozzle. 700mm Tube Length. 10mm Nozzle. Used to fill boxes. Colour of the original may very slightly from illustrated images. Get great value tools and products to help you create the perfect trade job. Plasterers Quick Fill Mud Pump. 700mm Tube Length 10mm Nozzle. Lightweight Description 10mm Nozzle 700mm Tube Length Quick Precise Used to fill boxes Fits TapePro, TapeTech, Columbia and all other brands Lightweight Inexpensive Payment PayPal & Credit Cards Cheques Please Make Out Cheques To Online PlasteringSupplies Bank Deposit Please Leave Your eBay Username As reference Shipping We Use Australia Post For All Deliveries And Couriers For Large Deliveries All Shipping Is Registered Remote Areas May Incur Extra Shipping Charges Combined Shipping We Will Combine Shipping Where Possible After Purchase Please Wait For Us to Send You An Invoice All tracking notices will be sent to the registered email address Terms of Sale By purchasing from PlasteringSupplies you are agreeing to our terms and conditions. PlasteringSupplies adheres to all trading rules applied by eBay. Whilst all care is taken, any errors or omissions in the item details is purely unintentional. All pictures contained within this listing are for illustrative purposes only. PlasteringSupplies reserves the right to cancel sales due to unintentional errors. Colour of the original may very slightly from illustrated images Buyer must pay all postage and handling as per description International shipments - Buyer is responsible for all duties and taxes All sales must be paid within 7 days Buyer will be responsible for paying for their own shipping costs for returning their item. Shipping costs are non-refundable. Warranty on power tools is 12 months. Warranty on batteries is 6 months. About Us PlasteringSupplies is here for tradesmen, handymen and builders. Get great value tools and products to help you create the perfect trade job. Tools are sourced from around the world and brought here to give you the widest and best range to choose from. Our company has been in the building trade for over 30 successful years . We wish to provide you with the experience to get the job completed right. Your Feedback is of great value for us. By sending Feedback we will know that you received your items We will leave Positive Feedback the same day we receive Positive Feedback from you If you have any concerns before leaving feedback please contact us We will do our best to keep the customer satisfied Contact Us If you have any queries please do not hesitate to contact us and we will be happy to answer your questions. Pictures sell! Auctiva Offers Free Image Hosting and Editing. 300+ Listing Templates! Auctiva gets you noticed! The complete eBay Selling Solution.

If its dry bagged it should say on the bag how much water per bag, like I think a 20lb bag of Sheetrock Easysand says something like 5.4-7.1 litres dont quote me on that, but its on the bag so you just use maths and say use quarter of the water for quater of the bag. With drymix the less water end of the spectrum is stronger so good for filling, the more water within guidelines is still strong enough but easier work for second coating.

The Loading Pump, with appropriate accessories (Gooseneck and/or Filler Adapter not included but sold separatly), is used to fill the following tools: Automatic Taper, Corner Applicator/Corner Box, Nail Spotter, and Flat Box. Attach the Gooseneck to fill the Automatic Taper. Attach the Filler Adapter to fill the Nail Spotter, Corner Applicator, and Flat Box. Simply hang the tube of Loading Pump into a bucket of mud, leaving the leg of the Pump on the floor. Attach the appropriate accessory to the pump. Prime the Pump by pumping the handle a couple of times. Now you should be ready to fill your tool.
The Loading Pump, with appropriate accessories (Gooseneck and/or Filler Adapter not included but sold separatly), is used to fill the following tools: Automatic Taper, Corner Applicator/Corner Box, Nail Spotter, and Flat Box. Attach the Gooseneck to fill the Automatic Taper. Attach the Filler Adapter to fill the Nail Spotter, Corner Applicator, and Flat Box. Simply hang the tube of Loading Pump into a bucket of mud, leaving the leg of the Pump on the floor. Attach the appropriate accessory to the pump. Prime the Pump by pumping the handle a couple of times. Now you should be ready to fill your tool.


 8613371530291