
12 gauge overshot card punch factory

If you’ve been reading my articles for any length of time, you probably know I load a lot of shotgun shells using Lyman and other published data. Over the years I’ve also developed a large number of custom loads, many of which require filler wads or overshot cards to get the correct shot column and a good crimp. Although these aren’t the most expensive components on the market, they still add up, particularly if you need several per shell. To make matters worse, they’re often difficult to find, particularly if your local gun store stops stocking the brands you’re accustomed to.
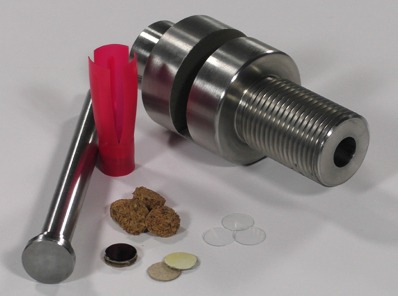
With this in mind I’ve designed and manufactured my own custom punch for producing 12 gauge filler wads and overshot cards. The model shown in the video above represents my prototype, which I’ve been using and testing for quite a while now.
Beginning with construction you’ll note it’s composed of just two parts; a die and punch. The die is made from stainless steel so that it won’t rust or corrode, while the punch is hardened tool steel that’s rigid enough to remain perfectly straight, and maintain an edge.
I also specifically designed this punch to fit in standard Lee reloading presses to help keep the cost low, and better utilize the equipment I’ve already got.
To install this tool, we simply insert the punch into the press’s ram, raising it up to it’s maximum height. Next we’ll thread the die in place overtop; this helps keep things aligned properly.
Operation is likewise extremely simple. If you check out the video above, you’ll see there’s a slot cut in the side to allow a multitude of different materials to be fed. So far I’ve used cardboard and vegetable fiber, in the future I’ll likely try cork as well.
With the material in place it’s a simple matter of operating the press handle, and punching filler wads. Each one comes out the exact internal diameter of a standard 12 gauge shotshell wad. If I need to produce a lot and don’t want to make a mess, I just place a margarine container with a hole in the bottom onto the nozzle at the top of the die, and punch as many as I need.
With a good supply of these on hand, it’s no trouble at all to customize my shot columns by placing them above or below my shot or slugs. Likewise, if I’ve got a difficult load to crimp well, like low-volume birdshot or roundball slugs, adding one to the top as an overshot card makes things a snap.
I’m really happy with how my punch turned out, and already working on designs for a 20G model. If things go well I may try some others like a 410, 16 or 28 gauge.

The tool consists of two components including a punch, and die. Starting with the punch, it’s made from hardened tool steel designed to maintain a sharp cutting edge. If you’re the kind of reloader who loads tens of thousands of shells, you’ll be pleased to know the tip has been bored out and extra material left in place so that it can be re-sharpened easily should the need arise. The base of the punch is designed to fit a Lee Precision, single stage press, however it should fit any brand with sufficient clearance that’s compatible with Lee shell holders.
To install this tool, the operator begins by slotting the punch into place and raising the ram. This step helps ensure everything’s lined up well when installing the die, to avoid damaging the cutting edge during operation.
The operator begins by lowering the ram part way until the punch is just below the feed port on the die, but still inside the base of the die. All reloading presses have a bit of play in the shell holder, so the safest way to protect the cutting edge is to simply feed the punch into the die part way before engaging the cutting edge on material.
Next, the user simply slides the material to be punched into the feed port and begins operating the press as normal. As filler wads are punched, they will be pushed out the top of the die where they can be collected. If the operator’s intention is to produce a great many filler wads in one sitting, it is advisable to place a container (a margarine container works well) with a hole cut in the bottom on top of the die, allowing them to stack up inside and avoid making a mess.
Originally designed this unit to punch corrugated cardboard, so that seems like a good place to begin. The punch works quite well with standard corrugated cardboard boxes I’ve cut into strips. It’s a fast, simple process that yields nice, concentric disks. Cardboard works great for buck and birdshot as it’s dense enough to take up slack, but flexible enough to compress during loading. This is critical to obtaining a professional looking crimp with even the trickiest loads.
Next up is craft foam. It’s not really my first choice due to it not being biodegradable, but I know some folks really like it, so I have confirmed the punch will work with it. As with the cardboard and cork, it punches very easily, although the edges aren’t quite as smooth as the denser materials.
Finally we have plastic blister packaging. Although not biodegradable, I really like having a transparent option on hand when I need something as an overshot card. Once again it cuts smoothly, and easily. The material demonstrated above is actually plastic from grocery store salad containers if you can believe it, however thicker packaging not only punches well, it crimps even better.
The finished filler wads measure 0.650″, the same internal diameter as a standard 12G shot cup, and an equally excellent size for use as overshot cards. With a good supply of these on hand, it’s no trouble at all to customize my shot columns by placing them above or below my shot or slugs. Likewise, if I’ve got a difficult load to crimp like low-volume birdshot or roundball slugs, adding one to the top as an overshot card makes things a snap.

Purely by accident I discovered what for me is the best backing for punching wads. We built our deck from Timber-Tek, (I think that"s the right name). Consequently we had left over ends and butts just as if it was built of wood. I couldn"t find my piece of industrial belting I had used for years and got to examining a piece of the deck material. Seemed little hard to me but figured I didn"t have anything to lose so I "gave it a whack" with my punch and a florist box. Doggone stuff works great and didn"t dull the punch at all, which I thought it would do. Been using it ever since and have yet to sharpen a punch. What we used has one side in wood grain and the back side is smooth.

Our custom logo overshot cards are the favorites of our ballistic lab. We use a heavier stock material (.045") and apply a water-repellant coating to both sides. The result is an attractive and highly functional overshot card.
Use: Simply place an overshot card on top of the shot charge just before crimping to improve overall crimp quality and seal in small shot and/or buffer. Excellent for use with BPIRoll Crimpers.
Excellent for roll crimpsOur testing lab has proven that poor crimps can alter the performance of an otherwise good load. Overshot cards always produce better, more consistent crimps and this consistency is demonstrated in the standard deviation of loads in our lab. Our ballistic lab recommends overshot cards for better crimps in all loads.
Place an overshot card on top of the shot charge just before crimping to improve overall crimp quality and seal in small shot and/or buffer. Excellent for use with BPI Roll Crimpers.
Our testing lab has proven that poor crimps can alter the performance of an otherwise good load. Overshot cards always produce better, more consistent crimps and this consistency is demonstrated in the standard deviation of loads in our lab. Our ballistic lab recommends overshot cards for better crimps in all loads.
Clear Overshot Disks(either plain or printed with shot size) are also offered for great roll crimping options. See pictures in Additional Images or click on this link.
Shotshell size selection:Use the same size gauge as your hull. Smaller diameter cards also work if your particular size is out of stock. For example, a 20ga overshot card works in a 16-gauge shotshell and so on.


 8613371530291