
double weave overshot factory
I am new to doubleweave and have been told that any overshot pattern can be used to weave a doublewide fabric. How do I figure out the treadling, especially when you weave the top layer first with the shuttle, then the bottom twice, and back to the top to finish. Can you please help me understand this?
I’m assuming you have threaded every other thread on the first four shafts following the overshot pattern for the top layer, and you have threaded the alternate threads on shafts 5 to 8 for the bottom layer the same order but in the opposite direction from the first four shafts.
To weave Block A in the top layer, for example, shafts 1 and 2 must be down plus all of the shafts in the bottom layer. To weave Block A in the bottom layer, you’ll raise the Block A shafts for the bottom layer so the pattern weft will be placed correctly when the piece is unfolded. You will therefore raise all of the top-layer shafts plus shaft 5 and 6. (Whenever you weave in the top layer you leave down the shafts where you want the weft to show on the face; whenever you weave in the bottom layer, you raise the shafts where you want the weft to show on the back plus the top-layer shafts.)
For specific information about planning and weaving projects in doublewidth overshot and other structures, you need the Best of Handwoven ebook, Doubleweave, Doublewidth! It is a great resource!

July has been a very busy time, what with all the watering (it’s been hot and dry), squishing of bugs, and weeding, not to mention flax harvesting. However, I recently did a tiny bit of weaving for my double-weave study group with the Pioneer Valley Weavers Guild, led by the elegant and brilliant Barbara Elkins.
Doubleweave is a versatile technique that lets you weave two layers of cloth at the same time. The layers can be joined at the right or left edges, joined at both edges, they can be totally separate, or they can exchange periodically (i.e., the bottom layer comes to the top and the top layer goes to the bottom). Our samples used four shafts, which is the minimum number you need.
With the doubleweave version of overshot, the pattern is made by the intersection of the bottom and top layers of the cloth. There are no long floats. The cloth is a little dense because it’s two layers woven together, but you sett it more loosely than you would for regular plain weave. I used 5/2 cotton for these samples.
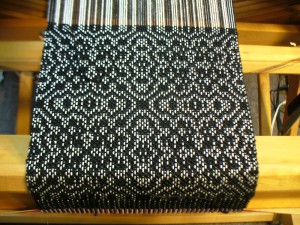
Here is one of my overshot samples still on the loom. The warp isn’t striped, even though it looks that way. The stripes appear because some black warp ends from the bottom layer are raised to the surface with each row, or pick, of the pattern. In the last pick at the fell line (top of the cloth) you can see where I just wove these parts of the pattern. I like how it looks as if the warp threads are zooming into the cloth (well, they are in a sense). As soon as you change sheds, these stripes disappear, to be replaced by the next set of pattern threads.

Let’s say we have threaded up our looms for double weave blocks on 8 shafts. How do we set about weaving them? In this post I will cover two basic liftplans which allow us to weave checkerboard style patterns. Examining the logic of these liftplans will also give us the basis for further design options.
Layer 1 is threaded on shafts 1-4, so to weave it we need to alternate lifting shafts 1 & 3 with shafts 2 & 4. Hey, that sounds familiar! Yes, now we have four shafts for this layer, we are weaving it as if it were single cloth threaded on those four shafts. The same result is achieved for layer 2 by lifting shafts 5 & 7 alternately with shafts 6 & 8. These four lifts create our two layers.
It’s worth pausing a moment here to note that the shafts which are lifted to weave (marked with a circle) are the same in both liftplans. The only differences are which shafts are marked with an X. As long as our design keeps each layer distinct and woven with its own weft – which, for now, is exactly what we will do – all our liftplans will be constructed around the same basic skeleton:
To create this design using double weave, we need to take several things into account. We can see it takes two blocks, as each horizontal row has two distinctly different looking areas: a blue area and a grey area. To achieve this, we will need to weave the blue warp layer with a blue weft and the grey warp layer with a grey weft. We will also need to find a way of raising the blue layer to the surface of the cloth in one block, while raising the grey layer to the surface in the other block. And we need to do this in two different ways, so that in the top row we obtain grey-blue-grey-blue and in the next row we get blue-grey-blue-grey.
The diagram above shows how I might think about liftplan 1: the blue threads in both blocks are marked with Xs to show that these are the threads I want on the face of the cloth. Whenever I weave the grey layer, therefore, I enter Xs into the liftplan for these shafts to raise them up to the top.
The most important thing to note about the final liftplans is that the two requirements of ‘weaving a layer’ and ‘lifting it out of the way’ belong to different picks. When we are weaving the blue layer, it is the grey layer we need to lift. When we are weaving the grey layer, it is the blue layer we need to lift. Every pick acts on both layers of our double cloth.
The approach I have taken to developing the liftplans above gives you a strong hint about the way we might tie up a floor loom efficiently to weave blocks.
However, if you want more flexibility, then you can separate out the two aspects of double weave. You can tie up four treadles to weave the skeleton liftplan (1 & 3, 2 & 4, 5 & 7, 6 & 8) and then tie up other treadles to raise the different blocks. For 8 shafts and 10 treadles, this is a useful tie-up:
Today we’re talking about double weave: the structure that is on every new weaver’s bucket list! It’s easy to see why double weave captures weavers’ imaginations. In double weave, you make two layers of clothat the same time. It feels like a cheat code, or a magic trick. And if that wasn’t enough, you can also make those two layers interact in different ways on your loom to create tubes, colour blocks, or double-wide cloth. All this possibility, and all from a threading and treadling that is not that much more complex than plain weave!
Here’s the basics of how double weave works on a four-shaft loom. To weave plain weave, you really only need two shafts. So you use shafts 1 and 2 to weave one layer of plain weave, while shafts 3 and 4 weave a second layer. The really cool part is that you can do this with a simple straight draw threading (1,2,3,4)! You just need to adjust your tie-up for double weave and you’re ready to get weaving. One word of caution for counterbalance loom weavers: the tie-up requires lifting and lowering either one or three shafts at a time, so you may find it difficult to get a good shed unless you have a shed regulator. Weavers with jack looms, table looms, and countermarche looms, weave away!
The most common use for double weave is to make double-width cloth. To do so, you throw your shuttle so that it connects the two layers at the left-hand side and leaves the right side open. You can easily visualize this by folding a piece of paper in half. The fold is like the left side of the weaving: it is where the connection is. The side opposite the fold is like the right side of the weaving: open and free to move. When you unfold the paper, you have something twice as wide as the folded piece. Your weaving looks like that folded piece of paper while it’s on the loom. When you cut it off, you get to unfold it and see the whole thing! All of a sudden, your Baby Wolf can make Mighty-Wolf-sized cloth… and beyond.
When you’re weaving double-width, it’s key to pay attention to the side where the two layers join. You want to be generous with your weft there, so that you don’t end up with excessive draw-in. In normal weaving, excessive draw-in shows up as pinched sides. In double-weave, it shows up as an ugly stripe of dense cloth smack dab in the middle of your cloth! One of our Master Weavers, Shannon Nelson, recommends threading an extra end of slippery cotton right at the join, then gently pulling it out after you cut off your project. This both keeps your project from drawing in and provides a little breathing room when the thread is removed.
Double-width double weave is particularly useful for making big, snuggly pieces, like our Reflections Double Weave Blanket. Using double weave lets you make a 45”-wide blanket on a 26” loom… and that’s finished width after draw-in and shrinkage! You can’t even make a 45”-wide finished project on a 45” loom without using double-weave. For pieces that you want to wrap up in, double weave is essential. It expands your options without requiring you to somehow work a 60” loom into your craft space.
Now here’s where things get really cool. With four shafts you can only do two plain weave layers. But with an eight shaft loom you can assign four shafts to each layer, letting you do two layers of twill, or trade the layers back and forth to create more complex colour effects. Our Sunroom Throw pattern is an advanced 8-shaft project that uses double weave to create strong blocks of colour. The throw isn’t double-width. Instead of simply connecting the two layers at one side, it swaps sections of the two layers back and forth in blocks. This creates a dense but still drapey cloth that is heaven to wrap yourself up in. Without using double weave, the dense sett of this project would make cloth as stiff as cardboard. But using double weave lets you achieve results that would otherwise be impossible.
Our two double weave patterns are only the tip of the iceberg of what you can do with double weave. You can set up for double-width double weave and then connect both sides instead of only one, creating a tube that could become a cowl or a pillowcase. You can leave both sides open and swap layers every few inches, making a piece with dramatic 3D ripples. Trying out double weave is a great way to start thinking about the structure of your cloth instead of just working with its surface design and colours. And once you start weaving double weave, you’ll find it hard to stop. Like so many other kinds of weaving, it’s something that you can learn quickly and then explore for years.
Weave structures often have specific threading and treadling patterns that are unique to that particular weave structure and not shared with others. This book takes you out of the traditional method of weaving overshot patterns by using different treadling techniques. This will include weaving overshot patterns such as Summer/Winter, Italian manner, starburst, crackle, and petit point just to name a few. The basic image is maintained in each example but the design takes on a whole new look!
Author of the popular Overshot Simply and Shadow Weave Simply now shares her explorations of overshot weaving structures. Her teaching style is to break down the weave structure into its basic parts so that it is easy to understand, and then teach you how the parts work together to create the weave structure so that you can use any pattern or create your own.

Conventional shaft loom weaving constricts the weaver into making only a single layer of fabric that is no wider than the loom. Increase your loom"s capabilities with Doubleweave Revised & Expanded!
In this comprehensive guide to doubleweave, master-weaver Jennifer Moore revisits the tips and techniques to weaving in multiple layers. Doubleweave Revised & Expanded is filled with new information about double weaving and more including:
Soon, I hope, the weather will be glorious in my gardens with ponds. They are beautiful now, but the weather is still very windy and chilly, and not enticing to sit outside with a simple loom, and just breathe. Every year I have this goal, this vision of life in the back yard, listening to the birds, the quiet drone of small planes overhead, and watching the fish in the pond while I weave. Sounds lovely, but I can assure you it never happens. Because I am always too busy, and more importantly, I get easily distracted and depressed by all those weeds and deeds that need attention in said poetic back yard.
So what that means, is I need little looms to easily carry outdoors, and just weave. I have plenty of inkle looms. And many have projects on them. But I have a large collection of 18 little Structo looms, the 8″ wide metal kind, four of them are 8 shafts, and I have a couple of adorable 4 shaft Leclerc 10″ wide looms of about the same vintage. I had visions of setting them all up with different weave structures to explore, and one of the perfect ways to do that is with what’s called a Gamp, which is a sort of sampler with blocks of design across, so whatever you ‘treadle’, affects all the different threadings across. It is like creating a library of little designs.
So over the last few weeks, as my broken shoulder starts to heal, I’ve been really busy just playing in the studio. I’m making progress on the overshot placemats I agreed to do for a friend (this is a really good friend), and I’m actually half way done. I’ve completed three mats and only have three more to go. And I’m really enjoying the scale, working with 20/2 cotton for the ground, and 10/2 for the pattern. I thought I’d hate it, but I can weave half a mat in an hour, and I’m getting really smooth at handling two shuttles. (The pattern is from Handwoven Magazine Nov/Dec 2010 in an article by Mary Berent, pg 38).
I had a guild friend come and help me set up one of the baby Leclerc’s, with a doubleweave sampler, from Jennifer Moore’s book called Doubleweave. This is a pretty complex and lengthy sampler, and just drafting it out in weaving software is time consuming. It doesn’t look like much at the moment, but I’m actually weaving two layers of cloth simultaneously. One layer is light, and the other dark, and then they switch.
On the other baby Leclerc, I used the spools that came with it, when my late mother in law gave me the loom years and years ago. The spools had linen on them, and I managed to get them threaded and I started a linen huck sampler. I’m using the “Stuck on Huck” sampler in Best of Weaver’s, Huck Lace pg 6, by Lynn Tedder.
And on one of my 8 shaft Structo’s, I found a beautiful Shadow Weave sampler from a draft from Webs Valley Yarns #199, Shadow Weave Sampler Scarf in 8/2 tencel. I wound four spools with the color sequence using yarn I had in colors I already had, and the effect is charming. Can’t wait to sit in the garden and weave on this.
I have three more drafts planned out for another group of 8″ Structos, an 8 shaft Quigley from Tom Knisely’s handwoven table linens, a deflected double weave gamp from Marion Stubinetsky’s Double Twist pg 204, and another Robyn Spady gamp, in overshot on 4 shafts from Handwoven Magazine May/June 2014.
And yes, there is still life to contend with. I managed to film two more episodes on Monday ofThe Weaver Sews, one launched last night, part one. I had so many people ask about how I made the doubleweave sampler jacket I featured in my last blog post, I decided to just do a couple videos.

In January our Handweavers Hui brought Jennifer Moore to Hawaii for two doubleweave workshops, with support from the Hawaii State Foundation on Culture and the Arts. Both workshops were based on Moore’s book The Weaver’s Studio: Doubleweave. The Big Island weavers had the basic workshop which covers the first half of the book with four-harness weaves, while our Honolulu group got the second half, which was mostly eight harness weaves plus a view more complicated four-harness ones. The Honolulu workshop came first, and a couple of the more experienced Big Island weavers flew over to join our workshop.
Moore is an excellent teacher who has thought hard about the logic of doubleweave and has developed various methods to convey it. She uses an original system of drafting and tie-ing up for doubleweave. She presents doubleweave as having dark and light threads to represent the two layers, and organizes the draft and the tie-up to so that you can easily distinguish the dark and light layers and understand what you are doing.
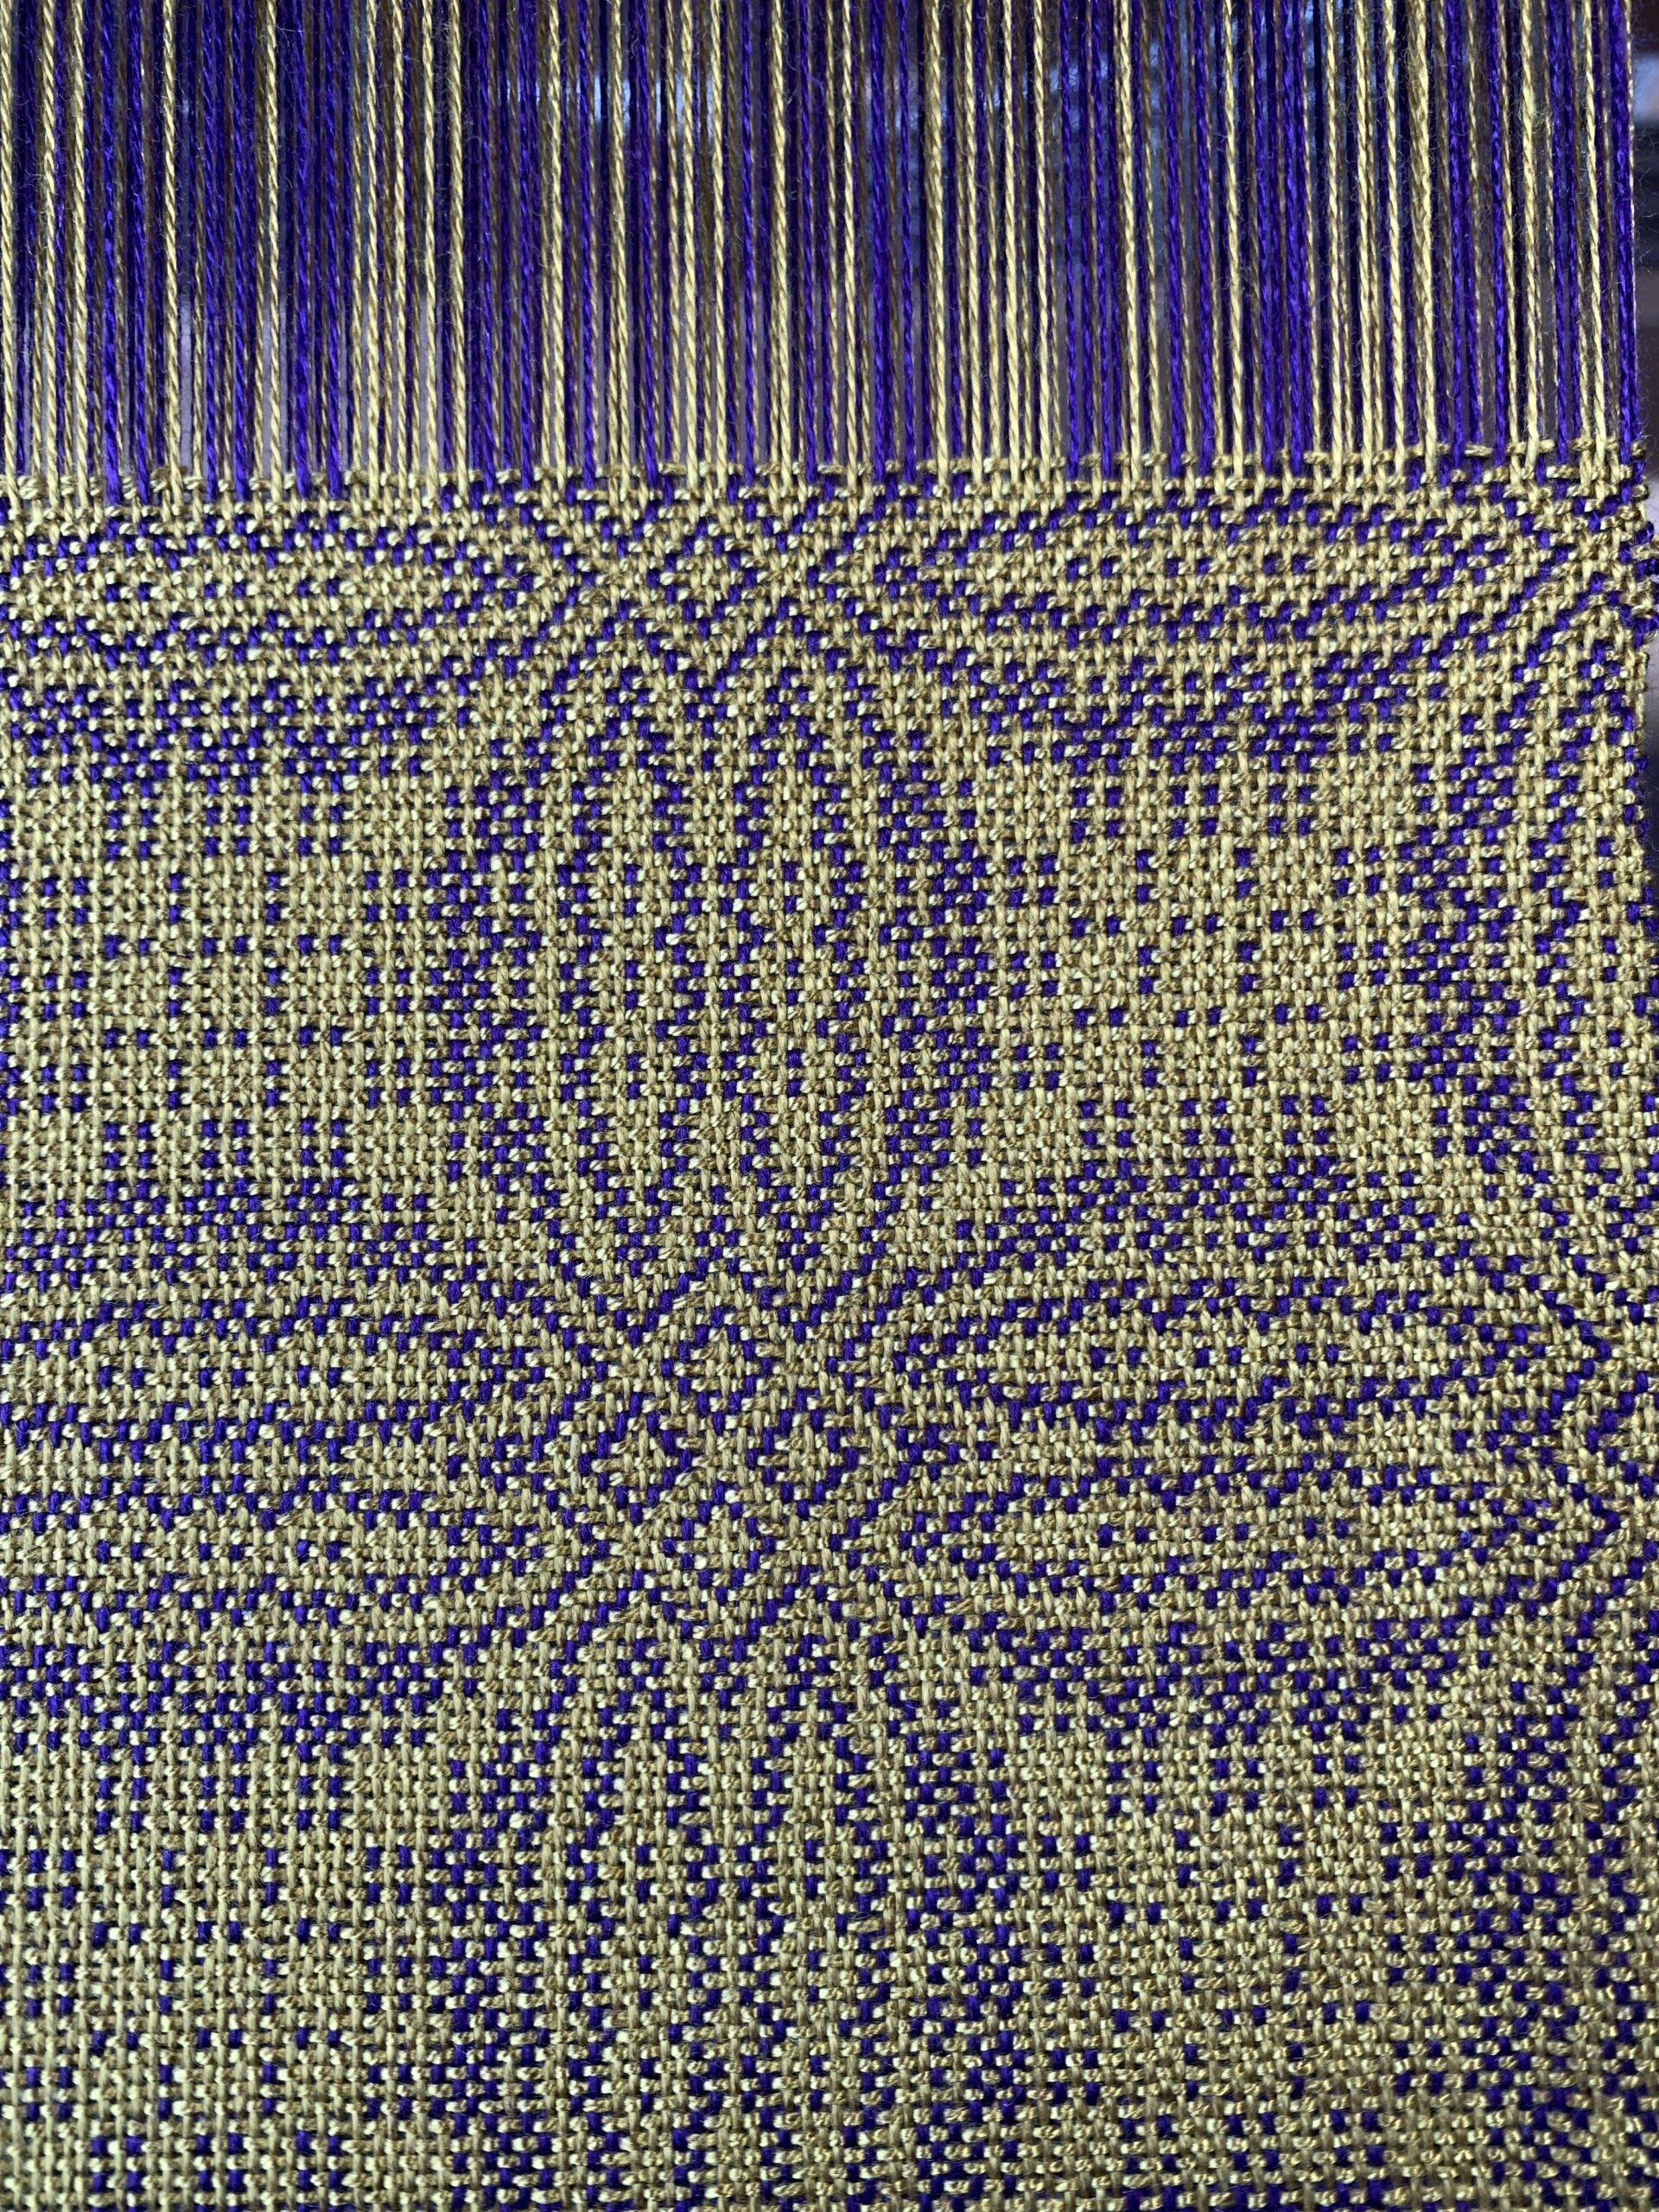
This sample was set up to weave twill in two layers joined at one side so it would open up to double width. The warp was in two made in a very bright contrast between a bright pink and a bright green, so I tried to tone it down with a maroon weft.
We had about a dozen different samples set up on fourteen looms at Linekona Art Center, plus two “extra” ones set up on table looms (because those drafts require such frequent changes that they work best with an 8 harness table loom where you can manually set up each pick). Every draft had 288 ends of 5/2 cotton, but the threading and tie-up were quite complicated and it took longer than people expected to get the looms ready. The workshop was done round-robin style so everyone could weave samples of all the different alternatives.
In short mini-lectures, Moore grouped together a number of samples in order to make particular points and show us how they were related. Then we would go back and work on whichever loom was free. The same samples are in her book, but these are some of the ones I did. These first two were fairly straightforward, and people enjoyed doing them. But some of the others, like doubleweave pickup, were very difficult and people only wove an inch or so before they gave up and moved on to something else.
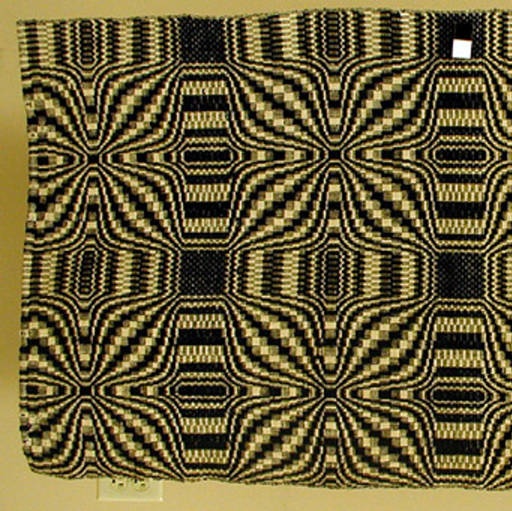
There were two looms warped with doubleweave overshot, which is quite an interesting innovation. Normally overshot is a four harness weave with a plain weave background and an overshot pattern with longer floats that are often of a heavier yarn. It is the type of weaving you find in colonial coverlets and there are all sorts of books of overshot patterns.
But in doubleweave overshot, you thread one layer for the background and one with the overshot pattern in a contrasting color. You are supposed to weave the pattern and tabby alternately using two shuttles, which makes the two layers completely bind together, but the pattern shows up in the opposite colors on the reverse side. There are no long floats at all. One of our members also figured out that you could use a single shuttle to treadle the pattern and tabby alternately and still get an interesting effect with a lot less mental concentration.
This sample was stitched cloth, which wasn’t on the list, but Moore created it by changing the tie-up and treadling of the double-width twill sample, which the under-layer was stitched together with the top layer by periodically switching the layers.
When the class began a couple of weeks after the workshop, several people tried out the doubleweave warps. One person who had not attended the workshop finished off a doubleweave overshot warp. She had bought some 10/2 tencel to make a navy and white scarf with a different pattern, but with a little encouragement from other class members she ended up typing on her warp to the doubleweave overshot pattern. Her yarn was finer than the 5/2 used in the workshop and it produced a really beautiful scarf.
Others played with a log cabin warp that could be used for tubular or stuffed doubleweave.The most warp was left on the two double-weave pickup warps, but they are so difficult and frustrating that people would try doing it for an inch and then give up. We are all in awe of Jennifer Moore’s own accomplishment of having spent a year weaving a spectacular wall hanging showing all the phases of the moon over a year. I has been featured in Shuttle, Spindle, and Dyepot and is also on her website.
There were still other impacts of the doubleweave workshops. The Big Island group started a doubleweave study group that I believe is still continuing. I was inspired to weave the double width doubleweave herringbone twill blanket that is in Moore’s book. That turned into a much longer saga than I had expected, and is the subject of some other posts. I apologize for posting these blogs out of sequence!

Introduction:I can’t thank Molly McLaughlin enough for all the information she generously shared. She’s been weaving for over 30 years and has developed her own unique weave structures to weave beautiful, intricate, and exciting art pieces. This post is about her work and the fine silk threads she uses.
Master Weaver, Lillian Whipple has been weaving for over 50 years and has all the qualifications as Molly but her comments supported Molly’s so much I chose to include them as comments. Molly is on Instagram: @mollymclaughlinsfiberart. Lillian is on Facebook and it’s a good idea to Google her.
Molly uses a 40 dent reed for different circumstances and doubles up the threads in a dent as required. Double cloth is sett at 360 epi. Single layer cloth is 120 epi. For linen she has used 100 epi but would like it more dense. These setts are for twill based ground cloths. She gets the reeds from the Woolgatherers (woolgatherers.com). They are specially made by a reed maker in Germany.
“Over time I have worked to reduce the necessary number of shafts. Currently, I prefer to use 4 shafts for a single weave and 10 shafts for double weave. However, I space the shafts on the loom so that there is a space between each shaft, so 4 shafts take up the same amount of space as 8 shafts. This separation of shafts makes it much easier to avoid mistakes in the threading and to fix broken threads. I used to try and spread the warps over as many shafts as possible to reduce friction and heddle density, but I found that less shafts with more space between them made life much easier.”
“Along the lines of keeping things simple, I only weave double cloth if the shifting of layers will make it easier to actualize the cartoon that I have created, generally with a 3D component. Otherwise, I stick to single weave…here is an example of a design that called for double weave.”

Double weave can be a very intimidating weave style to take on. Sometimes just the sheer volume of threads you need to wind and how to thread them through the heddles can seem overwhelming. This post covers a simple approach to winding and threading a double weave sample that can be adapted for a variety of projects.
This post is the first in a series on double weave. Initially I will cover the setup and warping process for a sample warp. Then I will cover how to use double weave for pockets and tubes, double weave pick-up mug rugs and a double weave block wall hanging.
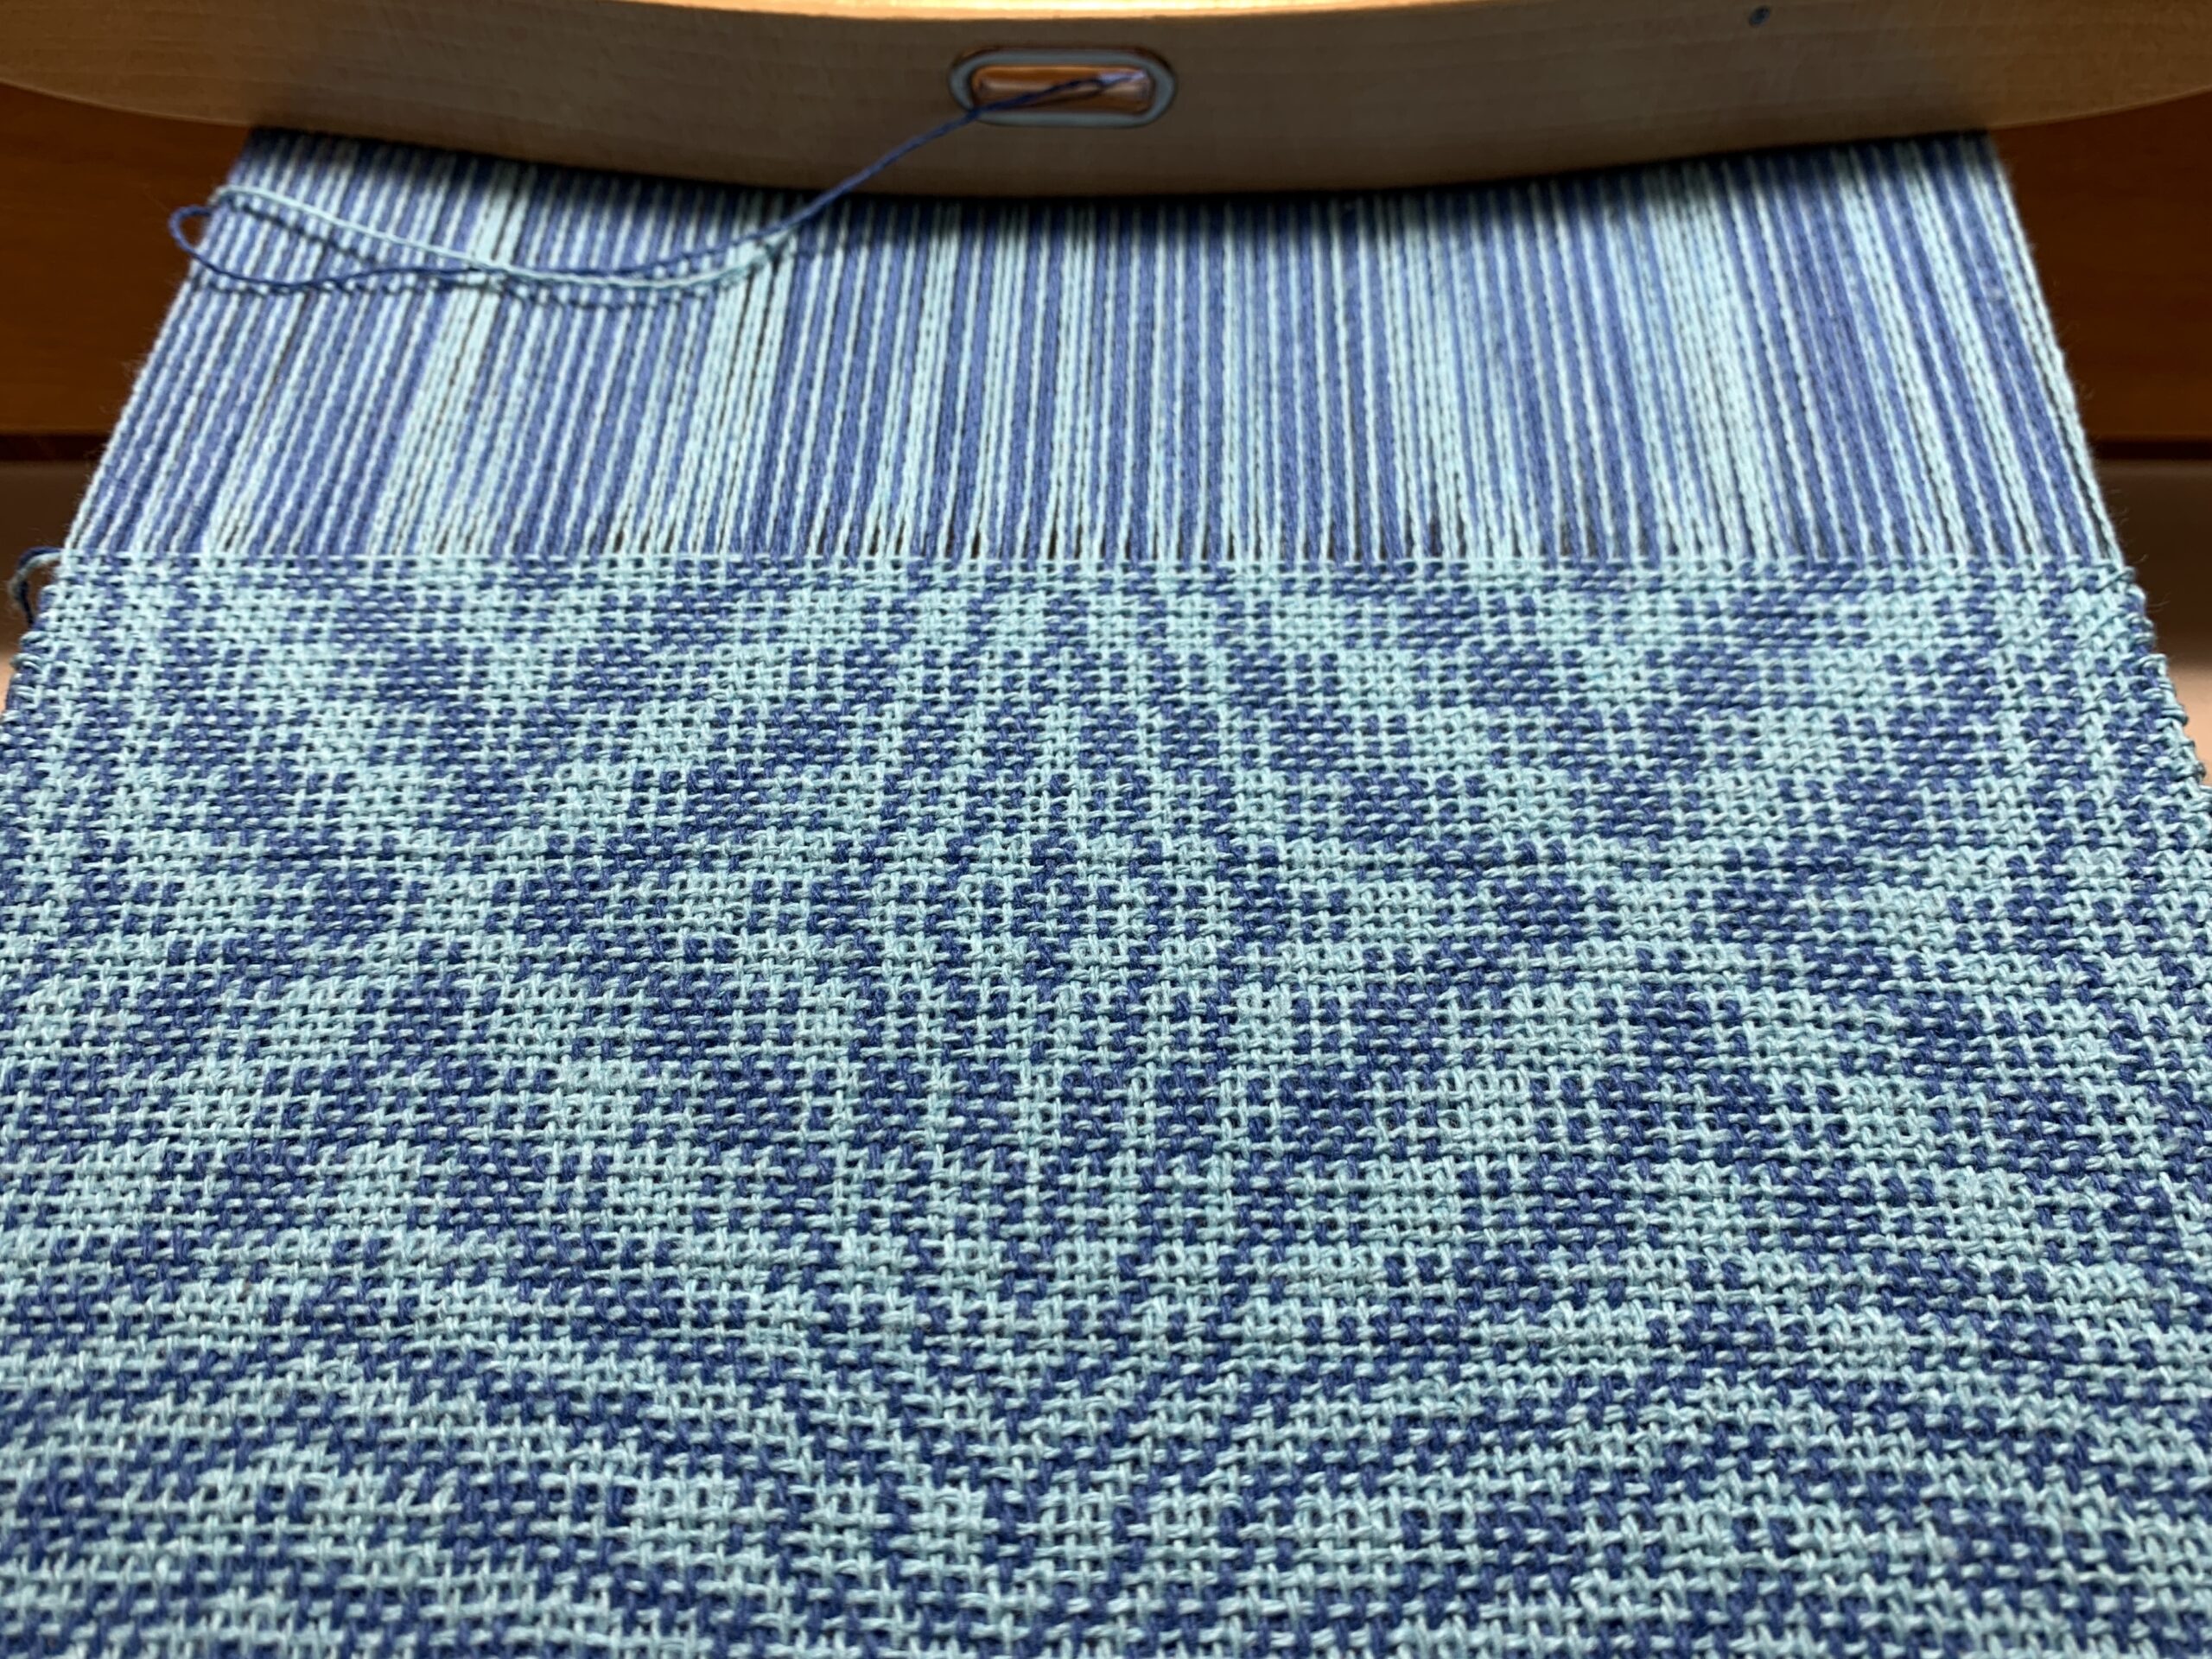
For a double weave, you can use as few as four shafts of the loom. Each layer of fabric needs at least two shafts. Because I already wound the warp in pairs of two yarns (one white, one aqua) it was simple for me to thread two yarns per dent of the reed. It is important that the pattern is maintained (one white and one aqua per dent). This makes the threading process simple! Use a straight draw threading that carefully alternates the colors. See draft.
For the top layer, lift shaft one and pass the shuttle through and then lift shaft three and pass the shuttle through. Now the picks for the top layer are complete. Then it’s time to weave the bottom layer. In order to do this, you need to lift the top layer (shafts one and three) plus shaft two for the bottom layer. Keep shafts one and three lifted, lower shaft two and raise shaft four for the final pick. There are now two separate layers of cloth sitting on top of each other.
First lift shaft two, pass the boat shuttle through, then lift shaft four. The white yarns should actually pass in-between the aqua yarns and make a white stripe. Now to weave the aqua layer on the bottom, lift the entire white layer plus shaft 1 of aqua. Pass the boat shuttle through and then lift shafts 2 and 4 plus shaft 3 of the aqua. This action intertwines the two layers. You may now proceed with either the white or aqua as the top layer.


 8613371530291