
overshot titration for sale
During your titration, you overshot your endpoint and your solution was too pink. Would this lead to a final pKa that was too high or too low? Explain why using chemical reasoning.
The pKa will not be affected since pKa values are obtained before the endpoint of the titration. In a titration curve, it is found in the region where...
The endpoint of titration is overshot! Does this technique error result in an increase, a decrease, or have no effect on the reported percent acetic acid in the vinegar? Explain.
Titration is a quantitative analytical volumetric technique that permits the determination of the unknown concentration of an analyte with a known concentration of titrant. This is possible because the two react in a known stoichiometric manner allowing calculation of the unknown concentration.
Manual titrations are time consuming and can be inaccurate at times due to human error. Not to mention, important data can get easily lost due to improper tracking methods. The Thermo Scientific Orion Star T900 Series Automated Titrators are designed to make performing titrations easier, more reliable, and more reproducible than manual titrations.
These auto titrators expand the number of ions and compounds that can be measured beyond direct electrode analysis and offer dynamic process controls that adjust the titration to optimize analysis results.
Manual titration can be a time consuming and frustrating process. Watch how easy it is to find the endpoint, reproduce your workflow, and optimize your results. The auto-filling burette helps to minimize the handling of corrosive materials. Use of an auto titrator well help ensure a safer, more efficient lab.
A water treatment plant in the midwestern United States that ran up to 10,000 titrations each year improved their workflow. Learn how streamlining the workflow using an Orion Star Automated Titrator for low-level alkalinity titrations benefited the lab.
In this white paper, you’ll learn about the dispense accuracy and precision of the Orion Star T900 Series Automated Titrators. We’ll demonstrate that our auto titrators exceed well-established industry precision and accuracy specifications, providing users with greater confidence in their titration applications.
Streamline your manual titration workflows and increase efficiency and repeatability with an Orion Star T900 Series Automated Titrator. Review the applications chart below to find out if an auto titrator is for you.
We are currently unable to offer solutions for Karl Fischer, amperometric, stat, and dead stop titrations. For other questions please contact customer support to be connected to your local sales representative.
Get our top 10 tips for performing automated titrations, and methodologies for common uses of an auto titrator. Discover how to perform an acid/base titration for orange juice, water and petroleum in this ebook.
Performing manual titrations can be extremely tedious, requiring the operator to stand in one place, watching minuscule droplets drip into a sample container and diligently waiting for the color change or other endpoint indictor to occur before starting the process all over again, for possibly hours and hours of repeated sample titrations.
An automatic titrator allows you to start the titration and then walk away from the titrator to perform other tasks or tests while the titrator takes care of the titrant addition, endpoint detection and results calculations automatically without any involvement from the operator.
Manual titrations typically use a non-certified, Class B or Class A burette with stopcock to add doses of titrant to the sample. The operator uses the stopcock to start and stop the additions of titrant into the sample, often one drop at a time, until the endpoint is reached.
The precision of these additions, especially near the endpoint, is primarily determined by the operator’s skill level, experience and focus on the task at hand. All too commonly, an operator can allow too much titrant to flow out of the burette into the sample and overshoot the endpoint, requiring them to perform the entire titration all over again. Even highly skilled and experienced operators can be limited in the precision of their manual titration results by the last few drops of titrant, since each drop can vary in volume.
When using an automatic titrator, the titration is performed using a high-accuracy titrant delivery system that controls all titrant additions into the sample and will adjust the dose rate as it detects the endpoint approaching.
Once the endpoint is reached, the titrator uses the precisely measured volume of titrant added to the sample to automatically calculate the concentration results for the sample. The operator’s skill level, experience and focus on the task at hand is no longer a factor in the overall accuracy of the titration results and the possibility of missing the endpoint is greatly reduced.
Typically calculating titrations in the lab is done by calculating the sample concentration after the endpoint has been reached. There are many points in this calculation where human error can get in the way of consistent, reproducible results.
When using an auto titrator, it will automatically calculate the sample concentration from the entered parameters. Plus, on the automatic titrator, electrode, titrant and titration setup parameters can be saved as a method, so the exact same settings are used for each titration. These methods can be transferred between titrators for consistent procedures to be used on multiple titrators or multiple labs. This way you can save time with repeat titrations by running the exact same parameters each time without having to reenter any information.
Instead of manually logging the titration results in a notebook or scrap of paper, an auto titrator will automatically save the titration results in the data log with time and date stamp.
A smooth titration graph and receiving results back from your titrator does not always guarantee that they are accurate. Always review your results, your calculations, and quality checks.
It is important when reviewing titration results to ask yourself, “Does this result make sense?”. This is especially the case when switching methodologies, i.e. from manual titrations to automatic titrations. It can be alarming to see an unfamiliar number, but it is important to take a closer look at your specifications to determine the cause of deviation. The four most important parts of a specification to examine are the units, significant digits, the range, and the methodology used to originate the specifications. We will talk about the significance of each.
There are many different ways to represent the results of titration. Units of specifications can vary, but specifications are commonly represented in %, ppm (mg/L or mg/g), or simply mL (milliliters) of titrant used to determine the endpoint. Results can be customized in the method options to match those of the specifications in more cases. Results that vary from the original specification by a common factor, like 10 or a 1000 are most commonly attributed to a difference in units and can be easily adjusted.
In the example of a salt titration, some customers prefer that results be represented in sodium chloride, whereas some specifications represent the result in just chloride. The titration is exactly the same for both units, but the calculated results differ because of the difference in molar mass between sodium chloride and chloride. In the case of acidity, titration results are normally represented in units of the predominant acid. A specification that is written in % lactic acid, would differ greatly from a result represented in % citric acid. This is true, not only because of the differences in molar mass, but also the reaction ratio between the titrant and the specific acid. These deviations can easily be corrected in the method so that the results match the specification.
When possible, it is always a good idea to understand the methodology used to originate the specification. Different methods have varying degrees of accuracy and unique potential interferences. When moving from one methodology to another, i.e. from manual titration to automatic titration, there may be a slight difference in results. In the case of manual titrations, the endpoint is often overshot and the results can vary between operators. This leads to slightly higher numbers than the actual results. Specifications may need to be reevaluated when switching methodologies to improve the accuracy of the specification.
In summary, familiarity with specifications will make interpreting the results of titration much easier. Implementing quality checks, discussed below, will help to ensure that titration results are accurate.
A Laboratory Control Spike, abbreviated LCS, is a standard of known analyte concentration that is carried through the sample analysis procedure to evaluate the accuracy of the titration method. For example, if we were titrating the concentration of nickel in a plating bath, we would use a nickel standard of verified concentration to validate the accuracy of the testing procedure. The AOAC has published guidelines on percent recovery as it pertains to the concentration of analyte which is listed above. Laboratory Control Spikes can be used to validate new methods or to ensure the continued accuracy of current methods.

o = 0.05 mol L−1, Merck) were used. Solid borax (disodium tetraborate decahydrate), Na2B4O7·10H2O (Merck), was used to prepare a stock solution with a concentration of 0.05 mol L−1. Titrations were performed by using standard glass burettes with a reading precision of 0.025 mL (half of a scale division). A certain amount of the sample was transferred with a standard glass pipette (±0.05 mL) into a conical flask, and it was filled up with water to about 100 mL. Then the indicator was added (resulting concentrations in the sample solutions are given in Table 1), and the titration was performed. Each experiment was repeated 10 times.
Sample solutions for potentiometric titrations were prepared in the same manner in a beaker. The titrant was added either with the standard glass burette in case of high concentrations of the sample, or with a transfer pipette (10–100 ± 0.6 μL, VWR, Germany) in case of small concentrations. Titrations were followed by using a glass electrode (InLab®, Mettler Toledo, Swiss) in conjunction with a pH metre 761 Calimatic (Knick, Germany). The glass electrode was calibrated before each measurement. For each sample and concentration, 11 experiments were performed (one with each indicator).
To construct the colour maps, the titration curves were recorded by measuring the pH of the solutions with a glass electrode, and the coloured solutions where photographed in spectrophotometric cuvettes. For this, Britton-Robinson buffer solutions were prepared according to [21] with a variation of the pH in 0.4 pH increments. For each indicator, these buffer solutions were prepared and the indicator was added in the concentrations given in Table 1. The pH of each buffer solution was measured in the absence and presence of the indicator, and no detectable differences could be noted. Individual pictures were taken and the colour maps were created using the freeware PhotoScape.
o ≈ 5 × 10⁻⁴ mol L−1). The colours of the starting solutions (v = 0 and τ = 0 in Fig. 4) differ in case of high and low concentrations, because the titrations start at different pH values. In case of high concentrations, the starting colour is of vivid red pink (pH = 2.1), changing to red orange during progressive titration. At τ ≈ 0.91 (τ: degree of titration) the solution is already orange in colour (pH = 3.1). A distinct transition takes place between τ ≈ 0.985 and τ = (0.994 ± 0.002) from orange to bright yellow (pH ≈ 3.8–4.2, titration error at first bright yellow −0.6 %). In case of small concentrations the colour of the starting solutions is already orange (pH = 3.0). The transition from orange to bright yellow takes place between τ ≈ 0.8 and τ = (0.96 ± 0.01) (pH ≈ 3.7–4.4, titration error −4 %).
o ≈ 5 × 10⁻³ mol L−1, pH = 2.4), the sample solution with Methyl orange is of vivid red pink, too (Fig. 5a). But the colour changes quickly to red orange during progressive titration. Already at τ ≈ 0.5 (pH = 3.8) the solution is yellow orange in colour. The transition takes place between τ ≈ 0.62 and τ = (0.90 ± 0.03) from yellow orange to bright yellow (pH ≈ 4.7, titration error −10 %). In case of low concentrations (C
o ≈ 5 × 10⁻⁴ mol L−1, pH = 3.3) the colour of the starting solution is already yellow orange (Fig. 5b). The transition from yellow orange to bright yellow is smeared out, and bright yellow is reached at τ = 0.83 ± 0.04 (pH ≥ 4.5, titration error −17 %).
o ≈ 5 × 10⁻⁴ mol L−1) are brilliant yellow before the addition of hydrochloric acid (pH = 9.2 and pH = 9.0 for high and low concentrations, respectively). In case of high concentrations, the transition from yellow to yellow orange (first orange undertone) is observable at τ = 1.012 ± 0.004 (pH = 4.3, titration error +1.2 %), but the colour changes gradually to orange, red orange and at least vivid red pink when continuing the addition of hydrochloric acid (i.e., large excess, pH < 3.0, cf. Figure 6a). In case of low concentrations, the transition from yellow to yellow orange is hardly visible at τ = 1.17 ± 0.06 (pH = 4.3, titration error +17 %), a real transition to orange and red orange is only obtainable, if an excess of hydrochloric acid is added (cf. Fig. 6b).
Methyl red is a very common indicator for titrations of strong acids with strong bases. It is a dark red violet crystalline powder. In contrast to Methyl orange, it is sparingly soluble in water, and a stock solution should contain 0.02 % of the indicator in a 60 % ethanol water mixture. The transition interval is from pH 4.4 to 6.2 (Scheme 4). In the literature [13], the colour transition is given from yellow (base) to red (acid), but as it is shown in Fig. 7, a better description for the colour of the acid is fuchsia.
o ≈ 0.001 mol L−1, respectively). This colour does not change markedly during ongoing titration (Fig. 7a, b). The transition from fuchsia to yellow is very sharp. Only very close to the transition point (τ > 0.997 and τ > 0.98 in case of high and low concentrations, respectively, pH ≈ 4.5), the fuchsia colour starts getting lighter. At τ ≈ 1.000 (τ = 0.999 ± 0.002, high concentration, and τ = 1.00 ± 0.02, low concentration, pH ≈ 6–7) the complete solution is yellow. In both cases the systematic error is negligible, as we will discuss later in detail. However, it must be mentioned here, that the yellow colour vanishes with time, and the colour of the solutions returns to fuchsia because carbon dioxide from ambient air dissolves, and this decreases the pH of the solution. The rate of the regeneration of the fuchsia colour depends strongly on the experimental and ambient conditions, e.g. the return of the colour is very fast when the solution is heavily shaken. Hence, it is not serious to give a certain time span in which the colour should stay, although, this is often done in textbooks. In praxis, this leads very often to the fact that undergraduate students read the end point too late.
In case of a weaker acid like oxalic acid, the transition is not as sharp as for strong acids (cf. Fig. 8a, b). We can see here, that both solutions are fuchsia before titration starts. The brilliant fuchsia turns pale at τ > 0.90 (pH > 4.7). At τ ≈ 0.98 (pH = 5.5) the pale fuchsia turns to red orange, and the transition to clear yellow is obtained at τ = 0.990 ± 0.003 and τ = 0.99 ± 0.01 (pH = 5.7) for high and low concentrations of oxalic acid, respectively (titration error −1 %).
In case of borax a sharp transition is observable; here the colour changes from yellow to brilliant fuchsia (Fig. 9a, b). At τ ≈ 0.99 (high concentration) and τ ≈ 0.98 (low concentration) (pH ≈ 6.0) the solutions start getting slightly orange (very weak orange undertone), and at τ = 1.000 ± 0.003 and τ = 1.00 ± 0.01 the transition to fuchsia for low and high concentrations is obtained, respectively (pH = 5.2). In both cases, the titration error is negligible.
Sample solutions of high and low concentrations of hydrochloric acid and sulfuric acid with Congo red are pale blue violet (pH = 2.1 and pH = 3.0 for high and low concentrations, respectively, cf. Fig. 11a, b). In case of high concentrations the colour starts getting brighter already at τ ≈ 0.93 (pH ≈ 3.2). Between τ ≈ 0.98 and τ ≈ 0.99 (pH ≈ 3.7–4.0) the transition takes place from violet to red violet, and the solutions become orange above τ = 0.993 ± 0.002 (pH = 4.2, titration error −0.7 %). In case of low concentrations the transition from violet to red violet and at least to orange is observable between τ ≈ 0.8 and τ = (0.94 ± 0.02) (pH ≈ 3.7–4.3, titration error −6 %).
In case of oxalic acid, both titrations start with a pale blue violet colour (pH = 2.4 and pH = 3.3 for high and low concentration, respectively) (Fig. 12a, b). In case of high concentrations, at τ ≈ 0.7 (pH ≈ 3.8–4.0) it starts getting brighter and the solution becomes more violet. Between τ ≈ 0.80 and τ ≈ 0.85 the transition from red violet to orange red is observable, a clear orange is obtained at τ = 0.87 ± 0.02 (pH = 4.6, titration error −13 %). In case of low concentration, the transition interval is smeared out over a larger range of the titration degree; the solution starts getting brighter already about τ ≈ 0.5 (pH ≈ 3.8), and a clear orange is obtained already at τ = 0.77 ± 0.04 (pH = 4.5, titration error −23 %).
Figure 13a and b show the titration curves for high and low concentrations of borax with HCl and Congo red as indicator. In both cases, the solutions are orange before adding the HCl. In case of high concentration, the transition from orange via red violet to violet is rather sharp, it starts at τ ≈ 1.01 (pH = 4.5), and the transition to blue violet is obtained at τ = 1.014 ± 0.004 (pH = 4.0, titration error +1.4 %). In case of small concentration, the transition starts later at τ ≈ 1.05 (pH = 4.5), and the transition from red violet to blue violet is not as sharp as in case of high concentrations. A clear blue violet is obtained at τ = 1.15 ± 0.02 (pH = 4.0), i.e., the titration error is +15 %.
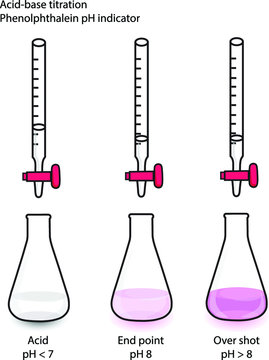
Solutions of high and low concentrations of strong acids as well as of weak acids appear colourless, when Phenolphthalein is added (see Figs. 14a, b, 15a, b). Under the conditions we consider here (concentration of Phenolphthalein is given in the experimental section, transition point at pH ≈ 8.5), for strong acids a sudden colour change to faint pink is obtained at τ = 1.003 ± 0.002 and τ = 1.02 ± 0.02 (high and low concentration, respectively). It is of outmost importance to avoid all colour influences from outside, meaning that the background is covered with white paper. The faint colour fades with time until the solution appears colourless again due to the influence of ambient air (cf. Methyl red). If the solution appears dark pink, the endpoint is overshot. Phenolphthalein is a suitable indicator for the titration of weak acids with a strong base as it can be seen in case of oxalic acid (Fig. 15a, b). Here, the colour turns to faint pink at τ = 1.000 ± 0.003 (high concentration) and τ = 1.01 ± 0.01 (low concentration).
In contrast, Phenolphthalein is absolutely inappropriate as an indicator for the titration of weak bases with a strong acid, as it is depicted in Fig. 16a, b for borax. Although the sample solutions are pink, this colour fades quickly during ongoing titration, and the systematic deviation exceeds −40 % (τ = 0.54 ± 0.12 for high concentration, τ = 0.53 ± 0.08 for low concentrations).
Thymolphthalein turns from colourless to blue, but it has to be mentioned here, that it is only a fade blue, the transition is rather difficult to see and the influence of carbon dioxide from ambient air is rather pronounced due to the high pH values. In that range, the addition of about 5 × 10⁻⁵ mol L−1 of H3O+ ions leads to a change in pH of about 0.3 units. In case of strong acids (Fig. 17a, b), the first very faint blue colour is obtained between pH ≈ 9.7 and 10.0, i.e., τ = 1.009 ± 0.003 (high concentration, titration error +0.9 %), and τ = 1.06 ± 0.02 (low concentration, titration error +6 %). As in case of Phenolphthalein, it is important to avoid all colour influences from outside, and the progress of titration should be controlled with a white background.
Similar results are obtainable with a weak acid like oxalic acid, as it is depicted in Fig. 18a, b. The first very faint blue colour is obtained between pH ≈ 9.7 and 10.0, i.e., τ = 1.006 ± 0.002 (titration error +0.6 %) in case of high concentration, and τ = 1.06 ± 0.02 (titration error +6 %) in case of low concentration.
The solutions of high and low concentrations of hydrochloric acid and sulfuric acid with Bromophenol blue are pale yellow in colour (pH = 2.1 and pH = 3.0 in case of high and low concentrations, respectively, cf. Fig. 20a, b). In case of high concentrations, around τ = 0.97–0.98 (pH ≈ 3.5–3.7) the solutions start getting greenish yellow to grey and then to pale blue. The most striking colour change takes place at τ = 0.989 ± 0.003 (pH ≈ 4.0) the colour changes to blue purple resulting in a titration error of −1.1 %. During ongoing addition of the titrant, a smeared out colour change from blue purple to purple was observed. At lower concentrations, a faint greenish yellow colour is already visible at τ = 0.7 (pH ≈ 3.5), but the transition to blue purple takes place at τ = 0.94 ± 0.01 (pH ≈ 4.2), resulting in a titration error of −6 %.
In case of oxalic acid, the sample solution with high concentration of the acid (pH = 2.4) shows a pale yellow colour, too (Fig. 21a). Already at τ ≈ 0.6 (pH ≈ 3.6), the solution gets greenish yellow, and at τ ≈ 0.7 (pH ≈ 3.8–4.0) the colour changes via grey to pale blue. A clear transition to blue purple takes place at τ = 0.87 ± 0.02 (pH = 4.6), i.e., a titration error of −13 %. In case of low concentration of oxalic acid (Fig. 21b), the starting solution is greenish yellow in colour (pH = 3.3), and the colour changes slightly right from the beginning of the titration. Between τ ≈ 0.4 and τ ≈ 0.8, the colour turns gradually from pale blue to blue. The transition to blue purple takes place at τ = 0.86 ± 0.05 giving a titration error of −14 %.
Solutions of high and low concentrations of borax with Bromophenol blue as indicator are purple at the beginning, changing gradually to blue purple during ongoing titration (Fig. 22a, b). The blue colour starts degrading at τ ≈ 0.99 (high concentration) and τ ≈ 1.00 (small concentration) (pH ≈ 5.0–4.5). A transition from pale blue via grey to greenish yellow is observable between τ ≈ 1.00 and τ ≈ 1.03 for high concentrations, and between τ ≈ 1.01 and τ ≈ 1.15 for low concentrations, respectively (pH ≈ 4.5–3.2). If grey colour (pH ≈ 4.0) is taken for the determination of the transition point, the systematic errors are +1 and +8 % for high and low concentrations, respectively. In both cases, one will not end up with a clear pale yellow colour.
Sample solutions with high concentrations of strong acids with Bromocresol green as indicator are yellow in colour (pH = 2.1, Fig. 23a). The colour changes at τ > 0.91 (pH > 3.1) to become greenish yellow, but a clear colour change from green to bright blue green is observed at τ = 0.999 ± 0.002 (pH ≈ 5.0, titration error −0.1 %), i.e., the systematic error is negligible. Also in case of small concentrations of strong acids, a sharp colour change is observed (Fig. 23b). The solutions are slightly greenish yellow right on from the beginning of the titration (pH = 3.0). Bright blue green solutions are observed for τ = 1.00 ± 0.01.
A quite different result is obtainable in case of high and low concentrations of a weak acid like oxalic acid. Starting with a yellow solution, in case of high concentration (pH = 2.4) it becomes greenish yellow, soon; in case of low concentration we already start with a greenish yellow solution (pH = 3.3). The colour change is smeared out from turquoise to bright blue green between τ ≈ 0.70 and τ = (0.97 ± 0.01) (pH = 4.0–5.4) for high concentrations, and between τ ≈ 0.75 and τ = (0.91 ± 0.03) (pH = 4.4–5.0) for low concentrations (i.e., the titration errors are −3 and −9 %, cf. Fig. 24a, b).
Solutions of borax in high and low concentration are bright blue green (pH = 9.2 and pH = 9.0 for high and low concentration, respectively), when Bromocresol green is added. Here, with ongoing addition of hydrochloric acid, the transition from blue green via turquoise to greenish yellow is rather sharp, and at τ = 1.009 ± 0.002 (high concentrations) and τ = 1.05 ± 0.02 (low concentrations) the greenish yellow colour is established (pH = 4.2, titration errors +0.9 and +5 %). In case of high concentrations, the colour will change until a yellow solution results, but this needs a markedly excess of hydrochloric acid (τ ≈ 1.1, pH ≈ 3.5). In case of small concentrations the solutions are still greenish yellow at τ ≈ 1.2 (pH ≈ 3.6) (cf. Fig. 25).
Only in case of high concentrations of strong acids, a smeared transition from red orange to greenish yellow can be observed at the beginning of the titration (cf. Fig. 26a), because the sample solutions have a pH = 2.1. In case of low concentrations of strong acids one already starts with a greenish yellow solution (pH = 3.0, cf. Fig. 26b). The same holds true for high and low concentrations of oxalic acid (pH = 2.4 and pH = 3.3, cf. Fig. 27a, b). In all cases, a sharp transition from greenish yellow to blue is obtained at the following degrees of titration: τ = 1.000 ± 0.003 (strong acid, high concentration), τ = 1.01 ± 0.02 (strong acid, low concentration), τ = 1.002 ± 0.003 (H2C2O4, high concentration), τ = 1.01 ± 0.01 (H2C2O4, low concentration), i.e., the titration error is negligible. But also here we can observe the influence of carbon dioxide (as it was already discussed in case of Methyl red). The blue colour turns quickly to green.
In all cases considered here, only the transition from yellow to vivid violet (or vice versa in case of borax) is considered. The transition is very sharp, very close to the transition point the solutions appears pale pink to nearly colourless (pH ≈ 7.3–7.8), (cf. Figs. 29a, b, 30a, b, 31a, b). As it was discussed already for other indicators, the influence of carbon dioxide from ambient air is very strong, during the titration of acids with a strong base. The colour turns quickly back to yellow. For all the three acids considered here in high and low concentration the titration error is negligible. The end points are obtained at the following degrees of titration: τ = 1.003 ± 0.003 (strong acid, high concentration), τ = 1.00 ± 0.01 (strong acid, low concentration); τ = 0.999 ± 0.002 (H2C2O4, high concentration), τ = 1.00 ± 0.02 (H2C2O4, low concentration).
In case of borax we start with the vivid violet solutions (Fig. 31a, b). At τ ≈ 0.8 (pH ≈ 8.2) the colour turns to pale pink (nearly colourless). A clear transition from colourless to yellow is obtained at τ = 0.95 ± 0.01 (titration error −5 %) in case of high concentration and τ = 0.92 ± 0.02 (titration error −8 %) in case of low concentration (pH = 7.5).
In case of strong and weak acids in both, high and low concentrations, the sample solutions are fuchsia, and a sharp transition from fuchsia via salmon to mustard yellow is observable (Figs. 32a, b, 33a, b), but solutions turn rapidly to fuchsia again under ambient conditions (see discussions above). For all the three acids considered here in high and low concentration the titration error is negligible. The end points are obtained at the following degrees of titration: τ = 1.001 ± 0.003 (strong acid, high concentration), τ = 1.00 ± 0.02 (strong, acid, low concentration); τ = 0.999 ± 0.002 (H2C2O4, high concentration), τ = 1.01 ± 0.02 (H2C2O4, low concentration).
In case of borax titrations, it is much more difficult to determine the end point, because the transition starts already at τ ≈ 0.95 (high concentration) and τ ≈ 0.90 (low concentration) (pH ≈ 7.5), and the colour changes from salmon via pale pink to fuchsia. A clear fuchsia is obtained at τ = 0.993 ± 0.004 (high concentration) and τ = 0.99 ± 0.02 (low concentration) (pH = 6.8, Fig. 34a, b).

Titrate! is useful to teach the theory and practice of acid-base titrations by showing the equipment, the titration conditions, changes in indicator colour and the titration plot in one glance.

Look up the pH indicator using the link in the Resources section if you are performing an acid-base titration. The pH indicator is a chemical that changes color over a given pH range. Before beginning your titration, you should have added a couple drops of the indicator, so you"ll already know which one you are using. The link under the Resources section will tell you what color change to expect when your titration is complete.
Swirl the flask of analyte while adding titrant from the buret. (The analyte is the chemical you are testing in the titration, while the titrant is the standard you are adding.) Swirling will make sure the analyte remains well-mixed so that the color change (when it occurs) is an accurate reflection of the pH of the solution.
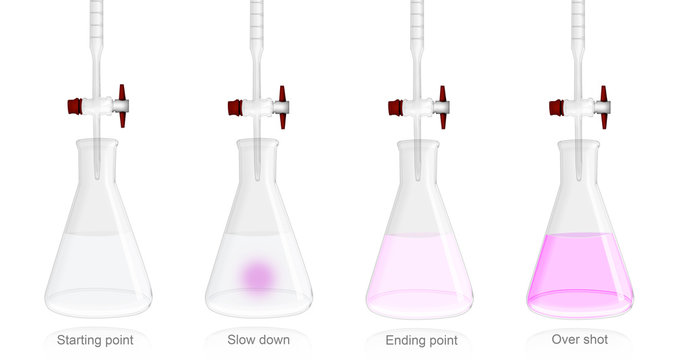
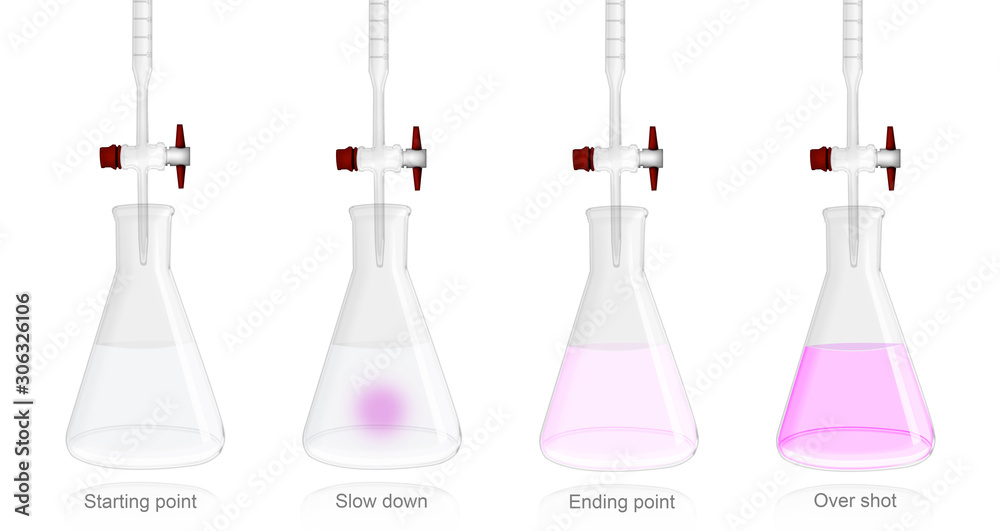
Add titrant slowly. If you add titrant too quickly, you could easily overshoot the end point of your titration, at which point you may need to repeat the entire experiment.
Watch the solution closely for the color change. Once the solution begins to change color and the new color persists for at least 30 seconds, you have reached the end point of your titration.

7.Continue adding titrant in small quantities. As the titration progresses, the color change described in step 6 will take longer to disappear. This signals that the endpoint is getting closer and that the titrant should be added in smaller and smaller quantities. Titrant should be added dropwise very close to the endpoint.
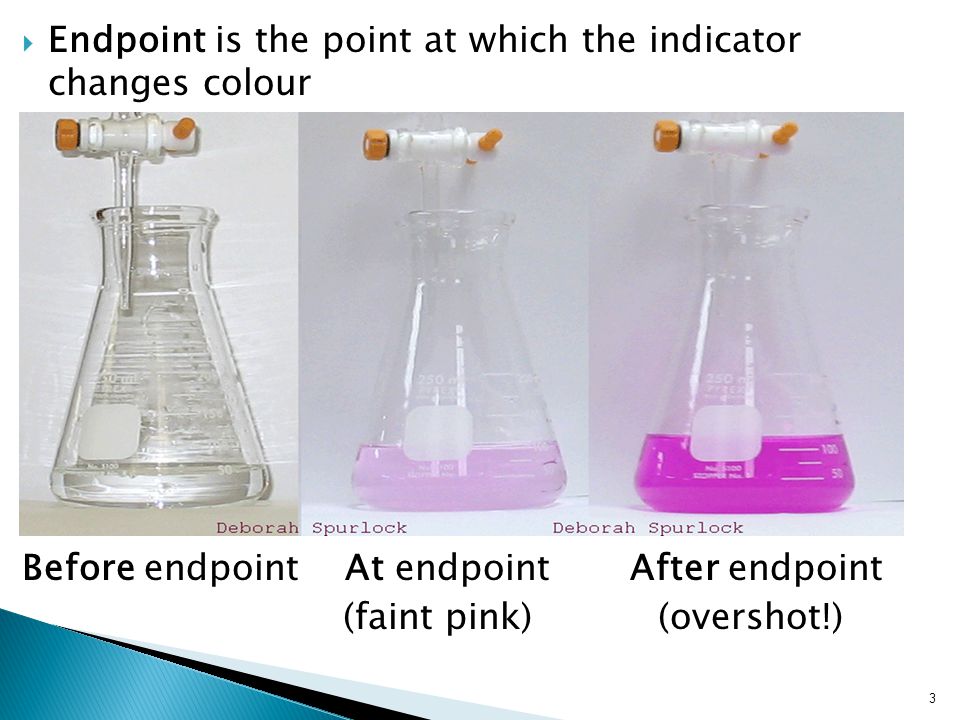
8.The endpoint of the titration is signaled when a permanent color change is observed (longer than 30 seconds). It is possible to overshoot the endpoint by adding too much titrant. A correct endpoint is shown on the left, an overshot endpoint on the right.


 8613371530291