
overshot weaving definition pricelist
In its simplest form – overshot is a weaving technique that utilizes at least 2 different types of weft yarns and floats to create a pattern. These patterns are often heavily geometric.
Ground weft– plain weave pattern that is used between each row of your overshot pattern. This plain weave gives the textile structure and allows for large areas of overshot to be woven without creating an overly sleazy fabric. Without the use of a ground weft on an overshot pattern, the weaving would not hold together because there would not be enough warp and weft intersections to create a solid weaving.
They were most popular though in southern Appalachia and continued to be so even after textile technologies advanced. When other parts of colonial America moved to jacquard weaving, the weavers of southern Appalachia continued to weave their overshot coverlets by hand.
Since the overshot coverlets were most often woven at home on smaller looms they usually had a seam down the middle where two woven panels were sewn together.
The thing about overshot is that no matter the application, it is pretty impressive. Perhaps that is just my opinion, but due to how complex it can look, I feel that it is pretty safe to say.
Just because it was originally used for coverlets, does not mean it can only be used for coverlets. Changing aspects of the pattern like the colors used, or the way you use your ground weft can drastically change the look and feel of your weaving.
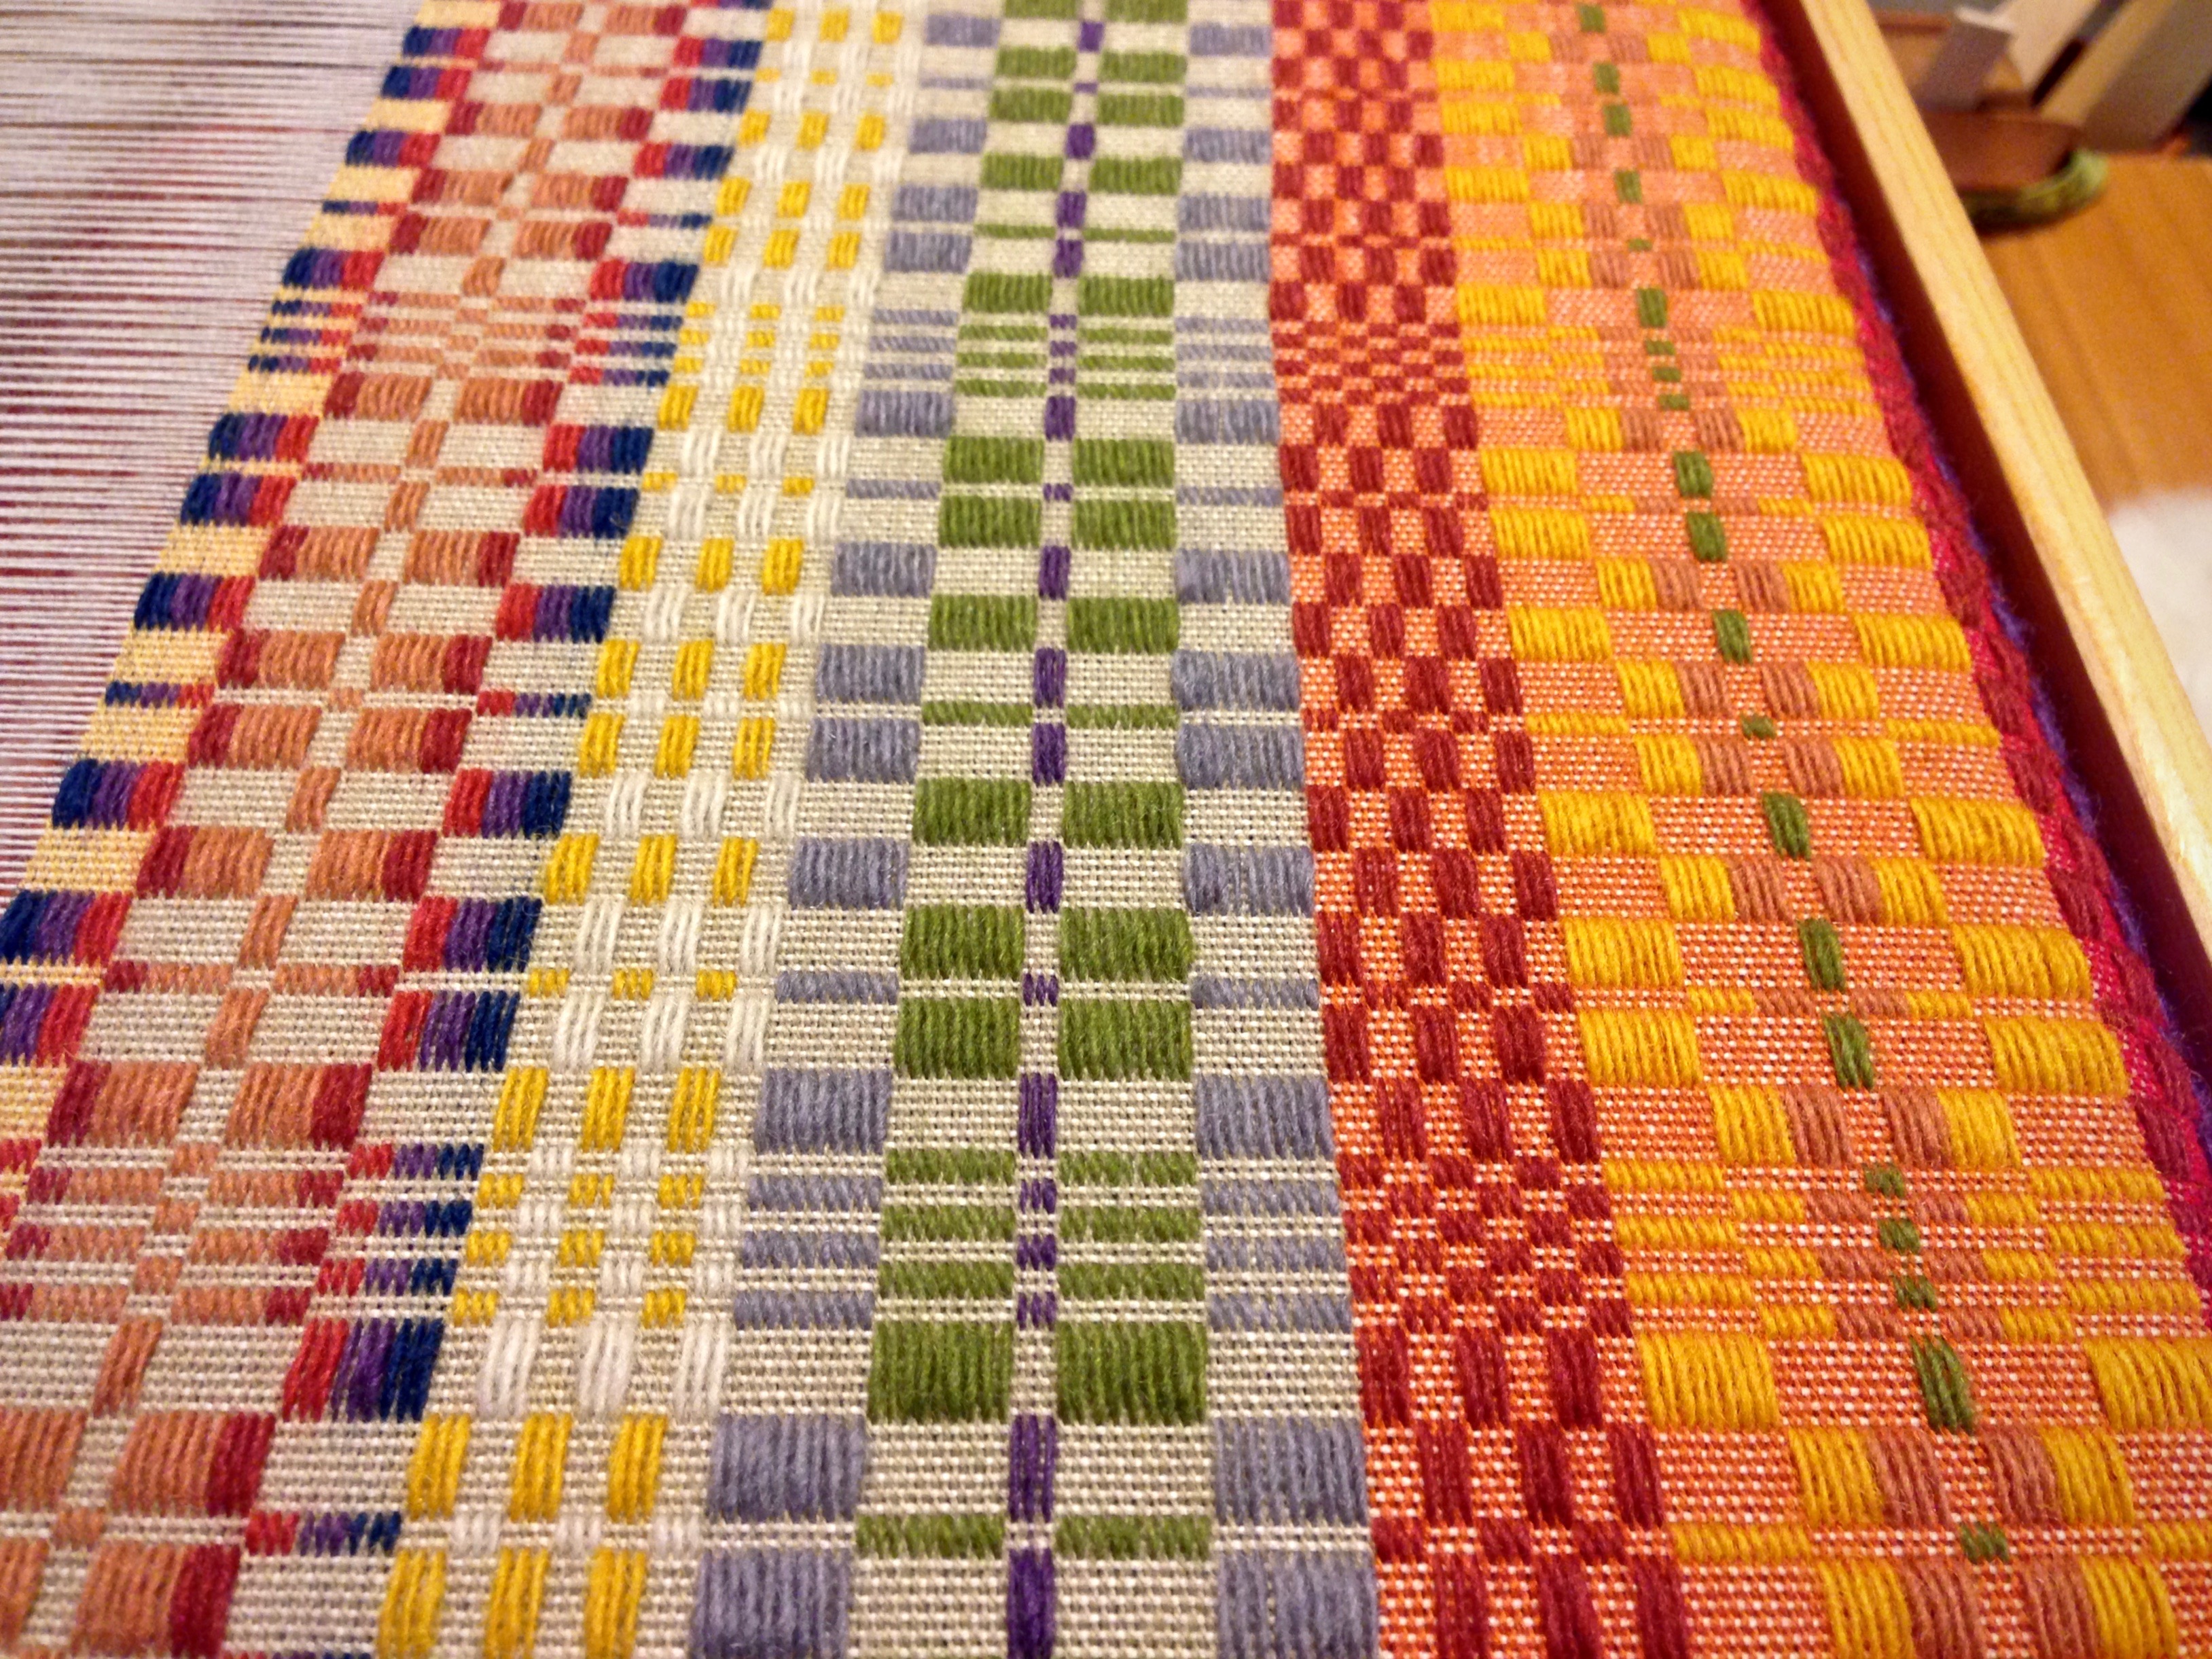
In the image below you can see the ground weft is not the same color throughout. Instead, I wove the ground weft as discontinuous so that I could add extra pattern and design into the weavings. In this case, you may be wondering how to deal with your weft yarns when they are in the middle of the weaving and not at the selvage.
The discontinuous weft yarns will float onto the back of the weaving until you are ready for them in their next pick. This does make your overshot weaving one sided since it will have vertical floats on the back. Keep this in mind if you want to try this technique out.
Also seen in the image above, the overshot yarn that I used was not all one color! This is a really simple way to get extra dimension and interest in your overshot if that is something you are looking for.
This makes it simple to be able to only weave overshot in certain parts of your weaving. If you want to do this then you can continue to weave your plain weave across the entire width of your weaving, but only weave overshot in specific areas. This creates a overshot section that functions similar to inlay.
Since the overshot pattern is strongly influenced by the weft yarns that are used it is important to choose the right yarns. Your weaving will be set up to the specification needed for a balanced plain weave. Make sure you understand EPI in order to get the right warp sett for your overshot weaving.
The ground weft used is almost always the same yarn as your warp. This allows the overshot weft to really be able to shine without contrasting warp and weft plain weave yarns.
In order to get the full effect of the overshot, it must be thick enough that when you are weaving your pattern it covers up the ground weft between each pass. If it is not thick enough to do this, it will still be overshot, but the full effect will not be seen.
What this warp thread does is serve as an all-purpose selvedge that does not correspond with your pattern. Instead, you would make sure to go around this warp thread every time to make sure that you are able to weave fully to the selvedge. Without this, your overshot weft will float awkwardly on the back of your weaving whenever the pattern does not take it to the edge.
I have mentioned this book multiple times because it really is such a great resource for any weaver looking to weave patterns of all types. It contains 23 pages of different overshot patterns (among so many other patterns) that you can set up on your floor or table loom.
Like a lot of different types of weaving, it is possible to do it on almost any type of loom that you have. The difference being that it might take you a little bit longer or require a bit more effort than if you did it on a traditional floor loom.
Weaving overshot on a frame loom or rigid heddle loom will require the use of string heddles and pick-up sticks that you have to manually use to create a shed.

You may remember that I recently returned from a visit to The Philippines. It may not surprise you that I am always on the lookout for interesting textiles, and especially handwoven fabrics. I don’t mean to do that; it just happens… Well, when I met sweet Beth at the Sunday market, I felt like I hit the jackpot! Beth and I had a common language – Handweaving! (She speaks fine English, too, of course; but you know what I mean.)

Cloth is woven on a grid of vertical warps and horizontal wefts. But, with a bit of knowledge about designing weaving drafts, you can use these rectilinear elements to create smoothly flowing lines in your woven fabric.
In this article, I focus on designing with overshot blocks in order to create flowing curves large enough to be seen at a distance. I will also discuss "weaving as overshot" which is a method of applying overshot techniques to other weave structures and, finally, finish up with some strategies for designing curves in any weave structure.
In the twill draft above, the diagonal lines are only three threads apart, which might be too subtle an effect. To make the scale of your design larger, you can use a diagonal progression of weave-structure blocks instead of individual threads. The following draft shows an example of a diagonal progression using overshot blocks on four shafts.
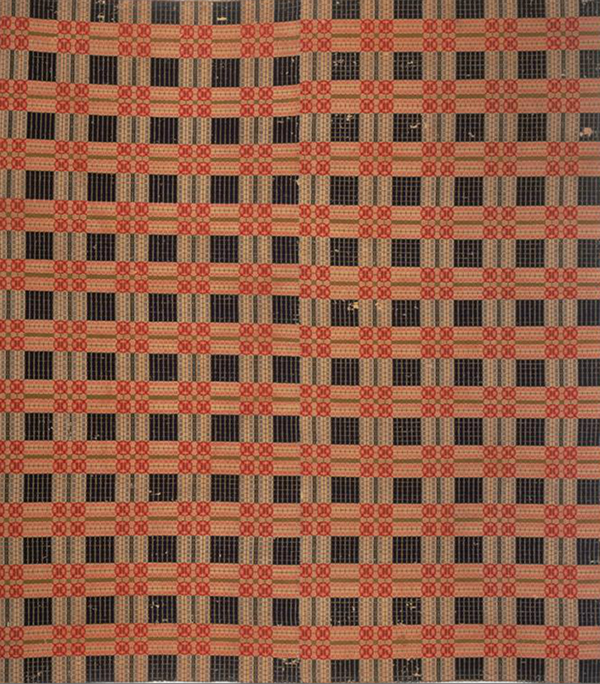
Overshot is a weave structure creating a plain-weave cloth with decorative supplementary weft floats. These floats lie on top of (float over) the ground cloth. If you pull out all of the pattern weft threads, you are left with a plain weave cloth formed by the warp and the tabby weft. There are never any warp floats because of the tabby weft.
Weaving software is very helpful for testing hues and values for weft yarns to use with your warp. If you choose to weave overshot with a single shuttle, choose a contrasting value to the warp for a subtle design but faster weaving.
If you put the curve in your threading, the waves travel across the fabric horizontally, in the direction of the weft. You can see this in the overshot draft below.
Another disadvantage to putting the curves in the threading is that it limits your ability to improvise curved designs organically at the loom. It"s easy to change treadling patterns during weaving. Changing the threading, however, is a much more involved process.
I learned how to make curves by studying a traditional overshot draft called Blooming Leaf (page 133 in A Handweaver"s Pattern Book by Marguerite Davison). In this draft, the treadling maintains a diagonal progression but the scale changes to make the shape "bloom" and undulate.
[Note: When I create overshot drafts, I place the first pattern block on treadle three; I like to weave the tabby picks with my left foot (alternating between treadles one and two) and use my right foot (on the remaining treadles) to weave the pattern weft and create the design.]
Now that you know how to create curves, undulations, and reflected curves, you have the tools you need to create any kind of curve or diagonal line in four-shaft overshot. For a challenge, try making a long curve followed by a short curve, like a meandering river.
The methods described above also work for overshot on six, eight, ten, or more shafts. As you add additional shafts to your design, you gain the ability to create smoother and more dramatic curves.
Below is an example of an eight-shaft overshot threading; in this case a diagonal progression with a point and mirror symmetry. My treadling in this draft is an S-shaped curve. This is just one example of the many different curves you can weave on this threading.
Because the underlying structure of overshot is plain weave, any threading which can produce plain weave can theoretically be woven as overshot, alternating tabby and pattern weft.
I wove the draft above using a 20/2 silk sett at 30 epi. I chose to sett the yarn this densely so I could weave both an overshot and twill version on the same warp. You can see the resulting cloth in the picture below.
How do I weave as overshot when my sett is more appropriate for twill? I use a tabby weft that is much finer than the warp, in this case 140/2 silk from Lunatic Fringe.
Other times I choose to weave as overshot because the floats show off the pattern-weft yarn, such as the handspun wool used as the pattern weft in the cloth below.
It is easy and fun to make up a curved treadling at the loom, especially when weaving as overshot. Even after forty-two years of weaving, I still enjoy working with long, non-repeating treadlings; watching the curves grow and change as I weave. Instead of memorizing a sequence and repeating it carefully, I watch the design and think about where I want the next curve to go.
A side benefit of weaving long, undulating curves instead of small, repeated patterns is that a small variation in a repeat will stand out, but design variations are normal in organic curves.
The drape of overshot fabric is not as fluid as that of a twill fabric. So for a scarf or shawl I might choose a structure other than overshot. Fine silk, however, has such nice drape that I can weave as overshot and still get good results.
With weaving software, it is easy to create curved overshot designs. Simply draw a freehand curve in the treadling—smoothing it out if necessary—and then add the tabby shots. Once you have the general idea from designing drafts, you can improvise new curved designs at the loom.
For other weave structures, creating a profile draft can be helpful. A profile draft is a design template that represents the woven design at one level of abstraction. To convert a profile draft into a weaving draft, you replace each block in a profile draft with the appropriate block of a given weave structure. You can, therefore, express a single profile draft in many different weave structures: overshot, summer-and-winter, Bronson lace, huck lace, double weave, etc.
Profile drafts with smooth, flowing curves are also useful for learning how to design graceful lines. Weaving software helps because you can quickly create and edit drafts. None of the weaving programs I"m familiar with have an option to create "graceful" or "smooth" curves. So you"ll have to train your hand and eye, but this comes with practice.
I like smooth, flowing curves that are visible at a distance. So I look for structures that give me the maximum number of pattern blocks to design with. Generally I use weave structures where I have as many pattern blocks as there are shafts on my loom. On a four-shaft loom, I use crackle, overshot, advancing and network-drafted twills, advancing points, turned taqueté, rep, and shadow weave.
If you work with graph paper, remember to check the repeats, i.e., transitions, in the threading and treadling to make sure there aren"t gaps or discontinuous areas that affect the flow of your curve. In weaving software, you can do this easily by zooming out the view to check the draft over several repeats.

My first teaching assignment was a lecture to the Whidbey Weavers Guild. During this time of emerging corona virus activity, the guild was well attended. My lecture on Overshot: Past and Present was a warm-up for the three-day workshop I would begin the following day.
We had an eager 15 attendees in the overshot workshop. The work was very creative. I send out instructions for preparing the looms ahead of time. In the workshop, everyone follows the same treadling order, but each weaver chooses their own colors to bring. Sometimes the thickness varies from one weaver to the next, also. The result is that everyone’s artistic decisions and sense of design are apparent. No two set of samples are identical. The students work through a certain set of treadling patterns and go home with a variety of samples. Some of their work is pictured below.
It was fun getting to know this weaving group. They are so supportive of each other and encouraging. I have never taught in an area where I needed to plan my presentation around the ferry schedule so that was a new experience. I said my good-byes at the end of the weekend class, knowing that I’d see some of them the next day.
The day after my overshot workshop, two wonderful ladies took me up to my next assignment: a lecture on Summer and Winter to the Skagit Valley Weavers Guild. Many of the guild members were also members of Whidbey Weavers Guild and of the Whatcom Weavers Guild, who would host me for my next workshop. A couple of my overshot workshop students brought in their samples. They had cut them from the loom and washed them the day before, after the overshot workshop was finished. It was fun to see their completed work and talk about what their next steps would be.
The three-day Early American Textiles workshop was presented at the Jansen Art Center and hosted by the Whatcom Weavers Guild. Nine students wove round robin style on ten different looms. Each loom had been warped by one of the students in a traditional weaving pattern using thread similar to what early American weavers would have used. Throughout the workshop we stopped to talk about production practices within the US and Europe during the 17th, 18th and 19th centuries. One of the students brought in a lovely coverlet she had found in a thrift store. Another shared stories of her aunt and uncle who were weavers. My students were very knowledgeable and, as usual, I learned as much from them as they did from me.
I hope I get a chance to visit the area again. I wish everyone had such a nurturing weaving community. We all need connections and we benefit from seeing each others work. I’ll leave with a couple of photos from the ferry to Whidbey Island from Mukilteo.

Overshot weave is the topic this week. Even if you haven’t heard of overshot before, I’m guessing you will still recognize it. Have you ever seen a historical coverlet before? That is overshot. Typically 2 colors. ALL about the pattern. That’s the one! Overshot.
Overshot is a partnership between 2 shuttles. The first shuttle is all about the pattern. She flits all over the fabric making big leaps and seemingly impossible designs. The second shuttle is all plain weave. She’s the reliable one, making sure the fabric will actually hold together.
Overshot Weave – Overshot is a weaving pattern that was very common in Southern Appalachia. I found a great article with some history about overshot from Comfort Cloth Weaving. Here’s the link.
Weaving Draft – A weaving draft is like sheet music. It tells you how to set up the loom and then the order in which to toss the shuttles in order to recreate a specific pattern. Once you can read a draft, the weaving world is your oyster!
Great news – I have created a free .pdf that follows along with this weaving pattern series! It provides an overview of each weaving pattern. Tells you how to recognize it and what it is used for. Plus, I’ve included a few notes on how to create the pattern on your loom. It’s a fabulous resource! Click here to get your copy today. Happy Weaving!
Step out of the weaving comfort zone and experiment with something new Weave structures often have specific threading and treadling patterns that are unique to that particular weave structure and not shared with others. This book takes you out of the traditional method of weaving overshot patterns by using different treadling techniques. This will include weaving overshot patterns as Summer/Winter, Italian manner, starburst, crackle, and petit point... Read Full Overview


 8613371530291