
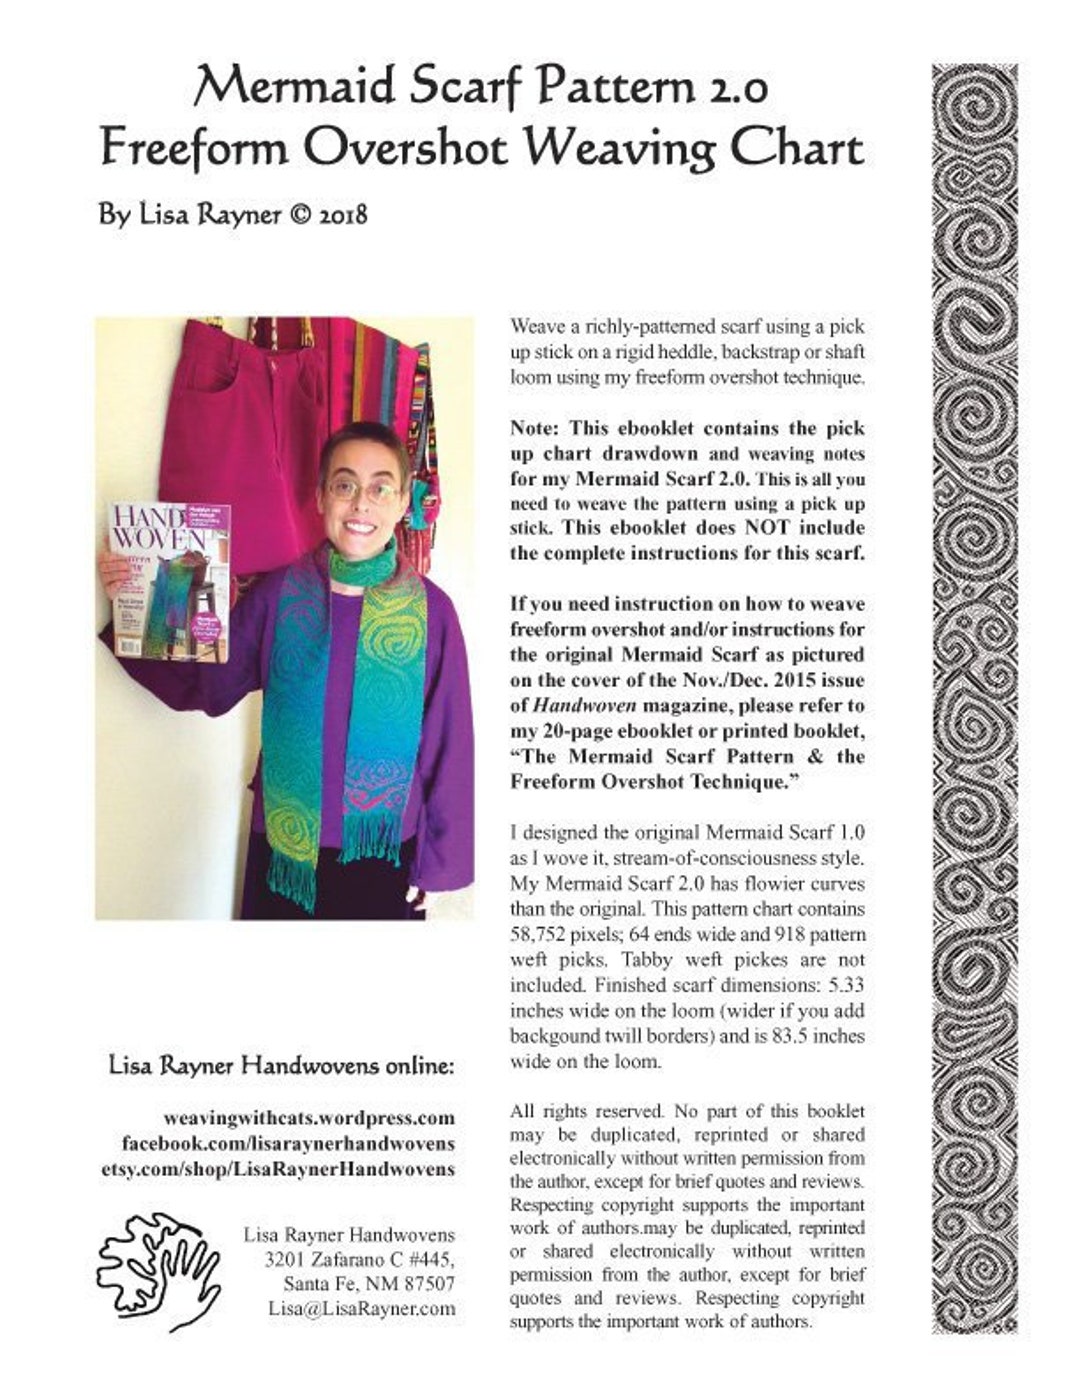
overshot weaving tips quotation

I wove some samples and decided to make this for my scroll. The warp was handspun singles from Bouton. I wanted to see if I could use this fragile cotton for a warp. I used a sizing for the first time in my weaving life. The pattern weft is silk and shows up nicely against the matt cotton.
This illustration and quote are in The Weaving Book by Helen Bress and is the only place I’ve seen this addressed. “Inadvertently, the tabby does another thing. It makes some pattern threads pair together and separates others. On the draw-down [draft], all pattern threads look equidistant from each other. Actually, within any block, the floats will often look more like this: [see illustration]. With some yarns and setts, this pairing is hardly noticeable. If you don’t like the way the floats are pairing, try changing the order of the tabby shots. …and be consistent when treadling mirror-imaged blocks.”

Lots of people think that overshot must be a complicated 8-shafts-and-above weave structure, but that is far from true. Most overshot designs can be woven on 4-shafts, and once you get into a weaving rhythm of pattern-tabby-pattern-tabby, weaving goes smoothly as the beautiful patterns emerge on your loom. That said, designing and weaving overshot requires a bit more concentration than plain weave.
Here are five tips from designer Pattie Graver, author of Next Steps in Weaving, to ensure great overshot results. The first three are probably ones you’ve already heard about weaving other structures, but the last two are about looking at overshot designs and color choices in a mindful way.
I follow the advice of Helene Bress in The Weaving Book: “Identify a diagonal line that appears in the cloth as you weave and try to keep that at 45 degrees.” I keep a protractor by my loom!
If warp and pattern weft are too close in value, the overshot designs will not appear in strong contrast. Remember, too, that the eye follows light, so bits of lighter pattern weft add interest to the cloth.
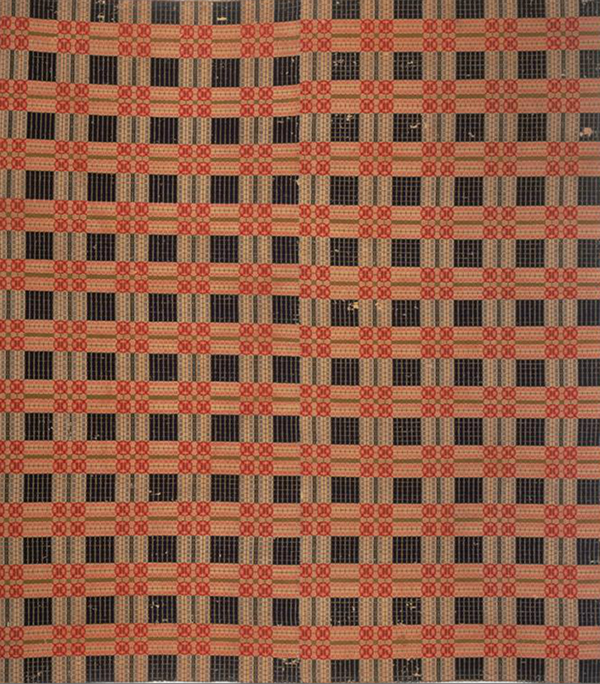
Debbi Rutherford used name drafting to create this overshot pattern and then used a variegated yarn for her pattern weft. Handwoven January/February 2017. Photo by Joe Coca.

Over the years I have picked up quite a few good tips and suggestions that have helped to make my weaving better, but I have also read or heard a lot of tips that just did not work for me. So in reading the tips I have set to this page know that they are just suggestions. Each weaver has their own “weaving personality” and what might work for someone else just does not work for you. With that in mind, glean from the following words what works for you and throw out the rest.
If you are having a little trouble with the fell line of your cloth (where you have laid the last weft thread across the warp in your weaving project) having a curve or “smiling” wave to it, here is a tip that I tried and it worked for me. When you are weaving, open the shafts you are ready to weave, throw the shuttle, but before you beat that pic in beat it with the shed open, then close the shed and beat lightly once more. This has worked very well for me.
In the weaving process we always have “tails” of weft thread where we have started and ended the bobbins. I always put the tail threads to the underside of the weaving while I am weaving and do not cut them off. I wait until the fabric is off the loom and I have done the finishing wash and dry, then I cut them off even with the fabric. In doing this, I have already evenly distributed the weaving threads in the finishing process and if the fibers are going to shrink slightly they will have already done so. This gives your finished cloth a clean finish.

The origin of the technique itself may have started in Persia and spread to other parts of the world, according to the author, Hans E. Wulff, of The Traditional Crafts of Persia. However, it is all relatively obscured by history. In The Key to Weavingby Mary E. Black, she mentioned that one weaver, who was unable to find a legitimate definition of the technique thought that the name “overshot” was a derivative of the idea that “the last thread of one pattern block overshoots the first thread of the next pattern block.” I personally think it is because the pattern weft overshoots the ground warp and weft webbing.
Overshot gained popularity and a place in history during the turn of the 19th century in North America for coverlets. Coverlets are woven bedcovers, often placed as the topmost covering on the bed. A quote that I feel strengthens the craftsmanship and labor that goes into weaving an overshot coverlet is from The National Museum of the American Coverlet:
Though, popular in many states during the early to mid 19th centuries, the extensive development of overshot weaving as a form of design and expression was fostered in rural southern Appalachia. It remained a staple of hand-weavers in the region until the early 20th century. In New England, around 1875, the invention of the Jacquard loom, the success of chemical dyes and the evolution of creating milled yarns, changed the look of coverlets entirely. The designs woven in New England textile mills were predominantly pictorial and curvilinear. So, while the weavers of New England set down their shuttles in favor of complex imagery in their textiles, the weavers of Southern Appalachia continued to weave for at least another hundred years using single strand, hand spun, irregular wool yarn that was dyed with vegetable matter, by choice.
And, due to the nature of design, overshot can be woven on simpler four harness looms. This was a means for many weavers to explore this technique who may not have the financial means to a more complicated loom. With this type of patterning a blanket could be woven in narrower strips and then hand sewn together to cover larger beds. This allowed weavers to create complex patterns that spanned the entirety of the bed.
What makes overshot so incredibly interesting that it was fundamentally a development of American weavers looking to express themselves. Many of the traditional patterns have mysterious names such as “Maltese Cross”, “Liley of the West”, “Blooming Leaf of Mexico” and “Lee’s Surrender”. Although the names are curious, the patterns that were developed from the variations of four simple blocks are incredibly intricate and luxurious.
This is only the tip of the iceberg with regard to the history of this woven structure. If you are interested in learning more about the culture and meaning of overshot, check out these resources!
The National Museum of the American Coverlet- a museum located in Bedford, Pennsylvania that has an extensive collection of traditional and jacquard overshot coverlets. Great information online and they have a “Coverlet College” which is a weekend series of lectures to learn everything about the American coverlet. Check out their website - coverletmuseum.org
Textile Art of Southern Appalachia: The Quiet Work of Women – This was an exhibit that traveled from Lowell, Massachusetts, Morehead, Kentucky, Knoxville, Tennessee, Raleigh, North Carolina, and ended at the Royal Museum in Edinburgh, Scotland. The exhibit contained a large number of overshot coverlets and the personal histories of those who wove them. I learned of this exhibit through an article written by Kathryn Liebowitz for the 2001, June/July edition of the magazine “Art New England”. The book that accompanied the exhibit, written by Kathleen Curtis Wilson, contains some of the rich history of these weavers and the cloth they created. I have not personally read the book, but it is now on the top of my wish list, so when I do, you will be the first to know about it! The book is called Textile Art of Southern Appalachia: The Quiet Work of Women and I look forward to reading it.

Over three years ago, when my David Louet floor loom was still somewhat new to me, I wrotethis post on overshot. If you read it, you will discover that my initial relationship with overshot was not a very positive one.
Back then, I was a little harder on myself as a learning weaver. By now, I’ve realised that weaving, just like life, is a journey that has a beginning but no end. Back then, I thought that my ultimate goal was to be a “master weaver”.
The happy ending to the initial overshot sob story is that I can weave overshot now. Quite well, in fact! And I also teach it. And I happen to love it, very, very much. Don’t you love a happy ending?
I don’t think there was any particular moment where I thought to myself “I can weave overshot now!” I didn’t even weave any overshot for quite some time after that initial attempt. But slowly it tempted me back, and we started over. It was just a matter of sticking with it, employing some specific techniques and practice, practice, practice until it feels like an old friend.
My love of overshot has only increased with my more recent discovery of American Coverlets. I loved the look of the coverlets and the history behind them before I realised that so many of them were woven in the wonderfully humble 4 shaft overshot.
I’ve put a lot of research time into coverlets this year and have made it a big weaving goal of mine to weave my first coverlet, which is quite an undertaking, but I relish the thought.
Now that I have quite a lot of experience weaving overshot, I want to share my best overshot tips with you in hope that you too will fall in love with this wonderful weave structure.
To weave overshot you need a warp yarn, a tabby yarn and a pattern weft yarn. Using the same yarn for warp and tabby works perfectly. For the pattern weft, I like to use a yarn that is twice the size of the tabby/warp yarn. I have experimented with using doubled strands of tabby/warp yarn in a contrasting colour, but it just doesn’t look as good. A thicker pattern yarn is the way to go.
What will the size of your item be? A miniature overshot pattern may get lost in a blanket, but may be perfect for a scarf. As a general rule, a good way to estimate the size of one repeat of your pattern just by looking at the draft is to see how many repeats are in one threading repeat. Also consider the thickness of your yarns and the sett you intend to weave.
Just to give you an idea, my current project is woven at 20 ends per inch with 8/2 cotton for warp and tabby and fingering weight wool for the pattern weft. The weaving draft has 50 threads in one threading repeat. My design repeats on the loom are around 2.5″ wide and just under 5″ long, which is a great size for the 30″ x 99″ throw I’m weaving.
This is a non negotiable for overshot if you want neat edges and less headaches! You get used to using floating selvedges very quickly, so don’t stress if you have no experience with them.
There are 6 treadles needed for overshot, even though you weave on 4 shafts. The two extra treadles are for the tabby weave. I always set up my pattern treadles in the centre of the loom – two on the left and two on the right. Then I set up a “left” tabby and a “right” tabby treadle. To do this on my 8 shaft loom I leave a gap between the pattern treadles and the tabby treadles so that my feet can “see” and differentiate between a pattern and tabby treadle.
I like to advance little and often. You will find your own preference or “sweet spot” for weaving, but I find that with overshot I advance a lot more frequently at a much smaller amount than I do usually.
An example of this is that I wove an overshot sampler right before Is started my main project (the throw). It was a narrow warp (around 8″) and a different overshot threading and treadling than I’m using for the project.
I personally do not use a temple. Some weavers will say they won’t weave without one. I’ve tried using a temple on many of my projects, particularly if I’m getting broken edge warp threads (signs of tension problems and too much draw in). But I will avoid using one wherever I can get away with it, and I don’t use one for weaving overshot.
I find that if I’m careful with weft tension and warping evenly, I do not get excessive draw in. It is something I’m constantly aware of while weaving and remind myself of tip 4 so that my weft picks are not pulling in at the edges.

Advanced weavers with 8-, 12- or 16-harness looms will find a lot of useful information here. The purpose of this book is to present a number of weaves from which a wide range of designing is possible. Charts have been developed to assist in tying up, pegging or feeding the information to the computer so that precious time may be saved to apply to the designing aspect. Concepts are given in a terse but clear and to the point format eliminating the need for in-depth study. Once you understand the concepts you"ll understand many different multiple harness weave systems. After a short section explaining the Charts and Terminology used in the book, the author provides chapters that cover: Beiderwand, Crackle, Damask, Diaper Twill, Dimai, Double Two-Tie, Double Weave, Lace Weaves, Overshot, The Profile Draft, Summer & Winter, Tie-ups and Twills. There is a large bibliography for those who wish to do further study and a complete index at the end.
Weaving Overshot with Madelyn Van Der Hoogt DVD 92 Minutes From heirloom coverlets to dazzling contemporary household textiles and garments, overshot is one of the handsomest of weave structures. Whether woven in miniature on a towel or largescale in a rug, overshot is striking. In this video, Madelyn van der Hoogt teaches everything you need to know to explore the many faces of overshot. You"ll learn: How to read, weave, and play with overshot drafts Techniques to achieve balanced patterns Why halftones happen, and how you can use them in your designs How to spot and weave overshot in rosefashion and starfashion How to combine overshot threading with other treadlings, with spectacular results Ideas for playing with color and materials Along with Madelyn"s video workshop, this DVD gives you a printable booklet on overshot weaving, complete with planning exercises, reference materials, and overshot projects you can learn from and use. Order your copy of Weaving Overshot today

In its simplest form – overshot is a weaving technique that utilizes at least 2 different types of weft yarns and floats to create a pattern. These patterns are often heavily geometric.
Ground weft– plain weave pattern that is used between each row of your overshot pattern. This plain weave gives the textile structure and allows for large areas of overshot to be woven without creating an overly sleazy fabric. Without the use of a ground weft on an overshot pattern, the weaving would not hold together because there would not be enough warp and weft intersections to create a solid weaving.
They were most popular though in southern Appalachia and continued to be so even after textile technologies advanced. When other parts of colonial America moved to jacquard weaving, the weavers of southern Appalachia continued to weave their overshot coverlets by hand.
Since the overshot coverlets were most often woven at home on smaller looms they usually had a seam down the middle where two woven panels were sewn together.
The thing about overshot is that no matter the application, it is pretty impressive. Perhaps that is just my opinion, but due to how complex it can look, I feel that it is pretty safe to say.
Just because it was originally used for coverlets, does not mean it can only be used for coverlets. Changing aspects of the pattern like the colors used, or the way you use your ground weft can drastically change the look and feel of your weaving.
In the image below you can see the ground weft is not the same color throughout. Instead, I wove the ground weft as discontinuous so that I could add extra pattern and design into the weavings. In this case, you may be wondering how to deal with your weft yarns when they are in the middle of the weaving and not at the selvage.
The discontinuous weft yarns will float onto the back of the weaving until you are ready for them in their next pick. This does make your overshot weaving one sided since it will have vertical floats on the back. Keep this in mind if you want to try this technique out.
Also seen in the image above, the overshot yarn that I used was not all one color! This is a really simple way to get extra dimension and interest in your overshot if that is something you are looking for.
This makes it simple to be able to only weave overshot in certain parts of your weaving. If you want to do this then you can continue to weave your plain weave across the entire width of your weaving, but only weave overshot in specific areas. This creates a overshot section that functions similar to inlay.
Since the overshot pattern is strongly influenced by the weft yarns that are used it is important to choose the right yarns. Your weaving will be set up to the specification needed for a balanced plain weave. Make sure you understand EPI in order to get the right warp sett for your overshot weaving.
The ground weft used is almost always the same yarn as your warp. This allows the overshot weft to really be able to shine without contrasting warp and weft plain weave yarns.
In order to get the full effect of the overshot, it must be thick enough that when you are weaving your pattern it covers up the ground weft between each pass. If it is not thick enough to do this, it will still be overshot, but the full effect will not be seen.
What this warp thread does is serve as an all-purpose selvedge that does not correspond with your pattern. Instead, you would make sure to go around this warp thread every time to make sure that you are able to weave fully to the selvedge. Without this, your overshot weft will float awkwardly on the back of your weaving whenever the pattern does not take it to the edge.
I have mentioned this book multiple times because it really is such a great resource for any weaver looking to weave patterns of all types. It contains 23 pages of different overshot patterns (among so many other patterns) that you can set up on your floor or table loom.
Like a lot of different types of weaving, it is possible to do it on almost any type of loom that you have. The difference being that it might take you a little bit longer or require a bit more effort than if you did it on a traditional floor loom.
Weaving overshot on a frame loom or rigid heddle loom will require the use of string heddles and pick-up sticks that you have to manually use to create a shed.
One of the coolest things about weaving is that it is generally understood to have emerged at similar times in many different geographical locations around the world. People weave in different ways, for different purposes, and in different conditions. Learning from other weavers has been one of the most valuable experiences to my weaving practice. Since I expect most of us won"t be traveling much in the near future, I figured it was a good time to share some of my most meaningful travel experiences.
I"ve had the opportunity to go to to Mexico, India, Morocco, Europe, and many places in the US and Canada to learn from weaving experts. I’m going to share what I’ve learned along the way.
At first I was hesitant to take up the time of busy weavers. I felt like just another tourist distracting them from their work. Turns out, most of the weavers were really excited to meet a Canadian weaver! After a few interactions, I realized that it wasn"t all take, I had something to GIVE too. It can be tricky trying to communicate with a language barrier, but it isn"t impossible. In many situations in Morocco, I had no Arabic, and most of the weavers had little-no English, so we were both trying to communicate in French which was not great for either of us. The good thing about weaving is that so much of it can be communicated without any language at all. In the above image, I am learning a special weaving knot from Youseph that he learned as a child. After he taught me, I shared with him how I tie on the loom with a surgeons knot. I also helped him to lower his bench so it was more ergonomic. Even though Youseph is a lifelong weaver who drills holes in cards himself to make the patterns on his handmade Jacquard-like loom, I still had a little something to contribute.
Many weavers in North America are fortunate enough to have access to the weaving tools that they need. This isn"t always the case in many of the places I visited. Most of the looms I saw in India, and all of the looms I saw in Morocco were handmade, often by the weaver themselves. Popular scrap materials include toothpicks, bike parts, string, and sticks of all kinds.
I remember once for a project making about 30 string heddles because I had not planned well. I got very grumpy. My perspective is different now for sure. Have you ever been in a weaving situation where necessity was the mother of invention?
I was lucky enough to have a translator in the small town of Sefrou, where I had the opportunity to speak with Mustapha (see above image). He was excited to talk to another weaver and we shared weaving knowledge and stories. He told me that in Arabic, the warping mill is called the “heart,” because without a good warp, the weaving has no life. I think about that now when I use my mill. The translator told me that Mustapha was difficult to translate because he speaks in so many metaphors. Weaving is full of metaphors! How could he not?
Have you seen weaving at all in your travels? If money/time/coronavirus were no object, where would you go? Angela and I would love to hear about your weaving-travel adventures!

The Big Book of Weaving – Handweaving in the Swedish Tradition: Techniques, Patterns, Designs and Materials by Laila Lundell has been my reading selection for the past few weeks. There are books that you speed through and they give you great ideas. This is a book that is perfectly suited for winter months when you can take time to digest a section before moving on to the next.
This book has often been used as a textbook for new weavers wanting to know how to get started with their first floor loom. The project sequence starts from the very beginning using plain weave and moves through pattern weaving. The author presents both 4 and 8 shaft projects for each type of weaving.
Projects that I found quite interesting – “Kitchen Towels with Small Blocks” that can be woven with 16/2 cotton. In this project Ms. Lundell also offers a complete project plan for weaving the bands needed for hanging towels. A great mystery solved!
“Choosing the right materials for a weaving takes a lot of knowledge. It’s a good idea to train your eyes and fingertips to become familiar with various materials and to learn about their special qualities”

There is a lot to learn about weaving! As a new weaver, you might wonder what the next steps are to grow your skills. Next Steps in Weaving has the answers you"re looking for.
In this beautiful book by Pattie Graver, former Managing Editor of Handwoven magazine, you"ll be explore a variety of weave structures and concepts in depth and detail including twill, color-and-weave, overshot, summer and winter, and lace.
This is not just a book of weaving patterns. Each topic is explained and supplemented with instructions for weaving a sampler and a project in order to solidify the concepts and enable you to design your own projects. In addition, the book offers troubleshooting tips in order to expand your weaving expertise.
Whether you"re new to weaving, have the basics down, or are looking to improve your foundation skills, this book will be an asset to your weaving library. So what are you waiting for? Take the Next Steps in Weaving!
"Pattie is a weaver who lives her passion. She sees weaving as being part of the essence of who we are, an integral part of our history, as well as our present-day culture, and therefore in many ways a birth-rite to us all, and one that she can share with us if we wish to follow her into the world of weaving." --The Textile Blog

This post is the third in a series introducing you to common weaving structures. We’ve already looked at plain weave and twill, and this time we’re going to dive into the magic of overshot weaves—a structure that’s very fun to make and creates exciting graphic patterns.
Overshot is a term commonly used to refer to a twill-based type of weaving structure. Perhaps more correctly termed "floatwork" (more on that later), these textiles have a distinctive construction made up of both a plain weave and pattern layer. Requiring two shuttles and at least four shafts, overshot textiles are built using two passes: one weaves a tabby layer and the other weaves a pattern layer, which overshoots or floats, above.
Readers in the United States and Canada may be familiar with overshot textiles through woven coverlets made by early Scottish and English settlers. Using this relatively simple technique, a local professional weaver with a four-shaft loom could easily make a near-infinite variety of equally beautiful and complex patterns. If you’d like to learn more about overshot coverlets and some of the traditions that settlers brought with them, please see my reading list at the bottom of this article!
As it is twill-based, overshot will be very familiar to 4 shaft weavers. It’s made up of a sequence of 2-thread repeats: 1-2, 2-3, 3-4, and 1-4. These sequences can be repeated any number of times to elongate and create lines, curves, and shapes. These 2-thread repeats are often referred to as blocks or threading repeats, IE: 1-2 = block 1/A, 2-3 = block 2/B.
There are three ways weft appears on the face of an overshot cloth: as a solid, half-tone, or blank. In the draft image I’ve shared here, you can see an example of each—the solid is in circled in blue, the half-tone in red, and the blank yellow. Pressing down the first treadle (shafts 1 and 2), for example, creates solid tones everywhere there are threads on shafts 1 and 2, half-tones where there is a 1 or 2 paired with 3 or 4, and nothing on the opposite block, shafts 3 and 4. Of course, there’s not really nothing—the thread is simply traveling on the back of the cloth, creating a reverse of what’s on the face.
Because overshot sequences are always made up of alternating shafts, plain weave can be woven by tying two treadles to lift or lower shafts 1-3 and 2-4. When I weave two-shuttle weaves like overshot, I generally put my tabby treadles to the right and treadle my pattern picks with my left foot and my tabby with my right. In the draft image I’ve shared above, I’ve omitted the tabby picks to make the overarching pattern clearer and easier to read. Below is a draft image that includes the tabby picks to show the structure of the fabric.
Traditional overshot coverlets used cotton or linen for warp and plain weave wefts, and wool pattern wefts—but there’s no rule saying you have to stick to that! In the two overshot patterns I’ve written for Gist, I used both Mallo and Beam as my pattern wefts.
In the Tidal Towels, a very simple overshot threading creates an undulating wave motif across the project. It’s easy and repetitive to thread, and since the overshot section is relatively short, it’s an easy way to get a feel for the technique.
The Bloom Table Squares are designed to introduce you to a slightly more complex threading—but in a short, easy-to-read motif. When I was a new weaver, one of the most challenging things was reading and keeping track of overshot threading and treadling—but I’ve tried to make it easy to practice through this narrow and quick project.
Overshot works best with a pattern weft that 2-4 times larger than your plain weave ground, but I haven’t always followed that rule, and I encourage you to sample and test your own wefts to see how they look! In the samples I wove for this article, I used 8/2 Un-Mercerized Cotton weaving yarn in Beige for my plain weave, and Duet in Rust, Mallo in Brick, and Beam in Blush for my pattern wefts.
The Bloom Table Squares are an excellent example of what weavers usually mean when they talk about traditional overshot or colonial overshot, but I prefer to use the term "floatwork" when talking about overshot. I learned this from the fantastic weaver and textile historian Deborah Livingston-Lowe of Upper Canada Weaving. Having researched the technique thoroughly for her MA thesis, Deborah found that the term "overshot" originated sometime in the 1930s and that historical records variably called these weaves "single coverlets’ or ‘shotover designs.’ Deborah settled on the term "floatwork" to speak about these textiles since it provides a more accurate description of what’s happening in the cloth, and it’s one that I’ve since adopted.
This book contains the collected drafts and work of Frances L. Goodrich, whose interest in coverlets was sparked when a neighbor gifted her one in the 1890s. Full of charming hand-painted drafts, this book offers a glimpse into North Carolina’s weaving traditions.
Amanda Ratajis an artist and weaver living and working in Hamilton, Ontario. She studied at the Ontario College of Art and Design University and has developed her contemporary craft practice through research-based projects, artist residencies, professional exhibitions, and lectures. Subscribe to herstudio newsletteror follow her onInstagramto learn about new weaving patterns, exhibitions, projects, and more.

Creating is not a guarantee of a beautiful, mind-blowing outcome. It is simply the act of bringing something into existence that wasn’t there before. This quote doesn’t just apply to those who are trying to make art. I feel it applies to all of us who are creating, even if your weaving as a relaxing hobby. As I thought about it, there were a lot of ideas in this quote that stood out to me.
Even if you’re weaving for fun, it’s easy to get caught up in wanting your weave to come out perfectly. I know from my own experience that I get caught up in wanting my weave to look exactly how I imagined before I even started it, or when I feel like I just don’t like how it is looking. I touched on this a few weeks ago and in that post I talked about trusting your gut and knowing when to make corrections, but it’s also important to not over work your creations. Sometimes the best creative solution is to just let it be. You might even find a time or two when you come back to find that you have started to like what you created.


 8613371530291