
hacker rotary table brands
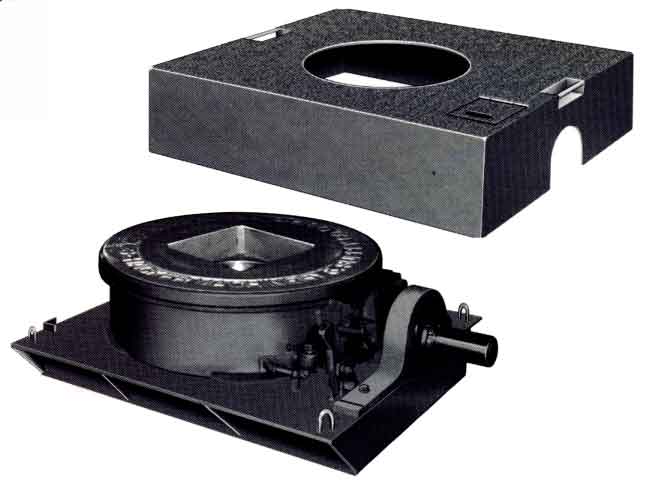
This versatile Rotary Grinding Table with built-in sine table and variable speed motor quickly converts a surface grinder to rotary circular work. Highly accurate setups are possible for precision prototype or production toolroom work. more...
Please note that while there are always risks associated with providing personal data, whether in person, by phone or over the Internet, and no system of technology is completely safe, "tamper or hacker- proof", Ringier Trade Media Ltd. has endeavoured to take appropriate measures to prevent and minimize risks of unauthorized access or improper use of your personal information.
Please note that while there are always risks associated with providing personal data, whether in person, by phone or over the Internet, and no system of technology is completely safe, "tamper or hacker- proof", Ringier Trade Media Ltd. has endeavoured to take appropriate measures to prevent and minimize risks of unauthorized access or improper use of your personal information.

2022 top rated 4 axis CNC router 1325 with 4x8 rotary table (4th axis) is popular for woodworking, cabinet making, home decorations, mold making, sign making, arts, and crafts, now the best budget 4x8 CNC wood router machine for sale at affordable price.
1325 refers to the CNC router table size of 1300mm x 2500mm, someone may name it as 4" x 8" by feet or 48" x 96" by inches. 1325 is the most common used model in CNC machines to make a full sheet project. As the name implies, it is named by the manufacturer according to the table size of the machine. The maximum table size is 2500mm in length, 1300mm in width, and 200mm in height. It is widely used in popular woodworking plans and projects, such as cabinets making, door making, home decoration, advertising, and sign making. CNC router 1325 is designed as 1325 single spindle, 1325 dual head, 1325 multi head, 3-axis 1325, 4th-axis 1325, 4-axis 1325, 5-axis 1325, and 1325 ATC CNC router with automatic tool changer spindle based on the configuration level.
4 axis is based on 3 axis, and the 4th axis (A axis) is added to the rotation axis. In addition, 4 axis is divided into four-axis three-linking and four-axis four-linking CNC machines, adding a rotating axis and the control system is also a four-axis linkage system to be called a true four-axis linkage CNC machine. Because of the rotary motion of the 4th rotary axis, 3D machining of cylindrical, arc, and circular surfaces is realized.
If the 4 axis you purchased has only three feed axes (X, Y, Z), the Y axis can be manually replaced with a rotary axis, and only a maximum of three axes can be linked. This is a four-axis three-link CNC machine, which is also known as 4th axis.
The rotary axis CNC router kit uses a DSP handle industrial control system. The four-axis linkage control has excellent and stable quality, good maintainability, and usability. It can control the completion of the 3D machining of the cylinder and the rotation of the tetrahedron. It is suitable for three-dimensional sculpture of figure statues and legs of European furniture. The cylinder engraving machine has the following advantages:
Woodworking industry: 3D wave board, furnitures, solid wood door, kitchen cabinets, wardrobe cabinets, tables, beds, computer desk, table legs, sofa legs, wood crafts, paint door, screen, windows, shoe polisher, game cabinets and panels, mahjong table, auxiliary machining.
4 axis CNC machine can do all 3 axis CNC machine can do. The 4 axis spindle (B axis) can rotate ±90 degree, which is suitable for side milling, drilling, cutting, lock slot and so on. It is especially designed for processing on different 3D curved surface carving.
We will offer you with our detail quotation according to the consulted 4x8 CNC machine. You will get the most suitable specifications, the best accessories and the affordable price.
All the CNC routers can be shipped worldwide by sea, by air or by international express logistics via DHL, FEDEX, UPS. You are welcome to get a free quotation by filling up the form with name, email, detailed address, product and requirements, we will shortly contact you with the full information including the most suitable delivery method (fast, secure, discreet) and freight.
Unfortunately they too suffer from "cheapitis". Indian made tools fall into two definate classes of good and not so good. The problem being that there is little or no consistency from model, size or brand. Bison and some of the other vendors like Grizzly do have a decent quality offering, but they are not sub 100 dollar items. You definately want the largest table that your mill will accomodate because you also need room to be able to clamp and secure the piece you are working on. I am not familiar with the dimensions of your lathe/mill but you want to try to keep the quill retracted as close to the head as possible to impprove stiffness and reduce chatter, but you do not want to crowd the head too much either. I would also opt for the horz/verticle mounting options to increase the tools use and versatility. The sub 100 dollar units seem to be rough, have a good bit of looseness and have been found to even still have casting dirt still in the cavities. This is especially prevalent in the cheapest offerings from places like CDCO and Shars. So I would suggest a bit more shopping with an eye toward making one slightly more expensive purchase rather than having to revuild/repair a smaller unit that you will ultimately replace or relegate to the "spare parts" dungeon. I have not bught one myself yet, but I have been following a number of threads outlining the woes of others who failed too remember the old adage of :Ya gets what ya pays for, and nothing more" Hope this helps and is not intended to discourage just inform and to help you become aware of the pitfalls with rotary tables in general.
Unfortunately they too suffer from "cheapitis". Indian made tools fall into two definate classes of good and not so good. The problem being that there is little or no consistency from model, size or brand. Bison and some of the other vendors like Grizzly do have a decent quality offering, but they are not sub 100 dollar items. You definately want the largest table that your mill will accomodate because you also need room to be able to clamp and secure the piece you are working on. I am not familiar with the dimensions of your lathe/mill but you want to try to keep the quill retracted as close to the head as possible to impprove stiffness and reduce chatter, but you do not want to crowd the head too much either. I would also opt for the horz/verticle mounting options to increase the tools use and versatility. The sub 100 dollar units seem to be rough, have a good bit of looseness and have been found to even still have casting dirt still in the cavities. This is especially prevalent in the cheapest offerings from places like CDCO and Shars. So I would suggest a bit more shopping with an eye toward making one slightly more expensive purchase rather than having to revuild/repair a smaller unit that you will ultimately replace or relegate to the "spare parts" dungeon. I have not bught one myself yet, but I have been following a number of threads outlining the woes of others who failed too remember the old adage of "Ya gets what ya pays for, and nothing more" Hope this helps and is not intended to discourage just inform and to help you become aware of the pitfalls with rotary tables in general.
Hacker Radio Limited manufactured domestic radio and audio equipment. The company was formed in Maidenhead by brothers Ron and Arthur Hacker in 1959, and traded successfully until 1977. Financial difficulties resulted in the company being sold and relaunched with the name Hacker Sound which closed in 1979.
The Hacker brothers, Ron (born 1908) and Arthur (born 1910), founded Dynatron in the late 1920s with help from their father Harry, but in 1955 Ekco took over the company, which at the time employed 150 people. By 1959, the number of employees had risen to 250, but the Hacker brothers were uncomfortable with the arrangements and decided to set up their own company, Hacker Radio Limited. In December 1960 Ekco merged with Pye, then Pye was bought by Philips in 1967. In 1981, Roberts Radio bought Dynatron from Philips.
The Hacker brothers acquired a factory in Cox Green, Maidenhead, and started producing a range of transistor portable radios, beginning with the RP10 Herald. Throughout the 1960s, profits were healthy and the workforce increased. In 1973, the company was awarded its first Royal Warrant of appointment, and gained a second in 1976. But financial difficulties experienced in the 1970s caused the company significant problems, and despite cost-cutting measures, the firm"s bankers called in the receivers in May 1977. The assets were bought by Pullmaflex and the company reformed as Hacker Sound; the Hacker brothers were retained as consultants. Arthur Hacker"s son John, who had been made a director in 1975, was made Technical Director. However, difficulties continued, and the company was bought by Motoradio, who moved the operation to Bournemouth. Finally, a fire put an end to activities, and the Hacker trademark was purchased by Roberts Radio.
Hacker Radio primarily marketed its products to the UK domestic market, and were priced towards the top of the market. This, plus the relatively short period of operation (only two decades) results in a lower brand awareness today compared to other household names such as Roberts Radio. However, Hacker products have a strong following among vintage radio enthusiasts and collectors. An active group on Yahoo
The stated Hacker philosophy was to focus on technical performance rather than cost, and words to this effect are frequently found in printed material from the time. Many examples of their products survive today, and it is widely accepted among vintage radio enthusiasts that the build quality is higher than most similar sets from the same era.
Hacker produced many products during their 19 years of trading. Some of their more notable models are described below - a full list is available on-line.
The first product launched was the RP10 Herald. In common with many of their 1960s designs, this was built into a wooden case covered in leathercloth, with foam padding under the front and rear panels and a turntable to enable the set to be rotated for best reception (the internal ferrite rod aerial being highly directional). It featured a large (5 inch by 8 inch) 30Ω loudspeaker, and was powered by two PP9 batteries. Initial sets used Ediswan transistors; later sets used Mullard devices, including the AF117, which unfortunately went on to suffer from tin whisker formation within the encapsulation.
The next Herald, the RP30, retained the same loudspeaker and grill, but had a restyled cabinet that retained the padded leathercloth, which was available in charcoal black, blue or red (the latter with brass trim). The electronic design was revised, and the audio amplifier was rather more complex, incorporating rotary bass and treble controls. Coverage was MW and LW as before, but a version including short wave (16.5 to 50 metres) was offered (the RP31SW). Later, another version offering Marine Band (70 to 200 metres) in addition to MW and LW was released (the RP32), but this sold in relatively small numbers, and few exist today. These sets continued to use the Mullard AF11x-series of transistors.
Another AM Herald, the RP82, was introduced towards the end of Hacker"s existence, but these are very scarce indeed. Electrically, they are based on the very basic AM-only RP70 Ranger.
The RP37 VHF Herald looked like a third-generation Herald, but the presence of a telescopic aerial indicated that this is an FM-capable receiver; indeed it was an FM-only radio. Like most Hacker sets from the 1960s and early 1970s, this set used two PP9 batteries. They were available in the same colour choices as the RP35 AM Herald, and there was a variant with a revised scale in royal blue that incorporated the Open University logo in place of the local stations. The terms of this arrangement are presently unclear.
This was Hacker"s premium portable model, featuring AM and FM reception, and the name was used for four generations of the receiver. The first three versions featured separate tuners and IF stages for the AM and FM sections. The first generation, the RP18 Sovereign, was released in 1964, and was slightly larger than the contemporary Herald. The case was leathercloth-covered wood with padding for the front and rear panels, and was only available in charcoal black. The same large loudspeaker was used. The FM front end was bought in from German company Görler, and the rest of the tuner sections used Mullard AF11x-series transistors. User-adjustable station markers were provided to indicate the position of three favourite stations - but as these could only be moved over the lower half of the FM band (which only extended to 101 MHz), they were intended to locate the three national BBC services available at the time.
The final Sovereign - the RP77MB Sovereign IV - was rather different. It used simpler and cheaper circuitry that no longer had separate AM and FM sections. The case was somewhat larger because it was originally designed to accommodate a cassette mechanism; the RP77MB Sovereign IV was a radio-only version of the RPC1 radio-cassette recorder. The styling was similar to the previous model, with a black anodised finish to the aluminium components. The turntable was dropped for this model. As with the Sovereign III, operation is from eight D-cells or the mains supply, and MW, LW and FM (to 104 MHz) bands are covered. The amplifier circuitry is simpler than the Sovereign III; in fact, it"s electrically very similar to that used in the Sovereign II - though with some component changes. The loudspeaker is a 5 by 8 inch model made by Elac.
There was a variation of the third-generation Sovereign called the RP75 Super Sovereign. This took the basic RP72 Sovereign and added two short wave bands - the only Hacker set to include both FM and SW. Coverage was 10.9 to 33 metres and 27.5 to 89 metres. Electronic fine-tuning (band-spread) was provided, and switchable ISM returned to the FM band; separate switches are provided for ISM and AFC, unlike the Sovereign II where these functions were combined on one switch. A signal-strength (and battery test) meter was provided. Echoing the development of the RP72, a mains power supply was added (the RP75MB), then the FM coverage was extended to 104 MHz. With the MB models, an ATU (aerial tuning unit) was included to improve short-wave reception. The speaker fitted to the RP75 and RP75MB was the same as the RP72, but with a larger magnet.
The RP38 VHF Hunter was released in 1969, and was intended to be an "economy" set. It had MW, LW and VHF coverage. The cabinet was also cheaper to make and lacked a turntable. Initial models used the same 5" by 8" Goodmans loudspeaker as the contemporary RP35 Herald/RP25 Sovereign, but a model from Elac quickly replaced this.
An updated version followed a year later: the RP38A. This added bass and treble controls, using an amplifier that was electrically very similar to that in the RP35/RP25. This model was in production for many years, and went through several cosmetic changes before production ended in 1976. Initially available with side panels in finished hardwood or covered with black leathercloth, and black leathercloth covered front and rear panels (with no padding), the grill was thin aluminium perforated sheet which picks up dents rather easily. In 1973, a new grill was introduced - the same as the Sovereign III "family" - which was a heavy and thick aluminium extrusion. At some point afterwards, the handle is changed to a three-part unit that matches the rest of the Hacker range, and then towards the end of the run, the silver tone control knobs are replaced with black plastic versions. All versions of the Hunter have an FM band that is limited to 101 MHz (and non-switchable AFC).
In 1962, Hacker released the RV14 Mayflower; an FM-only valve table radio finished in striking veneers. Unusually for a Hacker, this set had coverage to 108 MHz - the FM front end was supplied by Görler. The audio sections were based around a pair of ECL86 triode/pentode valves that operated in push-pull, delivering around 7 watts in ultra-linear mode to a large (10 by 7 inch) loudspeaker. An EM84 "magic eye" tuning indicator valve was used.
Hacker made many mono record players, most of which could be converted to stereo with the purchase of a matching amplified loudspeaker; the GP15 Cavalier, GP42 Gondolier and GP45 Grenadier being commonly encountered examples. They also made a number of radiograms, and later music centres with matching loudspeakers and badge-engineered cassette decks from Japanese manufacturers including Sanyo and Nakamichi.
Many wood crafts are carved by CNC router in daily life, the carving technology is done by hand before, CNC router came into being soon, but the machine can only process the limited area of crafts, that is required by hand to complete the entire craft, and now manufacturers adopt rotary axis in the CNC table, it does not require manual processing work, because the rotary axis can calculate the direction of the object. Compared with the CNC machine before, it reduces the workload and strengthens the quality of the wood crafts, because the rotary axis can work in different levels, so the rotary CNC router machine can ensure the quality of carving crafts better than the CNC machine before.
In addition, Local rotary machining is realized, the size of the object is not limited, you can set their size, so the new CNC router machine is becoming more and more popular.
No matter what kind of CNC router machine, rotary axis is an important part of its work, if you do not understand the functions of the rotary attachment, this will have an impact on the use of the machine. STYLECNC will tell you the functions of the rotary axis for CNC router machine as following:
The five functions of rotary axis need to be understood in detail before using a rotary CNC router. This will improve the work efficiency and crafts quality.
I’ve got a couple of threads running where rotary tables have been mentioned (ok, mainly by me). One thing to put to bed straight away: I don’t really *need* one, but it would be handy for some jobs, and - primarily - good fun to play with.
Ive got an SX2P mill, and a 5” table was suggested as a good size for that. Soba was a brand mentioned, and one of the usuals has a set including table, tailstock, 4-jaw chuck and dividing plates. Cost is about £340 from Chronos, delivered. I understand that quality could be acceptable, but chances are it might need some fettling. I watched a review video, and it seemed as expected.
Is there a ‘rotary table 101’, for example what’s the correct way of centering the table under the spindle, and when using the 4-jaw chuck how do you subsequently centre the work in that?
Mine came with a 3 jaw and that gets used equally in both vertical and horizontal modes the 4-jaw SC would be similar. Also have a flange mount ER32 that gets used sometimes as it"s a bit shorter and also allows the spindle collet to get closer to small work when table is vertical.
To centre my rotary table I have a centered plug which fits into the rotary table centre. This allows put a centre into the mill spindle and just run it down to the rotary table to centre it to the spindle then bolt it to the mill table.
When I bought my (secondhand) rotary table I also bought a small import 3-jaw chuck. I"ve never fitted it and not missed it, so I never will fit it. I mount work direct on the table.
Andrew - the first part I’d use it for is the small (c.30 mm) diameter aluminium output shaft blank for my son’s rc car (as per earlier thread) The Chuck would seem the obvious choice to hold it, but the height restriction could be an issue. What would be the best way of centering and holding a piece like that direct to the table? Make a temporary base plate and screw the bar vertically to that, then clamp the plate to the rotary table? Or something like that?
To centre my rotary table I have a centered plug which fits into the rotary table centre. This allows put a centre into the mill spindle and just run it down to the rotary table to centre it to the spindle then bolt it to the mill table.
I was wondering if something like that is accurate enough. Sounds straightforward. I guess you could also turn and drill a tight fitting centre plug, then align the table so the drill presses straight into the hole?
For a more accurate set-up, mount a dial indicator on the mill spindle and use it to locate on the morse taper of the rotary table spindle. (or the machined recess on the end of some RT"s). Carefully turn the mill spindle by hand to achieve zero movement of the indicator. Bolt down the RT and check again to see if it has not moved.
That"s obviously an - ahem - suboptimal setup, but shows what can be done in the way of fitting quarts into pint pots. The work was ~1" diameter and the tool mounted in an ER25 collet chuck. I didn"t have problems with headroom - it was the size of the table which was problematic. Anyhow it worked:
Over the years I have built up a fair number of simple arbors which get reused or it"s not hard to knock up another and these just go into the chuck and the work screws to those. Not sure I would want to try clamping this 1/4" sq x 3/8" long part direct to the table and still be able to get at it will a 6mm cutter and not hit any clamps
As you don"t have any form of indexer like a 5C spin indexer you will end up using the R/T to cut square or hex shapes onto small parts which will again be quick and easy to hold in a chuck or collet fixed to the table
......the first part I’d use it for is the small (c.30 mm) diameter aluminium output shaft blank for my son’s rc car (as per earlier thread) The Chuck would seem the obvious choice to hold it, but the height restriction could be an issue. What would be the best way of centering and holding a piece like that direct to the table? Make a temporary base plate and screw the bar vertically to that, then clamp the plate to the rotary table? Or something like that?
I"d concede that a chuck might be the simplest solution, but not necessarily the most accurate. My rotary table has a 1" parallel hole in the centre, which is way more useful than a Morse taper. So I"d make a 1" spigot with a flange for clamping to the table and a recess to locate the work. There would also be a hole for a screw into the part to be machined.
If you could not get the chuck in then a 5mm pin held in your collet chuck and lowered into the central hole would locate the part and a couple of small clamps will hold it down by the flange. Zero DRO before raising head and changing to the cutter. Though as I said it could be done without a rotary table too.
My advice is not to get wrapped round the axle worrying about the quality of hobby tools. If the best possible rotary is really needed (and I suggest it"s not), then buy an industrial model. It will cost a few thousand pounds, and although it will be somewhat more robust, don"t expect it to be bullet proof. Many a well-made rotary table has been wrecked hacking out big wheels for model traction engines!
Most hobby rotary tables are of the HV6 design. A worm drives a cogged wheel and turns the table on a simple plain bearing. Though obviously made down to a price, they"re reasonably accurate and sufficiently sturdy for most amateur purposes. They"re aren"t high-technology, nowhere near as difficult to make as a computer hard disc.
Today the world is flooded with mid-range tools, affordable rather than excellent. Not intended to last forever, they are nonetheless generally acceptable for the light duty found in typical hobby workshops. Many products come from similar anonymous factories, and are rebranded by a local seller. But be aware that some versions are too cheap, or customer returns, or manufacturer rejects. The customer probably has no idea who made the item, or even which country or countries it came from. And for this class of kit, it rarely matters. The customer isn"t looking for "quality", he"s after "value for money" and "fit for purpose".
In this way, with the R T in a suitable position on the table, the Tailstock is clamped to the table, so that the Tailstock barrel can be inserted into the bored arbor.
The Tailstock barrel locates the R T.so that it can be clamped to the table. The Tailstock can then be repositioned wherever is suitable along that T slot, for the work in hand.
This is not present - it’s just a plain threaded collar, which in my table wasn’t true to the shaft. This makes preload and play impossible to get right, since if you remove the bind, you get clearance 180 degrees round. I tried to clean it up in the lathe, but with limited success. If the roller bearing was fitted as listed, it would be way better. Further to this, there’s a grub screw which is a limit stop for worm gear engagement with the main gear. This is just loose in its thread, and would be free to vibrate either way, changing the critical engagement adjustment preset. I substituted a cap head screw and locknut which can be seen in the image below (just above the silver engagement lever). Anyway, once adjusted to the best of my ability, I got about 3 minutes of backlash on the handwheel, and about 0.0035” play at the edge of the table:
The chuck is OK, very stiff, but no big deal. The supplied t-nuts clashed with the lock plates, and needed thinning on the linisher. Contrary to some reviews, my supplied chuck key is a perfect fit. I tried the table/chuck out by helping my son making some differential parts for his r/c car. This involved milling sectors from a small diameter shaft:
Pleased your generally happy with the Soba 5 inch table it should serve you well. I must have been lucky with mine I have 1.5 minutes backlash at the handwheel and 0.0015" at the table edge. In a full 360 degree rotation I have a couple of spots each about 15 degrees worth where it goes a tad light but hardly noticeable.
Don"t forget you can gain around 40mm in Z if you use finger collets against using the collet chuck. I have a 6mm and 10mm which take most of my regular cutters. I mainly use the collet chuck but if you have a tall job plus a table mounted vice or chuck it could make all the difference to fitting the job and tooling in. The 40MM extra on mine is based on my finger collets against the collet chuck both from ARC.
My Tailstock has tappings for a key or dowels. Because my T slots differed in width from the keyway on the Tailstock, I made up two stepped dowels. One end is tight fit in the Tailstock keyway, and the other in the T slot of the Mill table.
Position the R T, loosely, on the Mill table so that it roughly aligns with the Tailstock, in the place where you wish to use it, with the 2MT alignment arbor in place...
The Centre barrel, being snugly located in the 2MT arbor will have aligned the Tailstock barrel vertically; and the R T along and across the Mill table, so both can be clamped.
Once the Tailstock centre barrel has been aligned, it is set up and should not need to be reset. It can be used, with the 2MT arbor to align the R T on the Mill table in the future.
So yeah, McMaster whenever possible and I"ll gladly (have my employer) pay more for it. Shout-out to Misumi, too, however. I do mostly prototyping and I use so much of their customizable items, like rotary shafts. Much cheaper and faster than doing a drawing, sending it out to 3-8 local shops to try to find one that is quiet enough jobwise to take on a tiny one-off project and waiting 4 weeks for it, at a high price.
I"m not so sure about this. I"m not a prime member and I frequently get orders delivered before the estimated delivery date. On the other hand I also see instances where amazon takes suspiciously long to ship something. A charitable explanation might be that their logistics capacity (eg. planes or vans) is limited, so if you"re not a prime member you get deprioritized.
There aren"t many legacy organizations that successfully digitized with that second path in mind, at least not at first - McMaster, B&H Photo, and Sweetwater come to mind as notable exceptions. It"s a useful thought experiment, I think, even for those working on startups and green-field projects.
Then something even cooler happened: A week after delivery, that same sales engineer emailed me, just checking in. To make sure I got everything set up and was comfortable with it, to see if I could use any further help. As it happens, I was fine, but if something along the line had derailed me, this absolutely would"ve made a difference in getting me back on track. An expert whose entire job is to make sure I have a good experience with their stuff.


 8613371530291