
how to use a rotary table on a milling machine in stock

Years ago, before I learned CNC, I owned a Phase II 8″ horizontal/vertical rotary table that I purchased from Kap Pullen’s Getmachinetools.com store. He has them at a good price, BTW, and he’s a darned nice fellow to deal with as well as being a frequent HSM contributor. Anyway, its a nice little table, but I hadn’t done a whole lot with it for quite a while after purchasing it. As is so often the case, one day, a project landed on my doorstep and I was glad to have it.
Before I could get started, however, I had to make some accessories for it. Basically, I needed some T-Nuts to fit the table, as well as a little fixture that makes it easy to hold a plate up off the table through a hole in the center so you can machine it. The latter, what I call a “plate machining fixture”, was inspired by something similar I saw the Widgitmaster of CNCZone fame using to make Dremel clamps for his mini-router:
The Plate Maching Fixture and 3 Homemade T-Nuts. T-Nuts are easy to make: square a block to the proper dimensions, mill the side reliefs, drill, and tap. These are much smaller than the mill’s Bridgeport standard T-slots, so I made them myself and I’m using 1/4-20 bolts with them. They’re made of mild steel.
I turned the round spigot using the 4-jaw on the lathe. I’m making the fixture out of MIC-6 aluminum plate, which is pre-ground very flat on the sides. This is a 5 inch by 3 inch piece. I’ve clamped it to the rotab using my T-nuts and the regular mill clamps and step blocks. It is sitting on parallels to make sure I don’t cut into the table. You can also see how I’ve clamped the rotary table to the mill table using a big cast iron V-block I have. You can never have to many blocks with precision faces hanging around!
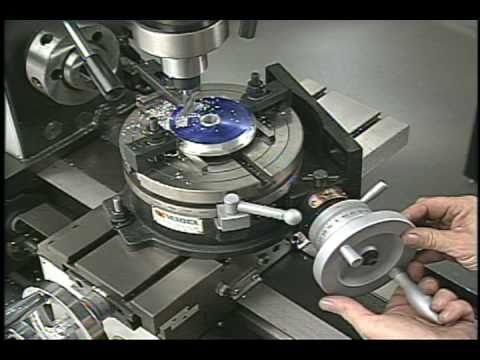
Having a 4-jaw chuck on your rotary table is mighty handy! Because it’s a 4-jaw, you can dial in the workpiece by adjusting the jaws until it is perfectly concentric with the table’s axis of rotation. The best way is to make an adapter plate that attaches to the back of the chuck in the same way that your lathe does so you can exchange lathe tooling with the rotab. Here is an example:
For the example, the chuck is threaded onto the adaptor plate, and then the holes in the adapter plate’s flange are used to bolt down to T-nuts on the table.
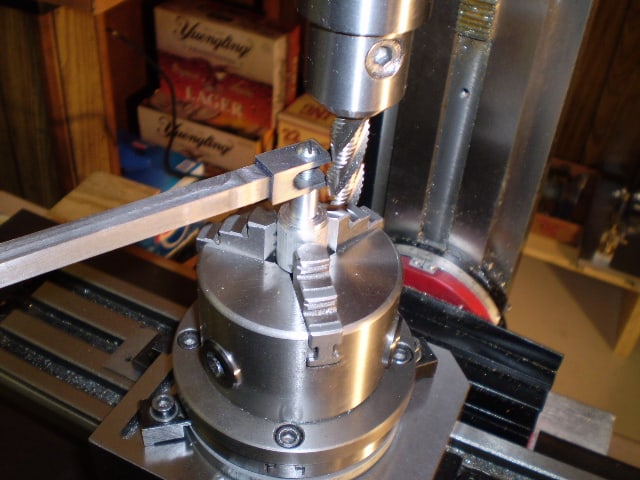
In my case, I bought a 4-jaw from Shars brand new, and simply drilled some through-holes in the chuck to mount to the table directly without an adapter plate:
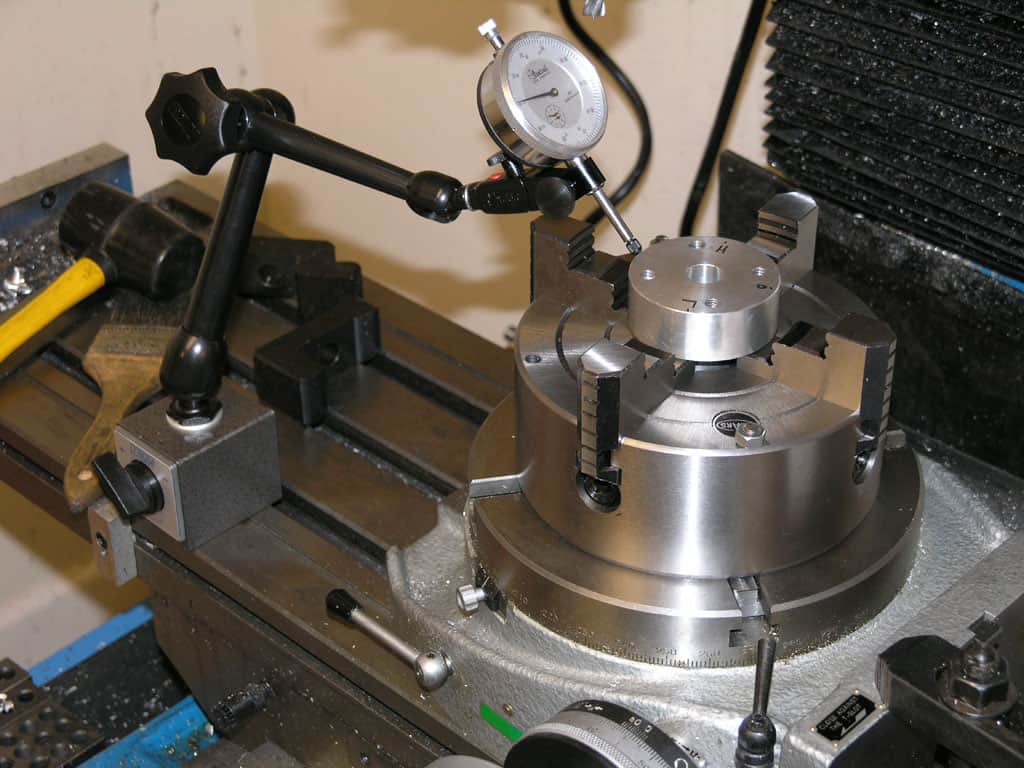
First, you want to make sure your part is properly centered on the table. To do that, I clamp the table down on the mill table (no special place is needed), put my Indicol indicator holder on the mill spindle, and find some round feature on the part to indicate on. For example, on the plate milling fixture above, indicate on the round boss, or on the center hole. Spin the table and bump the part in until spinning the table doesn’t move the indicator.
Second, locate the center of rotation directly under the mill spindle. You can simply use the X and Y table handwheels to do this. Use that Indicol to indicate off of a circular feature you want centered under the spindle. Turn the indicol around on the spindle and adjust the handwheels until the indicator stays put relative to the spindle position. A Blake Coaxial indicator will make this last even simpler.
When you’re rounding partially by cranking a part around on the rotary table, it’s really easy to go a little too far and screw things up. The answer is to drill the end points to make the exact stopping point on the rotab a lot less sensitive:
Centering with a Blake indicator is really fast, but what if you don’t have a Blake, or worse, what if your mill is too small to accomodate one? Here is a nice solution I found on a German site. This fellow has made an ER collect fixture for his rotary table, and has taken care that when installed on the table, the axis of the collet is aligned with the table’s axis. He can then place a dowel or other straight pin in the collet and line up until it will go into a similarly sized collet on the spindle. Nice trick! It’s similar to how Widgitmaster showed me to align a drill chuck on a QCTP to the lathe centerline with a dowel pin held in the lathe chuck.
I usually get a good many arguments started about rotary table setups. I worked in a large forge die shop, and I still do the setups the way we were shown in that shop. Probably 95% of the time you used a rotary table on a rotary head milling machine, so getting stuff on center was step #1.
The first thing to be pointed out is that the center hole and OD of the table aren"t necessarily on the axis of rotation. Easy to check, take the worm out of engagement and pull the table around by hand with an indicator zeroed on the center hole. Just like indicating a part in a four jaw.
If it is on center, that"s great. If not, you can eyeball your part on center and lightly clamp while you indicate it in by pulling the table around by hand and tapping it. If you don"t have a concentric hole or OD to use an indicator on, a center punch mark and a pump center can be used.
Once the part is on the center of the rotary tables axis, it"s a simple matter to center it under the machine spindle by locking the table and rotating the machine spindle and indicating like you would normally.

rotary filing—that is, running a circular cutter withfile-like teeth in the headstock of alathe.Rotary filling and later,true milling were developed to reduce time and effort

rotary filing—that is, running a circular cutter withfile-like teeth in the headstock of alathe.Rotary filling and later,true milling were developed to reduce time and effort

Busy Bee Tools sells metalworking equipment that professionals and serious hobbyists can rely on to get the job done. Our huge selection allows you to complete your metalworking projects, or care for your tools, with the methods that best suit you.
We have a wide selection of metal cutting tools and tools designed to remove material from your project. Check out our qualitymetalworking bandsaws, metal grinders, metal grinder wheels and metal belt sanders. For projects that could be ruined by exposure to too much heat, choose a slow grinder. Or, shape your metal with a metalworking lathe.
Those who fabricate sheet metal can choose from our wide selection of sheet metal tools such as metal brakes, sheet metal shears, metal hand shears and sheet metal machines.
For drilling, milling and facing, Busy Bee Tools carries a range of high-quality metal milling machines, including mini-mills for those with limited space.
Any selection of metalworking tools would be incomplete without welding tools. Our welding equipment includes amps, electrode holders, cutting tips and more.
Lastly, to hold your precious projects in place while you work on them, we carry high-quality metalworking vises that provide superior grip and peace of mind.
This item is backordered from our supplier. We will ship as soon as it is received. Your credit card will not be charged until shipped. Please Note: For shipments to locations outside the USA, backordered items must be placed on separate orders.Remove From Cart

Our dealer and auctioneer members offer the most extensive selection of used machinery in the world, with thousands of machines available in warehouses and plants across the globe.
Presuming you have a lathe, a reasonably close way to indicate a threaded hole is to first turn the head of a screw of the same thread round, then thread the screw into your part. The round head is now what you indicate against.
This method isn"t perfect, as you can have thread OD to screw pitch axis errors, but it"s generally good to ~.005". If you need better than that there are purpose made threaded gauges that are meant for this use, but they"re relatively expensive.
As to indicating in the part, your Rotab has the capacity built-in. Place your part in the vise, then rotate the assembly and watch for deviation of the thread center from Rotab center. Use the X-Y travel to lower the error and repeat. When your thread is at center, you then just use rotation and your indicator to true the vise to X, or whichever way you want to orient it.
Keep in mind that your combination of Rotab and vise is very close in weight to the listed capacity of the machine, so I would suggest not using it for larger work where you"ll move the mill table too far from its center. To much overhanging weight will damage both the machine and cutting accuracy.

Integrating a rotary axis in your rotary table milling machine can improve its capability for complex machining as well as increase productivity. We stock the best rotary tables for your milling machine. Our machines can be integrated into almost any CNC machining center. We stock a range of 4th and 5th axis rotary tables, milling machines, and accessories.

Three-purpose lathe chuck / universal with a set of external OJS and internal IJS jaws and a key Average w: 100 mm Clamping: M3(screws only from the front) Other dimensions and parameters - see attached PDF Accuracy, throwing - see enclosed PDF Other sets of internal and external jaws can be purchased - see related products. The chuck has a lubricator directly on the front of the chuck, we recommend the lubricant oil KV 100 during machining without rinsing or Vaseline Gleit 520HP 520TS / MOGUL CALSUL 2 WR when rinsing. The chuck is delivered in a paper box with a Czech manual. Including sets of Allen screws for clamping only from the front(type M3). Suitable for grinders, dividers, turntables, etc.


 8613371530291