
floor jack safety valve adjustment quotation

An overload valve of a floor jack primarily exists so that the jack does not exceed the weight limit of the hydraulic press, which might cause it to break down. Overload valves stop the press from lifting further up if the weight limit is crossed.
The floor jack overload valve adjustment process is very straightforward and only requires you to follow a set of simple steps. However, if you’re trying to adjust the overload valve, chances are that your floor jack is having some trouble holding pressure. In that case, we have some solutions for that as well.
An overload valve is a safety measure to protect the hydraulic press from unwanted damage due to excessive pressure. It works by loosening the connection between the jack handle and the hydraulic press.
When we’re talking about adjusting the overload valve, we’re mainly changing the max weight capacity of the floor jack. To do that, you just need the right screwdriver. It varies from model to model, some use Philips heads while others use binding heads.
Once you’ve got the right screwdriver, find the location of the safety valve. There will be a shield on top of it that you’ll have to remove with the screwdriver. Spot the screws and turn them counterclockwise to release the shield.
After you’ve done that, the valve should be exposed to you. There are mainly two types of valves used on floor jacks. The handle valve and the screw valve. Handle valves have a handle, while screw valves have a hole for the screw to go through.
For a handle valve, you just have to hold on to the handle and rotate it to adjust the weight overload on the floor jack. Rotate it clockwise to increase the maximum weight capacity and counterclockwise to decrease it.
These valves are typically very sensitive so a small turn could drastically change the output. So, try it in small amounts and figure out the correct amount for you.
For a screw valve, you will need a corresponding screwdriver. Typically it is the same as the shield’s screws, but according to your model, it could be different.
Safety Note: Before attempting to put pressure after adjustments, check the instruction manual of the floor jack for the maximum supported weight capacity. Normally, the valve will be set to 90% of that max capacity. So, you can at best increase it to 100%. Going beyond that will be very risky as it can damage both the floor jack and your vehicle.
This is a very common issue for which people consider adjusting the overload valve. A loose valve can indeed cause your floor jack to suffer such problems. However, that’s not the only cause.
The hydraulic press will fail to operate if the oil levels are above or below the given margins. Also, if the oil is of low quality, it might cause friction which can also prevent it from working properly. To maintain the proper hydraulic level, you should fill your jack with oil correctly and safely.
To know exactly what types of fluid are used in a floor jack, check out this article where we have explained and recommended the hydraulic fluid to use in your jack.
Hydraulics work by using highly pressurized compressed air. After long-term use, some of that air can leak into other parts of the machine causing havoc. The air mostly gets trapped in the oil chamber. To remove air from the floor jack, you just need to bleed it.
The final most obvious consideration would be that the floor jack is damaged. In most cases, it’s the hydraulic press. Repairing a broken floor jack is not worth the effort and the money. You’re better off getting a new floor jack.
Keep in mind that the overload valve is a safety measurement. So, a floor jack overload valve adjustment should only be done under your own circumstances. To be on the safe side, never exceed the given weight limit of your floor jack.
A hydraulic jack serves one fundamental goal: the lifting of heavy loads. Jacks are designed to provide force multiplication to enable a worker to amplify their strength through the jack"s hydraulics or mechanics to accomplish this goal.
There are two main types of jacks commonly in use; one type uses hydraulic pressure for lifting (hydraulic jacks), while the other uses a screw thread to achieve lift (mechanical jacks). Of the two, hydraulic jacks usually provide higher lift capacity and are more reliable.
Hydraulic jacks are available in two varieties: floor jacks and bottle jacks. Floor jacks have a horizontal shaft that pushes on a crank. The crank connects to a lifting pad that rises vertically. These jacks are capable of lifting several tons.
Bottle jacks have been around longer, and their name derives from their resemblance to an old-fashioned milk bottle. Bottle jacks have a vertical shaft that raises a platform called a bearing pad. They can lift up to several hundred tons, depending on the specific capabilities of the model being used. However, these jacks typically cannot lift the load to the same height as with a floor jack.
Both types of jacks operate under the same basic principle: In a closed container, the pressure is the same in all directions. In the case of a hydraulic jack, this container is a cylinder, and it holds incompressible hydraulic fluid. Hydraulic fluid is forced into the cylinder through a check valve that prevents the fluid"s backflow. The check valve keeps the cylinder pressurized so the load does not drop. As pressure builds in the cylinder, the force pushes upward on the plate of the jack and lifts the load resting on it. The weight of the load lowers the plate when the check valve is released, allowing the hydraulic fluid a path to exit.
There are some issues that are common to all types of hydraulic jacks which can impact their operation and safety. At some point, users will likely encounter leaks, rams that won’t lift, safety valves that get tripped, damage to the frames, and jack handles that kick back. While many hydraulic jack repairs are easy to accomplish, others might require the assistance of a professional.
Leaks, in particular, are extremely common, and result from a failed or dislodged seal or O-ring. Repair involves draining the hydraulic fluid, disassembling the jack, and inspecting the seals. Be sure to look carefully for cuts, tears, seals that are out of place, degradation, scratches, and so on. These issues are an indication that the seals or O-rings need to be replaced.
Repairing leaking seals can be a significant undertaking, especially for those not experienced in jack repair. Novices might want to leave this type of issue to a professional with the requisite experience. Also, if the leaked fluid is cloudy or foamy, that indicates the presence of water or air in the hydraulic system and could mean that the hydraulic fluid needs to be replaced and the potential source of the intrusion investigated.
Jacks may also be overloaded, causing the safety valve to trip. The purpose of this safety feature is to prevent the jack from being loaded beyond its rated operating pressure, typically measured in pounds- force per square inch (psi). A jack will not behave the same way after the safety valve has been tripped. The ideal way to address this issue will vary by manufacturer, so always consult the service manual when this occurs. Professional service is recommended in these instances to restore safe operation of the jack.
In other cases, rams may stop lifting, which is usually the result of insufficient hydraulic fluid in the reservoir. Luckily, this is a repair that even beginners can handle. When there isn’t enough hydraulic fluid present, air may become trapped inside of the system. The solution here is to add the appropriate amount of hydraulic fluid, then turn the jack to its release position. Next, pump a few times to purge out the trapped air. Then, refill the reservoir and place the seal cap back on. Be careful to avoid introducing contamination (such as dirt and dust) to the hydraulic system while adding fluid, and never mix two different types of fluid.
Hydraulic jacks are powerful devices for lifting, but like any other mechanical or hydraulic system, they will inevitably require maintenance and occasional repairs. While someone with fundamental mechanical skills may accomplish some repairs, others are best handled by a hydraulic professional. Be sure to consider the options carefully before deciding on a course of action.

After a ratchet-and-socket set, box-end wrenches, and screwdrivers, the most commonly used automotive DIY tools are probably a floor jack and a set of jack stands. Whether you’re changing a flat tire, replacing brake pads and rotors, or performing work under the vehicle that requires it to be raised for clearance or comfort, it’s important to understand that the functions of floor jack and jack stands are tightly intertwined.
That is, you use a floor jack to lift the nose or tail of a car (or, possibly, just one wheel), then you set it on jack stands to keepit safely in the air.
Last year, low-priced tool giant Harbor Freight recalled several of its jack stands due to instances of the stands slipping under a shifting load. It pushed the issue of jack stand safety to the automotive media’s front burner, which is certainly a positive thing. I thought I’d give you my common-sense perspective on floor jack and jack stand safety.
Before I delve into the mechanics of the slippage of the Harbor Freight stands, we need to jump into the Wayback Machine. If you wrenched 30 years ago, the jack stands you likely used had a design consisting of two sliding stamped metal tubes like the ones pictured below. The bottom of the outer tube was slit in three places, and the resulting sections were bent outward to create three legs which had metal bands welded to the bottoms to secure them against splaying apart further under load.
The inner height-adjustable tube had a cradle on the top to hold whatever part of the car it was under, as well as several holes that could be aligned with a hole in the outer tube and locked with a metal pin that was the diameter of a pencil. Stands like this were inexpensive and lightweight, but the stamped metal was fairly thin, the increment of height adjustment with the holes was usually pretty coarse, and using the stands meant putting them under your jacked-up car, raising the inner tubes, lowering them until one hole aligned with the hole in the outer tubes, and manually sliding the pins through. The pins actually performed three separate functions—selecting a height, locking that height in place, and supporting the weight of the car—but this wasn’t really trumpeted as an advantage.
The stamped metal-pinned tubular jack stand was gradually replaced by a welded ratcheting design. Instead of having two sliding stamped-metal tubes with their location fixed by a pin, the ratcheting design has a post with teeth, which slides up and out of the middle. This ratchet works like the familiar ratchet in a wrench, except it’s linear instead of circular. Teeth on the post are a right-triangle sawtooth shape with the short edge parallel to the ground. As the post is lifted up, a “pawl”—a curved eyebrow-shaped bar—has one end that pivots, and another end that slides under the part of the tooth that’s parallel to the ground, making it so the post can be pulled upward but can’t be lowered without flipping the release bracket. It’s a bit quicker to deploy beneath a jacked-up car than a pinned stand.
In addition to the ratchet itself, the construction of a ratcheting stand is heavier and thicker than the pinned stamped-metal tubular one. Typically, a thick metal plate is bent into a four-legged shape, welded onto itself at a seam, and welded at the top to the central body that receives the toothed post. If you accidentally run over a stamped-metal tubular stand, odds are you’ll flatten it, or at least bend the legs. In contrast, if you accidentally run over a ratcheting jack stand, odds are you’ll damage the undercarriage of the car.
In May 2020, low-priced tool giant Harbor Freight recalled 1.7 million of its Pittsburg-brand three-ton jack stands (items 56371) and six-ton stands (items 61196 and 61197) due to reported instances of the stands slipping while under load. You can find videos on YouTube where people demonstrate this under controlled conditions. This video of a disassembled jack stand does a pretty good job of showing the mechanics of the problem—the end of the pawl not fitting as securely under the teeth as it should. And on this website, you can see photos in which someone put white paint on the pawl, and a surprisingly small amount of paint transferred onto one of the teeth on the shaft, which demonstrates the small amount of overlap of the pawl under the teeth.
The root cause of the problem was reportedly traced to aging tooling at one factory run by the manufacturer, the Jiaxang Golden Roc Tool Company, affecting reportedly about 5 percent of the jack stands manufactured there. There were reportedly 11 injuries caused by the problem, none of them life threatening.
Unfortunately, Harbor Freight’s replacements for the recalled three-ton stands (item 56373) had a different problem—instances of the seam weld cracking when under load. These were recalled as well. You can find videos of this “zipper failure” of the seam weld on YouTube. Together, the recalls created the impression that any Harbor Freight jack stand was going to kill you.
An unintended but completely reasonable response to the Harbor Freight jack stand debacle was a sharp resurgence in interest in tubular jack stands, where a thick and plainly-visible pin is used to set the height, lock the stand, and support the car’s weight. Although the cheap lightweight stamped metal design is a thing of the past (and rightly so), sales of pinned-design jack stands such as this Torin T43004, with two sliding aluminum tubes and a screw-on aluminum base, soared. In addition to having a locking pin instead of a pawl, the screw-on base means that this particular design is even free of the kind of weld that failed in the second Harbor Freight recall.
Ratcheting jack stands, however, have not gone away. Far from it. In fact, many if not most new ratcheting stands have had a makeover, receiving a manually-insertable safety pin that provides redundant load bearing to the ratchet pawl. If you want to buy new ratcheting stands, you’d probably need to go out of your way to find one that doesn’thave this “double-locking” feature.
Obviously, the Harbor Freight jack stand recalls are a very serious issue, and if you have Harbor Freight jack stands from one of the recalled batches, you should return them. But should you toss your current ratcheting jack stands in the recycle bin and pony up for one of the newer pinned-tubular stands or a ratcheting stand with a redundant pin? If you’ll never feel safe working under a car unless you do, sure. But if that’s allyou do, you still won’t be as safe as you could be.
With that said, I’ve been wrenching on my own cars for 40 years and writing about it for 35, and in my Hack Mechanic opinion, the dominant safety issues working under a car are these, and they remainthese, even after you’ve exchanged your Harbor Freight jack stands:
Always, always,“double-jack” the car. I can’t write this often enough or say it strongly enough. The single most important thing you can do to make working beneath a car as safe as possible is that, after you’ve used your floor jack to raise the car and set it down on jack stands, leave the floor jack in place as a back-up.This is literally zero extra work, and it costs you nothing. I realize that, at times, the floor jack may then be in the way, but consider approaching the part you need to work on from another angle.
Always jack up the car on a level surface, never on an incline.You’d think you need to be suicidal or an idiot or both to jack up a car on a hill, but people sometimes make poor choices in the heat of the moment. I was a physics major in college and had a mechanics professor—that’s “mechanics” as in the study of the forces on moving and stationary objects—who died when his car fell on him. Months after it happened, I looked at his driveway and was astonished at its steepness. What caused him to do it, I don’t know. The best, smoothest, most level, safest place to jack up a car is usually your concrete garage floor. Maybe there was already a car in his garage and all he wanted was a quick oil change. Who knows. That a mechanics professor could get this wrong enough to get himself killed haunts me to this day.
Don’t jack up a car on asphalt, especially on a hot day. Asphalt is never as hard as concrete, and as its temperature increases, it can get soft enough that a floor jack and jack stands can sink right in, causing a car to topple. Combine it with a surface that isn’t laser level and things can go sideways very quickly. I’ll never forget checking out a car I was thinking about buying. I met the seller in a CVS parking lot in July. I’d brought an aluminum floor jack and used it to put the nose of the car in the air to quickly wiggle the front wheels and check for front-end play. I didn’t “double-jack” the car because I wasn’t even pulling the wheels. I didn’t perceive the parking lot as slanted, but it was, and the slant was at a right angle to both the car and the jack, and that—combined with the hot temperature and the soft asphalt—caused the jack to sink and the car to topple, with the nose abruptly jumping one foot toward me. My body was never under the car, but it scared the bejesus out of both me and the seller, and I’ve never forgotten it. If you have no place other than asphalt to jack up a car and have absolutely no other choice, I strongly advise making sure it’s dead flat and putting metal plates beneath the floor jack and all jack stands.
Once settled, check the jack stands. Once you’ve released pressure on the floor jack and let the car down on the jack stands, check the stands both top and bottom. Make sure that the part of the car the cradle (at the top of the stand) is touching is in the middle and is sitting flat, and verify that all four legs of the base of the jack stands are sitting securely on the ground. This is especially crucial if you’re trying to put all four wheels of the car in the air, as the act of jacking up one end of a car can easily cause stands already at the other end to tip forward.
Don’t overload the jack or the stands. I’ll talk about load ratings below, but basically, don’t be an idiot and jack up a truck with a little jack and then set it on little stands.
Don’t rock the cradle.Once the car is up on stands, give it a few good shoves from all four sides. Any motion should be barely perceptible. It certainly shouldn’t sway. (Note, however, that some owners of pinned jack stands report that, due to that circular pin, they do sway more than ratcheting stands, where the pawl rests on a squared-off tooth). However, once you’re under the car, do notrock it. It can be surprisingly easy to set up a resonant harmonic motion if you’re doing a lot of shoving, such as while installing a transmission and trying to line up the splines and seat the input shaft in the pilot bearing.
Jack stands manufactured after 2015 should be rated in pairs. That is, a pair of three-ton jack stands should together safely support 6000 pounds. The ratings come from the American National Standards Institute (ANSI) and American Society of Mechanical Engineers (ASME). You may see the standards referred to as ASME PALD (Portable Automotive Lifting Devices) and ANSI PASE (Portable Automotive Service Equipment). Stands manufactured to these standards are tested to 200 percent of their rated load for 10 minutes and experience less than 1/8-inch of deformation. However, note that testing is by the manufacturer, not by ANSI or SAME, and merely allows the manufacturer to claim certification of the product line. It is not assembly-line testing of each set of stands.
If you look up your vehicle’s weight in the owner’s manual or online and divide that by two, in theory that’s the minimum load rating you need for a pair of jack stands to support the front or rear of the vehicle. However: 1) for both safety and peace of mind, you probably don’t want to use the minimum, and 2) weight is just one factor. Jack stands also need to reach the underside of the vehicle and support the load in a stable manner, and the higher the stands are extended, the more the vehicle can rock. For example, half the weight of a 6000-pound truck is 3000 pounds, and on paper, even a little pair of two-ton (4000-pound) jack stands exceeds that, but two-ton jack stands are typically short and may not reach the frame rails of the truck even when fully extended.
So, apply some common sense and use the little two-ton jack stands for small passenger cars, three-ton stands for medium to large cars or mid-sized SUVs, and real five- or six-ton truck jack stands for a full-sized truck or SUV.
There are a few ways to think about floor jack load ratings. A floor jack that is ASME PASE 2014-certified should have been tested by the manufacturer to 150 percent of its rating, so as with jack stands, there is a built-in safety factor. It also should have a bypass valve that prevents you from continuing to lift if it’s overloaded. (Safety tip: If it’s getting really hardto keep pumping up the jack, you’re probably close to overloading it.) However, as is the case with jack stands, if you look at the load ratings the wrong way, you can fool yourself into doing things that aren’t safe. It’s important to understand that the physical size of the jack is probably just as important as the numerical load rating, since a big jack is simply more stable than a small one.
Case in point: If you’re only ever using a jack to lift one wheel to change a flat and want to factor in that the wheel could be on the heavy end of the car where the engine is, assume the jack has to safely lift 33 percent of the weight of the car. For a big vehicle like a 6000-pound truck, one-third the weight is 2000 pounds, so, on paper, even the smallest 1.5-ton (3000-pound) trolley jack has an adequate rating. But, as with the jack stand calculation above, this is so misleading that it’s unsafe, as the jack needs to reach the lift point, get the vehicle high enough in the air to lift the tire off the ground and allow a stand to be put under the frame, and do all this in a stable fashion. I simply don’t believe that a little trolley jack with a narrow base can do that repeatably and safely on a big vehicle, no matter what the load rating says.
For this reason, an oft-quoted rule of thumb, cited by Tom and Ray Magliozzi (“Click and Clack” of Car Talkfame) is that a right-sized floor jack should be rated to at least 75 percent of the vehicle’s weight. So, 6000-pound vehicle à 4500-pound (2 1/4-ton) jack. That still feels a little light to me, but the recommendation does say “at least.”
My option is that, as with jack stands, you should use a good dose of common sense and only ever use a narrow little trolley jack to lift one wheel of a small car, use at least a two-ton jack for repeated in-garage lifting of most cars, use at least a three-ton jack for SUVs, and use a real truck jack to lift a real truck.
This could be a whole column in and of itself. Consulting an owner’s manual doesn’t always help, as it’ll probably only tell you where the factory jack points are for the flimsy little jack that comes with the car. An enthusiast web forum is probably the best place to look. The nose of an older car is typically lifted from the middle of the front subframe, and jack stands are typically placed either under the subframe or the frame rails, but on a newer car, these locations may be hidden under cladding, and the plastic jack pads on or under the rocker panels may be best. Be hyper-aware of the rust situation on your car, as the car world is filled with stories of jacks puncturing rusty frame rails.
To a certain extent, with both floor jacks and stands, bigger is better, as bigger generally means a larger load rating, more stability, and higher lift, but it also means heavier, and that’s at odds with portability. If you’re looking for just-in-case floor jack and stands to have in the trunk for a road trip, you want them light and right-sized.
One wildcard is that, if you have a very low car with a jacking point that is far underneath and difficult to reach, you need a low-rise, long-reach floor jack, but the quirky tradeoff is that even though these are big and heavy to have the structural rigidity necessary to achieve the long reach, that very design means they don’t have as high a load rating as an equally-heavy truck jack would have.
I currently own four floor jacks. The biggest is an AC Hydraulics DK13HLQ, which was and still is the cream-of-the-crop of low-rise long-reach floor jacks and has an insanely low 3.15-inch profile. They’re very expensive, but about 10 years back I found a used one locally and treated myself. For reaching the jack point of my BMW M Coupe or playing limbo with the front sway bar of my lowered Lotus Europa, nothing else I own will work. However, due to its long reach, it’s only rated at 2900 pounds. The Harbor Freight 2 1/4-ton jack has been kicking around the garage since it was still called “Harbor Freight and Salvage.” The Pittsburgh 1.5-ton aluminum floor jack gets thrown in the trunk for road trips. It’s a little bigger than the little yellow trolley jack that used to perform that function, but that makes it more stable. I don’t currently have a real truck jack, but then again, I don’t currently have a real truck.
Stand-wise, there are three sets, all of which are ratcheting stands. There’s a set of tall six-ton truck stands that I bought nearly 20 years ago when I needed to put the back of the Porsche 911SC way up in the air to drop the engine. There’s an old set of Harbor Freight three-ton stands that still see the most use. And there’s a set of aluminum stands that get thrown in the trunk along with the aluminum floor jack for road trips. These are all old enough that none have the new “double-locking” redundant safety pin, but since I always “double-jack” the car, I don’t lose sleep over it. I do check the welds on all three sets for any signs of cracking.
If you won’t feel safe working under a car until you have the best most expensive jack stands available, by all means have a look at the D41609 from US Jacks or the ESCO 10498 stands. But once you have them, please remember everything I said above—always double-jack the car, work only on a level concrete surface, do not overload the stands, and do not rock the car.

You can have the best-equipped garage with the best tools in the world, but none of it will matter if you can’t get to the components of your vehicle that need to be fixed or replaced. A floor jack should be in your toolbox if you need to change your oil, replace a flat tire, or make other repairs to your car or truck.
Unfortunately, no matter which floor jack you choose, there might be a time when it doesn’t work like intended, and you’ll need to do some troubleshooting.
Locate the Gross Vehicle Weight (GVW) on the sticker in your driver’s door jamb to find out the right tonnage capacity for your vehicle. The weight of most vehicles is also divided into front and rear weights. Make sure that the jack you purchase can lift more than the heavier of the two weights. For example, if you need 3100 pounds in the front (just over 1-1/2 tons), get a floor jack that can bear at least 2 or 2-1/2 tons.
One of the most common reasons a jack won’t lift is incorrect fluid levels. First, remove the oil plug and look into the chamber to check the oil level. The suggested level for most floor jacks is 3/16 to a quarter above the reservoir. If you need to replenish, make sure you have the highest-grade oil possible.
If the jack’s oil level is higher than the required level, you will need to drain it. When a jack has more fluid than necessary, it risks blowing out seals, producing internal leaks, and causing the jack to lose pressure.
A jack with a low oil level will generally work correctly, but the low fluid level will significantly reduce the jack’s height. Hydraulic systems are closed-loop, which means the fluid level should never fall below zero. If it does, there’s most likely a leak someplace, which you’ll need to rectify before using your jack.
A jack can be tilted during shipping, allowing air to enter the cylinders. As a result, when you first pull a new jack out of the box, it’s critical to bleed out the air before using it.
Additionally, it would be best to repeat this practice monthly or whenever you notice any lapses in lifting capacity. Bleeding the jack every month will help your jack perform at its best. To bleed your lift, follow the steps below:
Most of the time, this will completely bleed the jack. If not, gently pull the oil fill plug on the side after the cylinder has been freed and lowered to help remove any trapped air.
Check the valve for leaks and make sure it’s airtight. If it isn’t, it will let the pressure out and allow air back into the system when you try to raise something.
You should look for cracked welds, destroyed parts, oil leaks, and anything else that isn’t in working order. You should also check the jack’s ram by flipping it on both sides. Always inspect it in both the retracted and extended states. If the floor jack has rusty pistons, this could indicate a problem.
Regular inspections are necessary for your lift. For example, examine where the jack was stored for any fluid leaks and inspect the housing for any cracking or rust and the piston rod for scoring or other damage. You should also look to determine if excessive wear in any areas could cause problems. Finally, keep an eye out for any foreign things (metal shards, dirt, rocks, etc.) that could harm the device.
It’s also essential to clean the hydraulic jack after each use before storing it. Wash the jack’s exterior using a gentle soap solution. Make sure that you do NOT CLEAN the hydraulic components that move. Oil your parts regularly to avoid premature wear. It would be best to grease the caster wheels, the front axle, the elevator arm, handle base pivot bolts, and the release mechanism with a general-purpose lubricant. After each use, inspect the seals for possible oil leakage and replace them as soon as possible.
Hopefully, this guide has helped you understand how to fix a jack that won’t lift. Regular maintenance is, once again, the most straightforward approach to avoiding malfunctions and future difficulties. Maintain your jack as much as possible by regularly keeping it clean and dry and lubricating it.Should you need parts for your lift or a new jack altogether, SVI is here to help you. We have everything that you might need for a safe and reliable floor jack. Contact us today at (800) 321-8173 and we can offer you same-day shipping on in-stock parts!

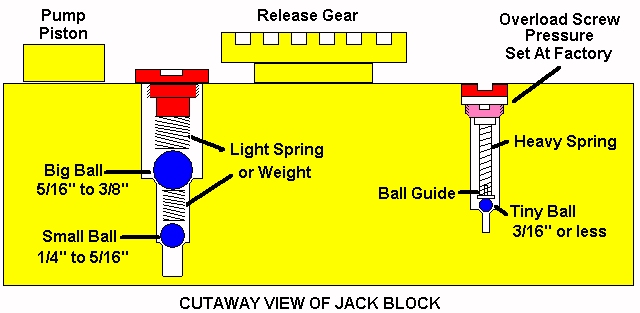
formatting link I"ve had it about 6 years, and although it"s only seen light use i thought it would be a good idea to check the hydraulic oil level. So, after a quick re-read of the instructions, off i set to remove the filler plug. Like a complete muppet though, i actually removed the safety valve instead, which the instructions go to great pains to say do not adjust. Not only did i adjust it, i removed it :(
I"ve re-fitted it, and it"s in approximately the same position it was before i messed with it, but is this good enough? Is there any way to check, or should i just err on the side of caution and buy another jack?

Hydraulic jacks simplify the movement of large or heavy items. The jack’s hydraulic system multiplies a worker’s efforts, enabling one person to successfully lift and maneuver heavy loads with little physical strain. Jacks are also used to suspend heavy objects in midair to provide maintenance access with minimal exertion on the operator’s part.
Though they’re built to be tough, hydraulic jacks can sustain damage from heavy use, improper maintenance, environmental elements, and other factors that compromise their ability to perform. Regular hydraulic jack repair and/or maintenance mitigates the damage caused by these issues by identifying signs of damage early and allowing for fast correction of any problems. This is especially crucial for older jacks that have been operational for many years.
Regardless of the type of jack or the application, there are some issues that are common within this tool category. Maintenance problems can compromise a jack’s ability to operate efficiently and negatively impact operator safety. If your equipment exhibits these signs, it is important to coordinate jack repairs right away.
Without a structural sound frame, your entire unit could literally fall apart under a heavy load. This type of damage typically cannot be repaired and requires the purchase of a new hydraulic jack.
Stop using your hydraulic jack immediately if the handle kicks back up after a down stroke. This condition is extremely dangerous for operators. Fortunately, a repair professional can restore the unit’s function.
When rams won’t respond properly, this usually points to a lack of hydraulic fluid. Simply add more fluid, turn the jack to its release position, pump a few times to release trapped air, and then refill the reservoir. Once the seal is replaced, the unit should function properly.
If the load is too heavy, the jack’s safety valves will engage, which will cause the jack to stop lifting. Refer to the user manual to identify the safety valve and follow instructions to reset it.
Hydraulic jacks are an essential part of many industrial and commercial operations. From warehouses to production floors, these devices enable the simple and efficient movement of massive products and components. However, hydraulic jacks are not indestructible. Like all machinery, attentive maintenance and prompt repairs are both key to prolonging the life of the unit.
Many common hydraulic jack repairs can be performed by novices or those with little mechanical skill. However, proper correction of many issues will benefit from professional input. Metro Hydraulic Jack Co. provides hydraulic jack repair services that support your commercial or industrial operation. Our repair shop and testing facility are fully equipped to evaluate, service, and repair your hydraulic floor jack.
Not only do jack stands protect technicians who need to work underneath vehicles, but they also provide stability for personnel while loading and unloading cargo trailers. See SafeRack’s line of jack stands
Jack stands generally consist of an adjustable A-shaped base frame, a ratcheting post with a platform for supporting vehicles, and a ratchet handle mechanism.
While you can use most jack stand models to lift a vehicle upward, the stand’s ratcheting mechanism must be disengaged in order to lower it. This is virtually impossible to do, as you would need to be able to lift the vehicle with your bare hands.
While hydraulic floor jacks can lift vehicles quickly and easily, they can (and likely will) occasionally fall — especially cheap models. This puts you and your vehicle at risk. Floor jacks also provide only one point of contact, which can leave your vehicle unstable and prone to tipping if you lift it from the middle.
Not only do jack stands protect you and your vehicle from falling floor jacks, but they also provide multiple points of contact that help you avoid tipping issues.
While all jack stands perform the same general function, their structure and strength can vary based on the specific type of vehicle they are designed to support.
Available with ratchet or gas-activated leveling systems and security locking safety pins, semi-trailer jack stands are designed with static load capacities of up to 100,000 pounds. Some models can also be used as trailer jacks with lifting capacities of 40,000 pounds.
OSHA also states that “a positive mechanical means” can be used to ensure that a truck is unable to move at the loading dock. These mechanical devices can include jack stands.
While OSHA does not mandate a specific type of jack stand — nor the number or placement of such stands — when stabilizing semi-trailers, the agency says “[f]ixed jacks may be necessary to support a semi-trailer and prevent upending during loading or unloading when the trailer is not coupled to a tractor.”
The agency also has additional safety standards specific to jacks:All jacks — including lever, ratchet, screw, and hydraulic varieties — must include stop indicators, and the stop limit must not be exceeded.
A jack should never be used to support lifted loads. Once a load has been lifted, it must be blocked up immediately. (Place a block under the jack’s base when the foundation is not firm, and place a block between the jack cap and load if there’s a chance the cap might slip.)
To set up a jack, rest the jack on a firm, level surface; center the jack correctly, make sure the jack head bears against a level surface and that lift force is applied evenly.
When using portable jacks to support semi-trailers, OSHA strongly recommends following both the trailer and the jack manufacturer’s instructions regarding their proper number and placement.
Due to the potential for bumpy and rough road conditions, trailer manufacturers instruct operators and technicians to properly load, block, and brace cargo to prevent load shifts and tipping per the North American Standard for Protection Against Shifting and Falling Cargo. Following these guidelines is crucial for establishing safe loading and unloading conditions involving jacks and jack stands.
In addition to reiterating OSHA regulations, jack manufacturers like Aldon Company, Inc. offer additional recommendations for safe usage of jack stands:Jack stands are designed solely for the support of semi-trailers. Do not use them for any other purpose.
Thankfully, the number of people who are injured or killed by falling vehicles each year is very low. When something tragic does happen, it typically involves a vehicle that fell off a jack, slipped off the blocks, or fell when a jack failed. Very rarely does it involve a jack stand.
The main risk factor that technicians need to remember is that jacks are designed to lift vehicles, while jack stands are designed to support their weight.
There is a seal at the end of the cylinder on a jack that is essentially the only component that maintains the hydraulic pressure needed to keep the vehicle in the air. This seal is not intended to carry such a load for long periods of time, and forcing it to do so can increase the chances of an accident.
Just like with any manufactured item, there can be significant differences in build quality from one model of jack stand to another. These differences can be even more pronounced when trying to save a few bucks by shopping for jack stands on Amazon.
Amazon sent a replacement pair of stands out to me (they actually upgraded me to the T43002A model with a locking bar). but one of that pair was also crooked due to the same welding problem. This is a real safety issue which makes these stands unacceptable (even if the quality of welds themselves is acceptable)…
– “The hinges were rusted when they arrived and the pin holding the stopper in place was rusted out in one of the jack stands. This prevented the jack stand from staying in place. I am glad that I tested them out before putting them under my car because this is very dangerous!”
Step 6 –Park your vehicle on a firm, solid, and level surface such as concrete or asphalt. Never raise your vehicle on soft or uneven ground. If the ground shifts or the jack changes position, you could be seriously injured or killed
Step 7 –To keep the vehicle from rolling back unexpectedly, chock the wheel(s) opposite from where you will put the jack. If you will be jacking up the front right wheel, put the chock behind the rear left wheel. If you are jacking up the left side of the vehicle, put one chock ahead of the front right wheel and one more behind the rear right wheel.
Step 8 –Inspect your floor jack and make sure the pressure relief valve is closed. (You typically close the valve by twisting the jack lever clockwise.) Don’t use your vehicle’s emergency jack for routine repairs, only for emergencies. If your jack is leaking fluid or shows other signs of disrepair, stop working and repair or replace your jack before you proceed.
The jack should make contact with a sturdy, unpainted section of the vehicle’s frame. Don’t put the jack under a body panel. Not only can this damage the vehicle, it can also injure or kill you.
Step 10 –Slide the jack under your vehicle at the chosen jack point.To raise one of the front wheels, position the jack just behind it. To raise one of the rear wheels, position the jack just in front of it. You can also raise both front (or rear) wheels simultaneously by using a jack point midway between the front (or rear) wheels. Some vehicles have a dedicated jack point for this. With other vehicles, you’ll need to position the jack beneath the front or rear subframe.
Be sure to place the jack under the subframe exactly midway between the front (or rear) wheels. Do not place the jack under the oil pan, radiator, steering rack, or other non-structural components.
When raising both rear wheels, you may be able to use the rear differential as a jack point. This is not always the case, however, and can damage some vehicles — so refer to your vehicle’s documentation.
Step 11 –Looking under the vehicle, adjust the jack’s position so it will make secure contact with the jack point when raised. The angle of the vehicle will change as it is raised, so be sure to position your jack so that it won’t slip off the jack point.
Step 12 –Begin raising the vehicle by pumping the jack handle down and back up repeatedly. Keep an eye on the jack where it makes contact with the vehicle to make sure it stays seated properly as you raise it. If you can’t do that, pause after raising the vehicle an inch or two and verify that the jack made solid contact with the jack point.
If you need to, lower the jack back down by slightly opening the release valve. Then close the release valve, and reposition the jack so that it makes better contact.
The purpose of the jack is to raise the vehicle, but the jack stand holds the vehicle in place. Be sure to place it in a safe spot that you know can support the weight of the vehicle, without it slipping off the jack stand.
Step 14 –Slowly open the jack’s release valve, lowering the vehicle until it comes to rest on the jack stand. Once the full weight of the vehicle is supported on the jack stand(s), you can either remove the jack or leave it in position for later.
From fall protection at the loading terminal to crossovers inside a distribution center, SafeRack has the systems you need to keep your operation productive, efficient, and safe. Learn how our innovative technology patented designs and extensive expertise help employers across the globe improve worker safety and productivity.

ARI-HETRA’s Model WS-1945 hydraulic jack is designed to engage the shackle mounts of your heavy-duty military and construction vehicles, allowing you to raise the front and/or rear of your equipment weighing up to 45,000 lbs. Now available on our GSA Schedule (GS-07F-291AA)!


 8613371530291