
gas oven safety valve troubleshooting in stock
Trouble turning on your gas stove? If your igniter is glowing but there is no flame, then one of two components in your range are at fault. These components are the “safety valve” and the igniter itself.
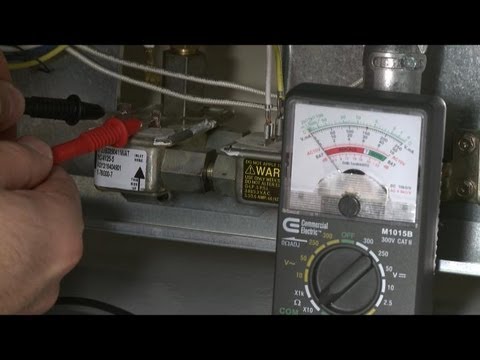
Take a clamp-on type ammeter, and attach it to the circuit to determine whether the igniter is working efficiently enough to open the safety valve. Clamp your meter onto the wire that either goes to the bake burner igniter or the bake burner safety valve. Turn on the bake function, and see what current is drawn. Typically your meter will show 2.8 – 3.0 amps for a normal current draw for a working igniter. If your meter is showing 2.7 or lower then you can assume that the igniter is not drawing enough current to actually ignite the flame, and therefore it won’t open the oven safety valve to allow the gas to enter the burner chamber. If this happens, it’s time to replace the oven burner igniter.
To test the oven safety valve, measure between the two terminals, on the valve and look for continuity. The resistance here is low, but you should be able to detect 1 to 1.5 ohms. If your model uses a dual valve, one for the broil burner and one for the bake burner, then you will have two bi-metals and again you can test them for continuity using a multimeter. They also should be very low resistance and those would indicate that they"re normal working oven safety valves.
If after performing these tests, you"ve determined that you need to replace your gas range"s oven safety valves, oven igniter, burn igniter, or safety valves? Take a look at our large selection of oven parts.

Control valves and igniters on contemporary gas stoves provide convenience, as well as safeguards. Control valves regulate gas pressure to the burners. Turning the burner knob on all the way triggers an electrical spark at an igniter that ignites the gas. Troubleshooting the stove allows you to diagnose common problems. In most cases, you can identity and correct the cause of a burner that won"t ignite or burn as it should without outside assistance.
Basics When you turn a burner control knob all the way on, you should hear a clicking sound that indicates the igniter is generating the electric spark needed to ignite gas at that burner. After the burner ignites, turning the knob down a notch shuts off the electrical current to the igniter. If you hear the clicking, but the burner doesn"t ignite, start by performing a simple gas test.
Gas Test Each burner receives gas through a small metallic tube that connects between the burner and the safety valve that"s located in the front of the burner compartment. If an igniter sparks, but the burner doesn"t ignite, attempt to light the burner with a fireplace match or butane fireplace lighter. If this isn"t successful, there may be food particles or grease buildup in the holes on the burner. Poke a toothpick into each hole, and repeat the test. If this isn"t successful, contact the local gas company, and schedule a service call.
Igniter Wires Each igniter receives electrical current through small wires that connect to a control module near the safety valve. Look for a detached connection at an igniter or the control module, and simply reconnect the wire at the appropriate tab. If the igniter clicks and ignites the gas, you"ve fixed the problem. If an igniter clicks, but the burner doesn"t light, a simple visual test may lead to the problem.
Igniter Spark The color of the spark at an igniter should be almost white with a blue tint. If the spark is yellow or orange, the igniter is not producing ample spark to ignite the gas. Igniters are relatively easy to replace. Using a nut driver, remove two small hex-head screws that secure the base of the igniter to the burner compartment, and pull off the wire connectors. Take the igniter to an appliance accessory store, and get a new one based on the brand and model of the stove. Install it in the reverse order it was removed.
Control Valve Control valves regulate the gas pressure when you turn on a burner. Without one, you wouldn"t be able to turn down the flame at a burner. The control valve is located in front of the burner compartment and has threaded fittings where the tubes from each burner attach. If you smell gas at the valve, tightening the fittings with the appropriate open-end wrench is the first order of business. Alternatively, if a burner flame flickers, and you can"t turn the flame on high, the valve may be faulty. Again, if you don"t have experience with gas appliances, contact the local gas company and schedule a service call.

So, you’re having trouble with your oven. There are some common oven problems that you can try to troubleshoot yourself when your oven is not working properly. Whether the problem is your oven not heating, oven not turning on, or your oven is not working in general, we’ve got suggestions for you.
The most common cause of an oven not heating is a defective igniter. The igniter draws electrical current through the oven safety valve to ignite it. If the igniter is too weak, it won’t open the valve correctly and will fail to ignite the gas in the oven burner. To see if the igniter is defective, observe the igniter when the oven is on. If the igniter glows for about 2 minutes without igniting the gas flame, the igniter is likely too weak to open the valve and needs to be replaced.
Another common cause for an oven not heating is having one of the wires that supplies power to the oven element burn out; it is common for these wires to burn out near the heat source. Inspect the wires leading to the oven element or igniter. If you determine the wire is fried, replace it. If you don’t see anything visibly burnt, check to make sure the wires are not loose and causing interruption to the flow of power to the oven element.
A common oven problem is the oven not maintaining proper temperature, or not getting to the correct temperature you have set it too. A defective igniter can cause this problem. As the igniter weakens over time, it takes longer to open the gas safety valve. When this happens, there is a longer span before the burner reignites, attempting to heat the oven to maintain accurate temperature.
Consequently, the oven temperature will drop too low before the burner is lit again. The oven temperature should not drop more than 40 degrees F. before the igniter relights the burner. If you are detecting too much temperature fluctuation, you may need to replace the igniter.
The oven sensor is another common culprit to the oven temperature not regulating. On some oven models, you can recalibrate the oven control up to 35 degrees F.- refer to the owner’s manual for instructions on how to recalibrate the oven control. Otherwise, you may need a licensed technician to determine if the oven sensor is failing.
If you discover the self-cleaning feature of your oven not working, the oven control board may be defective. The oven control board has relays that send voltage to the bake/broil circuits based on sensor input. If you have a faulty oven control board, the heating components will not get the voltage they need to activate.
Again, that pesky igniter. The igniter is the most commonly defective component of an oven that won’t turn on. See above “Oven Not Heating” for more details about checking the igniter.
Another common cause of an oven not working is loose or burnt wires. The wires that supply power to the oven element or igniter sometimes burn out near the heat source. Check the wires leading to the element or igniter. The will wire usually be visibly burnt if the wire is indeed burned out. If this is the case, the wires need to be replaced.
One of the most common oven problems is a stove burner that won’t light properly. The spark modules, spark electrodes, and spark wires all work together and are responsible for the burners lighting. First check the spark electrode and spark wire. If both of those are in working order, then check the spark module. If the burner produces a weak spark, or sparks intermittently, the spark module may need to be replaced.

Pilot ignition systems use a flame sensing element to sense whether the pilot is lit and the safety valve can open. The sensing element sits right in the pilot flame.
Just exactly where the sensor sits in the pilot flame is important. (See figure 6-A) If the sensing bulb is not in the right part of the flame, or if the pilot is adjusted too low or too high, it will not get hot enough and the safety valve will not open.
When two dissimilar metals (for example, copper and steel) are bonded together electrically, and then heated, they generate a tiny electrical current between them. The voltage is very small, measured in millivolts. This is the basis for a millivolt oven ignitor system. All that"s needed is a safety valve that will sense this tiny voltage and open the valve if it is present. If the pilot is out, there is no millivoltage and the safety valve will not open. See figure 6-B.
If the burner in a millivolt system will not start, typically the problem is the gas valve. Occasionally the problem might be the pilot generator or thermostat. The thermostat in these is just a temperature-sensitive on/off switch. To test, turn it on and test for continuity.
If that doesn"t work, we have a minor dilemma in determining whether the problem is the pilot generator or the safety valve. The dilemma here is that the voltages are too small to be measured with standard equipment. VOM millivolt adaptors cost nearly as much as the pilot generator itself. And the safety valve, which is usually the problem, costs twice as much as the pilot generator. So usually you just replace either or both of them. But don"t forget they are electrical parts, which are non-returnable. What I recommend is just to replace the gas valve first; that usually will solve the problem. If not, replace the pilot generator. You just ate a gas valve, but trust me, you"d have bought one sooner or later anyway.
When installing the pilot generator, screw it into the safety valve finger tight, plus 1/4 turn. Any tighter than that and you can damage the electrical contacts on the valve.
In some systems the sensor is a liquid-filled bulb, with a capillary to the safety valve or flame switch. When the liquid inside heats up, it expands and exerts pressure on a diaphragm, which opens the valve or closes the switch.
It is important to know that these sensor bulbs do not cycle the burner on and off to maintain oven temperature. That is the thermostat"s function. It has a sensor bulb too, but it senses oven temperature, not pilot flame. The only function of these pilot sensing elements is to prevent gas flow to the burner if the bulb does not get hot enough to assure burner ignition.
In flame switch systems, hydraulic pressure from the capillary physically closes the switch, which completes an electrical circuit to the safety valve. The safety valve is electrical and operates on 110 volts. See Figure 6-D. If the pilot is out, the flame switch does not close and the 110 volt heating circuit is not complete, so the safety valve will not open.
Some of these direct-pressure (hydraulic) systems use a two-level pilot. The pilot stays at a very low level; not even high enough to activate the safety valve. This is called the constant pilot, or primary pilot. Gas for the primary pilot may come from either the thermostat or directly from the gas manifold.
When the thermostat valve is turned on, the pilot flame gets bigger, heating the sensor bulb, which activates the safety valve (hydraulically) and the burner ignites. This is called the heater pilot, or secondary pilot. Gas for the secondary pilot comes from the oven thermostat itself.
When the gas oven reaches the correct temperature setting, the thermostat drops the pilot flame back to the lower level, the safety valve closes and the burner shuts off. See figure 6-E.
If you do have a good strong pilot that engulfs the pilot sensing bulb with flame, then odds are that the sensing element and/or whatever it is attached to are defective. If it is a flame switch, replace the flame switch. If it is a safety valve replace that.
In a two-level pilot system, remember that the main oven thermostat supplies the secondary pilot with gas. So if you cannot get a good secondary pilot the problem may be the pilot assembly, or it may be the thermostat. If you do get a good secondary pilot, you"re back to the sensing bulb and safety valve.
Spark ignition systems use a spark module to generate a pulsing, high-voltage spark to ignite the gas. The spark module is an electronic device that produces 2-4 high-voltage electrical pulses per second. These pulses are at very low amperage, measured in milliamps, so the risk of shock is virtually nil. But the voltage is high enough to jump an air gap and ignite gas. The spark ignition module is usually located either under the cooktop or inside the back of the stove. The same module is used for both the surface burner ignition and the oven burner ignition.
However, the spark is not certain enough to light the oven burner, and the gas flow is too high, to rely on the spark alone. Remember, in an oven, before the safety valve opens, you need to be assured of ignition. So the spark ignites a low-gasflow pilot, and then the safety valve opens only when the pilot is lit.
This is the same two-level pilot system described in section 6-2(b), with a few important exceptions. The constant or primary pilot does not stay lit when the oven thermostat is turned off. It does, however, stay lit the whole time the oven thermostat is turned on.
When the gas oven is turned on, a switch mounted to the oven thermostat stem signals the spark module. These are the same switches as shown in section 5-3.
When the thermostat calls for more heat in the oven, the heater or secondary pilot increases the size of the pilot flame, which heats the sensing bulb, which opens the safety valve and kicks on the burner.
Yup, this ol" boy"s got it all. Spark ignition, a pilot, a flame switch and TWO - count "em - TWO safety valves; one for the pilot and one for the burner. (Figure 6-H)
The operation is actually simpler than the diagram looks. When you turn on the oven thermostat, a cam on the thermostat hub closes the pilot valve switch. This opens the 110 volt pilot safety valve and energizes the spark module, igniting the pilot. As in the other spark system, the pilot flame provides a path that drains off the spark current, so the ignitor stops sparking while the pilot is lit. As long as the oven thermostat is turned on, the pilot valve switch stays closed, so the pilot valve stays open and the pilot stays lit.
When the pilot heats the pilot sensing element of the flame switch, the flame switch closes. This completes the 110 volt circuit to the oven safety valve, so the valve opens and the burner ignites.
When the oven temperature reaches the set point of the thermostat, the thermostat switch opens, breaking the circuit and closing the oven safety valve, and shutting off the burner.
Now that you know how the system works, first look to see what is not working. When the oven thermostat is on, and there isn"t a pilot flame, is the electrode sparking? Is there spark, but no primary pilot? Is the primary pilot igniting, but not the secondary? Is there sparking after the thermostat is shut off?
(The pilot may or may not light, but the main burner is not lighting) Remember that the thermostat supplies the pilot with gas in these ovens, and only when the thermostat is on. So if you don"t have a primary and secondary pilot flame, odds are the problem is the pilot orifice or oven thermostat. Try cleaning the pilot assembly and sensor bulb as described in section 6-5. If that doesn"t work, adjust the secondary flame a little higher. If that doesn"t work, replace the pilot assembly.
If you do have a good strong secondary pilot that engulfs the pilot sensing bulb with flame, then odds are that the oven safety valve (or flame switch, whichever is attached to the pilot sensing bulb in your system) is defective. Replace the defective component.
Something is wrong with the high-voltage sparking system. If you are in a hurry to use your oven, you can turn on the oven thermostat, carefully ignite the primary pilot with a match and use the oven for now; but remember that the minute you turn off the thermostat, the pilot goes out.
Are the cooktop ignitors sparking? If so, the spark module is probably OK. What typically goes wrong with the sparking system is that the rotary switch on the valve stops working. Test continuity as described in section 5-3(a). If that isn"t the problem, check the electrode for damage and proper adjustment. The spark target (the nearest metal to the electrode) should be about 1/8″ to 3/16″ away from it, (about the thickness of 2-3 dimes) and directly across the primary pilot orifice. Replace or adjust the electrode as appropriate. When replacing, make sure you get the right kind of electrode (there are several) and do not cut the electrode lead; follow it all the way back to the spark module and plug the new lead into the proper spark module terminal.

When you turn the dial on your gas stovetop, it opens a valve that lets gas through. This gas is released and mixes with air. It is ignited by a continuous spark which comes from the spark module, and a blue flame is created.
When the electrode on your gas oven burner continues sparking after the gas has been lit, it usually is a sign of a short in the spark module. This usually happens when liquid (like water from an overflowing pot) gets into the spark module. To fix this, unplug your appliance and let the burner dry out. Turn it on again and test it to see if drying has fixed the problem.
If your spark module sends out a spark intermittently instead of sparking at a continuous pulse, it has probably worn out and most likely needs to be replaced. You can call a service technician or your home warranty company to get this repaired. This is not something that you should attempt to repair or replace yourself. Although the cost of the spark module really depends on the oven model the part can be found for anywhere between $30 to $250it"s a better deal to replace one spark module rather than replacing an entire oven. This is especially true if you have a home warranty plan, as the repair will generally only cost a small service call fee.
If you see any damage, call a registered technician or your home warranty company in order to get the electrode replaced. Sometimes, your electrode"s spark is being blocked by the top of the burner being slightly off. Make sure the burner is in the correct place for the electrode to reach the gas and light it before calling a repairman or your home warranty technician.
If you don’t see any cracks on the actual electrode, you can also turn each burner dial to see if there’s one that doesn’t spark. If all of your burners spark but one, there’s probably a problem with the dial. There are times when the dials can become stripped and won’t turn on the electrode. It’s also possible that the dial has shorted out because food or water has spilled into the burner. You can try to dry out the burner, and if that doesn"t work, the igniter wiring harness will need to be replaced. Paying to repair this part is much more cost effective than purchasing a new oven, as the parts range between $30 and $100. With a home warranty, you only pay a small service call fee for parts and labor to repair the igniter wiring harness as long as it"s failed from normal wear and tear.
There’s a chance that food or grease has plugged up the tube that releases gas to be lit by the burner. Turn your oven off and remove the burner from the oven. Clean out thesmall tube inside of the burner with a toothpick or small brush.
When you turn on your oven to bake (or broil) the dial sends electricity to the igniter, which begins to warm up. As the igniter warms, the safety valve releases gas into the oven burner tube. Once the gas reaches the igniter (which can get up to 2,000 degrees Fahrenheit) the gas is lit by the extremely hot metal on the igniter, and warms the oven. When the oven reaches the temperature you selected, the burner and igniter will shut off, but will turn on and off while you’re cooking to keep the correct temperature in the oven.
First, remove the shields so you can see the igniter. If the igniter is glowing, but there’s no flame after the igniter has been glowing for a longer period of time, theigniter has probably grown too old and can’t open the safety valve to bring gas into the burner tube. Call your home warranty company for diagnosis for this problem.
Oven problems can happen to any homeowner, but with some troubleshooting and a home warranty plan from Landmark Home Warranty, you can usually fix small issues or repair or replace the oven. If you"re interested in covering your oven with a home warranty plan, compare Landmark"s home warranty plans here, or download a brochure with our contract for your state here.

On a newer gas oven, the burners release and set fire to the gas via an igniter called the hot surface igniter. The ignitor is a very fragile thing, whether it’s the round or the flat type. It works like a chain reaction: turning on the oven sends electricity to the igniter, causing it to heat red-hot. This makes the two metals in the oven safety valve contort enough to open the valve and set the gas aflame. This chain reaction takes about 60 seconds in a working oven. And a persistently cold oven could be the result of any break along the chain. A burner that won’t light could be connected to an igniter with no power coming into its circuit. Have a repairperson check the circuit for electricity, since this is a live voltage check. If there is indeed power coming to the igniter, and it is open circuit, a multi-meter can be used to run a continuity check. It may be that, while the igniter is glowing, it’s still insufficiently hot to open the valve: this can be checked by your repairperson with an amp meter. A defective igniter can’t be repaired: replacement is the only option.
Their are several different gas safety valves. On ovens with ignitors, if the ignitor is weak then the oven will not light off, but what if the igniter is new and the oven will not come on?
NOTE:Never put 120 volts to the safety valve in an attempt to make it come on. All you will do is kill that valve"s bi-metal. It has to be hooked in line with the igniter to work properly. Why? The ignitor takes up most of the power. The power goes through the safety valve as 120 volts but because the amperage is all being hogged by the ignitor, the gas valve opens up and allows gas to flow out into the burner and ignite. Unless it is leaking most of the time the gas safety valve is NOT the problem.
On ovens with pilot lights or standing pilots most of the time it IS the safety valve because the little thermocouple that mounts on the pilot goes bad and won"t open the safety valve.
Some ovens offer a seperate safety feature called a flame switch. What it amounts to is the thermocouple mounted on the pilot light goes to the flame switch which will have continuity as long as it is heated by the pilot light.
NOTE: If you do have to replace the gas valve remember this: It will not come preset. You will have to adjust the flame height with a wrench. It is a good idea to set the 2 valves side by side, adjust the orifice height on the new valve to the same height as the old one and then you need only to tweak it a tad. If the flame is too low it will take 2 hours to bake a pie shell. too high and the bottom will be cooked before the rest. It is best to adjust the flame to about half way up the flame spreader.

You’ve been waiting for an hour for your gas oven to come up to heat. It should have been ready 45 minutes ago. And still you wait. “What’s the problem?” you curse under your breath. We’ve been here and we know exactly how you feel. (Although we hope it’s not the night before a bake sale when you encounter this.) Appliances don’t always work. Sometimes you run into a problem with your gas oven and you’ve got no idea what it is or why it’s happened.
When you were purchasingyour brand new gas oven, it might have seemed like a fantastic idea at the time. When you compare the pros and cons, a gas oven comes out ahead for many people. You save money because gas ovens cost less to run than electric ovens, they heat up and cool down quicker, and they are more energy efficient. Or you might have chosen it because while an electric oven typically only lasts for 13 years, a gas oven can last up to 15 according to American Home Shield. These are all reasons we looked into when it came to justifying our gas oven against the initial cost of purchasing one and installing the gas line.
Something to look for with all of these issues is whether your oven is getting gas or not. Start by turning on the range burners if you have any. If the gas is flowing normally to the range burners, you know that the issues are within the oven itself. If they aren’t, you need to take a step back and make sure that you’re getting gas from your intake line, and your gas provider. (Sadly, we don’t have an in with any of them. We advise calling them once you’ve confirmed that an issue is with the gas supply rather than the oven itself.)
Sometimes the burners in your oven just won’t light completely. Even though you’ve got the dial cranked to high, you’re not getting a sufficient flame. This not only is going to affect your cooking, but also the efficiency of your oven. The most likely reasoning for this is that you have a cross-over port that’s restricted due to some type of blockage. Grab your old toothbrush and a wire brush and scrub carefully at all of the ports. With a bit of time you should be able to clear anything blocking the ports.
What about if the pilot light doesn’t light up after you’ve turned the oven on? You’ll know it hasn’t if you can open up the oven and don’t see a light at the back of the oven. If it’s not on, you might need to clean the electrode for the pilot. After you’ve taken your trust tools to it, you can relight the pilot with this article from Bob Villa.
One of the benefits of a gas oven, and the reason many people choose them, is the rapid on-off time, the opposite of using electric ovens. However you can have times where even after you ignite the oven, it takes a long time before it operates. This can be caused by the ignition ports being blocked. Please note, this is different from having the cross-over ports blocked. A trained technician is your best choice in this case, rather than doing it yourself. They will be able to tell if it is the ignition port that is clogged and get it fixed. The reason we advise caution here is because a delayed ignition has the potential to cause a fire or explosion, causing damage to you, your oven or your home.
If your oven won’t heat at all, it’s possible that the ignition is a problem. If you’ve made sure that both the gas supply is active and open, pop open the panel at the bottom of your oven. Here you’ll see your burner tube. Turn on your oven to 350 and see if the igniter burns hot. If it does but the gas doesn’t ignite, there’s most likely a problem with the igniter, and it’ll need to be replaced. If the igniter doesn’t glow, the next step is checking it with a multimeter, which you can do on your own, or you can call us in. For more information on how this process works, check out this video.
If you’re facing off against an oven that doesn’t have any flame, your first spot to look is the igniter. (Hm, that thing seems to be the potential spot for several problems doesn’t it?) So, pull out the shields and check to see if it’s glowing. If there’s not flame and your igniter has been glowing for a long period of time, you need a new igniter. They can get old and worn out so that they can’t open the safety valve and bring gas into the burner tube.
If you’ve got your oven lit and you can smell the gas, you’ve got a problem. Start by turning off the oven. If left unchecked a gas leak can cause a fire, explosion or poisoning of anyone in the home.
Now that we’ve got you safe, there are two possible causes for you smelling gas. The first is that the gas valves are opening up too soon before the ignition is reaching the right temperature. The second could be a hole or slit in the gas valves. Both of these need to be addressed by a professional as soon as possible after you notice it.
Oven problems can happen to any homeowner. It’s not something you’ve done or not done, it’s just wear and tear on the parts. The good news is that half of these you can fix on your own. For the other half, Appliance Rescue Service is always here to help. If you’ve got questions about ovens (gas or electric) that we didn’t cover today, or just in general, let us know in the comments below or over on our Facebookpage. If on the other hand you found us because you’re dealing with one of these problems, you can reach out to us on our webpage. So long as you live in Addison or the surrounding area, we’re here to help.

FYI, when replacing a burner valve don’t take short cuts and just replace the front portion of the valve. It may save you from future problems by replaceing the whole valve.
On the lighter side of trouble shooting issues, I recently spoke to a customer in the denver area who was positive that his 6 burner convection oven range fan was burnout and not working properly at all. After repeated phone calls back and forth with the customer and the factory numerous emails and part breakdowns, We were able to conclude that the problem was as simple as plugging in the fan for the convection oven. Sometimes it pays to check the simple solutions also!
Don’t be fearful of completing some minor repairs on your own and avoiding a costly service call. There are several fixes for your range which you can tackle yourself. Grab a “Gas Repair for the Hopeless” guide, save some money and learn how to take care of your gas equipment.
When a thermostat fails and is “Running Wild” be very careful this means the thermostat will not shuf-off and is in the WIDE open position. The thermostat controls the gas flow and when not working gas is very dangerous.
When changing out the top burner gas valves some people notice that the two pieces of the valve are held together with two small phillips head screws (on some valves, not all) DO NOT try to replace only half of the gas valve. This is a very serious safty issue and it will more than likely NOT fix your problem, leaving you with two gas valves that do not work. Do it right, and do it once!!
These are very helpful hints on troubleshooting. Since 99% of the restaurants that I work with have a range similar to this, I like to remind my customers of how to find the model and serial number of the unit, especially if I am speaking to them over the phone. It ensures that I get them the right part the first time if we can’t automatically figure it out. The model/serial number is always located on the inside of the kick plate underneath the oven door or on the unit itself once the kick plate is removed. Another helpful tip is to write this information down when you buy a new range so that you will always have it as time wears on and the information wears off.
Every restaurant owner that knows a little about fixing gas equipment should always keep a back up thermocouple or thermopile for every gas piece of equipment on the line. These items are cheap and will save you from paying next day air charges when your gas equipment goes out on Thursday night.
A little preventative maintenance never hurts either. Lubricate you burner valves with graphite grease on regular intervals. Nothing worse than a stuck, or hard to turn valve. Also a great up sell that can save your customers a service call.
I have a US Range model u60-6r24rru one side of the lower oven unit does not shut off the gas it keeps heating just by turning the Temperature knob just slightly to ON , the other oven strangely has no gas going through the Pilot line , however when I turn on the Temperature Knob I am able to lite the oven by hand although lets say when set at 350 it shuts off I guess the Thermostat is working on that unit
It sounds like your gas safety valve is defective and should be replaced as soon as possible. You’ll also need to replace the thermostat on the side that you’re having to light by hand.
Until you get this fixed, you should cut off all gas to the range, because if that safety valve is shot you face a very real danger of gas building up and possibly igniting.
Unfortunately it cannot be converted. The main reason is the lack of electrical power. Even if the range had power, there are no electronic gas valves for it.
You could put a separate sparker on each burner but it would require drilling holes into the front panel (6 of them). Then you could shut the pilot valves off and use the sparker to light each burner.
for some reason my convection oven is not working i check the plug and its plugedin. what can i check all the different relays and electrical connections with
I cook in our church camp and one of our Wolf ovens shuts off ten minutes after startup. The Pilot light also shuts off. The safety valve, thermocouple, and the thermostat have all been replaced. Do you have any suggestions?
Sounds like you may not have the thermocouple in the pilot flame far enough or when you turn it on the burner is consuming most of the gas causing the pilot flame to get too low. This would cause the thermocouple to cool and shut the safety down. The thermocouple needs to be at least three quarters of the way into the pilot flame.
I have an old Garland (can’t find the model # on the range) but the manual says G280, G30A. The oven will not light and wondering what I need to fix it and if its worth it to invest the money. Thanks for your help.
I have a maytag gas oven wall unit model cwg3100aab and when cooking it will cook for about 30 minutes and then it will give me the f3 error what can I do
The wife found an old 1952 universal gas stove, Everything worked fine when we first got it about a year ago. Now, the oven will not come on, the pilot is lit . Stove part works fine. She loves the thing!!! After reading Teddy’s problem I think mine might be the same. Approximatelyhow much will it cost to fix, is it worth it!!
The Sounds as though the thermostat may be bad. It may not be opening to allow gas to flow through. The only suggestion I can offer is to google either antique or vintage stove parts. There are a lot of sites that provide parts for the vintage units.
That’s going to be a hard one to answer. Have you checked the flue to make sure the is no grease build up in it? If it is smoking from the top of the range have you checked the tray under the top burners? Make sure you don’t have any build on the oven walls or the top of it.
Also check the burner valves to make sure the orifice is not plugged. Some burner valve orifices are adjustable so may want to make sure they are open.
My 12 year old wolf range/oven pilot won’t stay lit. have replaced the thermocouple and safety valve. won’t light unless i turn on the oven temp a little, then i can light the pilot. hold the button for 30 seconds and the oven lights. then after a few minutes, it all goes out. Any suggestions?? THANKS!
Is the pilot tube attached to the back of the oven thermostat? If so, on the front of the thermostat there is a pilot adjustment screw. Try adjusting it first if it still will not light you will have to replace the thermostat because it is not allowing the pilot gas to get through to the pilot.
Is the thermostat somewhere where I can reach it? Also, why would the oven light up and stay going for a few minutes if there’s no gas getting to the pilot? I’m going to look at it now!! thanks for the lead!
I may be repeating myself but here we go. I took over a kitchen with a propane garland 6 burner 2 oven unit that is putting out an incredible amount of soot on everything especially saute pans and stock pots. It is getting everywhere, and I am being told that its always done that. 26 years I have never seen a burners put soot/carbon on all the pots and pans. Also none of the burners will light when you turn them on even though the pilot lights are lit so I have to light with a lighter every time I want to cook something (which is very often) our cost in lighters alone is killing us. any help or suggestions would be greatly appreciated. Was gonna try and drill out holes and see if that helps but not really sure what to do. is it a oxygen gas mixture problem? again we run on propane and are at 4200 feet, however I worked in a similar restaurant at same elevation on propane and had no problems with soot, Thanks
Hi – my older commercial Wolf range oven sat for 3 months During our kitchen remodel. It was recently hooked back up to the propane and now it seems to be running too hot – black soot is insiide the oven and on the bottom of my pans.
Christie, what is the model and serial number for the range? We’ll need that info to determine what pilot valve you have, which should be located behind the manifold. Another suggestion would be to check the regulator.
Adjusted Pressure regulator down to increase WC, on occasion burners lighting blows out the pilot. Sometimes with standing pilots the burners will not ignite. I suspect too low gas pressure from municipal but need another opinion.
If you have a lot of soot you may want to clean your stove–this could explain the large flames if you’re burning lots of debris. You may also have a gas pressure issue, which is mostly controlled by the gas valve itself. Give us a call at 888-388-6372 or contact us online for more info. Thanks!
hi. I have a ?35+ yrs old commercial 8 burner. 24 in. griddle. 1 lower oven. oven has pilot. has gas. but oven burner will not ignite. only gas build up and ignite out the LP regulator! in front of oven. how can I get the oven to work properly?
I have a four burner gas stove with a double oven (one bottom traditional size, one upper 1/2 size). When all four burners are being used for cooking, and I try to use either oven, or both at the same time, the oven(s) being used shuts itself off (both will do this simultaneously), and the burners, how ever many are being used, will go out. The flame(s) quickly die(s) out, leaving me with a partially cooked meal. Meaning I get to finish dinner on the grill outside.
I am a strong believer in fixing appliances myself when possible, I’m quite handy, and follow all laws of basic common sense when it comes to safety in the home, ESPECIALLY with gas.
Is there some handy tool out there (hopefully not terribly expensive) that would allow me to measure, or test the stove at specific points where these are located, so that I could test each safety valve and thermostat; SO I would not have to replace them all, AS WELL as to check my work prior to returning the gas line to the stove?
Would it be safest to go ahead and just replace ALL of the safety valves and thermostats at the same time, SINCE the issue is occurring ALL throughout the stove, AT the same time?
If you’re working with a commercial unit chances are you need new burner valves. If you’re working with a residential unit then please direct these questions to the equipment manufacturers. They should have a technical assistance hotline to call.
The problem is that when the burners are on cooking something and you turn on the over when the oven starts and is heating up, the Flame on the top burners pull away from the cast iron burners about 1/2 to 1 ” and all the burners igniters start sparking.The seams to me to be some type of pressure or air mixture issue.. the repair person has replaced the Thermostat, Convection Fan, adjusted the burners and now wants to replace the spark module.
Any advise on the possible cause? This is a natural gas stove. Plugged Oven burners? I don’t understand a spark module as being the issue. Am I thinking clearly?
HELP Please!! I HAVE A HOBART GN9OS Convection oven. Its old but has worked good for years. I just recently cleaned the inside and now for some reason its not working…..I dont know if its coincidence or what?!?
Anyway, the pilots are still lit but when I go to turn it on, I get no burners kicking on. Usually there are only a few things that could be wrong, I’m handy, so I replaced the Thermostat and that didnt help…..then I replaced the gas solenoid valve, same thing……no help…..Any ideas?? Like I said, pilots are lit, just burners dont fire up. Im about to drop back and punt and call in a professional……
Patrick, the only other thing I think I would check is the wiring and making sure you have power where you’re supposed to have power. Is there power being sent to the gas valve when it’s trying to heat? Those kind of checks…
Thanks for the help! It seems that when I turn the oven on and turn the thermostat there is no power going to the gas valve solenoid as you suggested…..
I have a roper 30 in gas range. every time i go to set the oven temp as i turn the knob to raise the temp it keeps going back. Takes me several minutes to get the temp right. Could it be the thermostat?

The kitchen is the heart of the home. It’s where families share dinner, gather together and pass down recipes. One of the worst things that can happen when preparing to cook an amazing meal for your family is to find out that your gas oven won’t light. Do you call a repairman or resort to the microwave?
A handy homeowner can troubleshoot the problem when a gas oven doesn’t light. A handful of common problems can plague gas ovens. Many are as simple as a loose connection, while others involve replacing important components. However, those simple repairs are less likely to cost you an arm and a leg. Before worrying about replacing your oven, see if one of these common issues is the cause of your oven problems.
You can check a handful of issues if your gas oven doesn’t light. From a simple power issue to a faulty gas igniter, here are a few common reasons your gas oven won’t work.
If your oven won’t heat and your gas burners won’t light, the problem might be as simple as a tripped circuit breaker. Even though you have a gas oven, it still needs electricity to run. Electricity powers the control board, igniter and temperature sensor, among other parts.
The oven should connect to a standard 15- or 20-amp switch inside your circuit breaker box. These are the single switches. Your oven may also have its own dedicated breaker switch. If not, you can check the power by testing the secondary outlet. The problem lies elsewhere if the outlet works but your gas oven does not.
While a rare occurrence, your gas oven may not heat because your gas supply is off — usually a result of maintenance repairs or replacements in the system. For example, if your oven or other gas-reliant appliance was recently repaired, the gas line is likely still turned off.
Like a thermostat, the temperature sensor regulates the oven temperature of your gas oven. It connects to the igniter switch. If the temperature sensor breaks, the oven will not light for safety reasons.
Troubleshooting and replacing this sensor is a fairly easy fix for a homeowner who is comfortable working on a gas oven. Unplug the oven from the wall.
The igniter controls the oven safety valve, also known as the gas valve. This oven component ensures only gas enters the oven when the igniter is hot enough to ignite it. This component stops working if there is not enough power to either the valve or the igniter. A handy homeowner can use a multimeter tool to test that the valve is working. Unplug your oven.
Use a multimeter tool on the RX1 setting and test the valve. Some brands use valves with terminals for both the broiler and the baking elements. Test both sets of terminals.
The igniter is the key component of a gas oven. If you have a faulty igniter, many of the other components will not work and the oven will not turn on. Oven igniters glow hot to ignite the natural gas released by the oven safety valve. However, if the heating element is not working, the gas valve will not trigger and the oven will not ignite.
To check the gas igniter: Turn off the circuit to the oven and confirm the power is off by checking that the oven light, clock and control board are all off.
If nothing looks wrong with the part, plug the oven back in and watch to see if the igniter glows after turning on the oven. If it does not glow orange, replace it.
Replacing a faulty gas oven igniter is a moderately easy DIY appliance repair. Estimated costs are between $40 and $80, depending on the cost of a replacement igniter. If you have a newer oven, check any manufacturer warranties before making any repairs.
While a homeowner can do this project, ensure you take every safety precaution before attempting. Turn off the oven’s gas supply and disconnect the appliance from the outlet. Remember to take precautions if you smell gas (even after you have turned off the supply to the oven). Turn off the main gas supply to your home, open windows for ventilation, and call an appliance technician for assistance.
To ensure you have the correct replacement igniter, have your oven model number and serial number. A Kenmore oven might not use the same part as a Whirlpool oven. These numbers are often found inside the oven door or drawer, depending on the brand of oven.
Turn off all power to your oven. Ensure the power is off by checking that the light, control board and clock are off. Then remove the oven racks. Next, unscrew the base plate and remove it from the oven. You will find the igniter underneath.
Take a reference photo before removing the old gas igniter. Install the new igniter in the same way. Be very careful with the new igniter because it is very fragile. Unplug the two wires or the wire harness from the igniter.
While your gas stove and gas oven are part of the same appliance, they do not use the same parts and components. This is why your gas burners can work while your gas oven won’t light. Your gas range has its own set of igniters, gas valves and safety features. If everything is in working order, your range can work independently of your gas oven.
Appliance repairs are always a big inconvenience and can sometimes cost an arm and a leg. Don’t get stuck without your most important appliances. Check out the Cinch Home Services warranty plan that cover appliances, including both gas and electric ovens. With three different options to choose from, you can find the right plan for your home.

First of all, if you’re nervous about working on your gas oven (or not completely confident in your DIY appliance repair abilities) then you’ll need to schedule a Sears Technician to diagnose and repair your oven when it won’t heat. Safety should always be your highest priority when fixing appliances—even if you need to have someone repair your oven for you.
Even if you’re sure that you’ll have an appliance technician complete the oven repair, it doesn’t hurt to understand the troubleshooting and repair process involved in fixing a gas oven that won’t heat. There’s a chance that you can follow some of the troubleshooting steps described below and safely fix the oven yourself.
If you want some practical troubleshooting advice to see if you can fix a non-heating gas oven yourself, you’re in the right place. Carefully follow the troubleshooting and diagnostic advice described below to repair a gas oven that isn’t heating.
If you’re troubleshooting the oven on a gas range, turn on a surface burner to see if it’s getting gas. If a surface burner works, then you know that your oven should be getting gas as well.
If you’re troubleshooting a wall oven, check to see if the broil burner gets gas and heats up (if your wall oven has a separate broil burner). If you have a double oven, you can check to see if the 2nd oven is heating. If other burners in a wall oven are heating, then you know that the inoperative oven burner should be getting gas as well.
If gas supply valve for your stove or wall oven is open and you’re not getting gas to the appliance, check other gas appliances in your home such as the gas dryer. If your entire home is without gas, check the main gas cut-off valve for your house. Open the main cut-off valve if it’s shut. This may restore gas to your oven and other appliances so they work properly.
If the main gas cut-off valve for your home is open and no appliances are getting gas, then you need to contact your gas supplier to figure out what’s wrong.
If other appliances are getting gas but you suspect that your wall oven or stove isn’t getting gas, then you’ll likely need to have a plumber or gas technician from your gas supplier fix the gas supply going to your stove or wall oven.
Many gas ranges have a service cut-off valve on their pressure regulator at the back of the stove. It shuts off the gas supply to the oven but not the surface burners.
If the surface burners on your gas stove work but the oven burners aren’t getting gas, make sure that the lever on the service cut-off valve is in the open position.
When the basic troubleshooting steps don’t do the trick, you’ll need to conduct some advanced troubleshooting to fix a gas oven that isn’t heating. Nothing’s better than a YouTube video to describe advanced troubleshooting for a non-heating gas oven. Follow the steps in this Sears PartsDirect YouTube video to fix your gas oven:
After the video goes through some of the basic troubleshooting steps described above, the following diagnostic techniques are used to figure out what’s wrong with a gas oven that won’t heat.
When the igniter reaches ignition temperature, its resistance is low enough to allow enough current to flow through the circuit and open the safety gas valve.
The number 1 failure preventing a gas oven from heating is a weak igniter. The igniter won’t get hot enough to allow adequate current to flow to the safety valve so the valve won’t open to let gas flow to the burner for ignition.
If the igniter glows but the burner doesn’t ignite because the gas valve doesn’t open, then you’ll likely need to replace the igniter. As noted in the video, if you’re uncertain whether your glowing igniter has failed, you can schedule service for your oven and have a Sears service technician check the amp draw through the igniter circuit.
If you’re convinced that the oven igniter is bad, then you can order a new igniter and replace the igniter. Replacing a gas oven igniter is a relatively safe repair that most DIY’ers can accomplish on their own because it doesn’t involve disconnecting any gas lines in the oven. Follow the steps in this YouTube video to replace the oven igniter:
Unplug the range. For safety, always disconnect power before checking resistance. To check the resistance of the igniter, put the meter leads on the igniter terminals. If you measure between 10 and 2,500 ohms, then you know your igniter is okay.
Next, check resistance through the safety gas valve. The meter should measure less than 5 ohms of resistance through the terminals on the safety gas valve.
If the safety gas valve measures no continuity, you can have a Sears technician replace that part. Replacing the safety gas valve involve disconnection of gas lines inside the oven.
When you find that the igniter and safety gas valve appear to be okay, you’ll need to check wiring in the ignition circuit and the electronic oven control board.
With electrical power still disconnected from the oven, access the back of the electronic oven control board and check resistance through the ignition circuit wires connected to the electronic control board.
If you measure infinite resistance (also called an open load) through the ignition circuit wiring, then you’ll need to trace the wires through the ignition circuit and repair the broken wire (with the oven still disconnected from electrical power).
These DIY troubleshooting steps should help you fix a gas oven that isn’t heating in most situations. If you can’t figure out what’s wrong and fix the oven on your own, don’t hesitate to schedule oven repair service and we’ll send a Sears Tech right out to your home to fix the oven.

Again, not something anyone wants to see in connection with a gas appliance, but remember it’s basically the same problem as above, which is not immediately dangerous.
Spark ignition systems are modified pilot ignition systems. Instead of relying on a pilot flame to ignite the cooking gas, a spark is used to light the pilot gas.
Similar to problems related to your power supply, any issues linked to your gas supply will most likely require the assistance of a professional to avoid any potential health risks, which can include exposure to toxins, gas leaks and carbon monoxide poisioning.
A thermocouple opens up after the pilot gas has been lit and remains open for the duration which the oven is turned on. If it fails to open accordingly, the oven fails to light.
Modern gas ranges have thermostats and thermal sensors built into them to control their oven temperature. If the thermostat or thermal sensor is faulty or calibrated wrongly, it may stop your oven from heating up.
Some thermal sensors also have thermal fuses. The thermal fuse may blow up if the oven overheats. Though this is fairly uncommon, it does occur, and when it does, it prevents the oven from lighting.
If there’s no pilot flame, hold a lit matchstick or lighter over the flame aperture for about 10 seconds. This heats the thermocouple and opens up the gas valve.
The control panel is like the oven’s brain. It directs the functions of the gas range. An oven that fails to light could have faulty controls. The main culprit in this case usually is a failure of the power output from the controller to the ignition system.
There’s always a risk of electric shock when troubleshooting control board problems. Because of this, you always want to work with expert appliance repair professionals. An experiened pro will make sure to check for problems with the output relays at the oven’s control board, then be able to advise you on what controls are defective and which of those faulty controls need to be replaced.
First, check to ensure that you have an adequate gas supply. You can do this by examining how the cooktop burners burn. If these burners do not light or produce a weak flame, check the gas supply valve to your stove.
Defective valves may result in an oven that doesn’t heat correctly or doesn’t reach the set temperatures. Some oven valves also have a flame failure device (a safety valve) which when damaged may cause a low oven flame. Flame Failure Devices complement the action of the valve by restricting gas flow through the valve until there’s sufficient ignition flame.
If the oven has a pilot ignition system, the burner tube ignites immediately, and the fire spreads across quickly. Electric ignition systems take about 30 seconds before ignition occurs.
Modern ovens have thermostats and temperature sensors that turn the burner system on and off so as to regulate the internal temperature in the oven. When either the sensors or the thermostat malfunction, the oven may produce little or no heat.
The hardest part about repairing a gas range is figuring out the cause of the problem. Understanding how many years your household appliances have left can also help figure out the scale of the problem.Resolving issues on your own may seem like a good way to save money, but often you’ll end up spending an inordinate amount of time dealing with it. Moreover, you’ll still pay for any parts and tools you need, and if you get something wrong, that’s even more time and money.When you work with ABC’s trained technicians, you know that the job will be done right the first time.


 8613371530291