
how does a gas oven safety valve work brands

Most modern appliances have safety features built in, but your gas oven safety valve is arguably the most important. If an electrical appliance malfunctions, it can cause a fire, but a misfiring gas oven could potentially blow up your house. You don"t really need to know how the safety mechanism works to use your oven, but you may find that it gives you some extra peace of mind.
Broadly speaking, there are two ways a built-in safety mechanism can work. One option is that it remains "open" by default and to shut off if certain conditions are met. That"s how fuses and circuit breakers work in an electrical circuit: Ordinarily, the electricity is free to flow, but if the current grows too large, the fuse or breaker will blow and cut off the circulation of electricity.
The other option is for your safety mechanism to be "closed" by default and allow a device to operate only when the correct conditions are met. That"s how a gas oven safety valve works. Gas ordinarily is prevented from flowing, and if the valve is working correctly, it opens only when you want to light your oven.
Many gas stoves use what"s called a "hot surface igniter," a bar or element (similar to the ones on your stovetop) that gets hot enough to ignite the gas on contact. Gas oven safety valves on stoves with this type of ignition system take a couple of different approaches.
In one approach, a bimetallic strip operates the valve. It harnesses a simple scientific principle: Metals expand and contract at different rates when they"re heated and cooled. If you bond two suitable metals together in one strip, that strip will flex to a predictable degree as the temperature goes up and down. Wall-mount thermostats often use this principle, as do analog oven thermometers and the thermometer in the lid of your gas grill.
As appliance-repair website PartSelect explains, turning on your gas oven causes electricity to flow into the heating element of your hot surface igniter. As the igniter heats up, it warms a bimetallic strip inside your gas oven safety valve. When the igniter reaches its operating temperature, the bimetallic strip opens the valve and allows the gas to flow, igniting as it crosses the heated surface.
One intriguing thing about electricity is that a change in temperature can affect how well it passes through certain materials. For example, a lot of research revolves around superconductors – materials that offer very little resistance to an electrical current – but superconductors typically must be heavily chilled to work.
According to heating-equipment vendor Anglo Nordic, gas oven safety valves use a variation of that principle to operate. In these stoves, the flow of electrical current through the hot surface igniter becomes the control mechanism. The igniter"s bar is made of a material that offers less and less resistance to electricity as it heats. When it reaches the temperature required to ignite the gas, its resistance becomes low enough to trip the safety valve and open the flow of gas.
More modern ranges use an electrical igniter. When you turn on your oven, the gas begins flowing immediately, and it sends an electrical current to a piezo electric igniter. The current makes the igniter spark (like the manual igniter on your gas grill) and lights the oven"s burner. In this case, the safety valve works in the opposite way: An electronic sensor checks for the heat caused by ignition after a few seconds, and if it"s absent, it will close the valve and shut off the flow of gas.
It"s worth pointing out that not all gas ovens have a safety valve in the conventional sense. Older stoves simply use a pilot light, a small but constant flow of gas, which, in turn, feeds a small, candle-like flame. You essentially are the safety mechanism in this system: It"s up to you to check that the pilot is lit. When you turn on the gas manually, the small pilot flame ignites the main flame. It"s a mechanically simple system, which makes it durable, and for that reason, you"ll still see it used on commercial restaurant ranges, which must stand up to decades of heavy use.
First developed for use on early steam boilers as operating without them would cause an explosion unless carefully operated. Modern burner ovens now feature a gas safety valve to prevent an explosion when unlit. Unless ignited by an electric glow bar, pilot flame or electric spark with a gas supply, the valve will remain closed.
Safety should be you’re top priority when you’re working with gas. If you’re not careful, its extremely easy to cause a lot of damage. To prevent this modern day gas safety valves have been fitted around the world, to ensure an efficiently working system.
When your gas safety valves are on their last legs, making a repair or finding a replacement is the best thing to do. Keeping a spare in your kit is highly recommended.
The glow bar igniter and safety valve are wired in series within a glow bar system. This means that electricity can only pass through the valve after it has first passed through the glow bar. Electrical resistance from the glow bar blocks current to the gas valve, making sure that the valve closes. This decreases as the temperature increases. When the bar reaches a particular heat, enough to ignite the gas, it allows sufficient electricity through to open the gas valve.
The gas ignition source on Pilot light ignition system uses a low flame, fed by a line from the thermostat. The pilot flame will either burn constantly or be ignited electronically when the oven is switched on. More gas is fed to the pilot flame when the oven thermostat wants heat. Either excess pressure or an electric current will open the gas valve.
With some ovens the burner is directly ignited with an electric spark. An electric spark is sent to ignite the burner when the gas valve opens, this is due to the thermostat wanting heat. A sensor on the burner detects the flame and confirms ignition. The oven burner will lock out if there is no ignition after two attempts.
Pressure relief valves are usually installed in multi appliance, oil pumped ringmain systems. They are used to maintain a constant pressure on the positive side of the pump whether all appliances are in use or not.
Safety relief discharge pressurised gases and vapours to protect against overpressure. This is done by discharging pressurised gases and vapours from pipelines, this includes pressure vessels and plant components. Safety relief valves are the last line of defence and prevent explosion which could be fatal.
These spring-loaded and direct-acting. When the opening pressure is reached, valve gives way and opens, releasing the pressure. The pressures then equalised and the automatically closes.
Relief valves can either discharge into atmosphere, or via a connected blow-off line. The opening pressure of the boiler relief valve valve is preset usually at the factory according to the customer’s requirements.
Anglo Nordic have just what you need! If you have any questions for need more information, simply call us on 0208 979 0988 or email us at sales@anglo-nordic.com

Gas ovens came into usage in the mid-1800s and remain popular to this day. Early-model gas ovens had to be fired up with a match, and this functionality eventually evolved into the pilot light. In those early model ovens, sometimes user or mechanical error could cause the gas in the oven to explode. Fortunately, gas oven manufacturers have since developed electric-powered oven igniters that eliminated the need for matches and pilot lights, thereby improving safety.
Powering on a gas oven today causes the oven igniter inside to produce a spark that safely ignites the gas for the burner. Thermostats and timers built into modern gas ovens monitor the internal temperature, turning off the gas to prevent overheating, then automatically switching on the gas and reigniting to maintain correct heat levels.
Gas oven igniters today are made from silicon carbide, which enables them to deal with intensely high heat levels. As the name suggests, the gas oven igniter literally produces the heat that lights the gas so the cooking process may proceed at the desired temperature. As the user turns on the oven, electric current flows to the igniter, heating it to a very high temperature.
Once the igniter reaches the desired temperature, the oven safety valve opens the gas valve so the igniter can light gas burners inside the oven. Electric current continues to flow through the igniter even after the gas is lit. The igniter in modern gas ovens performs in series along with the oven safety valve.
A time delay relay can resolve issues with gas oven igniter controls by staggering the various gas oven functions. Using a time delay reduces the amount of energy used to power up the gas burners in the oven to ensure the different parts of the oven start at specifically defined, separate times for efficiency, longevity, safety, and proper oven function.
For instance, when switching on the gas oven power, a normally open time delay relay timer will begin a timing sequence to ensure fail-safe startup of the electrical gas oven igniter. With the time delay relay and the oven igniter hooked up in series, the relay contacts only close after the correct time has passed for the igniter to reach the correct temperature. This will trigger the solenoid on the gas valve to open the gas. If the igniter fails, however, then the safety valve remains closed, and the gas will not be released.
The normally open time delay relay can help prevent gas oven igniter problems, improving safety in oven operation. Amperite Co. time delay relays are the industry standard for today’s gas oven igniters. We provide appliance OEMs with customized time delay relays that will lead to consistent, reliable gas oven function for years.

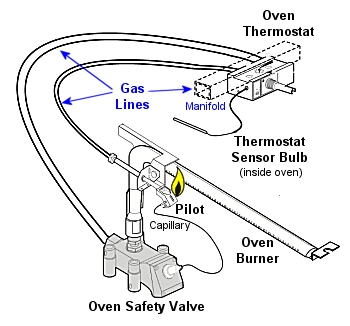
On a pilot ignition oven, there is a pilot which is an actual gas flame (although very small) in the oven. What happens in this system is that the pilot stays lit all the time and when the oven thermostat is turned on, the pilot flame extends (gets bigger) to envelope the thermocouple bulb of the oven safety valve. The thermostat controls gas flow to both the pilot and to the oven safety valve. Once the oven safety valve"s thermocouple senses appropriate heat, the safety valve opens to allow gas flow to the oven burner where the pilot flame ignites the gas.
On a pilot ignition system the pilot flame must be lit for the oven burner to receive gas. If the pilot will not stay lit, there may be a problem in the oven thermostat (which supplies gas flow to the pilot) or the gas tubing leading to it and/or the pilot itself may be plugged with cobwebs, grease, etc.
If the pilot IS lit but the oven burner is not lighting, the pilot flame will need to be inspected as the thermostat is turned on. If the pilot is not extending when the thermostat is tuned to ON, the oven thermostat may be defective. If the pilot is extending but the oven gas valve is not opening, that oven safety valve may be defective or its sensor bulb may be out of position on the pilot or just dirty causing it to not sense the proper temperature of the pilot flame. A dirty pilot can also cause a reduced size pilot flame so the oven safety valve can not sense the proper temperature to open.
This older type of electronic ignition system was popular in the mid 70"s and is for the most part no longer used but ranges/ovens employing it may still be in service. It was a fairly reliable setup.
On this style of ignition system there is a constantly burning pilot similar to the pilot ignition system described above but the pilot flame does not change in size as the control is turned on. This system uses a "flame switch" to detect that the pilot is lit instead of a safety valve like on the pilot ignition system. The thermostat on such a system is just electrical and does not alter gas flow to the oven.
The pilot flame should heat the tip of the flame switch"s sensor bulb to a red colour. If the flame switch detects sufficient heat on its sensor bulb at the pilot, it will close an electrical contact in its base. Once the thermostat is turned on, current will be allowed to flow through the flame switch to the oven valve to allow it to open. If the flame switch"s sensor is not heated sufficiently, the electrical contacts of the flame switch would remain open preventing any power from reaching the oven valve which in turn would prevent gas from flowing to the oven burner.
The pilot must be lit before electrical current will flow through the flame switch to the oven gas valve to allow gas to the oven burner. The flame switch"s contacts must be closed when its sensor is heated by the pilot. The thermostat"s contacts must close when turned on to allow current to flow to the rest of the oven system. A fault in any of those functions will prevent gas from flowing to the oven burner as a safety precaution.
This is the most popular system currently used for ovens and is comprised of a control mechanism (whether thermostat or electronic control), the oven ignitor and an oven gas valve.
What happens in this style ignition system is that the thermostat or electronic control switches power to the oven ignitor and gas valve circuit which are connected in series (one after the other). As power flows through the ignitor it heats and draws current (measured in amperage). Once the oven ignitor draws a specific amount of current the oven valve opens to allow gas to flow to the oven burner where the glowing hot ignitor (glow bar) ignites it. Power must continually flow through the ignitor and oven gas valve for gas to be released into the oven burner to create a flame. Once the set temperature is achieved the control stops all power to the ignition circuit which causes the ignitor to dim and the oven gas valve to close, stopping any burner flame. Cycling on and off continues to maintain the specific temperature the control is set for.
It should usually only take in the area of 30-90 seconds for the oven ignitor to reach the proper resistance to allow the proper amperage to reach the gas valve to open it and for the ignitor to ignite the gas at the oven burner.
Many ovens use a single oven burner in which case they only have a single gas valve and ignitor. The same burner is used for both bake and broil functions, the broil usually being in the drawer area below the oven. Higher-end models may have a separate bake and broil burner. On such a system there will be two ignitors, one for each burner. They may also employ a "dual" gas valve (see illustration above) instead of using a separate valve for each burner.
On oven models utilizing a "dual" gas valve, both the bake and broil gas and ignition systems should be considered totally independent of each other. Even each side of the dual gas valve should be evaluated as if each side was a separate "single" gas valve. Just because one side of a dual gas valve might work does NOT mean the other side of the valve should work too. Each is a separate mechanism inside a common housing.
As long at the ignitor is being powered, the control system (hydraulic thermostat or electronic control) is doing its job. The ignitor, while glowing, may not be allowing the proper amount of current to flow through it to the oven gas valve for it to open. Proper testing (see the link at the bottom of the page) requires an ammeter to check the current flow through the ignition circuit to the oven bake/broil valve.
Weak oven ignitors can glow but not achieve an adequate resistance to allow the correct current to flow to the gas valve for it to open. They can also glow but not be quite hot enough to ignite the gas immediately. See "Mini-Explosions" below for more on the latter.
If the ignitor ages and gets "weak", it is possible for it to glow and generate some warmth in the oven but the oven burner never actually come on to get the oven up to proper temperature. It is also possible for the oven burner to light and heat once but never cycle back on again afterward. The heat generated by the ignitor may keep the oven warm for a while until it is noticed that the oven isn"t heating "right" any longer.
Power must flow from the control system to the ignitor and through the oven valve. If there is any break in that circuit, the ignitor will not glow and thus the gas valve not open. The ignitor not glowing could be caused by the ignitor or the gas valve being open (infinite resistance - no continuity). If both have continuity (ie. at least some resistance) and the ignitor is still not glowing, a problem in the control system or the rest of the electrical circuit would need to be investigated.
An ignitor and oven valve having continuity does not necessarily that they are good, just that they"re not electrically open, which is only one way that they might fail. If either has NO continuity at all (ie. infinite resistance) they are likely defective and need to be replaced.
In the latter case, the oven should be removed from use until the condition can be looked into and corrected. DO NOT continue to use a gas appliance in such a condition!
It can sometimes happen that the ignitor is just on the verge of allowing the correct amperage to the oven valve, but not quite. In such a case the oven valve can repeatedly cycle open and close quickly, creating a "pulsating" or sputtering burner flame. Testing for proper amperage draw of the ignition circuit is needed to determine if a "weak" oven ignitor may be responsible instead of an internal problem with the oven valve itself.
*There is NO voltage or resistance test that will help to diagnose the cause of the problem at this point. Only an amperage test is relevant. An ignitor with a white or beige colored rectangular base should draw 3.2 to 3.6 amps or it is defective. A round base or powder-blue colored rectangular base ignitor should draw 2.5 to 3.0 amps.
Instead, when the oven thermostat is turned on, gas flows to the oven safety valve and also to the oven"s pilot, which gets lit via a spark. Once the pilot is lit and the safety valve"s sensor bulb senses that pilot flame, that valve will then open up to allow gas to flow to the oven burner where the pilot flame ignites the burner.
Whirlpool has introduced a new variation on the spark ignition system. In this system there is no "pilot", instead the spark directly ignites the gas burner (hence the name) and an additional electronic control monitors its performance.
When the range control calls for either bake or broil, the DSI module electronically checks both gas valves" solenoids for continuity. If the checks fail, the module will turn the oven off or lock it out. If the checks are successful, the module will power the appropriate gas valve so it can open and also initiate sparking at the burner ignitor. Both the bake and broil ignitors will spark simultaneously.
If no flame is present at the burner, the DSI module will allow the ignitor to spark for 4 seconds. A 30 second pause will then occur, after which time it will attempt to light the burner again. If gas still fails to ignite, the microcomputer will then lock the system out.
Once gas has ignited, the flame sensing circuitry will monitor the flame at the burner as long as it is powered to make sure that it is present. If at any point no flame is detected, the DSI module will lock out the system.
On such a system the oven will not light for 30 seconds after power is restored to the appliance. Also, if no ground is found in the power connection to the range (or just at the DSI control), the oven will light once but them turn off and be "locked out".
Whirlpool"s DSI system will likely only be found on Whirlpool"s brands of appliances such as Whirlpool, KitchenAid, Roper and Inglis as well as some Whirlpool built Kenmore ranges and ovens.

Safety valves. It took me a little while to figure out how they worked, what their true purpose was. But let’s start with the outside of the stove. There’s a “CP” logo. That stands for “Certified Product” and is a trademark by the American Stove Makers Association that ensures that your stove meets certain high standards, like the stove’s oven/broiler safety systems. A highly respected and knowledgeable vintage stove sage I know (Steve S.) said about 20 criteria must be met to earn the designation.My OKM vintage gas stove has safety valves and connected thermocouples for a safer operation of the oven and broiler.
The Robertshaw TS Series thermomagnetic safety valve is a control used to cut off the flow of gas to the burner in the event of a pilot outage. The magnet assembly is energized by voltage generated by a thermocouple that is heated by the pilot flame. When this flame is extinguished, the thermocouple voltage decreases until a spring overcomes the magnetic force and loses off both the pilot and main gas (the older valves just shut off the main burner gas). This control can be used for commercial and residential ovens, infrared heaters, chicken and pig brooders, recreational vehicle gas appliances and many more applications requiring automatic safety valves!
What it means is if, for any reason, the gas flow to the stove stops while the oven or broiler burners were on, in addition to the burners going out the pilot flame would go out. That would cool down the thermocouple probe which sits in the pilot flame. When the thermocouple is not hot enough, it signals the safety valve to close, which blocks gas from flowing to the burners.
WHY?Prior to safety systems existing, when these stoves were being produced, gas distribution was not always reliable. Sometimes, the gas supply would die out, shutting off the flames. Then after a little while, the gas would come back on.
Unlike the cooktop burners, the oven burner is hidden. If say, a bread baker were only using the oven at that time the gas supply stopped then started again, she or he might not have realized what happened. It was possible the baker might open the oven to check, realize the flame had gone out and try to relight the manually lit oven with a match.
With a safety system, when the gas flow was re-established to the entire stove, the safety valve would have prevented the raw gas from filling up the oven or broiler chambers because the valve closed when the pilot light went out.
These days, gas distribution is pretty reliable. Most often safety valves can seem to be a problem for three reasons: a) after the gas has been shut off from the stove (so the stove can be safely repaired or relocated), b) when the thermocouple bimetal’s charge dwindles and dies, c) when the safety valve loses its magnetic charge and cannot stay open.
When my gas stove was moved into my kitchen, I needed to perform a manual reset of the two safety valves so I could test the oven and broiler. When the stove was disconnected from the previous owner’s gas line, that killed the pilot flames which cooled the thermocouples which closed the safety valves.
Each time I worked on my stove’s major systems, I’d shut off the gas to the stove. To restart the oven and broiler burners, I’d have to manually reset the safety valves if I wanted the oven and broiler to auto light again.
Made sure the pilot flame is on and the thermocouple probe is in that flame. The heat causes the thermocouple to charge and send a signal to the safety valve. The signal cannot open the safety valve, but it can only keep it open. If the pilot is not lit, I’d light it and wait about a minute for it to warm up enough to signal the safety valve.
Pushed in and held the red button on the safety valve. Pushing the button manually opens the safety valve, allowing the gas to flow to the oven/broiler burner. Once the gas flow reached the burner, the pilot flame would ignite the oven burner. Small happy dance.
Released the button on the safety valve. When everything worked properly, the safety valve would stay open, because the thermocouple sent a signal for it to stay open. Big happy dance. If the oven burner shut off after that process, I assumed the thermocouple signal was too weak to keep the safety valve open. Time for a new thermocouple. Pout! Or the safety was on the fritz. Major $$$ pout!
If you have a multimeter with a DC volt scale, you can use that to test your thermocouple’s charge. But don’t ask me how. I’ve no meter nor knowledge on such things.
There are many different safety valve model for major gas appliances like stoves, water heaters and furnaces, but they all have the same purpose – to prevent raw or uncombusted gas from leaking. Their designs and features have evolved over the years. If you’re trying to find a replacement safety valve for your stove, you don’t have to necessarily get original unit.
But you do need to make sure the replacement valve meets all the critical requirements. For example, the gas line openings need to be the match the diameter of the gas lines in your stove, it needs to have correct port for the thermocouple, it needs to fit the opening of the previous unit, etc. There are workarounds for most of that, but it involves plumbing adapters, additional gas lines and/or plumbers.
When my old gas furnace safety died, troubleshooting pointed to the safety valve as the trouble. I disconnected it and took it to a local appliance parts shop. Thankfully, the owner recognized my old no-longer-available furnace safety valve and knew which updated model would work.
The Robertshaw® 1720 Series Thermomagnetic Safety Valve is a control used to cut off the flow of gas to the burner in the event of a pilot outage. The magnet assembly is energized by voltage generated by a thermocouple that is heated by the pilot flame. When this flame is extinguished, the thermocouple voltage decreases until a spring overcomes the magnetic force and closes off both the pilot and main gas. This control can be used for commercial and residential ovens, infrared heaters, chicken and pig brooders, recreational vehicle gas appliances and many more applications requiring automatic safety valves.

Trouble turning on your gas stove? If your igniter is glowing but there is no flame, then one of two components in your range are at fault. These components are the “safety valve” and the igniter itself.
Take a clamp-on type ammeter, and attach it to the circuit to determine whether the igniter is working efficiently enough to open the safety valve. Clamp your meter onto the wire that either goes to the bake burner igniter or the bake burner safety valve. Turn on the bake function, and see what current is drawn. Typically your meter will show 2.8 – 3.0 amps for a normal current draw for a working igniter. If your meter is showing 2.7 or lower then you can assume that the igniter is not drawing enough current to actually ignite the flame, and therefore it won’t open the oven safety valve to allow the gas to enter the burner chamber. If this happens, it’s time to replace the oven burner igniter.
For a “hot surface” or “glow bar igniter” you can test their power continuity using a multimeter. Simply insert both leads onto the terminals for the igniter and measure the resistance. If it shows resistance, it has continuity. No resistance? No continuity. Typically these will be somewhere between 80 and 175 ohms of resistance for a working igniter.
To test the oven safety valve, measure between the two terminals, on the valve and look for continuity. The resistance here is low, but you should be able to detect 1 to 1.5 ohms. If your model uses a dual valve, one for the broil burner and one for the bake burner, then you will have two bi-metals and again you can test them for continuity using a multimeter. They also should be very low resistance and those would indicate that they"re normal working oven safety valves.
If after performing these tests, you"ve determined that you need to replace your gas range"s oven safety valves, oven igniter, burn igniter, or safety valves? Take a look at our large selection of oven parts.

Sorry, we couldn"t find any existing answers that matched.Try using some different or simpler keywords, or submit your new question by using the "Ask a Question" button above!
Thank you for your inquiry. The oven safety valve is one part that may fix the issue, but there are some other parts that you will need to check to see which one is causing the issue. You will need to check the igniter, the electronic control board and the temperature sensor. I hope this helps. Thank you and have a great day!
Can this oven valve work on my range? The range was plugged into the wrong outlet and it shorted out, the igniter glows when the stove is turned on however the burner isn"t lighting. I was told the the valve needs to be replaced.
Thank you for your question. This is not the correct safety valve for your appliance. I have listed the correct valve below for you. I hope that helps. Good luck with your repair.
Thank you for your question. Yes, this part will work for propane. Please consult your owner"s manual for further information. I hope this helps. Thank you and have a great day!
Oven doesn"t heat. Igniter glows when gas is turned on, voltage on value starts near zero and slowly ramps up to just under 3 volts, but gas never ignites. The slow ramp seems normal to allow igniter to get hot, but not sure what the valve"s voltage should be to have it open. Valve coil is not open per ohm meter. Sounds like a bad valve? Thanks.
Hello Curt, Thank you for your inquiry. It sounds like it could be either this part or the pressure regulator. When the ignitor heats up to a certain temperature, it is supposed to trigger the valve to open and let the gas in to ignite and the regulator cuts it off at a certain pressure. Hope this helps!
Hello Sal, thank you for your question. You can test the gas valve to see if it has gone bad. You will need to test this with a multimeter. Here is a video that will show you how to test that valve.
Hello Steve, thank you for your question. The oven safety valve part number WB19K31 will work with either NAT or LP gas. The part itself can be switched over without any additional parts. Please check your owners manual on steps to change that over. I hope this helps!
In the oven a wire from the igniter shorted (had to pry the wire off the wall) to the frame. Would the control valve or the thermostat also be damaged. Where is the thermostat located on the stove. I noticed that the plastic on one of the knife connection on the control valve was missing
Hello Robert, thank you for writing. It is doubtful that the Oven Safety Valve or Oven Thermostat were also damaged when this occurred. The Oven Thermostat (part PS235170 on your model) is located behind the Manifold Panel (control panel). We hope this helps.
Hi there, i have a GE gas range (model jgbp28sem1ss) and need to replace the safety valve for the part of the oven that bakes. Is this the correct part? Thanks
Hello Morgan, Thank you for contacting us. I have researched the model you have provided and have found the part you are looking for is PartSelect Number: PS2370035. Hope this helps!

The kitchen is the heart of the home. It’s where families share dinner, gather together and pass down recipes. One of the worst things that can happen when preparing to cook an amazing meal for your family is to find out that your gas oven won’t light. Do you call a repairman or resort to the microwave?
A handy homeowner can troubleshoot the problem when a gas oven doesn’t light. A handful of common problems can plague gas ovens. Many are as simple as a loose connection, while others involve replacing important components. However, those simple repairs are less likely to cost you an arm and a leg. Before worrying about replacing your oven, see if one of these common issues is the cause of your oven problems.
You can check a handful of issues if your gas oven doesn’t light. From a simple power issue to a faulty gas igniter, here are a few common reasons your gas oven won’t work.
If your oven won’t heat and your gas burners won’t light, the problem might be as simple as a tripped circuit breaker. Even though you have a gas oven, it still needs electricity to run. Electricity powers the control board, igniter and temperature sensor, among other parts.
The oven should connect to a standard 15- or 20-amp switch inside your circuit breaker box. These are the single switches. Your oven may also have its own dedicated breaker switch. If not, you can check the power by testing the secondary outlet. The problem lies elsewhere if the outlet works but your gas oven does not.
While a rare occurrence, your gas oven may not heat because your gas supply is off — usually a result of maintenance repairs or replacements in the system. For example, if your oven or other gas-reliant appliance was recently repaired, the gas line is likely still turned off.
Like a thermostat, the temperature sensor regulates the oven temperature of your gas oven. It connects to the igniter switch. If the temperature sensor breaks, the oven will not light for safety reasons.
Troubleshooting and replacing this sensor is a fairly easy fix for a homeowner who is comfortable working on a gas oven. Unplug the oven from the wall.
Set the multimeter to the RX1 setting and touch the sensor terminals with the tool to ensure the sensor resistance reading is within the correct parameters.
The igniter controls the oven safety valve, also known as the gas valve. This oven component ensures only gas enters the oven when the igniter is hot enough to ignite it. This component stops working if there is not enough power to either the valve or the igniter. A handy homeowner can use a multimeter tool to test that the valve is working. Unplug your oven.
Use a multimeter tool on the RX1 setting and test the valve. Some brands use valves with terminals for both the broiler and the baking elements. Test both sets of terminals.
The igniter is the key component of a gas oven. If you have a faulty igniter, many of the other components will not work and the oven will not turn on. Oven igniters glow hot to ignite the natural gas released by the oven safety valve. However, if the heating element is not working, the gas valve will not trigger and the oven will not ignite.
To check the gas igniter: Turn off the circuit to the oven and confirm the power is off by checking that the oven light, clock and control board are all off.
If nothing looks wrong with the part, plug the oven back in and watch to see if the igniter glows after turning on the oven. If it does not glow orange, replace it.
Replacing a faulty gas oven igniter is a moderately easy DIY appliance repair. Estimated costs are between $40 and $80, depending on the cost of a replacement igniter. If you have a newer oven, check any manufacturer warranties before making any repairs.
While a homeowner can do this project, ensure you take every safety precaution before attempting. Turn off the oven’s gas supply and disconnect the appliance from the outlet. Remember to take precautions if you smell gas (even after you have turned off the supply to the oven). Turn off the main gas supply to your home, open windows for ventilation, and call an appliance technician for assistance.
To ensure you have the correct replacement igniter, have your oven model number and serial number. A Kenmore oven might not use the same part as a Whirlpool oven. These numbers are often found inside the oven door or drawer, depending on the brand of oven.
Turn off all power to your oven. Ensure the power is off by checking that the light, control board and clock are off. Then remove the oven racks. Next, unscrew the base plate and remove it from the oven. You will find the igniter underneath.
Take a reference photo before removing the old gas igniter. Install the new igniter in the same way. Be very careful with the new igniter because it is very fragile. Unplug the two wires or the wire harness from the igniter.
While your gas stove and gas oven are part of the same appliance, they do not use the same parts and components. This is why your gas burners can work while your gas oven won’t light. Your gas range has its own set of igniters, gas valves and safety features. If everything is in working order, your range can work independently of your gas oven.
Appliance repairs are always a big inconvenience and can sometimes cost an arm and a leg. Don’t get stuck without your most important appliances. Check out the Cinch Home Services warranty plan that cover appliances, including both gas and electric ovens. With three different options to choose from, you can find the right plan for your home.
Cinch serves nearly 1 million customers and includes a 180-day workmanship guarantee on covered repairs. Get a quote on a Cinch home protection plan today.

This website is using a security service to protect itself from online attacks. The action you just performed triggered the security solution. There are several actions that could trigger this block including submitting a certain word or phrase, a SQL command or malformed data.

This website is using a security service to protect itself from online attacks. The action you just performed triggered the security solution. There are several actions that could trigger this block including submitting a certain word or phrase, a SQL command or malformed data.

Gas appliances are widely spread as electric ones but need specific knowledge and requirements. They are supposed to be dangerous and need constant maintenance and repair. The main piece of advice when you face a problem with any gas appliance is don’t try to repair it by yourself.
When you’ve set your gas oven to preheat at 350 degrees Fahrenheit, then you place the cake on the oven counter. But after that, you turn the oven light on to see if the cake is rising. And, to your regret, it is not. Opening the oven door, you realize the temperature in the oven has not been increased above the temperature in the kitchen. Why won’t the oven heat up? To understand that, you should probably understand how a gas oven works.
Upon the experience of our gas technicians, most of the time this issue is caused by either a problem with a power, gas, gas igniter, burners, or in rare cases temperature control thermostat.
Fix Appliances CA is one of the best home and commercial appliance repairs, and it specializes in gas appliances repair, maintenance and installation. Having almost two decades of experience in the gas repair market, we implement our knowledge and skills to offer highly qualified services done in time.
All our technicians have Technical and Safety Authority certificates to provide the services mentioned above and you are sure to get a professional job at reliable prices. Keep in mind that Fix Appliances CA is the company that provides their gas appliance repair service near you. Not only in big cities such as Ottawa or Toronto but in small cities or towns, such as Etobicoke, Forest Hill, North York, Parkdale, Scarborough, and other GTA areas.
Before we pay attention to the reasons why the gas oven is not working but the stove is, let’s discover how it works. When selecting the bake or broil function on a gas oven, the control sends 120 volts of alternating current to the bake or broil igniter or spark electrode. The igniter is wired to a safety valve, and as the component gets hot, it draws an increased current, or amps, through the valve. A bimetal arm inside the valve reacts to the heat generated by the amps which causes the arm to flex and open, releasing gas into the oven’s bake or broil burner tube.
The igniter or spark electrode then ignites the gas into a flame to heat the oven. An igniter will remain on to keep the safety valve open until the oven reaches the designated temperature. A thermostat sensing bulb, or an oven sensor, monitors the temperature and when the selected temperature is reached, the control will shut off the voltage to the igniter.
Keep in mind, that the temperature designated by the control is only an average one. The actual temperature will fluctuate throughout the cycle. Convection ovens will reduce this fluctuation by using a motorized fan, with or without its own heating element, to circulate the heated air evenly throughout the oven cavity.
In this part, our experts tried to give you simple step-by-step instructions, and we are sure that they will help you to find the cause of the problem and fix it so that you can get back to using your oven again. However, if at any time you feel like you are in over your head, turn the job over to a qualified third party. Why take the risk of burns or worse? You will need a few tools and replacement parts to take on the fix yourself. Either way, you’ll want to act fast because this problem will not get better and it will cause a significant disruption in your daily life until you handle it.
The first step is to ensure your oven is getting power to it. Even though your oven is gas-powered, it still requires electricity for the timer and other components to be able to operate. If the circuit breaker is ok, check that the power socket is working: you can try the oven in a separate power socket to check this out. If the power outlet or socket is faulty, it must be replaced by a qualified electrician only.
Sometimes the gas supply can get impeded and not get through to your oven. Check that the main gas valve is turned on. If not, turn it back on. Check all of the other gas supply valves, such as those on the branch lines. If everything is working, move to another step.
This is the most common cause of an oven not working even while the stove does. Sometimes the igniter can simply wear out over time, or it can break for other reasons. If the igniter coil and the element for any signs of damage or discoloration, which are good signs that they may need to be replaced. If the igniter does work, the problem might be caused by another faulty component.
If the gas igniter is working, the problem might be that the gas elements or burners are blocked. The easiest way to check them is to take them out and check that they aren’t blocked in any way. If they are, give them a clean and then put them back into the oven and see if this solves the problem. If not, move on to the next issue.
The temperature control thermostat and thermocouple is the next components to check if you still haven’t found the cause of the problem. This component aims to monitor the temperature inside the oven and then cycle on the heat when the oven temperature gets too low. If the temperature control thermostat becomes defective, it can stop your oven from turning on. This doesn’t happen often, but if the igniter is working, your best option might be to simply replace the temperature control thermostat and see if that solves the problem.
Any gas appliance is dangerous and can cause explosions if mishandled. Of course, we recommend not to repair it by yourself, it is necessary to contact the pros and schedule a visit to check and repair your gas oven.
Fix Appliances CA services all residential and light commercial gas appliances, not only the kitchen but laundries, such as ranges, ovens, cooktops and dryers. Experts of our company are prepared and experienced in working with electric ovens and gas ones as well. Their work includes the installation, maintenance and repair of major brands. Moreover, Fix Appliances CA is an authorized company for most gas appliance makers.
Red Tag from Enbridge or Uniongas. A red tag on a gas range or a gas dryer typically means that the equipment is not safe to operate and a technician has to put a red tag on it, which means the gas will be shut off until the problem is fixed. No worries, our team has you covered.
No matter what the problem with your gas and propane appliance is, even when we talk about gas ovens, we solve any troubleshoot issues with them on a same-day basis. You are welcome to give us a call at 888-242-0777 or submit a request online. Our highly trained and qualified gas experts will do their best.
1. The FMDA safety valve is the only type with the thermocouple permanently attached to it. This means the thermocouple cannot be replaced; the entire safety valve must be replaced if the thermocouple fails. The easiest way to identify an FMDA type safety is a ½” diameter red button on the bottom of the valve. You must know the gas pipe size and if the pilot tube is an “in and out” or an “out only.” An “in and out” safety valve has two threaded holes at the top of the part, one for gas for the pilot to come in and one for gas to go out. An “out only” safety valve has just one threaded hole to connect gas for the pilot to.
2. The BASO safety valve can vary in design depending on the piece of equipment it is on, so it is important to know the brand name, model and serial number of the piece of equipment to get the correct safety valve the first time. The easiest way to identify a BASO valve is by the 15/16” diameter red pilot button. The thermocouple is separate from the safety.
3. The TS type safety valve is the only one that can be rebuilt. It is similar to the FMDA and BASO types in that it has “in and out” or “out only” pilot tubing, so you must know what is in your equipment. A rebuilt kit is available in both and it is not necessary to replace the body unless it is damaged. The body has no moving parts in it. The easiest way to identify the TS safety is by the 5/8” diameter red button. The thermocouple is also separate from this safety, similar to the BASO.
If the wire leads are screwed to the top terminal block, and two tubes are coming out of the top of the valve, it is the tubing type combination safety valve.

If your gas range is not working correctly, you should check the gas pressure regulator shut-off valve. The factory default setting for the gas pressure regulator is in the "ON" position but may have been turned to the "OFF" position during handling or transportation. When the shut-off valve is on the "OFF" position, gas will flow to the cooktop burners but will not provide a gas supply to the oven.
You can check if the shut-off valve if you can slide the range out from the cabinet. If you are unable to slide the range out, we recommend consultation with a local certified technician.
Verify the pressure regulator shut-off valve is in the open position. The pressure regulator is located at the back of the range. Make sure that the shut-off valve lever is in the "On" position (see illustration below).
NOTE: If the range is hard piped, you will not be able to slide it out from the cabinet if it connected with a flexible supply line, take care not to over-extend the supply line. The main gas valve will usually be at the end of a fixed pipe and connect to the pressure regulator with a flexible supply line. Take care not to kink or pinch this flexible pipe.
:max_bytes(150000):strip_icc()/shutting-off-gas-to-the-stove-2718660-hero-033bbdf1503f455e8dcca0f2c668a154.jpg)
Robertshaw® has been creating and implementing innovative solutions throughout its history. Robertshaw continues to develop ground-breaking solutions that make products more effective, more efficient, and more attainable.


 8613371530291