
how to fix prestige cooker safety valve free sample

Pressure cookers have become commonplace in modern households, and their improved safety features have made them twice as popular. In the past, pressure cookers earned a dark reputation for explosions, but today, most pressure cookers have a minimum of 10 or more safety features.
That said, when the pressure cooker safety pressure valve starts leaking, you should know the cause because pressure cookers must release steam to stay safe.
You find many pressure cooker safety valves on top of the lid near the handle, but this depends on the type. If you see a leak from here while pressure cooking, that doesn’t always mean danger.
The safety valve releases the steam to lower the pressure to safer levels and regulate the pressure. The newer models, like the electric pressure cooker, even release the steam using a computer chip. A pressure cooker model like this will release light vapors or condensation from the safety valve, which doesn’t pose a danger.
Important to note: The safety valve leaking doesn’t pose a danger as long as the pressure cooker continues to build to the desired PSI. Once you reach your desired PSI, the safety valve should stop leaking altogether. If it continues to leak, that indicates pressure control failure.
Pressure cookers will open the safety valves enough to release the pressure cooker steam building in the pot. This causes a hissing sound or rattling sound. Don’t feel intimidated that is normal. If you wanted a quieter pressure cooker, electric pressure cookers don’t make as much noise.
You must maintain consistent pressure to ensure that the pressure cooker will cook the food all the way through. Safety valves can be bought and replaced if you have a broken one. However, buy a quality safety valve from any of the reputable brands to ensure the quality.
Manufacturers made safety valves to protect consumers from exploding pressure cookers. If you have a defective safety valve that doesn’t leak, you could use it. You could use it, but you wouldn’t be wise to do it. Don’t do this.
Safety valves let out the dangerous excessive steam. When they leak, they let out steam unnecessarily, and the pressure cooker won’t cook the food. On the other hand, when defective and closed, you have a higher risk of it exploding. Never use a pressure cooker that has either a leaking valve or a defective valve.
You don’t want to see steam exiting the safety valve because the leaking from high pressure can put you in a dangerous situation. The escaping steam can cause second and third-degree burns if exposed to the skin. If you notice a leak, immediately turn off your pressure cooker from the heat source and release the steam. Even smaller leaks pose a danger.
Steam exits from the safety valve of your pressure cooker because of a broken disc, or rubber gasket, on the inside. Because of this, it releases too much steam and the vessel never boils. If you have damage to the valve, you will see a hole in the valve.
Warning: Working on the safety valve yourself does pose a small level of danger. Do this at your own risk. If you don’t want the risk, then take it to an authorized service center. A utensil repair professional can also repair this, but it depends on how much damage was done to the pressure cooker.
Buying a low-quality pressure cooker could be the cause of why these products don’t last long. They have a proneness to issues. You should also clean and maintain your pressure cooker after each use because it can begin to leak if not cleaned properly.
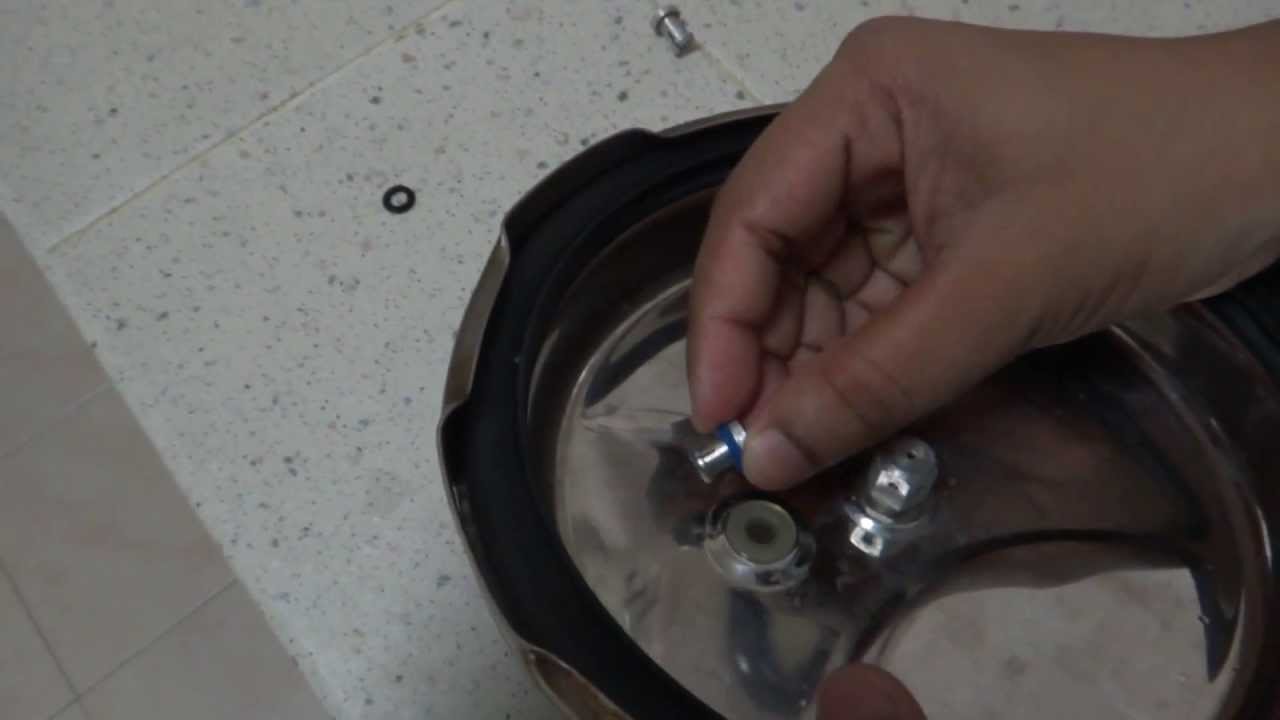
As we said, you can use two methods to replace the safety valve if you have a leak: You can replace it from the inside of the lid, or you can replace it from the outside of the lid. Before attempting either consult your user manual.
To replace the safety valve from the outside, you will use a screwdriver on the outside to turn the screw, while you hold the screw and keep it from twisting on the inside. Once it releases, use a cotton swab to clean the inside of the hole.
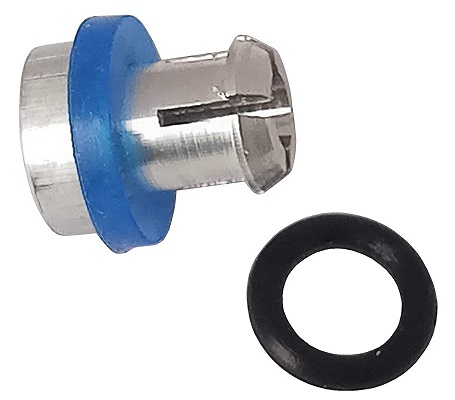
Check for surface damage as well to make sure that you don’t have structural problems. Examine the o-ring as well to make sure that it doesn’t have defects. Replace the safety valve with the new one and tighten it up.
From the inside, you will use a wrench to unscrew the safety, while the screwdriver will hold the screw in place. Once you have released it, do the same thing as you did with the first method. Replace the safety valve and tighten it back up.
While you can replace them via the DIY method, don’t try to fix a broken safety valve. The replacement parts only cost between $2 to $17 to replace a safety valve. Buy from a genuine brand because it guarantees that you fix the problem.
Considering the cheap cost, you may want to buy a spare because you can replace it at a moment’s notice. When the pressure reaches a dangerous level, the safety valve acts as the canary in the coal mine. This blows out before it explodes. The safety valve attempts to bring the pressure back down to a normal level.
Never use a damaged valve because it doesn’t provide the same level of protection. You may experience similar problems as before like the valve leaking, or the valve shutting down altogether. Both scenarios put you in a dangerous situation.
The safety valve leaking poses a danger at the first sign of damage. With that in mind, a leak only gives you one example of what can happen to them. You should replace the safety valve whenever it becomes cracked or brittle. As soon as you see the damage, replace it.
Inspect the safety valve for signs of wear before each use. Another reason that manufacturers say to only fill the pressure cooker two-thirds full is that it ensures that the food doesn’t block the safety valve. The pressure cooker will build a dangerous level of pressure if that happens.
Let’s say that the food blocked the pressure release valve. The safety valve may melt to release the steam. That becomes the last stop before the pressure cooker explodes. The valve helps to maintain the pressure levels. While you have other safety features, this component especially protects you.
Thorough cleaning after using your pressure cooker will go a long way to helping it stay in tip-top condition. Handwash the pressure cooker lid with soap and warm water. Never put a pressure cooker in the dishwasher because this can be hard on the more sensitive components like the gaskets and rubber ring or seal.
A leaking safety valve doesn’t always mean danger, but look for the cause if it continues after you reach the desired PSI. Some steam leaking is normal, but you shouldn’t see an excessive amount of it leaking. That indicates that your pressure cooker has too much pressure.
Never try to repair a damaged safety valve. You can simply replace them, but if you don’t feel comfortable doing it yourself, hire a professional. Always pay attention to leaks because they can stop your pressure cooker from building pressure.
Such a valve assembly is known from German laying-open print DOS No. 2,606,676. The pressure relief means thereof consists of a check valve which also serves as a safety valve. It has a valve housing of a resilient material which is fitted into a hole in the cover in the vicinity of the cooking valve aperture. The closure body is designed as a shaft-shaped valve body, transverses the valve opening and supports two spaced valve disks inside the cover as well as a dome-shaped head outside the cover. The head abuts against the valve opening in the pressureless state. As the pressure builds up in the pressure-cooker, however, the valve body is lifted and the upper valve disk closes off the valve opening internally so that the pressure in the cooker can build up. When the pressure becomes excessive, the upper valve disk can move outwardly through the valve opening of the valve housing. This allows steam to escape through the valve opening. The second valve disk preventing the valve body from being blown off the cooker although it does not obstruct the escape of steam. The cooking valve usually comprises a spring-loaded valve and a displaceable pressure indicator for the cooker which is located therein and is also spring-loaded. The springs press against the interior of a cap which is adapted to be screwed on to the valve housing. In the known valve assembly, the cap of the cooking valve has an asymmetrical design on the underside facing towards the cooker cover. It features a guide bevel at this location which reduces its clearance height. In the normal cooking position, the area with the maximum inner clearance height overlaps or overlies the check valve. When the cap is screwed off, the area with a minimum clearance height comes to lie above the check valve over which it can move without obstruction when the head of the check valve abuts against the outer side of the valve seat in the completely pressureless state. If the check valve has closed due to the internal build-up of pressure in the cooker, ie if the upper valve disk abuts against the valve seat, the guide bevel presses the valve body of the check valve downwardly and steam can escape through the check valve. The pressure in the cooker is relieved, whilst the person using the cooker is warned simultaneously by the sound of the escaping steam not to unscrew the cap any farther. If the valve body has been raised only slightly owing to a slight superpressure in the cooker, eg at the onset of pressure build-up, an additional stop which projects into the clearance height prevents the cap from being rotated any farther.
The known valve assembly is expensive to manufacture, since it requires a valve housing and a valve body for the pressure relief means. These parts are expensive to manufacture and to assemble. The cap of the cooking valve is also expensive to produce owing to its asymmetrical shape, and the dimensions of the guide bevel as well as the region of reduced clearance height must be kept within a narrow tolerance range: the valve body must be pressed downwardly to open the valve on the one hand, although on the othe hand this must not be so far that the valve head closes the opening externally. Another drawback is that when the cap is rotated into the open position, the stop jams the head of the valve body and this cannot return to its original position, even when the cooker is not under pressure, until the cap has been turned back somewhat. When the check valve functions as a safety valve, the valve disk cannot automatically turn back any longer due to the valve opening. The cap cannot be screwed off over the projecting valve body either. This makes it impossible to gain access to the valve body and return it to the normal position. Yet another disadvantage is that the valve body of the check valve can only be cleaned thoroughly--quite essential for proper sealing--if it has been snapped out of the valve disk. Since this is complicated and troublesome, such cleaning is frequently postponed or forgotten completely.
A valve assembly comprising a pressure relief means disposed adjacent to the cooking valve is also known from German utility model No. 7,624,730. The pressure relief means is designed as a safety valve in the form of a check valve. The cap of the cooking valve has indents on the periphery thereof. Both valves are spatially associated with one another such that the valve body can be raised adjacent to such an indent only when the cap is in certain positions. The check valve can be closed and pressure built up in the cooker only in this position. When the valve body is in the raised position, ie when pressure has built up in the cooker, the valve body in turn locks the cap of the cooking valve which cannot be rotated. Hence, the vent opening cannot be opened by adjusting the cap. This known valve assembly, which therefore does not correspond to the preamble of the present invention, is expensive to manufacture due to the design of the check valve. It is also difficult to clean, since the steam is dissipated to one side through a cavity in the cooking valve beneath the cap when the safety valve responds to excessive pressure. These cavities are difficult to reach, even after the cap has been removed. Furthermore, the valve body cannot be turned back into its original position until after the safety valve has responded and the excess pressure has been vented off. Only then can the cap be removed from the cooking valve.
The object of the present invention is to provide a valve assembly according to the preamble of the claim which is economical to manufacture, easy to clean and simple to operate in all modes of operation.
The construction of the closure body as a seal disposed on the cap makes it possible to design the vent opening in the form of a simple hole in the cover without any valve housing. Such a hole can be produced during one and the same operation as the hole for the cooking valve. It is easy to clean. The arrangement of the associated seal in the cap gives rise to a constructional design which is simple and easy to clean. This construction of the pressure relief means is made possible by the recognition that the vent opening need only be open to relieve the pressure. An open valve is unnecessary prior to a pressure build-up, since the air being heated up can escape by way of the conventional sealing rings between the pressure-cooker and the cover until the sealing ring abuts sealingly against the cover and cooker wall due to the build-up of pressure. In the pressure relief means in accordance with the invention, the co-operation of the seal and the vent opening permits steam to escape even when the cap is moved minimally towards the venting position. The pressure in the cooker decreases immediately. Moreover, the co-action of the venting opening and the seal generates a warning sound which warns the cook not to opening the cooking valve while the cooker is still under pressure. If there is no seal in the cap, no pressure will build up in the cooker at all.
The seal can advantageously consist of a material which is so resilient that it sealingly closes the vent opening at normal cooking pressure and permits pressure to be vented should it become eccessive. The pressure relief means thus functions as a safety valve as well.
In a preferred embodiment, the seal is designed in an annular shape. It is impossible to insert a ring improperly. The opening is always covered irrespectively of the angular position of the cap in the cooking position.
The annular seal advantageously has an internal diameter which is smaller than the external diameter of the cap section it surrounds. The annular seal is thus seated in the cap region in such a way that it can be neither twisted nor lost. Dirt cannot readily collect between the cap and the annular seal so that the seal does not have to be removed every time the cooker is cleaned.
FIG. 1 indicates the cover 1 of a pressure-cooker. A valve housing 2 is firmly riveted into place in the cover 1. It includes a valve seat 2a against which a valve body 3 is urged by a valve spring 4. This valve spring 4 presses against the inner side of a cap 5 overlying the entire valve assembly and designed as a cap or acorn nut. A pressure indicator 6 is displaceably mounted in the valve body 3. It is pre-biased by a pressure indicator spring 7 which presses against the valve body on the one hand and, on the other hand, against the inside of the cap 5. The cap 5 is adapted to be screwed on to the valve housing by means of a thread 8, thereby determining the tension of the valve and pressure indicator springs.
The cylindrical inner part 5b of the cap 5 forming the nut is surrounded by an annular seal 9 of a resilient material. The annular seal has an internal diameter which pre-biases it on the nut. The brim 5a of the cap extends externally to the annular seal.
The cover 1 has a hole 10 in spaced relation from the valve axis and is located between the internal and external diameters of the annular seal. It serves as a vent opening and is closed by the annular seal 9 during cooking.
FIG. 2 shows the cap 5 from the top. It features a inscribed ring 11 which indicates the setting of the cap relative to an arrow 12 on the cover (not shown).
The afore-described valve assembly functions as follows during cooking: the cap 5 is screwed down to the stop with the inscription "cooking" adjacent to the arrow 12. The valve spring as well as the pressure indicator spring are both pre-biased in this position. The annular seal 9 closes the hole 10. Steam pressure can now build up in the cooker in the known manner once the warm air has escaped between the cooker and the cover as mentioned above. The cooking pressure is chosen by regulating the supply of heat in response to the position of the pressure indicator 6. At the conclusion of cooking, the cap 5 is turned half a turn to the "venting" position. This causes the annular seal to release the hole 10, the steam can escape and the pressure is relieved. The venting is continuous and dependent on the speed of rotation.
If the pressure indicator is not observed during cooking, i.e. if the supply of heat is not turned down at the proper time, thus causing the pressure in the cooker to become excessive, the steam can escape through the hole 10. This gives off a warning whistle and deforms the annular seal 9. Should the generated steam still be excessively high, the valve body 3 is lifted off its seat 2a.

Pressure cookers are quite common in kitchens these days because they save time and effort while in cooking. They used to be dangerous, but not anymore, thanks to improved technology, advanced mechanisms, and safety features that have given an entirely new dimension to cooking.
However, like every other tool, a pressure cooker can encounter issues that can impact the cooking time and the quality of food, causing you unnecessary frustration. What would you likely do? Check the instruction manual and search for troubleshooting steps.At times, user manuals may not be able to resolve the problem, because of the following reasons:
This is the main reason why this particular post includes every problem a pressure cooker can develop. Starting with the basic steps on how a pressure cooker should be used, we’ll take you through the common functioning issues, followed by some critical ones. This post will provide the insight on technical and functional aspects of modern-day pressure cookers. So, let’s get started right now!
Below are the steps showing how you should operate your pressure cooker under normal circumstances.Pour the liquid into the pressure cooker up to the minimum level indicated in the manual. Add the desired food item and lock the lid if required.
Choose the pressure according to the food (normally indicated in the manual). Modern-day pressure cookers, especially electric cookers have pre-determined programs and time. So, you can use this feature as well.
After 10 to 15 minutes of pressure cooking, the following processes will have taken place:The air and steam will escape out of the valve indicating that the cooking contents are boiling.
You have to turn on the digital timer to cook the food at the desired pressure. In automatic electric pressure cookers, there is a count-down feature that automatically maintains the pressure for a certain time.
At the end of the cooking, the pressure release takes place. It depends on upon the recipe what kind of pressure release method suits it. The pressure releases as the steam comes out through the pressure release valve.
Steam leakage is the most common problem in pressure cookers that causes problems in pressure buildup. It takes longer for the pressure to reach the desired limit, and when it does, it cannot remain constant for the specified period.
Wash the gasket in cold water and fix it back in the correct manner. Follow the directions while fixing the gasket back to its position.Damaged Gasket or Old Valve
Sometimes the gasket gets damaged. With the passage of time, the pressure valve loses its efficiency and effectiveness. As a result, you don’t get the right pressure buildup for cooking.Always check the gasket and pressure valve for damages, and replace them as soon as possible.
There are several different issues why your pressure cooker may not properly cook the food within the estimated time, such as:You’ve filled too much food or water
If you’re a new user, you might easily be scared seeing water coming out of the valve, but it’s not a big thing. However, this is another common issue that can cause operational issues for a pressure cooker.
This particular problem mainly occurs in pressure cookers that have pressure regulating weights. You can see the water dripping out and vapors accumulating around the rim during the pressure buildup. As soon as the pressure is achieved, the vapors go away.
Anyhow, if you have a different model and still having the same issue, it may be because of food particles accumulated inside the vent pipe. To avoid this issue, clean the valves and the vent pipe regularly.Difficulty in Opening the Lid
Another common problem with pressure cookers is, the cooker lid gets tight and remains jammed even after the heat is turned off. It is often caused by the internal pressure of the pressure cooker. The pressure release may be insufficient and ends up jamming the lid.
If the lid remains jammed, remove the pressure valve and allow the pressure cooker to heat on high. That will release the pressure, and the lid will loosen its grip.
There are many reasons for pressure cookers not achieving the desired pressure level. Each of them, with their solutions, is mentioned below:The Lid: The lid of the cooker must be positioned accurately. In that case, remove and refix it in the right manner. If the problem persists, replace the lid according to the instruction manual.
The Gasket: There may be a problem with the gasket’s positioning. You need to remove the gasket by removing the lid first. Clean the gasket properly then refix it in the manner specified by the instruction manual. The gasket may deteriorate with excessive cooking, spattering oil, and acid foods. If there are signs of wear, a replacement may be needed.
The Locking Mechanism: Pressure cooker may not be attaining the right pressure because of the locking mechanism. Or, it may not have been locked properly. This problem occurs in pressure cookers that do not have a self-locking feature. Check the locking mechanism of your pressure cooker, thoroughly before putting the food in it.
The Rim: Leakage may also occur due to a damaged rim. They get damaged when you rap your spoon against the rim. If you have a stainless steel pressure cooker, use steel wool to remove scratches and stains on the rim.
The Valve: Another reason why the specified pressure level is unattainable is due to the improper placement of the pressure valve. Improper cleaning of the valve causes this. So, always clean and fix the valve of the pressure cooker before cooking.
Old Gasket and Valve: As discussed above, the gasket and pressure valve must be checked regularly before using the cooker. Normally, you should replace the gasket and other pressure cooker components made of silicone or rubber every 18 months.
The Liquid: Pressure cookers have limited capacity for food, and they always need space to build pressure. A pressure buildup will take up to 30 minutes to reach the desired pressure if there is too much liquid inside the cooking pot. Follow the instructions while adding the liquid to keep it at the minimum level.
The Food: Normally, the instruction manual has information about how much ingredients you can put inside your pressure cooker for a certain recipe. Too much ingredients can cause a delay in pressure buildup, or the pressure may not be achieved at all. In general, if you’re filling grains, fruits, and legumes, keep your pressure cooker half-full. For all other recipes, maintain 2/3 of the filled space.
Cold Items: Either allow the frozen food to defrost before pressure cooking or plan for longer times. Frozen ingredients can easily increase the pressure cooking time up to 30 minutes.Desired Pressure Cannot be Maintained
Any of the following issues may cause difficulty maintaining the pressure you want:Old or Damaged Gasket: The gasket of the pressure cooker needs to be replaced every 18 months. If your pressure cooker consists of other rubber or silicone parts, replace them periodically.
Problem with the Valve: Pressure valve needs to be secured properly to create pressure buildup and maintain the desired pressure for a certain period of time. Pressure cannot reach the desired level with an old or worn out pressure valve. So, always clean the pressure valve and replace it every 18 months.
External Temperature:This is the main issue with stove top pressure cookers in which you either reduce the heat too much or too soon. Read the instruction manual thoroughly to know the exact time to turn down the heat. If you think you’ve turned the flame lower than the required limit, turn it back to high and allow the pressure to build. Then reduce the heat slowly to the desired level.Pressure Valve Sprays Foam or Food
It can happen because of the following reasons.The opening method: The main reason why a pressure valve sprays foam, you’ve used the wrong opening method. If it sprays foam, there is likely legumes, fruits, and grains in the pressure cooker. For these ingredients, the only way to open the pressure cooker is through natural release method. For other recipes, follow the instruction manual.
Thickeners: If you have included thick liquid or flour in your recipe, the pressure valve may spray the food out. It happens because of the food binding with the steam, and when the pressure is released, some food particles might also come out.
Filling More than Limit: If the pressure cooker is filled more than its capacity, food particles will mix with the steam and spray out when the pressure is released. So, keep the pressure cooker 1/3 empty for all kinds of foods except for fruits, legumes, and grains as they should half-fill the cooker.Pressure Cooker Releases Steam More than it Normally Does
Steam is released before pressure cooking and after it… there are few reasons why your pressure cooker releases too much steam in either stage.Valve adjustment: If you notice that the valve is releasing too much steam, adjust the valve.
Too Much Heat: Excessive heat applied to the pressure cooker may cause too much steam release. In that case, let some pressure out then reduce the heat.Food is not Cooked Properly
Your food may be undercooked or overcooked because of the timing, regardless of the model you use. Follow the instruction manual and note the amount of time required for different recipes to cook properly. There may be other reasons as well.Heat During Pressure Cooking: In stovetop pressure cookers, if you set the heat too high, the food can be overcooked, dried, or burned. Too much heat builds up extra pressure and causes the food to burn or dry. So, if you experience it during cooking, lower the heat to the minimum level.
Burner Size: Another problem with stovetop pressure cookers is, if the burner is wider than the size of the pressure cooker, your food may overcook or burn. Always, use the burner according to the size of your pressure cooker.
Well, if you have installed a new gasket then you have to make sure it’s installed the right way. While installing it in the lid, make sure that the “Right Side” of the gasket points upward. If the problem persists, check the structure of your pressure cooker looking for signs of “warping”.
If you have a vintage aluminum pressure cooker, it may have this problem. Stainless steel pressure cookers don’t often face this issue, and they don’t damage as often when compared to their aluminum counterparts.It may have a warped lid: you may not detect the warping at first sight, but even the slightest warping can cause the steam to leak. It may have been due to overheating or aging of the material. Or, the pressure cooker may have been dropped in past.
The base unit has a damaged rim: This is caused by dents, dings, scratches and abrasive cleaners. If the rim gets damaged, it may not allow adequate sealing. In this situation, you have to either replace these parts or buy a new pressure cooker.Gasket Stuck to the Lid
If the gasket gets old and needs replacement, there are chances that further heating will melt it and it will stick to the metal. If the gasket is exposed to high or prolonged heating, it can stick to the lid. In this situationUse liquid dish soap, vinegar or hot water to soak the gasket.
Using a plastic pad, try to loosen the gasket carefully, so that you can remove the entire gasket later. If that seems impossible, try to remove off in pieces, as much as you can.Melted Gasket
To remove a melted gasket or one that’s bonded with the metal, apply WD-40, “Gum-Out” or “Goo-Gone.” While applying these solvents, read the instructions carefully. They should be a last resort and not used on materials that would interact with the product.
The metal sealing and the pressure cooker lid should not be scratched or damaged while removing the gasket. So, avoid using scrapers, sandpaper, or abrasives on these metal surfaces.Aluminum Pressure Cooker Having Stains
If you have an aluminum pressure cooker, you have to be careful while cleaning it. Alkali solutions can harm and discolor aluminum. Baking soda is a mild alkali and ammonia solvents are medium strength alkalies that can cause stains on aluminum pressure cookers. You can remove light stains and small discoloration by cooking acid foods in an aluminum pressure cooker. For stubborn stains, you can apply the following method.
If you live in a location where tap water contains minerals, your aluminum pressure cooker may develop mineral stains. That happens, because the minerals from the water deposited inside the aluminum pan, react with the soap, detergents and the fats from the food and produce stains on the surface.
Heat tint is a dark and permanent discoloration on stainless steel with purple or blue color appearing prominently. It is caused by any of the following issues:Too much heat is applied to the pressure cooker
Although the heat tint is permanent, it may fade with the passage of time. Mild discoloration does not affect the usefulness of the pot, while severe tints can cause functional issues in your pressure cooker.
This website is using a security service to protect itself from online attacks. The action you just performed triggered the security solution. There are several actions that could trigger this block including submitting a certain word or phrase, a SQL command or malformed data.

Pressure cookers are the cheetahs of the cooking world--they"re just so darn fast. Pressure cookers are great for cooking food quickly while also retaining the vitamins and minerals that can be lost when food is cooked using other methods. There"s still a little bit of a learning curve, though, so if you"re using a pressure cooker for the first time, it"s important to know how to get started safely. Knowing the basic mechanisms of pressure cooking being able to recognize an unsafe system will make all the difference when you start using your pressure cooker.

Safety is of the utmost importance when dealing with pressure relief valves. The valve is designed to limit system pressure, and it is critical that they remain in working order to prevent an explosion. Explosions have caused far too much damage in companies over the years, and though pressurized tanks and vessels are equipped with pressure relief vales to enhance safety, they can fail and result in disaster.
That’s also why knowing the correct way to test the valves is important. Ongoing maintenance and periodic testing of pressurized tanks and vessels and their pressure relief valves keeps them in working order and keep employees and their work environments safe. Pressure relief valves must be in good condition in order to automatically lower tank and vessel pressure; working valves open slowly when the pressure gets high enough to exceed the pressure threshold and then closes slowly until the unit reaches the low, safe threshold. To ensure the pressure relief valve is in good working condition, employees must follow best practices for testing them including:
If you consider testing pressure relief valves a maintenance task, you’ll be more likely to carry out regular testing and ensure the safety of your organization and the longevity of your
It’s important to note, however, that the American Society of Mechanical Engineers (ASME) and National Board Inspection Code (NBIC), as well as state and local jurisdictions, may set requirements for testing frequency. Companies are responsible for checking with these organizations to become familiar with the testing requirements. Consider the following NBIC recommendations on the frequency for testing relief valves:
High-pressure steam boilers greater than 15 psi and less than 400 psi – perform manual check every six months and pressure test annually to verify nameplate set pressure
High-pressure steam boilers 400 psi and greater – pressure test to verify nameplate set pressure every three years or as determined by operating experience as verified by testing history
High-temperature hot water boilers (greater than 160 psi and/or 250 degrees Fahrenheit) – pressure test annually to verify nameplate set pressure. For safety reasons, removal and testing on a test bench is recommended
When testing the pressure relief valve, raise and lower the test lever several times. The lever will come away from the brass stem and allow hot water to come out of the end of the drainpipe. The water should flow through the pipe, and then you should turn down the pressure to stop the leak, replace the lever, and then increase the pressure.
One of the most common problems you can address with regular testing is the buildup of mineral salt, rust, and corrosion. When buildup occurs, the valve will become non-operational; the result can be an explosion. Regular testing helps you discover these issues sooner so you can combat them and keep your boiler and valve functioning properly. If no water flows through the pipe, or if there is a trickle instead of a rush of water, look for debris that is preventing the valve from seating properly. You may be able to operate the test lever a few times to correct the issue. You will need to replace the valve if this test fails.
When testing relief valves, keep in mind that they have two basic functions. First, they will pop off when the pressure exceeds its safety threshold. The valve will pop off and open to exhaust the excess pressure until the tank’s pressure decreases to reach the set minimum pressure. After this blowdown process occurs, the valve should reset and automatically close. One important testing safety measure is to use a pressure indicator with a full-scale range higher than the pop-off pressure.
Thus, you need to be aware of the pop-off pressure point of whatever tank or vessel you test. You always should remain within the pressure limits of the test stand and ensure the test stand is assembled properly and proof pressure tested. Then, take steps to ensure the escaping pressure from the valve is directed away from the operator and that everyone involved in the test uses safety shields and wears safety eye protection.
After discharge – Because pressure relief valves are designed to open automatically to relieve pressure in your system and then close, they may be able to open and close multiple times during normal operation and testing. However, when a valve opens, debris may get into the valve seat and prevent the valve from closing properly. After discharge, check the valve for leakage. If the leakage exceeds the original settings, you need to repair the valve.
According to local jurisdictional requirements – Regulations are in place for various locations and industries that stipulate how long valves may operate before needing to be repair or replaced. State inspectors may require valves to be disassembled, inspected, repaired, and tested every five years, for instance. If you have smaller valves and applications, you can test the valve by lifting the test lever. However, you should do this approximately once a year. It’s important to note that ASME UG136A Section 3 requires valves to have a minimum of 75% operating pressure versus the set pressure of the valve for hand lifting to be performed for these types of tests.
Depending on their service and application– The service and application of a valve affect its lifespan. Valves used for clean service like steam typically last at least 20 years if they are not operated too close to the set point and are part of a preventive maintenance program. Conversely, valves used for services such as acid service, those that are operated too close to the set point, and those exposed to dirt or debris need to be replaced more often.
Pressure relief valves serve a critical role in protecting organizations and employees from explosions. Knowing how and when to test and repair or replace them is essential.
Year after year, your water heater serves an important role in your home. Your morning routine just wouldn’t be the same—or nearly as comfortable—without hot water. Yet, water heaters and their components do not last forever. Preventative maintenance is the key to ensuring that your water heater continues to safely provide your home with hot water. In this article, we’ll review a critical safety component of your water heater, the water heater pressure-relief valve.
If your water heater has stopped working, fill out the form to schedule a free VIP plumbing inspection here in the Chicago area. Our plumbers are available 24/7 to help you and your home!
The name is actually quite literal. It’s a valve that relieves excess pressure in the water heater tank. By doing so, it can prevent excess pressure buildup that has the potential to cause a tank burst and flood your home. It’s an unheralded but essential safety mechanism for your water heater.
As your water heater heats up the water in the tank, the water expands and steam is generated. The greater the heat, the more expansion that occurs. This expansion puts pressure on the exterior walls of the tank, but this is to be expected. Some degree of excess pressure escapes through the water pipes connected to the water heater. In the event that it cannot, the pressure-relief valve triggers. By releasing some of the hot water and air, the valve lowers the pressure back down to safe levels.
If the pressure-relief valve is unable to open, the pressure can continue to build inside of the tank past that 100 PSI ceiling. The heavy metal tank can withstand a lot of pressure buildup, but it eventually has its limits. The results are explosive, as the tank gives way, sending hot water flooding outward.
If your water heater has an emergency shutoff valve installed, the burst will be detected and the water supply will automatically shutoff. If not, you’re potentially looking at a flooded home with significant and costly water damage.
So, what causes the pressure-relief valve to fail? In many cases, the valve gets stuck or frozen in place due to the buildup of rust and corrosion inside the tank. Or, the valve is stuck due to a prior instance in which it released hot water.
A broken valve is something that should be fixed right away, but—unless you’re examining your water heater closely on a regular basis—may not be something most homeowners notice. That’s why regular testing and maintenance is important.
We recommend that homeowners here in Chicago test their pressure-relief valve when they flush out their water heater twice every year. Bundling your water heater maintenance tasks together makes sense, since each of these tasks takes about 10 minutes to complete.
Start by positioning a large bucket underneath the valve. You are going to release some hot water during this process, so you want to make sure you’re wearing safe clothes to reduce a scalding risk. Remove the drain pipe attached to the pressure valve.
Then, gently lift the valve switch so that hot water begins to come out of the valve and into the bucket. For the purposes of this test, don’t push the switch all the way up.
So long as water and air are coming out of the water heater during this test, your water heater pressure-relief valve is working as intended. On the other hand, if you’ve flipped the switch up and you’re not seeing any release, that could indicate a problem with the valve.
Did you know that most people use between 80 and 100 gallons of water every day? From using the restroom and showering to cooking and cleaning, your water usage is a crucial part of your daily home routine. Here are just a few daily tasks most homeowners do without thinking, and the corresponding amount of water it takes to complete them: Flushing a toilet: 1-3 gallons per flush
This doesn’t take into account washing your hands, taking a bath, or watering your lawn. Your water use may also skyrocket during the summer, when you’re drinking more water or cooling off in the sprinklers.
Taking all this into account, it’s crucial that your water systems are working at their full capacity. Your water heater delivers hot water to your home, and your water pressure needs to be sufficient for your appliances to work and for your showers to be comfortable.
For all your daily tasks to run smoothly, water pressure is especially important. Imagine not having enough water pressure to flush a toilet or take a shower. There are other consequences to having water pressure that is too high.
To get your water pressure checked and adjusted by a professional, call the team at King Heating, Cooling, & Plumbing in Chicago, Illinois. We’re the experts on all home systems and can make sure your home is running at 100% capacity.
It’s been a long day at work, and you want to come home, take a hot shower, and relax with the family. You turn on the shower to see a small stream of water—or droplets—coming from the shower head. Even when you turn the shower handle to full capacity, only a small amount of water drips out. What’s the problem?
Your water pressure is likely too low. This can be an annoying setback for many homeowners, who depend on high water pressure to shower, clean, cook, and more. How can you properly shower or wash your hands when only a few drops are coming out of the faucet?
On the opposite side of the water pressure spectrum, high water pressure can pose a danger to you and your family inside the home. When water pressure is too high, pipes can become damaged and systems can overwork themselves to bring that water to you. It’s just like the tale of Goldilocks and the Three Bears: you don’t want your water pressure too low or too high—you want it just right.
Low water pressure is usually just a nuisance to homeowners and doesn’t pose a serious problem. High water pressure, on the other hand, can damage fixtures, seals, joints, and more. Water pressure that’s too high can also waste a lot of water in the home, leaving you with a higher utility bill at the end of the month.
As it comes from the municipal water supply to your home, residential water generally ranges from 40 to 80 PSI (pounds per square inch). Anything above or below this range could be considered too low or too high. Some experts will say that any level above 60 PSI is too high of water pressure for your home. It’s best to speak with a professional plumber to get your water pressure checked and to learn more about what level is right for your home. Your PSI range can be affected by elevation, house size, water needs, age of your home, and other factors.
If you haven’t checked your water pressure level in a while, it may be time to call King for a free VIP plumbing inspection. Even if you feel your water pressure and water heater are working great, there could be hidden efficiency problems lurking underneath the surface, such as a water heater that is running too hot and wasting energy. Only a true plumbing professional can get to the bottom of the issue and help you save money, month-over-month.
This goes without saying, but if you’re not comfortable flushing your water heater or checking the valve, don’t just ignore this crucial maintenance need. Give our team a call and have us out to your home to perform this service for you. Remember, this preventative maintenance can help prevent a tank burst and major water damage.


 8613371530291