
how to open pressure cooker safety valve factory
Pressure cooking is a wonderful way to prepare food that cooks thoroughly and quickly at a high temperature. Some are worried about the dangers of using a pressure cooker, so it is helpful to find out how to check your pressure cooker safety valve for safe operation.
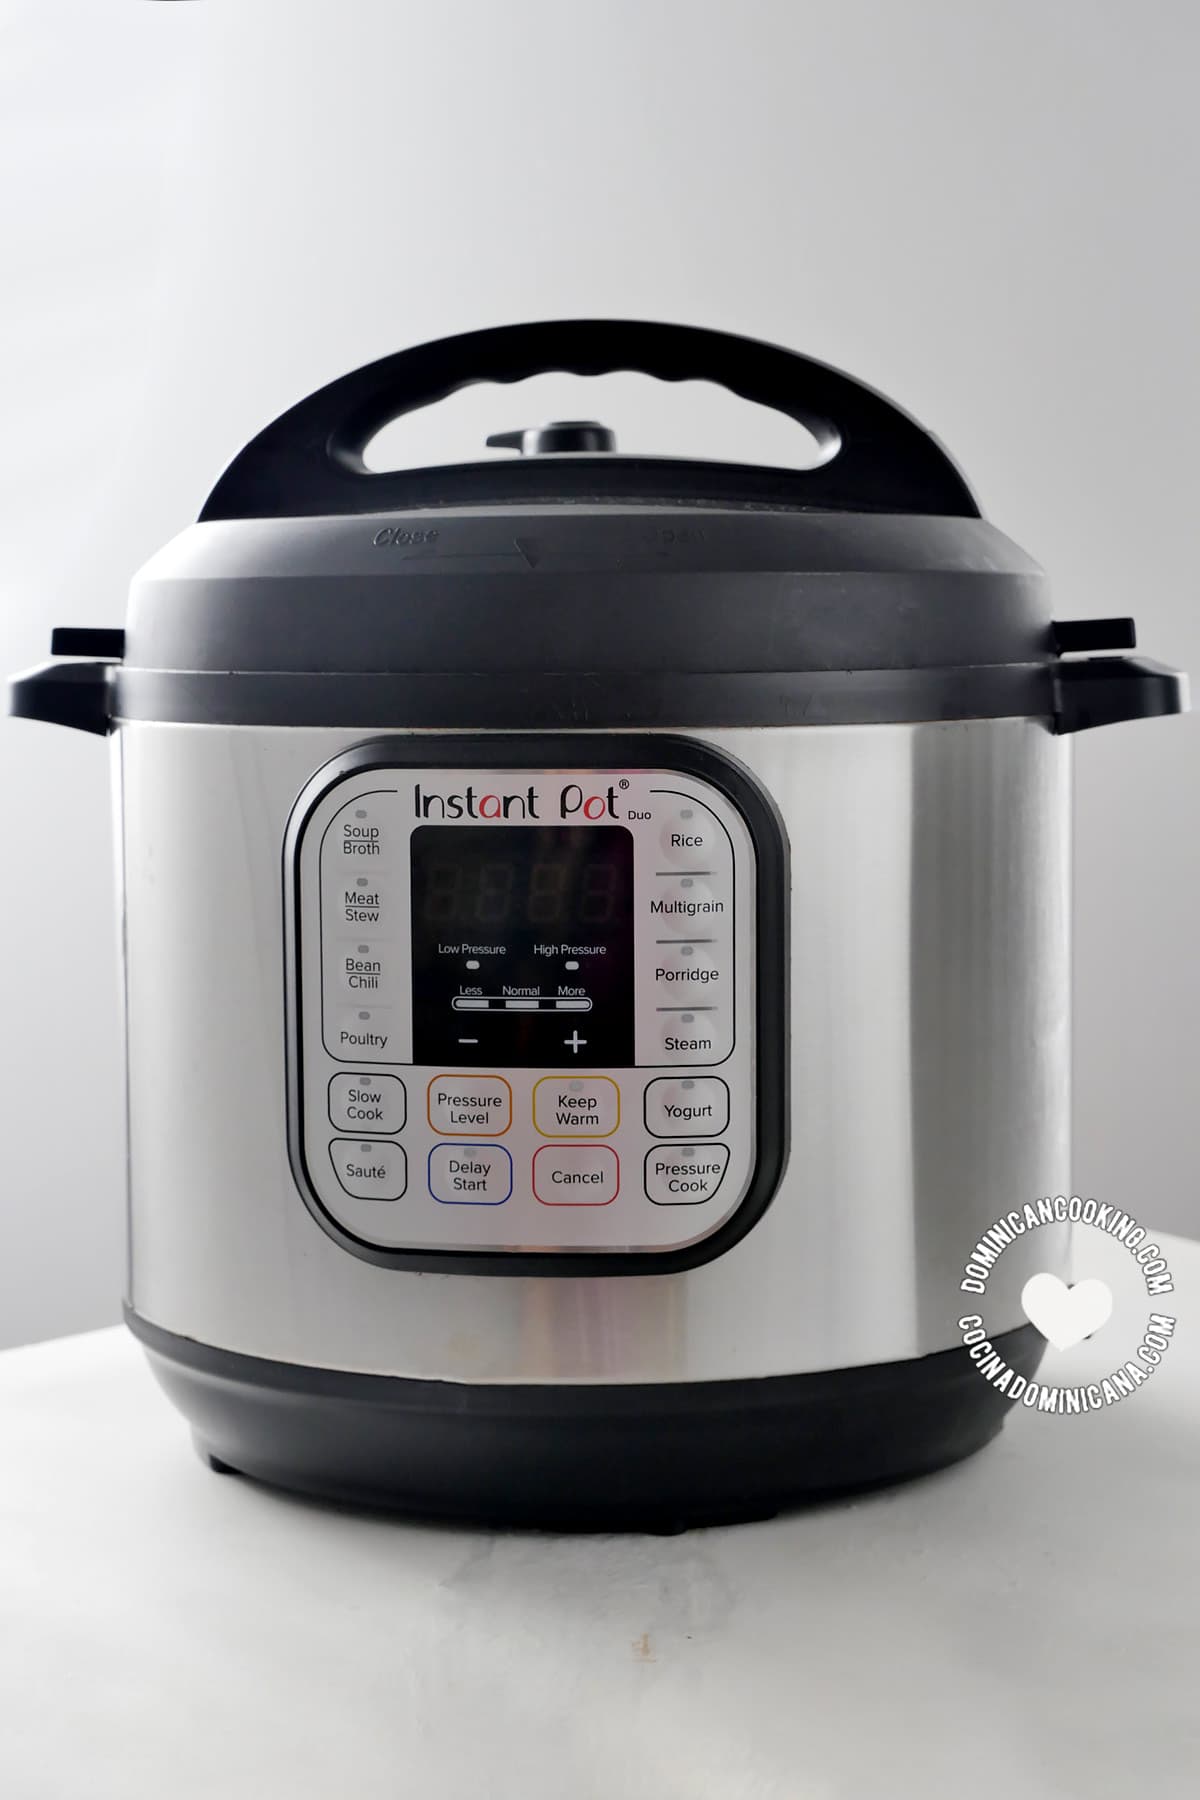
For those worried that a pressure cooker might explode, the safety valve is the design feature that prevents this from happening. If the cooker has a safety valve, you can see it installed on the cooker’s lid.
A pressure cooker is designed to trap the steam inside to increase the pressure. However, too much pressure is not safe. The valve must release pressure if it gets too high.
The blog of pressure cooking today has many recipes that are delicious. There are 25 recipes for pasta so you can try a new one every day for nearly a month.
There is a weight inside many of the safety valves that is lifted by the internal steam pressure when it reaches a certain amount. When the pressure lifts the weight inside the valve, this allows some steam to escape.
Jeffrey Eisner who says “he is a nice Jewish boy from Long Island.” He started with pressure cooking by making a simple mac and cheese dish with a recipe that he shared on YouTube. The video was an immediate success and led to his making new recipes for pressure cooking.
In a sealed cooker, as the pressure builds up, the boiling point of water rises. This phenomenon is the cause of the increased heat that cooks the food more thoroughly and faster.
The science that explains this is fascinating. The normal boiling point of water under standard atmospheric pressure of 15 pounds per square inch (psi) is 212°F (100°C). In a pressure cooker, the atmospheric pressure doubles from 15 psi to 30 psi. This added pressure raises the boiling point of water from 212°F (100°C) to 250°F (121°C).
If you see steam escaping from the safely valve do not worry. The steam escaping from the safety valve is its normal function, which means the valve is working properly.
If the internal pressure within the cooker gets high enough, this lifts a weight in the safety valve that allows steam to escape. The escaping vapor lowers the pressure. You can hear the steam escaping, making a whistling sound, or rattling the valve.
The first pressure cooking devices were used in the 17th century. They were useful to remove fat and collagen from bones so that the bones could then be ground down to make a pure bone meal.
The inventor of the device, Denis Papin, called it a “steam digester” or “bone digester.” His invention was the precursor to both pressure cookers and the steam engine. Surprisingly, the early designs did not have any safety features, and this caused some of the first ones to explode while being used.
The legacy of those early pressure-cooking devices may be why some still fear this problem even today. Papin, to his credit, came up with a design improvement that is what we call a safety valve to avoid the dangers of these explosions.
By the 1930s, the modern pressure cooker design became useful in a home kitchen. The Flex-Seal Speed Cooker, invented by Alfred Vischer, came out in 1938.
These home cookers became even more popular in 1939 with the release of the design by the National Pressure Cooker Company (now called National Presto Industries), which is still manufacturing these cookers today.
The first-generation cookers had a safety valve that worked with a weight. When the internal pressure rises high enough to lift the weight, some steam escapes, and the valve makes a distinctive rattling sound.
Second-generation cookers use a spring-loaded valve that makes less noise and is adjustable for pressure sensitivity by using a dial, which is on the cooker.
Third-generation models are the most recent versions. They use an electric heating source that is regulated by the internal pressure. These devices do not need a safety valve because the heat source automatically shuts off before the pressure gets too high.
Suppose you are thinking about getting a new cooker. In that case, there is another device that you might consider called a food dehydrator, which I describe in the article entitled, “How Much Electricity Does a Dehydrator Use?” here.
For the styles of cookers with a safety valve, it may not be obvious when the valve is not working if it is blocked. You may notice the lack of steam while the cooker is heated. The valve could rarely be blocked, but if not cleaned properly, it is possible.
Alternatively, the valve may be broken, missing, or the pot may not seal properly. These problems might allow too much steam to escape. This leakage may cause the cooker not to heat up properly and not allow the internal pressure to build up to the proper level.
One of the signs of a problem with a lack of pressure is that the food takes much longer to cook than you normally expect when using a cooker of this type.
One tip in the video is not to open the cooker after finishing cooking and take the lid to run it under cold water. This sudden temperature change can make the safety valve work less well and may cause the need to change the valve more frequently.
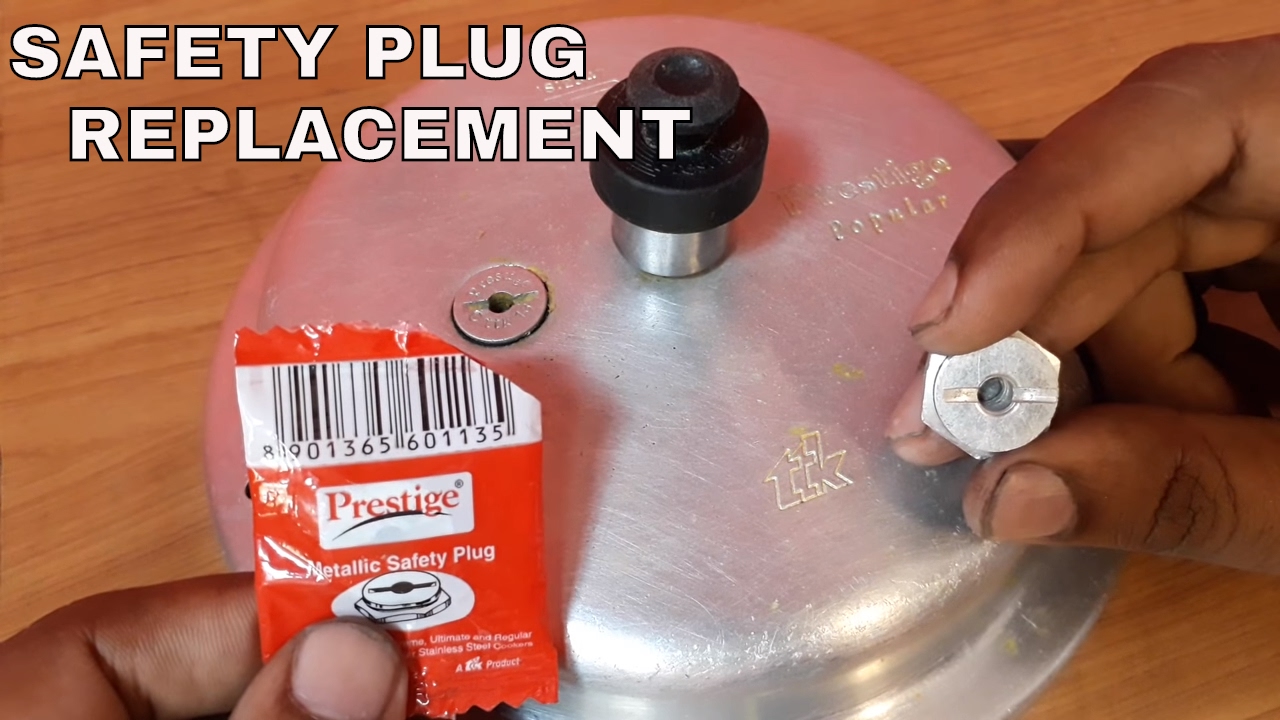
If you use a cooker that needs a valve to work properly and the valve is broken or missing, you can replace it with a new valve. Be sure to get the manufacturer’s specifications to ensure you use the correct replacement part.
Some of these problems include the ventilation knob being open or not enough liquid is in the cooker (requires at least one cup). Another cause is the sealing ring is missing, damaged, covered with food particles, or not in the proper position.
The video narrator shows how she cleans her float valve for her instant pot that she uses as a cooker. If you use too little liquid or too much, the cooker may not pressurize.
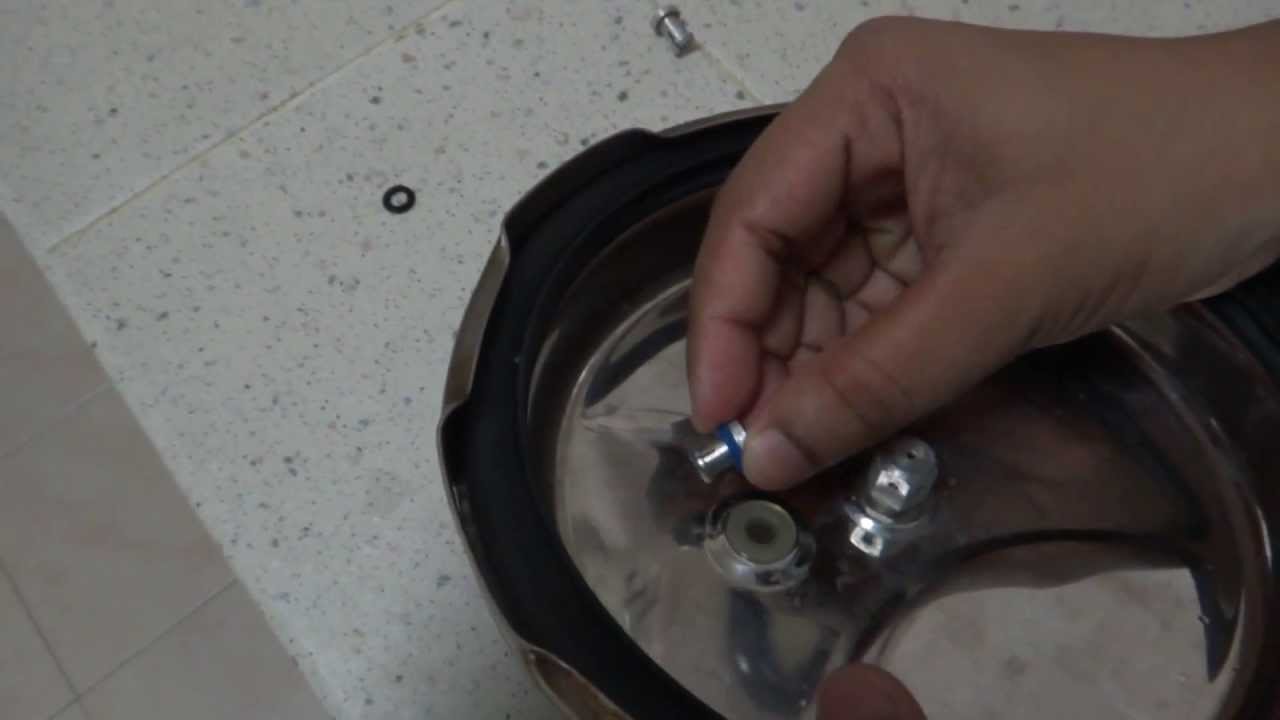
For the type with screws, hold the valve from the bottom of the lid with the pliers and use the screwdriver to remove the screws from the top to remove the broken part. Replace it with the new one and tighten the screws that hold it in place by holding it with the pliers from the bottom of the lid again and tightening the screws from the top.
For the type with a nut, use the wrench to loosen it for removal and perhaps a socket when you put on the new valve to tighten it with enough torque to hold it securely in the proper position.
Modern pressure cookers that are in good repair are quite safe. The one caution to remember is not to overfill the cooker so that the food might block the safety valve. This overfilling with food would be very difficult to do and not something to worry about for normal use.
Be careful where you keep your cooker on the countertop because it is important to know how hot a stovetop can get. Even when turned off, a stovetop may still be very hot, which I discuss in this article.
Now you know everything you need to know about a pressure cooker safety valve. You know what they do, how they work, and how to replace one if it needs repair. Enjoy your pressure-cooking recipes without worrying about the safety valve.
If having a safety valve on your cooker still bothers you, consider buying an electric cooker without a valve that instead has a built-in safety feature that automatically shuts off power if the pressure gets too high.

Pressure cookers have become commonplace in modern households, and their improved safety features have made them twice as popular. In the past, pressure cookers earned a dark reputation for explosions, but today, most pressure cookers have a minimum of 10 or more safety features.
That said, when the pressure cooker safety pressure valve starts leaking, you should know the cause because pressure cookers must release steam to stay safe.
You find many pressure cooker safety valves on top of the lid near the handle, but this depends on the type. If you see a leak from here while pressure cooking, that doesn’t always mean danger.
The safety valve releases the steam to lower the pressure to safer levels and regulate the pressure. The newer models, like the electric pressure cooker, even release the steam using a computer chip. A pressure cooker model like this will release light vapors or condensation from the safety valve, which doesn’t pose a danger.
Important to note: The safety valve leaking doesn’t pose a danger as long as the pressure cooker continues to build to the desired PSI. Once you reach your desired PSI, the safety valve should stop leaking altogether. If it continues to leak, that indicates pressure control failure.
Pressure cookers will open the safety valves enough to release the pressure cooker steam building in the pot. This causes a hissing sound or rattling sound. Don’t feel intimidated that is normal. If you wanted a quieter pressure cooker, electric pressure cookers don’t make as much noise.
You must maintain consistent pressure to ensure that the pressure cooker will cook the food all the way through. Safety valves can be bought and replaced if you have a broken one. However, buy a quality safety valve from any of the reputable brands to ensure the quality.
Manufacturers made safety valves to protect consumers from exploding pressure cookers. If you have a defective safety valve that doesn’t leak, you could use it. You could use it, but you wouldn’t be wise to do it. Don’t do this.
Safety valves let out the dangerous excessive steam. When they leak, they let out steam unnecessarily, and the pressure cooker won’t cook the food. On the other hand, when defective and closed, you have a higher risk of it exploding. Never use a pressure cooker that has either a leaking valve or a defective valve.
You don’t want to see steam exiting the safety valve because the leaking from high pressure can put you in a dangerous situation. The escaping steam can cause second and third-degree burns if exposed to the skin. If you notice a leak, immediately turn off your pressure cooker from the heat source and release the steam. Even smaller leaks pose a danger.
Steam exits from the safety valve of your pressure cooker because of a broken disc, or rubber gasket, on the inside. Because of this, it releases too much steam and the vessel never boils. If you have damage to the valve, you will see a hole in the valve.
Warning: Working on the safety valve yourself does pose a small level of danger. Do this at your own risk. If you don’t want the risk, then take it to an authorized service center. A utensil repair professional can also repair this, but it depends on how much damage was done to the pressure cooker.
Buying a low-quality pressure cooker could be the cause of why these products don’t last long. They have a proneness to issues. You should also clean and maintain your pressure cooker after each use because it can begin to leak if not cleaned properly.
As we said, you can use two methods to replace the safety valve if you have a leak: You can replace it from the inside of the lid, or you can replace it from the outside of the lid. Before attempting either consult your user manual.
To replace the safety valve from the outside, you will use a screwdriver on the outside to turn the screw, while you hold the screw and keep it from twisting on the inside. Once it releases, use a cotton swab to clean the inside of the hole.
Check for surface damage as well to make sure that you don’t have structural problems. Examine the o-ring as well to make sure that it doesn’t have defects. Replace the safety valve with the new one and tighten it up.
From the inside, you will use a wrench to unscrew the safety, while the screwdriver will hold the screw in place. Once you have released it, do the same thing as you did with the first method. Replace the safety valve and tighten it back up.
While you can replace them via the DIY method, don’t try to fix a broken safety valve. The replacement parts only cost between $2 to $17 to replace a safety valve. Buy from a genuine brand because it guarantees that you fix the problem.
Considering the cheap cost, you may want to buy a spare because you can replace it at a moment’s notice. When the pressure reaches a dangerous level, the safety valve acts as the canary in the coal mine. This blows out before it explodes. The safety valve attempts to bring the pressure back down to a normal level.
Never use a damaged valve because it doesn’t provide the same level of protection. You may experience similar problems as before like the valve leaking, or the valve shutting down altogether. Both scenarios put you in a dangerous situation.
The safety valve leaking poses a danger at the first sign of damage. With that in mind, a leak only gives you one example of what can happen to them. You should replace the safety valve whenever it becomes cracked or brittle. As soon as you see the damage, replace it.
Inspect the safety valve for signs of wear before each use. Another reason that manufacturers say to only fill the pressure cooker two-thirds full is that it ensures that the food doesn’t block the safety valve. The pressure cooker will build a dangerous level of pressure if that happens.
Let’s say that the food blocked the pressure release valve. The safety valve may melt to release the steam. That becomes the last stop before the pressure cooker explodes. The valve helps to maintain the pressure levels. While you have other safety features, this component especially protects you.
Thorough cleaning after using your pressure cooker will go a long way to helping it stay in tip-top condition. Handwash the pressure cooker lid with soap and warm water. Never put a pressure cooker in the dishwasher because this can be hard on the more sensitive components like the gaskets and rubber ring or seal.
A leaking safety valve doesn’t always mean danger, but look for the cause if it continues after you reach the desired PSI. Some steam leaking is normal, but you shouldn’t see an excessive amount of it leaking. That indicates that your pressure cooker has too much pressure.
Never try to repair a damaged safety valve. You can simply replace them, but if you don’t feel comfortable doing it yourself, hire a professional. Always pay attention to leaks because they can stop your pressure cooker from building pressure.

Uh oh! Your pressure cooker’s safety valve melted. Take that as a warning sign. When the safety valve melts, the trapped steam tried to escape through the safety vent. Left unchecked, your pressure cooker could explode, shooting scalding hot water and food in every direction.
First, you need to learn what caused the safety valve to melt. You can’t replace the pressure cooker safety valve without pinpointing the cause because you will simply melt a second one.
Any one of these things can cause your pressure cooker to overheat, and this sends the steam shooting out from the safety valve melting it. You need to understand why it melted because if it happened from damaged equipment, you risk having it happen again. Identify the cause and fix what caused it. If it happened because you overfilled the pressure cooker, never fill it more than two-thirds full.
Never operate a pressure cooker with a melted safety valve. You need to replace it because it lowers the risk that it will explode. In fact, without it, the safety valve could suddenly burst without warning.
When the valve’s nozzle senses increased temperature, the disk in the valve lifts to release the excess steam. Once the pressure in the container decreases, the disk drops back down to close the outlet. A melted safety valve indicates that dangerous levels of steam and pressure exited the valve.
An ounce of prevention is worth a pound of the cure. First, avoid doing the things that we mentioned above. Second, clean the safety valve every so often to maintain it. This goes a long way to making sure that it lasts for years. You should also inspect the safety valve every six to 12 months.
To clean the safety valve, pour hot water over it and scrub the valve after a few minutes. Gently scrub black stains from the valve with 3 tablespoons of baking soda mixed with water. You will use vinegar to eliminate mineral deposits because the acid wipes it clean.
Inspect the safety valve at the end of each use to see that it remains in good condition. Replace the safety valve if you see signs of cracking or brittleness. For maximum safety, you should check the safety valve, but you need to check the other parts too like the gasket and the pressure regulator.
Whether your safety valve melted or shows signs of damage, you need to replace it as soon as possible. Pressure cooker safety valves don’t cost much running between $2 to $17. You could even pick up a spare in case one breaks, which means that you can replace it right away without interruption.
After a pressure cooker safety valve melts, you can replace it using one of two methods. You can either replace the valve from the inside or the outside.
To replace it on the outside, use a screwdriver to turn the screw. Hold the screw on the inside to keep it from twisting. This will remove the melted valve. You will take the valve and toss it in the garbage because you won’t need it anymore. Next, take a cotton swab and dab the area with the cotton to eliminate debris that you may have left behind.
Let’s say that you want to replace the safety from the inside. Take a wrench and unscrew the safety valve from the inside. You might still use the screwdriver on the outside to hold the screw and keep it from twisting. Once you release it, use the cotton swab and replace the valve.
Important to note: The safety valve disk of your pressure cooker should move freely. Check this beforehand because it ensures safe operation. Along with that, the valve should point away from you and not toward you.
Some people may wonder if they can wait to replace the safety valve. Don’t wait. Pressure cooker safety valves don’t cost much to replace, and they serve as one of the most important safety features of a pressure cooker. Never forgetting this device’s infamous reputation for exploding, pressure cookers need a safety valve to keep you safe. You don’t want the pressure cooker to explode without warning.
When the pressure cooker’s safety valve goes out, it gives you an advanced warning. Without it, you’d have no way to tell. Most modern pressure cookers will turn on the safety valve light once steam exits it as another warning. You can use that to lower the temperature before the safety valve would melt, causing an explosion.
Let’s say that one of your safety valves melted, but because you bought a modern pressure cooker, most come with two or three safety valves. The multiple redundancies protect your pressure cooker from exploding. Even if one or two of the safety valves blow out, you still have one more place to release the excess steam.
If one of the safety valves melts, we would always advise that you replace it right away because one extra safety valve can mean the difference between an explosion and avoiding catastrophe. Take proactive measures and don’t wait until danger knocks on your doorstep. Even with the redundancies, pressure cookers still pose a danger if you don’t address them.
Provided you take the right precautions, most pressure cookers won’t threaten your safety any more than a stove would. Proper maintenance and usage prevent the pressure cooker from ever melting the safety valve or causing an explosion.
Along with the safety valve, check to see that the pressure regulator works well. The pressure regulator controls the pressure cooker’s internal pressure to reach a fixed maximum. It works in partnership with the safety valve.
Did you know that when the pressure cooker safety valve melts, it does this to provide a warning? As intimidating as it might sound, manufacturers added this feature purposely through the right design. The safety valve uses a low melting point alloy. This lets the steam escape through a vent to drop the pressure without causing an explosion.
In fact, if you see a melted safety valve, it means that you averted a crisis through the valve melting. That is why these safety features matter so much.
Class action lawsuits against pressure cooker companies exist because of how many people suffered injuries from them. To give you an idea about a class-action lawsuit means that 20 people or more filed a lawsuit against a company. This means that at least 20 people were injured because of pressure cookers, but that number can stretch into hundreds of cases.
We wouldn’t advise that you use an old pressure cooker. Even if it came from a deceased relative that you cared deeply about, outdated pressure cookers don’t have the same safety features to protect.
Hence, they explode more often, and back in the 1950s, you often heard of them exploding. Most modern pressure cookers have 10 or more safety features. As we said, they usually have two or three safety valves to protect you. Redundancies ensure that if one clogs up, the other will melt to release the pressure.
You can’t fix a melted pressure cooker safety valve because once it melts, you can’t give it form again. Luckily, it doesn’t cost much to replace a melted safety valve, and you can switch it out in 10 to 20 minutes.
The straightforward process means that almost anyone can replace it. Your safety valve serves as the last line of defense. Once this melts, the pressure cooker will explode if you can’t release the pressure within the container. In the past, the safety valve may have contained lead in it, but modern safety valves don’t have lead in them.
This website is using a security service to protect itself from online attacks. The action you just performed triggered the security solution. There are several actions that could trigger this block including submitting a certain word or phrase, a SQL command or malformed data.

Following this advice is a problem because the steam release vent is one of the pressure cooker’s main safety systems and any obstruction could cause this system to fail, or to trigger one of the other last-resort safety systems (which are generally pretty messy and could permanently damage electric pressure cookers).
In fact, most pressure cooker instruction manuals instruct the cook not to cover the lid or obstruct the vent or steam release valves of their pressure cooker.
When cooking in a small space, the large release of steam after pressure cooking can certainly be inconvenient. Here are three ways to reduce the impact of steam in your kitchen:
Open the pressure cooker using Natural Release, instead. This releases just a little wisp of steam during a 20-30 minute period as the cooker cools itself down.
Place the cooker under the range hood, using a cutting board to stabilize, and operate and release pressure there. Before it’s time to release pressure, simply turn the exhaust fan in the range hood to maximum power. Remember to remove this set-up away from the range when the oven or other burners are in operation.
If the range hood is not accessible, operate or carefully move the pressure cooker next to an open window or ventilated area before releasing pressure. If moving the pressure cooker, ensure the pressure valve is pointing away from you and that the floor is free of trip hazards (children, pets, rugs). If the pressure cooker is electric, disconnect or hold the power cord so you don’t trip over it.If your cooker’s instruction manual advises you not to move the cooker while it has contents under pressure, don’t do it.
foamy food with wrong pressure release – Foods that are known to foam and bubble, such as beans, rice, most grains and fruits should only have the pressure cooker opened using Natural Pressure Release. This keeps the foam from bubbling up and shooting out through the pressure valve.
pressure cooker too full– Cooks unfamiliar with pressure cooking may fill a pressure cooker all the way up to the top. The “max” line in the liner of electric multi-cookers is actually to be used for slow cooker and other non-pressure programs. The rules are different when cooking food under pressure. The cooker should never be filled more than half-way for foamy foods (rice, grains and beans), nor more than two-thirds for everything else.
If you must get the cooker open right away, and there is stuff spraying out of the valve, open the pressure valve in small bursts 5 to 10 seconds apart – this will give the foam time to subside between bursts. Then, clean the pressure cooker lid, gasket, and every part of valve very well so there is no food residue interfering with the valve at the next use.

We make every effort to prevent shipping damages. If your package appears damaged upon receipt, simply REFUSE the shipment. If the shipping company has left and you realize that your package(s) is damaged, immediately contact Customer Service at 773-338-5460. You must contact Customer Service within 24 hours of receipt of package. All Damaged Exchanges must be returned double boxed (manufacturers box must be inside of another box designed for shipping) with the RMA # written clearly on the outer box accompanied by a note, explaining why the product is being returned, in the original merchandise box. Exchanges are made for the same model only.
All televisions 37 inches and larger will be opened at delivery for the customer to inspect the unit for damages. After inspection, the customer will be required to sign for the unit, acceptance being that the unit is in new condition and undamaged. The unit is then non-refundable and non-exchangeable.
For the convenience of our valued customers we offer an easy to follow return policy for defective items. Eligible defective products may be returned for an exchange within 10 days from the date your product was delivered. Defective products will be exchanged for the same model only. Defective products must be returned with the original box and packaging and with all included materials including, but not limited to, warranty cards, manuals, and accessories. The UPC label must be intact. We reserve the right to charge for all missing materials.
The 10 day defective exchange policy does not apply to TVs 32" and larger, any over sized product(s) shipped via truck freight company (other than standard UPS or USPS), cell phones. If any of these items are deemed defective, they will be covered exclusively by the manufacturers’ warranties (if exists), and you must contact the manufacturer for any repairs.
To process a defective return/exchange you must request RMA. All returns/exchanges require a Return Merchandise Authorization Number (RMA#). This will be given by Customer Service. All Returns/Exchanges must be double boxed (manufacturers box must be inside of another box designed for shipping), with the RMA # written clearly on the outer box accompanied by a note, explaining what is wrong with the item, in the original merchandise box.
If you are not satisfied with your purchase, you may (after obtaining a Return Merchandise Authorization Number), exchange or return the merchandise for a refund within 10 days of receipt (Less Shipping & Handling Charges. Restocking fees* may apply). All returned merchandise must be free from damage of any kind, and be in its original factory box with all original packing materials, warranty cards, manuals, accessories, UPC label intact, and any other included materials.
This 10 day return policy does not apply to televisions, any over sized product(s) shipped via truck freight, cell phones or open box/clearance merchandise. All unlocked cell phones and open box/clearance merchandise are Final Sale.
All Returns/Exchanges require a Return Merchandise Authorization Number (RMA#). Returns without RMA#s will not be accepted. To obtain a Return Merchandise Authorization Number, you must contact Customer Service at 773-338-5460. All Returns/Exchanges must be double boxed (manufacturer’s box must be inside of another box designed for shipping) with the RMA # written clearly on the outer box accompanied by a note explaining why the product is being returned in the original merchandise box. There are NO refunds on Special Ordered Products. There are no returns or exchanges on registered performance plans.
If your order was shipped for free or at a promotional shipping rate, you will incur the actual "to and from" UPS/Freight charges upon returning merchandise. You may contact us for actual shipping rates for your order.
In the event that you refuse your package, you will be subject to paying the full shipping price of the product both ways. If you ordered an item that has Free shipping you will be charged the full shipping amount. In addition, if your package is undeliverable due to incorrect information provided by you the purchaser or any other reason that is not the fault of Popular Electronics, the purchaser is responsible for payment of the full shipping amount. Refused delivery on special order item or large order will also incur restocking fees.
All returns will be subject to a minimum 25 percent restocking fee for all returns. If the return does not include all original parts, accessories, is missing the UPC label, or is not double boxed, we reserve the right to charge an additional fee for the missing materials. Additionally, if your UPC label is missing we reserve the right to charge for the Rebate Offer amount.
Pressure canners for use in the home were extensively redesigned beginning in the 1970"s. Models made before the 1970"s were heavy-walled kettles with clamp-on or turn-on lids. They were fitted with a dial gauge, a vent pipe in the form of a petcock or covered with a counterweight, and a safety fuse. Most modern pressure canners are lightweight, thin-walled kettles; most have turn-on lids fitted with gaskets. At least one style is still made with heavy cast aluminum, has screw-down knobs around the canner and does not have a gasket, however.
Modern pressure canners have removable racks, an automatic vent/cover lock, a vent pipe (steam vent), and a safety fuse. Use only canners that have the Underwriter’s Laboratory (UL) approval to ensure their safety.
Today’s pressure canner may have a dial gauge for indicating the pressure or a weighted gauge, for indicating and regulating the pressure. Weighted gauges are usually designed to "jiggle" several times a minute or to keep rocking gently when they are maintaining the correct pressure. Read your manufacturer’s directions to know how a particular weighted gauge should rock or jiggle to indicate that the proper pressure is reached and then maintained during processing. Dial gauge canners will usually have a counterweight or pressure regulator for sealing off the open vent pipe to pressurize the canner. This weight should not be confused with a weighted gauge and will not jiggle or rock as described for a weighted gauge canner. Pressure readings on a dial gauge canner are only registered on the dial and only the dial should be used as an indication of the pressure in the canner. One manufacturer now makes a dual-gauge canner; read the manufacturer’s user manual for information on when and how to use either the weighted gauge or the dial.
Pressure canners come deep enough for one layer of quart or smaller size jars, or deep enough for two layers of pint or smaller size jars. The USDA recommends that a canner be large enough to hold at least 4 quart jars to be considered a pressure canner for the USDA published processes.
The altitude at which the canner is operated is above sea level and adjustments in pressure are not made. Internal canner pressures (and therefore temperatures) are lower at higher altitudes. Canners must be operated at increased pressures as the altitude increases. Check reliable canning instructions for altitude adjustments.
Air is trapped in the closed canner during the process. Air trapped in a pressure canner lowers the temperature obtained for a given pressure (for example, 10 or 15 pounds pressure) and results in underprocessing. To be safe, USDA recommends that all pressure canners must be vented 10 minutes before they are pressurized.
To vent a canner, leave the vent pipe (steam vent) uncovered (or manually open the petcock on some older models) after you fill the canner and lock the canner lid in place. Heat the canner on high until the water boils and generates steam that can be seen escaping through the open vent pipe or petcock. When a visible funnel-shape of steam is continuously escaping the canner, set a timer for 10 minutes. After 10 minutes of continuous steam, you can close the petcock or place the counterweight or weighted gauge over the vent pipe to begin pressurizing the canner. (See steps 3 and 4 below.)
An inaccurate dial gauge is used. Dial gauges should be checked for accuracy each year before use. If the gauge reads high or low by more than two pounds at 5, 10 or 15 pounds pressure, replace it. If it is less than two pounds off in accuracy, you can make adjustments needed to be sure you have the required pressure in your canner.
Make sure the pressure canner is working properly before preparing food. Clean lid gaskets and other parts according to the manufacturer’s directions; make sure all vent pipes are clear and contain no trapped material or mineral deposits. Center the canner over the burner. The burner and range must be level. Your pressure canner can be damaged if the burner puts out too much heat. In general, do not use on an outdoor LP gas burner or gas range burner over 12,000 BTU’s. Check your manufacturer’s directions for more information about appropriate burners.
Put the rack and hot water into the canner. If the amount of water is not specified with a given food, use enough water so it is 2 to 3 inches high in the canner. Longer processes required more water. Some specific products (for example, smoked fish) require that you start with even more water in the canner. Always follow the directions with USDA processes for specific foods if they require more water be added to the canner.
For hot packed foods, you can bring the water to 180 degrees F. ahead of time, but be careful not to boil the water or heat it long enough for the depth to decrease. For raw packed foods, the water should only be brought to 140 degrees F.
Place filled jars, fitted with lids and ring bands, on the jar rack in the canner, using a jar lifter. When moving jars with a jar lifter, make sure the jar lifter is securely positioned below the neck of the jar (below the ring band of the lid). Keep the jar upright at all times. Tilting the jar could cause food to spill into the sealing area of the lid.
Turn the heat setting to its highest position. Heat until the water boils and steam flows freely in a funnel-shape from the open vent pipe or petcock. While maintaining the high heat setting, let the steam flow (exhaust) continuously for 10 minutes.
After this venting, or exhausting, of the canner, place the counterweight or weighted gauge on the vent pipe, or close the petcock. The canner will pressurize during the next 3 to 10 minutes.
Start timing the process when the pressure reading on the dial gauge indicates that the recommended pressure has been reached, or, for canners without dial gauges, when the weighted gauge begins to jiggle or rock as the manufacturer describes.
Regulate the heat under the canner to maintain a steady pressure at, or slightly above, the correct gauge pressure. One type of weighted gauge should jiggle a certain number of times per minute, while another type should rock slowly throughout the process – check the manufacturer’s directions.
IMPORTANT: If at any time pressure goes below the recommended amount, bring the canner back to pressure and begin the timing of the process over, from the beginning (using the total original process time). This is important for the safety of the food.
When the timed process is completed, turn off the heat, remove the canner from the heat (electric burner) if possible, and let the canner cool down naturally. (Lift the canner to move it; do not slide the canner. It is also okay to leave the canner in place after you have turned off the burner. It is better to do so than to let jars inside the canner tilt or tip over if the canner is too heavy to move easily.)
While the canner is cooling, it is also de-pressurizing. Do not force cool the canner. Forced cooling may result in food spoilage. Cooling the canner with cold running water or opening the vent pipe before the canner is fully depressurized are types of forced cooling. They will also cause loss of liquid from jars and seal failures. Forced cooling may also warp the canner lid.
Even after a dial gauge canner has cooled until the dial reads zero pounds pressure, be cautious in removing the weight from the vent pipe. Tilt the weight slightly to make sure no steam escapes before pulling it all the way off. Newer canners will also have a cover lock in the lid or handle that must release after cooling before the lids are twisted off. Do not force the lid open if the cover locks are not released. Manufacturers will provide more detailed instructions for particular models.
Depressurization of older canner models without dial gauges should be timed. Standard size heavy-walled canners require about 30 minutes when loaded with pints and 45 minutes when loaded with quarts. Newer thin-walled canners cool more rapidly and are equipped with vent locks that are designed to open when the pressure is gone. These canners are depressurized when the piston in the vent lock drops to a normal position. Some of these locks are hidden in handles and cannot be seen; however, the lid will not turn open until the lock is released.
After the canner is completely depressurized, remove the weight from the vent pipe or open the petcock. Wait 10 minutes; then unfasten the lid and remove it carefully. Lift the lid with the underside away from you so that the steam coming out of the canner does not burn your face.
Using a jar lifter, remove the jars one at a time, being careful not to tilt the jars. Carefully place them directly onto a towel or cake cooling rack, leaving at least one inch of space between the jars during cooling. Avoid placing the jars on a cold surface or in a cold draft.
Let the jars sit undisturbed while they cool, from 12 to 24 hours. Do not tighten ring bands on the lids or push down on the center of the flat metal lid until the jar is completely cooled.
Remove ring bands from sealed jars. Ring bands can be washed and dried and put away for using another time. Put any unsealed jars in the refrigerator and use first.
Dry the canner, lid and gasket. Take off removable petcocks and safety valves; wash and dry thoroughly. Follow maintenance and storage instructions that come from your canner manufacturer.
The University of Georgia and Ft. Valley State University, the U.S. Department of Agriculture and counties of the state cooperating. The University of Georgia Cooperative Extension and the Colleges of Agricultural and Environmental Sciences & Family and Consumer Sciences offer educational programs, assistance and materials to all people without regard to race, color, national origin, age, sex or disability.
Pressure cookers of the domestic type generally have an escape port, usually in the removable cover of the cooker, and the pressure within the cooker is regulated by a relief valve controlling the port. Relief valves are well known and a common type comprises a valve member and a valve seating, one of which acts against the other under pressure of a predetermined weight. When it is desired to vent the cooker, for example, when cooking is finished, the valve has to be opened. This can cause a rapid escape of steam and hence the operator has to take care to avoid being scalded.
According to the invention there is provided a pressure cooker relief valve assembly comprising a valve member and a valve seating one of which acts against the other under the pressure of a predetermined weight to close a valve port, the assembly including a skirt portion surrounding the valve port to form a chamber, the chamber having an opening in the skirt portion so that gas entering the chamber through the valve port can escape from the chamber to the atmosphere in substantially a sinqle predetermined direction and the skirt portion forms part of the mass of the predetermined weight.
The opening in the chamber enables escaping gases (e.g. steam) to be directed away from the user and escaping steam may also entrain air which can help to provide cooler conditions for the user in the vicinity of the valve. The skirt portion forms part of the mass of the predetermined weight and thus the valve member including the chamber can form a compact design which may be easily removed as a unit in order to gain access to the valve seating, e.g. for cleaning purposes.
Preferably the valve member includes a hand grip portion to enable the valve to be manually manipulated (e.g. to open the valve) and the opening in the skirt is arranged to direct escaping gases away from the hand grip portion.
In a preferred embodiment the chamber has an inner wall surrounding the valve port, the inner wall having an opening therethrough such that gas from the valve port can pass into the chamber through the opening in the inner wall and from the chamber to the atmosphere through the opening in the skirt portion.
With many existing types of pressure cookers it is necessary to manually lift the weight off the valve seating when it is desired to open the valve. This operation requires the weight to be firmly grasped and this can be a disadvantage if escaping steam is issuing from the valve. Alternative methods of venting the cooker include lifting the weight by means of, for example, a pivoted lever or a sliding wedge. These mechanical methods for lifting the weight are complicated and hence expensive to produce.
Accordingly the pressure cooker relief valve assembly may include means for relieving the pressure of the weight by axially rotating the weight and a cam surface relative to each other, the rotation causing the weight to be tilted relative to the valve seating. The valve assembly can be opened by simple rotation of the weight relative to the cam surface. Either the weight or the cam surface or both can be rotated. Preferably the cooker is vented by manual rotation of the weight in which case the weight need only be handled momentarily to turn it through a small angle. In an alternative embodiment the rotation may be achieved by, for example, a clockwork timer acting through a linking mechanism. The tilt of the weight caused by the rotation, whether manual or mechanical, can aid in directing the escaping steam in a predetermined direction, e.g. away from the user, especially if the underside of the weight is in close proximity to another surface. The direction of the escaping steam is further controlled by the opening in the surrounding chamber as explained above, through which any gas (e.g. steam) entering the chamber through the valve port can escape.
As shown in the FIGS. 1 to 6 of the drawings, the first embodiment of a pressure relief valve assembly is indicated generally by reference numeral 1 and is mounted on the lid 2 of a pressure cooker. The assembly includes a valve of known type including a valve seating 3, incorporating a valve support 4, held in position by a wing nut 5 within the lid 2. A port 6 extends through the seating 3 and this can be closed by a valve pin 7. A weight 8 is attached to the upper end of the pin 7.
The weight 8 is retained by the valve support 4 by means of a snap ring 9 and locking ring 10 such that the pin 7 can rotate in the seating 3 and be tilted and lifted by the mechanism described hereinafter or the weight 8 with its attachments can be removed from the seating 3 for cleaning purposes.
Mounted on the lid 2 below the weight 8 is a valve seat collar 13, the structure of which is shown specifically in FIG. 5. The upper face of the collar comprises a cam surface consisting of a flat surface 14 and a recess 15.
Attached to the weight 8, and covering its upper surface, is a cover 16. The cover 16 includes a hand grip portion 17 and an opening 18 (shown most clearly in FIG. 4) in a side wall opposite to the hand grip portion. Extending from the cover 16 are side walls 19 forming an outer skirt which together with the cover 16 forms a chamber surrounding the valve.
In the position shown in FIG. 1 the valve is in the closed or sealed position. The prong member 12 of the weight 8 is within the recess 15 of the collar 13 and the pin 7 is firmly seated on the valve seating 6.
When it is desired to open the valve the cover 16 is rotated through a small angle thus rotating the weight 8. The prong member 12 is thus cammed out of the recess 15 on to the top face 14 of the collar 13. This causes the weight 8 to be tilted and raised, lifting the pin 7 off the seat 3. The valve is thus opened. Any steam within the pressure cooker is released into the chamber formed by the cover 16 and side walls 19 and out through the opening 18, in a direction away from the hand grip 17. The dimensions and shape of the chamber and the opening are chosen so as to minimise the noise level of the escaping steam.
The modified valve seat collar 13" shown in FIG. 6 is similar to that shown in FIG. 5 in having a recess portion 15" and a flat surface 14" forming a cam surface for the prong member 12. The collar 13", however, has two horizontal extensions 20 and 21. A downward extension of the weight 8 can fall between extensions 20 and 21, so that the extensions act as stop members only allowing rotation of the weight through a small angle.
The modified pressure relief valve assembly will now be described with reference to FIGS. 7 to 11. The modified assembly is indicated generally by reference numeral 21 and is mounted on the lid 22 of a pressure cooker. The assembly includes a valve of known type including a valve seating 23, incorporating a valve support 24, held in position by a nut 25 within the lid 22. A port 26 extends through the seating 23 and this can be closed by a valve pin 27. A weight indicated generally by reference numeral 28 is attached to the upper end of the pin 27. The weight 28 comprises a plastic moulding 29 and an annular metal weight ring 30. The moulding 29 has an inner depending skirt portion 31 and an outer depending skirt portion 32. The inner skirt portion 31 has a slot 33 in one face. The outer skirt portion 32 has slits 34 in a corresponding face.
The valve assembly 21 is detachably mounted on the valve support 24 by means of a snap ring 36, held in position by means of a washer 37, such that the pin 27 can rotate in the seating 23 and be tilted and lifted by the mechanism described hereinafter or the assembly 21 cah be removed from the seating 23 for cleaning purposes.
A metal plate 40 extends substantially perpendicular to the outer skirt portion 32 and forms a bottom wall of the chamber. The metal plate 40 is provided with two cam lobes 41 which co-operate with the cam surface of the valve seat collar 42, described hereinbelow.
The valve seat collar 42 is mounted on the lid 22 below the weight 28. An O-ring 43 is retained between the collar 42 and the lid 22. The collar 42 has two recesses 44, 45 to receive the lobes 41. The recess 44 has a cammingsurface comprising a ramp 46. A stop 47 is provided by the vertical end wall of the recess 44. The collar 42 has an upstanding skirt portion 48, which in use, is situated within the inner skirt 31 of the weight 28. A cut-away portion 49 is provided in one face of the skirt portion 48.
In the position shown in FIGS. 7 and 9 the valve is in the closed or sealed position. The lobes 41 are situated within the recesses 44 and 45 of the collar 42 and the pin 27 is firmly seated on the valve seating 23.
When it is desired to open the valve the assembly 21 is rotated through a small angle by means of the handle 39. The lobe 41 within the recess 44 is cammed up the ramp 46 until further rotation is prevented by stop 47. The camming action causes the weight to be tilted and raised, as shown in FIGS. 8 and 10, lifting the pin 27 off the seat 23. The valve is thus opened. Any steam within the pressure cooker is released through the port 26, through holes in the valve support 24, out through the cut-away portion 49 in the skirt 48, through the slot 33 in the inner skirt portion 31 into the chamber between the inner and outer skirt portions 31, 32. The steam escapes from the chamber, in a direction away from the handle 39, via the slits 34 in the outer skirt portion 32, the slits being designed to deflect the steam in a partial upwards direction so as to control its forward projection. The dimensions and shape of the chamber and the various openings are chosen so as to minimise the noise level of the escaping steam.
Pressure relief valves (safety relief valves) are designed to open at a preset pressure and discharge fluid until pressure drops to acceptable levels. The development of the safety relief valve has an interesting history.
Denis Papin is credited by many sources as the originator of the first pressure relief valve (circa 1679) to prevent overpressure of his steam powered “digester”. His pressure relief design consisted of a weight suspended on a lever arm. When the force of the steam pressure acting on the valve exceeded the force of the weight acting through the lever arm the valve opened. Designs requiring a higher relief pressure setting required a longer lever arm and/or larger weights. This simple system worked however more space was needed and it coud be easily tampered with leading to a possible overpressure and explosion. Another disadvantage was premature opening of the valve if the device was subjected to bouncing movement.
Direct-acting deadweight pressure relief valves: Later to avoid the disadvantages of the lever arrangement, direct-acting deadweight pressure relief valves were installed on early steam locomotives. In this design, weights were applied directly to the top of the valve mechanism. To keep the size of the weights in a reasonable range, the valve size was often undersized resulting in a smaller vent opening than required. Often an explosion would occur as the steam pressure rose faster than the vent could release excess pressure. Bouncing movements also prematurely released pressure.
Direct acting spring valves: Timothy Hackworth is believed to be the first to use direct acting spring valves (circa 1828) on his locomotive engine called the Royal George. Timothy utilized an accordion arrangement of leaf springs, which would later be replaced with coil springs, to apply force to the valve. The spring force could be fine tuned by adjusting the nuts retaining the leaf springs.
Refinements to the direct acting spring relief valve design continued in subsequent years in response to the widespread use of steam boilers to provide heat and to power locomotives, river boats, and pumps. Steam boilers are less common today but the safety relief valve continues to be a critical component, in systems with pressure vessels, to protect against damage or catastrophic failure.
Each application has its own unique requirements but before we get into the selection process, let’s have a look at the operating principles of a typical direct acting pressure relief valve.
In operation, the pressure relief valve remains normally closed until pressures upstream reaches the desired set pressure. The valve will crack open when the set pressure is reached, and continue to open further, allowing more flow as over pressure increases. When upstream pressure falls a few psi below the set pressure, the valve will close again.
Most commonly, pressure relief valves employ a spring loaded “poppet” valve as a valve element. The poppet includes an elastomeric seal or, in some high pressure designs a thermoplastic seal, which is configured to make a seal on a valve seat. In operation, the spring and upstream pressure apply opposing forces on the valve. When the force of the upstream pressure exerts a greater force than the spring force, then the poppet moves away from the valve seat which allows fluid to pass through the outlet port. As the upstream pressure drops below the set point the valve then closes.
Piston style designs are often used when higher relief pressures are required, when ruggedness is a concern or when the relief pressure does not have to be held to a tight tolerance. Piston designs tend to be more sluggish, compared to diaphragm designs due to friction from the piston seal. In low pressure applications, or when high accuracy is required, the diaphragm style is preferred. Diaphragm relief valves employ a thin disc shaped element which is used to sense pressure changes. They are usually made of an elastomer, however, thin convoluted metal is used in special applications. Diaphragms essentially eliminate the friction inherent with piston style designs. Additionally, for a particular relief valve size, it is often possible to provide a greater sensing area with a diaphragm design than would be feasible with a piston style design.
The reference force element is usually a mechanical spring. This spring exerts a force on the sensing element and acts to close the valve. Many pressure relief valves are designed with an adjustment which allows the user to adjust the relief pressure set-point by changing the force exerted by the reference spring.
What is the maximum flow rate that the application requires? How much does the flow rate vary? Porting configuration and effective orifices are also important considerations.
The chemical properties of the fluid should be considered before determining the best materials for your application. Each fluid will have its own unique characteristics so care must be taken to select the appropriate body and seal materials that will come in contact with the fluid. The parts of the pressure relief valve in contact with the fluid are known as the “wetted” components. If the fluid is flammable or hazardous in nature the pressure relief valve must be capable of discharging it safely.
In many high technology applications space is limited and weight is a factor. Some manufactures specialize in miniature components and should be consulted. Material selection, particularly the relief valve body components, will impact weight. Also carefully consider the port (thread) sizes, adjustment styles, and mounting options as these will influence size and weight.
In many high technology applications space is limited and weight is a factor. Some manufactures specialize in miniature components and should be consulted. Material selection, particularly the relief valve body components, will impact weight. Also carefully consider the port (thread) sizes, adjustment styles, and mounting options as these will influence size and weight.
A wide range of materials are available to handle various fluids and operating environments. Common pressure relief valve component materials include brass, plastic, and aluminum. Various grades of stainless steel (such as 303, 304, and 316) are available too. Springs used inside the relief valve are typically made of music wire (carbon steel) or stainless steel.
Brass is suited to most common applications and is usually economical. Aluminum is often specified when weight is a consideration. Plastic is considered when low cost is of primarily concern or a throw away item is required. Stainless Steels are often chosen for use with corrosive fluids, when cleanliness of the fluid is a consideration or when the operating temperatures will be high.
Equally important is the compatibility of the seal material with the fluid and with the operating temperature range. Buna-N is a typical seal material. Optional seals are offered by some manufacturers and these include: Fluorocarbon, EPDM, Silicone, and Perfluoroelastomer.
The materials selected for the pressure relief valve not only need to be compatible with the fluid but also must be able to function properly at the expected operating temperature. The primary concern is whether or not the elastomer chosen will function properly throughout the expected temperature range. Additionally, the operating temperature may affect flow capacity and/or the spring rate in extreme applications.
Beswick Engineering manufactures four styles of pressure relief valves to best suit your application. The RVD and RVD8 are diaphragm based pressure relief valves which are suited to lower relief pressures. The RV2 and BPR valves are piston based designs.

This website is using a security service to protect itself from online attacks. The action you just performed triggered the security solution. There are several actions that could trigger this block including submitting a certain word or phrase, a SQL command or malformed data.
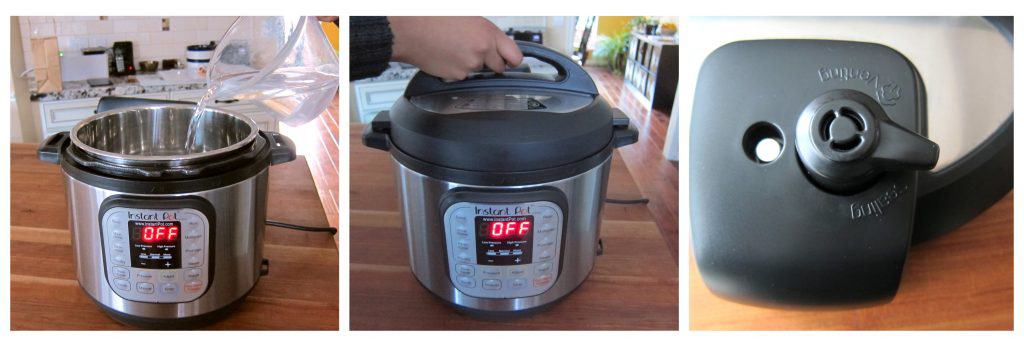
Quick pressure release or natural pressure release?It’s one of the most common questions I get. Electric pressure cookers and multi-cookers like the Instant Pot, Ninja Foodi, and Crockpot Express have the ability to release pressure two ways. Instant Pot Natural Release is a frequent search term. Let me explain the difference!
Releasing the pressure can be a little intimidating to people who are new to pressure cooking—especially the quick release with the noise and jet of steam. But don’t let a little noise get between you and fabulous meals cooked in your pressure cooker!
Those are often the first questions new pressure cooker users ask. So I thought it would be a perfect time for a post explaining it for all those who have an electric pressure cooker or multi-cooker like the Instant Pot waiting for them under the tree.
When the cook time ends, your pressure cooker will beep. At this point, the recipe will direct you to release the pressure in the cooking pot. You can release the pressure two ways: a quick pressure release or a natural pressure release.
A quick pressure release is when you turn the pressure release switch to the Venting position and let the steam to release quickly when the cook time ends. This will result in a strong jet of steam coming from the pressure release valve. This is normal.If drops of liquid or foam start to emerge from the pressure release valve, simply switch the valve back to the Sealed position and use an Intermittent Pressure Release (more on that below).
Other pressure cookers may have different labels, but it’s the same basic principle. Turn the valve to allow the steam to escape / pressure to release.
When the pressure is fully released, the float valve will drop and the lid will unlock to open. For safety reasons, the pressure cooker will not open until the pressure is released and the float valve has dropped.
Using a quick pressure release stops the pressure cooking quickly. Therefore, you should use a quick pressure release when you are cooking ingredients, like vegetables, that you want to avoid overcooking.
A natural pressure release is when you leave the pressure release switch in the Sealed position when the cook time ends. This lets the pressure release slowly, without you doing anything. When the pressure is fully released, the float valve will drop and the lid will unlock and open.
A natural pressure release is a bit anticlimactic in comparison to a quick pressure release. There is no jet of steam when the natural pressure release starts. There’s also no clear way to tell when the pressure is fully released, and no beep or signal when the lid unlocks. Sometimes you can hear the float valve drop if you’re close by.
The time it takes for the pressure to release naturally will vary depending on the ingredients and amount of liquid in the pressure cooker. A natural pressure release can take from 5 to 30 minutes in the electric pressure cooker.
Using a natural pressure release allows the cooking to stop gradually. You don’t want to open the valve quickly when the ingredients inside could be foaming. You’ll get foam shooting out through the valve, so use a natural pressure release when making steel cut oats, a large pot of soup or pasta.
You also want to use a natural release for large cuts of meat. Just like you’d let meat rest after grilling it, a slow natural release is said to let the meat relax and be more tender.
During a natural release, the cooking continues so you need to take that in to account when determining your cook time. If a recipe calls for a Quick Release, you can use a Natural Release if you prefer, but reduce the cook time.
The different types of pressure releases can also be combined. You don’t have to wait for all the pressure to release to get the benefit of a natural pressure release.
I almost always only wait 10 minutes before I release the remaining pressure. Combining the two release options reduces waiting time yet gives you many of the benefits of a natural pressure release, such as reducing foam and tenderizing meats.
An intermittent pressure release is the best of both worlds. It’s a way to quickly release pressure for foods such as pastas, soups, and certain grains, which are prone to foaming or spitting if you try to release pressure with a quick release but would be overcooked with a natural pressure release.
With this method, you open and close the pressure release valve in short intervals. This allows the pressure to escape more quickly than a natural pressure release and also prevents foam from coming out of the pressure release valve.
With some foods, one or two closed intervals is all I need before I can leave the valve in the Venting position; with other foods, if the foaming is particularly bad, I will close the valve and wait a minute or two, then slide the valve to Venting again and continue opening and closing the valve as needed.
No you do not need to turn the pressure cooker off for a quick or natural pressure release. The pressure will release on the Keep Warm setting. The benefit of not turning it off is that the time will count up so you can see how long it’s been since the pressure cooking time ended.
There is some deba


 8613371530291