
how to open pressure cooker safety valve for sale

This website is using a security service to protect itself from online attacks. The action you just performed triggered the security solution. There are several actions that could trigger this block including submitting a certain word or phrase, a SQL command or malformed data.

The safety valve inside a pressure cooker is a safety backup mechanism that comes into effect when the pressure inside the cooker turns uncontrollably high and finds no path to escape.
To release steam, the cooker has pressure regulating valves that Jiggle or extend outwards with the help of spring. Some release steam with the help of a computer chip!
If for any reason, the pressure regulating valve fails to release steam, the excessive pressure causes the safety valve to open up and release steam in a controlled way.
The other valve is located a little away from the pressure regulating valve. It is screwed on the lid of the cooker and is made up of synthetic rubbers like neoprene or hardened Viton.
If you see pressure steam coming out of the safety valve, it does not signify danger. It only points to some possible dysfunctions that need to be taken care of.
Damaged Gasket. A gasket is a rubber ring that helps to seal the cooker. A damaged or uneven placement of the gasket could lead compromise the seal of the cooker leading to pressure escaping from the safety valve.
Cheap quality pressure cookers made from an unknown brand are a safety hazard as they compromise on health and protection of the consumer. Low-quality safety valves malfunction easily causing steam to escape.
If the quantity of food and water is too less and water boils away, it can result in a burnt and empty cooker. Since the temperature and time duration is not controlled, the temperature inside the cooker becomes excessively high quickly leading to the safety valve breaking down.
If the pressure cooker is placed on a large flame, the flame starts licking the side walls leading to excessive temperature building and safety valve destruction
If the pressure cooker is not regularly cleaned and maintained, it can clog the pressure regulating valve forcing the safety valve to emit steam out of the cooker.
Some models come with a sealing feature that needs to be set manually. Forgetting to turn them on can cause the steam to escape from the safety valve.
For traditional pressure cookers, failure to manually adjust the temperature and pressure causes excessive pressure build-ups causing the safety valve to break or melt.
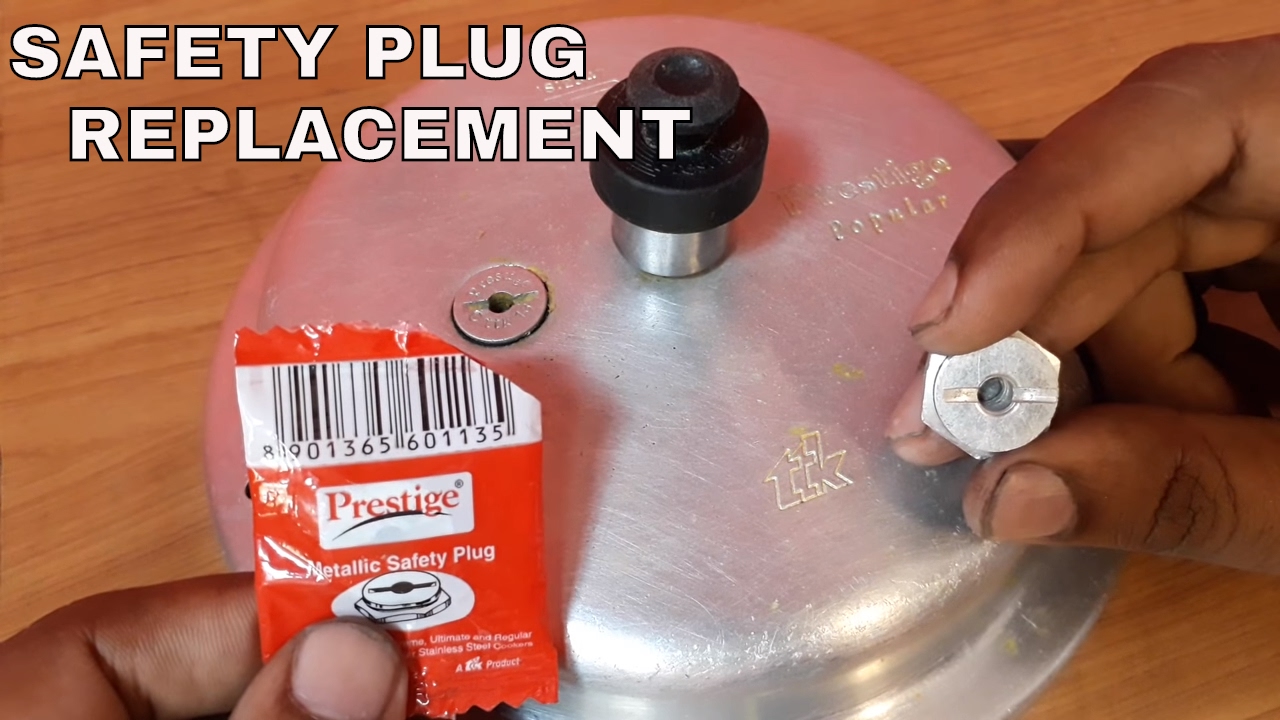
You can replace the safety valve from the outside by holding firmly the inside part so it doesn’t move. Use a screwdriver to rotate and twist the screw on the outside until it comes off.
Always buy from trusted brands as they ensure quality checks when it comes to material and usage. No amount of budgeting should compromise your safety and good health.
Make sure the rubber rings and the lid of the cooker are closed properly and in correct alignment. If the rubber ring has become loose, it is best to replace it.
Follow the tips above to avoid steam coming out from your safety valve. If, despite all precautions, the safety valve opens up, replace it with a new one.
General wear and tear are bound to happen in any cooking vessel over the years so don’t worry about it much. Fix the cause and all the best cooking scrumptious and healthy food!
We make every effort to prevent shipping damages. If your package appears damaged upon receipt, simply REFUSE the shipment. If the shipping company has left and you realize that your package(s) is damaged, immediately contact Customer Service at 773-338-5460. You must contact Customer Service within 24 hours of receipt of package. All Damaged Exchanges must be returned double boxed (manufacturers box must be inside of another box designed for shipping) with the RMA # written clearly on the outer box accompanied by a note, explaining why the product is being returned, in the original merchandise box. Exchanges are made for the same model only.
All televisions 37 inches and larger will be opened at delivery for the customer to inspect the unit for damages. After inspection, the customer will be required to sign for the unit, acceptance being that the unit is in new condition and undamaged. The unit is then non-refundable and non-exchangeable.
For the convenience of our valued customers we offer an easy to follow return policy for defective items. Eligible defective products may be returned for an exchange within 10 days from the date your product was delivered. Defective products will be exchanged for the same model only. Defective products must be returned with the original box and packaging and with all included materials including, but not limited to, warranty cards, manuals, and accessories. The UPC label must be intact. We reserve the right to charge for all missing materials.
The 10 day defective exchange policy does not apply to TVs 32" and larger, any over sized product(s) shipped via truck freight company (other than standard UPS or USPS), cell phones. If any of these items are deemed defective, they will be covered exclusively by the manufacturers’ warranties (if exists), and you must contact the manufacturer for any repairs.
To process a defective return/exchange you must request RMA. All returns/exchanges require a Return Merchandise Authorization Number (RMA#). This will be given by Customer Service. All Returns/Exchanges must be double boxed (manufacturers box must be inside of another box designed for shipping), with the RMA # written clearly on the outer box accompanied by a note, explaining what is wrong with the item, in the original merchandise box.
If you are not satisfied with your purchase, you may (after obtaining a Return Merchandise Authorization Number), exchange or return the merchandise for a refund within 10 days of receipt (Less Shipping & Handling Charges. Restocking fees* may apply). All returned merchandise must be free from damage of any kind, and be in its original factory box with all original packing materials, warranty cards, manuals, accessories, UPC label intact, and any other included materials.
This 10 day return policy does not apply to televisions, any over sized product(s) shipped via truck freight, cell phones or open box/clearance merchandise. All unlocked cell phones and open box/clearance merchandise are Final Sale.
All Returns/Exchanges require a Return Merchandise Authorization Number (RMA#). Returns without RMA#s will not be accepted. To obtain a Return Merchandise Authorization Number, you must contact Customer Service at 773-338-5460. All Returns/Exchanges must be double boxed (manufacturer’s box must be inside of another box designed for shipping) with the RMA # written clearly on the outer box accompanied by a note explaining why the product is being returned in the original merchandise box. There are NO refunds on Special Ordered Products. There are no returns or exchanges on registered performance plans.
If your order was shipped for free or at a promotional shipping rate, you will incur the actual "to and from" UPS/Freight charges upon returning merchandise. You may contact us for actual shipping rates for your order.
In the event that you refuse your package, you will be subject to paying the full shipping price of the product both ways. If you ordered an item that has Free shipping you will be charged the full shipping amount. In addition, if your package is undeliverable due to incorrect information provided by you the purchaser or any other reason that is not the fault of Popular Electronics, the purchaser is responsible for payment of the full shipping amount. Refused delivery on special order item or large order will also incur restocking fees.
All returns will be subject to a minimum 25 percent restocking fee for all returns. If the return does not include all original parts, accessories, is missing the UPC label, or is not double boxed, we reserve the right to charge an additional fee for the missing materials. Additionally, if your UPC label is missing we reserve the right to charge for the Rebate Offer amount.

Pressure cooking is the process of cooking food under high pressure steam and water or a water-based cooking liquid, in a sealed vessel known as a pressure cooker. High pressure limits boiling, and creates higher cooking temperatures which cook food far more quickly.
The pressure cooker was invented in the seventeenth century by the physicist Denis Papin, and works by expelling air from the vessel, and trapping steam produced from the boiling liquid. This is used to raise the internal pressure up to one atmosphere above ambient and gives higher cooking temperatures between 100–121 °C (212–250 °F). Together with high thermal heat transfer from steam it permits cooking in between a half and a quarter the time of conventional boiling.
According to New York Times Magazine, 37% of U.S. households owned at least one pressure cooker in 1950. By 2011, that rate dropped to only 20%. Part of the decline has been attributed to fear of explosion, although this is extremely rare with modern pressure cookers, along with competition from other fast cooking devices, such as the microwave oven.
In 1679, French physicist Denis Papin, better known for his studies on steam, invented the airtight cooker used steam pressure to raise the water"s boiling point, thus cooking food more quickly. In 1681 Papin presented his invention to the Royal Society of London as a scientific study; he was later elected as a member.
In 1918, Spain granted a patent for the pressure cooker to José Alix Martínez from Zaragoza. Martínez named it the olla exprés, literally "express cooking pot", under patent number 71143 in the Boletín Oficial de la Propiedad Industrial.360 recipes for cooking with a pressure cooker.
In 1935, the Automa pressure cooker was introduced. Mountaineers attempting to climb Mount Everest took it along with them to cook in higher altitudes.
In 1938, Alfred Vischer presented his invention, the Flex-Seal Speed Cooker, in New York City. Vischer"s pressure cooker was the first designed for home use, and its success led to competition among American and European manufacturers.1939 New York World"s Fair, the National Pressure Cooker Company, later renamed National Presto Industries, introduced its own pressure cooker.
Today, most pressure cookers are variations on the first-generation cookers, with the addition of new safety features such as a mechanism that prevents the cooker from being opened until it is entirely depressurized.
These include an electric heat source that is automatically regulated to maintain the operating temperature and pressure. They also include a spring-loaded valve (as described above) and are typically non venting during cooking.
Second-generation electric, with digital controller. Delayed cooking becomes possible and the controller shows a countdown timer when working pressure is reached.
Third-generation electric, with smart programming, which includes pre-set cooking times and settings based on heating intensity, temperature, pressure and duration.
Some pressure cookers are multifunctional (multicookers): pressure cooker, saute/browning, slow cooker, rice cooker, egg cooker, yogurt maker, steamer, sous vide, canner, and stockpot warmer that can also be used to keep cooked food warm.Ninja Foodi pressure cooker, which was the first pressure cooker that could also air fry, several other pressure cooker manufacturers, including Instant Pot, have come out with their own pressure cookers that can air fry, which are now known as pressure air fryers. Pressure air fryers have two separate lids, one for pressure cooking, and one for air frying.
At standard pressure the boiling point of water is 100 °C (212 °F). With any food containing or cooked with water, once the temperature reaches the boiling point, any excess heat causes some of the water to vaporize into steam efficiently carrying away heat keeping the food temperature at 100 °C.
In a sealed pressure cooker, as the water boils, the steam is trapped in the cooker which raises the pressure. However, the boiling point of water increases with pressure resulting in superheated water.
In a sealed pressure cooker the volume and amount of steam is fixed, so the temperature can be controlled either directly or by setting the pressure (such as with a pressure release valve).
For example, if the pressure reaches 1 bar or 100 kPa (15 psi) above the existing atmospheric pressure, the water will have reached a temperature of approximately 120 °C (248 °F) which cooks the food much faster.
Pressure cookers also use steam and water to rapidly transfer the heat to the food and all parts of the vessel. While, compared to an oven, a pressure cooker"s 120 °C is not particularly high, ovens contain air which is subject to thermal boundary layer effects which greatly slows heating, whereas pressure cookers flush air from the cooking vessel during warm up and replace it with hot steam. For items not placed within the liquid, as this steam condenses on the food it transfers water"s latent heat of vaporization, which is extremely large (2.275 kJ/g), to the surface, rapidly bringing the surface of the food up to cooking temperature. Because the steam condenses and drips away, no significant boundary layer forms and heat transfer is exceptionally efficient, and food heats much faster and more evenly.
However some recipes require browning to develop flavors as during roasting or frying. Higher temperatures are attainable with conventional cooking where the surface of the food can dry out. Such browning occurs via the Maillard reaction, at temperatures higher than the roughly 120 °C (248 °F) achieved in pressure cooking. Because those temperatures are not reached in pressure cooking, foods are generally browned by searing them, either in the open pressure cooker or another pan beforehand.
A pressure cooker can be used to compensate for lower atmospheric pressure at high elevations. The boiling point of water drops by approximately 1°C per every 294 metres of altitude (see: High-altitude cooking), causing the boiling point of water to be significantly below the 100 °C (212 °F) at standard pressure. This is problematic because temperatures above roughly 90°C are necessary to cook many common vegetables in a reasonable time. For example, on the summit of Everest (8,848 m (29,029 ft)), the boiling point of water would be only 70 °C (158 °F). Without the use of a pressure cooker, many boiled foods may remain undercooked, as described in Charles Darwin"s
Having crossed the Peuquenes [Piuquenes], we descended into a mountainous country, intermediate between the two main ranges, and then took up our quarters for the night. We were now in the republic of Mendoza. The elevation was probably not under 11,000 feet (3,400 m) [...]. At the place where we slept water necessarily boiled, from the diminished pressure of the atmosphere, at a lower temperature than it does in a less lofty country; the case being the converse of that of a Papin"s digester. Hence the potatoes, after remaining for some hours in the boiling water, were nearly as hard as ever. The pot was left on the fire all night, and next morning it was boiled again, but yet the potatoes were not cooked.
When pressure cooking at high altitudes, cooking times need to be increased by approximately 5% for every 300 m (980 ft) above 610 m (2,000 ft) elevation. Since the regulators work off the pressure differential between interior and ambient pressure, the absolute pressure in the interior of a pressure cooker will always be lower at higher altitudes.
Weight is a concern with backpackers, so mountaineering pressure cookers are designed to operate at a lower differential pressure than stove-top units. This enables them to use thinner, and therefore lighter materials. Generally, the goal is to raise the cooking temperature enough to make cooking possible and to conserve fuel by reducing heat lost through boiling.Sherpas often use pressure cookers in base camp.
Pressure cookers employ one or more regulators to control the pressure/temperature. All types have a calibrated pressure relief valve, as well as one or more emergency valves.
With the simplest types, once the desired pressure is reached, the valve opens, and steam escapes cooling the vessel and limiting the temperature. More advanced stovetop models have pressure indicators that permit the user to adjust the heat to prevent the steam from escaping. Third generation types automatically measure the state of the vessel and control the power so as to not release steam in operation.
Pressure cookers are available in different capacities for cooking larger or smaller amounts, with 6 litres" capacity being common. The maximum capacity of food is less than the advertised capacity because pressure cookers can only be filled up to 2/3 full, depending on ingredients and liquid (see Safety features section).
Because of the forces that pressure cookers must withstand, they are usually heavier than conventional pots of similar size. The increased weight of conventional pressure cookers makes them unsuitable for applications in which saving weight is a priority, such as camping. Nonetheless, small, lightweight pressure cookers are available for mountain climbers
A gasket or sealing ring, made from either rubber or silicone, forms a gas-tight seal that does not allow air or steam to escape between the lid and pan. Normally, the only way steam can escape is through a regulator on the lid while the cooker is pressurized. If the regulator becomes blocked, a safety valve provides a backup escape route for steam.
The twist-on design has slots on the lid engaging with flanges on the body, similar to a lid on a glass jar, that works by placing the lid on the pot and twisting it about 30° to lock it in place. A common modern design, it has easily implemented locking features that prevent the removal of the lid while under pressure.
The center screw design has a bar that is slotted in place over the lid and a screw tightened downward to hold the lid on. Though an older design, it is still produced due to its ease of construction and simplicity.
The bolt-down design has flanges on both its lid and its body for bolts to be passed through, and usually uses wingnuts that hinge on the body and so are never fully removed from the cooker; this sealing design is typically used for larger units such as canning retorts and autoclaves. It is very simple to produce, and it can seal with simple and inexpensive gaskets.
The internally fitted lid design employs an oval lid that is placed inside and presses outward; the user inserts the lid at an angle, then turns the lid to align it with the pot opening on top because the lid is larger than the opening. A spring arrangement holds the lid in place until the pressure forms and holds the lid tightly against the body, preventing removal until the pressure is released.
Gaskets (sealing rings) require special care when cleaning (e.g., not washed with kitchen knives), unlike a standard lid for a saucepan. Food debris, fats, and oils must be cleaned from the gasket after every use. Gasket/sealing rings need replacing with a new one about once a year (or sooner if it is damaged e.g. a small split). A very dry gasket can make it difficult or impossible to close the lid. Smearing the gasket sparingly with vegetable oil alleviates this problem (using too much vegetable oil can make the gasket swell and prevent it sealing properly). A gasket that has lost its flexibility makes bringing the cooker up to pressure difficult as steam can escape before sufficient pressure is generated to provide an adequate seal; this is usually a sign that the gasket needs replacing with a new one. Oiling the gasket with vegetable oil may alleviate the problem temporarily, but a new gasket is often required.
Early pressure cookers equipped with only a primary safety valve risked explosion from food blocking the release valve. On modern pressure cookers, food residues blocking the steam vent or the liquid boiling dry will trigger additional safety devices. Modern pressure cookers sold from reputable manufacturers have sufficient safety features to prevent the pressure cooker itself from exploding. When excess pressure is released by a safety mechanism, debris of food being cooked may also be ejected with the steam, which is loud and forceful. This can be avoided if the pressure cooker is regularly cleaned and maintained in accordance with the manufacturer"s instructions and never overfilled with food and/or liquid.
Modern pressure cookers typically have two or three redundant safety valves and additional safety features, such as an interlock lid that prevents the user from opening the lid when the internal pressure exceeds atmospheric pressure, preventing accidents from a sudden release of hot liquid, steam and food. If safety mechanisms are not correctly in place, the cooker will not pressurize the contents. Pressure cookers should be operated only after reading the instruction manual, to ensure correct usage. Pressure cooker failure is dangerous: a large quantity of scalding steam and water will be forcefully ejected and if the lid separates it may be propelled with considerable force. Some cookers with an internally fitted lid may be particularly dangerous upon failure as the lid fits tighter with increasing pressure, preventing the lid from deforming and venting around the edges. Due to these dangers pressure cookers are generally over-engineered in a safety regard and some countries even have regulations to prevent the sale of non-compliant cookers.
For first generation pressure cookers with a weighted valve or "jiggler", the primary safety valve or regulator is usually a weighted stopper, commonly called "the rocker" or "vent weight". This weighted stopper is lifted by the steam pressure, allowing excess pressure to be released. There is a backup pressure release mechanism that releases pressure quickly if the primary pressure release mechanism fails (e.g., food jams the steam discharge path). One such method is a hole in the lid that is blocked by a low melting point alloy plug and another is a rubber grommet with a metal insert at the center. At a sufficiently high pressure, the grommet will distort and the insert will blow out of its mounting hole to release pressure. If the pressure continues to increase, the grommet itself will blow out to release pressure. These safety devices usually require replacement when activated by excess pressure. Newer pressure cookers may have a self-resettable spring device, fixed onto the lid, that releases excess pressure.
On second generation pressure cookers, a common safety feature is the gasket, which expands to release excess pressure downward between the lid and the pot. This release of excess pressure is forceful and sufficient to extinguish the flame of a gas stove.
The recommended maximum fill levels of food/liquid avoids blockage of the steam valve or developing excess pressure: two-thirds full with solid food, half full for liquids and foods that foam and froth (e.g., rice, pasta; adding a tablespoon of cooking oil minimizes foaming),pulses (e.g., lentils).
Pressure cookers are typically made of aluminum (aluminium) or stainless steel. Aluminum pressure cookers may be stamped, polished, or anodized, but all are unsuitable for the dishwasher. They are cheaper, but the aluminum is reactive to acidic foods, whose flavors are changed in the reactions, and less durable than stainless steel pressure cookers.
Higher-quality stainless steel pressure cookers are made with heavy, three-layer, or copper-clad bottoms (heat spreader) for uniform heating because stainless steel has lower thermal conductivity. Most modern stainless steel cookers are dishwasher safe, although some manufacturers may recommend washing by hand. Some pressure cookers have a non-stick interior.
Pressure cooking always requires a water-based liquid to generate the steam to raise the pressure within the cooker. Pressure cooking cannot be used for cooking methods that produce little steam such as roasting, pan frying, or deep frying. A minimum quantity of liquid is required to create and maintain pressure, as indicated in the manufacturer"s instruction manual. For venting cookers more liquid is required for longer cooking times. This is not desirable for food requiring much less liquid, but recipes and books for pressure cookers take this into account.
Food is placed inside the pressure cooker with a small amount of water or other liquid such as stock. Food is either cooked in the liquid or above the liquid for steaming; the latter method prevents the transfer of flavors from the liquid.
Sauces which contain starch thickeners can tend to burn onto the interior base of the pressure cooker which may prevent the cooker from reaching operating pressure. Because of this issue, sauces may require thickening or reduction after pressure cooking.
With pot in pot pressure cooking, some or all of the food is placed in an elevated pot on a trivet above water or another food item which generates the steam. This permits the cooking of multiple foods separately, and allows the use of minimal water mixed with the food in the pot which permits thick sauces which would otherwise scorch onto the bottom of the pan to be cooked.
The lid is closed, the pressure setting is chosen and the pressure cooker is heated to boil the liquid. The cooker fills with steam and vents air. As the internal temperature rises, the pressure rises until it reaches the desired gauge pressure.
It usually takes several minutes for the pressure cooker to reach the selected pressure level. It can take around 10 minutes or longer depending on: the quantity of food, the temperature of the food (cold or frozen food delays pressurization), the amount of liquid, the power of the heat source and the size of the pressure cooker. There is typically a pop-up indicator that shows that the cooker has pressure inside, but it does not reliably signal that the cooker has reached the selected pressure. The pop-up indicator shows the state of the interlock which prevents the lid from being opened while there is any internal pressure. Manufacturers may use their own terminology for it, such as calling it a "locking indicator."
Timing the recipe begins when the selected pressure/pressure is reached. Once the cooker reaches full pressure, the heat is lowered to maintain the pressure. With pressure cookers accurate timing is essential using an audible timer.
With first generation designs, the pressure regulator weight begins levitating above its nozzle, allowing excess steam to escape. In second generation pressure cookers, either a relief valve subsequently opens, releasing steam to prevent the pressure from rising any further or a rod rises with markers to indicate the pressure level, without constantly venting steam. At this stage, the heat source is reduced to the lowest possible heat that still maintains pressure, as extra heat wastes energy and increases liquid loss. In third generation pressure cookers, the device will detect the vessel has reached the required cooking temperature/pressure and will maintain it for the programmed time, generally without further loss of steam.
Recipes for foods using raising agents such as steamed puddings call for gentle pre-steaming, without pressure, in order to activate the raising agents prior to cooking and achieve a light, fluffy texture.
Small containers such as plastic pudding containers can be used in a pressure cooker, if the containers (and any covering used) can withstand temperatures of 130 °C (266 °F) and are not placed directly on the interior base. The containers can be used for cooking foods that are prone to burning on the base of the pressure cooker. A lid for the container may be used if the lid allows some steam to come into contact with the food and the lid is securely fitted; an example is foil or greaseproof paper, pleated in the center and tied securely with string. Containers that are cracked or have otherwise sustained damage are not suitable. Cooking time is longer when using covered containers because the food is not in direct contact with the steam. Since non-metal containers are poorer heat conductors, the type of container material stated in the recipe cannot be substituted without affecting the outcome. For example, if the recipe time is calculated using a stainless steel container and a plastic container is used instead, the recipe will be undercooked, unless the cooking time is increased. Containers with thicker sides, e.g., oven-proof glass or ceramic containers, which are slower to conduct heat, will add about 10 minutes to the cooking time. Liquid can be added inside the container when pressure cooking foods such as rice, which need to absorb liquid in order to cook properly.
The flavor of some foods, such as meat and onions, can be improved by gently cooking with a little pre-heated cooking oil, butter or other fat in the open pressure cooker over medium heat for stove-top models (unless the manufacturer advises against this) before pressure cooking, while avoiding overheating the empty pressure cooker not heating the empty cooker with the lid and gasket in place to avoid damage. Electric pressure cookers usually have a "saute" or "brown" option for frying ingredients. The pressure cooker needs to cool briefly before adding liquid; otherwise some of the liquid will evaporate instantly, possibly leaving insufficient liquid for the entire pressure cooking time; if deglazing the pan, more liquid may need to be added.
After cooking, there are three ways of releasing the pressure, either quickly or slowly, before the lid can be opened. Recipes for pressure cookers state which release method is required at the end of the cooking time for proper results. Failure to follow the recommendation may result in food that is under-cooked or over-cooked.
To avoid opening the pressure cooker too often while cooking different vegetables with varying cooking times, the vegetables that take longer to cook can be cut into smaller pieces and vegetables that cook faster can be cut into larger pieces.
To inspect the food, the pressure cooker needs to be opened, which halts the cooking process. With a conventional saucepan, this can be done in a matter of seconds by visually inspecting the food.
This method is sometimes called a quick release, not to be confused with the cold water release (mentioned below). It involves the quick release of vapor by gradually lifting (or removing) the valve, pushing a button, or turning a dial. It is most suitable to interrupt cooking to add food that cooks faster than what is already in the cooker. For example, since meat takes longer to cook than vegetables, it is necessary to add vegetables to stew later so that it will cook only for the last few minutes. Unlike the cold water release method, this release method does not cool down the pressure cooker. Releasing the steam with care avoids the risk of being scalded by the rapid release of hot steam. This release method is not suitable for foods that foam and froth while cooking; the hot contents might spray outwards due to the pressure released from the steam vent. Pressure cookers should be operated with caution when releasing vapour through the valve, especially while cooking foamy foods and liquids (lentils, beans, grains, milk, gravy, etc.)
The natural release method allows the pressure to drop slowly. This is achieved by removing the pressure cooker from the heat source and allowing the pressure to lower without action. It takes approximately 10 to 15 minutes (possibly longer) for the pressure to disappear before the lid can be opened. On many pressure cookers, a coloured indicator pin will drop when the pressure has gone. This natural release method is recommended for foods that foam and froth during cooking, such as rice, legumes, or recipes with raising agents such as steamed puddings. The texture and tenderness of meat cooked in a pressure cooker can be improved by using the natural release method. The natural release method finishes cooking foods or recipes that have longer cooking times because the inside of the pressure cooker stays hot. This method is not recommended for foods that require very short cooking times, otherwise the food overcooks.
This method is the fastest way of releasing pressure with portable pressure cookers, but can be dangerous if performed incorrectly. Hence it is safer to release pressure by using the other methods. The manufacturer"s instruction book may advise against the cold water release or require it to be performed differently.
The cold water release method involves using slow running cold tap water, over the edge of the pressure cooker lid, being careful to avoid the steam vent or any other valves or outlets, and never immersing the pressure cooker under water, otherwise steam can be ejected from under the lid, which could cause scalding injury to the user; also the pressure cooker lid can be permanently damaged by an internal vacuum if water gets sucked into the pressure cooker, since the incoming water blocks the inrush of air.
The cold water release is most suitable for foods with short cooking times. It takes about 20 seconds for the cooker to cool down enough to lower the pressure so that it can be safely opened. This method is not suitable for electric pressure cookers, as they are not immersible. This type of pressure cooker cannot be opened with a cold water quick-release method.
The cold water release method is not recommended when cooking pulses e.g. red kidney beans, as the sudden release of pressure can cause the bean to burst its skin.
Most pressure cookers have a cooking (operating) pressure setting between 0.8–1 bar (11.6–15 psi) (gauge) so the pressure cooker operates at 1.8 to 2.0 bar (absolute). The standard cooking pressure of 15 psi gauge was determined by the United States Department of Agriculture in 1917. At this pressure, water boils at 121 °C (250 °F) (described in vapour pressure of water article).
The higher temperature causes food to cook faster; cooking times can typically be reduced to one-third of the time for conventional cooking methods. The actual cooking time also depends on the pressure release method used after timing Christmas puddings are typically timed according to their weight. Frozen foods need extra cooking time to allow for thawing.
When pressure cooking at 1 bar/15 psi (gauge), approximate cooking times are one minute for shredded cabbage, seven minutes for boiled potatoes (if cut small, not diced) and three minutes for fresh green beans. If the pressure is released naturally after timing
Some recipes may require cooking at lower than 1 bar/15 psi (gauge) e.g. fresh vegetables, as these can easily overcook. Many pressure cookers have 2 or more selectable pressure settings or weights.
Some pressure cookers have a lower or higher maximum pressure than 1 bar/15 psi (gauge) or can be adjusted to different pressures for some recipes; cooking times will increase or decrease accordingly. This is typically done by having different regulator weights or different pressure or temperature settings. Some pressure cookers operate at lower pressures than others. If the recipe is devised for a higher pressure and the pressure cooker does not reach that pressure, the cooking time can be increased to compensate.
Less energy is required than that of boiling, steaming, or oven cooking. Since less water or liquid has to be heated, the food reaches its cooking temperature faster. Using more liquid than necessary wastes energy because it takes longer to heat up; the liquid quantity is stated in the recipe. Pressure cookers can use much less liquid than the amount required for boiling or steaming in an ordinary saucepan. It is not necessary to immerse food in water. The minimum quantity of water or liquid used in the recipe to keep the pressure cooker filled with steam is sufficient. With non venting pressure cookers, steam isn"t continually escaping, thus evaporation losses are non existent once it has reached pressure. Overall, energy used by pressure cookers can be as much as 70% lower than used by cooking in a pan.
Because of this, vitamins and minerals are not leached (dissolved) away by water, as they would be if food were boiled in large amounts of water. Due to the shorter cooking time, vitamins are preserved relatively well during pressure cooking.
Several foods can be cooked together in the pressure cooker, either for the same amount of time or added later for different times. Manufacturers provide steamer baskets to allow more foods to be cooked together inside the pressure cooker.
Not only is this steam energy transmitted quickly to food, it is also transmitted rapidly to any micro-organisms that are present, easily killing even the deadliest types that are able to survive at the boiling point. Because of this enhanced germ killing ability, a pressure cooker can be used as an effective sanitizer for jam pots, glass baby bottles, or for water while camping.
Some foods are not recommended for pressure cooking. Foods such as noodles, pasta, cranberries, cereals and oatmeal can expand too much, froth and sputter, potentially blocking the steam vent and creating an unsafe condition.
An ≥ 121 °C) is a type of pressure cooker used by laboratories and hospitals to sterilize equipment. A stovetop autoclave is essentially a higher-pressure cooker with a gauge, used as an autoclave in poorer areas.
Pressure canners are large pressure cookers which have the capacity to hold jars used in canning. Pressure canners are specifically designed for home canning, whereas ordinary pressure cookers are not recommended for canning due to the risk of botulism poisoning, because pressure canners hold heat (≥ 115 °C) and pressure for much longer than ordinary pressure cookers; these factors are a critical part of the total processing time required to destroy harmful microbes such as bacterial spores.
A pressure air fryer (not to be confused with a pressure fryer) is a recent combination of a pressure cooker and an air fryer, with two separate lids, one for pressure cooking and one for air frying. The air frying lid has a convection fan in it that allows it to air fry foods, similar to an air fryer oven. This innovation was popularized by the Ninja Foodi Pressure Cooker, marketed as the first pressure cooker that can crisp and air fry.
A pressure oven is a recent combination of an oven and pressure cooker, usually as a countertop convection oven. They operate at low pressures, 10 kilopascals (1.5 psi), compared to other pressure cookers.rotisserie. Although having insufficient pressure for most conventional pressure cooking functions, they do also have non-pressure oven modes.
Robinson, H. (1947). Denis Papin (1647-1712). Notes and records of the Royal Society of London, 5(1), 47-50. Retrieved June 25, 2021, from http://www.jstor.org/stable/531177
Rick Rodgers; Arlene Ward & Kathryn Russell (2000). Pressure Cooking for Everyone. Chronicle Books. p. 12. ISBN 9780811825252. Retrieved 30 June 2016.
Park, Je Won; Kim, Young-Bae (March 2006). "Effect of Pressure Cooking on Aflatoxin B in Rice". Journal of Agricultural and Food Chemistry. 54 (6): 2431–2435. doi:10.1021/jf053007e. PMID 16536630.
Wise, Victoria (2005). The Pressure Cooker Gourmet: 225 Recipes for Great-Tasting, Long-Simmered Flavors in Just Minutes. Harvard, Mass: Harvard Common Press. p. 262. ISBN 1-55832-201-9.
Borenstein, Seth (17 April 2013). "How does a pressure cooker bomb work?". MediaWorks TV. Archived from the original on 24 March 2016. Retrieved 13 November 2018.
"Burning Issue: Canning in Pressure Cookers". National Center for Home Food Preservation. September 2015. Archived from the original on 13 November 2018. Retrieved 13 November 2018.

You may know how to use an Instant Pot or pressure cooker to make your meal, but when you’re done cooking, how do you release the pressure? You have several options that can work while preserving your food, too. For your safety, be sure to follow the cooking instructions that come with your appliance.
The quick-release option works best for those nights when you need to get the meal on the table quickly before your meeting or the kids’ sports practice. When your food finishes cooking, hit the “cancel” button, then move the valve to “venting.” The quick-release method has many benefits, including saving you time and avoiding the mushiness that can occur when the instant pot overcooks the ingredients. If you often overcook your food, the quick release may be your best option.
It takes about two or three minutes to finish this type of release. Don’t use cold water to stop the pressure cooker or you may damage your instant pot.
The natural-release method takes more time than quick-release, from 10 to 60 minutes based on the meal you make. Instead of finishing up fast, you slowly let the pressure on the pot decrease until you’re ready to serve. You may choose to wait until the pressure naturally lowers and the lid-lock disengages, or you can wait 10 minutes until the recipe finishes cooking and open the valve for a slightly faster method. Either way will offer several benefits, including:
Intermittent pressure release combines the best aspects of natural and quick releases. This method allows you to get to your food quickly while ensuring it’s properly cooked. We recommend this approach to avoid spitting, which can occur with a quick release, or overcooking with a natural release.
Toggle the pressure release valve between open and closed several times, allowing pressure to decrease naturally while also stopping foam from escaping through the valve. While it may only take one or two toggles before the food is ready, you should check if it’s still foaming before you dig in.
Now that you know how to release pressure from a pressure cooker, you may already be looking forward to your next meal! Find the ingredients you need from San-J to make a delicious recipe. Our Slow & Pressure Cooker Sauces are great for slow cooking, pressure cooking and simmering. Whether you’re making Korean beef, Hawaiian teriyaki meatballs or Thai green curry chicken, San-J Slow & Pressure Cooker Sauces make it easy to bring bold Asian flavors to your favorite dishes.

Quick pressure release or natural pressure release?It’s one of the most common questions I get. Electric pressure cookers and multi-cookers like the Instant Pot, Ninja Foodi, and Crockpot Express have the ability to release pressure two ways. Instant Pot Natural Release is a frequent search term. Let me explain the difference!
Releasing the pressure can be a little intimidating to people who are new to pressure cooking—especially the quick release with the noise and jet of steam. But don’t let a little noise get between you and fabulous meals cooked in your pressure cooker!
Those are often the first questions new pressure cooker users ask. So I thought it would be a perfect time for a post explaining it for all those who have an electric pressure cooker or multi-cooker like the Instant Pot waiting for them under the tree.
When the cook time ends, your pressure cooker will beep. At this point, the recipe will direct you to release the pressure in the cooking pot. You can release the pressure two ways: a quick pressure release or a natural pressure release.
A quick pressure release is when you turn the pressure release switch to the Venting position and let the steam to release quickly when the cook time ends. This will result in a strong jet of steam coming from the pressure release valve. This is normal.If drops of liquid or foam start to emerge from the pressure release valve, simply switch the valve back to the Sealed position and use an Intermittent Pressure Release (more on that below).
Other pressure cookers may have different labels, but it’s the same basic principle. Turn the valve to allow the steam to escape / pressure to release.
When the pressure is fully released, the float valve will drop and the lid will unlock to open. For safety reasons, the pressure cooker will not open until the pressure is released and the float valve has dropped.
Using a quick pressure release stops the pressure cooking quickly. Therefore, you should use a quick pressure release when you are cooking ingredients, like vegetables, that you want to avoid overcooking.
A natural pressure release is when you leave the pressure release switch in the Sealed position when the cook time ends. This lets the pressure release slowly, without you doing anything. When the pressure is fully released, the float valve will drop and the lid will unlock and open.
A natural pressure release is a bit anticlimactic in comparison to a quick pressure release. There is no jet of steam when the natural pressure release starts. There’s also no clear way to tell when the pressure is fully released, and no beep or signal when the lid unlocks. Sometimes you can hear the float valve drop if you’re close by.
The time it takes for the pressure to release naturally will vary depending on the ingredients and amount of liquid in the pressure cooker. A natural pressure release can take from 5 to 30 minutes in the electric pressure cooker.
Using a natural pressure release allows the cooking to stop gradually. You don’t want to open the valve quickly when the ingredients inside could be foaming. You’ll get foam shooting out through the valve, so use a natural pressure release when making steel cut oats, a large pot of soup or pasta.
You also want to use a natural release for large cuts of meat. Just like you’d let meat rest after grilling it, a slow natural release is said to let the meat relax and be more tender.
During a natural release, the cooking continues so you need to take that in to account when determining your cook time. If a recipe calls for a Quick Release, you can use a Natural Release if you prefer, but reduce the cook time.
The different types of pressure releases can also be combined. You don’t have to wait for all the pressure to release to get the benefit of a natural pressure release.
I almost always only wait 10 minutes before I release the remaining pressure. Combining the two release options reduces waiting time yet gives you many of the benefits of a natural pressure release, such as reducing foam and tenderizing meats.
An intermittent pressure release is the best of both worlds. It’s a way to quickly release pressure for foods such as pastas, soups, and certain grains, which are prone to foaming or spitting if you try to release pressure with a quick release but would be overcooked with a natural pressure release.
With this method, you open and close the pressure release valve in short intervals. This allows the pressure to escape more quickly than a natural pressure release and also prevents foam from coming out of the pressure release valve.
With some foods, one or two closed intervals is all I need before I can leave the valve in the Venting position; with other foods, if the foaming is particularly bad, I will close the valve and wait a minute or two, then slide the valve to Venting again and continue opening and closing the valve as needed.
No you do not need to turn the pressure cooker off for a quick or natural pressure release. The pressure will release on the Keep Warm setting. The benefit of not turning it off is that the time will count up so you can see how long it’s been since the pressure cooking time ended.
There is some debate about whether or not the pressure releases more slowly if it’s on the Keep Warm Setting. The Instant Pot Company’s official position is that it does not release more slowly on the Keep Warm Setting because the Keep Warm heat does not turn on until the pressure has been released.
I prefer to turn off or unplug the pressure cooker before I do a quick pressure release or natural pressure release. I seem to always forget to turn off the pressure cooker if I don’t turn it off when the pressure cooking ends. I also prefer to set a timer to remind me 10 minutes has passed and it’s time to release the pressure when I’m doing a natural pressure release.
If you’re in a hurry to get cooking, you can always skip to our Make Your First Meal post and come back to this information while you’re waiting for the chicken to cook.
Once you have your first meal under your belt, move on to some easy pressure cooking recipes. Before you know it, you’ll be making fabulous pressure cooker meals and wondering how you ever cooked without it.
We are a participant in the Amazon Services LLC Associates Program, an affiliate advertising program designed to provide a means for us to earn fees by linking to Amazon.com and affiliated sites.

Over the last decade the Instant Pot has elbowed its way onto many a kitchen counter. The multifunctional appliance earns its place with slow cooker, pressure cooker, and saute capabilities (just to name a few). So you can either set-it-and-forget-it before leaving for work or pressure cook a whole chicken in a fraction of the time it takes in the oven.
That’s all great, but when the Instant Pot’s many buttons and menacing-looking steam valve are staring you in the face, the appliance ($99.95, Amazon) can be intimidating. I promise it’s easy to use once you get started.
They’re not quite as user-friendly as a simple Crock-Pot, but it’s worth learning how to use the multicooker just for the time you’ll save in the kitchen. There are a few basic steps for most easy Instant Pot recipes, but you’ll get the hang of it. Here’s what you need to know about using an Instant Pot.
The Instant Pot is a pressure cooker that works by using steam to build pressure. As the pressure builds forcefully inside the pot, it produces temperatures high enough to quickly heat and cook the food inside.
Instant Pots have other built-in cooking programs, too. It can act as a, yogurt maker, rice maker, steamer, orsautepan — making it one of the most versatile smallon the market.
For starters, wash the pot and inside the lid with soap and water before using for the first time (and of course, between uses). When it’s plugged in and ready to go, here’s how to get going:
The Instant Pot comes with a few accessories, most of which you won’t use a lot. Your go-to accessory is the plastic condensation catcher. Snap it onto the back of the Instant Pot to collect condensation from the steam; otherwise, you’ll end up with water all over the counter.
Place the lid on top of the pot and push down as you turn it clockwise (in the direction of the arrows printed on the lid). This will seal the lid to the pot so that the Instant Pot can pressure cook the food inside. Turn the valve (the little knob on top of the lid) to the sealing position.
Once you’re ready to cook, set the time and pressure controls according to your recipe instructions. Select “pressure cook” and use the + and – buttons on the control panel to set the time. Almost every Instant Pot recipe involves the pressure cook option, but note that other modes may differ. The “saute” mode should always be used with the lid off, and if you’re using the “slow cook” setting, make sure the valve is set to venting rather than sealing.
When your food is cooked, move the pressure release valve from the “sealing” position to the “venting” position. When you do this, all the hot steam from inside the pot will come out of the valve, so be careful not to burn yourself. It’s easiest to do this while wearing an oven mitt or by using a long-handled spatula to turn the knob so your arm is never directly over the steam. When all the steam has been released, you can open the lid.
When you hit “pressure cook,” your Instant Pot will default to the amount of time last used. Simply use the + and – buttons to adjust the time according to the recipe you’re making.
The Instant Pot takes a few minutes to reach the proper pressure to cook. If you set it at 10 minutes, it won’t actually be done in 10 minutes. Allow 3 – 4 extra minutes per recipe for the appliance to heat. The machine is smart enough to know how long you set it for, so even with the added minutes, after exactly 10 minutes of cook time, it’ll turn off and your food is done.
To start the Instant Pot Duo, plug it in and add the food you want to cook. Then use the control panel to set the pressure (high or low), and set it to the appropriate time. The confusing thing about the Instant Pot Duo is that it doesn’t actually have a start button — as soon as you set a time, it’ll start heating.
Since your Instant Pot works by using steam to create pressure, you’ll need to add at least one cup of liquid to your Instant Pot for any meal you cook.
Also, some foods carry more water than others, so you’ll probably need to add less water with veggies (like tomatoes or spinach) than you would with denser foods like meats.
Inside your inner pot, you’ll see it says “PC MAX,” with a 2/3 line and a 1/2 line. It’s important to never fill your inner pot past than the 2/3 max line.
The steam valve sits on top of your Instant Pot lid and has two settings:sealingandventing.The steam release handle allows you to move from one setting to the other.
Make sure the steam release handle is in thesealingposition before using any of the pressure cooking programs. This will prevent steam from escaping the Instant Pot and allow pressure to build inside.
To vent the steam valve,you’ll need to have the steam release handle in theventingposition — either by pushing it back yourself (also known as a manual or “quick release”) or on its own via a “natural release.”
Natural Release:Your Instant Pot releases pressure on its own until the float valve (next to the steam valve on top of your lid) drops down. A natural release takes a bit longer, but it’s best for recipes with meats, soups, broths, beans, starchy foods, and foods with lots of liquid.
Quick Release:You manually release pressure from your Instant Pot by pushing the steam release handle back to the venting position until the float valve drops down. A quick release is much faster and is best for recipes with vegetables, fish, and fragile or fast-cooking foods.
The sealing ringis an Instant Pot accessory and safeguard that keeps your lid locked tight during pressure cooking. It helps your machine withstand the high forces of pressure needed to cook the food inside.
That’s why it’s always good to have a spare sealing ring to use for different types of Instant Pot recipes. I recommend using one sealing ring for sweets and another sealing ring for savory dishes.
TheKeep Warmsetting automatically turns on when your food is done cooking, so it’s easy to get distracted and forget that it’s on. If you don’t manually shut off the machine, the Keep Warm setting will keep it on for 10 hours before the machine shuts off itself.
If you’d rather NOT use the Keep Warm setting on your Instant Pot, you can switch it off on the control panel and avoid the risk of overcooked food altogether.
Depending on the recipe and the amount of food you’re cooking, it can take up to 40 minutes for your Instant Pot to fully build pressure. But remember, releasing that pressure from your Instant Pot takes time, too.
Before starting your Instant Pot recipe, don’t forget to factor in the time it takes to build and release pressure. A 15-minute recipe can quickly turn into a 35-minute recipe when you account for the whole process.
The cooking programs are located on the left and right sides of your control panel. Press the button for the cooking program you want to use; then press the “+” and “-” buttons to add or subtract time.
Instant Pots are best known for their pressure cooking abilities, but that doesn’t mean its other programs (like slow cooking andsauteeing) aren’t as good.
Thesauteprogram works the same as a stovetop pot or pan, but it’s definitely a game-changer. You can stir-fry veggies, thicken sauces, and brown meats without adding another pot to your pile of dishes.


 8613371530291