
wire rope cable clamp installation factory

Wire rope clip is otherwise known as a wire rope clamp, wire cable clamp, wire clamp, wire clip, U-bolt, etc. It is widely used for making eye-loop connections or join two wire rope cable ends together. The traditional styles of wire rope clips usually have three components: a U-shaped bolt, a forged or cast iron saddle, and two nuts.
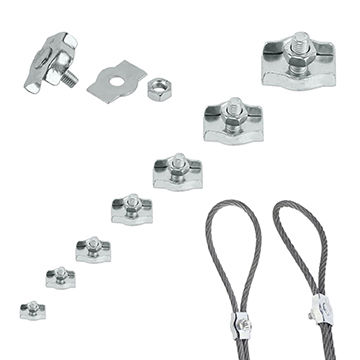
The wire rope clips are available in a range of sizes and finishes, while you can easily find the difference from the appearance, traditional wire clips with u bolt, saddle and nuts, fist grip, stamped cable clamp.
Cast and malleable wire rope clips can only be used under light duty loads applications with relatively light loads, such as handrails, fencing, guard rails, etc.
While the drop forged wire rope clip variety is recommended for important, critical or sustaining overhead loads, such as guy lines, support lines, scaffolding, etc. The drop forged wire rope clips can be used in critical suspending, guying, and tie-down applications for the die forging process make them strong and more durable and the heating and hammering steps make their structure to be consistent and conform to the shape of the forged item.
Simplex and duplex cable clamps are also known as single stamped wire clip and double stamped cable clip are composed of stamping plate, saddle, and bolts, feature an aesthetic design, used for outdoor light duty applications.
Wire rope clips are available in a variety of materials and finishes but basically three types of materials, carbon steel, cast, malleable iron, and stainless steel.
Carbon steel wire rope cable clamps are galvanized, or hot dipped galvanized, the galvanised metal wire clamp has an added zinc layer to prevent rusting and protect against scratching and the addition of carbon corresponds with an increase in the hardness and strength of wire rope cable clamps. G, but stainless steel wire rope clamps are the best choice for corrosion-resistant applications that can be used for saltwater environments.
Commonly wire rope clamp installation is very simple, there’s a well-known saying can help you remember how to attach wire rope clips, that reads “never saddle a dead horse.” Just follow the recommendation ways:
Keep three or more wire rope clips attached at the end of the wire rope dead end, space between each wire rope clip should be at least 6 times the wire rope diameter.
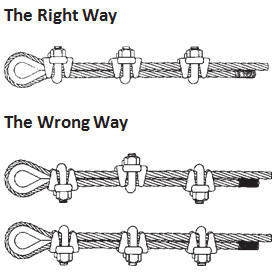
You can see the correct and incorrect ways of installation from the following pictures and find how many wire rope clips to use at one wire rope loop.
The saddle shall be placed on the live end of the wire rope, with the U-bolt on the dead-end side—Remember the well-known saying: “Never saddle a dead horse.” Use at least two or three wire rope clips to secure the ends properly to the length of the rope, and tighten nuts evenly one by one until reaching the recommended torque.
If you have any wire rope clips questions, you can contact us by email at info@hilifting.com. We will be glad to share with you more useful information.

While these clips are not designed to be used in an overhead lifting situation (swage sleeves should be used instead), wire rope clips are heavy-duty wire rope clips that used for sustaining overhead loads. Examples include guy lines, support lines, scaffolding, etc.
Install the first clip at the dead end side of the rope. The "U" side of the clip must always cover the dead end of the rope, and the "saddle" side of the clip on the live end of the rope. Place the nuts of the clip and tighten them using a torque wrench.
Place more clips on the rope if you need more than two on the wire rope. Be sure to space them evenly between the end clips. Finally, tighten the end clips and apply tension to reach the recommended torque for the wire rope.
Wire rope clips, also called wire rope clamps, consist of a U-shaped bolt, a metal saddle piece, and two nuts. They are used in wire rope loop assemblies and are ideal for field installations. We offer several models to meet your specific needs.

Rope diameter is specified by the user and is generally given in the equipment manufacturer’s instruction manual accompanying the machine on which the rope is to be used.
Rope diameters are determined by measuring the circle that just touches the extreme outer limits of the strands— that is, the greatest dimension that can be measured with a pair of parallel-jawed calipers or machinist’s caliper square. A mistake could be made by measuring the smaller dimension.
The right way to unreel.To unreel wire rope from a heavy reel, place a shaft through the center and jack up the reel far enough to clear the floor and revolve easily. One person holds the end of the rope and walks a straight line away from the reel, taking the wire rope off the top of the reel. A second person regulates the speed of the turning reel by holding a wood block against the flange as a brake, taking care to keep slack from developing on the reel, as this can easily cause a kink in the rope. Lightweight reels can be properly unreeled using a vertical shaft; the same care should be taken to keep the rope taut.
The wrong way to unreel.If a reel of wire rope is laid on its flange with its axis vertical to the floor and the rope unreeled by throwing off the turns, spirals will occur and kinks are likely to form in the rope. Wire rope always should be handled in a way that neither twists nor unlays it. If handled in a careless manner, reverse bends and kinks can easily occur.
The right way to uncoil.There is only one correct way to uncoil wire rope. One person must hold the end of the rope while a second person rolls the coil along the floor, backing away. The rope is allowed to uncoil naturally with the lay, without spiraling or twisting. Always uncoil wire rope as shown.
The wrong way to uncoil.If a coil of wire rope is laid flat on the floor and uncoiled by pulling it straight off, spirals will occur and kinking is likely. Torsions are put into the rope by every loop that is pulled off, and the rope becomes twisted and unmanageable. Also, wire rope cannot be uncoiled like hemp rope. Pulling one end through the middle of the coil will only result in kinking.
Great stress has been placed on the care that should be taken to avoid kinks in wire rope. Kinks are places where the rope has been unintentionally bent to a permanent set. This happens where loops are pulled through by tension on the rope until the diameter of the loop is only a few inches. They also are caused by bending a rope around a sheave having too severe a radius. Wires in the strands at the kink are permanently damagedand will not give normal service, even after apparent “re-straightening.”
When wire rope is wound onto a sheave or drum, it should bend in the manner in which it was originally wound. This will avoid causing a reverse bend in the rope. Always wind wire rope from the top of the one reel onto the top of the other.Also acceptable, but less so, is re-reeling from the bottom of one reel to the bottom of another. Re-reeling also may be done with reels having their shafts vertical, but extreme care must be taken to ensure that the rope always remains taut. It should never be allowed to drop below the lower flange of the reel. A reel resting on the floor with its axis horizontal may also be rolled along the floor to unreel the rope.
Wire rope should be attached at the correct location on a flat or smooth-faced drum, so that the rope will spool evenly, with the turns lying snugly against each other in even layers. If wire rope is wound on a smooth-face drum in the wrong direction, the turns in the first layer of rope will tend to spread apart on the drum. This results in the second layer of rope wedging between the open coils, crushing and flattening the rope as successive layers are spooled.
A simple method of determining how a wire rope should be started on a drum. The observer stands behind the drum, with the rope coming towards him. Using the right hand for right-lay wire rope, and the left hand for left lay wire rope, the clenched fist denotes the drum, the extended index finger the oncoming rope.
Clips are usually spaced about six wire rope diameters apart to give adequate holding power. They should be tightened before the rope is placed under tension. After the load is placed on the rope, tighten the clips again to take care of any lessening in rope diameter caused by tension of the load. A wire rope thimble should be used in the eye of the loop to prevent kinking.
U-bolt Clips.There is only one correct method for attaching U-bolt clips to wire rope ends, as shown in TheRightWayimage below. The base of the clip bears on the live end of the rope; the “U” of the bolt bears on the dead end.
Compare this with the incorrect methods. Five of the six clips shown are incorrectly attached—only the center clip in the top view is correct. When the “U” of the clip bears on the live end of the rope, there is a possibility of the rope being cut or kinked, with subsequent failure.
Proper seizing and cutting operations are not difficult to perform, and they ensure that the wire rope will meet the user’s performance expectations. Proper seizings must be applied on both sides of the place where the cut is to be made. In a wire rope, carelessly or inadequately seized ends may become distorted and flattened, and the strands may loosen. Subsequently, when the rope is operated, there may be an uneven distribution of loads to the strands; a condition that will significantly shorten the life of the rope.
Either of the following seizing methods is acceptable. Method No. 1 is usually used on wire ropes over one inch in diameter. Method No. 2 applies to ropes one inch and under.
Method No. 1: Place one end of the seizing wire in the valley between two strands. Then turn its long end at right angles to the rope and closely and tightly wind the wire back over itself and the rope until the proper length of seizing has been applied. Twist the two ends of the wire together, and by alternately pulling and twisting, draw the seizing tight.
The Seizing Wire. The seizing wire should be soft or annealed wire or strand. Seizing wire diameter and the length of the seize will depend on the diameter of the wire rope. The length of the seizing should never be less than the diameter of the rope being seized.
Proper end seizing while cutting and installing, particularly on rotation-resistant ropes, is critical. Failure to adhere to simple precautionary measures may cause core slippage and loose strands, resulting in serious rope damage. Refer to the table below ("Suggested Seizing Wire Diameters") for established guidelines. If core protrusion occurs beyond the outer strands, or core retraction within the outer strands, cut the rope flush to allow for proper seizing of both the core and outer strands.
The majority of wire rope problems occurring during operation actually begin during installation, when the rope is at its greatest risk of being damaged. Proper installation procedures are vital in the protection and performance of wire rope products.
Until the rope is installed it should be stored on a rack, pallet or reel stand in a dry, well-ventilated storage shed or building. Tightly sealed and unheated structures should be avoided as condensation between rope strands may occur and cause corrosion problems. If site conditions demand outside storage, cover the rope with waterproof material and place the reel or coil on a support platform to keep it from coming directly in contact with the ground.
While lubrication is applied during the manufacturing process, the wire rope must still be protected by additional lubrication once it is installed. Lubricants will dry out over a period of time and corrosion from the elements will occur unless measures are taken to prevent this from happening. When the machine becomes idle for a period of time, apply a protective coating of lubricant to the wire rope. Moisture (dew, rain, and snow) trapped between strands and wires will create corrosion if the rope is unprotected. Also apply lubricant to each layer of wire rope on a drum because moisture trapped between layers will increase the likelihood of corrosion.
Always use the nominal diameter as specified by the equipment manufacturer. Using a smaller diameter rope will cause increased stresses on the rope and the probability of a critical failure is increased if the rated breaking strength does not match that of the specified diameter. Using a larger diameter rope leads to shorter service life as the rope is pinched in the sheave and drum grooves which were originally designed for a smaller diameter rope. Just as using a different diameter rope can create performance problems, so can the use of an excessively undersized or oversized rope.
Measure the wire rope using a parallel-jawed caliper as discussed in Measuring Rope Diameter at the top of this page. If the rope is the wrong size or outside the recommended tolerance, return the rope to the wire rope supplier. It is never recommended nor permitted by federal standards to operate cranes with the incorrect rope diameter. Doing so will affect the safety factor or reduce service life and damage the sheaves and drum. Note that in a grooved drum application, the pitch of the groove may be designed for the rope’s nominal diameter and not the actual diameter as permitted by federal standards.
Wire rope can be permanently damaged by improper unreeling or uncoiling practices. The majority of wire rope performance problems start here.Improper unreeling practices lead to premature rope replacement, hoisting problems and rope failure.
Place the payout reel as far away from the boom tip as is practical, moving away from the crane chassis. Never place the payout reel closer to the crane chassis than the boom point sheave. Doing so may introduce a reverse bend into the rope and cause spooling problems. Follow the guidelines highlighted under Unreeling and Uncoiling and Drum Winding. Take care to determine whether the wire rope will wind over or under the drum before proceeding. If the wire rope supplier secured the end of the rope to the reel by driving a nail through the strands, ask that in the future a U-bolt or other nondestructive tie-down method be used; nails used in this manner damage the rope.
Take extra precaution when installing lang lay, rotation-resistant, flattened strand or compacted ropes. Loss of twist must be avoided to prevent the strands from becoming loosened, causing looped wire problems.
The end of the rope must be securely and evenly attached to the drum anchorage point by the method recommended by the equipment manufacturer. Depending on the crane’s regulatory requirements, at least two to three wraps must remain on the drum as dead wraps when the rope is unwound during normal operations. Locate the dead end rope anchorage point on the drum in relation to the direction of the lay of the rope. Do not use an anchorage point that does not correspond with the rope lay. Mismatching rope lay and anchorage point will cause the wraps to spread apart from each other and allow the rope to cross over on the drum. Very gappy winding will occur resulting in crushing damage in multilayer applications.
Back tension must be continually applied to the payout reel and the crewman installing the rope must proceed at a slow and steady pace whether the drum is smooth or grooved.Regardless of the benefits of a grooved drum, tension must be applied to ensure proper spooling. An improperly installed rope on a grooved drum will wear just as quickly as an improperly installed rope on a smooth drum. If a wire rope is poorly wound and as a result jumps the grooves, it will be crushed and cut under operating load conditions where it crosses the grooves.
Every wrap on the first or foundation layer must be installed very tightly and be without gaps. Careless winding results in poor spooling and will eventually lead to short service life. The following layers of rope must lay in the grooves formed between adjacent turns of the preceding layer of rope. If any type of overwind or cross-winding occurs at this stage of installation and is not corrected immediately, poor spooling and crushing damage will occur.
On a multilayer spooling drum be sure that the last layer remains at least two rope diameters below the drum flange top. Do not use a longer length than is required because the excess wire rope will cause unnecessary crushing and may jump the flange. Loose wraps that occur at any time must be corrected immediately to prevent catastrophic rope failure.
The use of a mallet is acceptable to ensure tight wraps, however a steel-faced mallet should be covered with plastic or rubber to prevent damage to the rope wires and strands.
Rotation-resistant ropes of all constructions require extra care in handling to prevent rope damage during installation. The lay length of a rotation-resistant rope must not be disturbed during the various stages of installation. By introducing twist or torque into the rope, core slippage may occur—the outer strands become shorter in length, the core slips and protrudes from the rope. In this condition the outer strands become over- loaded because the core is no longer taking its designed share of the load. Conversely, when torque is removed from a rotation-resistant rope core slippage can also occur. The outer strands become longer and the inner layers or core become overloaded, reducing service life and causing rope failure.
The plain end of a wire rope must be properly secured. If the entire cross section of the rope is not firmly secured, core slippage may occur, causing the core to pull inside the rope’s end and allowing it to protrude elsewhere, either through the outer strands (popped core) or out the other end of the line. The outer layer of the outside strands may also become overloaded as there is no complete core-to-strand support.
Secure the ends of the rope with either seizing or welding methods as recommended under Seizing Wire Rope. It is imperative that the ends be held together tightly and uniformly throughout the entire installation procedure, including attaching the end through the wedge socket and the drum dead end wedge
When installing a new line, connect the old line to the new line by using a swivel-equipped cable snake or Chinese finger securely attached to the rope ends. The connection between the ropes during change-out must be very strong and prevent torque from the old rope being transferred into the new rope.Welding ropes together or using a cable snake without the benefit of a swivel increases the likelihood of introducing torque into the new rope. A swivel-equipped cable snake is not as easy as welding the ropes, but this procedure can be mastered with a little patience and practice.

Wire ropes are one of the most critical pieces of rigging and lifting hardware. You can use wire ropes for lifting, rigging, and tying loads of virtually any size, shape, and type. To make the most out of wire ropes, however, you need a few additional rigging equipment, one of which includes wire rope clamps.
Also known as wire rope clips, riggers often use this nifty little piece of hardware at the end of the length of a wire rope. You can use a wire rope clamp to:
In short, a cable clamp is what makes a wire rope one of the most versatile pieces of rigging hardware. As these clamps come in different shapes, sizes, and materials, you will need to choose one that perfectly fits your lifting and rigging application. But before we get down to that, first, you need to understand what is wire rope clamp, its types, and a few other things.
It is a simple mechanical device. A typical wire rope clip consists of a saddle, U-bolt, and two hex nuts. This simple device is suitable for less permanent rigging and lifting applications. You must never use wire rope clips to make industrial slings.
The ASME B30.9 Slings standard clearly states that riggers should not use mechanical wire rope terminations that require periodic adjustments to create slings. In other words, you need to be careful when using rope clamps. You can use a wire rope clip to create an end loop for a winching or crane cable. You can also use it to build perimeter cables or increase the length of a wire rope going through a D-shackle or eye bolt.
Based on their shape, there are two types of cable clamps, U-bolt and double saddle. They both have unique mechanical properties and hence applications.
These cable clamps consist of a U-bolt, two nuts, and a metal base called a saddle. The U-bold passes through the saddle, which you can tighten with the two nuts. They come in various sizes and types of materials, including stainless steel and galvanized steel. You can choose a U-bolt wire rope clamp depending on your rigging or lifting application.
Usually, there are three types of materials used for making rope clips. You can choose a material based on your application as each one comes with its unique strengths and weaknesses.
In this type of wire rope clip, the base or saddle is made from forged steel. The manufacturing process involves heating and hammering the clips into desired shapes. Riggers often use these cable clamps for critical and heavy-duty applications as they are very strong. You can see them in winch lines, crane cables, hoist lines, towing lines, scaffoldings, guy lines, and even tie-downs.
The base or saddle is made from cast iron. As cast iron lacks the metal properties of stainless steel, it is not that strong. So, the malleable galvanized wire rope clamps are not very strong. They can break under heavy usage. You will see them being used in small or light-duty applications like fencing, parameter cables, or guard rails.
Stainless steel wire rope clips are arguably the best ones. The base or saddle is made from high tensile strength stainless steel. They are durable and easy to use. You can find these cable clamps in temporary guard rails, flag posts, and other outdoor rigging applications.
Wire rope clamps are an essential part of the rigging hardware. You can’t do away with them. But you have to make sure to use the right ones to keep the load and the riggers safe. If a wire rope snaps because you used the wrong type of clip, it can lead to disastrous consequences.
The first step in choosing cable clamps is to buy them from a trusted and reputed rigging hardware manufacturer. The last thing you want is to use a defective or poor-quality clip. This will compromise the safety of your load and your crew.
As you can see, each wire rope clamp comes with unique properties. You need the instruction manual to understand when, where, and how to use the cable clamps. Make sure the clamps are accompanied by respective user manuals when making a purchase.
By now, you know that some cable clamps are more suited for outdoor environments, while others aren’t. As a result, carefully think about where you want to use the wire rope clips. For example, if it’s a heavy outdoor application, stainless steel wire rope clamps would be a great fit.
Taking into account how large and heavy the load is also equally important. Heavier loads will require strong cable clamps that won’t break under stress. Also, you shouldn’t use clips for any permanent rigging or lifting applications. They are suited only for temporary load applications.
Lastly, it’s always better to get an expert on board when shopping for wire rope clips. Maybe you can hire an engineer or expert with considerable field experience to help you choose the right types of clamps. An expert will help you take every detail into account before making the purchase. Remember, if you choose the right cable clamps right off the bat, you’ll save considerable time and money down the line.
Wire rope clamps are one of the essential rigging hardware. They land wire ropes more flexibility, allowing you to handle a wide range of applications with ease and safety. These are some tips that will help you choose the appropriate clamp for your need.
HHI sells different types of clamps and other rigging hardware, both online and offline. If you are looking for reasonably priced and high-quality cable clamps or other hardware, check out our online store or reach out to our experts.
Want to learn how to install wire rope clips on your own? Here you will learn all about how to install wire rope clips, so you can look like a pro in front of your co-workers or friends!
The parts of a wire rope clip include the saddle, U shaped bolts and nuts. The longer part of the cable that extends to the other connection point is called the live end; this is the part that will be holding the load.
Ever hear of the phrase, “Never saddle a dead horse.” with wire rope clips this phrase means never apply the saddle of the clip to the dead end. And lastly, the length of the cable starting from the base of the eye to the end of the dead-end is a turnback.
Before you begin to assemble your wire rope clips, there are some much-needed materials. Here is a list of materials you should have before beginning:
Take a look at your wire rope and if there is any unraveled wire or a knot, cut that part of the wire rope off. If your rope does need to be cut, take the end of your rope and your seizing tape and seize the end of your rope.
Seizing your cable with tape before cutting it helps keep the end tight. If your rope does not need to be cut, still seize the end of your rope, but make sure to tightly wrap it so it keeps the structure of the wire rope. If you are dealing with a thicker cable try wrapping the end with soft wire for tighter security.
Measure your turnback. This would be the length of the cable from the base of the eye to the dead end. You want to measure and mark your turnback length. Next, you want to decide how large the eye in your cable is and mark the live end across from the turnback measurement. The last thing you want to do is make sure you mark your live end where your dead end ends.
First, you want to line up your markings from earlier, and apply your first clip to your assembly while making sure you space the wire rope clip one saddle length from the dead end.
Next, you want to tighten and torque the nuts. Make sure the nuts are clean and there is no lubrication. When tightening the nuts, alternate to ensure they are taking on the pressure evenly. Using a torque wrench will help get to the recommended torque requirement for holding the load. Over tightening your nuts will permanently kink the wire rope and cause future failures.
Tighten your remaining clips beginning with the clip closer to the dead-end while making sure to remove any slack in the cable between the clips. To remove slack, push it to the eye as you work your way down tightening your clips in the termination.
Inspect your assembly during the first load and tighten or re-torque clips as needed. When you have inspected and finalized your wire rope clip, your assembly is ready for use.
If you still need help assembling or have questions about stainless steel wire rope clips, you can always call Silver State Wire Rope and Rigging! We know all about heavy-duty lines of wire rope and double saddles. We would love to help and get you up to expert wire rope clip status, so don’t wait and contact us today!


 8613371530291