
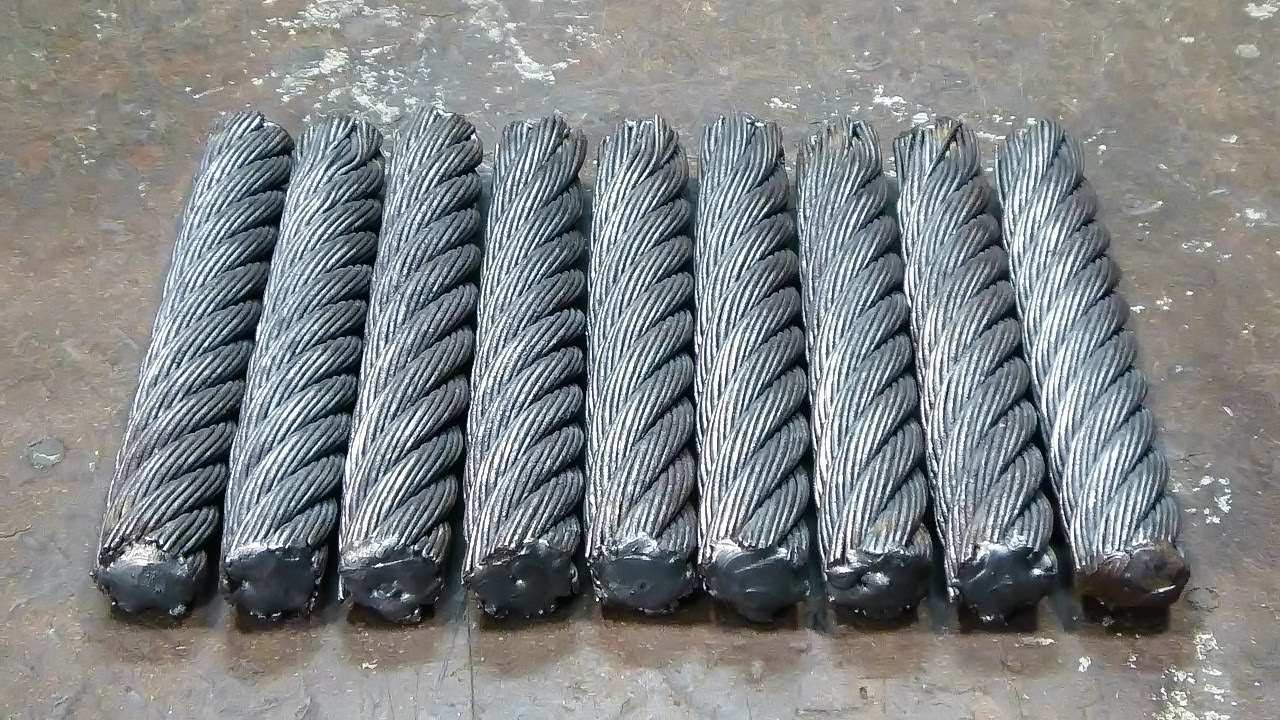
wire rope damascus in stock

This wire rope is used in making Cable damascus. For heat treatment, treat similar to 1075 carbon steel. Comes covered in grease to prevent rust and corrosion.

This wire rope is used in making Cable damascus. For heat treatment, treat similar to 1075 carbon steel. Comes covered in grease to prevent rust and corrosion.

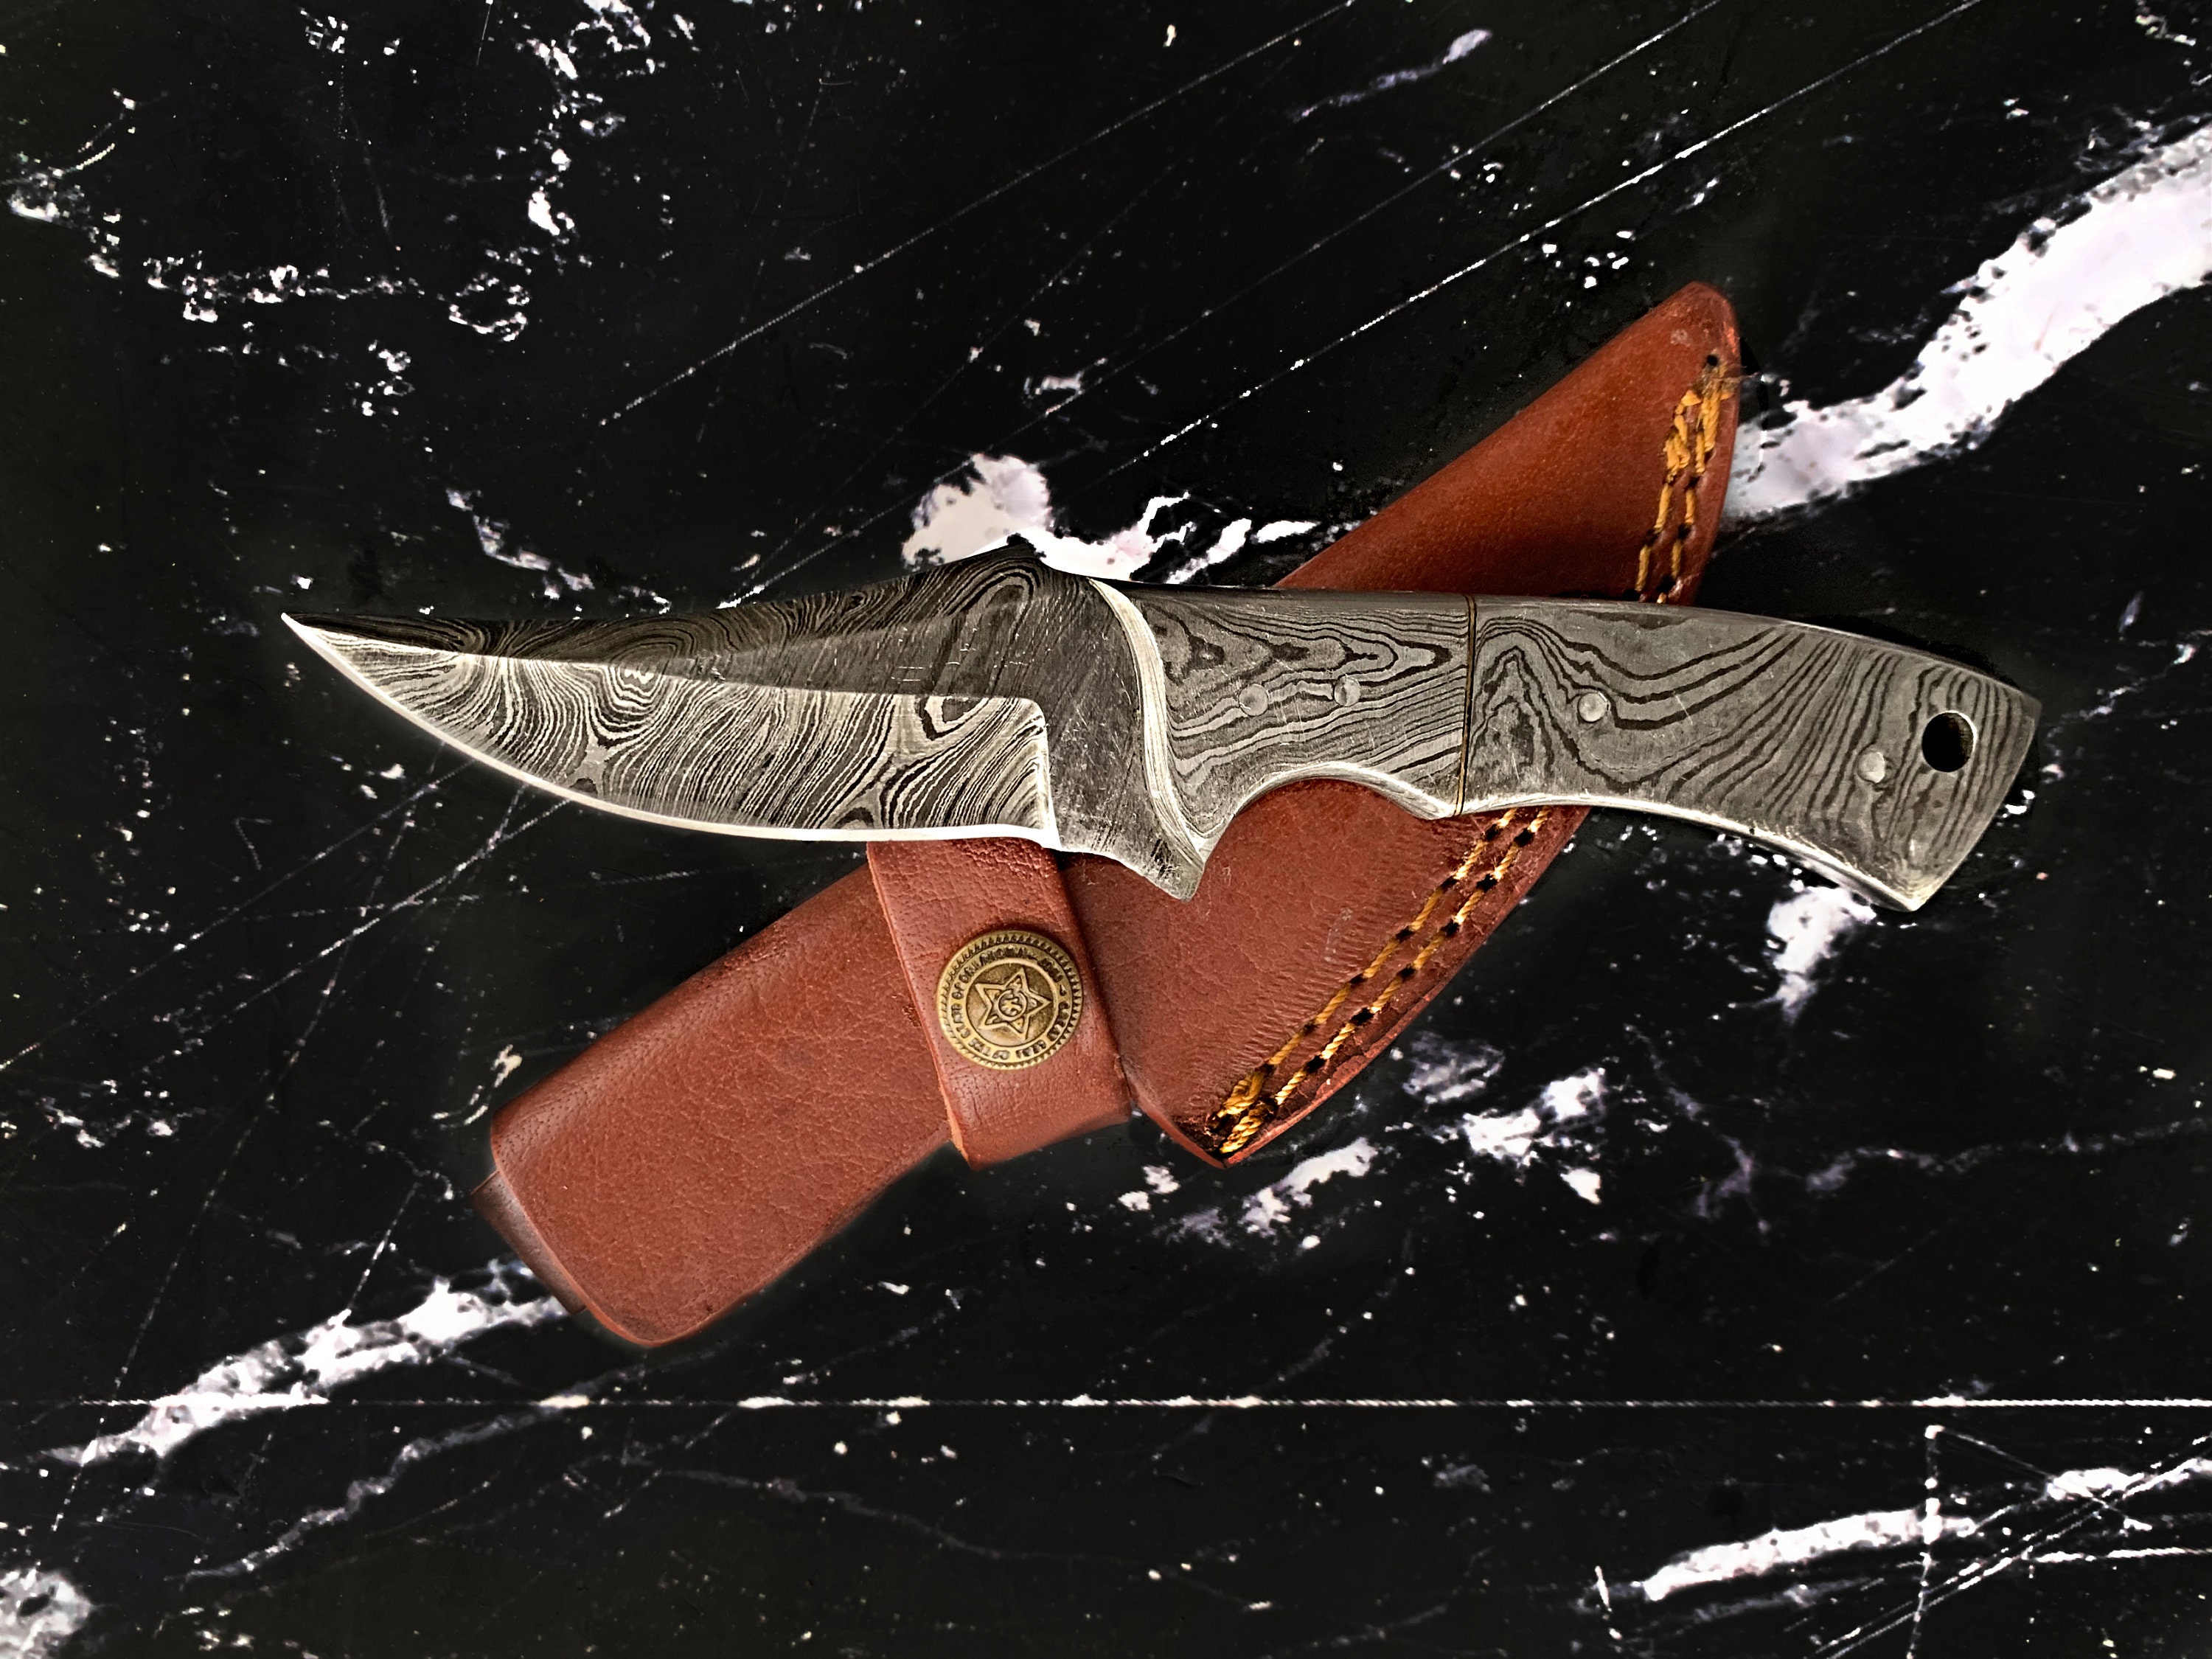
I start with 1" high carbon wire rope that I buy straight from the manufacturer. The reason I do this, as opposed to using scrapped cables is because I have no idea the sort of stresses it may have been under and there is no easy method of determining carbon content for hardening. Each knife is forge welded into a solid blade, fully hardened and tempered.

Let’s talk about wire “damascus”. It’s not really wire. It’s not really pattern-welded steel, and it’s not really Damascus, but it’s fun and easy to do. It’s a great first project, and you can find your stock in any scrap-yard in the world. Almost fool-proof for a beginner so far as mistakes are concerned, and if manipulated properly can produce some striking results in terms of pattern. I’ve sold a few small knives as letter openers, and I’ve used it to make “Celtic” pommels, and guards, as well as chapes, accents for scabbards, and jewelry. I’ve used it to trade for chain mail, and other stuff I choose not to take the time to do myself. Among the better Master Blade-smiths, at the larger Blade Shows it will be “poo-poo’ed” as “cheesy” but that’s okay for me, as I’m an up and comer, and also the kind of guy that really doesn’t feel bad that I didn’t come out of the womb knowing everything. It’s pretty, and if made from high carbon suspension bridge, or industrial cable (non-galvanized ) makes for a pretty good knife, short sword, and if you weld on a solid edge… sword. I’ve seen stuff by Colonel Hrisoulas and Charles Kain that rivals anything, by anyone, ever, out of cable.
Lots of guys start off with wire, and others take it on to an art-form. I know a few that have stuck with it, and make great table cutlery, and artwork to dazzle. Google the expression “Wire Damascus” and see some of the books in the bibliography at the end of this tutorial, and see good shots of some magnificent pieces. I myself have done a few, and have on hand enough bridge and crane cable to make much more in the future.
The bottom is low carbon, “choker” cable, like you find on oil riggers, and boom lifts. Not so great for blades, as it won’t harden properly without a sandwich of high carbon on the cutting edge. It has either a solid steel center, or a nylon rope center, and must be taken apart, and re-twisted before being forged. Lot of work for a crap steel right? As you can see I’ve done just that. I took a six inch section of oily cable, degreased it in my cleaning station, heated it up some to burn off all the junk. Don’t use your normal gas forge for this, as old crap oil, and gunk, will come oozing out of it once it’s reached 600 degrees or so and severely contaminate your forge. No matter how good you clean it with gas, and no matter how clean it looks on the surface, and no matter how much anti-greasing agent you use. Nevertheless, make sure all grease, dirt, grime, and the rope are wholly burned out. I do this in my trash bin -for as of yet out in the country the EPA doesn’t swoop down on every outdoor barbecue. Wouldn’t they love to taste my hot dogs?
Heat up the cable a section the width of your vice, 3-5 inches if it’s a longer piece. Heat wise, once cherry red, have a pipe wrench, or as I have done, an old style pipe-wrench, pre-set to size, with a two foot handle welded on, and twist the wire down on itself. I try to use counter-clockwise as a goal. As above.
And here is the long 2″ wire in the first picture up above, welded solid, and drawn into a blade billet. I have not finished it into a blade as of yet, this will be posted soon after I do the pic’s for welding on a high carbon edge.
Below is a nice shot of a finished piece. Done in chain-saw blades. Same idea as the wire, but you just forge down a glob of chain-saw blades. Each chain saw has three different metals in it. The tip is usually some sort of carbide, the pins holding the chain bodies together is high carbon, and the bodies are a lower carbon steel.
One of the most beautiful wire damascus knives I think I can remember is one of Jim Ence’s in the book: Points of Interest, Volume II ( ISBN 0-9613834-2-9 ). If you can beg, borrow, or steal a copy, they are very collectable now, as only so many were made. I don’t have permission to publish the picture here, so I may not, but you can also see nice pieces in books still in print. Try Decorative and Sculptural Ironwork: Tools, Techniques & Inspiration by Dona A Meilach, 2nd Edition 1999 ( ISBN 0-7643-0790-8 ) for our craft pages 199-234. And as already mentioned, Col Jim Hrisoulas book The Complete Bladesmith, back cover, left pic, and on page 150-153 of his book for how too.
Starting to reveal the soul of it. Got to keep it happening both ways. Notice the wire brush and chisel still sometimes necessary. Always remember the more you do hot, the less you do with grinders and files later.

The modern connotation of Damascus steel is different from the original Damascus of the past. Historic Damascus steel referred to as crucible stee,l which had a very high carbon content and had a visible surface pattern because of its crystalline structure.Tthis Damascus steel, or Wootz steel, ended up being called Damascus steel because the crusader,s on their way down to the Holy Lan,d would purchase new blades of this superior steel (superior to medieval European steel) in cities like Damascus. The modern connotation, however, is instead different kinds of steels that have been pattern-welded and that display a similar surface pattern when acid etched. The Damascus you will see made here is is of the latter definition. Cable Damascus is perhaps one of the easiest ways to create Damascus steel with a complex pattern. Unlike other techniques, this method requires no folding and essentially comes in its own ready to forge shape.
Like they always say, safety first! Seeing as how this whole process involves forging, grinding and dipping metal into chemicals, it is important to use the proper safety equipment. For the forge welding stage, many people who do any kind of smithing, know the basic safety equipment: gloves, apron, closed toed shoes, etc. Howeve,r one piece of equipment sometimes goes overlooked. Everyone knows that eye protection is important but for this kind of work you need a special kind of eye protection. The above and only picture in this section is of a pair of dydidium glasses. The reason that it is the only picture up there is because just about everybody who works with metal knows the safety basics but rarely do I see people point out this kind of eye protection. Normal goggles are usually fine for most crafts but not for forge welding. The heat required for forge welding puts out a bit of radiation that over the long term can cause vision loss. Dydidium however will block most of the radiation and save your eyes. One final point, dydidium glasses are not the same as welding masks or sunglasses. If you use either of these while forge welding, your pupils will dilate and your eyes will get even more of the radiation.
Before you can forge out your section of cable you have to set it all up. Before it goes in the fire you first have to cut off your section like in the first image. I cut off 3, 12 in sections of 1 inch cable at the time with a chop saw. You can use whatever method you like to cut the cable just be sure that the cable that you use is all steel with no plastic involved and that it is not galvanized as the heat reacting with the plating will produce gas that can make you very sick or even kill you. So keep that in mind when getting cable. Also, if this is your first time attempting cable Damascus you might not want to jump right in to the the larger diameter cable and instead start out with a piece of half inch. You wont be able to make anything more than a toothpick with the results but its a good way to practice without wasting bigger and more expensive cable.
After the cutting, be sure to wrap the ends of the cable with steel wire. This is to keep the section from unwinding during the first parts of the process. Be sure to only use plain steel wire because other wires that are coated or are made of other can melt or react with the heat and just mess everything up.
Everybody who makes Damascus has their own list of steps or additives that seem to make the whole process work for them. I encourage you to go, do some research and discover one that works for you. For me, I spray my cold metal with WD40 until it is just completely soaked and then coat the whole thing with regular borax before putting the sections in the fire. Both the borax and WD40 act to prevent oxidation which can make forge welding impossible. The borax won"t typically stick to metal unless its hot or wet and the WD40 will burn off in the forge so getting the section wet with WD40 and using that to stick the borax on seems to make everything work for me.
Damascus steel when ground down should look just like one solid piece of metal. In order to get the pattern, you need to etch the steel with an acid. There are several options as far as acids go but personally I use ferric chloride. If you only want a very superficial etch, like the one in the cover image, you only need to dip the metal in the acid for about 20 min. I wanted a very deep etch that could actually be felt so I dipped mine for 7 hours. Once you are done with the etch, you need to clean it and neutralize the acid. One of the easiest ways to do that is just to spray Windex on the etched piece after it has been rinsed off. Don"t forget to wear gloves and eye protection for all this. If you want to add some color to the piece, like the last two images in the title, just heat the piece up a bit after the etch until the desired color has been reached.
The piece I made here didn"t require any quenching or heat treating because it is a decorative piece. If you choose to make a blade out of cable Damascus one thing to keep in mind is that when quenched, the steel has a tendency to warp in the direction of the cable twist. If you want a functional piece, make it thick, otherwise you might start with a knife and end up with a corkscrew.
Hi Armeria. Thanks for your informative instructable.I think the warping is caused because the wires of the cable are nearly aligned in one direction and after quenching, the contraction force is also exerted unequally in one direction to cause the warp. Don"t you think folding the cable several times during the forge welding can obviate the problem?
I think that you might be confusing the revealed pattern with having gaps in the steel. Proper forge welding will create a homogeneous billet. The pattern that is shown is the result of acid reacting to the different carbon contents of the former wires that experienced carbon migration before being welded. I hope that this helps!0
I think all carbon wire comes in grease to keep it from rusting... I have always just burned it out with a torch.... something that should be done outside and away from the shop... Another thing I just remembered is there is a product called "compact swage" wire that is a bit easier to weld.... What it is ... well its compacted wire.. When the nets got bigger on the fishing boats they needed stronger cable on the winches.. but a lot of the winches have grooved drums so if they are made for 7/8 cable, you have to use 7/8 cable.... so what they did was take 1" cable and run it through a rolling press and swaged it down to 7/8... basically taking all the extra space out... not quite as flexible but since its as strong as 1" cable.... since its a tighter wire it is a bit easier to weld.. not much but everything helps.... It helps what ever wire you use to do a "tighten up" twist at heat before trying to weld it...
I start with new "Improved Plowshare" wire-rope (similar to 1084). I "fuse" both ends with my TIG (heat, but no filler) to keep the strands from separating, then firmly weld it to a piece of re-rod. This particular piece of cable was 1.25". (this was shiny and clean, but the TIG will catches the oil on fire, thus the sooty appearance)

I made a cable Damascus blade for the first time this weekend and I couldn"t get it to quench without taking a warp. It"s an old 1/2 inch steel cable, I believe 7 large strands. I forged it down into a flat and then folded it and welded it back together to start with a thicker billet. When I forge welded the cable I lightly tapped it into the corner of my anvil horn so I can set it without it splaying. I also tack weld the ends before welding so they stay together.
Also if you have any tips on cleaning the cable out before weld, I"d love to hear it. I tacked the ends together and loosened the cable on a vice and cleaned it out the best I could with flux and wire brushing.
Lot of Six 3/4" x 8" Wire Rope Tool Steel Cable Damascus Knife Forge Blacksmith. Lot of six 3/4" x 8" sections of US made high carbon IWRC (Independent Wire Rope Core). Wire rope was salvaged from a crane at an old industrial site. Wire rope has a nice strand count and contains no fiber or plastic strands for your Damascus project. Wire rope has been used and is greasy and dirty. If you wish to purchase different lengths and quantities, please send a message along with your request for a quote. Lot of cable is being sold AS-IS. Shipping is free for this item. Thanks for looking. The free shipping is only to the lower 48 states, Alaska and Hawaii will require additional postage. No shipping to PO, APO/FPO.


 8613371530291