
raymarine hydraulic pump installation for sale

The Drive unit is the part that interfaces with your vessel"s steering system to keep you on the right course. Raymarine has a broad range of drive units to match almost any type of steering system - our Evolution Autopilots accommodate hydraulic, mechanical and power assisted stern drive systems.
If you are not sure how to determine what type of steering system is installed on your vessel, please consult an authorized Raymarine dealer or contact us directly by using the form below.

I suspect that if you consulted with Sea Star"s support team, you would find that the two capped ports are for an optional hydraulic fluid reservoir and for the additional hydraulic hose from the autopilot"s hydraulic pump shown within the diagram below.
Should no hydraulic fluid reservoir have been installed with your helm pump, then the helm pump would be acting as a limited capacity reservoir for hydraulic fluid. One of the caps which you have referenced will need to be removed to accommodate connecting the additional hydraulic hose from the autopilot"s hydraulic pump.
Regarding the location of the autopilot"s hydraulic pump, best performance will be achieved when the pump has been located in close proximity to the steering ram. The pump"s installation location should also be protected from exposure to moisture associated with rain and waves. However, it should be noted that it sometimes not practical, particularly in smaller boats, to install the autopilot hydraulic pump in very close proximity to the steering ram. In smaller boats, the location of the autopilot hydraulic pump is less important with respect to the performance of the autopilot. However, it is key to ensure that the autopilot hydraulic pump is located at a lower height relative to the helm pump and that the hose is run in a continuously upward direction from the autopilot hydraulic pump to the helm pump.
This is a replacement motor for the newer style type 1 hydraulic pumps with the fittings coming out horizontal (if the motor was on a table.) WILL NOT WORK WITH OLDER M81120, only the newest style as is depicted in the pictures in the manual. This comes as shown. NOT A COMPLETE AUTOPILOT PUMP – just a replacement motor assembly.

Raymarine evolution systems accommodate hydraulic, mechanical and power assisted stern drive systems. The Drive unit is the part that interfaces with your vessel’s steering system to keep you on the right course. Raymarine has a broad range of drive units to match almost any type of steering system. Raymarine Evolution pilots connect to hydraulic steering systems using a rugged hydraulic pump matched to the capacity of the hydraulic steering system. If your system is hydraulic You’ll need to find out the size (in cc) of the hydraulic cylinder ram(s) mounted to the rudder or inboard engined boats, or to the drive unit on outboard engined boats. Your steering system documentation will have this information.

Raymarine Evolution pilots connect to hydraulic steering systems using a rugged hydraulic pump matched to the capacity of the hydraulic steering system.
Raymarine, the world leader in marine electronics, develops and manufactures the most comprehensive range of electronic equipment. Raymarine is dedicated to the design, manufacture and distribution of the highest quality marine electronic products and services to the worldwide recreational and light commercial markets. Whether it be stand-alone units or fully integrated systems, Raymarine understands boating and what it takes to make it safer.
To match a Raymarine hydraulic pump to your vessel you need to learn the size (in cubic inches) of the actual hydraulic cylinder ram or rams that are mounted to the Rudder on inboard engine boats or the ram mounted to the drive on outboard engine boats. Your steering system documentation will have this information.
The Drive unit is the part that interfaces with your vessel’s steering system to keep you on the right course. Raymarine has a broad range of drive units to match almost any type of steering system.

The EV-150 system is engineered specifically to meet the needs of small to medium-sized hydraulically steered boats with a steering ram capacity between 4.9 cubic inches (80 cc) and 14.0 cubic inches (230 cc).
The system comes complete with a Raymarine p70Rs autopilot controller, EV1 Sensor Core, ACU-150 Actuator Control Unit, and an Evolution autopilot cabling kit.
EV1 Sensor Core - The EV-1 is designed for Evolution mechanical and hydraulic autopilot systems. SeaTalkng networking enables a single cable connection for power and data to the Evolution ACU (actuator control unit) and extended SeaTalkng and NMEA2000 networks.
ACU-150 - The Raymarine ACU-150 is a component of the EvolutionTM Autopilot system and is designed to provide power and control to a Raymarine Type-1 Hydraulic Drive Unit (M81120.) The ACU-150 connects to the SeaTalkng network for communication with its other peripherals. It also has connections for an optional Rudder Reference Unit (sold separately.) The ACU-150 works on 12-volt DC systems only.

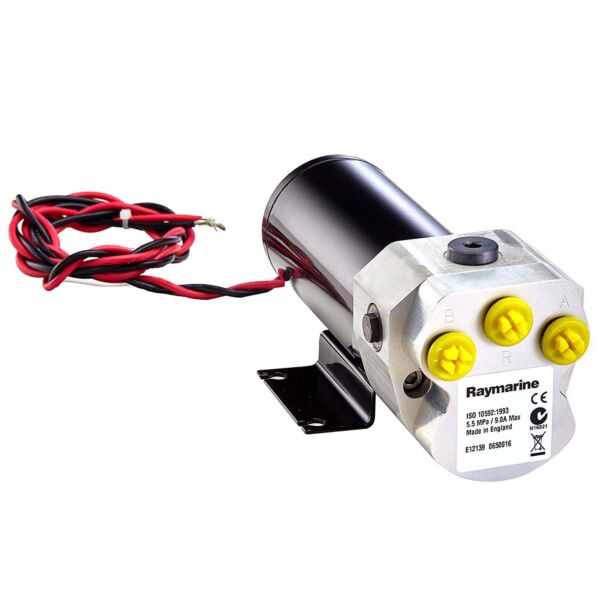
This Hydraulic Pump is built to operate the steering mechanism of the boat playing an important part in a Raymarine autopilot system. Designed for use on boats with an existing hydraulic steering system or for use in a boat with mechanical steering in conjunction with a secondary steering ram. Built with a precision gear pump and a check valve driven by a servo motor.

My radar and chartplotter were Raymarine, so I chose Raymarine for the autopilot as well. I had Raymarine Wheel-Pilot in my Morgan sailboat and had a Sport-Pilot in my fishing boat, and I was happy with them both. I liked Raymarine"s Seatalk interface and I thought it would be best to have all the electronics be of like brand for best compatibility. In retrospect, I did make the right decision.
The Raymarine autopilot has been the best piece of equipment I have installed on the boat. I use the autopilot as soon as I leave the dock and it runs till I return. It has never faltered. It is a far better helmsman that any person good be, in keeping the boat running true in all sea conditions. The system installed on Stella Blue is robust. It will handle yachts much larger that Stella Blue. A boat the size of Stella Blue, falls in the lower end of the recommended range of application for this system, thus resulting in a very responsive system while keeping the workload fairly light for the autopilot. Now for the details.
Raymarine manufactures 3 different hydraulic pumps for this class of autopilots, type 1, 2, and 3. The size pump you need is determined by the volume of the steering cylinder. The single engine 400 uses a 13.7 cu. in. (BA175-7TM) cylinder, with a 2.4 cu. in. (SeaStar II) pump. The Raymarine type 2 hydraulic pump covers applications from 9.8 – 21 cubic inch and this is the pump to get. (Even though the ram capacity of 13.7 falls within the type 1 pump (4.9–14 cubic inch rams) range, do not use the type 1 unless you always boat in flat water with no wind. It is marginal in capacity and will give unsatisfactory performance in this application)
The pump type determines the corepack that you will need. The corepack is the course computer and the power supply/controller to drive the pump. The corepacks come in two versions, with or without internal rate gyro. The rate gyro is a sensitive instrument that senses yaw much faster than the compass can supply heading information. If you want your boat to track straight in following seas, the rate gyro is a must. Stella Blue uses the 400G corepack that includes the internal rate gyro (this model name has been renamed the S3G.)
Before I bought the autopilot, I inquired of several dealers about installation cost and mounting locations. Costs were estimated from $1500.00 on up, and the proposed installations were not at all what was recommended by Raymarine. I didn"t like what I heard from any of them, so I decided to do it myself. A couple of them were going to put the system up on the flybridge, which is probably the easiest, but worst (furthest) location from the rudder. The installation is rather straight forward and took about a day.
Raymarine suggests that the pump be located as close to the ram as possible. Nobody I talked to thought that was a good idea. First, it might be subject to salt water corrosion if green water leaked through the hatch seal above, and it would require another break point in the hydraulic lines. The next best location would be at the first junction of the lines where they meet below the lower helm station. Tapping in at this location would minimize plumbing, the pump would be in a dry controlled environment, and it would still be in a relatively low point of the hydraulic system to make bleeding less problematic.A suitable location under the stairs for the corepack and compass would be near by minimizing wire runs. It is a very serviceable location as well.
Before I started the installation, I had an aluminum bracket fabricated for some 1/2" thick 6061-T6 aluminum plate. Not knowing at the time, where the exact location of the pump would be I used a piece of 1/2" starboard to mount the bracket to the 2 x 4 beam behind the shower and just above the hot water heater. The junction where the lower helm, upper helm, and rudder lines all meet, is just a few inches above. I had three short hydraulic lines made up by Allied Industrial Products, in New Britain, CT, to patch the pump into this junction. Three more brass tees and some MPT / male compression adapters and the pump is all plumbed in!
The corepack is mounted just a few feet away under the stairs. Again, a well protected and serviceable location for the electronics. The power for the unit comes off the DC buss bars behind the air return screen located below the lower helm station. In the above picture you can see the red and yellow wires that feed the core pack bundled up with the red and black coming from the corepack to the pump.
In addition to the power in and power out to the pump wires, there is a rudder angle transducer, an electric compass, controls leads, and a wire to turn the unit on/off. The rudder angle transducer wire runs across the bulkhead and then aft along side the fuel tank to the aft compartment. It follows the trim pump and the analog rudder angle transducer wires. Not a very tough run. That whole mess is protected by a shelf I built as another project.
The last part of the installation is the on/off switch. The corepack uses a circuit between two terminals on the board to shut off the system. If the circuit is closed, the system is off and if the circuit is open the system is on, the reverse of what you might expect. So I found one of the switches at the lower helm that was unused and removed power from it by cutting the buss bar feeding that switch. I then ran the wires from the corepack to it and re-labeled the switch. Bleed the hydraulic system and then it was ready for sea-trial and calibration. Read the manual! It is easy, but must be done correctly.
We have had the pleasure of using this system for three years now with out a problem. I am always amazed and thankful for how well this system works. It really helps make piloting pleasurable in all but the worst conditions. There are many brands of autopilots out there, and they probably all do an adequate job if installed correctly, but I found the documentation, ease of installation, and performance of this system to be highly satisfactory.


 8613371530291