
trim tab hydraulic pump made in china

Heading offshore for a fishing trip is not as enjoyable when the ride is rough. My 2004 Palm Beach 235 takes me offshore fishing almost every weekend. I knew he needed to give the boat an upgrade to control bow height and porpoising. This was when I decided to install new trim tabs on my boat. I installed the BOLT Electric Trim Tab System, paired with the Integrated Helm control, giving my boat the upgrade needed for a smoother ride to himys offshore fishing spots in North Florida.
Spending his time fishing Northeast Florida Coast Line onboard his 16 Super Gheenoe. This small boat lets him get into all those good fishing spots and his trim tabs help him keep control of the boat. Clayton installed the tabs himself, and found it to be a “very good experience!
Father and I started this restoration almost 10 years ago, now – it’s finally nearing the finish line.” says Chris. “We have spared no expense and want only the finest products on the boat, hence, the Bennett tabs! We installed the trim tabs ourselves, and the experience was very smooth. The instructions were very clear! We did work with Thomas at Bennett to make sure we got the perfect set of trim tabs for the boat, which was exceptional, awesome customer service.
We use our boat for fishing and cruising around the Gold Coast. We install the trim tabs ourself and custom made the trim planes as large as we could to fit on our transom to give the best operation. The BOLT kits are AWESOME and simple to install.”
I have a 1995 28 foot Bayliner that has trim tabs with a Bennett v351 HPU. I have owned the boat since 2005 and haven’t done anything to the trim tab system. I haven’t even checked the fluid level! It had worked flawlessly until last week when it completely stopped working. I just removed the Hpu, and as I removed the cover, I was amazed the unit had been working because it was TOTALLY rusted and corroded. I then ordered the right HPU and quickly and easily replaced the unit. Once again, it works perfectly. This is a real tribute to the Bennett product.
“Dad bought this boat when I was a kid and I hoped one day it would be mine. Now it is and after 24 years I’ve had to replace every system except one, the original Bennett Trim Tabs.”
“When I needed replacements for my Tiara, they suggested I call Bennett. Within 10 minutes my tabs were on the way and I was going about the rest of my day. Great customer service, thanks!
“My 1980 Crestliner has lived a good life. I completely restored it replacing nearly everything, except the Bennett Trim Tabs. I don’t believe there is anything more durable on a boat.”
“I’ve been fishing the Northeast for over 35 years. Every boat I’ve owned has had Bennett Trim Tabs. My last set lasted 17 years and was still working perfectly when I sold my boat.”
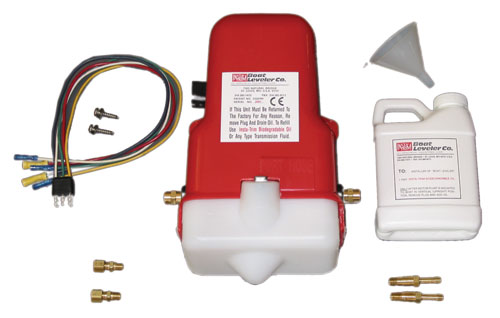
A compact powerhouse that creates hydraulic pressure to lower and raise the trim tabs. It employs two solenoid valves to direct the flow of fluid to the actuators. The solenoid valves lock tightly to secure the tabs in place. Strength to lower and hold even the largest tabs in place. The Lexan cover provides water-resistance to the electrohydraulic unit, and the translucent reservoir allows fluid check at a glance. Learn More

There seems to be a growing trend among boat builders to list trim tabs on the options list rather than include them as standard equipment, and the result is that many boats are delivered without trim tabs. To be perfectly honest (and in spite of what many boat salesmen claim), there are very few boats that don"t need trim tabs. The problem isn"t just with new boats, either, and there are many older boats that can benefit from a trim tab retrofit.
Even if your boat doesn"t need trim tabs to jump onto a plane quickly, they are essential for balancing the many variables that can change the trim of your boat. These variables range from the amount (and location) of the fuel and equipment on board to the number of passengers (including where your rather large Uncle Fred is sitting).
The speed of a boat can affect whether it runs level or with the bow high, and there are times (such as when running before big seas) when the trim tabs are used to add a margin of seaworthiness. Even a strong breeze from the side can cause a normally well-balanced boat to tilt uncomfortably, but that can easily be cured with a touch of a trim tab switch.
Trim tabs not only affect the running attitude of the boat, but their use can improve the boat speed, increase the fuel economy, stretch the range, and even improve your visibility for safety.
Trim tabs are independently adjustable extensions of the hull bottom that can deflect the water passing off the transom. While most people think that trim tabs are used to lower the bow of your boat, the reality is that they are actually lifting the stern to achieve that level running attitude.
Happily, trim tabs are a relatively simple afternoon project for anyone who can drill a few holes and hook up some color-coded wires. To get an idea of what is involved, we installed a set of Bennett trim tabs on our 23-foot test boat. Bennett has been a leader in the trim tab market since 1960 and, in addition to providing original equipment trim tabs for many builders, they have packaged do-it-yourself kits for boat owners to install.
Let"s take a quick look at the trim tab system. Most trim tabs are operated by electro/hydraulic systems where electrically operated hydraulic pumps are located at the stern and controlled from the helm by rocker or joystick switches. Each tab operates independently, giving the skipper four choices of up or down position on the two tabs. Since most of the equipment is located at the stern, the project is usually straightforward.
First, however, you must decide on the size of the trim tabs. Bennett recommends one inch of trim tab span (per side) for every foot of boat length. Thus a 22-foot boat would use a pair of 24-foot by 9-inch tabs. In our case, we took the advice of Bennett Marine"s customer service rep and chose the 12-by-12-inch tabs that would not only give us good clearance for the single outboard but would provide extra lift without becoming overly sensitive. The standard 12-by-12-inch kit retails for $505, and we upgraded for $20 to the rocker switch controls rather than the standard joystick that is less positive.
Once the kit arrived, it was time to start measuring. Bennett recommends installing the tabs as far outboard as possible to maximize the lateral (side-to-side) control. Position the tabs 3 to 4 inches in from the chine, and mark that area with a pencil. At this time, it"s very important to climb inside the boat and make sure that the area on the inside is clear of fuel tanks, flotation or other obstructions and accessible. Don"t start drilling without checking.
Assuming the area is clear, attach the twin stainless-steel mounting and backing plates with the supplied stainless-steel screws dipped in marine epoxy as a sealant. Before you tighten the backing plate completely, slide the trim tab into the hinge and then tighten everything down. Most boats have flat transoms but, if you have a curved transom, you"ll need a shim so the tabs mount flat.
The actuator pump bolts easily to the trim tab and, using a straightedge from the hull bottom, you mark the upper point on the actuator mount so that the tab is slightly "negative" when retracted which, in our case, was 5/8-inch above level with the hull bottom.
The hydraulic power unit should be mounted in a dry location inside the hull that is easy to reach for service. It screws easily into place, and the supplied hydraulic tubing then runs from the pump to each actuator. The tubing is assembled using brass elbow inserts that tighten easily into place with a 1/2-inch wrench. Be sure to use the supplied brackets to secure the tubing along the hull for a seamanlike installation.
The rocker switch control should be mounted at the helm where it"s easy to use, with the best spot near the throttle so that you can use the same hand to control both speed and trim. Either drill four 1 1/8-inch overlapping holes or use a jig saw to cut out a small rectangular hole in the dash for the control.
Run the wiring harness from the hydraulic power unit to the dash, securing it along the way. Pull the wires through the hole, attach them to the back of the rocker control with the ring connectors, wire the system to your 12-volt source, and then screw the control panel to the dash.
To fill the hydraulic reservoir, you can use a funnel to pour any type of automatic transmission fluid into the filler, but an easier way is to disconnect a tubing elbow from either side and then press the "Bow Up" trim control for that side until the reservoir is full.
If you plan to keep your boat in the water, you need to provide protection from electrolysis in the form of a zinc anode on each tab. In addition, you should paint the tabs with antifouling paint, but be sure you don"t paint over the zincs.
Using the trim tabs will quickly become second nature. Since the tabs operate independently, always start by bringing both tabs fully up so that you know they are operating in unison. When accelerating from a stop or low speed, put the tabs down to help your boat get on a plane quickly. As the boat reaches planing speed, bring the tabs up so that the boat runs level.
Leaving the tabs down will "overtrim" most boats and cause the bow to plow through the water, which reduces maneuverability and may lead to "bow steering," where the boat veers suddenly. When running inlets or in following seas, retract the trim tabs fully for best handling. And don"t use the trim tabs as a swim ladder — they"re sturdy but not that strong.
In our case, we knew beforehand what an improvement the trim tabs would make but, for many owners, adding a set of trim tabs will be like buying a newer, faster and better handling boat.


 8613371530291