
metroid zero mission parts of the map flash in stock
Walkthrough: Part OneadvertisementBrinstar (Morph Ball, Long Beam, Bombs, Missiles)After our heroine lands on the planet Zebes, you will take control of her in this epic mission to foil the plans of the evil Space Pirates. That said, make your way left, blasting the Zoomers as you go. Jump over the rock formation and continue until you see a giant red ball on a pedestal. Claim the Morph Ball as your own, blast some Zoomers out of your armored way, and roll under the rock formation. Continue right until you reach your very first Blue Hatch. Blast it open and head into the tiny room, where a lone Zoomer is lurking. Shoot it, and then the rocks it was crawling on. Shoot the floor to reveal that it is made out of Bomb Blocks; since you don"t have Bombs yet, go through the next hatch, into a rocky cavern. Bat-like creatures, or Skrees, will be on the ceiling in here; if they spot Samus they will drop down and drill a hole in the ground near her until they explode, causing a fairly unwanted bit of damage. Run under them until you reach a narrow passage. Now, before you get all ballsy to go under it, look at your map, which will indicate the there is an upgrade in this area. Jump up and shoot the ceiling until you reveal Energy Tank #2. Obviously you cannot reach it just yet, but you can most certainly keep this area in mind for later. Roll under the narrow passageway and run up the Chozo Statue that is blocking your path. Jump into its welcoming hands to refill your energy and reveal the location of your next power suit upgrade. The statue will sit down, allowing you to continue toward your new goal. Run through the Blue Hatch and into the room across the way -- this is your very first Save Room, mate! Save your game and get ready to go back out into the wilderness.Start climbing up the shaft by way of hopping from platform to platform, blasting the Zoomers you meet out of your way. Eventually you will see an armored bug floating back and forth. This little bugger is called Ripper (like Giles back in his young and wild days, for all you Buffy fans) and he is impervious to everything, so avoid him and keep on climbing. Eventually you will see a Blue Hatch on the right side of the shaft, obstructed by a narrow passage filled with blocks. You won"t be able to get to the hatch until you have the Long Beam, so ignore it for now and keep on climbing until you reach a Blue Hatch on the left. Go through it, roll under the narrow passage, and avoid the Skrees as you make your way to the room on the left. Inside is a lone Chozo Statue, holding some kind of weird looking blob-thing. Shoot it to reveal the Long Beam, and take your prize. When you go back outside, you will be able to shoot the Skrees before they can rip into you, so go ahead and do that, as it will make you feel all warm and fuzzy inside. The narrow passage in which you initially rolled through is now blocked off by some blocks, so take the high road into the unknown.Shoot the rocks blocking your path, and climb upward until you reach a couple of Skrees hanging out on the ceiling. Shoot them down, and continue left before jumping up into a new area. Head into the Blue Hatch on the left and check out the giant, two-headed statue blocking the way to Tourian. Shoot at it and jump on it all you want -- it won"t budge. Head back outside and go right, avoiding the lava pools as you go. When you reach the very end of the corridor (which is home to a Gray Hatch), a creepy spider thing will jump from the ceiling, inflicting some major damage on contact. Blast the creepy bastard until it is no more, and blast through the hatch once it starts flashing. Jump into the welcoming hands of the Chozo Statue in this next room, and it will reveal the location of yet another Power Suit Upgrade that is seemingly in the middle of nowhere. When the statue sits down, continue to the right. This will bring you back to the long shaft you had to climb to in order to reach the Long Beam. Drop down, until you reach the previously inaccessible Blue Hatch to the right, blast a new path, and roll to the door.In the next cavern, you will come across a Zoomer and your very first Red Hatch, which you obviously cannot open just yet. Drop down and enter the Save Room on the right to record your progress before continuing down the proverbial Rabbit Hole. When you reach the very bottom of the area, go into the area on the right (the only place you can go). As you go toward the right, the room will begin to rumble -- surely, not a good sign. Shoot or avoid the Zebs flying out of the lava and continue right until you pick up your very first Missile Tank. With these babies in your possession, Red Hatches will be no problem, so go back to the left, where the ground will shake, and a really gross, really huge bug will emerge.Boss Fight: King Worm Defeating the King Worm is simple, really: just fire a Missile into its eye three times (when the eye is open), and that will not only kill the Worm, but it will give you the mighty useful Charge Beam. However, if you do not defeat the beast, it will run away and you will not get the Charge Beam just yet. If this happens, don"t worry -- it will be back later, in a different room. It moves between just two rooms - each time you fail to defeat it, it reappears in the alternate room.Go back the way you came, climbing up the platforms and blasting Zoomers until you reach the Red Hatch on the right. Use a Missile to blast it open, and go through the door. In the next tiny room, you will notice a swarm of space flies, which will do nothing short of bugger and annoy you (as well as take some of your health). Shoot them down and continue into the next cavern. Jump onto the platforms until you see a nest of space flies blocking your path. Blast them into oblivion so that they cannot annoy you anymore, and jump onto the ledge behind you (to the left of the screen). Another nest of space flies will be there, blocking the path to a missile tank. Destroy the nest, take the missiles, and head to the right once more. Destroy another nest of flies and drop down to a Blue Hatch on the other side of it. Make your way into the next cavern, where a wall of rocks will block your way. Shoot the rocks and the Skrees and go onto the other side of the rocks. Crouch down and shoot the rock to reveal a hidden Missile Tank. Take it and continue to the right; if you did not defeat the King Worm, the ground will tremble before it pops up to annoy you once more. Remember: three missiles to the open eye is all it takes to get rid of it.Continue to the right and pick up Energy Tank #1 along the way as you avoid some more lava pools and Skrees. Drop to the bottom of the shaft here and blast the Red Hatch with a missile in order to open it. Go through it to reach the self-explanatory Map Room. Download the map of Brinstar, leave the room, and start your climb upward. Blast through the hatch on the left, and enter the leftmost room to save your game. When you are ready to go back out into the world, blast the Zoomers and climb up the short shaft. Enter the door on the left and roll through the narrow passage until you come across a Red Hatch. Blast it open to claim your Bombs and refill your health and weapons if needed.Roll under the Chozo Statue and set off a couple of Bombs in order to roll into a secret room. Explode the blocks and set some Bombs to launch yourself from platform to platform until you reach a hearty tank of Missiles. Go back out the way you came, and take note that the previously Blue Hatch that lead into this area has now turned Grey. Bomb the wall to release an army of space parasites. Roll into ball form and plant some Bombs to get rid of the nasty little buggers (if four of them are on you at once they start to drain your health, so dispose of them quickly) and the door will flash, letting you know that you are free to go.Retrace your steps to area near the Save Room, obliterating the Zoomers as you go. Go back through the corridor where you found your Energy Tank; when you reach the small room with past the Skrees, set a Bomb to destroy the blocks in the floor and drop into this new area. Get rid of the creepy crawling monsters as you drop to the bottom of this cavern. Go through the door and blast away at the creatures flying toward you before continuing left to a Red Hatch. Shoot it open to reveal a standing Chozo Statue, who is waiting to embrace Ball Samus. Hop into its claw-like hands to reveal that the next goal to work toward is somewhere in Norfair.Make your way back to the room with the space flies and their nests, exterminating the critters as you go. When you reach the small room leading to this area, break through the floor and drop down to see a Missile Tank in-between two platforms and a Bomb Block to the right. Getting this upgrade will require some speed as well as patience, b/c not only will the Bomb Block respawn after about 30 seconds of it being destroyed, but space flies will annoy you to death the entire time you are in here (if you kill them they just keep on coming to make getting these Missiles hell). Another, easier way to go about getting this Missile Tank is to come back once you have acquired the Power Grip upgrade. Regardless of what you decided to do concerning the Missiles, make your way left, back to the vertical shaft, save your game, and get ready to do a little exploring before going to Norfair.From the vertical shaft, make your way north until you come to a Blue Hatch all the way at the top of the area. Go through it, blast through some baddies, and roll under the strange missile shaped contraption. Jump the gap and blast the next missile shaped thing in order to make it rise. Roll under it and make your way to a bunch of pipes. Blast up via your trust Bombs to the top-most pipe and roll through it. Make your way to the right, through a Save Room, and past some Zeb spewing pipes until you come to a Missile Tank. Continuing right will only lead to a dead end, so go back the way you came, down to the very bottom of the shaft, and through the door to the left. Roll into the Chozo"s hands, if need be, and roll under the narrow passage to the left. Shoot the Skrees down and reveal Energy Tank #2 in the ceiling. Roll into Ball Form directly under the tank and set Bombs in quick succession, launching Samus upward until she makes contact with the upgrade. Now that your energy capacity has been increased, you can safely make your way back through the caverns of Brinstar, and into Norfair.NorfairAfter viewing a cut scene of the uber-creepy Mother Brain viewing Samus through what looks way too much like the Eye of Saruman, go into the room to the right to save your game. Continuing right through the Save Room will bring you to a room that you cannot advance in just yet, so go back to the elevator shaft and go through the hatch on the left. Go through the lava filled room, blasting the Gamets and Novas as you go until you reach a Missile Tank above. Use your Bombs to launch upward and collect the tank. Keep going left, blasting the fire-bat things (called Melia) as you go. When you reach the rock wall, bomb your way through it and roll through the narrow passage to the other side. Keep going until you reach an elevator shaft; go up the elevator to take a quick detour through Crateria.CrateriaGo to the right, shooting through the rock wall, and through the hatch into a room half filled with water. Drop into the water and bomb through the wall on the left. Roll through and shoot through the rocks (and the big space shark) until you reach a Missile Tank. Claim your prize and then go back to where you bombed through. Wait for the breakable block to reform and then use it to jump out of the water. Jump to the platform on the right, jump right once more, and then to the left. Bomb through the rocks and make your way left, into the Chozo Ruins.advertisementChozo Ruins (Unknown Item #1 and Power Grip)Make your way right, as that is the only direction you can go at the moment, until you reach a room with a Missile Tank under a gigantic block that you cannot destroy. Continue to the right until you see a Chozo Statue; blast the thing in its hand to reveal Unknown Item #1, and take what"s yours. Upon claiming this item, the giant blocks will begin to glow, signaling that they can now be destroyed. Get rid of the blocks, take the Missile Tank, and go back through the door. Destroy the block leading to the surface of the ruins and go left, jumping platform to platform until you reach the giant head, which has an entryway in its open beak. Go through the door and as you walk forward, the floor under you will crumble, dropping Samus into a very long, very wide space. Now that you are apparently stuck in the middle of nowhere, go to the wall on the left and shoot it to reveal a hidden path. Climb in and shoot some more blocks out of your way before going into Morph Ball mode. Use a Bomb to blast yourself up and to the left, and quickly roll through the narrow passage into a room where a giant statue holds the Power Grip. Leave this room and watch in awe as a giant statue complete with its own platforms rises from the floor. Start jumping and Power Gripping until you reach the top, where you will go through a door to the left.Jump down to the left, jump some platforms until you reach another Blue Hatch, and go through it. Take a leap of faith to the left to land on or near Samus" ship; replenish your health and weapons, save your game, and head to the right until you reach the elevator back to Norfair.
Walkthrough: Part ThreeadvertisementBack to BrinstarAs soon as you arrive in Brinstar run to the right, where the wall will crumble, allowing access to a Chozo Statue at the end of the dumpy corridor. Jump into its arms to reveal the location of the Hi-Jump upgrade on the map. It"s in Norfair -- argh!Okay, so now that we have determined that running around in giant circles is going to be an integral part of this game, leave this room and make your way to the shaft on the left side of the map. Go up this bad boy until you reach a Blue Hatch on the right; go through here make your way to the right, into one of Brinstar"s super long shafts. Climb into the hidden passage on the right side of the wall and continue to the right. Go through the Blue Hatch in here, all the way to the right until you reach the elevator to Norfair.Norfair Yet Again (Hi-Jump)All right, now that we"re back in Norfair for the umpteenth time, go down the shaft and run through the Save Room in order to charge up your Speed Booster. Fire your beam as you go in order to open hatches without sacrificing your Boost. When you reach the end of the ledge, kneel to stop and then tap the A Button and hold right to fly through the walls. Shoot and zoom your way through the hatch and into the next room, where the sheer speed of the Speed Booster will destroy the blocks in the floor, allowing the exploration of a new area. Woo-hoo!In this lower area, go into the room on the left and clear all of the enemies out as you make your way to the far left side. Run to the right to charge your Boost, blast through the hatch, and destroy the blocks in the next shaft over. Proceed to the left, vaporizing everything in your path, open the Red Hatch with a Missile (duh), and go inside the room to take the ever-useful Hi-Jump.A new area can be accessed by rolling under the Chozo Statue, but the hot air here will basically melt you, so don"t even try navigating the area. Instead, keep this in mind for later and leave the room the way you came. Once in the bubbly shaft, put the Hi-Jump to use in order to grab the Missile Tank to the right (unless you found an alternate method of acquiring this tasty treat) and fall to the bottom of the shaft. Go through the second hatch from the bottom (the very bottom hatch leads to a dead end at the moment) to find another Chozo Statue. Rolling into its hands will not only restore your health and Missile supply, but it will show you the location of the much needed Varia Suit, which just happens to be in the upper reaches of Brinstar. Now that you have this valuable information go back to Brinstar.Brinstar (Varia suit)Brinstar, once more, with feeling! When you reach Brinstar, climb up the long shaft on the right and go through the hatch at the top right. In this pipe filled room (yeah, you remember being here earlier, don"t you?), roll through the very top pipe, and roll to the other side. You"ll reach a creepy pulsating barrier which you can"t destroy yet. Instead jump to the ledge above the barrier where you can see another pipe at the top - morph into a ball and roll through the pipe, then go through the door on the other side. Save your progress in the Save Room.Go back outside the save room via the door on the left (the door you came in through). Shoot the ceiling to reveal a hidden path and climb into it. Proceed upward and go into the hatch to the left. Two creepy barriers block the path, but wait! Watch in awe as the space parasites eat them away in their quest to feed off of you. When the barriers are gone, destroy the parasites with some trusty Bombs and advance to the left. Jump up and roll into the path near the ceiling, where you will eventually fall on a breakaway block. Jump up and off of it quickly and continue to the left in order to avoid certain acid death. When you reach the other side, you will have to deal with another creepy, pulsating barrier. Watch the parasites chow down, get rid of them, and open the Red Hatch. Go inside and get that Varia Suit!When you leave the room, drop into the acid pool (now that you can handle it), and bomb through the floor to reveal a narrow passage. Roll through it, all the way to the left to grab an Energy Tank #5.Go back through the small shaft and into the Save Room on the right to save your progress. Exit through the hatch on the right and drop into the depths of the acid to see a creepy barrier blocking your path. Look up and you"ll see there are a few destructable blocks just below the surface of the acid. Destroy them, then go back out of the acid and head to the right above the acid pool. You"ll come to a movable gate: blast the red stripe so it raises, then collect some parasites on Samus. Don"t worry about Samus, she"s a badass so she"s not bothered by the parasites swarming her. Bring the parasites back to the creepy barrier and the parasites will destroy it and Samus can pass through.Go through the door, down the shaft, and into the hatch just above the Map Room. If you have not defeated the King Worm yet, you will go for another round in this corridor. Either way, keep going left, grab the Missile Tank below the middle corridor if you haven"t done it already, and drop down the right shaft (of the two large vertical shafts in the center of Brinstar). For those of you who still have yet to defeat the King Worm, it will appear for a final showdown in the long corridor leading to Norfair. If you do not defeat it here, you will lose out on the Charge Beam and a 100% completion rate. Regardless of if you have or have not defeated it, continue to the right and go back down to Norfair.Norfair (Super Missiles, Wave Beam, Unknown Item #3)Norfair, once more...without much feeling. Now that you are back in Norfair, go right, through the Save Room and up the shaft to the right. Go into the second room from the top (on the left hand side) in order to grab a Missile Tank. Grabbing this item was previously unheard of, as going into this room without the protection of the Varia Suit meant bad things. When you are ready to continue onward, go back down the shaft, through the Save Room, and charge up your Speed Booster in order to break through the barriers in the floors, as you did during your previous visit to this area. Go back to where you got the Hi-Jump and roll into the passage under the Chozo Statue. Continue on to the left, bombing the floors and hopping onto the paths until you reach the hatch on the other side.In the next room, Bomb and shoot the rocks obstructing the path in order to make an even surface. From the right side of the room, once all the obstacles are cleared, charge up your Speed Booster and take off to the left. When the time is right, jump, and you will blast through a barrier and land on the far ledge. Go left through the hatches until you find yourself in a Save Room. From here, you have two options to reach the next area: you can take the high road or the low road. For speed purposes, the route outlined here is the low road, as it is a more direct path, but either way is fine. Hell, take both if you want.advertisementOkay, so exit the Save Room from the left and Bomb through the floor between the two Blue Hatches to open up a path. Drop down, through the Blue Hatch to the left, and blast your way past the critters emerging from pipes. Exit this corridor to find yourself across from a Red Hatch. Shoot the hatch, go into the new room, and download the Map Data for Norfair. After you have the map, return to the corridor and drop into the lava pool; as soon as you jump in, the substance will disappear -- it was all a clever illusion, designed to keep you out of here! Anyway, destroy the floors as needed and go through the hatch to the right and start hopping from column to column, destroying your foes as you go, and avoiding the lava. When you reach the one screen wide room on the other side, destroy the floor and fall into a corridor with hot air. Make your way to the right, and fire at the wall to collect a Missile Tank. Keep going to the right to grab another Missile Tank, and turn around, going back the way you came.Continue through the Blue Hatch to the right of where you bombed the floor and go through the strange corridor. Destroy the vines with your beam, and use Missiles to take down the ones that have monsters tangled in them. In the next area, destroy the floor above the lava pit and drop into another illusion. Drop to the bottom of the shaft and go left, through the Blue Hatch. In this next room, destroy the wall (and the creature, too) and proceed to the left until you come to a Red Hatch. Open the door, go inside, and take the Wave Beam for yourself. Exit the area and go back the way you came. Use your new weapon to take on the creature in here through the wall, without being hurt! Yay! Go back up the short shaft and enter the Save Room to the right. When you are ready, exit through the hatch to the right; run to the right, blasting as you go in order to break some blocks while charging your Speed Booster. This will allow you to break through the Booster Blocks near the end of the hallway to get to the next room.As soon as you set foot in the next passage, the hatch you came through will turn Gray, indicating that you can"t leave until you meet some kind of requirement. Look at the giant larva and wonder what that requirement could be. Go to the path under the larva and use your Wave Beam to blast the ugly thing without taking any damage. When the creature is gone, jump up to where it was and go down the path it previously obscured. Dropping into the next area, you will face an angry larva that will charge at you and attempt to smother you in its space larva fatty tissue. Blast the beast to make it back up and plant some Bombs on the ground as you roll back to the left. As the beast charges, the Bombs will detonate and hurt it. Continue this process until the worm is gone; when it leaves its crusty shell behind, shoot the ceiling above to reveal Energy Tank #6 and jump up (in Ball Form) to take it. Once you have the tank, go to the left corner (where the larva cornered you) and run to the right, blasting as you go in order to open the hatch. In the next room, your Speed Boost will be charged, allowing you to zip through the floor to a Missile Tank. Drop to the bottom of the corridor and save your game. Head left through the Save Room, shooting your way through tentacles as you go. When you reach the end of the path, go into Ball Form and drop through the floor, to a trapped larva.Boss Fight: Larva Ensnaring Space Tentacles So, this really isn"t your typical boss, but listen up. See that Ripper floating around the room in a strange pattern? That armored bugger is your key to success, as your objective is to free the larva from the six tentacles that have it trapped. There are three tentacles on each side, making this quite simple, if you follow. Avoid the projectiles being shot out, or shoot them for Energy and Missiles. When the Ripper is positioned just right, use your beam to freeze him in place; jump on top of him and jump up once more to blast the tentacles with your trusty Missiles. Make sure you pay attention to the Ripper, as he will thaw out pretty quickly, causing you to repeat the process.When the tentacles are gone, the larva will fall through the floor, revealing a passage that leads to the right. Taking this path will lead you to Ridley"s lair, but you will not get far without Super Missiles, as there is a Green Hatch down here. But still go down to Ridley, then go back to up to Norfair and go left, back to where you freed the larva from the evil tentacles. Drop into the tunnel and make your way left this time. In the next chamber, there will be several small eggs strewn about. Breaking the leftmost egg will trigger a boss battle.Boss Fight: Imago Imago is a gigantic space bee that hates you and would like to have you for lunch. All it does is fly around the room, from left to right, right to left. It does shoot projectiles at you, as all bosses do, but defeating it shouldn"t be a problem. Simply chase it around and hit its stinger with charged beam shots or Missiles until it expires.When the Imago is defeated, its stinger will fall off, leaving the rest of the body to crash into the left wall, granting access to your very first tank of Super Missiles. Run through the Gray Hatch to the right, and use a Missile to blast a hole in the floor. Drop down to the Green Hatch and crack it open with one of those Super Missiles of yours. Proceed to the left, past the enemies (which can be avoided by bombing through the floor and following a narrow passage) and blast through the Red Hatch on the other side. In the small chamber, Energy Tank #7 sits across the way, with not a single obstacle in sight. If you try to run across the room in a straight shot, the floor underneath you will break, and you will have to work your way back up from a neighboring shaft. Instead, run four blocks in, to the middle of the room, and then jump across from there. If done correctly, you should be able to grab the edge of the floor and take the Energy Tank.After you get the Energy Tank, go left, down the shaft, and into the first hatch on the left to use a Save Room to your advantage. When you are ready to continue, leave the room and continue down the shaft in Ball Form. Grab the Missile Tank on the way down and then blast open the Red Hatch to gain access to the Map Room. Download the Ridley Map Data and go through the hatch to the right. In this next corridor there is a long, flat walkway along the ceiling; blast through the breakable blocks to the walkway and go all the way to the right. Run left to charge up your Speed Booster and fire at the blocks to break them. Kneel to stop at the ledge and jump down. Blast open the hatch and tap the A Button to hop up, then hold left to blast off through the doorway and into the Map Room. Blast the hatch in here while maintaining your charge (this may take a little practice) and run into the next room, where the Booster Blocks will be destroyed and a secret area revealed.Once in the secret area, start running to the left to charge up your Speed Booster again. Shoot the blocks as you go, and when you reach the corner, kneel down to stop, and then tap the A Button to fly upward and through a pair of blocks. From this corner, roll right, drop down, and straighten yourself out as you fall to grab the ledge on the right. Pull yourself up, roll to the right again, and fall once more. When you reach the collapsing block, quickly straighten yourself out and jump up to the next ledge. Roll to the right and tap Up to straighten as you fall; grab onto the ledge to the left and aim a Missile at the block on the right. Jump into the newly opened passage and go right. The floor will collapse one block left of the rightmost corner. Straighten out as you fall, fire to the left to clear the ledge, and then grab the ledge and roll up to it in one motion. Roll left quickly to grab Missile Tank number 1 of 2 in this area.When you roll to the midsection of the path holding the first Missile Tank, the floor will collapse under you. Straighten out as you drop and hang onto the ledge; aim upward and fire a couple of Missiles to obliterate the blocks above you. Jump up, grab the ledge, and then fire more Missiles above to break into the next path. Keep doing this until you reach Missile Tank number 2. Now that you have your goodies, go back up to the room with the long walkway along the ceiling and proceed to the right to collect yet another Missile Tank. Go through the hatch and into a Save Room to record your progress.A really tricky series of Boosts will allow you to blast your way into a secret area in the shaft outside of the Save Room, so read carefully. Go back to the lower corridor right outside of the Save Room and run to the left along the passage near the ceiling. Now, run right to charge up your Speed Booster and fire at the breakable blocks as you run. Kneel down to stop and the edge, jump down, and blast that hatch leading to the Save Room open. Once inside the Save Room, blast the hatch on the other side, tap A and hold Right to blast off into the next room. As soon as the screen turns black to load up the next room, hit down in order to stop while maintaining your charge. Climb up to the third platform and blast through the wall, into a new area. Getting this right the first time is a little difficult, but be patient -- you will get it eventually.In the secret hallway, charge your Speed Booster once more and use it to blast through a hole in the ceiling. When you reach the top, go open the hatch to the right and run inside to charge up the Speed Booster yet again. Open fire on the blocks as you run (first with your normal beam and then with a Missile at the last block) and jump through the blocks to the right in order to collect another Missile Tank. Keep in mind that this, too, is easier said than done.Getting the Missile Tank in the lower region of this unmapped area is not possible until you have the Space Jump, so leave through the way you came (this means crashing through the blocks you initially came through) and go through the hatch on the left side of the shaft, above the Save Room. Climb up into the next room and go to the left. Drop into the last gap of the center passage and grab onto a ledge. Roll through the narrow passage to the right and fall into a phony lava pit; destroy the block in the lower right corner to reveal a Missile Tank. Leave this area the way you came, and go into the next hatch on the left of the shaft. Go left through the hall, and when you reach the next room, fire through the wall to defeat some enemies. When they are all gone roll left and detonate a Bomb to gain access to another Missile Tank. When you reach the left side of this room, set off a Bomb to clear a passage to the upper left of this area. Hop up the ledges until you have to use a Super Missile to go forward. Roll into the next area and set off another Bomb to trigger a chain reaction that will give you access to a Super Missile Tank. Drop back down to the main hallway and go through the hatch to the left. In this small room, freeze the creature when it reaches the right side of the pillar and use it as a platform to grab the Missile Tank. Freeze the creature to the left of the tank to use it as a platform to the other side. Continue to the left, blasting anything that gets in your way (or not -- it"s up to you) until you come to a room holding a Super Missile Tank.After you take the Super Missiles, jump up to the right to grab a hidden ledge and pull yourself up. Open fire on the block to reveal another Missile Tank; take it and go through the hatch to the left. Roll through the narrow passage and fall down; destroy the breakable block to grab the first of two Missile Tanks in here. Go back up and destroy the breakable blocks to the left. Jump up, grab onto the ledge, and roll up to get the second tank. With Missiles in tow, go back to the small room where you had to freeze the creatures to make platforms and fall through the floor near the pillar. Run to the right to build up your Speed Booster and blast your way through the blocks on the floor of the corridor. Open the next hatch and plant a Bomb in the corner of the short green wall to open up a hidden passage that holds an Energy Tank #8. Once you have this item, go back to the left and start toward Ridley"s Room. Save your game in the Save Room right outside of the room and go into the hatch to the left. Falling through the collapsing block means that there is no turning back until after Ridley is D-E-D dead, so make sure you are absolutely ready to do this thing.Once on the other side of the collapsing block, the eye blocking the door will open up and fire an energy blast at you. Jump over the attack and hit it with one Super Missile or three standard Missiles to get rid of it. Go through the hatch and to the left of the empty room to grab Unknown Item #3 from the Chozo Statue. Break through the big block behind the statue to reach Energy Tank #9. Go back out, recharge your weapons and energy, and step out into the large room.Boss Fight: Ridley Upon re-entering the large chamber, run to the right and stop short of the last support on the platform, as it will break away once the cut scene is over. When Ridley arrives on the scene, he will start sending fireballs your way. Avoid them or shoot them and then open fire with Super Missiles and standard Missiles. Stay away from Ridley"s tail and try not to let him grab you; if you do in fact end up in his clutches, roll into Ball Form and shake free if you are low on energy, or keep pelting him with Missiles until he lets go. The 100% easiest and quickest way to beat him is to run under him as soon as he swoops into the room and fire Super Missiles and then standard Missiles into him from below. This method will keep you away from his claws, tail, and fireballs as well as do away with him in record time.advertisementLeaving Ridley"s lair may seem like a bit of brainteaser, but IGN Guides has all of the answers. Go out to the pipe that keeps spewing space bees and freeze one of the bugs as it emerges. Use it as a platform to get to reach a high ledge on the right. Blast through the big Chozo block and run through the right path to be deposited near in front of the Blue Hatch from which you entered. Make your way to the right shaft of Ridley"s lair, climb up, and dispose of another Chozo Block. Run to the left to expose a hidden section of the shaft, rise, and then run to the right and drop into the passage leading to the top of the shaft. In the next room (through the blue hatch to the left of the shaft), go to the pipe that is spitting out space bees in the upper right section. Jump up to fool the bee into rising high above the pipe and freeze it to create a ghetto space platform. Climb up to a high ledge to grab a Missile Tank. Continue to the left of the room and fire a Missile at the block in the lower left corner. Bomb through the floor to be taken to the room to the right of the elevator shaft leading back to Norfair.
"Planet Zebes... I called this place home once, in peaceful times, long before evil haunted the caverns below. Now, I shall finally tell the tale of my first battle here... My so-called Zero Mission." - Samus Aran
Metroid: Zero Mission is a remake of the Nintendo Entertainment System classic game Metroid, but with significant enhancements, including new areas, power-ups, and enemies as well as a few surprises.
Secrets: Check here for Metroid: Zero Mission unlockables, a code for the original Metroid game included with Metroid: Zero Mission, and a sampling of the Metroid: Zero Mission gallery.
This section provides general strategies for Metroid: Zero Mission, including performing special maneuvers like wall jumping and bomb jumping, and tips on completing the game as quickly as possible.
The Metroid enemies are certainly there to get in your way and be a hassle but many of them are little more than keepers of health and ammunition. Most dead enemies will reappear after you"ve returned to the location. There"s no need to defeat every enemy every time you move through the same room (unless of course you need some health or ammo). In fact, if you"re looking to beat the game quickly, ignoring most enemies is one of the important keys.
Whenever you see a pipe coming from the ground (think Mario type pipe), expect some Metroid enemies to emerge. These enemies are excellent sources of health and ammo. The enemies that emerge from pipes reappear even if you don"t exit the room completely. If you"re low on health or ammunition and need some easily, move around the pipe and eliminate the enemies that emerge.
One of the most impressive ways to complete the game is by collecting as few power-ups and items as possible. Some power-ups are mandatory, such as the morph ball and bomb. Others, however, are optional and can be skipped such as the charge beam.
If you"re looking to finish the game quickly or collect items as soon as possible, then you should master the art of the wall jump. In Metroid: Zero Mission, you can scale a wall by jumping alongside the wall. Perform a jump into the wall then tap the opposite direction and hit the jump button again. It will look like you"re literally spinning up the wall.
The bomb jump is another maneuver you can use to collect items as early as possible and even get the varia suit well before you are "supposed" to acquire the power-up. Collect the morph ball and bomb power-ups then you can perform the bomb jump. Enter morph ball mode and continually drop bombs. You will be propelled upward by the bomb explosions. If you time your bomb drops correctly, you can continue to ascend as high as you need to go with the aid of the explosions. You can even aim diagonally or cross small gaps with the aid of the bomb explosion. For instance, to get the varia suit after you have acquired the bombs, maneuver under its location in Brinstar. Bust the blocks above you and use bomb jump to reach the chamber. Next you"ll have to bomb jump diagonally to the ledge on the left side then use the bomb jump to reach the door above. Once inside the overhead chamber, use bomb jump to reach and cross the pillars to the far left side. Release the parasites to destroy the organism then scamper to the statue and recover the power-up.
If you can"t find a hidden item even though it appears on your map, try bombing the various surfaces around the room. The bomb may destroy blocks or at least reveal what you"ll need to destroy the blocks that lead you toward the hidden item.
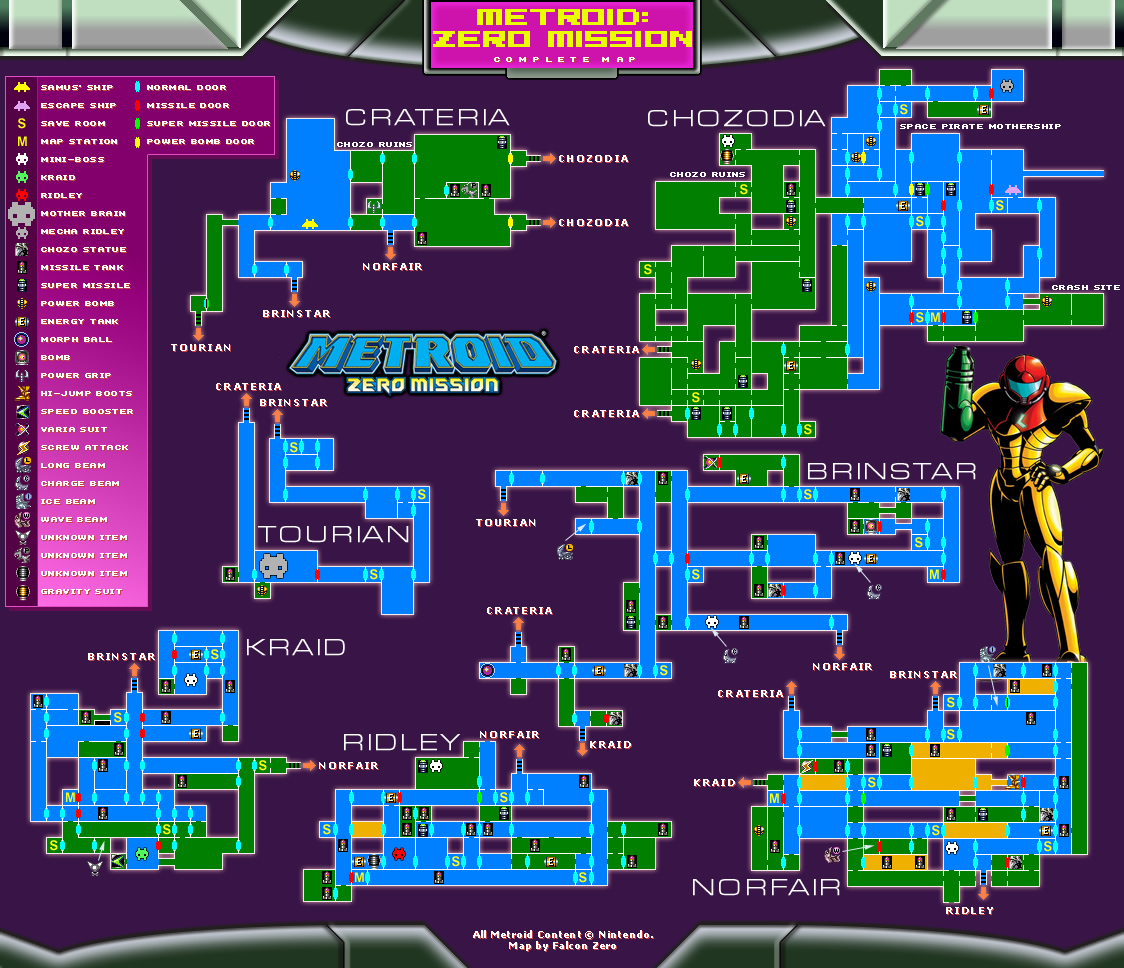
This section offers a complete walk-through for Metroid: Zero Mission. This walk-through includes a proven solution through the game. It primarily follows the linear structure of the game (unless otherwise noted) and snags all beam, suit, and miscellaneous power-ups and also reveals the location of many hidden items (check the map section as well). Since it explores most of the game, you won"t complete the game with a low time completion by following this walk-through but you will complete the game.
Head left from your start position and leap over the obstruction. You can"t go underneath just yet! Approach the spherical object on the pole. Jump and grab the object--it"s your first power-up, the morph ball.
Return back to the right and use the morph ball to roll underneath the obstruction. Approach the door at the far end and proceed through. In the next room, roll under the blocks or simply shoot them.
Continue to the right and into the next chamber. Avoid the enemies that fall from the ceiling. Roll underneath the obstruction and approach the statue. Jump into the statue"s hand.
This "Chozo" statue, and its counterparts throughout the game, reveals the location of the next important item. If you"re ever unsure on what to do next, just use the guidance provided by the last Chozo statue to proceed toward the next important item. You can also use these statues to replenish health and, later in the game, weaponry.
Continue to the right into the vertical shaft. Spot the save game room just to your right. Enter and save your game if you wish then ascend the vertical shaft. Avoid or shoot the enemies as you ascend.
Move upward until you reach the first door on the left side of the screen. Enter the tunnel. Duck and shoot the three blocks that clog the narrow tunnel. With the route clear, use your morph ball form to roll left. Beware of the falling enemies and approach another statue. This one holds a new item and adjustment to your primary weapon.
Leap into the statue"s hand and grab the long beam enhancement to your weapon, which causes your projectiles to fly further. Enter the statue"s hand again to replenish your health if necessary.
Return to the right. You can"t take the lower tunnel because the block obstructions have returned and you have no means of destroying them while in morph ball form. Instead, take the upper tunnel. Duck and shoot the blocks then use the morph ball to traverse the narrow tunnel.
Make your way up this hidden passageway. Shoot the path"s obstructions and continue to the main route up toward the top of the map. When you reach the top, you can search to the left but the area is blocked by two large reptilian heads. You won"t open this route for awhile so ignore it for now. Turn around and proceed toward the right.
You"ll reach the door--but this one is white. This indicates that the door is currently locked and won"t open until you clear the room of enemies. Defeat the enemy that falls from the ceiling to unlock the door.
The next room to the right contains another Chozo statue. Enter its hand to see the location of Brinstar"s next important item. Use the statue to replenish health as needed then proceed to the right.
Fall down the shaft. When you reach the blocks, shoot them to open a path. Continue downward until you reach the first door on your right. Use the morph ball to traverse the tunnel then continue right into the next vertical shaft. You"ll spot your first red door to your right. You can"t open red doors yet so you"ll have to find another path.
You can search up the shaft but the available route is also blocked. You must find a new weapon to continue along this pathway. Start your descent and use the save game room to the right as needed. Continue to the bottom of the shaft and enter the door on the right side.
Traverse the tunnel to the right (taking note of the tunnel crumbling ominously) and find your first missile tank on top of the center post. Avoid falling into the harmful liquid below if possible. If you continue to the right you"ll find the route blocked. You still need another weapon to get through this tunnel!
You"re about to put your new missiles to good use. Return to the left toward the tunnel"s exit. A gigantic worm appears from the tunnel"s ceiling--that"s what caused the crumbling walls--and attacks. You can"t continue on until you either defeat this beast or force it to run away. The worm does carry an optional weapon power-up so it"s worth destroying. You"ll likely destroy it eventually but you might as well eliminate it the first time!
To destroy the worm, you must hit the worm successfully three times before it escapes. You must use the missiles to hit the worm in its open eye; regular weapon fire won"t harm the beast.
When the worm first attacks, hit it in its open eye either initially or after it makes its first dive attack (watch for its pinchers to move indicating the worm is about to dive). Don"t waste missiles on the worm"s closed eye or its sides. It will shoot some spikes from its hide. Shoot these with your regular weapon to regain missiles or health. After the worm dives, move underneath and shoot its open eye with another missile. You must be quick as the eye doesn"t stay open for long. The worm now attacks to the left or right so maneuver out of the way and shoot the eye a third and final time to defeat the creature. If you only score two shots in this amount of time, the worm will escape. You"ll encounter it later in this tunnel and can kill it then.
After the worm"s death, grab the charge beam weapon power-up. This allows you to charge a more powerful shot with your primary weapon (hold down "B"). Return up the shaft until you reach the red door on the right side. You couldn"t open it before but now you have the key: missiles! Shoot a missile at the door to open the route.
Continue to the right, leap over the harmful liquid below, and shoot the flying pests overhead. In the far tunnel you must leap onto the rocks and traverse an upper path. But it"s blocked by the substance creating those flying things. Shoot the obstruction with your primary weapon or missiles. Clear a route to the far right side where you"ll find another door.
Move through another short tunnel and reach a set of vertical blocks that obstruct this route. Use your primary weapon to destroy the blocks and open a path through. Aim your weapon toward the ground and clear the lowest blocks to reveal a hidden missile tank.
Head to the right and locate your first energy tank resting on a post. Use your primary weapon to destroy more blocks obstructing the path to the right. Proceed through the far door and into another shaft.
Before ascending, drop down and use a missile to open the red door on the left. This is the map room. Approach the machine on the far left to download Brinstar"s map data. Exit the room and ascend the shaft.
Enter the first door on the left. Move through the first chamber to find a save game room. Exit and ascend one more level to another door on the left.
There"s nothing you can do in the bottom of this room just yet so use your morph ball to traverse the narrow tunnel on the upper portion of the room. Drop down the other side and use a missile to open the door.
Here you"ll encounter another Chozo statue holding another vital item. Grab the item to add bombs to Samus" repertoire. To set bombs, duck into a morph ball and press the "B" button to set. Bombs also permit the bomb jump maneuver as described in the "General Strategies" section of this guide. You can duck into morph ball form and continuously set bombs to propel Samus into the air to reach otherwise unattainable (at least until later in the game) areas and items.
Bombs destroy the block type underneath the statue. Put your bombs to use immediately and destroy those blocks. Roll left to a secret room. Use bombs to destroy the blocks overhead and practice your bomb jumping to reach the missile tank) on the upper ledge.
Exit and return to the door at the far right side of this tunnel. It"s white and currently locked. Use your bomb to destroy the blocks along the ground. This releases purple parasites from the cage overhead. Roll around and drop some bombs to shake off the parasites. Exit through the unlocked door.
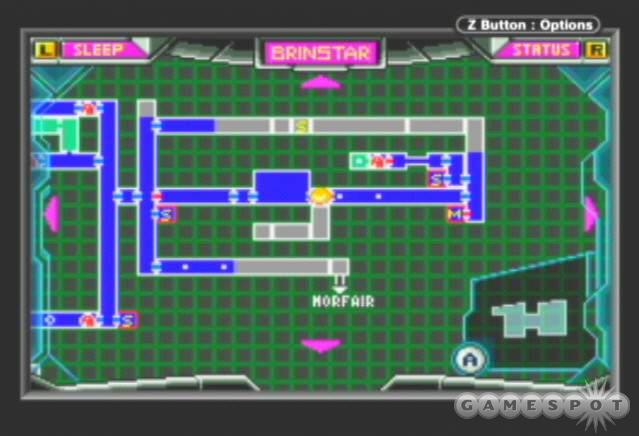
Make your way down the shaft and enter the door on the left side (above the map room). Retrace your steps to the area shown in the screenshot. There"s a block that can be bombed here. Set a bomb and destroy the floor to open a new passageway down. Unlock the red door with a missile and find a Chozo statue inside. It points the way to the next important item and guides you into the next area, Norfair.
Exit and return up the passage. Return to the room with the flying pests and their hives. Before exiting via the door on the left, leap through a secret passage near the top left corner of the room. Destroy another hive and find a missile tank in the back corner.
Continue to the left and exit into this vertical chasm. Ascend the ledges to the very top and enter the door on the right side. Roll underneath the missile-like objects (shoot the red spot on the second missile to force it to rise). Spot the two unique blocks along the ground. Use Samus" bomb to destroy them and open the passage.
Leap up to the top tube (shoot any enemies inside) and roll through to the far right side. Move through the next door and save your game if desired. Continue through the yellow bricked tunnel and snag another missile tank on a post. Retrace your steps to the left and descend the chasm until you reach the bottom.
This is the tunnel where you encountered the worm (and may encounter again if it wasn"t destroyed). Blocks impeded your progress before but now you"re equipped with the bomb. Go right and leap onto the blocks near the ceiling. Set bombs to open a new route. Roll through the tunnel and drop on the far side. Continue to the right and locate the elevator into Norfair.
Leap off the elevator to the right side and set a bomb to open a hole. Fall to the floor and go through the door on the right. Save your game if desired. Return to the left, underneath the elevator, and traverse the new tunnel.
You"ll reach a platform underneath a missile tank above. You can snag this missile tank now by using bombs to propel Samus in morph ball form to the ceiling and the missile tank. For more information on "bomb-jumping" see the general strategies section of this guide.
Resume course to the right. You"ll soon reach a dead-end. Duck and shoot the blockage to reveal a passage. Traverse it with Samus" morph ball then use a bomb to expose an exit. Continue left and move through the door.
This vertical chasm leads up and down from this door. The path down can be explored with the use of Samus" bomb-jumping maneuver. Use bombs to jump over the tall pillar on the left side. Drop down and go through the door on the right. Maneuver to the end of this passage to find another missile tank.
Proceed right into the water-filled chamber. Before you leap onto the platforms, jump into the water and drop down near the lone block at the base of one of the platforms (beware of the aquatic enemies swimming around!).
Shoot the block and the bigger block behind it. This clears a path into an underwater cavern. Bomb the bottom left corner twice to open the route into a secret chamber containing an aquatic enemy (kill or avoid it) and a hidden missile tank.
Exit the water on the left side of the chamber and use the platforms to reach the top left corner. Bomb the set of blocks that obstruct the route. Exit through the top of the screen and into the Chozo Ruins. You can"t destroy the bigger block that exits the cavern so instead continue to the right. Bomb any obstructions and traverse the tunnels in morph ball form.
Continue right into the next chamber. You"ll spot a missile tank under a block. You can"t get it just yet so keep going right. Jump over the blocks ahead and grab the item from the Chozo statue. It"s marked as an "Unknown Item" and is currently incompatible with your suit. It"s actually the Plasma Beam weapon but you won"t be able to use it until late in the game.
Proceed to the left and traverse the tunnel in morph ball form. You can destroy the block obstructing the exit now. Hop out of the tunnel and use the pillars to reach a door on the upper left side of the ruins. Enter the door then run left until you drop down inside the large chamber.
There doesn"t appear to be a way out but if you examine the left wall you"ll find a breakable section. Shoot the wall and navigate the hidden passageway with morph ball and bombs. Drop into the next chamber and grab the power-up from the structure. It"s the power grip, which allows you to grab and hang onto ledges and corners.
Exit the chamber to the right. The central structure now rises and provides a set of platforms that can get you out of this predicament. And not coincidentally, you get to use your new power grip as well! Ascend out of the chamber using the platforms.
Exit the area at the top left. Shoot the blocks that rest on the top of the pedestals to clear a path to the door on the far left. Utilize your power grip to pull yourself up into the tight space provided by the last pillar. Enter the door and drop down to the planet floor below. Continue left and find Samus" ship here on Crateria. Use it to replenish your health and weaponry as well as save your progress.
Return to the right and destroy the block in the upper right corner to open a passage. Find the elevator back to Nofair. Now equipped with power grip you can explore a new area.
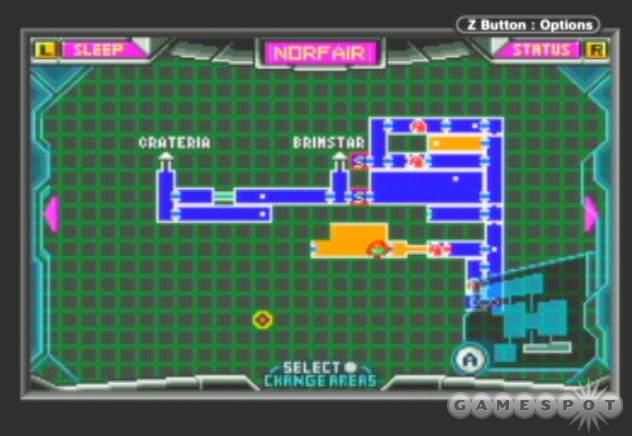
Drop down from the lift and take the first door on the right. Make your way to the area marked in the screenshot (by Samus" logo). Save your game on the way if you wish.
Traverse the ledges above you with help from power grip. Proceed to the door on the far right side of the room. Climb the ledges in the next section and enter the first door above you on the left. The next room contains a series of small platforms. Leap across the platforms with help from power grip (avoid the harmful pool below if possible).
Enter the next room and find a Chozo statue holding your next power-up. It"s the ice beam, an enhancement to your primary weapon. You can use it to freeze enemies in place; the enemies can then be used as platforms to reach otherwise unattainable areas.
Instead of using the door to the right, go underneath the statue and set a bomb to open a route left. Use power grip to grab hold of the pillar or freeze the enemy with the ice beam. Enter the left door into the next section. Before ascending this vertical area, enter the door on the left to find a save game room.
You"ll soon notice that there aren"t many platforms above you--but there are enemies! Use your ice beam to freeze the enemies in place and use them as new platforms to continue your ascent up this vertical shaft.
At the top, enter the door on the right. Traverse this area using power grip and ice beam (you can freeze the enemies that appear from the pool below). Leap from a frozen enemy into the hands of the Chozo statue, which provides guidance to the next power-up location. It reveals the route to Kraid.
Continue to the right using your ice beam to turn your enemies into frozen platforms. Enter the door at the end. The next room is more of the same. Leap to the small platform and use the ice beam to freeze the moving enemies. Freeze one close to your platform, stand on it, then freeze the other enemy so you can jump to the next ledge.
In the right side of the room, freeze the upper enemy. Bomb the second block down from the ceiling to expose a hidden missile tank. Drop down and continue through the door on the right side.
Walk to the right side of the next chamber to fall through a hole. Drop down to the very bottom of this shaft and enter the door on your left. You"re back in the initial room that required the power grip to navigate.
As you move to the left, spot the enemy underneath the row of blocks. He looks like he"s trying to get out! Bomb the floor to allow the enemy to soar higher. When the creature is at its peak, shoot it with the ice beam. Jump onto the creature and find a ledge above. Jump to the ledge, walk to the right, and snag the missile tank.
Exit this chamber to the left and use the save game room if you wish. Exit to the left. You"re underneath the Brinstar lift here. Use your ice beam to freeze the enemies. Use them as platforms to reach the lift. Return to Brinstar.
Backtrack your way to the left. Reach the vertical chasm and ascend (use the save game room on the right if you wish). Enter the first door on your right. Go right until you reach a room with a rocky bridge underneath your feet and two doors on either side of the screen.
Bomb a hole in the bridge and drop down into the room below. Spot the missile tank in the small niche. There are also a number of flying pests around the room. You must use a bomb to destroy the block and then can use your power grip and the ledges on the left side to reach the exposed tank. But you have to work quickly because the block reappears and the flying enemies also regenerate. Use the bomb-jumping technique to destroy the block then jump to the niche and grab the tank. Exit this recessed chamber.
Return to the left and down the long chasm. At the bottom, go left. This tunnel was also your starting location but it"s also near the route into Kraid.
After using the morph ball to traverse the narrow tunnel along the floor, use your primary weapon to shoot the ceiling and expose an energy tank. Use the bomb-jumping technique to snag the tank. Just position yourself below the tank and continue to drop bombs to propel your morph ball form up to the tank.
Continue to the left. You"ll recognize the area from earlier in the game. Now that you"re equipped with bombs, you can open a hole in the floor and descend into the next world, Kraid.
Before going right to the Kraid lift, drop down into a hole. You must do so in morph ball form. You"ll fall into some sort of device; it"s on the left side of the room"s bottom floor. This device will propel you upward at a very fast rate; all it requires is a little explosive charge. While in the device, drop a bomb and you"ll be propelled into an upper chamber containing a missile tank.
There are more tanks to be found in Brinstar before moving into Kraid if you wish to take the time to explore. Leap back out of the chamber and go right to the vertical shaft (the save game room is on your right). Move up to the first door on your right and move through to the next vertical shaft. Go up here until you run out of platforms with just enemies above you.
Now that you have the ice beam you can freeze these enemies and use them as platforms to reach a ledge above. While standing on the upper enemy, jump to the ledge on the upper left corner of the screen. Roll through and find a missile tank in the hidden room.
Return to the vertical shaft and drop down until you reach the area shown in the screenshot. Leap to the platform shown and notice the breakable block on its upper side. Set a bomb and drop inside. Eliminate the enemies in the hidden chamber and drop down into the room below. It contains a missile tank.
Drop down again and exit to the right. You"ll notice a new power-up on the left but it can"t be obtained just yet. Return to the vertical shaft. From the exit point of the hidden room you were just in, jump up and to the right onto the large piece of room. Hug the right wall and use your bomb-jumping technique to open a route. On the map it"s essentially directly to the right of the hidden room you were just exploring.
Bomb the floor to open a path to the right side of the room. Freeze the floating enemies to keep them away. Jump up to the upper ledge and grab the missile tank.
Hop down and enter the room on the left to save your game. Before exiting the save game room, walk along the wall on the left side. There"s a hidden tunnel. You can enter it now with the help of bomb-jumping (otherwise you"d need the hi-jump boots to hop in morph ball form). Go to the corner and bomb-jump while pressing the directional pad against the left wall. Traverse the narrow tunnel and use bombs to destroy any obstructions. Grab the missile tank in the hidden room.
Exit the save game room to the right. Open the red door with a missile and hop over to the right. Leap across the pillars and snag the missile tank. Destroy enemies and blockages with your primary weapon and cross this corridor to the right. Move through the door at the end.
The next room contains a tube on the right side. You can go up the platforms on the left but the ceiling is blocked. Instead, bomb the ground adjacent to the tube"s bottom. Roll into the hole and down into a recessed pit. It"s another propulsion device. Roll inside and set a bomb. The device propels you upward (destroying those enemies in the process).
At the top, roll to the left and to the first narrow passageway so you can grab the missile tank. If you miss it (or once you"ve grabbed it), you can use the device again to propel yourself back up the tube.
Use your power grip and jump up the wall using the small corners to grab hold. Keep going to the upper door on the left. In the next tunnel, destroy the blocks on top of the pillar to open a hole through. If you need health or missiles, stay close to the tube in the ground and shoot the enemies that emerge. Exit the tunnel to the far left.
Destroy the blocks in the next tunnel and drop down. There"s another propulsion device here. Before you enter through the door on the bottom right, use the device to launch yourself up the left side of the screen. As you descend after the blast, push the directional pad to the right and you"ll enter a new passage.
Open the red door on the right side with a missile. Inside you"ll find an unusual structure. This device controls the "zip lines" that are scattered throughout Kraid. These zip lines aid in your movement around Kraid. To activate the zip lines, jump into the device and enter morph ball form.
To use the zip lines, shoot the red button on the ceiling to call the line toward Samus. Then jump up and grab hold to transport along the ceiling to the opposite side of the screen. When you do so here, you"ll automatically hit an energy tank. Enter the door to the right and save your game.
Exit the save game room to the right. Walk to the edge of this small alcove to drop down in front of a door below. Enter the door on the left. Leap to the room"s center and prepare for another boss battle. The creature emerges from the pool below and will attack the left and right platforms--whichever you are currently standing on. You must use the zip line overhead to avoid the attack. When you drop to the other side, use your missiles to hit the creature around its neck. The creature also causes the hazardous pool to rise. Get on the highest platform to avoid taking damage. Repeat the process back and forth until the beast has been destroyed.
Before you exit the room to the left, drop down into the recess (where the creature came from). Hop over the pillars toward the left side. Destroy the block in the upper left corner of the recessed area (using bomb-jump if necessary). Maneuver through the tunnel into a secret room on the other side. Blast the block with your primary weapon and leap to the missile tank.
It"s time to exit the area. Return to the previous room and go left. Use the propulsion device to launch to the very top corridor. Proceed to the right and use the zip line to cross. Destroy the blocks behind the pillar and exit to the top right corner of the map. Drop down to the top of the tube then down to the bottom. Enter the door on the left. Retrace your steps through this corridor and enter and use the save room on the left side.
Exit the save room to the right and drop down one level to find two more doors. Enter the door on the left. Once inside the room, shoot the blocks on the platform and use the morph ball and bombs to traverse the winding corridor. Reach the zip line.
To reach the far side you can be in morph ball form while in the zip line. Normally you would wait until you have hi-jump boots so you can jump in ball form but you can use the bomb-jumping technique to enter the zip line. Cross the zip line moving to the left while in morph ball form. You can also just shoot the blocks that obstruct the path. If you return to the corridor and search the room on the right you"ll find another zip line leading to an energy tank. You can"t get it yet, though.
Exit the tunnel to the left side. Use the platforms to ascend to the next door on the right. Enter the door and notice it turn white behind you. Defeat the creature in this room! If you"re loaded up with missiles, use them. You"ll sustain heavy damage just getting nicked by this creature. After defeating the beast, climb to the top right corner of the room


 8613371530291