
rat king mission parts in stock
/cdn.vox-cdn.com/uploads/chorus_asset/file/9281927/Destiny_2_20170919124439.jpg)
Similar to many of Destiny 2"s Exotics, the Rat King requires you to complete a special quest, involving several steps - some of which hidden behind some pretty obscure riddles.
It"s worth it though, as the Rat King has some pretty awesome perks: an increase in damage, which stacks up to six times, depending on the number of other allies that have the weapon equipped nearby; and a second or two of invisibility, granted every time you reload immediately after getting a kill with the weapon.
Complete the quest Enemy of my Enemy - it"s a blue quest marker you"ll find in the world and on your map, which ends in you being given the option to kill or save an enemy captain. Either way, when you complete it, you"ll get the Rat King"s Crew item. The item takes up a Kinetic Weapon slot, but can"t be used as one.
On the Rat King"s Crew you"ll find a strange riddle. This is, in fact, the first of four riddles, and you"ll need to solve them, and then complete their respective tasks, one at a time to get the weapon itself. Read on for detailed solutions to these in the section below!
The main sticking point comes from figuring out what the four Rat King riddle solutions are, and then there"s the matter of actually completing the final one, which is most definitely not easy. Here"s a handy video from YouTuber KackisHD, with our full written description of how to do it, in detail, below!

The most important task for any Destiny player is raising their Power level, which is the combined level of equipped weapons and armour. There’s a sense of unspoken competition to get the rarest and finest-looking gear, with many devoting all of their time to looking the best.
The original Destiny included exotic weapons and armour that could only be obtained by fulfilling certain objectives, known to be difficult and almost impossible to complete.Destiny 2is no different and many players have already unearthed the first one – a sidearm weapon known as Rat King. Obtaining the coveted gun isn’t easy but if you’re interested in picking it up and becoming the envy of your friends, here’s how to do it.
Once you’ve beaten all of the story missions and reached the maximum level of 20, the "Enemy of the Enemy" side quest will appear on the planet Titan. Upon completion, you’ll be rewarded with the "Rat King’s Crew" item which takes up a space in your Kinetic weapon slot, although it isn’t a useable weapon just yet.
Once you view the Rat King’s Crew item in your inventory, a set of four riddles will appear, which you’ll need to solve whilst paired up with at least one other player in a Fireteam. Once all four riddles have been solved, Rat King’s Crew will morph into the coveted exotic sidearm weapon.
Riddle 1: “The Rat King’s Crew / Runs to and fro / Good girls and boys / Know where to go / Pick up your toys and darn your socks / on errands of woe, on errands we walk”
In order to solve the first of the four mind-boggling Rat King riddles, simply complete three patrols with your Fireteam. If you haven’t unlocked the ability to do them yet, travel to the European Dead Zone and complete the mission "Patrol" to gain access. Once unlocked, you can pick up patrols from flashing green beacons scattered throughout the many planets.
Riddle 2: “The Rat Kind’s Crew / Goes Arm in arm / To fight as one / To do no harm / So have your fun and run outside / Rally the flag and we’ll never die”
Riddle 3: “The Rat King’s Crew / Goes four and four / With good good fights / They learn to score /Then three as one they stand upright / Return from past the wall and wanting more”
Riddle 4: “The Rat King’s Crew / Stands three as one / They see Night’s fall / And fear it none / But watch the clock as you scale the wall / Lest five remain hope comes for none”
Riddle number four cranks up the difficulty notch and is by far the most frustrating part to solve. This time, you and your Fireteam need to successfully beat the weekly Nightfall strike with at least five minutes left on the clock. If you’ve yet to unlock Nightfalls, complete two normal strikes in the strike playlist and then level up your Power level to 240. Beating the weekly Nightfall strike is a challenge in itself so having to complete it with at least five minutes remaining is no easy task but we believe in you, Guardian.
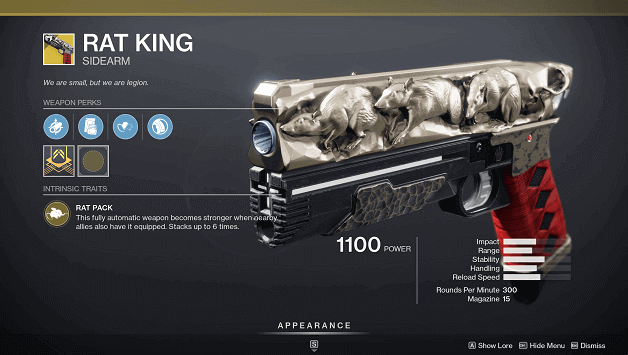
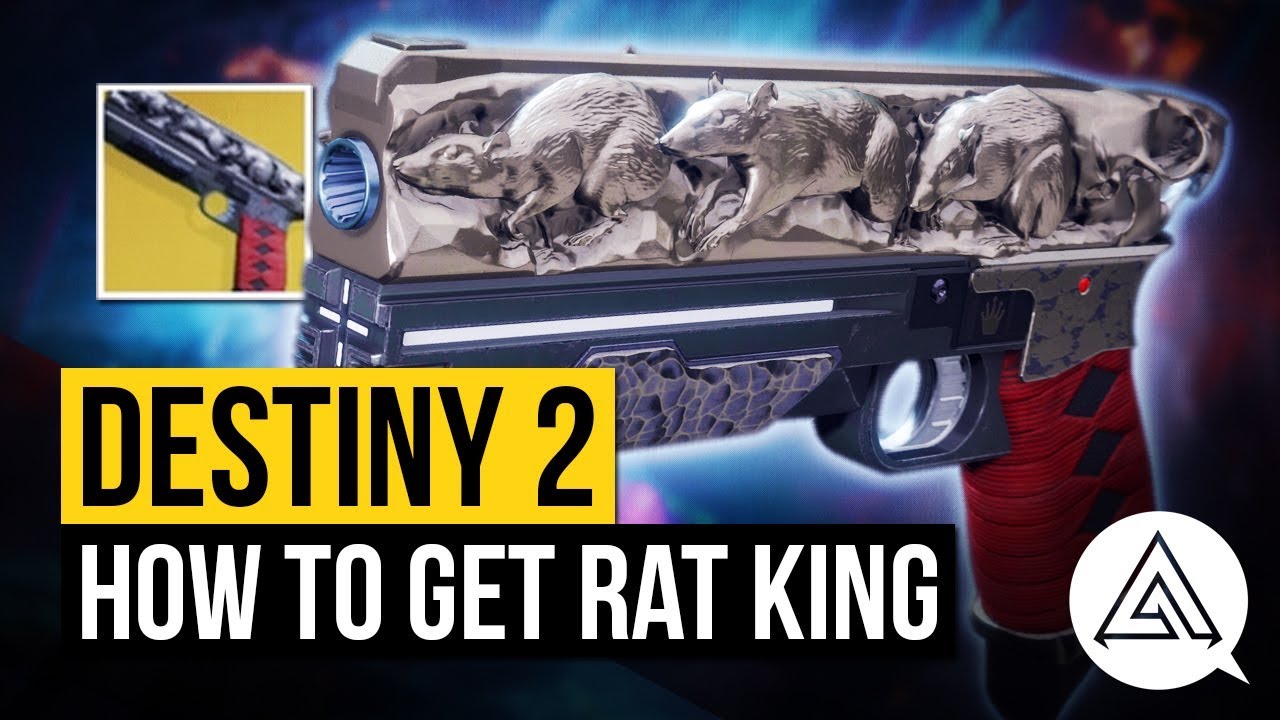
The Rat King, which is, if you check the lore, named after a Pied Piper-like figure who was said to have died many deaths and returned anew each time, is a pretty wonderful weapon. It"s a Kinectic Sidearm, and one of the most visually impressive weapons in the game, with a trio of rats carved into the side of it. As part of our complete Destiny 2 guide, we"ve got a comprehensive look at how to unlock this cool, unique weapon.
A Rat King, colloquially, is a pack of rats that have become tied together, their tails looping around in knots; like its namesake, you"ll need to work together both to obtain and to get the most out of this weapon. It can be upgraded with the "Rat Pack" ability, which increases its power whenever another Guardian is also using it (which stacks up to six times), and is reliant on teamwork to unlock.
There"s no other weapon ability in the game quite like it (although it"s worth noting that the power only kicks in when you and another Rat King user are near each other - you can tell because the weapon starts glowing when its power has been increased by another weapon holder). It"s going to be a very useful weapon to have for a six person Raid.
To access the post-game quest that you need to go on to find the Rat King, you first need to finish the campaign and hit your maximum level. Have a look at our tips for levelling up fast if you need any help dinging 20 as fast as you can.
Complete these missions in order - it shouldn"t take longer than two hours - and you should get the Rat King"s Crew drop at the end of the final mission.
"The Rat King"s Crew / Runs to and fro / Good girls and boys / Know where to go / Pick up your toys and darn your socks / on errands of woe, on errands we walk" - Old Children"s Rhyme
Try not to focus too much on the broken rhyme scheme, but instead look at the clues here: there"s a three-step process to "complete" this quest, and you are encouraged to "solve this riddle with other rats".
As it turns out, this is very simple. Get into a Fireteam with at least one other player (you can do this with as many friends as you want, as long as there"s at least two of you) and complete three patrol missions with the Rat King"s Crew in your inventory. It doesn"t matter which ones you do, or where you do them. Once you complete three, you"ll move to the next part of the riddle.
“The Rat Kind’s Crew / Goes Arm in arm / To fight as one / To do no harm / So have your fun and run outside / Rally the flag and we’ll never die” – Old Children’s Rhyme
“The Rat King’s Crew / Goes four and four / With good good fights / They learn to score /Then three as one they stand upright / Return from past the wall and wanting more” – Old Children’s Rhyme
“The Rat King’s Crew / Stands three as one / They see Night’s fall / And fear it none / But watch the clock as you scale the wall / Lest five remain hope comes for none” – Old Children’s Rhyme
This step is a lot trickier. You need to complete the Nightfall Strike. Make sure you get your light up a bit before entering. You need at least 240, but realistically you probably want to go in with at least 260 light if you don"t want to struggle too hard, because to get the Rat"s King you need to do more than just complete the Nightfall.
"Let five remain" is referring to how many minutes need to be left on the clock when you finish. You need to finish the Nightfall Strike with a full five minutes left on the clock to complete this step. In Destiny 2 Strikes you start missions with eleven minutes and gain time for kills, so you can"t afford to dawdle if you want to get this gun.
The Nightfall, of course, changes every week - some weeks finishing with five minutes spare may be more difficult than others. Pay attention to whichever modifiers are active that week and strategise towards getting through the mission as quickly as possible. Also, make sure you have a fireteam of three people for this - it"s going to be a whole lot harder with two. Try to make sure that, between you, you have a good mix of elements covered in your abilities and repeat the Strike a few times to improve.
Do this and you"ll be granted the Exotic Rat King, and so will your fireteam if they completed all the other steps with you. Remember that the weapon"s real strength lies in the power increase it gets when multiple players carry them together, so don"t expect amazing results out of it without teamwork.

0 forma best loki build warframe,1,0 forma immortal wukong build warframe,1,300k armor rhino build warframe,1,acolyte warframe,1,adaptation chroma warframe,1,adaptation warframe,1,android,2,arbitration guide warframe,1,arbitrations warframe,2,ash blade storm rework warframe,1,ash god build 2018 warframe,1,ash newest blade storm rework warframe,1,astilla build warframe,1,astilla mag combo build warframe,1,atlas one punch build warframe,1,atlas petrify build warframe,1,atlas rework warframe,1,atlas warframe,1,best adarza kavat build warframe,1,best akmagnus build warframe,1,best amprex build warframe,1,best ash build warframe,2,best ash god endgame build in warframe,1,best ash prime build,1,best astilla build warframe,1,best atlas build warframe,1,best beginners guide in fortnite,1,best cassowar build in warframe,1,best chroma build in warframe,2,best chroma build warframe,1,best chromatic blade excalibur build warframe,1,best credit farming 2018 warframe,1,best dps wukong build warframe,1,best dps zephyr build warframe,1,best eidolon weapon,2,best endgame arca plasmor build warframe,1,best endgame ash build warframe,1,best endgame equinox build warframe,1,best endgame excalibur build warframe,1,best endgame galatine prime build warframe,1,best endgame inaros build warframe,1,best endgame limbo build warframe,1,best endgame mirage build warframe,1,best endgame wukong build warframe,1,best endgame wukong warframe,1,best endo farming 2018,2,best endo farming 2018 warframe,1,best endurance warframe,2,best equinox build warframe,1,best excalibur build warframe,1,best excalibur build warframe 2018,1,best excalibur umbra build warframe,1,best focus warframe,1,best fortnite constructor guide,1,best fortnite guides,1,best frost build warframe,1,best gara build warframe,2,best gram prime build warframe,1,best harrow build warframe,2,best inaros build,1,best inaros build warframe,3,best ivara build warframe,1,best ivara build warframe 2018,1,best ivara builds warframe 2018,1,best khora build warframe,1,best kohm build warframe,1,best kuva farming warframe,1,best limbo build warframe,1,best loki build warframe,2,best melee weapon in warframe,1,best mesa build warframe,2,best mining spots warframe,1,best mirage build warframe,1,best nekros build warframe,1,best nergigante guide monster hunter world,1,best nidus build warframe,3,best nova build warframe,1,best oberon build,2,best oberon endgame build,1,best oberon immortal guardian tank build,1,best oberon tank build,1,best operator amp warframe,1,best orokin cell farming warframe,1,best oxium farm 2018 warframe,1,best phantasma build warframe,1,best plague zaw warframe,1,best pox build warframe,1,best prisma dual cleavers build warframe,1,best prisma twin gremlins build warframe,1,best radial blind excalibur build warframe,1,best revenant build warframe,1,best rhino tank build warframe,1,best riven warframe,1,best rubico prime build warframe,1,best sanctuary onslaught guide warframe,1,best sarpa build warframe,1,best saryn build warframe,1,best survival warframe,1,best synapse build warframe,1,best tank inaros build warframe,2,best tank nidus build warframe,1,best team warframe,1,best titania build warframe,1,best trinity build warframe,1,best vasto prime build warframe,1,best vauban build warframe,1,best vauban endgame build,1,best vaykor hek build,1,best volt astilla build warframe,1,best volt build warframe,3,best warframe synergy,1,best warframe team,1,best weapon for harrow warframe,1,best weapon warframe 2018,1,best wukong build in warframe,1,best wukong build warframe,1,best zarr build warframe,1,best zaw combination warframe,1,best zaw in warframe,2,best zaws in warframe,1,best zephyr build warframe,1,blade storm 3.0 rework ash build warframe,1,builds,1,cassowar good in warframe,1,cassowar review warframe,1,cassowar tips in warframe,1,cc limbo build warframe,1,cc nova build warframe,1,cc zephyr build warframe,1,chroma nerf warframe,1,chroma warframe,1,condition overload saryn build warframe,1,corpus pump action shotgun warframe,1,despoil nekros build warframe,1,destiny,1,destiny 2,15,destiny 2 best grenades,1,destiny 2 cayde-6 treasure maps locations guide,1,destiny 2 curse of osiris,1,destiny 2 leveling guide,1,destiny 2 leveling to 300 fast,1,destiny 2 leveling with mods,1,destiny 2 mida mini-tool,1,destiny 2 mida multi-tool,1,destiny 2 power leveling to 300,1,destiny 2 powerleveling,1,destiny 2 rat kings crew quest guide,1,destiny 2 royal pools challenge mode game mechanics,1,destiny 2 warlock god build,1,duality equinox warframe,1,eidolon hunter buzlok,1,eidolon hunter chroma,1,eidolon hunter ivara warframe,2,eidolon hunter limbo warframe,1,eidolon hunter rubico prime warframe,1,eidolon hunter volt warframe,1,eidolon hunting oberon warframe,1,elemental weakness guide monster hunter world,1,endgame amprex build warframe,1,endgame ash build 2018 warframe,1,endgame ash build warframe,1,endgame ash prime build,1,endgame atlas build warframe,1,endgame cassowar build warframe,1,endgame excalibur build warframe,2,endgame excalibur umbra build warframe,1,endgame gara build warframe,1,endgame harrow build warframe,1,endgame ivara build 2018 warframe,1,endgame ivara build warframe,1,endgame loki build warframe,2,endgame mesa dps build warframe,1,endgame nidus build warframe,2,endgame nova build warframe,1,endgame phantasma build warframe,1,endgame pox build warframe,1,endgame saryn build warframe,1,endgame titania build warframe,1,endgame vaykor hek build,1,endgame warframe,1,endgame zarr build warframe,1,endgame zaw warframe,1,excalibur build 2018,1,excalibur CC build warframe,1,fast and easy endo warframe,1,fast and easy platinum warframe,2,finish plague star bounty warframe fast,1,focus farming warframe,1,fortnite,2,fortnite best guides,1,fortnite newbie guide,1,fortnite pc,2,fortnite ps4,2,fortnite xbox one,2,free platinum warframe,1,fun vauban build warframe,1,galatine prime warframe,1,gara build warframe,1,god riven warframe,1,godlike wukong warframe,1,godly kohm riven warframe,1,godly vasto riven warframe,1,gram prime warframe,1,guides,29,gunblade pharoah warframe,1,how to capture eidolons using limbo warframe,1,how to capture gantulyst warframe,1,how to capture hydrolyst warframe,1,how to farm acolyte mods warframe,1,how to farm credits fast warframe 2018,1,how to farm ember prime parts warframe,1,how to farm endo warframe,1,how to farm frost prime parts warframe,1,how to farm khora fast warframe,1,how to farm kronen prime fast warframe,1,how to farm kuva blood warframe.,1,how to farm kuva fast warframe,1,how to farm loki prime parts warframe,1,how to farm new unvaulted relics warframe,1,how to farm nyth fast warframe,1,how to farm platinum warframe,3,how to farm relics fast warframe,1,how to farm sentirium fast warframe,1,how to farm tiberon prime fast warframe,1,how to farm zephyr prime fast warframe,1,how to gain operation standings super fast in warframe,1,how to kill hemocytes fast warframe,1,how to kill nergigante fast monster hunter world,1,how to limbo warframe,1,how to maintain efficiency in sanctuary onslaught warframe,1,how to mine fast warframe,1,hunter munitions warframe build,1,hunter munitions warframe guide,1,hydroid build 2018,1,immortal wukong warframe,1,inaros one shot god build,1,inaros umbra warframe,1,index farmer equinox warframe,1,insane damage nuke nova build warframe,1,ios,2,ivara concentrated arrow build warframe,1,ivara sancti castanas eidolon warframe,1,jat kittag ash build in warframe,1,jat kittag one shot build,1,jet streamed zephyr arca plasmor build combo,1,khora build 2018 warframe,1,khora build warframe,1,khora review warframe,1,khora warframe,1,kuva endless farming warframe,1,kuva farming 2018,1,kuva farming warframe 2018,1,latest news,6,limbo cc build warframe,1,limbo warframe 2018,1,loki build 2018,1,mag warframe,1,mara detron build warframe,1,mara detron warframe,1,meso relic farming warframe,1,million damage chroma build in warframe,1,mirage prime build warframe,1,mirage prime warframe,1,mmo,2,nest excalibur umbra guide warframe,1,nezha build warframe,1,nezha rework warframe,1,nidus and mag combo,1,nidus larva burst augment warframe,1,nidus larva burst build warframe,1,nidus warframe,1,nuke ash build in warframe,1,nuke trinity build warframe,1,nuker ivara build warframe,2,oberon build 2018 warframe,1,oberon build plains of eidolon warframe,1,oberon prime immortal build warframe,1,oberon warframe,1,octavia warframe,2,one shot ivara build warframe,1,one shot nuke equinox build warframe,1,orokin cell farm warframe 2018,1,oxium warframe 2018,1,path of exile,2,pc,36,perfect kohm riven warframe,1,phantasma warframe,1,phantasmag,1,plague star 2.0 guide warframe,1,platinum farm warframe,2,platinum warframe,2,playstation,2,playstation 4,24,poe exalted orb farming,1,poe righteous fire,1,pokemon go,2,pox build,1,pox build 2018 warframe,1,primal fury wukong build warframe,1,prime access,1,prisma twin gremlins warframe,1,ps4,3,razorwing blitz titania warframe,1,revenant warframe,1,rhino build 2018 warframe,1,rhino focus farmer build and setup,1,saryn endgame build warframe,1,saryn spore build warframe,1,shield of shadows nekros build warframe,1,solaris standings warframe,1,solo arbitration warframe,1,solo capture teralyst,1,solo capture teralyst using zaw in warframe,1,solo farming endo warframe,1,solo level 100 sortie assassination mission warframe,1,solo mirage build warframe,1,solo nergigante monster hunter world,1,status weakness guide monster hunter world,1,support nekros build warframe,1,synapse build 2018 warframe,1,tank nekros build warframe,1,teralyst capture chroma build,1,titania build warframe 2018,1,tornado zephyr warframe build,1,trinity 0 forma best build warframe,1,trinity prime best builds warframe,1,trinity sancti castanas build warframe,1,trinity tank build warframe,1,unairu focus guide warframe,1,update limbo build warframe,1,updated amprex build warframe,1,updated ash builds warframe,1,updated atlas build warframe 2018,1,updated excalibur build warframe,1,updated frost builds warframe,1,updated limbo build warframe,1,updated mesa build warframe 2018,1,updated pox build warframe,1,updated rhino build warframe,1,updated synapse build warframe,1,updated titania build warframe,1,updated vauban build warframe,1,updated warframe builds,1,updated wukong build warframe,1,vauban endgame build warframe,1,vauban minelayer build warframe,1,vauban one shot build warframe,1,vauban vortex build warframe,1,vectis prime build warframe,1,volt build for eidolon hunt warframe,1,volt capacitance warframe,1,volt cc build warframe,1,volt discharge warframe,1,volt elite sanctuary onslaught warframe,1,volt nuke build warframe,1,warfame best fishing spots,1,warframe,78,warframe amp parts guide,1,warframe amps guide,1,warframe arca plasmor guide,1,warframe axi relic farming,1,warframe baza build guide,1,warframe baza is it good,1,warframe baza review,1,warframe best chroma build,1,warframe best harrow build,1,warframe best nidus build,1,warframe build,1,warframe build guide,1,warframe builds,12,warframe capture 12 eidolons in one night,1,warframe credit farming guide,1,warframe crit zaw,1,warframe easy axi relics,1,warframe endo farming guide,1,warframe exodia limbo build,1,warframe fast solo capture eidolon teralyst,1,warframe fast way of earning ostron standings,1,warframe fishing guide,2,warframe focus fast gain,1,warframe focus points farming,1,warframe fortuna,1,warframe gara,1,warframe gara abilities,1,warframe gara how to play,1,warframe gara secret ability mechanics,1,warframe gara splinter storm ability super broken,1,warframe guide,1,warframe guides,31,warframe hydroid prime,1,warframe loki 2018,1,warframe meteors,1,warframe news news,1,warframe nidus build,1,warframe nidus grab and nuke,1,warframe oberon builds,1,warframe oberon updated builds 2018,1,warframe operation plague star guide,2,warframe ostron standing farming,1,warframe overkill chroma,1,warframe pc,60,warframe plains of eidolon,5,warframe plains of eidolon lephantis,1,warframe plains of eidolon volt build,1,warframe ps4,59,warframe quill standing farming,2,warframe razorwing blitz build.,1,warframe resource farming,1,warframe super fast teralyst capture,1,warframe synergy,1,warframe teralyst capture guide,3,warframe teralyst capture speedrun,1,warframe update 21.6.0,1,warframe wukong nuke build,1,warframe xbox one,58,wukong immortal build warframe,1,xbox,1,xbox one,23,zarr warframe,1,

Destiny 2’sRat King Exotic (yellow) weapon is one of the most interesting guns in the game. Getting your hands on the sidearm requires a fair bit of riddle solving and enemy slaying.
Before you start your quest to get the Rat King exotic sidearm in Destiny 2, you’ll need to handle some basic requirements. From there, you’ll unlock the starting quest for the Rat King and its subsequent quests.
Once you beat that mission, you’ll receive the Rat King’s Crew item, which appears in your kinetic weapon slot. When you hover over the item, you’ll see a small riddle and an objective that must be completed. Don’t be fooled. Even if you complete this riddle, there will still be three more to go.
Before you start working on your riddles, keep in mind that to complete them, you must either complete these riddles with a teammate who also has the Rat King’s Crew item or with a teammate who has the Rat King gun already. They must also have it equipped the entire time.
To unlock the Rat King in Destiny 2, you’ll need to solve some riddles. These riddles aren’t that hard to solve, but they require a few steps to complete them. Here are their solutions.
“The Rat King"s Crew / Runs to and fro / Good girls and boys / Know where to go / Pick up your toys and darn your socks / On errands of woe, on errands we walk.” — Old Children’s Rhyme
To solve this riddle, simply partner up with another player and complete three patrols. You can do any three you like, but the quickest way to handle this is on Titan, the same place you get the Rat King’s Crew item.
“The Rat King’s Crew / Goes arm in arm / To fight as one / To do no harm / So have your fun and run outside / Rally the flag and we’ll never die.” — Old Children’s Rhyme
“The Rat King’s Crew / Goes four and four / With good good fights / They learn to score / Then three as one they stand upright / Return from past the wall and wanting more.” — Old Children’s Rhyme
The third puzzle for the Rat King is just as straightforward as the others. Get together with a friend and dive into the Crucible. After completing two matches, this riddle will be complete.
“The Rat King’s Crew / Stands three as one / They see Night’s fall / And fear it none / But watch the clock as you scale the wall / Lest five remain hope comes for none.” — Old Children’s Rhyme
The Rat King’s final puzzle, unlike the others, is not easy. To solve this one, you must complete the Nightfall strike with five minutes left on the clock. Don’t get upset if this takes you several tries.
Like every other Destiny 2 Exotic (yellow) item, the Rat King has some unique aspects. Its most interesting is its main trait, Rat Pack, which allows the gun to become stronger when nearby allies also have it equipped. This can stack up to six times, so if you run a raid, like Destiny 2’s Leviathan and everyone is packing the Rat King, you’ll all get a boost when you’re near one another.
In this article, I have given all the details of how to unlock the ratking and the location and offer you all of the instructions you’ll need to finish the rat king questline. It’s a long journey, so it’ll be well worth it in the end.
The Rat King is an exotic Sidearm in Destiny 2, is a fascinating little tool with some impressive results. It’s a puzzle to open, as with so many Exotic objects, with the item’s journey forcing you to solve many riddles – and fulfill their sometimes-difficult tasks – to obtain it.
The Rat King, a rare tool in Destiny 2, is made for raids of six players. The harm multiplier for this Kinetic exotic arm rises for any member of your team that also uses the Rat King.
The multiplier seems to activate only when your teammates are within a certain distance of each other, but this function can render the Rat King a popular choice in Destiny 2 raids.
An Exotic Quest is Rat King’s Crew. It can be gained after finishing the Enemy of My Enemy quest or participating in a community game with a player wielding the Rat King Sidearm in a fireteam.
Many players have already discovered the first one – a sidearm pistol was known as Rat King – in Destiny 2. Getting your hands on the prized gun isn’t straightforward, but if you want to be the envy of your peers, here are the rat king quest steps.
Completing all of Destiny 2’s story missions unlocks new word quests, like the Titan’s Enemy of My Enemy quest. Look for the latest blue markers to see what world quests are accessible.
The ‘Enemy of the Enemy’ side quest will appear on the planet Titan after you’ve completed all of the story missions and achieved the whole level of 20.
When you view the Rat King’s Crew item in your inventory, you’ll be presented with a series of four riddles that you must solve when partnered with at least one other player in a Fireteam.
Like several of Destiny 2’s Exotics, the Rat King allows you to complete a unique rat king questline that consists of many stages, several of which are concealed behind several somewhat cryptic riddles.
It’s beneficial, mainly when six Guardians are all using it simultaneously, so keep that in mind while you read on for instructions on how to get rat king riddle.
If you’re confused about how to acquire the rat king’s crew item to begin the Rat King search, you’ll need to have completed the following criteria in Destiny 2:
Your decisions throughout the search would have no bearing on whether or not you receive the piece, so do as your heart desires. After you’ve obtained the part, you’ll need to solve the rat king riddle.
You might spend hours staring at the rat king riddle trying to sort them out, but if it is somehow not happening, then we’ve got the answers for you on how to solve the rat king riddle.
“The destiny 2 rat king’s crew / Good girls and boys / Know where to go / Runs to and fro / Pick up your toys and darn your socks / on errands of woe, on errands we walk.
Complete three patrols for your Fireteam to solve the first of the four mind-boggling Rat King puzzles. Travel to the European Dead Zone and complete the quest ‘Patrol’ to activate the right to perform them if you haven’t already.
“The rat king’s crew quest / To fight as one / Goes Arm in arm / So have your fun and run outside / Rally the flag and we’ll never die / To do no harm.”
“The Rat King’s Crew / They learn to score / With good fights /Then three as one they stand upright / Return from past the wall and wanting more/ Goes four and four.”
“The Rat King’s Crew / They see destiny 2 rat king nightfall / Stands three as one / Lest five remain hope comes for none/ But watch the clock as you scale the wall / And fear it none.”
The fourth riddle increases the complexity level and is by far the most challenging to answer. You and your Fireteam must defeat the weekly destiny 2 rat king nightfall attack with at least five minutes remaining on the clock this week.
If you haven’t already, complete two standard strikes in the strike playlist and then raise your Power level to 240 to activate destiny 2 rat king nightfall. Beating the weekly Nightfall strike is difficult enough, but doing it with at least five minutes left is much more difficult.
In Destiny 2, you’ll need to finish the Arms Dealer Nightfall attack with five minutes left to get your hands on the Rat King eventually. That’s a tall order, but we’ve compiled a list of Nightfall hints to help you out. Follow the below guide, and you’ll be the proud owner of the Rat King.
However, you would obtain the Rat King if you finish the Arms Dealer Nightfall with 5 minutes or more left. Visit our Destiny 2 Strike center to determine when the destiny 2 rat king nightfallwill be available again.
The rat has the most significant population density in the eastern parts, with pockets scattered in the central areas and a greater concentration in Big Valley between Owanjila and Strawberry.
In the cave just north of the Elysian Pool and waterfall, rats are also a problem. Except for Armadillo, rats are very rare in the Grizzlies and almost non-existent in New Austin.
The rats can even be seen in a crowd when you have a chance meeting with a bartender in Saint-Denis, who can inform you that his bar is infested with rats, but they aren’t all flawless 3-star rats.
Rat King has gone full auto to combat this, ensuring that “the rate of fire rise will make a difference while running in a pack.” Additionally, when fireteam members have the Rat King fitted as their kinetic arm, holstered, or in your side, the Rat Pack bonus would be enabled.
Although seeing that you’ve gone to such lengths to procure the Rat King Exotic pistol, you’re naturally curious as to how it works. We’re happy to say that obtaining the Rat King was well worth the effort.
It has deadly stopping ability, but it doesn’t do so at the expense of precision or shooting pace, as the Rat King will shoot as quickly as you can pull the trigger.
It adds a pleasant graphical touch to a tool that already looks amazing, and it makes the Rat King become one of Destiny 2’s most recognizable firearms.
It seems to be easy enough! Aside from the apparent time commitment needed to complete the plot required by many destiny 2 rat king’s crew anyway – all of this is reasonably straightforward.
The most challenging part is finding out what the four Rat King riddle solutions are, and then there’s the matter of actually finishing the final one, which is far from easy.
:no_upscale()/cdn.vox-cdn.com/uploads/chorus_asset/file/9282315/Destiny_2_20170919133348.jpg)
I had to apologize to the four other people in my house this morning, because at midnight, I was straight-up yelling. After two hours of trying, we finally did it. We got Rat King.
These are mild post-game spoilers, sort of, but these are the basics: Rat King is an Exotic sidearm that gets more powerful the more people in your Fireteam are using it. To get it, you have to complete a series of quest steps that culminate in completing the week"s timed Nightfall Strike with five minutes or more remaining. It"s not particularly easy.
Those are the kinds of moments that are going to keep me coming back to Destiny 2. The story might be basic and uninteresting, and certain characters" "witty" dialogue might be a bit much at times, but I (and most people I know) don"t play Destiny for a spectacular narrative. I"m happy to have a more fleshed-out world and actual context this time around, since it"s just enough to prop up the things about Destiny 2 that work well.
This will be my last entry before the final review, since I"m now making the final preparations before heading into the belly of the beast tomorrow. Expect the full review later in the week, once I"ve made it through the Raid. (Also, wish me luck.)
We broke for dinner after two failed attempts only to realize we"d missed a key modifier that would have made the Strike a breeze. (I won"t spoil it here if you haven"t done it, but it involves a bit of reading and strong team communication as you go.) But the process of collectively understanding a strategy in a group, and the excited yelling that went with it, was the most fun I"ve had in Destiny 2 so far.
My first impression of Destiny 2 was that it was just more Destiny, and that"s technically true to a point. But in nearly every aspect of the game I"ve seen so far, something is different enough to dramatically change how accessible and engaging the "same" formula can be. There are certainly moments and missions that you have to just get through, like a couple Strikes with uninspired objectives, but they"re not so obtrusive that they leave a bitter taste going into the endgame stuff.
I"m signing off for the weekend as I dive completely into Destiny 2, but check back Monday for more updates. Clans just launched, so I"ll be checking that out along with more Strikes and some general Raid prep. We also have tons of guides and the latest news, including how to get certain Exotics, in our Destiny 2 hub, plus a new weekly Let"s Play, Destiny"s Children.
I finished the last story mission this morning. Overall, it"s a pretty standard save-the-world story with some cheesy moments, but it capitalizes on Destiny"s most interesting narrative trait: its lore. I won"t spoil anything, but I was satisfied and maybe even a bit emotional about the ending. A little worldbuilding goes a long way.
My review in progress is based on my experience at a Bungie event a few weeks ago, where I"d played Destiny 2 on a dummy account. My first day with the game at launch--with my own account and character--has mostly just been replaying the story missions and side activities I"ve already completed. It"s… actually kind of nice.
Part of that is due to using my own character and knowing that the loot and gear I get is mine to keep. But for the first time in my history with Destiny, I"m also properly invested in the story and characters. The dialogue can be a bit cheesy at times, but the characters are more three-dimensional and have more personality. There"s also plenty of lore peppered in thanks to quips from your Ghost and items you can scan in the environment. Because the story missions (and in many cases, the side Adventure missions) give the proper background to contextualize your actions, it feels like you"re doing something of substance, rather than running through missions as a means to an end.
The coolest thing that came of of co-op, though, was the discovery that dialogue does indeed change if you import a Destiny 1 character rather than making a new one. My friend had imported his character (we"re both Hunters), and certain conversations were slightly different between the two of us. Where my Ghost gave me a basic introduction to the Taken, for example, his reminded him of the time they beat Oryx and questioned why the Taken would have returned.
Though I"ve only replayed things I"ve already done, I"m still excited about Destiny 2. I can"t wait to find my next exotic weapon, but I"m also looking forward to completing more Adventure missions and learning more about the world. My next step is to finish the story, reach level 20, and run some Strikes, so check back soon for more impressions.
Origin & Description: Do you know what a rat king is? The answer is: gross! A semi-mythical animal, rat kings are supposedly created when a lot of rats are crammed into a small, filthy space such that their tails become permanently knotted or stuck together. There are a few alleged examples of this freak phenomenon in museums around the world, but it’s still highly debated whether any of them are real* since rats are fastidious creatures who keep their nests clean but also do huddle together in the winter for warmth and like maybe could get tree sap on their tails or something? Point is: gross.
* (Weirdly, this phenomenon is proven to happen with squirrels. But “squirrel king” sounds less like a creepy freak of nature and more like a Magic card, so it never caught on.)
Rat kings occasionally turn up in fiction, especially supernatural fiction, where the linked rats’ brains are often depicted as fused into a creepy rat hive-mind. Rat King (the gun) works like that except it’s only gross in the “dealing disgusting amounts of damage” sort of way. Its gimmick is that when you use it, its perk amplifies for everyone nearby who is also using it, and vice versa - the more rats, the stronger it gets. The hammer end of the barrel has a rat skull mounted on it whose eyes glow as more rats come in range. With five other fireteam members packing the same gun the skull will blaze and Rat King will chew through whatever you point it at that’s not a raid boss with a particularly steep DPS check (pro tip: does not work for Riven cheese.) It’s also a quest exotic guaranteed to drop at the end of a series of missions that start after the base story campaign, so nearly all Guardians have access to it.
All in all, it’s a neat idea for a weapon. But in practice it’s not useful without at least one other Rat-King-wielding ally in range, and since it’s not a common choice of exotic you won’t be near another user unless you’re deliberately coordinating. The surprisingly short range on the Rat Pack effect doesn’t help either; in a large enough encounter space you might not proc the buff even with allies. Rat King is further hindered by being a sidearm, a weapon class that currently refuses to be useful no matter how much Bungie buffs it because of its scattershot recoil and very limited range. Rat King’s catalyst can help a lot, but that requires both getting the catalyst and caring enough to complete it - especially tricky since it only progresses when you do activities with, you guessed it, other people also using Rat King.
Despite all these drawbacks many players still enjoy Rat King. It explores a unique area of playspace and forming up a six-Rat-King fireteam for a jank-ass meme raid is legit a great time. The ornament “Black Plague” darkens the weapon and makes the rats’ eyes glow; “Catacombs” gives it a dingy bone look; and “Climate Change” frosts it over and turns the skull’s eyes an icy blue. Don’t know how the ideas of “rat king” and “climate change” collided in some Bungie artist’s head, but the result is pretty sweet so I’m not gonna ask.

I"m getting the impression that several of the tactics suggested here are based on exploiting the speed bug to construct things faster. I was able to finish this mission with the exploit (built guard towers next to the sewers), but as near as I can tell, there"s no way you could do that at normal speed; even if you have the peasants concentrate on one building at a time, guard towers are so slow to build that you"re unlikely to get even one up before the rats swarm in and kill the peasants. The best I could do at normal speed was two rangers" guilds, but six rangers weren"t enough to kill the rats quickly enough to prevent them from killing my workers and destroying buildings before they were ready.
Although I got through this mission, I feel a little unhappy about having to resort to what practically amounts to a cheat. Since I assume that the speed bug will be fixed in a patch sooner or later, this tactic probably won"t work in the long term, anyway. Is there another tactic that I just couldn"t think of, or do we just have to hope that this mission will be tweaked in a patch to give the player a little more time to prepare?
The Rat King is one of the new infected introduced in the game The Last of Us Part II (TLoU 2). This guide will show you how to deal with this boss when encountered in the hospital.
You will first encounter the Rat King during the Ground Zero section of Chapter 7 (Seattle Day 2), after you get the Medical Supplies that you needed from the ambulance.
While the right method of fighting the Rat King is key, making sure to be well stocked with ammo, Pipe Bombs, and crafting items will make the fight much easier. You can still find crafting items and ammo during the fight, but it is much more difficult to be forced to run away and search for anything to throw at the Rat King because you ran out of ammo and pipbombs. If you go in fully prepared you should have plenty to finish the fight.
During the fight with the Rat King, there will be a Stalker Half will tear itself from the Bloater Half. It fights the same as a stalker except it has much more health and will throw acid bombs, similar to a Bloater.
The Stalker Half will attempt to flank you and sneak up on you during your fight with the Rat King. Keep you eyes open for the Stalker Half, and if possible, try to deal some damage to it as soon as he detaches from the rat king.
Try dealing with him whenever you can catch him coming at you as the worst thing is he will grab and hold you until the Rat King can get you. After doing enough damage to it, it will run away and not come back. This will leave you with only the rat king to fight, making everything much easier.
The Stalker Half is easier to fight than the Rat King itself. The best tactic is to chase him down when he tries to run away and blast him with the shotgun, but if you run out of shotgun rounds just use your rifle.
As a series that focuses on the most unsettling downfall of humanity by turning people into walking scabs, The Last of Us has more than its fair share of scary moments. Just mention the university basement, school gym, or elevator scenes from Part 1 and any fan will curl up in a ball and slowly rock back and forth, trembling as they murmur “Grounded run” to themselves over and over
These sections are enough to send shivers down my spine even after having played through the first game six times, but there’s no moment in the series quite as terrifying as the Rat King encounter in The Last of Us Part 2. This grotesque behemoth runs with the body horror tones of the series in a way that the Bloater only dipped a toe in, creating one of the game’s most memorable moments.
The Rat King is encountered towards the tail end of Abby’s half of the story, as she sneaks around the same hospital that Ellie eventually turns into a graveyard. While in the lower parts of the hospital that have long been abandoned since the infection hit, Abby looks around to try and find a medkit for Yara.
After some looking around, Abby eventually finds an ambulance, which thankfully has the medkit inside of it. It couldn"t have been that easy, could it? At this point, you’re preparing for at least a swarm of Runners to attack you, or a Bloater if Abby’s luck has run out, but Naughty Dog introduces something far, far worse.
It’s at this point that the Rat King rears its ugly head, revealing the most monstrous form of infected the series has ever seen. This hulking behemoth is the amalgamation of infected that have been sitting around together alone since the infection first began, and it is terrifying.
As the Rat King screams at Abby, all she can do is scramble behind her for an escape, at a complete loss for words at what she"s seeing, cementing that this is the apex of the infected and something that"s never been seen before, by both Abby and the player. After sprinting through doors that picked the worst possible time to stop opening and seem to have conspired with red lights to make the Rat King even more terrifying, the boss battle begins and it doesn"t disappoint.
Scrambling around for ammo and having to stay out of range of the Rat King at all times is a clear callback to the Bloater encounters in the first game but the strength of the Rat King and the dark, claustrophobic areas mean the horror is turned up to 11. It"s also a much harder fight, as the Rat King has a ton more tricks up its sleeve (sleeves?) than anything any of the characters have ever faced before.
Much like the Bloaters, you need to throw everything you have at it. Here though, as you damage it more and more, the Rat King will split off bit by bit. Gnarled bodies will slither off from the mass of twitching flesh, the Rat King ever weakening but outnumbering Abby more and more. As these smaller Stalkers chase after Abby, you need to focus on one thing to avoid being overwhelmed and overpowered. There are moments in The Last of Us Part 2 that made me want to put the controller down to stop the brutal, pointless revenge, but the Rat King made me quit out of fear.
Much like how the cordyceps fungus is a real-world affliction that affects ants, the true horror of the Rat King is that it’s not too far from reality. It’s based on a phenomenon that rats experience where their tails tie up with one another and they form one combined being. In that case they’re not San amorphous blob of flailing zombie limbs, but it’s close enough to be believable, which is exactly what The Last of Us does best.

As a bit of a precursor to the story walkthrough, here are a few things you should take into consideration:This page has the Main Missions you need to complete, along with some other Secondary Missions that I found triggered along the way.
You should start working on relationships with everyone listed in the Important NPC Relationships as soon as you can. From the get go, the most important by far are Pinky, Phyllis and Gust.
If you start any mission, look to see if it has a time limit. If it does, prioritise itover any that do not have time limits. Failing missions will affect your relationships with people.
Below is the Table of Contents with all of the Main Missions in chronological order. If a mission triggers multiple main missions, this will be indicated. Secondary Missions that should naturally occur during the main story are also included, but bear in mind that when they actually start may vary between players.
This mission automatically starts on the second day. The Commerce Guild is in Portia, just north of your Workshop/house. You"ll be able to find the building easily enough, as the name is above the entrance, and on the mini-map will be a gold star.
When you"re speaking to Presley in the Commerce Guild, you"ll have a dialog option to select. Pick whichever one you want to continue on. This will complete this mission and automatically start the next one.
Head back to Presley in the Commerce Guild to complete this task. Doing so will complete this mission, and you"ll be rewarded with your Builder"s License.
Once you"ve done that, go back to Presley in the Commerce Guild. He"ll explain the Commissions Board to you, and after a cutscene, you"ll be give a Commission for building a Bridge to Amber Island. This Commission is your next main mission, and doesn"t have a time limit to it. Presley will inform you that in order to build this bridge, you will need to enter the Abandoned Ruin #1to collect the materials that you will need.
When you"re able to, I"d recommend picking up a Commission from the board in the Commerce Guild. They"ll be incredibly simple commissions, so pick the easiest one you can find to complete. This will allow you to get a couple of Gols that will make life easier. Be careful though, all Commissions have a time limit, so when you pick them, do them. You can only pick up one Commission a day (expect for special cases further into the game), so it"s a good idea to pick one that you can complete that day, and has good rewards. All of the Commissions change every day, so you can"t attempt to prepare yourself for the next Commission.
A good idea, if you really want the best Commissions every day, is to try and get to the Guild when it opens at 8am during the week. This is because you will have some competition in the form of Higgins, your Workshop Rival. He goes to the guild at opening time every day to try and get the best Commission going. However, if you"re not bothered about that, you can use Higgins to your advantage. To do this, whenever he goes to the Guild at 8am, run down to where his workshop is. There are two furnaces outside. In the furnace on the right (closest to the building), you"ll find a metal bar in there for you to steal. As long as Higgins doesn"t catch you, there will be no repercussions. If he does catch you, you"ll just have to fight him, which isn"t the worst thing in the world.
With your Builder"s License collected, it"s time to fix up your house, as you probably would have noticed that your character complained of a draft in the house. If you leave these gaps in your house, you won"t regain all of your stamina upon waking up in the morning. It doesn"t take much to repair these. You want to go out and collect 36 wood - this is the amount you"ll need to fix all of the gaps in the house. It"ll be a quick finish now that you have an Axe to chop down trees.
There"s no particular order in which you need to speak to the Shop Owners. Here is a list of them all, and the rewards for speaking to them:Dr. Xu, owner of the Clinic.
In order to complete this, you"re going to need to build a Grinder. To build a Grinder, you"re going to need to go into Abandoned Ruins #1. Due to the amount you"ll need to do, this mission is in the spoiler tags below.
While you"re in the Ruins, you"re aiming to collect an item called Old Parts. You need two of these for the Grinder, and it"s worth trying to find a few, as they come in quite handy while in the Ruins. The collect Copper Ore (the main reason you came here), look for redish stone, as this will net you a fair amount of Copper Ore very quickly. Another item you want to try and get at least one of is a Power Stone.You need them to power the Grinder.
Stay in the Ruins, mining away until you"ve got as much Cooper Ore, Old Parts and Stone as you can get. To complete Paulie"s commission, you"re going to need (in total):27 x Copper Ore
Old Parts are gathered in the Abandoned Ruins #1.It"s totally random as to when they"ll appear, but at this point in the game, it appears to be geared to awarding them to you fairly quickly.
You need to go to the Research Center, and talk to Petra. Once this secondary mission is completed, you"ll be able to use the Recovery Machine, which is in the Research Center. The Recovery Machine can be used to rebuild relics - as long as you have all of the relic pieces and enough Data Discs. The rebuilt relics can be then be placed in your Workshop (and you may get stat bonuses from doing so), or you can donate them to the Portia Museumwhen it opens.
Start off by going to speak to Petra first. You have a quick conversation with her, and then the secondary mission will be completed and you"ll get the rewards. And then you"ll need to go to the Church of Light(with a Data Disc) and speak to Lee. While you"re speaking with Lee, you"ll have a conversation option to pick. However you choose will result in you handing over 1 x Data Disc. In return you"ll receive 3 x Cotton Seed for you to plant. You"ll also be rewarded for completing the mission.
*** Spoiler - click to reveal ***Mission DetailsStrange Lenses- Go to the Research Center, then wait for a day. Go back to the Research Center and speak with Merlin.
Upon finding 2 x Eye Glasses, you"ll be informed to take them to the Research Center. When you get there, you"ll have a quick cutscene, and Merlinwill tell you to wait until the next day. Going back to Merlin the next day, she"ll give you the Color-blind Correction Glasses.Your reward for this mission will be .
Upon completion of Strange Lenses, the next mission will automatically trigger. You"ll need to find Sanwa, and you need to have the Glasses in your inventory.Sanwa wears a yellow t-shirt and yellow hat. When you find him, speak to him. You can answer however you like, but if you pick the conversation option "Fine, continue to sulk! See if I care. But I"ll leave the glasses with you", you"ll have to wait until the next day for the additional +10 Relationship reward. You"ll get it when Sanwa shows up at your Workshop the next day.
While it may seem like you"re spending time not progressing the story, having these items will actually help you in the long run. If you have followed the money-making tips in the Hints and Tips, you may also have enough resources and Gols to upgrade the Worktable to Level 2.
*** Spoiler - click to reveal ***Mission DetailsLast one minute against one of the current Civil Corps members to show that you"ve got what it takes to enter the ruins.
This mission is actually a lot easier than it sounds. All you need to do is survive one minute in a fight with either Sam, Arlo or Remington. You can try to fight the person to defeat them, but this could prove slightly difficult if you are a low level. So it"s definitely easier to just survive the full minute. The best way to do this is to run around the edge of the fighting ring. The person who you chose to fight will more than likely end up just chasing you, meaning that they cannot attack you.
This area contains the first of the Hazardous Ruins, the Sewage Plant.Opening this area early is an easy and great thing to do, as there are various missions that will require you to come to this area during the game.
After you"ve completed the Register Your Workshop mission, Presley will explain the Commerce Guild. Higgins will leave with the last commission on the board, and then after this Arlo will appear with a new commission from the Mayor, Gale. By the end of this, you"ll be given the new commission, which will see you needing to build 2 x Wooden Bridge Head, and 1 x Wooden Bridge Body, and then install them in the correct location.
Once you"ve crafted the required items, install them in the designated area (this will be shown on the map) and then report to Antoine. He will give you your rewards, and the mission will be completed.
The day after you"ve completed the mission, you"ll receive a letter in the mail from the Civil Corps letting you know that a new Ruin is open, the Abandoned Ruins #2.Access to this Ruin is 300 Gols a week.
The Sunday after completing the mission will have a Fireside Meeting, where Gale will discuss the thefts that have been occurring in Portia. Gale will then call you to his office on the Monday, with a commission to craft a Removable Battery, to restore power to the Amber Island Cave (this initiates The Cave on Amber Island mission).
This isn"t a mission, but you want to build 5 Dee-Dee Transports BEFOREgoing into the Cave on Amber Island. So put your of your focus into this before proceeding with the story.
You"re also going to need a Level 2 Worktable. To upgrade the Worktable, you"ll need 20 x Wooden Boards, 5 x Old Parts and 2000 Gols. You upgrade the Worktable from A&G Construction (the building to the left of the Commerce Guild).
You will need to do a lot of mining in the Abandoned Ruins #1.In the ruins you can obtain the Sand, Copper Ore, Tin Ore and Small Engines. The Small Engines may take you a bit of time to locate with the Relic Scanner. Rubber Fruit is acquired from kicking trees/chopping trees down. Wooden Boards are crafted on the Civil Cutter from Wood.
As stated above, you must complete this mission on a Thursday if you want the missable achievement. And make sure you have 5 Dee-Dee Transports already built.
You"ll receive a letter in the post from Gale. You"ll get it a day after completing Bridge to Amber Island. Go to his office and speak to him, and when you get the conversation choices, pick either "Town thief?"or "I heard about that!". If you pick "I was also stolen from!"you"ll lose relationship points with Gale. After speaking to him, you"ll get the Removable Battery blueprint from him. You build it on the Assembly Station.
Once you"ve crafted the Removable Battery, you"re going to wait until the day is a Thursday to continue the mission. When you get to a Thursday, head over to Amber Island with the battery.
You"ll see Liuwa standing outside the entrance to the cave. Speak to him before you go inside. In here, you will encounter Level 10-11 Snaillobs and Level 10 Bandirats. You"ll also meet a boss, the Hermit Snaillob, that you will have to kill to progress. It"s not too hard to defeat them if you have a Bronze Sword.
On your way to placing the battery, and after killing the boss, you"ll come across some breakable jars. In them will be the chance of obtaining some Gols, Salt, Roasted Meat, Meat, Smoked Met, Dried Apple Slice or Simple Circuits. There are a few Crystal deposits you can mine, and some Red Mushrooms you can gather as well. When you get to the Generator Room, look for the stove that here. Interact with it to fully restore your health and stamina. If you have any meat in your inventory, you can add it to the stove to cook up a Tasteless Broth.These restore 15 Stamina, and you can cook up to 10 on the stove, meaning you can recover 150 Stamina if needed.
Once you have all of those, and have killed all of the Bandirats, continue on until you get to a circular room. There"s a stove up here for you to use to replenish your health and stamina. You can also make Tasteless Broth here if you have any meat.
Then drop down for a cutscene. You"ll then need to kill two Bandirats, followed by the Bandirat Prince. This Prince is in no way difficult to beat. Just remember to use dodge (
After completing The Cave on Amber Island on a Thursday, you"ll have a Fireside meeting on the Friday. On the morning of the Saturday, Presley will be outside your Workshop explaining that Gale has secured funding for the Dee-Dee Transport and 5 commissions will appear on the Commerce Board.
This Commerce Mission is repeated five times on the Board. As it"s a weekend, Higgins will not take any Commissions, meaning you will be able to complete all 5.
With the 5 Dee-Dee Transports in your inventory, head over to the Commerce Guild (there"ll be an inspection you can complete while you"re here). On the board will be all 5 commissions, so take one. Then look on the map to find Antoine (as it"s likely he won"t be in the Guild). Head to him to turn the Commission in. And then repeat this 4 times. If you don"t manage to complete them all on the Saturday, you"ll be able to complete the last ones on the Sunday as well. All you need to do is to make sure you have completed 4 Commissions, and have one Commission ready by Sunday in order to unlock the only (true) missable achievement in the game.
This mission becomes available immediately after the first Dee-Dee commission has been handed in. Antoine will tell you to go and talk to Gale. Take the commission from him to build 3 Dee-Dee Stops. He"ll tell you to go and speak to Petra for the diagram.
Once you"ve given the Data Discs to Petra, you"ll need to wait a day or so for the blueprint. This will end the mission, and you"ll now be able to build the three Dee-Dee Stops.
This mission is repeatable up to four times, though as it"s commission based, Higgins may take one or more of the commissions. You can"t stack these commissions, but you can take them alongside another one if you wish. This mission will start with Gale sending you a mail about crafting some Street Lights.
The 4 commissions that will be placed are Rank B, and upon collecting one, you"ll be given a recipe for the Street Light. Go into your inventory and press
You can place the Street Lights where you wish, and you only need to place 2 to complete the mission. Once you"ve placed a Light, go and speak to Antoine to collect the commission rewards. You"ll then be able to pick up another commission for a Street Light immediately afterwards.
During the first Month of the first year, you"ll get a letter from Dawa asking for 5 Wooden Boards. All you need to do is cut the Boards on a Civil Cutter and then deliver them to Dawa at the Tree Farm.
Speak to Aadit and accept his commission to start this mission. Then head to the Research Center and speak to Petra. You"ll have to hand over 6 Data Discs, and the following day you"ll receive four blueprints.
From here on out, the Tree Farm will be open, and for you, the Tree Farm will deliver wood and other items to your Resource Box (which is next to your mailbox) every day. If you don"t upgrade, you"ll never have to pay for the resources you receive. There"s also a mention about Tree Farm Fees, but I never had to renew the registration, so effectively I was getting everything for free. But if you need to renew the registration for the resources, the game will warn you on the day it"s supposed to run out.
Once you"ve completed The Dee-Dee Stops Here, head up to the Peach Plaza (where the Guild is) for a cutscene. The fountain with spew green water with rubbish in it. The Portia River will also be polluted too, as well as the fishing spots around Amber Island and by the waterfall. After the cutscene, Arlo will place a commission in the Guild for you to pick up. You will need to craft the following items:10 x Hardwood Plank
Before starting this mission, aim to be at least Level 25. If you can, bring a stash of Snake Berries (restores 10 HP) and Royal Honey (restores 15 HP) to replenish health, along with any Simple Ointment (restores 120 HP) you can afford to purchase from Dr. Xu. You can also gather Herbs, which restores 10 HP.
For Stamina buffs, Apples (restore 5 Stamina), Aroma Apples (restores 20 Stamina) and Royal Honey (restores 10 Stamina) are by far the easiest to acquire, as you just need to kick the correct trees. Using Dried Apple Slices are good too, and if you invest in making a Drying Rackon the Worktable, you could craft an endless amount of Dried Apple Slices - they restored 10% of your Stamina.
You"ll receive a letter from the Civil Corps asking for you to fix a leaky pipe that is inside WOW Industries. To fix the pipe, you"ll need:4 x Steel Plate
For the rest of the mission, you will need to navigate your way through the sewage system, fighting enemies like Backrats and Redrats. There are a few chests and items to be discovered and gathered, so make sure to explore and collect what you can. By kil


 8613371530291