
mud pump assembly free sample
The 2,200-hp mud pump for offshore applications is a single-acting reciprocating triplex mud pump designed for high fluid flow rates, even at low operating speeds, and with a long stroke design. These features reduce the number of load reversals in critical components and increase the life of fluid end parts.
The pump’s critical components are strategically placed to make maintenance and inspection far easier and safer. The two-piece, quick-release piston rod lets you remove the piston without disturbing the liner, minimizing downtime when you’re replacing fluid parts.

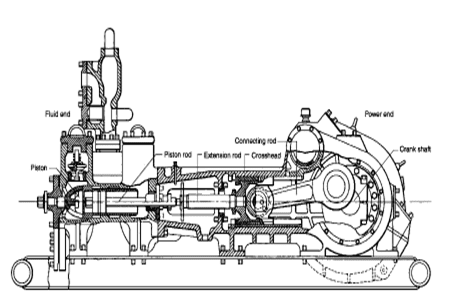
Triplex mud pumps pump drilling mud during well operations. An example of a typical triplex mud pump 10 shown in FIG. 1A has a power assembly 12, a crosshead assembly 14, and a fluid assembly 16. Electric motors (not shown) connect to a pinion shaft 30 that drives the power assembly 12. The crosshead assembly 14 converts the rotational movement of the power assembly 12 into reciprocating movement to actuate internal pistons or plungers of the fluid assembly 16. Being triplex, the pump"s fluid assembly 16 has three internal pistons to pump the mud.
As shown in FIG. 1B, the pump"s power assembly 14 has a crankshaft 20 supported at its ends by double roller bearings 22. Positioned along its intermediate extent, the crankshaft 20 has three eccentric sheaves 24-1 . . . 24-3, and three connecting rods 40 mount onto these sheaves 24 with cylindrical roller bearings 26. These connecting rods 40 connect by extension rods (not shown) and the crosshead assembly (14) to the pistons of the pump"s fluid assembly 16.
In addition to the sheaves, the crankshaft 20 also has a bull gear 28 positioned between the second and third sheaves 24-2 and 24-3. The bull gear 28 interfaces with the pinion shaft (30) and drives the crankshaft 20"s rotation. As shown particularly in FIG. 1C, the pinion shaft 30 also mounts in the power assembly 14 with roller bearings 32 supporting its ends. When electric motors couple to the pinion shaft"s ends 34 and rotate the pinion shaft 30, a pinion gear 38 interfacing with the crankshaft"s bull gear 28 drives the crankshaft (20), thereby operating the pistons of the pump"s fluid assembly 16.
When used to pump mud, the triplex mud pump 10 produces flow that varies by approximately 23%. For example, the pump 10 produces a maximum flow level of about 106% during certain crankshaft angles and produces a minimum flow level of 83% during other crankshaft angles, resulting in a total flow variation of 23% as the pump"s pistons are moved in differing exhaust strokes during the crankshaft"s rotation. Because the total flow varies, the pump 10 tends to produce undesirable pressure changes or “noise” in the pumped mud. In turn, this noise interferes with downhole telemetry and other techniques used during measurement-while-drilling (MWD) and logging-while-drilling (LWD) operations.
In contrast to mud pumps, well-service pumps (WSP) are also used during well operations. A well service pump is used to pump fluid at higher pressures than those used to pump mud. Therefore, the well service pumps are typically used to pump high pressure fluid into a well during frac operations or the like. An example of a well-service pump 50 is shown in FIG. 2. Here, the well service pump 50 is a quintuplex well service pump, although triplex well service pumps are also used. The pump 50 has a power assembly 52, a crosshead assembly 54, and a fluid assembly 56. A gear reducer 53 on one side of the pump 50 connects a drive (not shown) to the power assembly 52 to drive the pump 50.
As shown in FIG. 3, the pump"s power assembly 52 has a crankshaft 60 with five crankpins 62 and an internal main bearing sheave 64. The crankpins 62 are offset from the crankshaft 60"s axis of rotation and convert the rotation of the crankshaft 60 in to a reciprocating motion for operating pistons (not shown) in the pump"s fluid assembly 56. Double roller bearings 66 support the crankshaft 60 at both ends of the power assembly 52, and an internal double roller bearing 68 supports the crankshaft 60 at its main bearing sheave 64. One end 61 of the crankshaft 60 extends outside the power assembly 52 for coupling to the gear reducer (53; FIG. 2) and other drive components.
As shown in FIG. 4A, connecting rods 70 connect from the crankpins 62 to pistons or plungers 80 via the crosshead assembly 54. FIG. 4B shows a typical connection of a connecting rod 70 to a crankpin 62 in the well service pump 50. As shown, a bearing cap 74 fits on one side of the crankpin 62 and couples to the profiled end of the connecting rod 70. To reduce friction, the connection uses a sleeve bearing 76 between the rod 70, bearing cap 74, and crankpin 62. From the crankpin 62, the connecting rod 70 connects to a crosshead 55 using a wrist pin 72 as shown in FIG. 4A. The wrist pin 72 allows the connecting rod 70 to pivot with respect to the crosshead 55, which in turn is connected to the plunger 80.
In use, an electric motor or an internal combustion engine (such as a diesel engine) drives the pump 50 by the gear reducer 53. As the crankshaft 60 turns, the crankpins 62 reciprocate the connecting rods 70. Moved by the rods 70, the crossheads 55 reciprocate inside fixed cylinders. In turn, the plunger 80 coupled to the crosshead 55 also reciprocates between suction and power strokes in the fluid assembly 56. Withdrawal of a plunger 80 during a suction stroke pulls fluid into the assembly 56 through the input valve 82 connected to an inlet hose or pipe (not shown). Subsequently pushed during the power stroke, the plunger 80 then forces the fluid under pressure out through the output valve 84 connected to an outlet hose or pipe (not shown).
In contrast to using a crankshaft for a quintuplex well-service pump that has crankpins 62 as discussed above, another type of quintuplex well-service pump uses eccentric sheaves on a direct drive crankshaft. FIG. 4C is an isolated view of such a crankshaft 90 having eccentric sheaves 92-1 . . . 92-5 for use in a quintuplex well-service pump. External main bearings (not shown) support the crankshaft 90 at its ends 96 in the well-service pumps housing (not shown). To drive the crankshaft 90, one end 91 extends beyond the pumps housing for coupling to drive components, such as a gear box. The crankshaft 90 has five eccentric sheaves 92-1 . . . 92-5 for coupling to connecting rods (not shown) with roller bearings. The crankshaft 90 also has two internal main bearing sheaves 94-1, 94-2 for internal main bearings used to support the crankshaft 90 in the pump"s housing.
In the past, quintuplex well-service pumps used for pumping frac fluid or the like have been substituted for mud pumps during drilling operations to pump mud. Unfortunately, the well-service pump has a shorter service life compared to the conventional triplex mud pumps, making use of the well-service pump as a mud pump less desirable in most situations. In addition, a quintuplex well-service pump produces a great deal of white noise that interferes with MWD and LWD operations, further making the pump"s use to pump mud less desirable in most situations. Furthermore, the well-service pump is configured for direct drive by a motor and gear box directly coupling on one end of the crankshaft. This direct coupling limits what drives can be used with the pump. Moreover, the direct drive to the crankshaft can produce various issues with noise, balance, wear, and other associated problems that make use of the well-service pump to pump mud less desirable.
One might expect to provide a quintuplex mud pump by extending the conventional arrangement of a triplex mud pump (e.g., as shown in FIG. 1B) to include components for two additional pistons or plungers. However, the actual design for a quintuplex mud pump is not as easy as extending the conventional arrangement, especially in light of the requirements for a mud pump"s operation such as service life, noise levels, crankshaft deflection, balance, and other considerations. As a result, acceptable implementation of a quintuplex mud pump has not been achieved in the art during the long history of mud pump design.
What is needed is an efficient mud pump that has a long service life and that produces low levels of white noise during operation so as not to interfere with MWD and LWD operations while pumping mud in a well.
A quintuplex mud pump is a continuous duty, reciprocating plunger/piston pump. The mud pump has a crankshaft supported in the pump by external main bearings and uses internal gearing and a pinion shaft to drive the crankshaft. Five eccentric sheaves and two internal main bearing sheaves are provided on the crankshaft. Each of the main bearing sheaves supports the intermediate extent of crankshaft using bearings. One main bearing sheave is disposed between the second and third eccentric sheaves, while the other main bearing sheave is disposed between the third and fourth eccentric sheaves.
One or more bull gears are also provided on the crankshaft, and the pump"s pinion shaft has one or more pinion gears that interface with the one or more bull gears. If one bull gear is used, the interface between the bull and pinion gears can use herringbone or double helical gearing of opposite hand to avoid axial thrust. If two bull gears are used, the interface between the bull and pinion gears can use helical gearing with each having opposite hand to avoid axial thrust. For example, one of two bull gears can be disposed between the first and second eccentric sheaves, while the second bull gear can be disposed between fourth and fifth eccentric sheaves. These bull gears can have opposite hand. The pump"s internal gearing allows the pump to be driven conventionally and packaged in any standard mud pump packaging arrangement. Electric motors (for example, twin motors made by GE) may be used to drive the pump, although the pump"s rated input horsepower may be a factor used to determine the type of motor.
Connecting rods connect to the eccentric sheaves and use roller bearings. During rotation of the crankshaft, these connecting rods transfer the crankshaft"s rotational movement to reciprocating motion of the pistons or plungers in the pump"s fluid assembly. As such, the quintuplex mud pump uses all roller bearings to support its crankshaft and to transfer crankshaft motion to the connecting rods. In this way, the quintuplex mud pump can reduce the white noise typically produced by conventional triplex mud pumps and well service pumps that can interfere with MWD and LWD operations.
Turning to the drawings, a quintuplex mud pump 100 shown in FIGS. 5 and 6A-6B has a power assembly 110, a crosshead assembly 150, and a fluid assembly 170. Twin drives (e.g., electric motors, etc.) couple to ends of the power assembly"s pinion shaft 130 to drive the pump"s power assembly 110. As shown in FIGS. 6A-6B, internal gearing within the power assembly 110 converts the rotation of the pinion shaft 130 to rotation of a crankshaft 120. The gearing uses pinion gears 138 on the pinion shaft 130 that couple to bull gears 128 on the crankshaft 120 and transfer rotation of the pinion shaft 130 to the crankshaft 120.
For support, the crankshaft 120 has external main bearings 122 supporting its ends and two internal main bearings 127 supporting its intermediate extent in the assembly 110. As best shown in FIG. 6A, rotation of the crankshaft 120 reciprocates five independent connecting rods 140. Each of the connecting rods 140 couples to a crosshead 160 of the crosshead assembly 150. In turn, each of the crossheads 160 converts the connecting rod 40"s movement into a reciprocating movement of an intermediate pony rod 166. As it reciprocates, the pony rod 166 drives a coupled piston or plunger (not shown) in the fluid assembly 170 that pumps mud from an intake manifold 192 to an output manifold 198. Being quintuplex, the mud pump 100 has five such pistons movable in the fluid assembly 170 for pumping the mud.
Shown in isolated detail in FIG. 7, the crankshaft 120 has five eccentric sheaves 124-1 through 124-5 disposed thereon. Each of these sheaves can mechanically assemble onto the main vertical extent of the crankshaft 120 as opposed to being welded thereon. During rotation of the crankshaft 120, the eccentric sheaves actuate in a firing order of 124-1, 3, 5, 2 and 4 to operate the fluid assembly"s pistons (not shown). This order allows the crankshaft 120 to be assembled by permitting the various sheaves to be mounted thereon. Preferably, each of the eccentric sheaves 124-1 . . . 124-5 is equidistantly spaced on the crankshaft 120 for balance.
The additional detail of FIG. 8 shows the crankshaft 120 supported in the power assembly 110 and having the connecting rods 140 mounted thereon. As noted above, double roller bearings 122 support the ends of the crankshaft 120 in the assembly 110. Internally, main bearings 123 support the intermediate extent of the crankshaft 120 in the assembly 110. In particular, the main bearings 126 position on the main bearing sheaves 125-1 and 125-2 and are supported by carriers 125 mounted to the assembly 110 at 129. The external main bearings 122 are preferably spherical bearings to better support radial and axial loads. The internal main bearings 125 preferably use cylindrical bearings.
Five connector rods 140 use roller bearings 126 to fit on the eccentric sheaves 124-1 . . . 124-5. Each of the roller bearings 126 preferably uses cylindrical bearings. The rods 140 extend from the sheaves 124-1 . . . 124-5 (perpendicular to the figure) and couple the motion of the crankshaft 120 to the fluid assembly (170) via crossheads (160) as is discussed in more detail below with reference to FIGS. 10A-10B.
As shown in FIG. 9, the pinion shaft 130 mounts with roller bearings 132 in the power assembly 110 with its free ends 134 extending on both sides of the assembly 110 for coupling to drive components (not shown). As noted previously, the pinion gears 138 on the shaft 130 interface with the bull gears 128 on the crankshaft (120). Preferably, the interface uses helical gearing of opposite hand. In particular, the two pinion gears 138 on the pinion shaft 130 have helical teeth that have an opposite orientation or hand relative to one another. These helical teeth couple in parallel fashion to oppositely oriented helical teeth on the complementary bull gears 128 on the crankshaft 120. (The opposing orientation of helical teeth on the bull gears 128 and pinion gears 138 can best be seen in FIGS. 6A-6B). The helical gearing transfers rotation of the pinion shaft 130 to the crankshaft 120 in a balanced manner. In an alternative embodiment, the pinion shaft 130 can have one pinion gear 138, and the crankshaft 120 can have one bull gear 128. Preferably, these single gears 138/128 use herringbone or double helical gearing of opposite hand to avoid imparting axial thrust to the crankshaft 120.
The cross-section in FIG. 10A shows a crosshead 160 for the quintuplex mud pump. The end of the connecting rod 140 couples by a wrist pin 142 and bearing 144 to a crosshead body 162 that is movable in a crosshead guide 164. A pony rod 166 coupled to the crosshead body 162 extends through a stuffing box gasket 168 on a diaphragm plate 169. An end of this pony rod 166 in turn couples to additional components of the fluid assembly (170) as discussed below.
The cross-section in FIG. 10B shows portion of the fluid assembly 170 for the quintuplex mud pump. An intermediate rod 172 has a clamp 174 that couples to the pony rod (166; FIG. 10A) from the crosshead assembly 160 of FIG. 10A. The opposite end of the rod 172 couples by another clamp to a piston rod 180 having a piston head 182 on its end. Although a piston arrangement is shown, the fluid assembly 170 can use a plunger or any other equivalent arrangement so that the terms piston and plunger can be used interchangeably herein. Moved by the pony rod (166), the piston head 182 moves in a liner 184 communicating with a fluid passage 190. As the piston 182 moves, it pulls mud from a suction manifold 192 through a suction valve 194 into the passage 190 and pushes the mud in the passage 190 to a discharge manifold 198 through a discharge valve 196.
As noted previously, a triplex mud pump produces a total flow variation of about 23%. Because the present mud pump 100 is quintuplex, the pump 100 offers a lower variation in total flow, making the pump 100 better suited for pumping mud and producing less noise that can interfere with MWD and LWD operations. In particular, the quintuplex mud pump 100 can produce a total flow variation as low as about 7%. For example, the quintuplex mud pump 100 can produce a maximum flow level of about 102% during certain crankshaft angles and can produce a minimum flow level of 95% during other crankshaft angles as the pump"s five pistons move in their differing strokes during the crankshaft"s rotation. Being smoother and closer to ideal, the lower total flow variation of 7% produces less pressure changes or “noise” in the pumped mud that can interfere with MWD and LWD operations.
Although a quintuplex mud pump is described above, it will be appreciated that the teachings of the present disclosure can be applied to multiplex mud pumps having at least more than three eccentric sheaves, connecting rods, and fluid assembly pistons. Preferably, the arrangement involves an odd number of these components so such mud pumps may be septuplex, nonuplex, etc. For example, a septuplex mud pump according to the present disclosure may have seven eccentric sheaves, connecting rods, and fluid assembly pistons with at least two bull gears and at least two bearing sheaves on the crankshaft. The bull gears can be arranged between first and second eccentric sheaves and sixth and seventh eccentric sheaves on the crankshaft. The internal main bearings supporting the crankshaft can be positioned between third and fourth eccentric sheaves and the fourth and fifth eccentric sheaves on the crankshaft.

The maximum practical water depth for current drilling practices with a large diameter marine riser is approximately 7,000 feet. As the need to add to energy reserves increases, the frontiers of energy exploration are being pushed into ever deeper waters, thus making the development of drilling techniques for ever deeper waters increasingly more important. However, several aspects of current drilling practices with a conventional marine riser inherently limit deep water drilling to water depths less than approximately 7,000 feet. The first limiting factor is the severe weight and space penalties imposed on a floating vessel as water depth increases. In deep water drilling, the drilling fluid or mud volume in the riser constitutes a majority of the total mud circulation system and increases with increasing water depth. The capacity of the 21 -inch marine riser is approximately 400 barrels for every 1,000 feet. It has been estimated that the weight attributed to the marine riser and mud volume for a rig drilling at a water depth of 6,000 feet is 1,000 to 1,500 tons. As can be appreciated, the weight and space requirements for a drilling rig that can support the large volumes of fluids required for circulation and the number of riser joints required to reach the seafloor prohibit the use of the 21 -inch riser, or any other large-diameter riser, for drilling at extreme water depths using the existing offshore drilling fleet.
In addition, before disconnecting the riser from the blowout preventer stack, operations must take place to condition the well so that the well may be safely abandoned. This is required because the well depends on the hydrostatic pressure of the mud column extending from the top end of the riser to the bottom of the well to
overcome the pore pressures of the formation. When the mud column in the riser is removed, the hydrostatic pressure gradient is significantly reduced and may not be sufficient to prevent formation fluid influx into the well. Operations to contain well pressure may include setting a plug, such as a storm packer, in the well and closing the blind ram in the blowout preventer stack.
The well hydrostatic pressure gradient derived from the riser height is trapped below the closed blind rams when the riser is disconnected. Thus, the only barrier to the influx of formation fluid into the well is the closed blind rams since the column of mud below the blind rams is insufficient to prevent influx of formation fluid into the well. Prudent drilling operations require two independent barriers to prevent loss of well control. When the riser is disconnected from the blowout preventer stack, large volumes of mud will be dumped onto the seafloor. This is undesirable from both an economic and environmental standpoint.
These sediments are significantly influenced by the overlying body of water and the circulating mud column need only be slightly denser than seawater to fracture the formation. Fortunately, because of the higher bulk density of the rock, the fracture pressure rapidly increases with the depth of penetration below the seafloor and will present a less serious problem after the first few thousand feet are drilled. However, abnormally high pore pressures which are routinely encountered up to 2,000 feet below the seafloor continue to present a problem both when drilling the initial section of the well with seawater and when drilling beyond the initial section of the well with seawater or weighted drilling fluid. The challenge then becomes balancing the internal pressures of the formation with the hydrostatic pressure of the mud column while continuing drilling of the well. The current practice is to progressively run and cement casings, the next inside the previous, into the hole to protect the "open hole" sections possessing insufficient fracture pressure while allowing weighted drilling fluids to be used to overcome formation pore pressures. It is important that the well be completed with the largest practical casing through the production zone to allow production rates that will justify the high-cost of deep-water developments. Production rates exceeding 10,000 barrels per day are common for deep-water developments, and too small a production casing would limit the productivity of the well, making it uneconomical to complete. The number of casings run into the hole is significantly affected by water depth.
The multiple casings needed to protect the "open hole" while providing the largest practical casing through the production zone requires that the surface hole at the seafloor be larger. A larger surface hole in turn requires a larger subsea wellhead and blowout preventer stack and a larger blowout preventer stack requires a larger marine riser. With a larger riser, more mud is required to fill the riser and a larger drilling vessel is required to carry the mud and support the riser. This cycle repeats itself as water depth increases.
It has been identified that the key to breaking this cycle lies in reducing the hydrostatic pressure of the mud in the riser to that of a column of seawater and providing mud with sufficient weight in the well to maintain well control. Various concepts have
been presented in the past for achieving this feat; however, none of these concepts known in the prior art have gained commercial acceptance for drilling in ever deeper waters. These concepts can be generally grouped into two categories: the mud lift drilling with a marine riser concept and the riserless drilling concept. The mud lift drilling with a marine riser concept contemplates a dual-density mud gradient system which includes reducing the density of the mud returns in the riser so that the return mud pressure at the seafloor more closely matches that of seawater. The mud in the well is weighted to maintain well control. For example, U.S. Patent No. 3,603,409 to Watkins et al. and U.S. Patent No. 4,099,583 to Maus et al. disclose methods of injecting gas into the mud column in the marine riser to lighten the weight of the mud.
The riserless drilling concept contemplates eliminating the large-diameter marine riser as a return annulus and replacing it with one or more small-diameter mud return lines. For example, U.S. Patent No. 4,813,495 to Leach removes the marine riser as a return annulus and uses a centrifugal pump to lift mud returns from the seafloor to the surface through a mud return line. A rotating head isolates the mud in the well annulus from the open seawater as the drill string is run in and out of the well.
Drilling rates are significantly affected by the magnitude of the difference between formation pore pressure and mud column pressure. This difference, commonly called "overbalance", is adjusted by changing the density of the mud column. Overbalance is estimated as the additional pressure required to prevent the well from kicking, either during drilling or when pulling a drill string out of the well. This overbalance estimate usually takes into account factors like inaccuracies in predicting formation pore pressures and pressure reductions in the well as a drill string is pulled from the well. Typically, a minimum of 300 to 700 psi overbalance is maintained during drilling operations. Sometimes the overbalance is large enough to damage the formation.
the overbalance is reduced to zero. An even greater increase in drilling rate can be achieved if the mud column pressure is decreased to an underbalanced condition, i.e. mud column pressure is less than formation pressure. Thus, to improve drilling rates, it may be desirable to drill a well in an underbalanced mode or with a minimum of overbalance. In conventional drilling operations, it is impractical to reduce the mud density to allow faster drilling rates and then increase the mud density to permit tripping the drill string. This is because the circulation time for the complete mud system lasts for several hours, thus making it expensive to repeatedly decrease and increase mud density. Furthermore, such a practice would endanger the operation because a miscalculation could result in a kick.
In general, in one aspect, a positive-displacement pump comprises multiple pumping elements, each pumping element comprising a pressure vessel with a first and a second chamber and a separating member disposed between the first and second chambers. The first chambers and the second chambers are hydraulically connected to receive and discharge fluid, wherein the separating members move within the pressure vessels in response to pressure differential between the first and second chambers. A valve assembly having suction and discharge valves communicates with the first chambers. The suction and discharge valves are operable to permit fluid to alternately flow into and out of the first chambers. A hydraulic drive alternately supplies hydraulic fluid to and withdraws hydraulic fluid from the second chambers such that the fluid discharged from the first chambers is substantially free of pulsation.
FIG. 2A is a detailed view of the well control assembly shown in FIG. 1. FIG. 2B is a detailed view of the mud lift module shown in FIG. 1. FIG. 2C is a detailed view of the pressure-balanced mud tank shown in FIG. 1.
FIG. 8 is an elevation view of a subsea mud pump. FIG. 9A is a cross section of a diaphragm pumping element. FIG. 9B is a cross section of a piston pumping element.
FIG. 16 is a diagram of a mud circulation system for the offshore drilling system shown in FIG. 1. FIG. 17 is a graph of depth versus pressure for a well drilled in a water depth of
FIG. 20A is a graph of depth versus pressure for a well drilled in a water depth of 5,000 feet for a dual-density mud gradient system which has a mudline pressure less than seawater pressure.
FIG. 21 illustrates the offshore drilling system of FIG. 1 with a mud lift module mounted on the seafloor. FIGS. 22A and 22B are elevation views of retrievable subsea components of the offshore drilling system shown in FIG. 21.
FIG. 26 is a top view of another embodiment of the return line riser shown in FIG. 23. FIG. 27 illustrates the offshore drilling system of FIG. 1 without a marine riser and with a mud lift module mounted on the seafloor.
FIG. 31 is a graph of depth versus pressure for the initial section of well drilled in a water depth of 5,000 feet using the subsea flow assembly shown in FIG. 30.
The wellhead stack 37 includes a well control assembly 38, a mud lift module 40, and a pressure-balanced mud tank 42. A marine riser 52 between the drilling rig 20 and the wellhead stack 37 is positioned to guide drilling tools, casing strings, and other equipment from the drilling vessel 12 to the wellhead stack 37. The lower end of the marine riser 52 is releasably latched to the pressure-balanced mud tank 42, and the upper end of the marine riser 52 is secured to the drilling rig 20. Riser tensioners 54 are provided to maintain an upward pull on the marine riser 52. Mud return lines 56 and 58, which may be attached to the outside of the marine riser 52, connect flow outlets (not shown) in the mud lift module 40 to flow ports in the moon pool 22. The flow ports in the moon pool 22 serve as an interface between the mud return lines 56 and 58 and a mud return system (not shown) on the drilling vessel 12. The mud return lines 56 and 58 are also connected to flow outlets (not shown) in the well control assembly 38, thus allowing them to be used as choke/kill lines. Alternatively, the mud return lines 56 and 58 may be existing choke/kill lines on the riser.
A drill string 60 extends from a derrick 62 on the drilling rig 20 into the well 30 through the marine riser 52 and the wellhead stack 37. Attached to the end of the drill string 60 is a bottom hole assembly 63, which includes a drill bit 64 and one or more drill collars 65. The bottom hole assembly 63 may also include stabilizers, mud motor, and
other selected components required for drilling a planned trajectory, as is well known in the art. During normal drilling operations, the mud pumped down the bore of the drill string 60 by a surface pump (not shown) is forced out of the nozzles of the drill bit 64 into the bottom of the well 30. The mud at the bottom of the well 30 rises up the well annulus 66 to the mud lift module 40, where it is diverted to the suction ends of subsea mud pumps (not shown). The subsea mud pumps boost the pressure of the returning mud flow and discharge the mud into the mud return lines 56 and/or 58. The mud return lines 56 and/or 58 then conduct the discharged mud to the mud return system (not shown) on the drilling vessel 12. The drilling system 10 is illustrated with two mud return lines 56 and 58, but it should be clear that a single mud return line or more than two mud return lines may also be used. Clearly the diameter and number of the return lines will affect the pumping requirements for the subsea mud pumps in the mud lift module 40. The subsea mud pumps must provide enough pressure to the returning mud flow to overcome the frictional pressure losses and the hydrostatic head of the mud column in the return lines. The wellhead stack 37 includes subsea diverters (not shown) which seal around the drill string 60 and form a separating barrier between the riser 52 and the well annulus 66. The riser 52 is filled with seawater so that the hydrostatic pressure of the fluid column at the seafloor or mudline or separating barrier formed by the subsea diverters is that of seawater. Filling the riser with seawater, as opposed to mud, reduces the riser tension requirements. The riser may also be filled with other fluids which have a lower specific gravity than the mud in the well annulus.
Well Control Assembly FIG. 2A shows the components of the well control assembly 38 which was previously illustrated in FIG. 1. As shown, the well control assembly 38 includes a lower marine riser package (LMRP) 44 and a subsea blowout preventer (BOP) stack 46. The BOP stack 46 includes a pair of dual ram preventers 70 and 72. However, other combinations, such as, a triple ram preventer combined with a single ram preventer may
Mud lift module FIG. 2B shows the components of the mud lift module 40 which was previously illustrated in FIG. 1. As shown, the mud lift module 40 includes subsea mud pumps 102, a flow tube 104, a non-rotating subsea diverter 106, and a rotating subsea diverter 108. The lower end of the flow tube 104 includes a riser connector 110 which is adapted to mate with the riser connector 114 (shown in FIG. 2 A) at the upper end of the flexible joint 94. When the riser connector 110 mates with the riser connector 114, the flow ports 111 in the riser connector 110 are in communication with the flow ports 113 (shown in
FIG. 2 A) in the riser connector 114. A riser connector 112 is mounted at the upper end of the subsea diverter 108. The flow ports 111 in the riser connector 110 are connected to flow ports 116 in the riser connector 112 by pipes 118 and 120, and the pipes 118 and 120 are in turn hydraulically connected to the discharge ends of the subsea mud pumps 102. The suction ends of the subsea mud pumps 102 are hydraulically connected to flow outlets 125 in the flow tube 104.
The subsea diverters 106 and 108 are arranged to divert mud from the well annulus 66 (shown in FIG. 1) to the suction ends of the subsea mud pumps 102. The diverters 106 and 108 are also adapted to slidingly receive and seal around a drill string, e.g., drill string 60. When the diverters seal around the drill string 60, the fluid in the flow tube 104 or below the diverters is isolated from the fluid in the riser 52 (shown in FIG. 1) or above the diverters. The diverters 106 and 108 may be used alternately or together to sealingly engage a drill string and, thereby, isolate the fluid in the annulus of the riser 52 from the fluid in the well annulus 66. It should be clear that either the diverter 106 or 108 may be used alone as the separating medium between the fluid in the riser 52 and the fluid in the well annulus 66. A rotating blowout preventer (not shown), which could be included in the well control assembly 38 (shown in FIG. 2 A), may also be used in place of the diverters. The diverter 108 may also be mounted on the annular preventer 92 (shown in FIG. 2 A), and mud flow into the suction ends of the subsea pumps 102 may be taken from a point below the diverter.
The piston 140 moves downwardly to open the passageway 136 when hydraulic fluid is supplied to the opening cavity 139. As illustrated in the left half of the drawing, when the piston 140 sits on the body 128, the sealing element 150 does not extrude into the passageway 136 and the diverter 106 is fully open. When the diverter 106 is fully open, the passageway 136 is large enough to receive a bottom hole assembly and other drilling tools. When hydraulic fluid is fed into the cavity 138, the piston 140 moves upwardly to close the diverter 106. As illustrated in the right half of the drawing, when the piston 140 moves upwardly, the sealing element 150 is extruded into the passageway 136. If there is a drill string in the passageway 136, the extruded sealing element 150 would contact the drill string and seal the annulus between the passageway 136 and the drill string. FIG. 3B shows a vertical cross section of another non-rotating subsea diverter, i.e., subsea diverter 270, that may be used in place of the non-rotating subsea diverter 106. The subsea diverter 270 includes a housing body 272 with flanges 274 and 276 which are provided for connection with other components of the wellhead stack 37, e.g., the flow tube 104 and the subsea diverter 108 (shown in FIG. 2B). The housing body
The stripper element 286 includes a stripper rubber 288 that is bonded to a metal body 290. The locks 284 slide into recesses 291 in the metal body 290 to lock the metal body 290 in place inside the housing body 272. A seal 292 on the metal body 290 forms a seal between the housing body 272 and the metal body 290. The stripper rubber 288 sealingly engages a drill string that is received inside the bore 278 while permitting the drill string to rotate and move axially inside the bore 278. The stripper rubber 288 does not rotate with the drill string so the rubber 288 is subjected to friction forces associated with both the rotational and vertical motions of the drill string. The stripper element 286 may be carried into and out of the housing body 272 on a handling tool which may be positioned above the bottom hole assembly of the drill string.
A retrievable spindle 178 is disposed in the bore 168 of the housing body 162. The spindle 178 has an upper portion 180 and a lower portion 182. The upper portion 180 has recesses 181 into which the locks 176 may slide to lock the upper portion 180 in place inside the housing body 162. A seal 183 on the upper portion 180 seals between the housing body 162 and the upper portion 180. A bearing assembly 184 is attached to the upper portion 180. The bearing assembly 184 has bearings which support the lower portion 182 of the spindle 178 for rotation inside the housing body 162. A stripper rubber 185 is bonded to the lower portion 182 of the spindle 178. The stripper rubber 185 rotates with and sealingly engages a drill string (not shown) that is received in the bore 168 while permitting the drill string to move vertically.
FIG. 4C shows a vertical cross section of another rotating subsea diverter, i.e., rotating subsea diverter 1710, which may be used in place of the rotating subsea diverter 108 and/or the non-rotating subsea diverter 106. The rotating subsea diverter 1710 includes a head 1712 which has a vertical bore 1714 and a body 1716 which has a vertical bore 1718. The head 1712 and the body 1716 are held together by a radial latch 1720 and locks 1722. The radial latch 1720 is disposed in an annular cavity 1724 in the body 1716 and is secured to the head 1712 by a series of interlocking grooves 1726. The locks 1722 are distributed in pockets 1730 along a circumference of the body 1716. As shown in FIG. 4D, each lock 1722 includes a clamp 1732 which is secured to the radial latch 1720 by a screw 1734. A plug 1736 and a seal 1738 are provided to keep fluid and debris out of each pocket 1730. A retrievable spindle assembly 1740 is disposed in the vertical bores 1714 and
1718. The spindle assembly 1740 includes a spindle housing 1742 which is secured to the body 1716 by an elastomer clamp 1744. The elastomer clamp 1744 is disposed in an annular cavity 1746 in the body 1716 and includes an inner elastomeric element 1748 and an outer elastomeric element 1750. The inner elastomeric element 1748 may be made of a different material than the outer elastomeric element 1750. The outer elastomeric element 1750 has an annular body 1752 with flanges 1754. A ring holder 1756 is arranged between the flanges 1754 to support and add stiffness to the outer elastomeric element 1750. The inner elastomeric element 1748 is formed in the shape of a torus and arranged within the outer elastomeric element 1750. When fluid pressure is fed to the outer elastomeric element 1750 through a port (not shown) in the body 1716, the outer elastomeric element 1750 inflates and applies force to the inner elastomeric element 1748, extruding the inner elastomeric element 1748 to engage and seal against the spindle housing 1742.
As shown in FIG. 4E, the spindle assembly 1740 further comprises a spindle 1760 which extends through the spindle housing 1742. The spindle 1760 is suspended in the spindle housing 1742 by bearings 1762 and 1764. The bearing 1762 is secured between the spindle housing 1742 and the spindle 1760 by a bearing cap 1765. The spindle housing 1742, the spindle 1760, and the bearings 1762 and 1764 define a chamber 1768 which holds lubricating fluid for the bearings. The bearing cap 1765 may be removed to access the chamber 1768. Pressure intensifiers 1766 are provided to boost the pressure in the chamber 1768 as necessary so that the pressure in the chamber 1768 balances or exceeds the pressure above and below the spindle 1760. Referring back to FIG. 4C, the spindle 1760 includes an upper packer element 1772, a lower packer element 1774, and a central passageway 1776 for receiving a drill string, e.g., drill string 1770.
A landing shoulder 1778 is disposed in a pocket 1780 in the body 1716. The landing shoulder 1778 may be extended out of the pocket 1780 or retracted into the pocket 1780 by a hydraulic actuator 1782. When the landing shoulder 1778 is extended out of the pocket 1780, it prevents the spindle assembly 1740 from falling out of the body 1716. As shown in FIG. 4F, the hydraulic actuator 1782 comprises a cylinder 1784 which houses a piston 1786. The cylinder 1784 is arranged in a cavity 1788 on the outside of the body 1716 and held in place by a cap 1790. A threaded connection 1792 attaches one side of the piston 1786 to the landing shoulder 1778. The piston 1786 extends from the landing shoulder 1778 into a cavity 1794 in the cap 1790. The cap 1790 and the cylinder 1784 include ports 1796 and 1798 through which fluid may be fed into or discharged from the cavity 1794 and the interior of the cylinder 1784, respectively. Dynamic seals 1800 are provided on the piston 1786 to contain fluid in the cylinder 1784 and the cavity 1794. Additional static seals 1802 are provided between the cylinder 1784 and cap 1790 and the body 1716 to keep fluid and debris out of the cylinder 1784.
shoulder 1778 is fully extended and the spindle assembly 1740 seats on the landing shoulder 1778. The spring force must overcome the force due to the pressure at the lower end of the spindle 1760 to keep the piston 1786 in contact with the surface 1804. If the spring force is not sufficient, fluid may be fed into the cavity 1794 at a higher pressure than the fluid pressure in the cylinder 1784. The pressure differential between the cavity 1794 and the cylinder 1784 would provide the additional force necessary to move the piston 1786 against the surface 1804 and retain the landing shoulder 1778 in the fully extended position.
When it is desired to retract the landing shoulder 1778, fluid pressure may be fed into the cylinder 1784 at a higher pressure than the fluid pressure in the cavity 1794. The pressure differential between the cylinder 1784 and cavity 1794 moves the piston 1786 to the retracted position. The ports 1796 in the cap 1790 allow fluid to be exhausted from the cavity 1794 as the piston 1786 moves to the retracted position. Again, to move the piston 1786 back to the extended position, fluid pressure is released from the cylinder 1784, and, if necessary, additional fluid pressure is introduced into the cavity 1794. Pressure sensors may be used to monitor the pressure below the spindle assembly 1740 and in the cavity 1794 and cylinder 1784 to help determine how pressure may be applied to fully extend or retract the landing shoulder 1778. A position indicator (not shown) may be added to signal the drilling operator that the piston is in the extended or retracted position.
A connector 1810 on the head 1712 and the mounting flange 1812 at the lower end of the body 1716 allow the diverter 1710 to be interconnected in the wellhead stack 37. In one embodiment, the mounting flange 1812 may be attached to the upper end of the flow tube 104 (shown in FIG. 2B) and the connector 1810 may provide an interface between the mud lift module 40 (shown in FIG. 2B) and the pressure-balanced mud tank 42 or the riser 52 (shown in FIG. 1). When the mounting flange 1812 is attached to the upper end of the flow tube 104, the space 1818 below the packer 1774 is in fluid communication with the well annulus 66 (shown in FIG. 1).
The diameters of the vertical bores 1714 and 1718 are such that any tool that can pass through the marine riser 52 (shown in FIG. 1) can also pass through them. The retractable landing shoulder 1778 may be retracted to allow passage of large tools and may be extended to allow proper positioning of the spindle assembly 1740 within the bores 1714 and 1718. The spindle assembly 1740 can be appropriately sized to pass through the marine riser 52 and can be run into and retrieved from the vertical bores 1714 and 1718 on a drill string, e.g., drill string 1770. As shown, a handling tool 1771 on the drill string 1770 is adapted to engage the lower packer element 1774 of the spindle 1760 such that the spindle assembly 1740 can be run into the vertical bores 1714 and 1718. When the spindle assembly 1740 lands on the landing shoulder 1774, the inner elastomeric element 1748 is energized to engage the spindle assembly 1740. Once the spindle assembly 1740 is engaged, the handling tool 1771 can be disengaged from the spindle assembly 1740 by further lowering the drill string 1770. The handling tool 1771 will again engage the spindle assembly 1740 when it is pulled to the lower packer element 1774, thus allowing the spindle assembly 1740 to be retrieved to the surface.
Pressure-Balanced Mud Tank FIG. 2C shows the pressure-balanced mud tank 42, which was previously illustrated in FIG. 1, in greater detail. As shown, the pressure-balanced mud tank 42 includes a generally cylindrical body 230 with a bore 231 running through it. The bore 231 is arranged to receive a drill string, e.g., drill string 60, a bottom hole assembly, and other drilling tools. An annular chamber 235 which houses an annular piston 236 is defined inside the body 230. The annular piston engages and seals against the inner walls 238 and 240 of the body 230 to define a seawater chamber 242 and a mud chamber 244 in the mud tank 42. The seawater chamber 242 is connected to open seawater through the port 246. This allows ambient seawater pressure to be maintained in the seawater chamber 242 at all times. Alternatively, a pump (not shown) may be provided at the port 246 to allow the pressure in the seawater chamber 242 to be maintained at, above, or below that of ambient seawater pressure. The mud chamber 244 is connected through a
The piston 236 reciprocates axially inside the annular chamber 235 when a pressure differential exists between the seawater chamber 242 and the mud chamber 244. A flow meter (not shown) aπanged at the port 246 measures the rate at which seawater enters or leaves the seawater chamber 242 as the piston 236 reciprocates inside the chamber 235. Flow readings from the flow meter provide the necessary information to determine mud level changes in the mud tank 42. A position locator (not shown) may also be provided to track the position of the piston 236 inside the annular chamber 235. The position of the piston 236 may then be used to calculate the mud volume in the mud tank 42.
A wiper 232 is mounted on the body 230. The wiper 232 includes a wiper receptacle 233 which houses a wiper element 234 (shown in FIG. 5). As shown in FIG. 5, the wiper element 234 includes a cartridge 256 which is made of a stack of multiple elastomer disks 258. The elastomer disks 258 are arranged to receive and provide a low- pressure pack-off around a drill string, e.g., drill string 60. The elastomer disks 258 also wipe mud off the drill string as the drill string is pulled through the wiper element 234. The arrangement of the elastomer disks 258 gives a step-type seal which allows each disk to contain only a fraction of the overall pressure differential across the wiper element 234. The wiper element 234 will be carried into and out of the wiper receptacle 233 on a handling tool (not shown) that is mounted on the drill string 60.
Referring back to FIG. 2C, a riser connector 260 is mounted on the wiper receptacle 233. The riser connector 260 mates with a riser connector 262 at the lower end of the marine riser 52. A riser connector 115 is also provided at the lower end of the body 230. The riser connector 115 is arranged to mate with the riser connector 112 (shown in FIG. 2B) in the mud lift module 40. Flow ports in the riser connector 115 are connected to the mud return lines 56 and 58 through the pipes 122 and 124 and flow ports in the riser connectors 260 and 262. When the riser connector 115 mates with the riser connector 112, the pipes 122 and 124 are in communication with the pipes 118 and 120.
Referring now to FIGS. 2A-2C, when the mud lift module 40, the pressure- balanced mud tank 42, and the riser 52 are mounted on the well control assembly 38, the flexible joint 94 permits angular movement of these assemblies as the drilling vessel 12 (shown in FIG. 1) moves laterally. The angular movement or pivoting of the mud lift module 40 can be prevented by removing the flexible joint 94 from the LMRP 44 and locating it between the mud lift module 40 and the pressure-balanced mud tank 42 or between the pressure-balanced mud tank 42 and the riser 52. When the flexible joint 94 is removed from the LMRP 44, the mud lift module 40 may then be mounted on the LMRP 44 by connecting the flow tube 104 to the upper end of the annular preventer 92. The height of the wellhead stack 37 (illustrated in FIG. 1) may be reduced by replacing the pressure-balanced mud tank 42 with smaller pressure-balanced mud tanks which may be incorporated with the mud lift module 40. In this embodiment, the connector 262 at the lower end of the riser 52 would then mate with the connector 112 on the rotating subsea diverter 108. Instead of directly connecting the connector 262 to the connector 112, a flexible joint, similar to the flexible joint 94, may be mounted between the connectors 112 and 262. As shown in FIG. 6, a smaller pressure-balanced mud tank 234 includes a seawater chamber 265 which is separated from a mud chamber 266 by a floating, inflatable elastomer sphere 267. Of course, any other separating medium, such as a floating piston, may be used to isolate the seawater chamber 265 from the mud chamber 266.
Seawater may enter or leave the seawater chamber 265 through a port 268. One or more pumps (not shown) may be connected to port 268 to maintain the pressure in the chamber 265 at, above, or below that of ambient seawater pressure. A flow meter (not shown) may be connected to port 268 to measure the rate at which seawater enters or leaves the seawater chamber 265. Mud may enter or be discharged from the mud chamber 266 through a port 269. The port 269 could be connected to the piping that links the well annulus to the suction ends of the subsea pumps 102 (shown in FIG. 2B) or to the flow outlet 125 in the flow tube 104 (shown in FIG. 2B). A position locator (not
The height of the wellhead stack 37 (illustrated in FIG. 1) may also be reduced by eliminating the pressure-balanced mud tank 42 and employing the riser 52 to perform the function of the pressure-balanced mud tank. As shown in FIG. 7, when the pressure- balanced mud tank 42 is eliminated, a subsea diverter, e.g., the rotating subsea diverter 1710 which was previously illustrated in FIG. 4C, may provide the interface between the mud lift module 40 and the riser 52. In this embodiment, the connector 1810 at the upper end of the rotating subsea diverter 1710 mates with the connector 262, and the mounting flange 1812 mates with the upper end of the flow tube 104. The outlet 1816 in the connector 1810 is connected to a port 1820 in the flow tube 104 by piping 1822 so that mud from the well annulus 66 may flow into the riser 52. Because the mud in the well annulus 66 is heavier than the seawater in the riser 52, the mud 1821 from the well annulus 66 will remain at the bottom of the riser 52 with the seawater 1823 floating on top. This allows the bottom of the riser 52 to function as a chamber for holding mud from the well annulus 66. Mud may be discharged from the riser 52 to the well annulus 66 as necessary. A bypass valve 1824 in the piping 1822 may be operated to control fluid communication between the well annulus 66 and the riser 52.
In another embodiment, as shown in FIG. 7B, a floating barrier 1825 which has a bore for receiving a drill string, e.g., drill string 60, may be disposed in the riser 52 to separate the seawater in the riser from the drilling mud. The floating barrier 1825 may have a specific gravity greater than the specific gravity of seawater but less than the specific gravity of the drilling mud so that it floats on the drilling mud and, thereby, separates the drilling mud 1821 from the seawater 1823. In this way, the mixing action created by rotation of the drill string in the riser can be minimized. Means, e.g., spring- loaded ribs, can be provided between the floating barrier 1825 and the riser 52 to reduce the rotation of the floating barrier within the riser. When the floating barrier 1825 is disposed in the riser 52 as shown, the diverter 1710 (shown in FIG. 7 A) may be eliminated from the mud lift module. However, it may also be desirable to use the
Referring now to FIGS. 1-5, preparation for drilling begins with positioning the drilling vessel 12 at a drill site and may include installing beacons or other reference devices on the seafloor 17. It may be necessary to provide remotely operated vehicles, underwater cameras or other devices to guide drilling equipment to the seafloor 17. The use of guidelines to guide the drilling equipment to the seafloor may not be practical if the water is too deep. After positioning of the drilling vessel 12 is completed, drilling operations usually begin with lowering the guide structure 36, conductor housing 33, and conductor pipe 32 on a running tool attached above a bottom hole assembly. The bottom hole assembly, which includes a drill bit and other selected components to drill a planned trajectory, is attached to a drill string that is supported by the drilling rig 20. The bottom hole assembly is lowered to the seafloor and the conductor pipe 32 is jetted into place in the seafloor. After jetting the conductor pipe 32 in place, the bottom hole assembly is unlocked to drill a hole for the surface pipe 36. Drilling of the hole starts by rotating the drill bit using a rotary table or a top drive. A mud motor located above the drill bit may alternatively be used to rotate the drill bit. While the drill bit is rotated, fluid is pumped down the bore of the drill string. The fluid in the drill string jets out of the nozzles of the drill bit, flushing drill cuttings away from the drill bit. In this initial drilling stage, the fluid pumped down the bore of the drill string may be seawater. After the hole for the surface pipe 36 is drilled, the drill string and the bottom hole assembly are retrieved. Then, the surface pipe 36 is run into the hole and cemented in place. The surface pipe 36 has the subsea wellhead 35 secured to its upper end. The subsea wellhead 35 is locked in place inside the conductor housing 33.
The mud lift drilling operations begin by lowering the wellhead stack 37 to the seafloor through the moon pool 22. This is accomplished by latching the lower end of the marine riser 52 to the upper end of the mud tank 42 at the top of the wellhead stack 37. Then, the marine riser 52 is run towards the seafloor 17 until the subsea BOP stack
46 at the bottom of the wellhead stack 37 lands on and latches to the wellhead 35. The seawater chamber 242 of the mud tank 42 fills with seawater as the wellhead stack 37 is lowered. The mud return lines 56 and 58 are connected to the flow ports in the moon pool 22 after the wellhead stack 37 is secured in place on the wellhead 35. The drill string 60 with the spindle 178 is lowered through the riser 52 into the housing body 162 of the stripper 108. When the spindle 178 lands on the retractable landing shoulder 174 inside the housing body 162, the drill string is rotated to allow the locks in the housing body to latch into the recesses in the spindle 178. Then the drill string is lowered to the bottom of the well through the diverter 106, the flow tube 104, and the well control assembly 38. When the drill bit 64 touches the bottom of the well 30, the surface pump is started and mud is pumped down the bore of the drill string 60 from the drilling vessel 12. The drill string 60 is rotated from the surface by a rotary table or top drive. A mud motor located above the drill bit may alternatively be used to rotate the drill bit. As the drill string 60 or the drill bit 64 is rotated, the drill bit 64 cuts the formation.
The mud pumped into the bore of the drill string 60 is forced through the nozzles of the drill bit 64 into the bottom of the well. The mud jetting from the bit 64 rises back up through the well annulus 66 to the stripper 108, where it gets diverted to the suction ends of the subsea pumps 102 and to the port 248 of the mud chamber 244 of the mud tank 42. The pumps 102 discharge the mud to the mud return lines 56 and 58. The mud return lines 56 and 58 carry the mud to the mud return system on the drilling vessel 12. The pressure-balanced mud tank 42 is open to receive mud from the well annulus 66 when the pressure of mud at the inlet of the mud chamber 244 is higher than the seawater pressure inside the seawater chamber 242. The riser annulus is filled with seawater so that the pressure of the fluid column in the riser matches that of seawater at any given depth. Of course, any other lightweight fluid may also be used to fill the riser annulus.
Subsea Mud Pump FIG. 8 shows the components of the subsea mud pump 102 which was previously illustrated in FIG. 2B. As shown, the subsea mud pump 102 includes a multi-element pump 350, a hydraulic drive 352, and an electric motor 354. The electric motor 354 supplies power to the hydraulic drive 352 which delivers pressurized hydraulic fluid to the multi-element pump 350. The multi-element pump 350 includes diaphragm pumping elements 355. However, other types of pumping elements, as will be subsequently described, may be used in place of the diaphragm pumping elements 355.
FIG. 9A shows a vertical cross section of the diaphragm pumping element 355 which was previously illustrated in FIG. 8. As shown, the diaphragm pumping element 355 includes a spherical pressure vessel 356 with end caps 358 and 360. An elastomeric diaphragm 362 is mounted in the lower portion of the pressure vessel 356. The elastomeric diaphragm 362 isolates a hydraulic power chamber 370 from a mud chamber 372 and displaces fluid inside the vessel 356 in response to pressure differential between the hydraulic power chamber 370 and the mud chamber 372. The elastomeric diaphragm 362 also protects the vessel 356 from the abrasive and corrosive mud that maybe received in the mud chamber 372. The end cap 358 includes a port 374 through which hydraulic fluid may be fed into or discharged from the hydraulic power chamber 370. The end cap 360 includes a port 376 through which fluid may be fed into or discharged from the mud chamber 372. The end cap 360 is preferably constructed from a corrosion-resistant material to protect the port 376 from the abrasive mud entering and leaving mud chamber 372. The end cap 360 is connected to a valve manifold 378 which includes suction and discharge valves for controlling mud flow into and out of the mud chamber 372. The valve manifold 378 has an inlet port 380 and an outlet port 382. The ports 380 and 382 may be selectively connected to the port 376 in the end cap 360. As shown in FIG. 8, the inlet ports 380 are linked to a conduit 384 which may be connected to the flow outlet 125 in the flow tube
Piston pumping element FIG. 9B shows a piston pumping element 390 that may be used in place of the diaphragm pumping element 355 which was previously illustrated in FIG. 8. As shown, the piston pumping element 390 includes a cylindrical pressure vessel 392 with an upper end 394 and a lower end 396. A piston 398 is disposed inside the vessel 392. Seals 400 seal between the piston 398 and the pressure vessel 392. The piston 398 defines a hydraulic power chamber 402 and a mud chamber 404 inside the pressure vessel 392 and moves axially within the vessel 392 in response to pressure differential between the chambers 402 and 404. The piston 398 and pressure vessel 392 are preferably constructed from a corrosion resistant material. Hydraulic fluid may be fed into or discharged from the hydraulic power chamber 402 through a port 406 at the end 394 of the vessel 392. Mud may be fed into or discharged from the mud chamber 404 through a port 408 at the end 396 of the vessel 392. A valve manifold 410 is connected to the end 396 of the vessel 392. The valve manifold 410 includes suction and discharge valves for controlling mud flow into and out of the mud chamber 404. The valve manifold 410 has an inlet port 412 and an outlet port 414 which are in selective communication with the port 408.
Diaphragm Pumping Element with Diaphragm Position Locator FIG. 9C shows the diaphragm pumping element 355, which was previously illustrated in FIG. 9 A, with a diaphragm position locator, e.g., a magnetostrictive linear displacement transducer (LDT) 2011. The magnetostrictive LDT 2011 includes a magnetostrictive waveguide tube 2012 which is located within a housing 2013 on the upper end of the diaphragm pumping element 355. A ring-like magnet assembly 2014 is located about and spaced from the magnetostrictive waveguide tube 2012. The magnet assembly 2014 is mounted on one end of a magnet carrier 2015. The other end of the
The hydraulic power chamber 370 is in communication with the interior of the housing 2013. A port 2017 in the housing allows hydraulic fluid to be supplied to and withdrawn from the hydraulic power chamber 370. In operation, as hydraulic fluid is alternately supplied to and withdrawn from the hydraulic power chamber 370, the center of the elastomeric diaphragm 360 moves vertically within the pressure vessel 356. As the center of the elastomeric diaphragm 360 moves, the magnetic assembly 2014 also moves the same distance along the magnetostrictive waveguide tube 2012. The magnetostrictive waveguide tube 2012 has an area within the magnetic assembly 2014 that is magnetized as the magnet assembly is translated along the magnetostrictive waveguide tube. The conducting wire in the magnetostrictive waveguide tube 2012 periodically receives an interrogation current pulse from the transducer 2016. This interrogation current pulse produces a toroidal magnetic field around the conducting wire and in the magnetostrictive waveguide tube 2012. When the toroidal magnetic field encounters the magnetized area of the magnetostrictive waveguide tube 2012, a helical sonic return signal is produced in the waveguide tube 2012. The transducer 2016 senses the helical return signal and produces an electrical signal to a meter (not shown) or other indicator as an indication of the position of the magnet assembly 2014 and, thus, the position of the elastomeric diaphragm 362.
of the elastomeric diaphragm 362 within the pressure vessel 356 to be measured. This absolute position measurements can be reliably related to the volumes within the hydraulic power chamber 370 and the mud chamber 372. This volume information can be used to efficiently control the pump hydraulic drive (not shown) and the activated pump suction and discharge valves (not shown). It will be understood that other means besides the magnetostrictive LDT may be employed to measure the absolute position of the elastomeric diaphragm 362 within the spherical vessel 356, including linear variable differential transformer and ultrasonic measurement. It will be further understood that the diaphragm pumping element 355 can be employed in different applications as a pulsation dampener provided that the hydraulic power chamber 370 is filled with a compressible fluid, such as nitrogen gas, rather than hydraulic fluid. In a pulsation dampener application, means to measure the absolute position of the elastomeric diaphragm 362 within the spherical pressure vessel 356 can provide important information about pulsation and surges in hydraulic systems. The magnetostrictive LDT 2011 may also be used with the piston pumping element 390 (shown in FIG. 9B) to track the position of the piston 398 as the piston moves within the pressure vessel 392
Hydraulic drive circuits for the subsea mud pump FIG. 10A shows an open-circuit diagram for the hydraulic drive 352 (shown in FIG. 8). As sh


 8613371530291