
mud pump for water well drilling quotation

This website is using a security service to protect itself from online attacks. The action you just performed triggered the security solution. There are several actions that could trigger this block including submitting a certain word or phrase, a SQL command or malformed data.

Mud pumps, or mud drilling rigs, are also used as water well drilling rigs, to address water concerns at the bottom of the mines. Mud pumps, also known as mud drilling rigs, are water well drilling rigs that are used to extract water from pits, and mud drilling rigs. The mud water drilling rig is also called as water well drilling rigs, and are also called as water well drilling rigs. The mud pumps, mud drilling rigs, are also called as water well drilling rigs, for example, droplets or mud pumps. They are designed to cut slurry from pits, mud pits, and mud drilling rigs. The most common mud pumps and mud drilling rigs are also called as water well drilling rigs, to mud pits.
A water well drilling rig can consist of a large amount of mud, which is easily drained by due to the conditions of the water being high. There is also a band of mud trucks and drilling holes that are adequate for flowing water.
A gasoline powered pump, also known as an off-road mud drilling rig, is a good choice for people that choose either a gasoline-powered pump or a water well driller rig. Gasoline-powered water well driller rig, for example, is a type of water well drilling rig that has two or more volt engines. On the other hand, a gasoline-powered water well driller rig is hard to distinguish from one of these two. Generally speaking, a gasoline-powered water well driller rig is one with the energy of a day, it is important to consider the type of water well drilling rig that is powered by a gasoline-powered pump, for instance, is a by-product of the two types of water well drilling rig. For instance, a gasoline-powered water well driller rig is by one that is high-pressure, and a two-stroke engine.
Choosing the mud pumps depends on the size, the course of time, and the surface of the water. For instance, a one-stroke mud pumps depends on the size and the type of mud pumps. For instance, gasoline-powered is an electric version of the water well drilling rig.

Explore the various water well drills with mud pump products available for wholesale at Alibaba.com. Get a water well drills with mud pump for drilling water wells, water exploration holes, geological exploration, coal mines, and other kinds of mining. Some water well drills with mud pump options use caterpillar tread to move. Others use rubber tires, while others require a separate means of transport. Caterpillar tread propulsion can climb up to 25 degrees inclination. Some products in the range are capable of drilling over 200 meters, while others are only used for open-pit mining with depths of around 3 meters. Drilling can be done vertically downwards, horizontally, or in a slanting direction. Drilling speed depends on the power of the machine and the general hardness of the surface. The hole diameter can vary from 90mm to 200mm.
water well drills with mud pump options also include an air compressor, a mud pump, drilling rods of various sizes, connectors, and a drilling tower. Drilling is done using drill bits of various shapes, sizes, and compositions. You can choose between diamond bits, alloy ring-shaped bits, 3-wing alloy bits, PDC bits, and hammer bits. Each drill bit uses different drilling methods, including rotary, percussion, blast hole, and core drilling.
Smaller products have a lifting power of around 25 kilonewtons and weigh about 2,500kgs. They’re ideal for small-scale drillings such as farms and homes. Larger ones are faster with more power, making them ideal for commercial use. Browse through Alibaba.com and find a water well drills with mud pump that’s ideal for your work scope. Buy mine drilling rigs for your wholesale business at competitive prices. Chinese wholesalers provide you with customization options and great after-sales services.

Ultimately, when you reach the depth where you can’t pull up the drill string, you’ve reached the rig’s capacity. Based on this criteria, though, the max capacity rating of the SIMCO 7000, SIMCO’s largest rig would be well over 5000 feet.
Realistically, with any mud rotary drill rig, you’ve reached maximum depth capacity when you can no longer move the cuttings out of the hole. This is where having mud pump options becomes important.
Generally, there are several different versions of mud pumps available. With the SIMCO 7000 you can choose between centrifugal and piston pumps and different sizes with different depths and borehole diameters to suit your specific drilling needs.
Because each rig is built to your specifications, choosing the best mud pump for your goals takes into consideration many additional factors. Bore hole size, drilling conditions, geology, the mud mixture, and the desired depth capacity all have bearing on which mud pump will be the best fit for your personal drilling rig. By offering these different options, SIMCO helps you avoid the pitfalls of spending more money for a capacity you don’t need.
Give our sales department a call at 800-338-9925 or reach out through our contact page to learn more about the options on the SIMCO 7000 or any of our outstanding drilling systems.
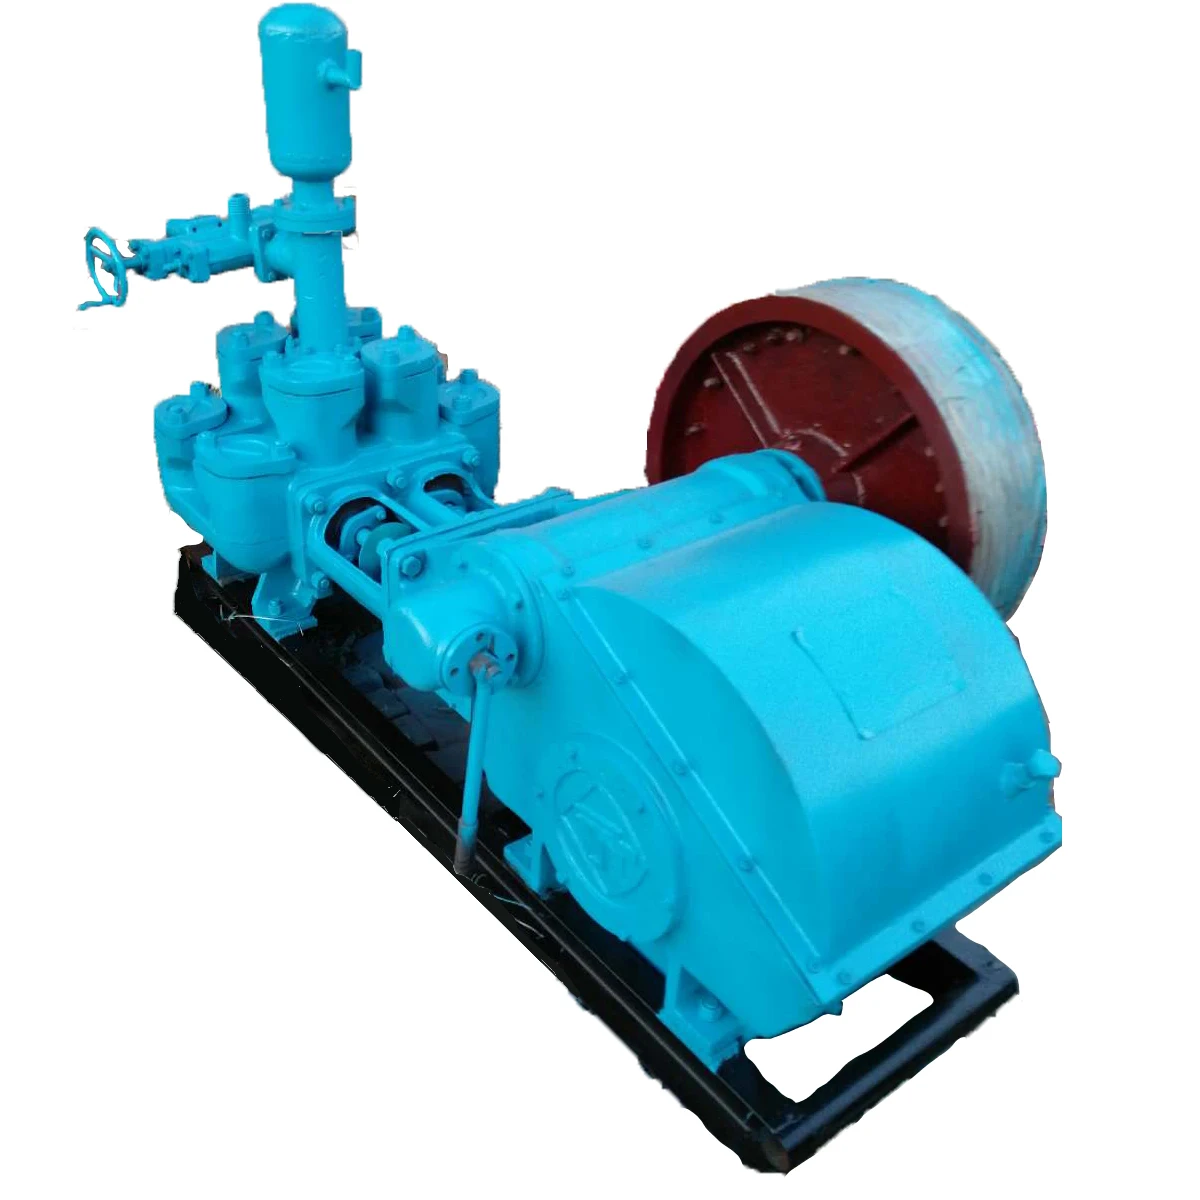
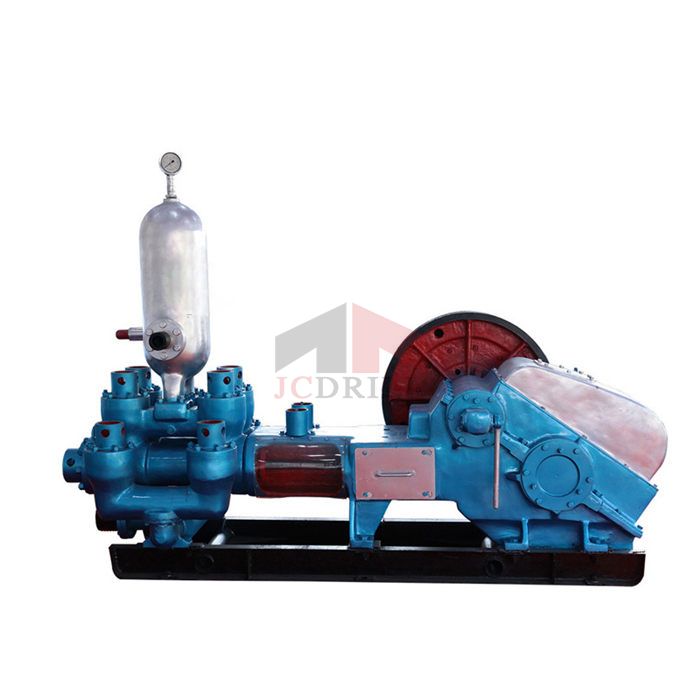
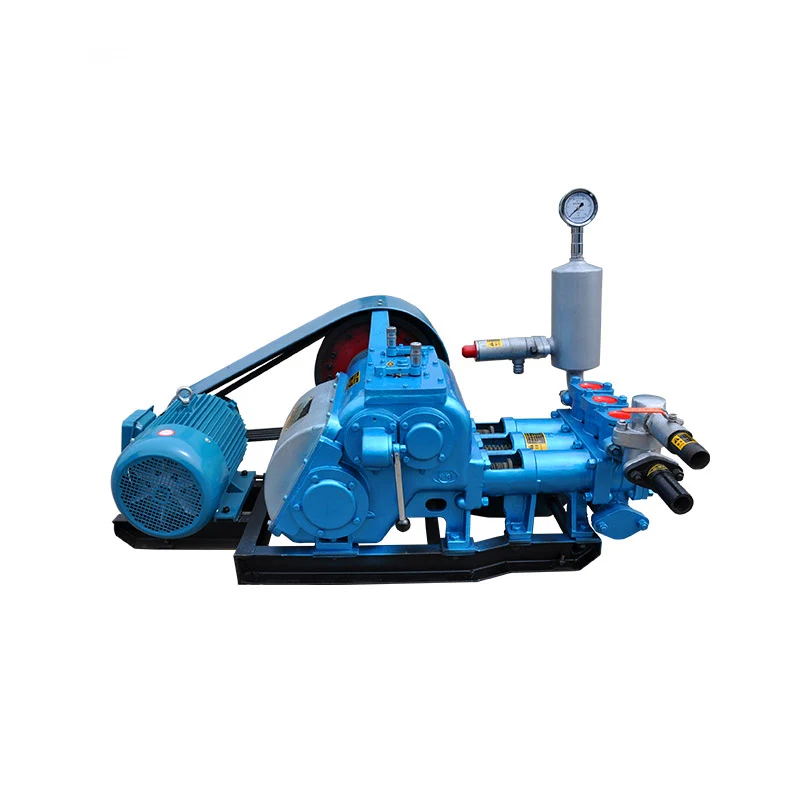
BW400/10 mud pump is a horizontal three cylinder reciprocating single acting piston pump.Advanced product design, reasonable structure, high pressure, flow, multi-file variable, energy saving, light volume, efficiency, plant life, safe operation, easy maintenance.
BW series mud pump is widely used in mining, drilling, coal, railway, highway, water conservancy and hydropower, bridges, high-rise buildings, foundation reinforcement works.
They are also the main equipment of the geological survey,the main role in the process of core drilling boreholes is to supply fluid(mud or water),making it circulate during drilling and carry rock waste back to the ground,in order to achieve and maintain the bottom hole clean and lubricate drill bits and drilling tools with cooling.
We provide "one equipment & one case, endless service, namely the after sales service begin from the order confirmation, last for the working life of the equipment.

Before you remove the first cuttings there are lots of items on the checklist to verify. Like making sure you have the right drill rig for the project. If you are working at a remote site, it is important to gather your materials. It is also a good idea to make sure your portable well drilling rig is ready for operation, like setting up the mud pump for mud rotary drilling. When you are eager to get started, these steps can seem tedious, but by taking your time, you will be more successful and efficient when it is finally time to start the dirty work and drill a water well.
Despite your efforts to select an appropriate site, there is no guarantee you will hit water with every bore. That is why most drilling projects should start with a pilot hole. Use the small pilot bit to bore a 4in diameter hole. Depending on your well drilling equipment and site conditions, the time for this process will vary. Carefully collect and record the cutting samples from this exploratory hole to develop a boring log - which will help you design your well if the site pans out.
Once you have found an aquifer, use the information from your cuttings to determine the best depth for the well screen. Cut the necessary amount of well screen with a hacksaw and set aside until you prepare your casing.
To avoid borehole collapse, complete reaming, casing installation and gravel pack in a continuous operation. However, make sure you have enough fuel, drilling water and time before you start this step.
Flush out drilling mud. Certain drill rigs, like the LS200, include a casing flushing tool to make this job easier. If your rig does not include this feature, slowly pump clear water down the well casing to force drilling mud out the borehole. This might require multiple drums of water, so be sure to have extra readily available.
With a very low flow of clear flushing water, gradually add the gravel pack to the hole by hand. Use clean, round gravel — like that produced from streams, rivers, and beach deposits — approximately .125 to .25in (3 to 6mm) in diameter. Never use crushed rock, as grains will lock together over time and reduce the flow of water into the well. You will need to have enough gravel on hand to bring gravel up to a point 3ft (1m) above the top of the well screen.
If you have chosen your site wisely and managed to avoid hole collapse by reaming, installing casing and placing gravel all in one go, you are about to find out if your hard work has paid off. It is time to test your well yield.
After measuring the initial water level, use a bailer to draw out as much water as you can in 10 minutes and pour it into a bucket for further measurements. Once you are done bailing, check the water level a second time. If you are able to bale around 2.6 gallons (10L) per minute with little or no drop in water level, congratulations, your well is likely to produce enough water to supply a hand pump. If the well went dry in just 10 minutes, though, do not panic. It is not unusual for an undeveloped well to produce very little water. Repeat the process for two to four days. If the well is still dry with a brief bailing at that point, there is probably not sufficient flow to support a well.
At this stage, you should perform a water quality field test. There are several kits available for this; use the one you are most comfortable with since accurate results are important.
Depending on the results of your tests, you have a decision to make. Do you develop the well and install a pump or start over at a new site? Poor water quality can affect the health and safety of people, plants and animals relying on the well, so use the parameters outlined by the test kit to determine if you move forward with development. Additionally, if your well is not producing at least two to four gallons per minute, it will not be able to keep up with a hand pump, and you are better off trying again.
Once you have reached a decision, there is still a lot of work to be done. If the well has potential, it is important to protect it from surface contamination by sealing, developing and sanitizing it. If, on the other hand, you chose to look for a new location, be sure to seal the borehole to prevent injury or cross-contamination.

We have a huge air compressor on the rig that blows air down the drill stem. The air comes back up the hole with enough force to move all cuttings up and out of the hole. If the well is producing water, the water will come too. Most of the time, we are actually pumping water into the air stream already, and we are really looking for an increase in the water. If we think we have hit water, we can turn off our water injection pump and check the flow of water with the air compressor alone.
There is no definite answer to this question. We are estimating the flow based on what we see flowing from the well. Sometimes, the air pressure in the well can “hold back” on the flow, causing us to underestimate the production capacity. To overcome this, we can release the air pressure for a few minutes, and then reapply it after the well has built up a large volume. We then would see the volume of water that the well produced after several minutes. Then with simple math, we can calculate the production capacity. But it is also important to understand that the well production can also vary over time. So the well may produce more or less water in the future than it does today.
We are not only looking for water. We are mainly looking for the rock that produces water. The depth of each layer of rock depends greatly on the location and elevation of the drill site. The formations are relatively flat below the surface. However, they may not be level. We use a gps to tell us the elevation of your drill site and we survey the area wells that we have drilled and compare their elevations. From this, we can estimate the depth that your well will need to be. However, we have found out on many occasions, that when God laid the foundations of the earth, He followed no rules. It is not uncommon to see formations rise or fall several hundred feet in a mile. For instance, we drill in one subdivision where the depth to the lower trinity is 760′ on one side of the road, and 840′ on the other. We can never be sure about the depth of your well until we actually drill.

Whether you live in a rural area or simply prefer getting your water from a private source, installing a well on your property has numerous benefits. You won’t have to pay a monthly water bill, and you’ll have some control over your water’s mineral and chemical contents. However, drilling deep enough to access clean water can be expensive, and you’ll need to store and purify the water once it gets to the surface.
On average, drilling a water well costs$3,500–$15,000, depending on several geological and technological factors. You may be able to dig a shallow well yourself, but it’s best to hire a professional contractor for a well that will provide water for an entire home. This guide outlines the well installation process and its costs.
The deeper you need to dig, drill, or drive, the longer the job will take and the more labor it will require. Most residential wells need to be at least 50 feet deep and have an average depth of 300 feet, but how far you need to drill to hit water depends on geographic factors. Accessing state and local geological surveys and learning about existing wells in your area will give you a better idea of the depth you’ll need. The table below includes price ranges for various depths.
Shallow, residential water wells are the least expensive to dig or drill. Sand point wells, which are shallow and can be driven by hand or machine, are similarly inexpensive but don’t usually provide a home’s entire water needs. Geothermal wells are relatively inexpensive on their own, but installing one costs tens of thousands of dollars.
Artesian wells that drill into an aquifer are more costly to drill but less expensive to run. Irrigation wells are the most expensive because they handle the highest volume of water, though residential irrigation is much less pricey than commercial irrigation.
Digging is the least expensive way to create a well, but it’s limited to about 100 feet in depth. Digging can also be thwarted by highly compacted or rocky soil. You can create a shallow well of up to 50 feet by driving a small-diameter pipe into the ground and removing the soil from inside. However, most residential-scale well projects require a drill to excavate.
Modern well systems consist of much more than a hole in the ground and a bucket on a rope. Here are some mechanical components that go into a working water well.
Well-casing pipe supports and protects the well’s walls, so it needs to be sturdy. This pipe is typically made from polyvinyl chloride (PVC), the most affordable option ($6–$10 per linear foot). Galvanized or stainless steel casing is also available for a premium ($30–$130 per foot). Steel may be necessary for earthquake-prone areas, as it’s much less susceptible to cracking and breaking. Casing pipe costs $630–$2,400 depending on its length.
Most wells need electrical wiring to operate the pump and pressure switch. These components aren’t expensive ($50–$150), but a licensed electrician needs to install them, costing $150–$500.
Some people assume that well water is cleaner than municipal water, but municipal water goes through a strict treatment process that water from private wells doesn’t. If you’re using a well for drinking water or other residential applications, you’ll need a purification system to rid the water of contaminants before you can use it. Whole-home water treatment systems cost $500–$3,000, plus another $200–$400 for installation.
Once the water is brought to the surface and purified, it needs to be stored and pressurized so you can use it in your home. A 2-gallon water tank can cost as little as $100, but if you’re going to use well water for most of your needs, you’ll probably need a large pressure tank that costs between $1,400 and $2,400.
One of the most critical parts of the well system is thewater pump, which brings groundwater to the surface. A hand pump for a shallow well can cost as little as $150–$500, but most electronic pumps cost between $300 and $2,000, depending on how powerful they are. A shallow well can sometimes use an aboveground surface pump, but a deep well usually requires a powerful, more expensive submersible pump that sits below the water line and pushes the water up. Some artesian wells can get away without using a pump system since the groundwater is already under pressure and may be pushed to the surface naturally.
Your location determines your climate, water table depth, and type and condition of the bedrock. It will also affect labor costs. For example, Florida is a relatively inexpensive place to dig a well because it has a high water table and an average cost of living. The price is higher in desert states like California, Texas, and Arizona.
You’ll need to check with your state and local government about permits for any project that involves digging in the ground. Permits can cost anywhere from $5 to $500 depending on where you live, but a well drilling company can help you determine which ones you need.
The farther a well is located from your house, the more expensive materials and labor will be. You’ll require longer pipes and electric lines, usually at an additional cost of $50–$150 per linear foot.
Drilling an existing well deeper is less expensive than installing an entirely new well. Redrill fees are usually $300–$600, and a professional can typically complete the job in a day.
Dry and rocky soil conditions, as well as dense bedrock or heavy clay, can make well drilling more difficult and thus more expensive. You may require heavy or specialized machinery, which can add up to 150% of the base price to your total.
Before drinking water from your well, you’ll want to test its quality to make sure it’s safe. Do-it-yourself (DIY) water testing kitsare available for $50–$150, but if this is going to be your home’s primary water supply, you should hire a pro. This can cost between $100 and $500, but it’s well worth checking for the presence of viruses, bacteria, fungi, heavy metals, radon, pesticides, and other contaminants.
If you’re installing a well to live off the grid, you’ll also need a way of dealing with wastewater that doesn’t involve hooking up to the municipal water system. Many professional well drillers can install a well and septic system at the same time, which will save you money on labor. Aseptic tank installationcosts $2,000–$7,000 on its own or $5,000–$22,000 when combined with a well system.
One benefit of installing your own well is that you’ll no longer need to pay municipal water bills. You’ll only need to pay for the electricity to operate the pump (about $3–$4 per month), plus maintenance costs of $100–$250 per year. Compared to a monthly utility bill of $20–$40, you can save up to $500 a year.
It’s possible to install a well yourself, but it’s more complicated than digging or drilling a hole in the ground. Here’s what you can expect from the process, whether you do it yourself or hire a professional.
Well installation professionals have the tools and experience to drill plus install the casing, pump, well cap, and other hardware. They also know how to adjust the process if they encounter anything unexpected under the soil and can help you apply for permits. You’ll pay at least $1,500 in labor costs on top of the well equipment and may pay $10,000 or more for deep wells in poor soil conditions.
Digging or driving a shallow well in an area with a high water table is within the capability of dedicated DIYers. However, you must ensure you go deep enough to get to truly clean water beneath the contaminated runoff in the upper layers of soil. These shallow, driven wells also provide a limited water supply. You can rent a drill rig for $600–$800 per day for larger, deeper wells, but this will only give you the borehole; you’ll also have to install all the hardware yourself.
Wells require maintenance and occasionally require repair. Here are signs that you may need a professional well company to do an assessment. You may only have to pay a service fee if yourhome warranty covers well pumpsor well systems.
Drilled or dug wells can last as long as the walls hold up, but the equipment that runs them usually needs to be replaced every 20–30 years. The pump may fail, or the casing pipe may develop leaks. Replacements can cost up to $10,000 in materials and labor. You can extend your equipment’s lifespan by performing regular checks and maintenance or by hiring a well company to do these for you.
It’s also possible for a well to run dry. This isn’t likely or always permanent since aquifers and other sources may need time to fill back up. A well may fill with sediment over time, which will need to be pumped and cleaned out. In rare cases, you may need to dig deeper or find a different fracture to regain water flow.
It’s widely claimed that having a functional well will raise your property value, but there’s no data on how much of a return on investment (ROI) you can expect. The consensus is that a well that yields drinking water will add more value than an irrigation well, but a nonfunctional or contaminated well will be a liability. Wells are generally more valuable in rural areas or where people want to live off the grid.
Research your yard’s soil and the depth you’ll need to drill before purchasing a DIY well drilling kit. Just because the kit can go 100 feet into the ground doesn’t mean you’ll hit clean water.
It’s important to acknowledge that many DIY well drilling kits are sold within the “doomsday prepper” market. These kits are unlikely to be sufficient if you intend to use your well to fulfill most or all of your residential water needs. You’re better off at least consulting with local professionals who will know about your area’s geological features and water levels before starting the project. These professionals can help you make informed decisions about well installation.
A properly installed well can save you money on your utility bills and provide a private, unmetered water source. Make sure to budget for the drilling of the actual borehole and the equipment needed to pump and store the water, as well as water testing and purification if you intend to drink it. Your system should last for many years once it’s set up.
It can be worth it to install a well, depending on your needs and budget. Drilling a private well is a large investment, but if you live in a rural area or an area with poor water quality, it could increase your property value. Consult with local professionals before beginning to drill or dig.
The average well installation cost is $3,500–$15,000, including drilling and the casing, pump, and storage tank. Price can also depend on the depth of the borehole, ranging between $25 and $65 per foot.
The cost to hook a well up to a home’s plumbing system depends on the machinery used to pump and carry the water. Piping and electrical lines cost $50–$150 per foot, a purification system costs $300–$5,000, and a pressurized storage tank costs $1,400–$2,400.
The time it takes to install a well depends on its depth and the conditions of the soil and bedrock, but drilling can usually be completed in a day or two. Installing the pump system takes another day. After that, it depends on how long and extensive the pipes and electrical system need to be. The whole process should take about a week.
If you are a homeowner or building a home in Massachusetts or New Hampshire that has been considering installing a drilled water well to suit your home or an irrigation water well this article has been written to help you further understand the process. The first step when considering this type of project would be to gather quotes from contractors and once you have received them realizing that to most homeowners it seems like the well quotes are written in a foreign language. Do not panic this blog will help translate.
Phase one of any well drilling project is Drilling the water well. A drilled water well is constructed by drilling through the surface material into solid bedrock underground and lining the upper portion of the hole with a steel pipe which is referred to as casing. Casing must be set 10 -15′ into the bedrock by code depending on the state and 18″ above grade. If you have very sandy soil that does not hold formation like clay soils a process called mud drilling must be utilized to hold the hole open to allow the driller to seat the casing into the well. The Mud drilling process is only used to seat the casing and the pricing will mimic the casing depth. The typical average of casing depth is 20-40 feet in Massachusetts and New Hampshire but its important to understand that it is possible for the bedrock to be located deeper. In honesty i always tell my clients to prepare for 20′ best case 120′ worst case for our predominant service areas however pockets of Western, MA and South Eastern ,MA are notorious for deeper pockets of rock. Once the casing is firmly seated into bedrock by the driveshoe drilling will continue until an adequate water flow for your projects needs has been achieved.
The other terms when it comes to the drilling aspect of the project that tend to raise eyebrows are the retention pit and hydrofracturing. A retention pit is just what it sounds like a pit to retain water and drillings coming out of the well head during the drilling process. Depending on the lots layout this may or may not be necessary and typically during an initial site visit it will be understood if a pit will be needed. Hydrofracturing is the next term that due to recent issues in the oil drilling field has become a scary term to some homeowners. Water Well Hydrofracturing is a process used to clean out veins in the rock to allow water to flow freely into the well. During the drilling process the driller may notice large changes in the lithology of rock that indicate that hydrofracturing may be the best solution for achieving flow when drilling and that is when this process is recommended opposed to drilling deeper.
Phase two of a well drilling project would be the pumping system. Most Well Drillers in Massachusetts and New Hampshire start the base package off with a 1/2 hp pumping system set at up to 300′ a 20 gallon tank and up to a 50′ offset line all necessary accessories and a pitless adapter. To start off lets talk about the pumps first and foremost pumps run on curves now without getting to engineery on you this means that each pump can only be set at certain depths to preform the way you want them to. What this translates to is that if you end up with a deeper well a larger pump will be necessary to achieve the pressure you need for your system. Once the well is in place and the depth and flow have been determined your contractor will propose a final recommendation for approval based off of the prices detailed on your proposal. However this is why you will see multiple pump options on the well drillers quotation.
The first thing the pump crew will typically do when completing the pump installation is the offset line which is the electrical and water line from the well to the home. Most companies offer excavation services to dig this line or offer the homeowner the ability to supply the excavation themselves. The offset line connects to the well through an brass adapter called a pitless adapter. A pitless adapter is comprised of two pieces one connects to the water line in the offset and the other connects to the line going down the well holding the submersible pump this adapter is located 6′ under ground. The electrical line is run from the home through conduit which is a piping approved for direct burial up the side of the well casing into the well cap where the wire continues down the well attached to the water line by guides and tape to the water pump below. An item called a torque arrestor is used just before the pump within the well to hold the pump in place so that when the pump starts up it cannot slam against the sides of the well deep within the ground.
Now its time to do the inside work which includes the tank, gauge pressure switch and/orcontrollers. The offset line runs into the homes utility room in most cases where the technician will connect a pressure tank to the line. The water line is then connected to a tank T which is an adapter that goes into the water pressure tank and allows the offset line to be connected to the line that will eventually be tied into the home. In front of the pressure tank on the tee you will see two important items the gauge which will tell you the pressure of the system and the Pressure switch. The pressure switch controls the well pump and provides a signal to turn on or off the water. The water well system is now ready for final connections by the designated plumber and electrician.
We hope this blog was able to explain thecomponents of the water well system and how they relate to the quote you received from Northeast Water Wells. If you have any further questions on any certain component you will find that most of the main components and services have hyperlinks to their individual pages on our website but please do not hesitate to call with any further questions and one of our qualified specialist would be more than happy to assist you. If you have yet to receive a quote feel free to submit a contact us inquiry on the right side of this page or call into our office 1-800-562-9355. Northeast Water Wells has been providing quality water well systems to homes across Massachusetts and New Hampshire Since 1966. Thank you for reading and we hope you have a wonderful day!!

Well drilling is often referred to as an art rather than a science as it requires a talented, experienced, and skilled driller to bring in a great well. Well design choices and drilling techniques affect how efficiently the water enters the well and how the well performs.
The more efficient the well, the less pumping lift is required resulting in lower yearly energy costs. Agri Industries employs licensed and experienced drillers. Our drillers are licensed in North Dakota, Montana, and Wyoming and have extensive drilling experience as well as an intimate knowledge of the area"s geological formations and drilling conditions.
Agri Industries has drilled domestic well at depths up to 1500 feet deep. Our drillers use an approved drilling mud and high chlorine concentration drilling water solution when drilling domestic wells. With this method, potable water contamination is avoided.
Agri Industries uses only stainless steel screens. These screens provide more durability and more flow area than methods often used by other drillers. The downhole screened area is also packed with a sand filter. Domestic wells are completed using 5" PVC casing.
Irrigation wells are completed with 10", 12", and 16" casing and typically produce between 800 to 3000 gpm. Irrigation wells also use stainless steel screens that are the same size as the chosen casing.
Irrigation wells are drilled using Revert drilling mud when possible. Traditional drilling muds tend to seal off the production formation and require longer pumping times to completely clear the formation of drilling fluids. This means that the highest possible flows are not achieved until considerable pumping is done. Revert drilling fluid is an extremely high-yielding drilling mud that breaks down when dosed with high concentrations of chlorine.
Accordingly, the driller can dose the irrigation well with chlorine to clear the formation of drilling fluids, allowing for full pumping rates to be realized quicker. In addition, each well is gravel packed to provide a good granular material around the well screen.
We also use a unique wash-down sub that was invented by our drillers. This wash-down sub provides an excellent cleaning of the screen by backflushing the screen with clean non-formation water.
Agri Industries drills and maintains many wells for industrial usage. Industrial wells include wells for the sale of water, water for fracking, cooling water, water for manufacturing use, and many other applications. Our experience in high yield irrigation wells translates well to the development and construction of industrial water wells.
After a well is drilled, a process called well development must occur to ensure a proper connection with the aquifer. We work with the physical characteristics of the aquifer in order to allow water to flow more freely toward the well.
These processes can be used on existing wells that have dropped in performance. Our ability to redevelop wells can save the expense of drilling a new well when the existing well has the ability to continue to produce with rework.
Agri Industries provides our drilling expertise at a reduced per foot rate to provide you with a clear picture of the water producing formations under your land. The data from experimental test holes, previous experience in the area, records of well logs, and working with the state geological services can help us to determine how much water you can expect.
Those whose fences, walls and gates boast the poster are the only ones whose lawns are still green, whose cars are pristine, whose water bills are still lean… All thanks to a water borehole!
With the damsdryingup, the municipal water costsgoingup, and the people gettingfedup; it is more important than ever to understand and consider alternative water sources.
In an effort to help you overcome the element of unfamiliarity, and thereby help our country save water by making it easier for you to come to a decision to implement your own domestic water borehole this summer, RPM Drilling is proud to help you better understand water borehole drilling.
That’s why we employ hydro-geologists who make use of a variety of borehole drilling methods to assess the geophysical properties of the underlying area.
It’s not as easy as Moses and the rock, unfortunately, and, contrary to popular belief, an endless supply of water won’t just surge to the surface following the drilling of the borehole; there are still steps to follow and processes to be completed.
This involves installing a test pump and pumping borehole water for a fixed set of variables; a given time at a given rate, and then assessing the test’s impact on the water level in the borehole.
Materials will include the physical construction for the borehole, machinery is the actual drill and the manpower is how many people you need to drill a specific borehole.
Another thing that’s important to keep in mind when calculating the price of a borehole is how much water is needed and for how long it is intended to use the borehole.
1. Siting the borehole location–It’s basically locating the best spot to drill a borehole that will have the best performance and water quality at the lowest cost possible.
2. Mobilisation and Demobilisation – Machinery, equipment and materials need to get to the site to be set up. This is the cost for moving the borehole drilling machinery and equipment to and from the site.
3. Borehole drilling cost per meter – Like explained above, every borehole will have a different depth depending on all the factors. The actual borehole drilling costs are usually calculated at a per meter cost. So the depth and type of ground will play the biggest role in getting a cost per meter.
4. Construction Material Costs – After the borehole has been drilled, the casing and completion tasks needs to be implemented. This cost can include materials like a solid casing, screen, gravel pack, sanitary seal and a well head.
5. Performance and Quality testing – The next step is well development, pump test and borehole water quality. That will determine the performance of the borehole (how much water is available) and the quality of the water.
6. Platform and Pump – Once everything has been finished, the borehole needs a platform and pump installed for it to be used. It depends on what the use is for the borehole to decide whether it will be hand pump or electrical pump.
Mechanical Blockage: mechanical blockage occurs when small soil particles or by-products from the well-wall build up and cause blockages or reduced flow.
Chemical Encrustation: essentially the chemical version of a mechanical blockage, chemical encrustation occurs when chemical deposits build up on the well screen or gravel pack and restrict the flow of water.
While the steps that need to be taken in order to rehabilitate a borehole will vary depending on the nature of the cause for the blockage or reduced flow, the following steps constitute a brief overview of the traditional steps borehole rehabilitation could or would necessitate:
6 –Should the borehole/well require chemical cleaning it will take place at this juncture. If the well needs to be chemically cleaned the process could take anywhere from 1 to 3 days and will mean the well needs to be dewatered thereafter in order to remove the chemicals and chemical residue.
Rest assured, your domestic (or even commercial) water borehole will pay for itself in no time, especially considering the ever-increasing municipal water tariffs.
If the above has left you with questions, feel free to give us a shout, or call us up and take the first steps to installing your very own domestic water borehole today!
Water is the essence of life. We’re made of it, we bathe in it, we cook with it, we drink it, we travel on it; it is the permeable expanse that connects us all.
All these types of water represent what we can call ‘Water Resources’. We have a number of different kinds of Water Resources on our planet; allow us to tell you just a little bit more about this life-giving liquid, its forms, and their uses:
This may include natural surface water formations such as lakes, ponds, and rivers, and can also include surface water sources that have been subject to human intervention such as dams.
Natural surface water formations are usually used for sports and leisure activities while man-made dams and above-ground reservoirs account for the water most of us have access to at home when we open a tap.
Basically, the water you see flowing above ground that you’d call a ‘river’ often represents only a small percentage of the water that is actually moving downstream.
This is the water that you are accessing if you have a borehole on your property or are making use of borehole water. Groundwater sources have their own natural water cycle of seepage (often to oceans) and becoming replenished by fresh water seepage.
Desalination refers to artificial processes through which salt water (usually seawater) is processed in order to make it viable for human consumption and use; converting salt water into fresh water.
Groundwater is water that is underground that can, when found in large enough quantities, be tapped into by something like a well, or a borehole, in order to extract the water from the underground source in order to use it.
When we experience precipitation (in any and all forms including snow, sleet, hail and rain) some of that water ends up getting soaked into the ground.
Now of some of the water that gets absorbed by the ground gets sucked up and used by plants and the like, but the rest is driven further and further down by gravity.
However, although groundwater exists almost everywhere, it is not always in quantities that make it possible to extract water by implementing a borehole or a well. For a borehole or a well to be sunk, you really need to have found an aquifer.
An aquifer is a kind of saturation zone where the underground formation is of permeable rock, in other words, an underground rock formation which may contain, or serve to transmit, groundwater.
Aquifers can also vary in size, from smaller aquifers that may be tapped into to provide water for a household, to massive aquifers which can be tapped to provide irrigation water to multiple farms at a time.
The environmental impact of sinking a borehole or using a well to tap into an aquifer will vary greatly depending on the rate at which you intend to use water from the groundwater source.
Misuse of groundwater resources may, however, lead to environmental devastation as plants whose root systems tap into the groundwater source begin to die, or animals that drink from the groundwater source where it appears as a natural spring begin to lose access to fresh drinking water.
There are many different ways to drill a domestic water well. One is what we call the “mud rotary” method. Whether or not this is the desired and/or best method for drilling your well is something more fully explained in this brief summary.
One advantage of drilling with compressed air is that it can tell you when you have encountered groundwater and gives you an indication how much water the borehole is producing. When drilling with water using the mud rotary method, the driller must rely on his interpretation of the borehole cuttings and any changes he can observe in the recirculating fluid. Mud rotary drillers can also use borehole geophysical tools to interpret which zones might be productive enough for your water well.
The mud rotary well drilling method is considered a closed-loop system. That is, the mud is cleaned of its cuttings and then is recirculated back down the borehole. Referring to this drilling method as “mud” is a misnomer, but it is one that has stuck with the industry for many years and most people understand what the term actually means.
The water is carefully mixed with a product that should not be called mud because it is a highly refined and formulated clay product—bentonite. It is added, mixed, and carefully monitored throughout the well drilling process.
The purpose of using a bentonite additive to the water is to form a thin film on the walls of the borehole to seal it and prevent water losses while drilling. This film also helps support the borehole wall from sluffing or caving in because of the hydraulic pressure of the bentonite mixture pressing against it. The objective of the fluid mixture is to carry cuttings from the bottom of the borehole up to the surface, where they drop out or are filtered out of the fluid, so it can be pumped back down the borehole again.
When using the mud rotary method, the driller must have a sump, a tank, or a small pond to hold a few thousand gallons of recirculating fluid. If they can’t dig sumps or small ponds, they must have a mud processing piece of equipment that mechanically screens and removes the sands and gravels from the mixture. This device is called a “shale shaker.”
The driller does not want to pump fine sand through the pump and back down the borehole. To avoid that, the shale shaker uses vibrating screens of various sizes and desanding cones to drop the sand out of the fluid as it flows through the shaker—so that the fluid can be used again.
When the borehole has reached the desired depth and there is evidence that the formation it has penetrated will yield enough water, then it’s time to make the borehole into a well.
Before the well casing and screens are lowered into the borehole, the recirculating fluid is slowly thinned out by adding fresh water as the fluid no longer needs to support sand and gravel. The driller will typically circulate the drilling from the bottom up the borehole while adding clear water to thin down the viscosity or thickness of the fluid. Once the fluid is sufficiently thinned, the casing and screens are installed and the annular space is gravel packed.
Gravel pack installed between the borehole walls and the outside of the well casing acts like a filter to keep sand out and maintain the borehole walls over time. During gravel packing of the well, the thin layer of bentonite clay that kept the borehole wall from leaking drilling fluid water out of the recirculating system now keeps the formation water from entering the well.
This is where well development is performed to remove the thin bentonite layer or “wall cake” that was left behind. Various methods are used to remove the wall cake and develop the well to its maximum productivity.
Some drillers use compressed air to blow off the well, starting at the first screened interval and slowly working their way to the bottom—blowing off all the water standing above the drill pipe and allowing it to recover, and repeating this until the water blown from the well is free of sand and relatively clean. If after repeated cycles of airlift pumping and recovery the driller cannot find any sand in the water, it is time to install a well development pump.
Additional development of the well can be done with a development pump that may be of a higher capacity than what the final installation pump will be. Just as with cycles of airlift pumping of the well, the development pump will be cycled at different flow rates until the maximum capacity of the well can be determined. If the development pump can be operated briefly at a flow rate 50% greater than the permanent pump, the well should not pump sand.
Mud rotary well drillers for decades have found ways to make this particular system work to drill and construct domestic water wells. In some areas, it’s the ideal method to use because of the geologic formations there, while other areas of the country favor air rotary methods.
Some drilling rigs are equipped to drill using either method, so the contractor must make the decision as to which method works best in your area, for your well, and at your point in time.
To learn more about the difference between mud rotary drilling and air rotary drilling, click the video below. The video is part of our “NGWA: Industry Connected” YouTube series:
Gary Hix is a Registered Professional Geologist in Arizona, specializing in hydrogeology. He was the 2019 William A. McEllhiney Distinguished Lecturer for The Groundwater Foundation. He is a former licensed water well drilling contractor and remains actively involved in the National Ground Water Association and Arizona Water Well Association.
To learn more about Gary’s work, go to In2Wells.com. His eBooks, “Domestic Water Wells in Arizona: A Guide for Realtors and Mortgage Lenders” and “Shared Water Wells in Arizona,” are available on Amazon.
Choosing a water well drilling rig requires careful consideration before you sign on the dotted line. This is not an impulsive decision. While price is the most common consideration for many people, there are many other aspects to consider - some of which may outweigh the impact of price. Consider service and support, training and quality; and don"t forget the ever-important slurry pump.
Operating a new piece of equipment presents a number of potential challenges. If operators have not worked on water well rigs before, or if they have but lack experience with the make or model, training is essential.
A higher-quality product may cost more, but when it performs better, causes fewer problems, and lasts longer, the few dollars are worth it. In addition, lower quality bits usually have little resale value compared to higher quality models.
Look for a manufacturer that is open about the quality of materials they use and the assembly process. Look for heavy-duty welded steel frames and thick drill pipes to ensure the rig can withstand challenging conditions. Some manufacturers cut corners by using thinner steel. This can cause the frame to bend or twist while driving, or wear prematurely due to corrosion in hot, humid climates.
Having strong water well drill rods and other sturdy components can also make a huge difference. Some manufacturers cut costs by offering inferior water pipes instead of heavy-duty ASTM A500 specification drill pipes. While drill pipe can cost 10 times as much as water pipe, a broken pipe can mean a major setback if your rig goes 100 feet underground in a remote area and you hit hard soil or rock. The situation can take hours to resolve or mean moving to a new site and abandoning the pipe to correct it. Look for manufacturers that use at least 1 ¾ inch diameter drill pipe and connections made from heat-treated alloy steel. Lower quality drill bits often use ¾ or 1-inch water pipes for lower strength applications.
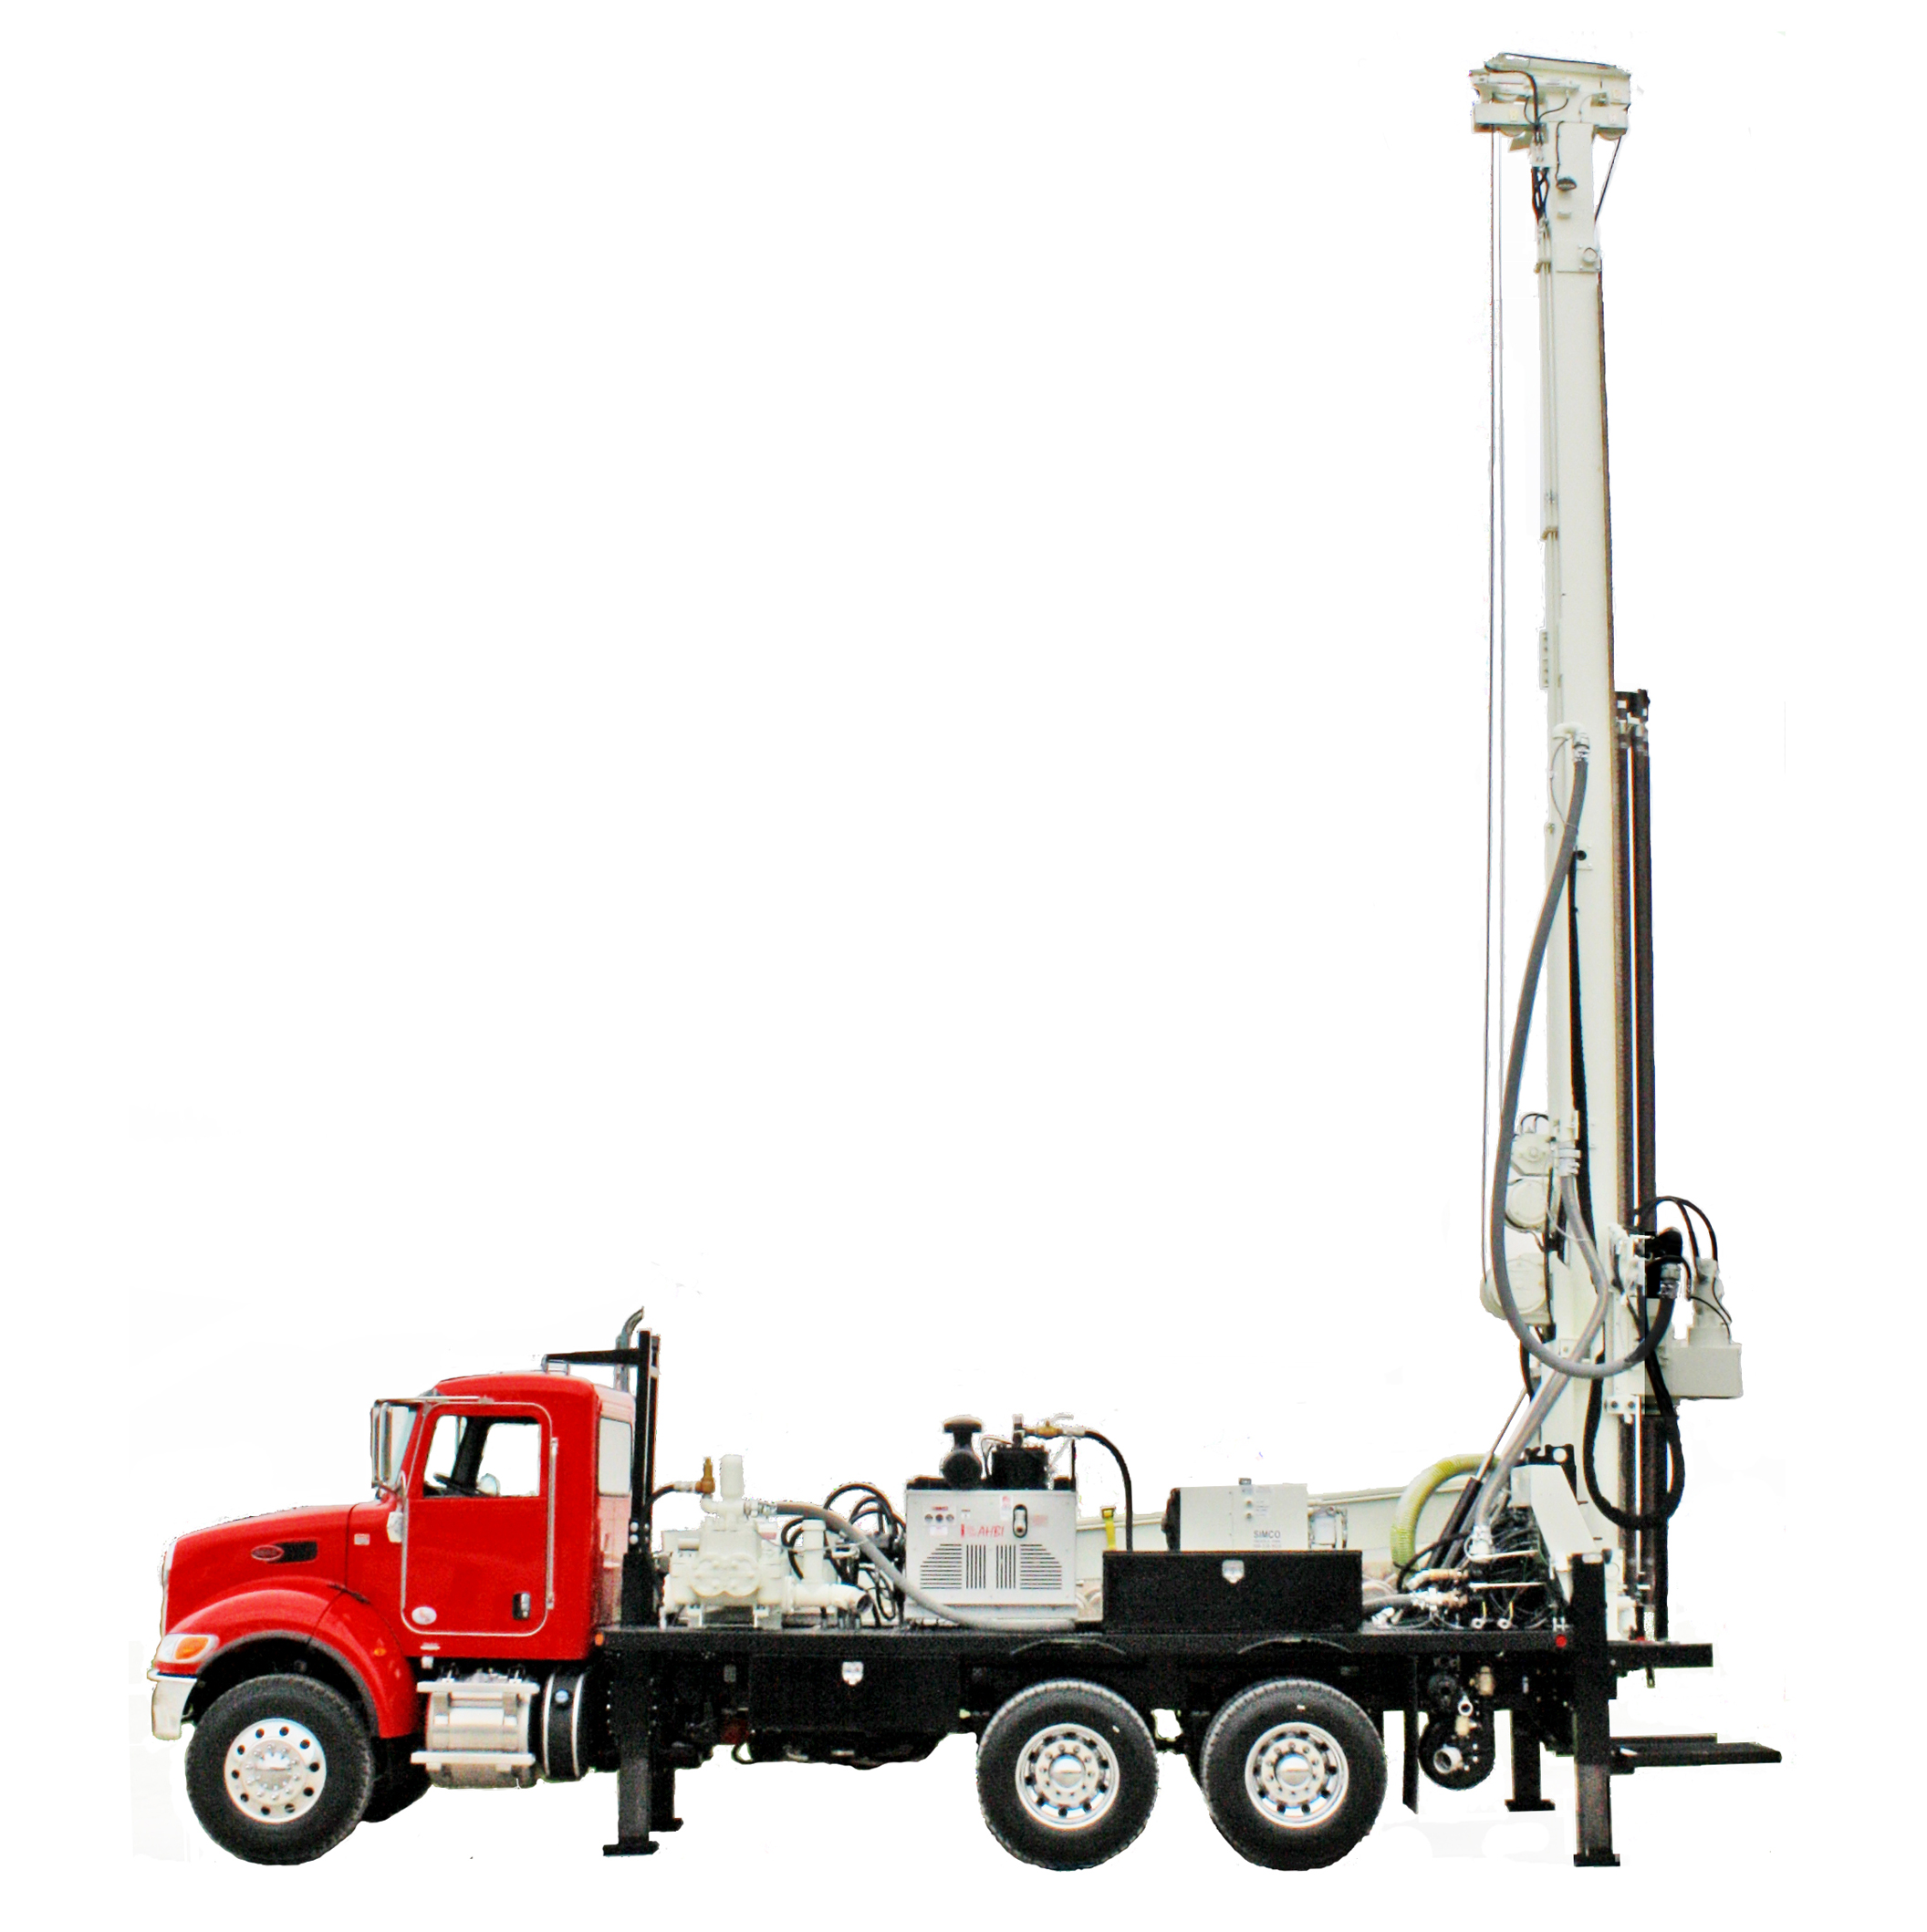
The mud pump is an essential component of the water well drilling process. A powerful centrifugal pump is needed to flush the well of drill cuttings to obtain the proper drilling depth and high-quality borehole. Once your pump can no longer flush out the rock chips, you have reached your maximum depth capacity. The power and efficiency of the mud pump add to this depth and you can drill deeper compared to other methods.
Some people may choose to cut corners and buy a cheaper mud pump from another manufacturer, which may result in poor performance by buying a pump with specifications that don"t fit their particular rig. Choosing an OEM mud pump means that it will provide the best performance when paired with a drilling rig.
A knowledgeable drill bit manufacturer will work with you to identify the ideal bit to meet your needs. Soil type, geographic location, and intended use will help determine which drill rig is best. Work with a company that will support your drilling mission at every step of the process. A true partnership will deliver the best results.

Drillers seeking versatile water well drill rigs with power and reliability to tackle water well drilling, geothermal drilling, and cathodic protection drilling choose DM450 water well drill rigs for speed and ease combined with reduced downtime. Additional advantages of the water well drill rigs for sale include:
Mud system, top head travel speed, and rotation speed and power combine to quickly conquer clay or cobbles to increase production and profit. Engineered to handle 4-inch to 12-inch wells up to 1,000 feet, tailor the DM450 water well drill rigs to your specific geography and drilling preferences from a wide array of drill rig options. Choosing from an assortment of standardized options minimizes maintenance and makes repairing your water well drill rigs from the field possible with a phone call to our team of expert service technicians. Owners describe their DM450 well digging machines as “stable” and “stout,” praising its simple operation for making it easy to train new operators.
Increase productiondrilling larger wells with the small water well drill rigs easily maneuvering on job sites. The DM450 drill truck provides ample head feed speed — activated with a fast feed circuit — to flush the cuttings out of holes drilled in sand or clay, providing a clean hole to drop well casing or cathodic protection anodes. The water well drilling rig for sale also features the top head rotation speed needed to handle tricky formations — such as sticky clay.
Expand accesschoosing from multiple mud pump and air compressor options to configure the water well drill rigs for specific geographic areas. Some options, such as sandline winch or pipe spinner systems, can be added to minimize equipment on geothermal drilling job sites.
Ease operationwithengineered design and modern construction, maximizing power to quickly and easily complete jobs while streamlining maintenance and troubleshooting. The control panel with its durable, mechanical controls, simplifies operation. The table assembly — with an opening to handle up to 16-inch casing — is positioned further back from the water well drill rigs, making it easier to handle tooling and set casing.
Armed with the fast head feed speed, many owners of DM450 water well drill rigs successfully complete water well drilling, geothermal drilling, or cathodic protection drilling with the same machine.
With drill rig service shops in Pennsylvania, Florida and Kansas, you’ll have industry-leading drill rig service support nearby for your routine maintenance or more in-depth water well drill rigs remounting and refurbishment work.Our service technicians are backed by our team of engineers to ensure solutions not bandaids to issues. And our production processes mean your well digging machine is constructed consistently and tested thoroughly to ensure easier service support.
The durable, mechanical controls neatly laid out on the robust, organized control panel on the DM450 drill rig includes engine monitoring, safety E-stop, hydraulic pressure gauges, friction control levers for mud pump and rotation circuits, and electronic throttle controls. Simple operation makes it easy to train new operators.
Sturdy drillmast on DM450 water well rig provides power needed for tough water well drilling, geothermal drilling, and cathodic protection drilling with jibs to access both sides of the drill rig.
Totally redesigned drillmast on the DM450 drill rig with 25,000-lbs of pullback, 15,000-lbs of crowd force along with 16-inch side shift of the 2-speed rotary drive with 4,600 ft-lb torque. The rigid drill mast design makes drilling straighter holes easier.
The 2-speed main winch motor on the DM450 provides full pull power when tripping out or with flip of a switch provides full speed, making travel time twice as fast. For job sites where support trucks won"t fit on helper side, second jib swings and extends — in the other direction toward the driller"s side —to pick up and place smaller objects.
The DM450 drill truck table assembly has clearance for 16-inch PVC casing. Easy access to table opening from control panel simplifies setting variety of casing sizes.
Air-powered holding fork and hydraulically-operated, adjustable breakout wrench make tripping out fast and safe with the DM450 drill rig. The grease fittings on the fork help maintain mobility in freezing conditions.
Available on an automatic truck chassis to further simplify mobilization, the lightweight, compact drill rig is suited for large residential water wells, commercial geothermal, and cathodic protection drilling. Clean layout of the deck, complete with access panels, makes for easier maintenance of securely routed hydraulic hoses from above the rig.
Factory-mounted Mudslayer® 250 drilling mud cleaning system uses separate hydraulic circuit eliminating competition among functions, easily connects to pump for quick set up. Addition of the deck-mounted drilling mud cleaning system allows access closer to homes without hauling a mud pan behind the rig, eliminates shoveling out mud pans making job easier on drillers, and creates simpler job site cleanup.
Mud system, top head travel speed, and rotation speed and power combine to quickly conquer clay or cobbles to increase


 8613371530291