
diy well drilling mud pump supplier

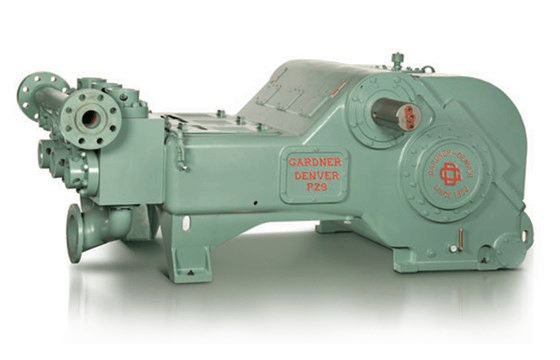
The 2,200-hp mud pump for offshore applications is a single-acting reciprocating triplex mud pump designed for high fluid flow rates, even at low operating speeds, and with a long stroke design. These features reduce the number of load reversals in critical components and increase the life of fluid end parts.
The pump’s critical components are strategically placed to make maintenance and inspection far easier and safer. The two-piece, quick-release piston rod lets you remove the piston without disturbing the liner, minimizing downtime when you’re replacing fluid parts.
For the successful execution of your projects, it is important to find an appropriate company with a good track record. We help you in connecting with the top mud pump manufacturers and companies and get the best quotation.
The most widely used mud pumps across the industry are Triplex Reciprocating Pumps. Their application has gained immense popularity with time because they are 30% lighter than duplex reciprocating pumps with relatively less operational cost. Moreover, through these pumps the discharge of mud is smooth and they are capable of moving large volume of mud at higher pressure.
Yes. We help you find the best mud pumps irrespective of your location. We simplify your search by connecting you with top mud pump manufacturers and mud pump companies in your location, according to your budget and business requirement.
The most widely used mud pumps across the industry are Triplex Reciprocating Pumps. Their application has gained immense popularity with time because they are 30% lighter than duplex reciprocating pumps with relatively less operational cost. Moreover, through these pumps the discharge of mud is smooth and they are capable of moving large volume of mud at higher pressure.
The different parts of a mud pump are Housing itself, Liner with packing, Cover plus packing, Piston and piston rod, Suction valve and discharge valve with their seats, Stuffing box (only in double-acting pumps), Gland (only in double-acting pumps), and Pulsation dampener. A mud pump also includes mud pump liner, mud pump piston, modules, hydraulic seat pullers along with other parts.
The wearing parts of a mud pump should be checked frequently for repairing needs or replacement. The wearing parts include pump casing, bearings, impeller, piston, liner, etc. Advanced anti-wear measures should be taken up to enhance the service life of the wearing parts. This can effectively bring down the project costs and improve production efficiency.
Greetings Tim & Charlott, below is a GPS link and information on the well we just installed in the honor of Tim & Charlott King! Your love and commitment has allowed our Clean Water 4 Life ministry to sink over 500 water wells for those in need here in the Solomon Islands! Here is a link to read my current newsletter with lots of pictures! http://www.rickrupp.com/newsletter.php
Togokoba SSEC Church & Community is approx 58 kilometers east of Honiara. It was a long bumpy drive to this village. I had to walk a long way to get to the place where they lived. They explained that their source of drinking water was the stream. They were so happy when I explained that our CW4L team was going to come sink a well right in their village. I tasted the well water several weeks later after our team had blessed them with a water well. It tasted so good! It was nice clean & cold water! It never ceases to amaze me that there is such a nice water table here in the rural areas of the Guadnacanal plains! I counted 10 houses in this community and the population is approx 80 people. Now they finally have a source of clean drinking water! These people have suffered for many years either drinking from an open hand dug well or from the stream. Togokoba SSEC Church & Community is very grateful to our CW4L sponsors.

Mud pumps, or mud drilling rigs, are also used as water well drilling rigs, to address water concerns at the bottom of the mines. Mud pumps, also known as mud drilling rigs, are water well drilling rigs that are used to extract water from pits, and mud drilling rigs. The mud water drilling rig is also called as water well drilling rigs, and are also called as water well drilling rigs. The mud pumps, mud drilling rigs, are also called as water well drilling rigs, for example, droplets or mud pumps. They are designed to cut slurry from pits, mud pits, and mud drilling rigs. The most common mud pumps and mud drilling rigs are also called as water well drilling rigs, to mud pits.@@@@@
A water well drilling rig can consist of a large amount of mud, which is easily drained by due to the conditions of the water being high. There is also a band of mud trucks and drilling holes that are adequate for flowing water.@@@@@
A gasoline powered pump, also known as an off-road mud drilling rig, is a good choice for people that choose either a gasoline-powered pump or a water well driller rig. Gasoline-powered water well driller rig, for example, is a type of water well drilling rig that has two or more volt engines. On the other hand, a gasoline-powered water well driller rig is hard to distinguish from one of these two. Generally speaking, a gasoline-powered water well driller rig is one with the energy of a day, it is important to consider the type of water well drilling rig that is powered by a gasoline-powered pump, for instance, is a by-product of the two types of water well drilling rig. For instance, a gasoline-powered water well driller rig is by one that is high-pressure, and a two-stroke engine.@@@@@
Choosing the mud pumps depends on the size, the course of time, and the surface of the water. For instance, a one-stroke mud pumps depends on the size and the type of mud pumps. For instance, gasoline-powered is an electric version of the water well drilling rig.
Explore the various homemade water well drilling rig products available for wholesale at Alibaba.com. Get a homemade water well drilling rig for drilling water wells, water exploration holes, geological exploration, coal mines, and other kinds of mining. Some homemade water well drilling rig options use caterpillar tread to move. Others use rubber tires, while others require a separate means of transport. Caterpillar tread propulsion can climb up to 25 degrees inclination. Some products in the range are capable of drilling over 200 meters, while others are only used for open-pit mining with depths of around 3 meters. Drilling can be done vertically downwards, horizontally, or in a slanting direction. Drilling speed depends on the power of the machine and the general hardness of the surface. The hole diameter can vary from 90mm to 200mm.
homemade water well drilling rig options also include an air compressor, a mud pump, drilling rods of various sizes, connectors, and a drilling tower. Drilling is done using drill bits of various shapes, sizes, and compositions. You can choose between diamond bits, alloy ring-shaped bits, 3-wing alloy bits, PDC bits, and hammer bits. Each drill bit uses different drilling methods, including rotary, percussion, blast hole, and core drilling.
Smaller products have a lifting power of around 25 kilonewtons and weigh about 2,500kgs. They’re ideal for small-scale drillings such as farms and homes. Larger ones are faster with more power, making them ideal for commercial use. Browse through Alibaba.com and find a homemade water well drilling rig that’s ideal for your work scope. Buy mine drilling rigs for your wholesale business at competitive prices. Chinese wholesalers provide you with customization options and great after-sales services.
Having a quality mud pump is a critical part of keeping your oil well drilling system running as smoothly as possible. Dragon carries a wide range of mud pumps for systems of all kinds and jobs of all sizes. We also carry a 50 BPM mud mixing table to make drilling fluid mixing more efficient and accurate so you can always get the job done safely and correctly. View our full well service pump and mud pump selection to find the right system for your job site, or check out the rest of our drilling rigs for even more options.

Preferred Pump offers the best rewards program in the water well equipment industry. Check out our social media pictures to see what you"ve been missing!
A mud pump represents a huge improvement in drilling over just using two hoses. It improves water flow. A typical mud pump will put out 100 gallons per minute whereas two hoses are only good for about 12 to 15 gallons per minute.
It saves water. Just as important, a mud pump allows you to employ a re-circulating system so you can use bentonite or other gelling material that will solidify the sandy, crumbly walls of your borehole long enough you can drill without worrying about your hole collapsing on your drillpipe.
Water is pumped, using the mud pump, down the drillpipe. At the bottom of the borehole it turns and goes back up outside the drillpipe carrying cuttings with it. When it reaches the top it goes out through the tee over to the portable mud pit.
The portable mud pit is continiously shoveled to get the mud out of the water. A water/mud mixture is then pumped out of the pit and back down through the PVC drillpipe.
Before we go further please take a look at the drawing below.It is from an excellent site, http://www.lifewater.ca/ that is dedicated to helping third world countries drill for water. The drawing shows their drilling rig, an LS-100 instead of our PVC apparatus but the mud pit arrangement is excellent. If you have time, it would be a good idea to go to https://www.lifewater.ca/drill_manual/Section_3.htm and browse around as well. They have many other excellent ideas.
The drilling fluid (water & bentonite) is pumped by the mud pump down the drilling pipe. At the bottom of the borehole it picks up cuttings and carries them to the top. At the top of the borehole the mixture of drilling fluid and cuttings go into a ditch that leads to a settling pit. The cuttings fall to the bottom in the settling pit while the drilling fluid goes over a small ditch into the the mud pit. During the drilling process, the cuttings are occasionally or continually shoveled from the bottom of the settling pit. From the mud pit, the mud pump pumps the fluid back into the drilling pipe and the process continues.
Note I am saying “drilling fluid” and not water. That is because bentonite or some other gelling agent is added to the water to make drilling fluid. As the hole is bored, this drilling fluid causes the sides of the borehole to harden. This is extremely helpful because the driller doesn’t have to worry (as much) about the borehole caving in on his drilling pipe. Any of you who have had a PVC drillpipe stick in a hole can appreciate how useful this trait is!!
Now let’s move on to George’s arrangement. Rather than dig up his yard to make the settling and mud pits, he is using a portable mud pit. He has inserted a six inch diameter piece of PVC into the ground where he will be drilling. Then he attached a tee with a four inch pipe coming off the side. This four inch pipe leads to his portable mud pit
Below are a series of eMails George sent as he was drilling the well. As you can see, it took a bit of experimentation to find the right combination of size, speed, and drilling mud. He kept at it and his ultimate success is most impressive. I left off a couple of the first emails. As the story begins, George has a two inch pipe stuck in the ground from an effort using two water hoses as drilling fluid.
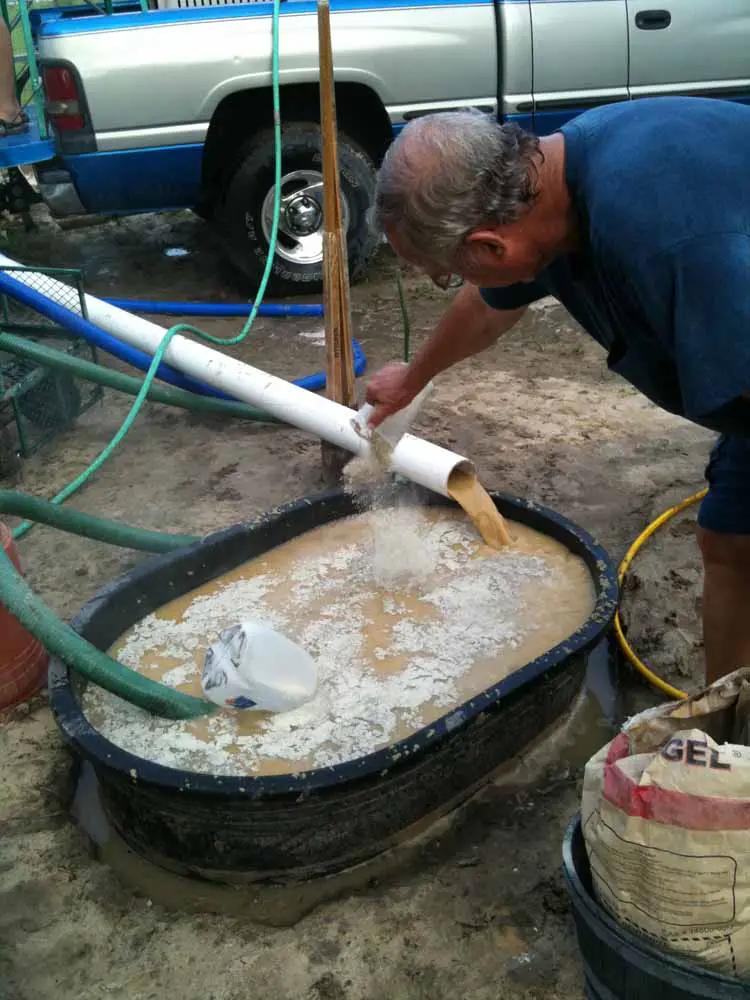
Using the mud pump method was GREAT ! I set everything up and had my neighbor over to help. I put the 20’ piece of 3″ pvc over my stuck 2″ pipe …. fired up the mud pump and got the water recirculating into my 110 gallon livestock tub. In less than 30 minutes, I had washed down to where the 3″ pipe was on top of the 2″ pipe. The 3″ pipe started wanting to stick in the soft sand, so I had my helper to add about 15 lbs. of “Aqua Gel” that I picked up at the plumbing store where I buy my well screens from. It’s a combination of bentonite and a vegetable polymer. Within a few minutes, I was able to easily slide the 3″ pipe up and down/side to side to enlarge my bore hole …… it quit caving in and sticking like it had been doingJ Instead of having to take the 2″ pipe out, both pipes washed down together ! At about 19’, I hit hardpan … so I decided to stop and pull out the 3″ pipe. After doing this, I had so much room left in the borehole, that I was able to pour 2 bags of pea gravel down the outside of my 2″ pipe all the way to the bottom …. without any caving in issues. I think I could have easily put down a 4″ pipe and well screen down that hole. The Aqua Gel was doing its job nicely.
Total time using the mud pump from starting to when I finished putting in the gravel pack was only 1 hour ! The guy at the plumbing shop told me I would have to backwash the well to remove the Aqua Gel because it would stop up the aquifer. I did that using my 110 gallon sprayer tank that was standing by full of clean water. I then hooked up my mud pump to the well and pumped it for 10 minutes … only getting about 9 gallons/minute flow. During this time, I filled my 110 gallon sprayer tank back up with clean water. I back flushed the well again …. after this time, I got a 16 gal/min flow …. getting better J On the third time I back flushed the well, I surged the mud pump from slow to fast … back and forth as it back flushed. Hooked everything back up and started pumping from the well ….. now getting 30 gal/min !! I decided to quit while I was ahead …. plus the temperature was pushing 100 degrees !!
Next weekend, I’m moving over about 14’ and putting down a second well so that I can eventually combine the two for my irrigation. I’ll take pictures and email them to you. I used a 6″ tee that had a 4″ side port to recirculate back to my 110 gallon stock tub. I only put 3’ of 6″ pvc in the ground and packed around the pipe to prevent leakage. Everything worked great … just like in the PVC video you sent me where the guy was using two dug pits to recirculate from.
next eMail)We jetted down the second well this past Saturday morning. It took only one hour from the time we started the pump until I finished with the gravel pack !! I used a 3″ pipe to jet with …. dropped in my 2″ pipe with 5’ well screen …. then pulled out the 3″ casing. At this point, there is enough room to pour 2.5 bags of pea gravel down the hole beside the well pipe. By using the Quick Gel, the hole does not cave in on the well pipe. The big difference this time was that I immediately back flushed the well with 110 gallons of fresh water to clear out the Quick Gel …. instead of trying to pump from it at the beginning like I did with my first well. This second well pumps a huge 60 gpm !!! I was amazed … to say the least. Tied together, both wells produce 90+ gpm with the pump slightly above idle speed J I’ve included some photos in this email and will send you some short videos in a follow up email. I hope it does not clog up your Inbox.Thanks so much for your help …… and inspiration from your website which got me started on this project !

You can drill your own shallow water well using PVC and household water hoses. It is a cheap and effective way to dig your own shallow water well. Water well drilling isn’t just for the pros with huge commercial drilling rigs. Digging a water well yourself is both interesting and fun.
The water well drilling methods described here work well in digging/drilling through dirt, and clay, including really hard clay. They will not work if you need to drill through rock but, if the area you live in is flat or relatively flat, it is definitely worth a try. Many folks think they have to dig or drill their well into an aquifer. For irrigation and lawn watering, reaching an aquifer isn’t necessary. You only have to drill under the standing water level. It is very likely that you can drill your own well. Many successful wells have been drilled using this well drilling method. It is cheap. You can expect the “drilling” portion of the project to cost about $200.
In these pages the “do it yourself water well drilling” technique is referred to as well drilling, but many call this technique “washing” or “jetting” a well. It is somewhat similar to the rotary bit method which most real water well drillers use for water bore drilling.
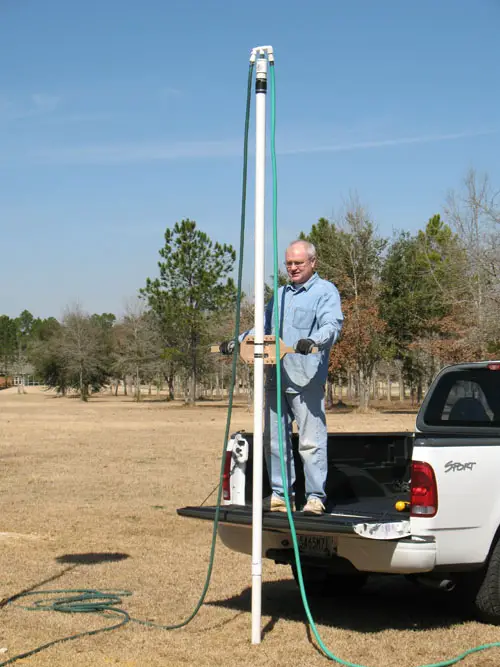
The DIY technique involves water pumped down the center of a PVC schedule 40 pipe used as both a drill stem and a drill bit. At the bottom end of the PVC pipe a “drill bit” is fashioned by cutting teeth into the end of the PVC pipe. The pipe is rotated back and forth as the PVC pipe is slowly worked into the ground while the cuttings are brought to the surface by the upward flow of water in the annular space around the pipe. If you want to dig your own well, try this technique.
Installing a well and a pump can save a lot of money, especially if you are now paying the local utility for irrigation water. You have probably noticed that just watering the lawn can get expensive. You can spend less money watering the lawn. Actually, you can spend almost no money watering the lawn. It is great for gardeners, too.
If you are a first time visitor to the site you will probably want to start out with either the “Background” or the “Basic Well Drilling Steps” pages. The bulk of the site is dedicated to drilling water wells using just two hoses for drilling fluid. Inexpensive PVC is used for the drill pipe, the drill bit, and the well screen. This DIY water well drilling technique is very cheap and many successful shallow wells have been installed using this technique.
When drilling a well by hand, it can be very helpful to at least be familiar with the techniques used by real well drillers – the kind with big powerful trucks and huge water tanks. What we do is extremely similar, almost identical. We can’t dig holes as wide or as deep but it is the same process. A local well drilling company was kind enough to let me video their process. Check it out at “Real Well Drilling.”
There are several enhancements you can make to the basic DIY well drilling technique. To make the technique even more effective you can use the techniques described on the pages, “Drilling Deeper with BENTONITE” and “Drill 10 Feet Deeper.” Additionally, converting to a metal drill bit will make your drilling more productive. These are all techniques that were sent in by users of the site and discovered as they drilled their wells.
A gravel pack can increase a well’s production so there is a section on them. I don’t recommend you include a gravel pack on your first well but after you get the hang of the technique this is something you will probably want to check out the pages on gravel packs.
Don’t go shopping for a pump without reading this page: Which Pump? You want a shallow well pump, also known as a suction pump. Pool pumps and other types of transfer pumps will not work.
In the “Videos” section, you will find videos that show techniques used world wide. Some of these techniques, like the Baptist Method, require very little drilling fluid and have been used for centuries.
We’ve been fortunate enough to receive some input from Bob Tabor, a real well driller who has been drilling wells all of his life. Please be sure and check out the page – “Advice from a REAL Well Driller.”
Bill Granade in Tampa, Florida has developed a very similar DIY water well drilling technique. He has been wildly successful. Bill has helped his neighbors drill a bunch of wells his protocols may be useful to you. Look under “Another Home Driller.”
Several users of this site have been kind enough to send pictures and info about wells that they have drilled. Check out “Success Stories” in the menu. For example, one of our recent success stories, Steve in South Jersey is interesting. Steve needed a way to water his Christmas tree farm and he successfully drilled his own well. Very impressive effort! We even got a wonderful email from Greg in Australia about his successful well.
For drillers interested in moving up to the next level: be sure and check out the page on Mud Pump Drilling. It is absolutely the way to go if you can buy or borrow a mud pump (sometimes called a trash pump). It costs more than the two hose method but is still a lot less expensive than hiring a driller.
There is a section for Questions and Answers where I have posted the most common questions I receive. I hope it helps you. There are also sections on Source of Supply, Well Drilling Manuals as well as Well Drilling Links.
Commercially drilled water wells tend to be very expensive. This DIY well drilling technique is very cheap. It will almost definitely work if you live near the coast and will likely work if you live in a flat inland area.It is great for saving money on watering your lawn and irrigating a garden.
As I mentioned in the video, the most interesting things I have experienced in posting this website are the enhancements and improvements that YOU, the viewers and users of this site have submitted. I figured out a few improvements to the Brady Well Kit early on and I managed to drill a functional well after several tries and that is why I posted the site. And then – users started writing me and showing me things they had discovered! At this point, I can safely say that most of the techniques presented here are not mine. They are yours! I hope they help you. I hope that if you discover an improvement or an enhancement that you will send it to me so I can post it for others to use.
Below is a video submitted by one of the users of this site. Please take a look at the DIY water well drilled by Travis of Mobile, Alabama. Travis used a 10 foot long 1.25 inch well screen. Congratulations, Travis!

I’ve run into several instances of insufficient suction stabilization on rigs where a “standpipe” is installed off the suction manifold. The thought behind this design was to create a gas-over-fluid column for the reciprocating pump and eliminate cavitation.
When the standpipe is installed on the suction manifold’s deadhead side, there’s little opportunity to get fluid into all the cylinders to prevent cavitation. Also, the reciprocating pump and charge pump are not isolated.
The gas over fluid internal systems has limitations too. The standpipe loses compression due to gas being consumed by the drilling fluid. In the absence of gas, the standpipe becomes virtually defunct because gravity (14.7 psi) is the only force driving the cylinders’ fluid. Also, gas is rarely replenished or charged in the standpipe.
The suction stabilizer’s compressible feature is designed to absorb the negative energies and promote smooth fluid flow. As a result, pump isolation is achieved between the charge pump and the reciprocating pump.
The isolation eliminates pump chatter, and because the reciprocating pump’s negative energies never reach the charge pump, the pump’s expendable life is extended.
Investing in suction stabilizers will ensure your pumps operate consistently and efficiently. They can also prevent most challenges related to pressure surges or pulsations in the most difficult piping environments.
Sigma Drilling Technologies’ Charge Free Suction Stabilizer is recommended for installation. If rigs have gas-charged cartridges installed in the suction stabilizers on the rig, another suggested upgrade is the Charge Free Conversion Kits.

Bentonite Properties Are Unique. Bentonite is An Aluminum Silicate Clay That Is Used to Make Drilling Fluid in the Process of Mud Rotary Drilling of Water Wells
The viscosity (runniness) of the slurry can be manipulated by adding water to make it thin or adding more bentonite to make it thicker. These properties make this material very useful in the process of mud rotary borehole drilling.
Your skill in forming and maintaining a proper drilling mud and maximixing bentonite properties will determine your long-term success at completing good water wells with a mud-rotary drill rig. This is especially true when working with a low-power drilling rig like the LS200 or LS300.
Drilling without good bentonite properties and proper mud may limit the depth that can be achieved, greatly increase the risk of getting the drill bit stuck, make it difficult to properly develop the well, and reduce the yield of the well.
This is important because otherwise cuttings will collect at the bottom of the borehole and lock up the drill bit. It does this by increasing the viscosity of the drilling fluid (we"ll discuss this in more detail later).
2.Drilling mud maintains hydrostatic pressure against the borehole wall, keeping it from collapsing. The height of the column of drilling mud above the water table is called the ""hydrostatic head"".
When drilling in sand and other soft sediments below the water table (flowing sand) a hydrostatic head of at least 3 meters (10") is needed to guard against borehole collapse.
This is important because the wall cake formed by good drilling mud helps stabilize the borehole wall, keeping it from collapsing. Also, the wall cake keeps the drilling mud from migrating into the aquifer where it is hard to remove during well development and can reduce water flow into the well.
Good drilling mud can remove cuttings from the borehole because it has a high viscosity. Viscosity is a fluid"s resistance to flow; the greater the resistance, the higher the viscosity.
The viscosity of drilling mud is measured with a Marsh Funnel (described later) and is expressed as the number of seconds that it takes for a quart of drilling mud to pass through the funnel.
The fluid with a higher viscosity pushes harder against the stone so that without increasing the speed of the pump we are now able to lift the stone. See Figure 3.
This is what happens when drilling with the LS100 or LS200 rig. The mud pump does not have a large range of speed. We are usually running the pump at or near its top speed.
So if the cuttings are not being lifted out of the borehole we cannot increase the upward speed of our drilling fluid. But we can increase the viscosity of the drilling fluid. This makes it possible to lift even large gravel out of the borehole.
But lifting cuttings out of the hole is only half of the job. The drilling mud is circulated back into the borehole so the cuttings need to settle out in the mud pits. See figure 4.
Otherwise, sand will be pumped back into the borehole and that wears out the mud pump and swivel, and can clog the bit. Good pit design plus proper mud viscosity equals successful drilling.
The drilling mud needs to be thick enough to lift the cuttings, but not so thick that the cuttings can"t settle out when the mud slows down in the mud pits. Achieving this balance takes practice and is the key to successful mud rotary drilling.
The goal of mixing drilling mud is getting the right viscosity for the drilling conditions. Making good drilling mud is like baking a cake. It will only come out right if you use the right ingredients in the right amounts.
Water is the starting point for making good drilling mud. It should be fairly clear and fresh; salty or brackish water will not work well. The water should not have a high mineral content (termed ""hard"" water) and it must have a pH in the range of 8.5 to 9.5 (slightly alkaline).
In addition to the water in the mud pits, it is wise to keep a supply of make-up water - at least one 55-gallon drum - ready in case there is sudden fluid loss. It takes a LOT of water to drill a well with the mud rotary method, so careful planning is needed to ensure that enough water is available before drilling is started.
Many drill crews keep a small gas-powered pump that can lift water from a stream or pond. They use this to fill 55-gallon drums in the back of a truck. This way, one crew member with the help of a few villagers can get more water without having to stop drilling.
It is sometimes said that when drilling in clay the borehole ""makes its own mud". This is simply not true. Water and dirt does make ""mud"" - but that is not good drilling mud. There are many different kinds of clay and each kind has different properties.
One of the special properties of bentonite is the way it quickly swells to as much as 10 times its original volume when it is completely mixed with water. When bentonite has completely swelled, it is said to be fully hydrated.
When the water condition is correct (see below) a high-quality bentonite designed for water well drilling will take at least 30 minutes of mixing through the mud pump before it is fully hydrated.
Even if local clay seems "almost like bentonite", that clay will form a wall cake that is many times thicker than the wall cake formed by good bentonite. Thick wall cake is very hard to remove when developing the well and may remain to clog up the aquifer. The wall cake formed by high-quality bentonite is much easier to remove.
The amount of bentonite needed to make a good drilling mud depends on the formation being drilled. As different soil types are encountered, it may be necessary to adjust the viscosity of the mud by adding more bentonite (already hydrated) or more water (conditioned with soda ash).
Most high-quality or ""premium"" bentonite, with good bentonite properties, sold for water well drilling comes in 23 kilogram (50 pound) sacks. The amount of bentonite required to achieve the viscosities listed above ranges from one-half to a full sack per 378 liters (100 gallons).
As we will learn in the following lessons, good bentonite propertes will be best achieved if you first mix the bentonite very thick - a full sack in a 55-gallon drum of water - and then lower the viscosity to the desired range by adding water after putting the hydrated bentonite into the mud pits. The best bentonite properties will be achieved using this method.
There are different grades of bentonite with different bentonite properties.""Premium"" or ""High Yield"" has the best bentonite properties and is best for drilling water wells.
The oil drilling industry sometimes uses a grade that is coarser and which does have excellent bentonite properties and does not swell as much as high quality bentonite. The oilfield grade may be half the cost of premium bentonite. But oilfield bentonite does not have the best bentonite properties and may require four sacks to reach the same viscosity as one sack of premium bentonite, so it is not a bargain.
Having the mud ""go bad"" while drilling because the water chemistry has changed can lead to a stuck bit or collapsed borehole. The best bentonite properties can be maintained by being certain of the pH of the drilling mud.
Drilling polymer is a special form of starch that gets very thick when mixed with water. Using polymer in the drilling mud will improve the bentonite properties. It comes as white granules or as a clear liquid. Liquid polymer is easier to mix, but dry polymer is weighs less and so is easier to store and transport.
There are different kinds of polymer, and not all types behave the same way. Some common polymers are Poly-Sal, EZ-Mud DP, and Kwik-Vis-D. (An older type of polymer was called ""revert"" and this term is still used by some drillers to describe a polymer.)All can be added to the drilling mud to improve the bentonite properties.
It is necessary to read the manufacturers instructions to be sure you are using the polymer correctly so as to achieve the best bentonite properties. In general, it takes a very small amount of polymer to make a thick drilling fluid.
When drilling in heavy clay, the clay will clump together to form chunks that can be as hard to remove from the borehole as large gravel. So the drilling mud needs to be thick enough to lift these cuttings.
If not removed, the clumps can form a ""boot"" or ""collar"" around the drill pipe, cutting off circulation. Adding polymer to the drilling mud - after the bentonite is fully hydrated - improves the bentonite properties and will help prevent these clumps from forming.
If the drilling mud already includes polymer, and additional bentonite is needed to increase the bentonite properties of viscosity or to replace lost drilling fluid, first hydrate the bentonite in a separate mixing drum before adding it to the active drilling fluid.
The recommended rate for two common dry polymers (Bariod ""EZ-Mud DP"" or WYO-BEN ""Kwik-VisD"") in a bentonite-based drilling mud ranges from 30 to 90 grams per 100 liters (0.25 to 0.75 pounds per 100 gallons).
A range is given because the drilling mud may need more or less viscosity for the particular formation. Use the minimum amount of polymer needed to maximize bentonite properties and lift cuttings out of the borehole and keep clay from clumping.
The mud pits are pumped out to remove all of the bentonite, fresh water is mixed with polymer using the mud pump, and drilling is resumed. This method removes most of the bentonite wall cake thus making it much easier to develop the well.
Because polymer may be more expensive or more difficult to obtain than bentonite, some drillers switch to polymer only when they are reaming the aquifer zone where they plan to place a well screen.
Polymer is easily broken down (made thin like water) by adding common household liquid bleach (3%-5% sodium hypochlorite). This is the same bleach used to disinfect the well after installing a hand pump.
It takes about 4 liters (l gallon) of bleach to break down 400 liters (100 gallons) of polymer, when the drilling mud is only polymer and water. Only the fluid in the borehole needs to be treated.
A 30-meter (100") borehole 200 mm (8") in diameter has a volume of around 900 liters (240 gal.). So, when drilling with polymer alone, it would take 9 liters (2.4 gal.) of bleach to treat the polymer when the well is being developed.
If polymer is used only to enhance bentonite properties and the drilling mud, then much less bleach is needed to break down the polymer. If the polymer is not broken down with bleach, then it can promote bacteria growth. For this reason, whenever polymer is used, it is important to add bleach to the well as it is being developed.
Other drilling mud products are available for a wide variety of applications and circumstances where bentonite properties need to be improved. These are beyond the scope of this introductory material. More information can be obtained from these major distributors of well drilling products:
A manufacturers" application rate for a drilling mud component - such as 1/2 pound per 100 gallons - can be difficult to relate to the volumes that are being used on a LS100/200 well drilling site.
The following summarizes the materials needed - according to manufacturers" recommendations - to make good drilling mud for a 200 mm (8") diameter borehole 30 meters (100") deep and for a borehole 60 M (200") deep:
It may take several hours for an army of women and children, walking from a river 2 km away carrying buckets of water on their heads, to fill just one mud pit.
It is very useful to have extra 55-gallon drums, a small 12-volt water pump, and hoses so that water can be collected from a source a distance away from the drilling site.
Carry the drums in the drilling equipment transport truck to a river or pond, hook the pump to the truck battery and pump water to fill the drums. The pump can also be used to transfer water from the drums on the truck to the storage drums at the drilling site.
As noted above, using a portable ""bladder tank"" is an efficient way to store water on the drilling site. When finished, the tank can be easily drained, rolled up, and loaded on a truck by two men.
Bladder tanks come in sizes ranging from 1,000 liters to more than 200,000 liters. A 6,000 liter (1,585 gallon) tank should provide enough capacity for a LS200 drilling operation.
Gathering water to fill a bladder tank is no less work than when using 55-gallon drums to store water, but the bladder should need to be filled only once at a drill site so drilling would not be interrupted to collect more water.

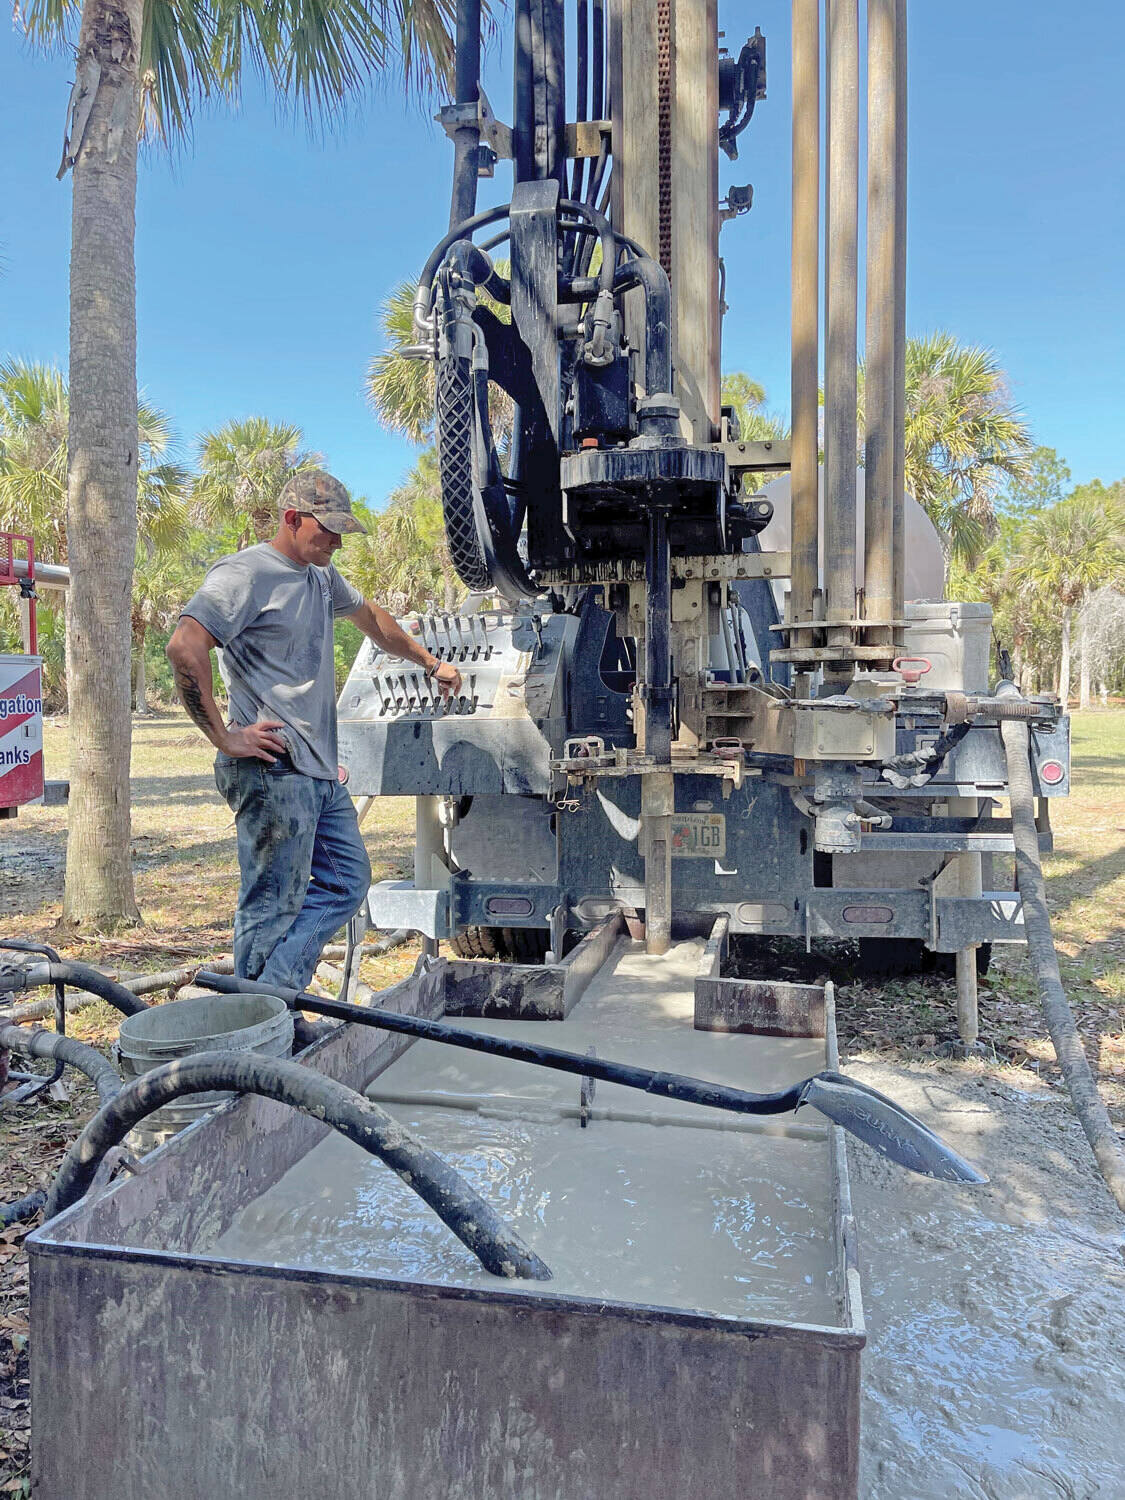
There are many different ways to drill a domestic water well. One is what we call the “mud rotary” method. Whether or not this is the desired and/or best method for drilling your well is something more fully explained in this brief summary.
One advantage of drilling with compressed air is that it can tell you when you have encountered groundwater and gives you an indication how much water the borehole is producing. When drilling with water using the mud rotary method, the driller must rely on his interpretation of the borehole cuttings and any changes he can observe in the recirculating fluid. Mud rotary drillers can also use borehole geophysical tools to interpret which zones might be productive enough for your water well.
The mud rotary well drilling method is considered a closed-loop system. That is, the mud is cleaned of its cuttings and then is recirculated back down the borehole. Referring to this drilling method as “mud” is a misnomer, but it is one that has stuck with the industry for many years and most people understand what the term actually means.
The water is carefully mixed with a product that should not be called mud because it is a highly refined and formulated clay product—bentonite. It is added, mixed, and carefully monitored throughout the well drilling process.
The purpose of using a bentonite additive to the water is to form a thin film on the walls of the borehole to seal it and prevent water losses while drilling. This film also helps support the borehole wall from sluffing or caving in because of the hydraulic pressure of the bentonite mixture pressing against it. The objective of the fluid mixture is to carry cuttings from the bottom of the borehole up to the surface, where they drop out or are filtered out of the fluid, so it can be pumped back down the borehole again.
When using the mud rotary method, the driller must have a sump, a tank, or a small pond to hold a few thousand gallons of recirculating fluid. If they can’t dig sumps or small ponds, they must have a mud processing piece of equipment that mechanically screens and removes the sands and gravels from the mixture. This device is called a “shale shaker.”
The driller does not want to pump fine sand through the pump and back down the borehole. To avoid that, the shale shaker uses vibrating screens of various sizes and desanding cones to drop the sand out of the fluid as it flows through the shaker—so that the fluid can be used again.
When the borehole has reached the desired depth and there is evidence that the formation it has penetrated will yield enough water, then it’s time to make the borehole into a well.
Before the well casing and screens are lowered into the borehole, the recirculating fluid is slowly thinned out by adding fresh water as the fluid no longer needs to support sand and gravel. The driller will typically circulate the drilling from the bottom up the borehole while adding clear water to thin down the viscosity or thickness of the fluid. Once the fluid is sufficiently thinned, the casing and screens are installed and the annular space is gravel packed.
Gravel pack installed between the borehole walls and the outside of the well casing acts like a filter to keep sand out and maintain the borehole walls over time. During gravel packing of the well, the thin layer of bentonite clay that kept the borehole wall from leaking drilling fluid water out of the recirculating system now keeps the formation water from entering the well.
This is where well development is performed to remove the thin bentonite layer or “wall cake” that was left behind. Various methods are used to remove the wall cake and develop the well to its maximum productivity.
Some drillers use compressed air to blow off the well, starting at the first screened interval and slowly working their way to the bottom—blowing off all the water standing above the drill pipe and allowing it to recover, and repeating this until the water blown from the well is free of sand and relatively clean. If after repeated cycles of airlift pumping and recovery the driller cannot find any sand in the water, it is time to install a well development pump.
Additional development of the well can be done with a development pump that may be of a higher capacity than what the final installation pump will be. Just as with cycles of airlift pumping of the well, the development pump will be cycled at different flow rates until the maximum capacity of the well can be determined. If the development pump can be operated briefly at a flow rate 50% greater than the permanent pump, the well should not pump sand.
Mud rotary well drillers for decades have found ways to make this particular system work to drill and construct domestic water wells. In some areas, it’s the ideal method to use because of the geologic formations there, while other areas of the country favor air rotary methods.
Some drilling rigs are equipped to drill using either method, so the contractor must make the decision as to which method works best in your area, for your well, and at your point in time.
To learn more about the difference between mud rotary drilling and air rotary drilling, click the video below. The video is part of our “NGWA: Industry Connected” YouTube series:
Gary Hix is a Registered Professional Geologist in Arizona, specializing in hydrogeology. He was the 2019 William A. McEllhiney Distinguished Lecturer for The Groundwater Foundation. He is a former licensed water well drilling contractor and remains actively involved in the National Ground Water Association and Arizona Water Well Association.
To learn more about Gary’s work, go to In2Wells.com. His eBooks, “Domestic Water Wells in Arizona: A Guide for Realtors and Mortgage Lenders” and “Shared Water Wells in Arizona,” are available on Amazon.


 8613371530291