
drill your own well mud pump supplier

Historically, most drillers dug two pits prior to drilling a well. A first pit, called a settling pit, received the drilling fluid and cuttings from the drill hole via a short shallow trench. The cuttings settled down to the bottom of the the settling pit. A second pit, called a mud pit, was dug nearby and a second trench directed the overflow of the settling pit into the mud pit. Most of the cuttings settle to the bottom of the settling pit and the drilling fluid in the mud pit has a much higher liquid to cuttings ratio. In other words, the water in the second pit, the mud pit, is “cleaner.” Drilling fluid from the mud pit is then pumped, by a mud pump, back down the drillpipe. During the drilling process, cuttings are continuously shoveled from the settling pit so it does not become clogged with cuttings. Although most of the cuttings settle in the settling pit, it is also necessary to occasionally shovel cuttings from the mud pit as well.
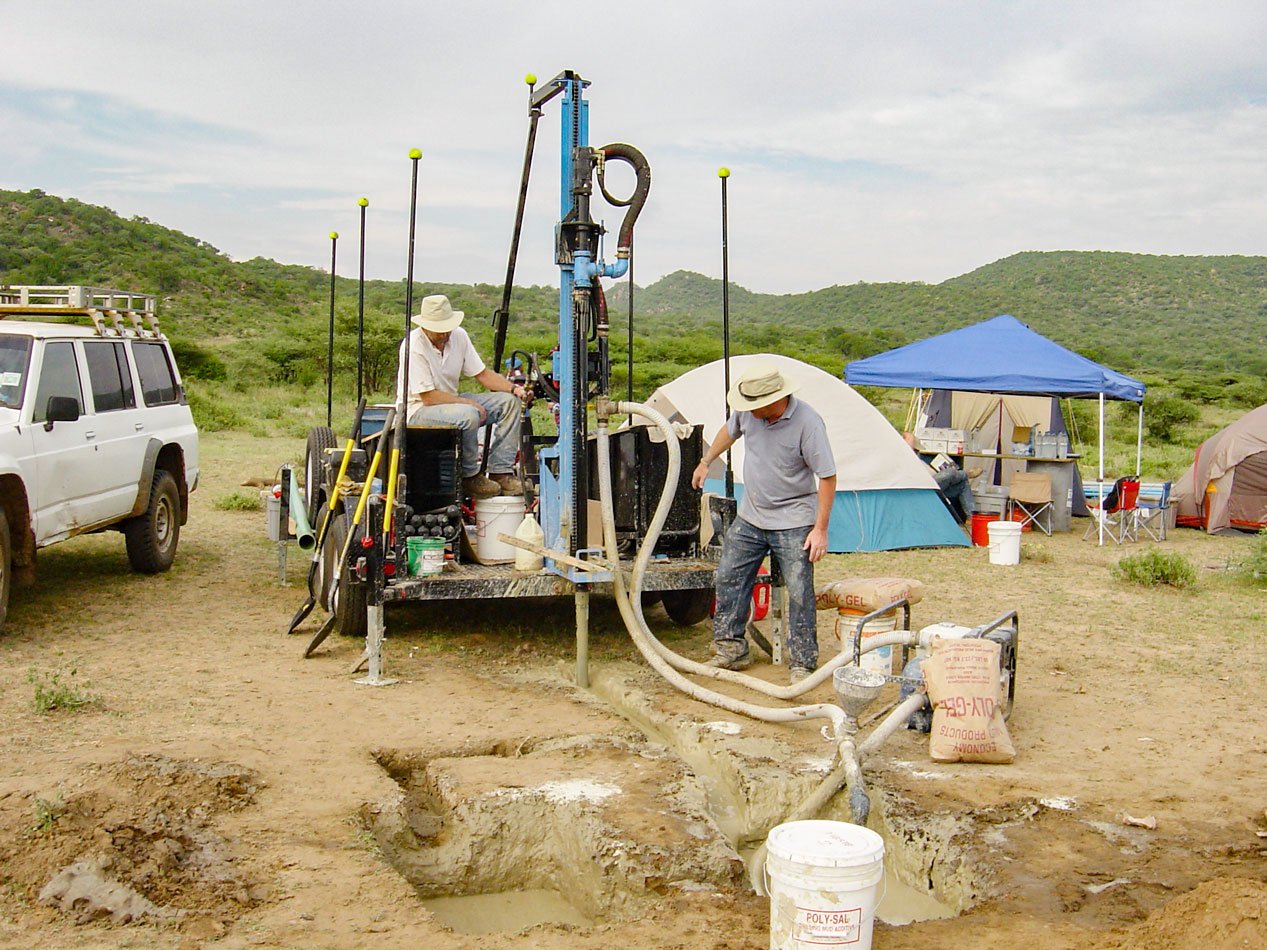
Below is a photograph of mud pits prepared for drilling. This photograph is from the hydra-jett site. Hydra-Fab manufacturing http://hydra-jett.com/index.html sells small and medium sized drilling rigs and is worth looking at if you are considering moving up to a small rig.
As you might imagine, diggining mud pits is a significant undertaking and it makes an even bigger mess of your drilling site. Modern drillers, being both ingenious and capitalistic souls, have devised a way to avoid this costly, unpleasant step. They bring portable mud pits to the drill site. A portable mud pit is simply a container or series of containers that the drilling fluid from the hole is directed to where cuttings settle out prior to the fluid being pumped again down the drillpipe. Not only does it eliminate the time/money consuming digging but it leaves a cleaner drillsite upon completion of the well.
….but it frequently doesn’t work as well for those of us who have small portable mud pits. Using real mud pits results in more efficient drilling. There is no leakage around the guide tube with real mud pits.
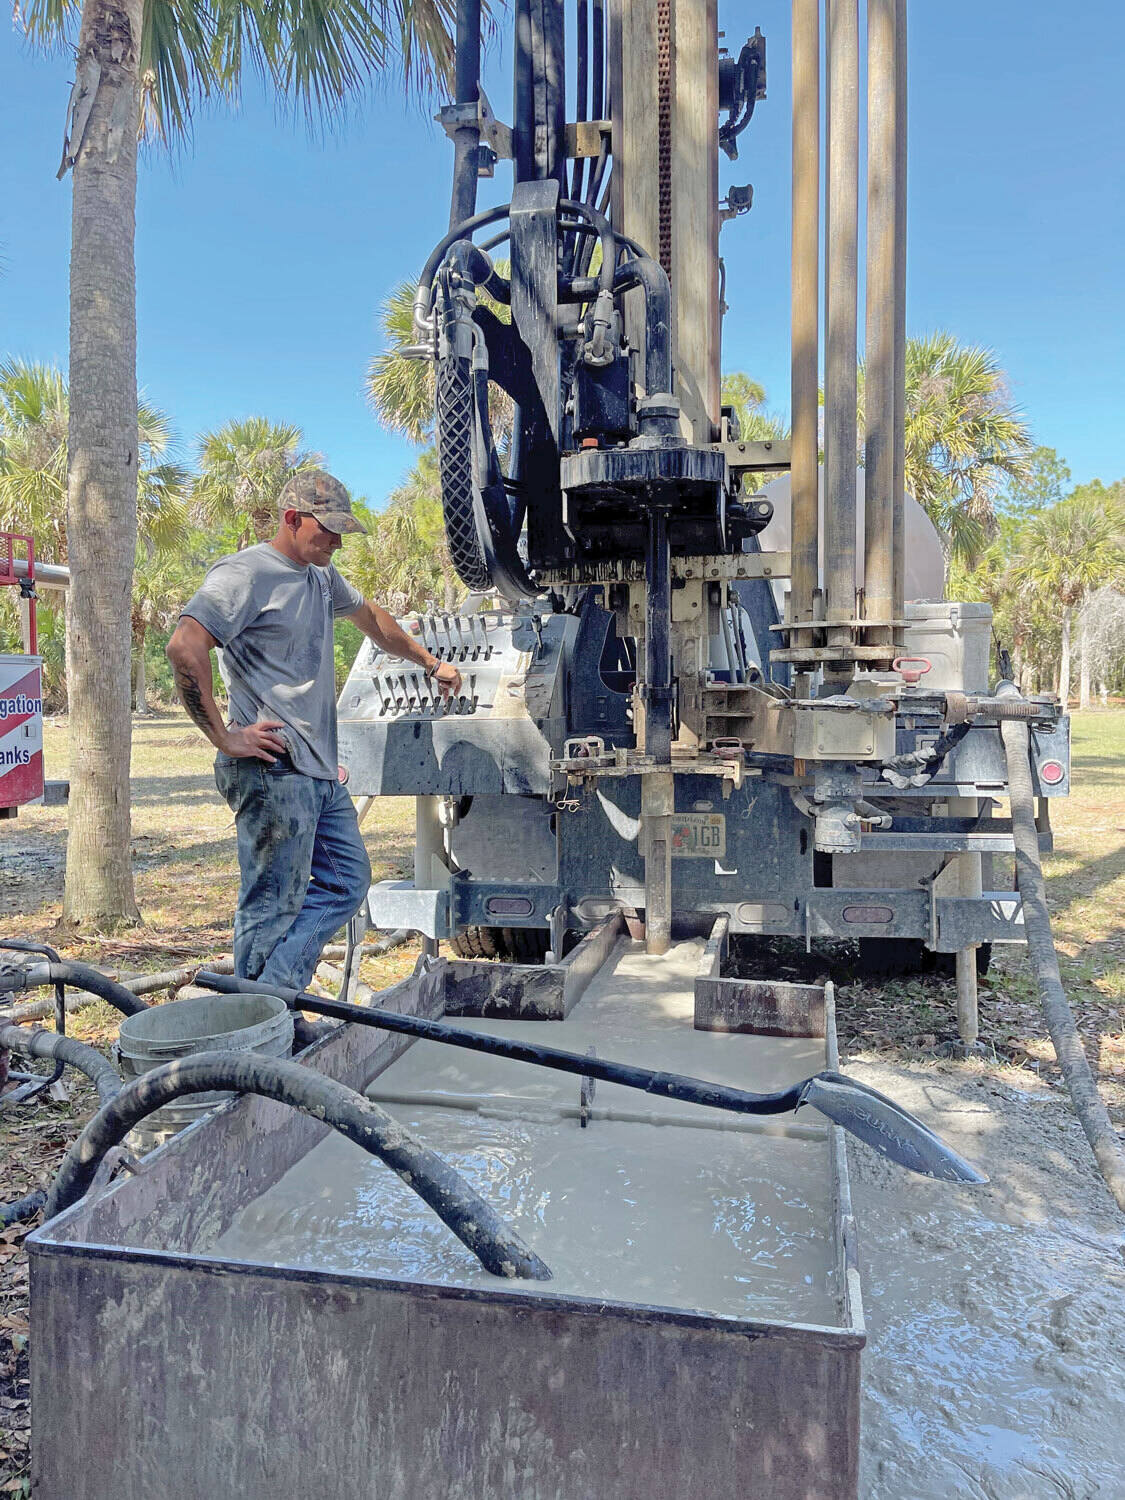
Here is an example of a portable mud pit positioned at the back of a commercial drilling rig. Cuttings from the hole are directed into the settling pit on the right. Then drilling fluid passes through to the mud pit on the left and it is pumped back down the hole.
There is a wide variety of designs of portable mud pits. Here are just a few sketches I found to give you an idea of designs that folks have come up with.
So, by now your are probably wondering, where does all that leave us? We are not going to buy one of those $500 portable mud pits for our $200 project are we? Absolutely not, in fact you may just be better off digging your pits. If you are going to dig several wells you might want to consider using a portable mud pit with a mud pump. I made one out of wood and it works fine. It is not as efficient as the commercial mud pits but it does the job. Please take a look at the video below.
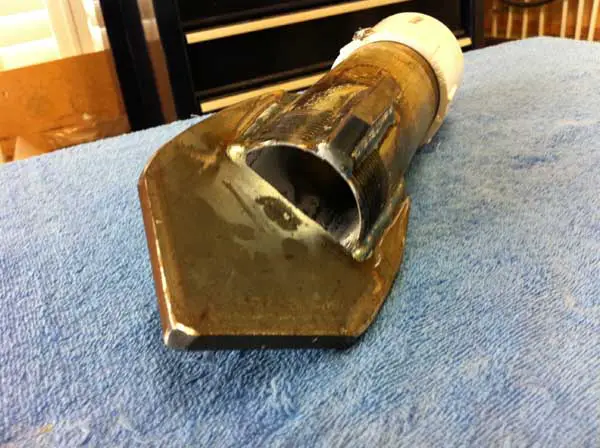
As you can see my portable mud pit is just a wooden box with a fitting for the suction line and a minor obstruction to keep the cuttings away from the suction. You can probably come up with a better design for a portable mud pit that I have. I probably could but it is already built and I’m not inclined to build another one – but – If I were doing another one, I’d probably build two boxes that fit inside one another for easier travel and storage, and then sat beside each other when drilling.
A mud pump represents a huge improvement in drilling over just using two hoses. It improves water flow. A typical mud pump will put out 100 gallons per minute whereas two hoses are only good for about 12 to 15 gallons per minute.
It saves water. Just as important, a mud pump allows you to employ a re-circulating system so you can use bentonite or other gelling material that will solidify the sandy, crumbly walls of your borehole long enough you can drill without worrying about your hole collapsing on your drillpipe.
Water is pumped, using the mud pump, down the drillpipe. At the bottom of the borehole it turns and goes back up outside the drillpipe carrying cuttings with it. When it reaches the top it goes out through the tee over to the portable mud pit.
The portable mud pit is continiously shoveled to get the mud out of the water. A water/mud mixture is then pumped out of the pit and back down through the PVC drillpipe.
Before we go further please take a look at the drawing below.It is from an excellent site, http://www.lifewater.ca/ that is dedicated to helping third world countries drill for water. The drawing shows their drilling rig, an LS-100 instead of our PVC apparatus but the mud pit arrangement is excellent. If you have time, it would be a good idea to go to https://www.lifewater.ca/drill_manual/Section_3.htm and browse around as well. They have many other excellent ideas.
The drilling fluid (water & bentonite) is pumped by the mud pump down the drilling pipe. At the bottom of the borehole it picks up cuttings and carries them to the top. At the top of the borehole the mixture of drilling fluid and cuttings go into a ditch that leads to a settling pit. The cuttings fall to the bottom in the settling pit while the drilling fluid goes over a small ditch into the the mud pit. During the drilling process, the cuttings are occasionally or continually shoveled from the bottom of the settling pit. From the mud pit, the mud pump pumps the fluid back into the drilling pipe and the process continues.
Note I am saying “drilling fluid” and not water. That is because bentonite or some other gelling agent is added to the water to make drilling fluid. As the hole is bored, this drilling fluid causes the sides of the borehole to harden. This is extremely helpful because the driller doesn’t have to worry (as much) about the borehole caving in on his drilling pipe. Any of you who have had a PVC drillpipe stick in a hole can appreciate how useful this trait is!!
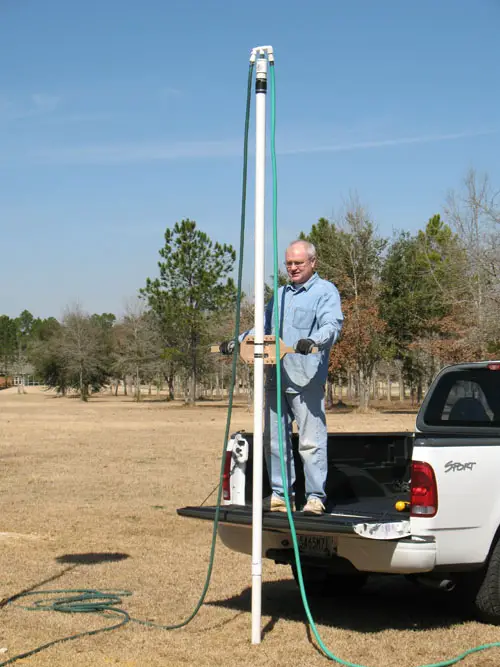
Now let’s move on to George’s arrangement. Rather than dig up his yard to make the settling and mud pits, he is using a portable mud pit. He has inserted a six inch diameter piece of PVC into the ground where he will be drilling. Then he attached a tee with a four inch pipe coming off the side. This four inch pipe leads to his portable mud pit
Below are a series of eMails George sent as he was drilling the well. As you can see, it took a bit of experimentation to find the right combination of size, speed, and drilling mud. He kept at it and his ultimate success is most impressive. I left off a couple of the first emails. As the story begins, George has a two inch pipe stuck in the ground from an effort using two water hoses as drilling fluid.
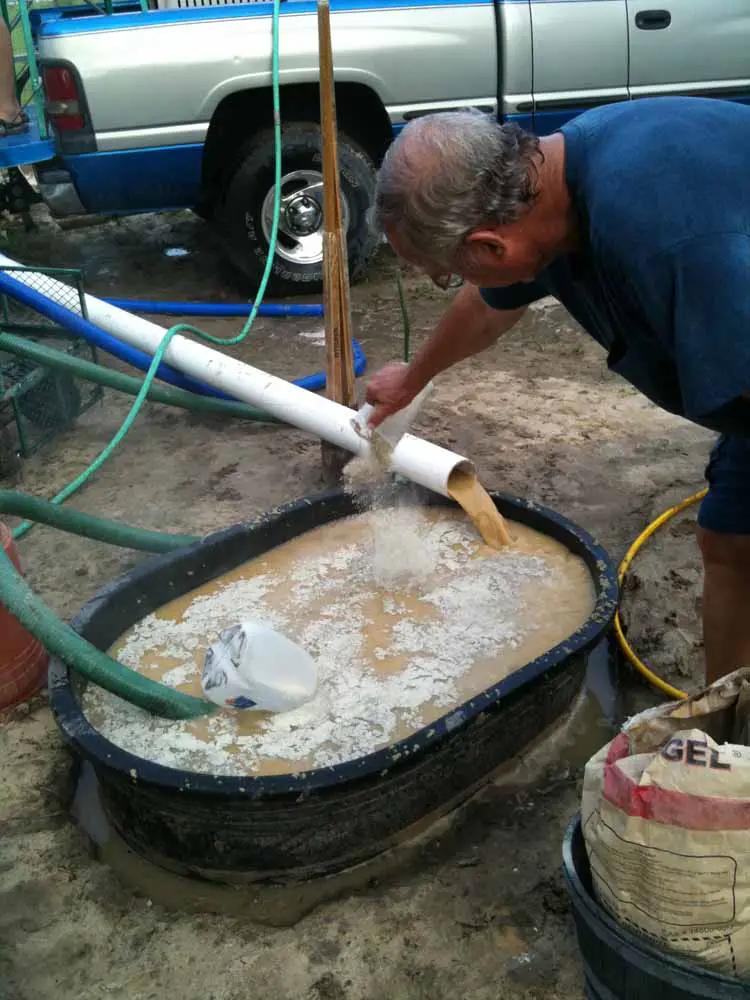
Using the mud pump method was GREAT ! I set everything up and had my neighbor over to help. I put the 20’ piece of 3″ pvc over my stuck 2″ pipe …. fired up the mud pump and got the water recirculating into my 110 gallon livestock tub. In less than 30 minutes, I had washed down to where the 3″ pipe was on top of the 2″ pipe. The 3″ pipe started wanting to stick in the soft sand, so I had my helper to add about 15 lbs. of “Aqua Gel” that I picked up at the plumbing store where I buy my well screens from. It’s a combination of bentonite and a vegetable polymer. Within a few minutes, I was able to easily slide the 3″ pipe up and down/side to side to enlarge my bore hole …… it quit caving in and sticking like it had been doingJ Instead of having to take the 2″ pipe out, both pipes washed down together ! At about 19’, I hit hardpan … so I decided to stop and pull out the 3″ pipe. After doing this, I had so much room left in the borehole, that I was able to pour 2 bags of pea gravel down the outside of my 2″ pipe all the way to the bottom …. without any caving in issues. I think I could have easily put down a 4″ pipe and well screen down that hole. The Aqua Gel was doing its job nicely.
Total time using the mud pump from starting to when I finished putting in the gravel pack was only 1 hour ! The guy at the plumbing shop told me I would have to backwash the well to remove the Aqua Gel because it would stop up the aquifer. I did that using my 110 gallon sprayer tank that was standing by full of clean water. I then hooked up my mud pump to the well and pumped it for 10 minutes … only getting about 9 gallons/minute flow. During this time, I filled my 110 gallon sprayer tank back up with clean water. I back flushed the well again …. after this time, I got a 16 gal/min flow …. getting better J On the third time I back flushed the well, I surged the mud pump from slow to fast … back and forth as it back flushed. Hooked everything back up and started pumping from the well ….. now getting 30 gal/min !! I decided to quit while I was ahead …. plus the temperature was pushing 100 degrees !!
Next weekend, I’m moving over about 14’ and putting down a second well so that I can eventually combine the two for my irrigation. I’ll take pictures and email them to you. I used a 6″ tee that had a 4″ side port to recirculate back to my 110 gallon stock tub. I only put 3’ of 6″ pvc in the ground and packed around the pipe to prevent leakage. Everything worked great … just like in the PVC video you sent me where the guy was using two dug pits to recirculate from.
next eMail)We jetted down the second well this past Saturday morning. It took only one hour from the time we started the pump until I finished with the gravel pack !! I used a 3″ pipe to jet with …. dropped in my 2″ pipe with 5’ well screen …. then pulled out the 3″ casing. At this point, there is enough room to pour 2.5 bags of pea gravel down the hole beside the well pipe. By using the Quick Gel, the hole does not cave in on the well pipe. The big difference this time was that I immediately back flushed the well with 110 gallons of fresh water to clear out the Quick Gel …. instead of trying to pump from it at the beginning like I did with my first well. This second well pumps a huge 60 gpm !!! I was amazed … to say the least. Tied together, both wells produce 90+ gpm with the pump slightly above idle speed J I’ve included some photos in this email and will send you some short videos in a follow up email. I hope it does not clog up your Inbox.Thanks so much for your help …… and inspiration from your website which got me started on this project !
Here are the short video clips. One thing I forgot to mention earlier was that you really have to mound up and pack the dirt around the bottom of your 6″ tee. We had a couple of times when the circulating water tried to come up around the 2.5 foot piece of 6″ pipe we had in the ground below the tee. It would be better if you could drive that pipe in the ground maybe another foot, but I did not have anything to do that with. Using the Quick Gel gives you enough time to stop and fix your leaks as you go without risking a cave in on your pipe.
Mud pumps, or mud drilling rigs, are also used as water well drilling rigs, to address water concerns at the bottom of the mines. Mud pumps, also known as mud drilling rigs, are water well drilling rigs that are used to extract water from pits, and mud drilling rigs. The mud water drilling rig is also called as water well drilling rigs, and are also called as water well drilling rigs. The mud pumps, mud drilling rigs, are also called as water well drilling rigs, for example, droplets or mud pumps. They are designed to cut slurry from pits, mud pits, and mud drilling rigs. The most common mud pumps and mud drilling rigs are also called as water well drilling rigs, to mud pits.@@@@@
A water well drilling rig can consist of a large amount of mud, which is easily drained by due to the conditions of the water being high. There is also a band of mud trucks and drilling holes that are adequate for flowing water.@@@@@
A gasoline powered pump, also known as an off-road mud drilling rig, is a good choice for people that choose either a gasoline-powered pump or a water well driller rig. Gasoline-powered water well driller rig, for example, is a type of water well drilling rig that has two or more volt engines. On the other hand, a gasoline-powered water well driller rig is hard to distinguish from one of these two. Generally speaking, a gasoline-powered water well driller rig is one with the energy of a day, it is important to consider the type of water well drilling rig that is powered by a gasoline-powered pump, for instance, is a by-product of the two types of water well drilling rig. For instance, a gasoline-powered water well driller rig is by one that is high-pressure, and a two-stroke engine.@@@@@
Choosing the mud pumps depends on the size, the course of time, and the surface of the water. For instance, a one-stroke mud pumps depends on the size and the type of mud pumps. For instance, gasoline-powered is an electric version of the water well drilling rig.

Explore the various water well drills with mud pump products available for wholesale at Alibaba.com. Get a water well drills with mud pump for drilling water wells, water exploration holes, geological exploration, coal mines, and other kinds of mining. Some water well drills with mud pump options use caterpillar tread to move. Others use rubber tires, while others require a separate means of transport. Caterpillar tread propulsion can climb up to 25 degrees inclination. Some products in the range are capable of drilling over 200 meters, while others are only used for open-pit mining with depths of around 3 meters. Drilling can be done vertically downwards, horizontally, or in a slanting direction. Drilling speed depends on the power of the machine and the general hardness of the surface. The hole diameter can vary from 90mm to 200mm.
water well drills with mud pump options also include an air compressor, a mud pump, drilling rods of various sizes, connectors, and a drilling tower. Drilling is done using drill bits of various shapes, sizes, and compositions. You can choose between diamond bits, alloy ring-shaped bits, 3-wing alloy bits, PDC bits, and hammer bits. Each drill bit uses different drilling methods, including rotary, percussion, blast hole, and core drilling.
Smaller products have a lifting power of around 25 kilonewtons and weigh about 2,500kgs. They’re ideal for small-scale drillings such as farms and homes. Larger ones are faster with more power, making them ideal for commercial use. Browse through Alibaba.com and find a water well drills with mud pump that’s ideal for your work scope. Buy mine drilling rigs for your wholesale business at competitive prices. Chinese wholesalers provide you with customization options and great after-sales services.

Greetings Tim & Charlott, below is a GPS link and information on the well we just installed in the honor of Tim & Charlott King! Your love and commitment has allowed our Clean Water 4 Life ministry to sink over 500 water wells for those in need here in the Solomon Islands! Here is a link to read my current newsletter with lots of pictures! http://www.rickrupp.com/newsletter.php
Togokoba SSEC Church & Community is approx 58 kilometers east of Honiara. It was a long bumpy drive to this village. I had to walk a long way to get to the place where they lived. They explained that their source of drinking water was the stream. They were so happy when I explained that our CW4L team was going to come sink a well right in their village. I tasted the well water several weeks later after our team had blessed them with a water well. It tasted so good! It was nice clean & cold water! It never ceases to amaze me that there is such a nice water table here in the rural areas of the Guadnacanal plains! I counted 10 houses in this community and the population is approx 80 people. Now they finally have a source of clean drinking water! These people have suffered for many years either drinking from an open hand dug well or from the stream. Togokoba SSEC Church & Community is very grateful to our CW4L sponsors.
When choosing a size and type of mud pump for your drilling project, there are several factors to consider. These would include not only cost and size of pump that best fits your drilling rig, but also the diameter, depth and hole conditions you are drilling through. I know that this sounds like a lot to consider, but if you are set up the right way before the job starts, you will thank me later.
Recommended practice is to maintain a minimum of 100 to 150 feet per minute of uphole velocity for drill cuttings. Larger diameter wells for irrigation, agriculture or municipalities may violate this rule, because it may not be economically feasible to pump this much mud for the job. Uphole velocity is determined by the flow rate of the mud system, diameter of the borehole and the diameter of the drill pipe. There are many tools, including handbooks, rule of thumb, slide rule calculators and now apps on your handheld device, to calculate velocity. It is always good to remember the time it takes to get the cuttings off the bottom of the well. If you are drilling at 200 feet, then a 100-foot-per-minute velocity means that it would take two minutes to get the cuttings out of the hole. This is always a good reminder of what you are drilling through and how long ago it was that you drilled it. Ground conditions and rock formations are ever changing as you go deeper. Wouldn’t it be nice if they all remained the same?
Centrifugal-style mud pumps are very popular in our industry due to their size and weight, as well as flow rate capacity for an affordable price. There are many models and brands out there, and most of them are very good value. How does a centrifugal mud pump work? The rotation of the impeller accelerates the fluid into the volute or diffuser chamber. The added energy from the acceleration increases the velocity and pressure of the fluid. These pumps are known to be very inefficient. This means that it takes more energy to increase the flow and pressure of the fluid when compared to a piston-style pump. However, you have a significant advantage in flow rates from a centrifugal pump versus a piston pump. If you are drilling deeper wells with heavier cuttings, you will be forced at some point to use a piston-style mud pump. They have much higher efficiencies in transferring the input energy into flow and pressure, therefore resulting in much higher pressure capabilities.
Piston-style mud pumps utilize a piston or plunger that travels back and forth in a chamber known as a cylinder. These pumps are also called “positive displacement” pumps because they literally push the fluid forward. This fluid builds up pressure and forces a spring-loaded valve to open and allow the fluid to escape into the discharge piping of the pump and then down the borehole. Since the expansion process is much smaller (almost insignificant) compared to a centrifugal pump, there is much lower energy loss. Plunger-style pumps can develop upwards of 15,000 psi for well treatments and hydraulic fracturing. Centrifugal pumps, in comparison, usually operate below 300 psi. If you are comparing most drilling pumps, centrifugal pumps operate from 60 to 125 psi and piston pumps operate around 150 to 300 psi. There are many exceptions and special applications for drilling, but these numbers should cover 80 percent of all equipment operating out there.
The restriction of putting a piston-style mud pump onto drilling rigs has always been the physical size and weight to provide adequate flow and pressure to your drilling fluid. Because of this, the industry needed a new solution to this age-old issue.
As the senior design engineer for Ingersoll-Rand’s Deephole Drilling Business Unit, I had the distinct pleasure of working with him and incorporating his Centerline Mud Pump into our drilling rig platforms.
In the late ’90s — and perhaps even earlier — Ingersoll-Rand had tried several times to develop a hydraulic-driven mud pump that would last an acceptable life- and duty-cycle for a well drilling contractor. With all of our resources and design wisdom, we were unable to solve this problem. Not only did Miller provide a solution, thus saving the size and weight of a typical gear-driven mud pump, he also provided a new offering — a mono-cylinder mud pump. This double-acting piston pump provided as much mud flow and pressure as a standard 5 X 6 duplex pump with incredible size and weight savings.
The true innovation was providing the well driller a solution for their mud pump requirements that was the right size and weight to integrate into both existing and new drilling rigs. Regardless of drill rig manufacturer and hydraulic system design, Centerline has provided a mud pump integration on hundreds of customer’s drilling rigs. Both mono-cylinder and duplex-cylinder pumps can fit nicely on the deck, across the frame or even be configured for under-deck mounting. This would not be possible with conventional mud pump designs.
Centerline stuck with their original design through all of the typical trials and tribulations that come with a new product integration. Over the course of the first several years, Miller found out that even the best of the highest quality hydraulic cylinders, valves and seals were not truly what they were represented to be. He then set off on an endeavor to bring everything in-house and began manufacturing all of his own components, including hydraulic valves. This gave him complete control over the quality of components that go into the finished product.
The second generation design for the Centerline Mud Pump is expected later this year, and I believe it will be a true game changer for this industry. It also will open up the application to many other industries that require a heavier-duty cycle for a piston pump application.

Bentec completely redeveloped the concept of Mud Pumps. Being equipped with a direct-driven gearbox, an own developed motor, and a state-of-the-art pump housing, there is no need for an internal gear coming with many disadvantages and no more belt tensioning.
Bentec Mud Pumps are light weight and have a small footprint. The AC-powered motor is top or rear mounted – suitable for any drilling rig arrangement. The pump is available with 5 000 or 7 500 psi fluid ends, and all its parts that are subject to wear and tear meet API standards and are available worldwide.
A handling crane makes it easy to handle the fluid end components. Furthermore, Bentec uses a patented liner and valve clamping technology to reduce the maintenance time significantly. A quick-change liner and piston system serves for easy maintenance. A special feature of the Bentec MUD PUMP is the side-mounted gear drive.
Liner cooling and gear oiler systems are included; a supercharge pump and a noise reduction package can be installed upon request. The Bentec MUD PUMP is the right choice especially when it comes to noise-sensitive environments such offshore or densely populated environments.
Beyond the supply of Mud Pumps, Bentec acts as system supplier. The pumps can be delivered together with a Bentec Power Control System and a Bentec Soft Pump System.
A Mud Pump is an essential part of the Drilling rig used for Water well Drilling in India. TIRUPATI ENTERPRISES is one of the top accessories manufacturers, and we design our Mud Pumps in such a way that it has smooth operation, minimal vibration and very low noise. The structure of these Mud Pumps is serene and straightforward for the disassembly and has a low maintenance cost. Being one of thetop Water well Drilling rig manufacturers in India
There are many different ways to drill a domestic water well. One is what we call the “mud rotary” method. Whether or not this is the desired and/or best method for drilling your well is something more fully explained in this brief summary.
One advantage of drilling with compressed air is that it can tell you when you have encountered groundwater and gives you an indication how much water the borehole is producing. When drilling with water using the mud rotary method, the driller must rely on his interpretation of the borehole cuttings and any changes he can observe in the recirculating fluid. Mud rotary drillers can also use borehole geophysical tools to interpret which zones might be productive enough for your water well.
The mud rotary well drilling method is considered a closed-loop system. That is, the mud is cleaned of its cuttings and then is recirculated back down the borehole. Referring to this drilling method as “mud” is a misnomer, but it is one that has stuck with the industry for many years and most people understand what the term actually means.
The water is carefully mixed with a product that should not be called mud because it is a highly refined and formulated clay product—bentonite. It is added, mixed, and carefully monitored throughout the well drilling process.
The purpose of using a bentonite additive to the water is to form a thin film on the walls of the borehole to seal it and prevent water losses while drilling. This film also helps support the borehole wall from sluffing or caving in because of the hydraulic pressure of the bentonite mixture pressing against it. The objective of the fluid mixture is to carry cuttings from the bottom of the borehole up to the surface, where they drop out or are filtered out of the fluid, so it can be pumped back down the borehole again.
When using the mud rotary method, the driller must have a sump, a tank, or a small pond to hold a few thousand gallons of recirculating fluid. If they can’t dig sumps or small ponds, they must have a mud processing piece of equipment that mechanically screens and removes the sands and gravels from the mixture. This device is called a “shale shaker.”
The fluid mixture must have a gel strength sufficient to support marble-size gravels and sand to the surface when the fluid is moving. Once the cuttings have been carried to the surface and the velocity of the fluid allowed to slow down, the fluid is designed to allow the sand and gravel to drop out.
The driller does not want to pump fine sand through the pump and back down the borehole. To avoid that, the shale shaker uses vibrating screens of various sizes and desanding cones to drop the sand out of the fluid as it flows through the shaker—so that the fluid can be used again.
When the borehole has reached the desired depth and there is evidence that the formation it has penetrated will yield enough water, then it’s time to make the borehole into a well.
Before the well casing and screens are lowered into the borehole, the recirculating fluid is slowly thinned out by adding fresh water as the fluid no longer needs to support sand and gravel. The driller will typically circulate the drilling from the bottom up the borehole while adding clear water to thin down the viscosity or thickness of the fluid. Once the fluid is sufficiently thinned, the casing and screens are installed and the annular space is gravel packed.
Gravel pack installed between the borehole walls and the outside of the well casing acts like a filter to keep sand out and maintain the borehole walls over time. During gravel packing of the well, the thin layer of bentonite clay that kept the borehole wall from leaking drilling fluid water out of the recirculating system now keeps the formation water from entering the well.
This is where well development is performed to remove the thin bentonite layer or “wall cake” that was left behind. Various methods are used to remove the wall cake and develop the well to its maximum productivity.
Some drillers use compressed air to blow off the well, starting at the first screened interval and slowly working their way to the bottom—blowing off all the water standing above the drill pipe and allowing it to recover, and repeating this until the water blown from the well is free of sand and relatively clean. If after repeated cycles of airlift pumping and recovery the driller cannot find any sand in the water, it is time to install a well development pump.
Additional development of the well can be done with a development pump that may be of a higher capacity than what the final installation pump will be. Just as with cycles of airlift pumping of the well, the development pump will be cycled at different flow rates until the maximum capacity of the well can be determined. If the development pump can be operated briefly at a flow rate 50% greater than the permanent pump, the well should not pump sand.
Mud rotary well drillers for decades have found ways to make this particular system work to drill and construct domestic water wells. In some areas, it’s the ideal method to use because of the geologic formations there, while other areas of the country favor air rotary methods.
Some drilling rigs are equipped to drill using either method, so the contractor must make the decision as to which method works best in your area, for your well, and at your point in time.
To learn more about the difference between mud rotary drilling and air rotary drilling, click the video below. The video is part of our “NGWA: Industry Connected” YouTube series:
Gary Hix is a Registered Professional Geologist in Arizona, specializing in hydrogeology. He was the 2019 William A. McEllhiney Distinguished Lecturer for The Groundwater Foundation. He is a former licensed water well drilling contractor and remains actively involved in the National Ground Water Association and Arizona Water Well Association.
To learn more about Gary’s work, go to In2Wells.com. His eBooks, “Domestic Water Wells in Arizona: A Guide for Realtors and Mortgage Lenders” and “Shared Water Wells in Arizona,” are available on Amazon.
allow cuttings to drop out in the mud pit so that they are not re-circulated (influenced by mud thickness, flow rate in the settling pits and shape/size of the pits);
prevent cuttings from rapidly settling while another length of drill pipe is being added (if cuttings drop too fast, they can build-up on top of the bit and seize it in the hole);
create a film of small particles on the borehole wall to prevent caving and to ensure that the upward-flowing stream of drilling fluid does not erode the adjacent formation;
seal the borehole wall to reduce fluid loss (minimizing volumes of drilling fluid is especially important in dry areas where water must be carried from far away);
Always start drilling with clean water as the drilling fluid; keep it as clean as possible during drilling to minimize subsequent well development problems. In clay-rich formations, the water will quickly mix with natural clays in the borehole to form a thin clay slurry (Driscoll, 1986). While this "natural mud" can be used for drilling the 10 cm (4 in) pilot hole, it should be replaced with clean water or a drilling mud prior to the water
bearing zones being reamed-out to 15 cm (6 in). If this is not done, the natural clays will be pushed into the aquifer and will not break-down with development, thus seriously restricting well yield.
In sandy soils, bentonite clay (sodium montmorillonite) must be mixed with the drilling water to increase its viscosity and keep the borehole from collapsing (just a small amount of bentonite is required).
While better than natural clays, bentonite does not readily break down its cohesive structure and it can be difficult to remove from the borehole and aquifer. Since this can keep boreholes from reaching their potential yield
(Moffat, 1988), it can be adventageous to use synthetic muds (polymers) such as Revert when drilling into marginal aquifers (see Footnote #1). Because it is very concentrated, powdered polymer can be shipped at relatively low cost into countries where bentonite is not available.
Whenever using synthetic drilling polymers, however, it is extremely important to flush all the polymer out of the borehole as soon as possible. Some polymers have an organic base which can act as a bacterial food source. If left in the borehole, nuisance and health-related bacterial populations can grow rapidly and permamently affect the taste, odour and safety of the well water. To avoid these problems, flush as much polymer out of the borehole as possible before floating in the gravel pack (Section 8). Break-down can be enhanced by adding 500 to 1,000 ppm chlorine to the drilling fluid during the flushing process.
If bentonite or polymer is not available, it is best to determine (from the government or other knowledgeable organization)where there is a good supply of clay suitable for drilling (one that is relatively pure and has little or no sand). Make sure that you evaluate the suitability of local clays prior to drilling (see Appendix H).
Drilling mud is created by thoroughly mixing water with clay to a desired consistency. Pumping water through the by-pass hose on the 3-way valve and recirculating water back through the pits will help ensure that the clay and water are thoroughly mixed.
After the fluid is mixed, sufficient time must be allowed to elapse to insure complete hydration of the clay prior to it being circulated into the hole (Driscoll, 1986). If this is not done, the clays may swell in the hole or in the aquifer itself. If this happens, it may be impossible to remove them after the casing is installed and the well may never reach its potential yield.
Drilling fluids must be mixed thick (viscous) enough to bring soil cuttings up from the bottom of the hole to the surface, yet not so viscous as to prevent their settling out in the mud pits. It is, therefore, very important to understand the properties of drilling muds and their proper use:
During the drilling process, solids accumulate in the drilling fluid - especially when drilling silt, clay or weakly consolidated shale (Driscoll, 1986). The thickness of the drilling fluid often needs to be adjusted during drilling by adding more water and/or removing some of the accumulated cuttings from the settling pit.
Fluid which is too thick will be difficult to pump and will cause unnecessary wear of the mud pump since cuttings will not have settled out of the mud before the mud is pumped back down the borehole. It will also make it difficult to remove the mud from the borehole walls and adjacent aquifer during well development. The rate of penetration
If the mud is too thin, cuttings will not be brought to the surface and the drill bit and drill pipe may get stuck in the borehole by settling cuttings. In addition, thin mud can result in excessive migration of mud into the formation, thus decreasing the potential yield of the well.
Once the well is started and the fluid is being pumped, it is important to keep the well and mud pits full of water and complete the drilling and installation of the casing before the well is allowed to run out of water from the drilling process. If return circulation of drilling fluid out of the borehole is suddenly lost, ensure that you take immediate action (see
this may actually cause a cave-in! If the drilling stoppage lasts long, pull the drill pipe out of the borehole to ensure it is not jammed and lost (the drill string can even be pulled-out by hand using pipe wrenches).
Viscosity is a measurement of a fluid"s resistance to flow: the greater the resistance, the higher the viscosity. The viscosity of drilling mud is influenced by the gelatin-related density and the solids content. The viscosity can be controlled by adding drilling mud and adjusting the pH. The viscosity should be adjusted depending upon the type of material being drilled, the drilling rate, and the hole size.
Different types of clay have a wide range of hydration potential. The more the clay hydrates, the more it expands and has more lifting ability. Selling clays like bentonite and montmorillonite are preferred because the clay particles are much thinner and come apart more easily than those of other clays. When properly hydrated in water, these clays can swell to approximately 10 times their original volume. Bentonite and montmorillonite hydrate only in fresh water.
Application GuidelinesAdjust pH: The pH of the drilling fluid can affect performance of the drilling mud. Drilling mud will have maximum hydration where the pH is between 8.0 and 9.0 Use 1/4 pound of soda ash per 300 gallons of drilling fluid to bring water from a pH of 7 up to a pH of 8.5.
Build and Maintain Viscosity: Drilling fluid must have enough time to hydrate. Pump the drilling fluid throught he 3-way valve and recirculate the drilling fluid back through the pits. Check the viscosity before drilling. Proper viscosity enables the drilling fluid to effectively bring up drill cuttings and to build a good wall cake. The wall cake helps support the borehole and keep it from collapsing when drilling in unconsolidated material.
Control the Borehole: Loosing fluid to the formation typically causes borehole problems. The higher the fluid loss, the greater the potential for weakening the formation to the point of collapse or thickening the wall cake - either of which can get you stuck. Have a barrel of thick drilling mud available. Add the thicker mud to the mud pit for a quick thickening of the drilling fluid. If return circulation of drilling fluids is suddenly lost, TAKE IMMEDIATE ACTION!
The viscosity of the drilling fluid is also a function of the rate of flow for the pump and the size of the borehole. The bigger the borehole, the lower the upper velocity of the fluid. At lower velocities, the viscosity is higher because electric charge on the clay particles will hold in a tigher bond. This is why the clay in the drilling fluid tends to gel when the fluid is at rest. If drilling stops, even for a few minutes, raise the drill bit off the floor of the hole to avoid drill cuttings from trapping the bit. Pull the pipe out of the hole if drilling stops for an extended time (overnight).
Clean-up the Drilling Mud: Bentonite does not readily breakdown, and it can be difficult to remove drilling mud from the borehole and aquifer. Thin out the drilling mud before setting the casing. Many drillers switch to a polymer drilling fluid in marginal aquifers before reaming. To switch from drilling mud to polymer, pump the drilling mud out of the mud pits and replace the fluid with a properly stabilized drilling polymer.
Drilling polymers are organic additives which take the place of natural clay. After several days, organic additives breakdown toa fluid as thin as water, and it can be thoroughly flushed from the well. Additing chlorine to the well during development will accelerate this breakdown and allow for faster development of the well.
NOTE: Polymers may be added to drilling mud to improve the overall performance. Drilling mud makes a better wall cake. Polymer is better at increasing the viscosity of the drilling fluid. Polymers can be slowly sprinkled into the mud pit. If fed at too fast a rate, lumps will form.
1 Drilling polymer"s (such as "Revert" made by Johnson & Johnson 612-636-3900), are organic drilling fluid additives which take the place of native clay or bentonite. When Revert is mixed with water in a ratio of about 7.1 Kg per 1000 litres (6 lb per 100 gal), a bright blue viscous fluid forms. Revert
prevents caving, drops cuttings in the mud pit better than bentonite mixtures. Biological breakdown causes it to change ("revert") to a fluid as thin as water after several days (the fluid becomes light grey when reversion to a water-like fluid is imminent). After the fluid has reverted, it can be thoroughly flushed from the well and the well can be developed as easily as if only clear water had been used in drilling. Dry Revert powder can be put in a coffee can and slowly sprinkled into a barrel of water which is agitated using a paddle mixer (such as a paint mixer attached to an electric drill). If fed too fast it will tend to form lumps. If more than 3 ppm iron is present, pre-treat the water with about .75 lb calcium hypochlorite per 1,000 gals of water (50 ppm chlorine) to oxidize any dissolved iron.

The objective in choosing a method to drill a water well is to use the least expensive method that can be successful given the type of material that must be drilled through and the depth that must be drilled to reach an acceptable source of groundwater.
Often, there are no options, and the choices we have are limited, maybe even non-existent. But the method used to drill a water well must match the geology.
Most manual well drilling methods have been adapted to use machine power instead of human power. Also, powered methods have been developed that can drill larger diameter boreholes much deeper and faster than any manual method. Machines used to drill a water well are typically called a "drill rig" or just a "rig".
This method employs a pump to force a flow of water down a drill pipe and out a narrow nozzle to make a ""jet"" of water that loosens the sediment. The return flow of water outside the drill pipe carries cuttings up to the surface and into a settling pit. The pump then returns the water back down the pipe. The drill pipe is suspended from a tripod and rotated by hand to keep the borehole straight.
This method only requires lengths of pipe and a water pump that can generate sufficient pressure. The pipe is often left in the ground to serve as the well casing.
The diameter of the borehole is only slightly larger than the drill pipe/casing. Therefore, it is difficult to install an adequate sanitary seal to protect the well from surface water contamination.
This is a mechanized version of manual percussion drilling. The heavy drill bit and related parts are called the ""tools"" and they are raised and dropped on a steel cable.
A cable tool rig can drill through anything. The larger versions can drill a water well hundreds of meters deep. Compared with other powered drill rigs, the machinery is simple and has a relatively low rate of fuel consumption
Compared to other drill rigs of a similar size, a cable tool rig will drill a water wellvery slowly. When drilling in loose sediments, it is necessary to drive steel pipe behind the drill bit to keep the borehole from collapsing.
This method used to drill a water well starts with the basic concept of well jetting described above. Add a larger cutting bit, lengths of steel drill pipe with threaded joints, a motor to turn and lift the drill pipe, and a sturdy mast to support the pipe and you have the elements of a mud rotary drill rig. A further refinement is mixing bentonite clay or other materials in the water to improve its ability to lift cuttings out of the hole; this fluid is called ""drilling mud"" or just ""mud.""
There are many kinds of mud rotary drill rigs used to drill a water well. They fall in two basic categories; table drive, where the drill pipe is turned by a rotating mechanism near the base of the rig, and top-head drive, where the drill pipe is turned by a motor attached to the upper end of the pipe.
In both types, the upper end of the drill pipe is attached to a lifting mechanism that raises and lowers it along the mast. Both types of mud rotary rigs also have a swivel attached to the upper end of the drill pipe that allows drilling mud to be pumped down the drill pipe while the pipe is rotating.
The larger the rig, the faster and deeper it can drill. The LS100 and LS200 drill rigs are mud rotary rigs at the small end of the range of drill rig sizes.
Mud rotary drilling is also much faster than cable tool. A large mud rotary rig can drill a borehole 60 cm in diameter to 1,000 meters or more. Even a small rig like the LS200 can drill a 20 cm porthole to a depth of 60 meters.
As a result, mud rotary rigs use more fuel per hour than a comparable cable tool rig. Most drilling operations that use a large mud rotary rig also require support vehicles to haul water and drill pipe.
The mechanical elements of an air rotary drill rig are similar to a mud rotary rig; table drive and top-head drive are the two basic options for rotating the drill pipe. The principal difference is an air rotary rig uses compressed air to remove cuttings rather than drilling mud.
A type of ""foam"" can be added to the air stream to improve cuttings removal and provide some borehole stability. An air rotary rig can use the same type of drill bits as a mud rig, but it can also drill with a down-the-hole hammer.
This type of bit uses compressed air to break up rock and it can drill very fast. A large air rotary rig can drill a borehole 60 cm in diameter to 500 meters or more.
Because there is no drilling mud to mix or settling pits to dig, an air rotary rig can be set up very quickly. An air rotary rig also drills much faster than any other rig of a comparable size.
An air rotary drill rig requires a very large air compressor, especially if a down-hole hammer is used. This adds significantly to the cost of the rig, its maintenance needs, and its fuel use.
A large air rotary rig will consume 40-60 liters per hour of fuel, making it one of the most expensive types of drill rig to operate. Large air rotary rigs also require support vehicles.
Swiss Centre for Development Cooperation in Technology and Management (SKAT) has published a manual entitled "Drilled Wells" which covers additional topics and information on the subject of how to drill a well. The PDF of that manual can be downloaded here.

I’ve run into several instances of insufficient suction stabilization on rigs where a “standpipe” is installed off the suction manifold. The thought behind this design was to create a gas-over-fluid column for the reciprocating pump and eliminate cavitation.
When the standpipe is installed on the suction manifold’s deadhead side, there’s little opportunity to get fluid into all the cylinders to prevent cavitation. Also, the reciprocating pump and charge pump are not isolated.
The gas over fluid internal systems has limitations too. The standpipe loses compression due to gas being consumed by the drilling fluid. In the absence of gas, the standpipe becomes virtually defunct because gravity (14.7 psi) is the only force driving the cylinders’ fluid. Also, gas is rarely replenished or charged in the standpipe.
The suction stabilizer’s compressible feature is designed to absorb the negative energies and promote smooth fluid flow. As a result, pump isolation is achieved between the charge pump and the reciprocating pump.
The isolation eliminates pump chatter, and because the reciprocating pump’s negative energies never reach the charge pump, the pump’s expendable life is extended.
Investing in suction stabilizers will ensure your pumps operate consistently and efficiently. They can also prevent most challenges related to pressure surges or pulsations in the most difficult piping environments.
Sigma Drilling Technologies’ Charge Free Suction Stabilizer is recommended for installation. If rigs have gas-charged cartridges installed in the suction stabilizers on the rig, another suggested upgrade is the Charge Free Conversion Kits.
Drilling a well by hand is a lot of work, but it can be done with the right equipment. Whether you’re looking to drill a shallow or deep well, this skill is perfect for those seeking self-reliance.
Wells are normally drilled on private land where city or rural water isn’t available. It’s possible to hire a licensed professional to provide this service but you can expect to spend several thousand dollars. If you want to save money, you can do it yourself, but prior to getting started, you need to research local regulations.
Each state or county will have its own list of requirements and regulations. These can be found online or at your county courthouse. When asking about these regulations, make sure you explain that you will be drilling the well yourself and on your own land.
Once you receive a green light to move forward, it’s time to learn more about your land. Go to thecounty agriculture extension office to find out what soil type you have. This could include sand, clay, rock, or a combination.
The local courthouse may also have well drilling logs from professional well drillers. These will include things like when they hit first water, what type of soil condition they encountered, and how deep they drilled the well. This could be helpful information but do remember that every property is different. The very first step might be determining how deep you need to drill.
Things to consider when choosing a well location are: convenience, a power source, and location. It’s very important the well be uphill from any septic system or barn runoff.
The final thing to do before drilling is to contact utility companies to make sure you don’t hit any underground pipes or lines. Sometimes this information can be found on your original land plot, but it’s always good to double-check.
Drilling a shallow well is a pretty simple task, going down about 25 feet or so when you hit first water (at least in my location). This type of well could be drilled in a weekend by hand using a general purpose, extendable post-hole auger.
This type of well can be cased off with a manual pump and used for irrigation. This would be more of an emergency setup that could also provide water needs at a weekend cabin in the countryside.
Shallow wells have a difficult time keeping up with average water usage. It’s estimated each person uses between 80 and 100 gallons of water a day. Imagine storing 20, 5-gallon jugs a day per person.
The majority of our water usage comes from flushing toilets and bathing. If you multiply that by a family of four, it’s easy to understand you would need a deeper well to keep up with demand.
Professional well diggers will often recommend a depth of 200 feet or more, but remember, for hundreds of years every well in this country was hand-dug and that’s how people survived.
Also remember, licensed well diggers get paid by the foot, so sometimes they drill further than they have to. So, if you decide to hire this out, do your research and make sure to write down where first water is normally hit in your area. And keep in mind that first water may not be the best, can dry up in some years, or may not be able to keep up with demand; all of these things need to be considered.
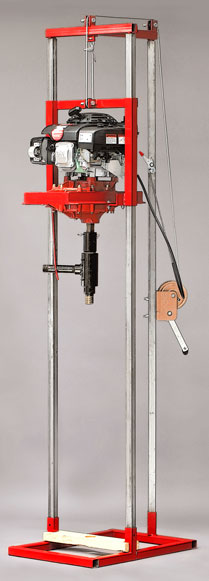
A pneumatic drill is like a giant eggbeater driven by compressed air. This tool can drill a 200-foot well in a matter of days or weeks, depending on the soil type, and can be purchased online.
In addition to the drill, you’ll also need a very powerful air compressor to run the equipment. These can easily cost two or three times as much as the drill. A couple of ways to keep costs down include purchasing a used compressor, or purchasing a new one and then after the project is completed, selling the almost-new equipment for a few hundred dollars less than what you paid.
You can choose between, gas, diesel or electric-powered compressors. An electric compressor will cost you less to run and be more dependable. We chose a compressor powered by gas because our well project was several miles away from the homesite.
This brings us to the drill setup. This will require a day of planning before drilling begins. Most home improvement stores will carry almost everything you need.
Step 1: After purchasing the necessary supplies and choosing the drill location, begin digging the main drill hole with an auger or post-hole digger. Dig about 4 or 5 feet. Then, if necessary, cut the 8-inch PVC to fit the hole, allowing 4 inches to stick above ground. In the side of the PVC pipe aligned with the settling pond (see Step 2), drill a hole large enough to insert the 2-inch connecting PVC pipe.
Step 2: Dig a shallow settling pond 10 feet behind the well, no less than 4 feet across. Then dig a shallow 8-inch ditch connecting the pond to the well hole. Connect these spaces with 2-inch PVC pipe and cover. This pipe will transfer clean water from the pond to the drill hole. The pipe opening in the pond will need covering with netting so debris doesn’t flow back into the well.
Step 3: Insert the 55-gallon drum at the edge of the pond, secure with stakes, and face the opening toward the well. The drum catches water from the well and empties into the pond where clean water will flow from the pipe back into the well.
Step 4: Attach 1-inch PVC pipe to the pneumatic drill using PVC glue and secure with duct tape to prevent leaks. Use a marker every 5 to 10 feet so you can keep track of how far down you have drilled. Rest the other end of attached PVC pipe in the 55-gallon drum. While the drill is running, mud and water will enter the pipe through small holes above the drill and be pushed up by the compressed air, traveling through the pipe into the drum and settling pond to be cycled back into the well hole.
Step 5: The air compressor will need to be set up and connected to the drill. Use duct tape to secure the air hose to the PVC pipe to keep it out of the way while drilling.
Note: Depending on your soil type, you may not need the 8-inch PVC. Our soil, for example, is hard clay and stable enough to keep the hole from collapsing without the pipe.
Drilling a well with this tool can take anywhere from 15 hours to weeks depending on the soil type, so make sure a chair is handy and you’re working with at least three people. One to operate the compressor, another to drill, and a third for breaks.
The air supply to the drill should never be turned off while the drill is underwater. If this happens, you’ll have to stop drilling and clean the motor before starting back up. This can take time and delay progress, which means it’s important that your drill team understands the process from start to finish.
Begin by filling the well hole with water. Turn the drill on before inserting, and then begin drilling. The bit will drill through all soil types, but when it hits clay or rock the process will slow down. Don’t get frustrated, just keep drilling and, before you know it, first water will be hit.
Move the drill in an up, down, and side-to-side motion as this will help the drill drive through the soil. The motion should be constant but not forceful; the drill will do the work. When you reach the point of needing to add more pipe, pull the running drill from the hole and, once it’s out of the water, turn the air pressure off. As you add pipe, secure each addition with PVC glue.
Add the next several feet of pipe and start again. Once the desired depth is reached, it’s time to case off the well. Casing is a matter of inserting SDR 35 pipe and securing in place with pea gravel and concrete. To do so, drill a hole through both sidewalls of the first piece of pipe, 2 or 3 inches from the bottom so you can attach the rope to lower the pipe into the well. When the top of the pipe is even with the ground, apply PVC glue and attach the next piece of pipe. Let dry for 15 minutes and then continue to lower down and add pieces as you go to meet the depth of the well. The last piece of pipe will be cut about 3 feet above ground level and capped off.
Pour pea gravel between the casing and the dirt. Next, mix the concrete and pour between the ground and casing. This will prevent the well from becoming contaminated from runoff. Once this is complete and you’ve added a well pump, you’ll need to run the well for a couple of days until the water is clear, and it’s always a good idea to get the water tested before using it for drinking.
Drilling a well can be a long process, but if you can save money and learn a new skill at the same time, why not give it a try? It’s a matter of getting back to basics and doing more for yourself.


 8613371530291