
drilling mud pump broken bolts factory
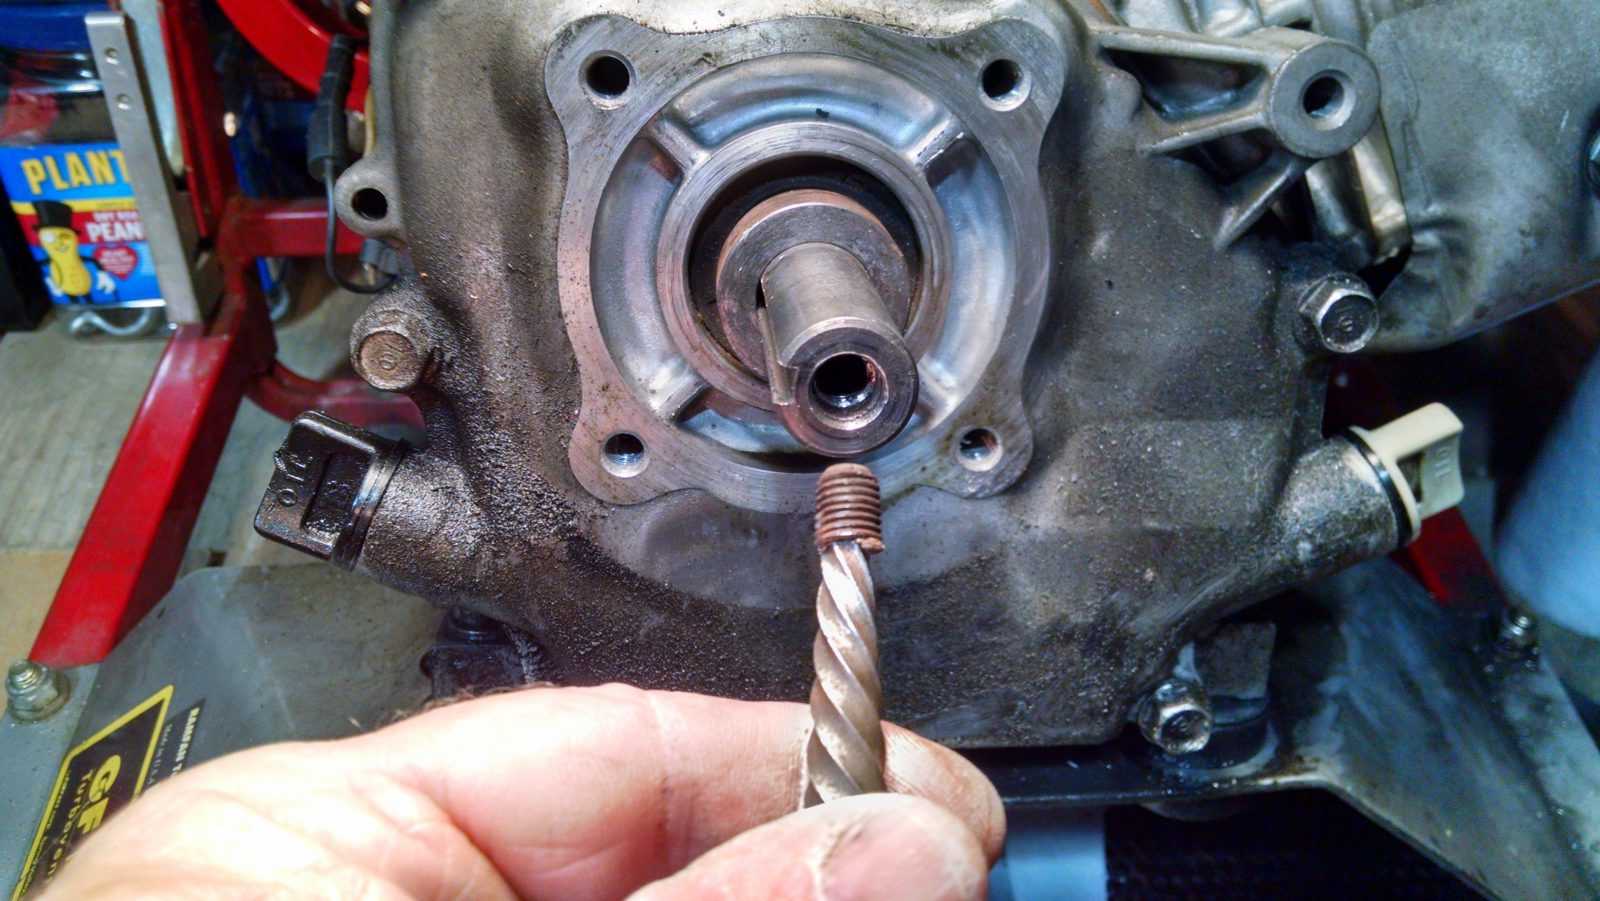
Center punched it, put a bolt in one of the other holes as a reference axis, and started drilling. I wasn"t able to put enough pressure with a 3/16 to keep it cutting (and wanting to avoid heating and work hardening it) so I went down to 1/8".
1/8" drill was working well, in about 1/2", when it chattered and snapped. Not what I wanted. Drilled 3/16" down to the broken drill, but couldn"t clear the broken drill out.
Switched to a 3/16" carbide center cutting 4fl endmill. That went right through the broken drill, no problem. Took that endmill down through the rest of the bolt, and hit the space at the end. So far so good.
Wouldn"t you know it, after some working back and forth, the broken bolt started to come free. No damage to the threads, no tapping to a larger size. Just clean the threads with a tap and done.
Rusted bolts and studs that break when being removedare the worst nightmare of any mechanic, and anyone else trying to fix a machine.Luckily, if you are a handyman who likes to take care of your vehicle in your own garage, there are now a number of options that weren’t available 20 or 30 years ago on how to remove a broken bolt.
When you have a screw head that is stripped or broken off or a bolt that has a stripped or broken off head, it can be impossible to remove without the right tools and the right methods.If you are stuck with a broken bolt inside your car, no need to worry, themaintenance tipsbelow will help you extract the piece of metal without much hassle.
What is the best tool orthebest way to remove a broken boltdepends on several factors. Sometimes a hammer or drill will get the job done. Other times, you may also get lucky and have enough room to weld a bolt or nut to the end of the broken bolt or stud. There may be times you’ll need more.
There are times when studs and bolts break in locations where you can’t get a hammer or drill, typically the case with exhaust manifold bolts. In these cases, let’s hope that the extractor or a pair of locking pliers will work, but you’re most likely going to need to remove the part from the vehicle.
If you can’t get pliers, extractors, drills, or hammers into where the stud or bolt is broken, another option is to grind two opposing sides flat so they can be grabbed with a wrench.
In the case of a broken stud or bolt with enough of its diameter protruding for the tool to grip it, you can get the job done with a cam-style extractor. Bolt and stud extractors have evolved over the years from the cam-style extractor to multiple piece kitswith a tool for each bolt size. Essentially, both work on the principle of using the gripping power created by counterclockwise torque on the tool to grip the broken part with enough force around as much of its diameter as possible to extract it.
The cam-style extractor is used by turning the extractor to open the jaws enough to go onto the broken stud before being hand-tightened. Then a wrench or ratchet and socket are used to apply enough torque to hopefully remove the problem part without breaking it inside the head or block. Remember to use ample penetrating oil in the process.
First, by using a hammer, mark the center of the broken bolt with a centre punch.Hit it squarely with the hammer to create a starting point for drilling a pilot hole.
Also importantly, it will also reduce the chances of damaging the thread of the broken boltwhen you extract it. If the threads on either the bolt or the bolt hole are damaged, it may make bolt removal impossible. Furthermore, if the threading on the bolt hole is damaged, you may be unable to use a new bolt once the old one is extracted.
Activate the reverse setting on the drilling machine. A left-handed drill bit would be threaded in the opposite direction. The left-handed drill as it will torque in the opposite direction same as the broken bolt, which will prevent the bolt from being driven in tighter. The left-handed drill will grab and unscrew the tight bolt for you to grab it using a pair of grips, and remove it.
However, we recommend that you use the extracting kit that is suitable for the size of the bolt you want to remove.Drill into the broken stud to the specified depth using the drill bit that corresponds to the extractor size you’ll be using.
Since you’re drilling in metal, keep the drill speed slow and steady. Drilling too fast will overheat the bit and dull it quickly.Using a lubricant or cutting fluid can help speed the drilling process and keep your bit from overheating.
Once, you continue with the extractor; the tapered end will catch andtorquewould work to loosen the bolt once the extracting bit is tight. Next,continue turning the extractor counterclockwise with a wrench or ratchet and socketuntil the broken bolt is removed completely from the surface. Straight and square flute extractors must be hammered into the hole drilled in the stud to remove the stud.
Give the part holding the broken bolt a few sharp raps with a hammer. You don’t want to deform the metal but just apply enough vibrating force to break the rust loose. You can use two hammers on parts like exhaust pipe flanges where you can reach two sides of the part at the same time.
If none of the above methods work, there’s always the last resort: the Heli-Coil. This method replaces the threads after drilling out the broken stud. Heli-Coils may also be a first option when the bolt breaks inside a part: the bolt is not protruding from the part; it’s actually recessed in the part.
First, drill the broken stud out with the specified bit to the specified depth. Thread this hole to the proper depth using the specified tap. Twist the Heli-Coil insert onto the tool until the tab at the bottom licks into the tool.
Most of the methods described above are effective for bolts that are at least 1/4 inch in diameter. Smaller bolts that you have top-down access to can have a slot cut into them with a Dremel and small cutting wheel to allow you to use a screwdriver to remove the offending part.
You have to have clear access to the end of the broken bolt and at least 1/4 inch needs to be protruding to give you enough room to cut into. Otherwise, you will weaken the part in the process to the point that it will break again and worse, inside the part it’s stuck in.

There are many different methods for freeing stuck parts including drilling, grinding or cutting the part. In these examples, there are risks. For example, the part to be loosened may be damaged or destroyed beyond repair, requiring replacement (if, that is, a replacement part can be found in time or at all). Drilling, grinding and cutting also present potential physical hazards to personnel and the surrounding equipment.
“Penetrating oils have been used and trusted by maintenance, repair and operations (MRO) pros, service technicians and experienced DIYers for decades,” Demirdogen said. “The best penetrating oils quickly loosen rusted nuts and bolts, free frozen shafts, pulleys and more. With Kroil, no space is too tight to penetrate, thanks to its ability to seep into the smallest opening or crevice.”
“Having a good penetrant is crucial when specialty parts, nuts and bolts are involved,” said Barry Lefavour of Big Jim’s Auto Body. “If we can’t get bolts off, we may end up breaking them, which creates many more problems. The penetrating oil gets in there and loosens things up, so we can crack them free. It saves a lot of time, because if we break something and we don’t have it in stock, we may have to place a special order. In such cases, the car sits longer, tying up the shop.”

Remove ProBushing™ PPB2125 (SML) and replace with the PPB2188 (MED) and follow with the ProDrill™ SSSC188 using the same procedure as above, manually inserting the ProDrill into the bushing by hand and then start and stop your drill on and off prior to drilling continuously. Remove ProBushing™ PPB2188 (MED) and replace with the PPB2270 (LRG) and follow with the ProDrill™ SSSC270 using the same procedure as above, manually inserting the ProDrill into the bushing by hand and then start and stop your drill on and off prior to drilling continuously. Blow the debris clean. Remove ProBushing™ PPB2270 (LRG) and replace with the ProBushing™ PPB2320 (TAP). Place one drop of ProLube™ drill and tap-cutting lubricant on the ProTap™ and proceed to insert the tap into the bushing. Slowly begin to restore the threads by turning the tap at ¼ revolution intervals clockwise and counter-clockwise periodically stopping to blow debris from the tap through the flutes of the tap. Removing the tap is not necessary. Continue to clean the threads until the tap stops. DO NOT OVER-TORQUE TAP. In the unlikely event a tap fractures, visit www.promaxxtool.com and purchase the ProTap™ extractor kit.

One of the most important things to keep in mind as you"re working is to resist the temptation of using excessive force. This could cause you to break a blind stud, which could mean hours of drilling out the busted shank. As with all projects, assess the situation and plan carefully using the following tips and tricks.
Is the bolt worth saving? A rusted fastener that has lost its tensile strength won"t have the necessary clamping force to do its job. It may be easier to just break the bolt and replace it. Smaller fasteners ,such as body bolts and screws, often can"t be saved. Use locking pliers on J-nuts so they won"t spin and simply break the bolt and discard.
Are you turning it the correct way? Most mechanics learn the rhyme "Righty-Tighty, Lefty-Loosey" on day one, but you"d be surprised at how many still get their spatial directions confused when working in a reversed or upside-down position. Note: Most threads are left-hand loosen, but some ring gear bolts, and old "60s Chrysler lug nuts, can be backward.
On stuck rusted nuts and bolts that can"t be cut or destroyed, some type of liquid thread loosener will be a huge help. There are many different brands to choose from, but in most cases, testing has shown penetrating oil can reduce the torque required to overcome the rust bond by up to half or more. A home-brew concoction of 50 percent Acetone and 50 percent automatic transmission fluid may work well in some cases, but be mindful of the fumes.
Liberally soak the threads with penetrating oil. Whatever brand you use, you may need to repeat applications and possibly soak overnight. Remember, patience is key—it can save you hours spent drilling out a broken bolt.


 8613371530291