
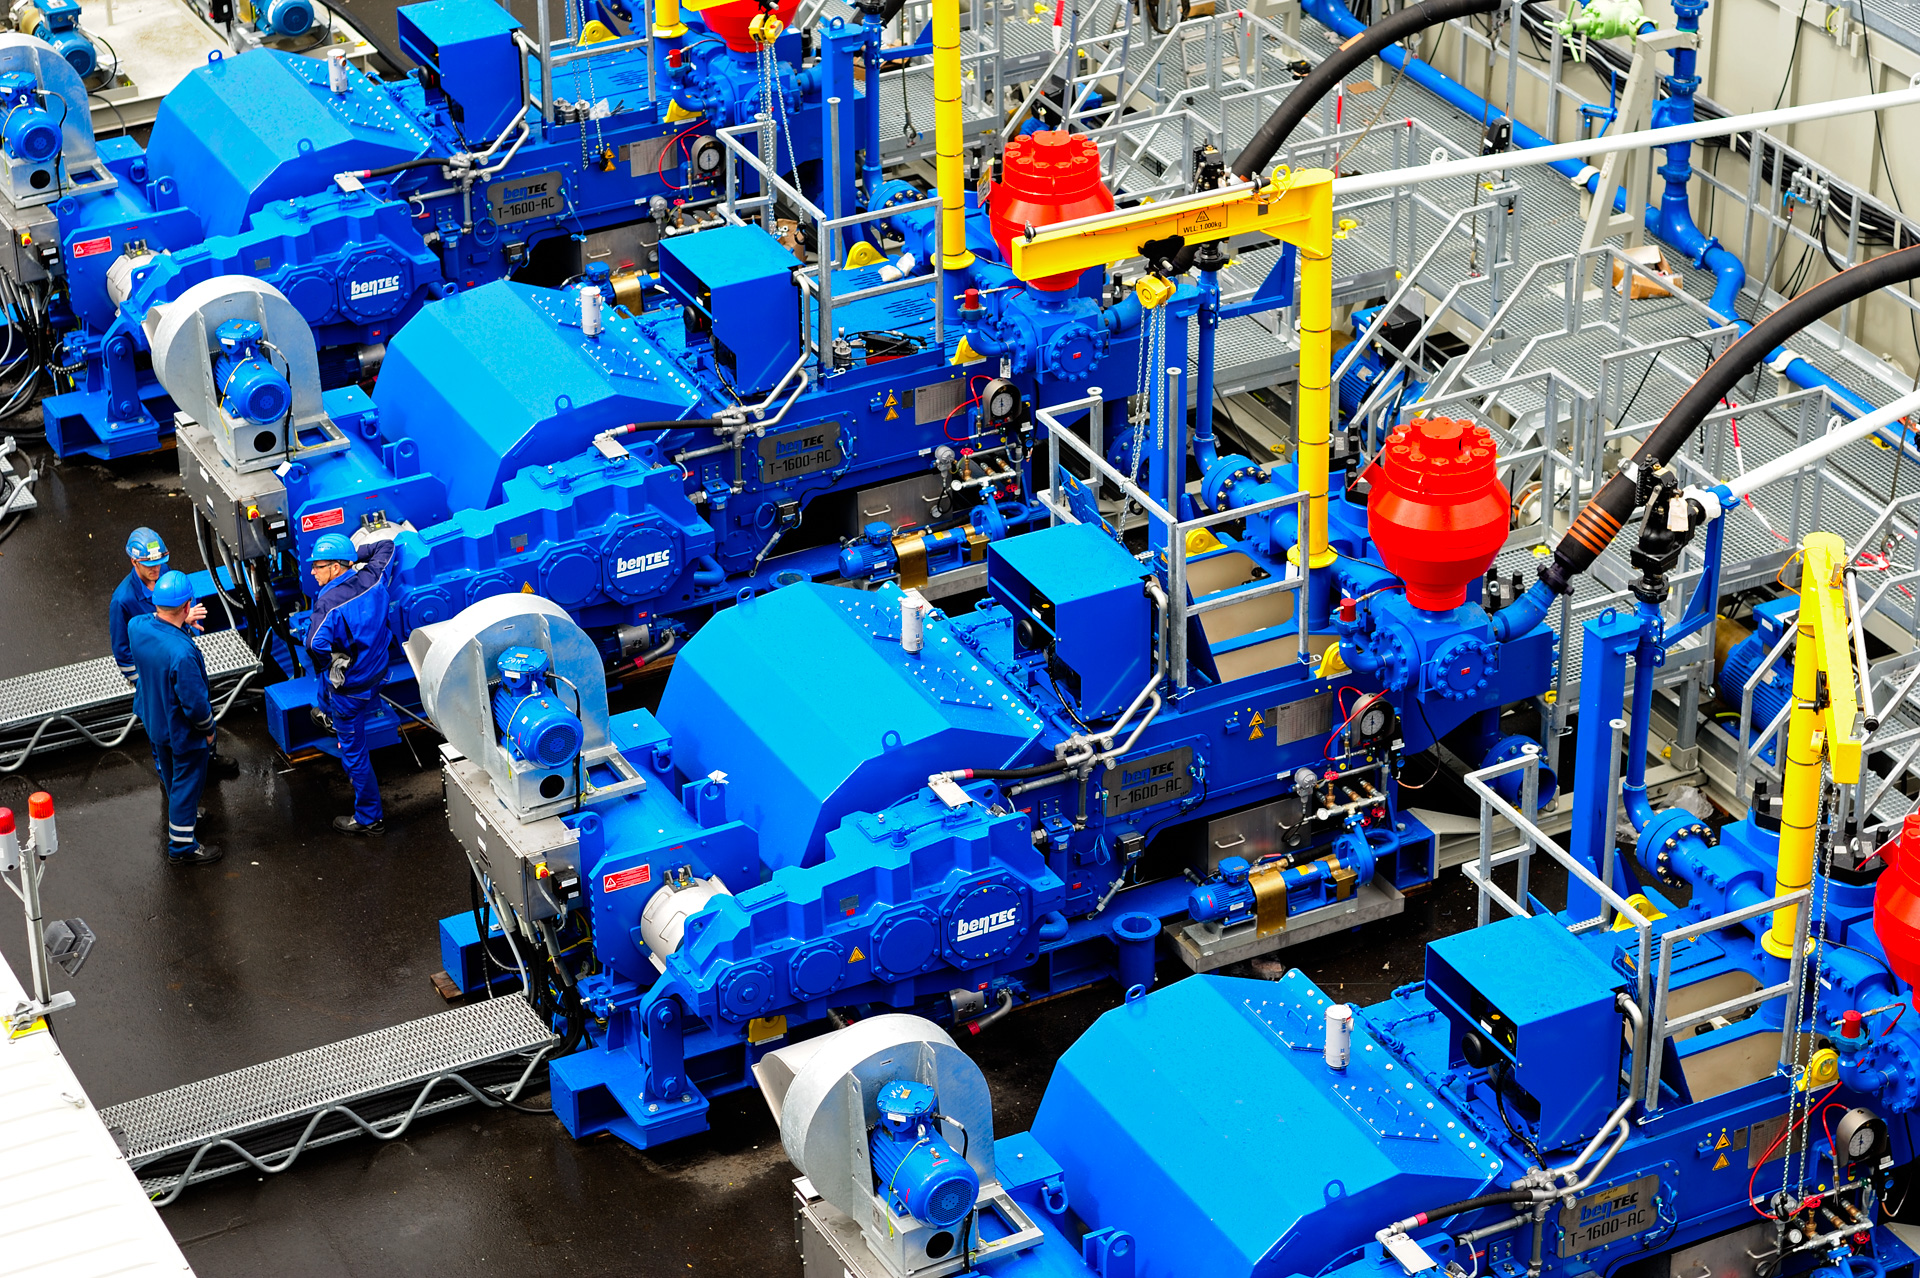
drilling mud pump pdf factory
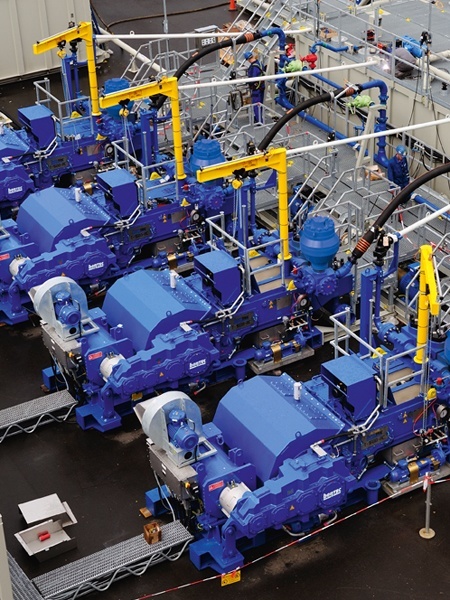
This mud pump will deliver the consistent flow of drilling fluid that is vital to HDD pipeline drilling projects. Suction inlet valve suspends charged flow during drill rod makeup and breakout process, keeping excess drilling fluid from escaping as drill pipes separate. The lubrication pump is driven off the auxiliary pad on the engine. It provides 55 psi (3.8 bar) of continuous crankshaft lubrication. The internal hydraulic reservoir has a capacity of 49 gal (185.5 L). Clutch with continuous duty throw-out bearing allows for longer pump disengagement during drill rod makeup/breakout....
A triplex piston pump produces up to 435.3 gpm (1647.8 L/min), providing a continuous flow of drilling fluid during drill operations. An electric centrifugal pump provides constant flow, keeping the pump running cool and leading to a longer life for both pistons and liners. Remote pendant control allows operator to mount controls where it makes sense for them. The remote pendant control monitors mud rate and eliminates the need for stroke counter. The integrated liner wash tank eliminates the need for additional water containers or electricity when running the pump. An engine-mounted air...
1. Use of new mud pump ......................................................................21.1. Technical Specification and Performance Parameter..............................................................21.2. Installation of New Pump .......................................................................................................41.3. Suction System Requirements ................................................................................................71.4. The Preparation of Power End................................................................................................81.5. Spray Pump Assembly ..........................................................................................................101.6. The assembly of Fluid End Parts ..........................................................................................131.7. Dampener Assembly .............................................................................................................181.8. Safety Valve ..........................................................................................................................19
3. Maintenance ....................................................................................243.1 Power End.............................................................................................................................243.2 Roller Bearings .....................................................................................................................253.3 Pinion Shaft Assembly.........................................................................................................263.4 Crankshaft Assembly (Fig .18) .............................................................................................273.5 Installing Crankshaft Assembly in Frame.............................................................................303.6 Installing of Crosshead Guides .............................................................................................323.7 Installing of Crosshead .........................................................................................................323.8 Checking Crosshead Alignment............................................................................................343.9 Fluid End Maintenance.........................................................................................................343.10 Welding and Repairs.............................................................................................................373.11 Repair to Valve Pot Cover Bore............................................................................................383.12 Change of Dampener Bladder...............................................................................................383.13 Apprixunate Weights of Pump Assemblies...........................................................................39
4. Maintenance of Pump.....................................................................394.1 Daily Maintenance................................................................................................................394.2 Weekly Maintenance.............................................................................................................404.3 Monthly Maintenance...........................................................................................................404.4 Yearly Maintenance ..............................................................................................................404.5 Cares should be Taken for the Following in Maintenance....................................................41
F-1300/1600 drilling mud pump’s instruction manual is a complete data andprovided for customers. The plait writes what these data"s purpose is for givingthe customer is accurate but clear data and main operation theme, but these datais a must for operating and maintaining. This manual supply for the operator ofdrilling pump, site maintains personnel and technical service that are completelyfamiliar with artesian well pump. It is not intended, nor would it be possible in such limited space, to coverevery possible condition, which may be encountered. But the customer canusually acquire the good but satisfied machine operation method and dependablesafety precautions measure from this manual. F-1300 drilling mud pump is similar to F-1600 drilling mud pump withoutline dimension, framework and fluid power end; just bearings of power endand gears pair are different. So we introduce these two pumps at the same timefor the convenience of customer. All specifications and data are in accordance with Engineering designsspecification and should be strictly adhered to in all maintain and repairoperations. If this manual have something not perfect, plead the customer bring up theprecious opinion with suggest, in order to have a second edition complement andrevise.
F-1300/1600 Drilling mud pump is one of the most important craft equipments inpetroleum drilling well. It is used for transporting drilling fluid with highviscosity, heavy density and high sand contented to well bottom and in order to cooloff the drill bit, flush the well bottom, crush the rock, when returning from wellbottom take out the rock debris. The design and manufacture of this drilling pump is in compliance with API Spec7K《Rotary drilling equipment specification》. All the wearing part of fluid end(valve, valve seat, linear etc) can be interchanged with same specification partsmanufactured according to API specification.
Model F-1300 F-1600 Type Triplex single acting piston/plunger pump Max. Cylinder 180 180 Diameter mm Rated Power kW 960 1180 Rated stroke spm 120 120 Stroke length mm 305 305 Gear ratio 4.206 4.206 Valve cavity API 7# API 7# Weight kg 24572 24971
1 0.3878 0.3459 0.3064 0.2693 0.2346 0.2023 Note: 1.Based on 100% volumetric efficiency and 90% mechanical efficiency. 2.Recommended strokes and Input power when mud pump are continually operating.
1.2. Installation of New Pump F-1300/1600 Drilling mud pump has been completely assembled and test operated underpressure before being shipped to the field. Unless otherwise instructed, the lubrication is drainedfrom the power end. Before putting the pump into service, the following precautions and operationsmust be performed or checked: In order to prevent personal injury during the performance of anymaintenance or inspection procedures, this equipment MUST BE SHUT DOWN AND NOTOPERATING, and all safety devices on prime movers, drives, etc, MUST BE IN THE SAFEPOSITION.
The skids under the F-1300/1600 mud pumps are suitable for most any type of installation. Thesupport under the pump must be level and adequate to support the weight and operating forcesexerted by the pump.
In land installations, 8 piece of 76mm×305mm boards laid side crosswise to the pump skids forthe entire length, or at a minimum, at the points indicated in Fig.2,is usually sufficient .The boardsshould be a 300mm wider than the width of the pump skid runners. Wet or marshy locations mayrequire a more stable foundation.
On permanent installations such as barge, platform, structural base, or concrete slab, wherepump skids are bolted down, it is essential that the skids be properly shimmed to prevent possibilityof twisting or distorting the power frame. The pump skids must sit solid on all shim points withbolts loose. On barge installations, the pump skids are generally bolted down to T-beams running parallel andin line with the pump skids. Install shims at points shown in Fig, 2 and 3 and observe caution ofproper shimming to prevent twist or distortion. The shims on all installations should extend the fullwidth of the skid beam flanges and have a minimum length of 12″(305mm) . On installations where the power unit or electric motor is mounted integrally with the pumpskids, the preferred installation would be to set the pump package on the T-beam skids and provideretention blocks rather than bolts to hold it in place. This will allow the pump to “float” andminimize the transfer of barge deck or platform distortion into the frame.
The drive between the mud pumps and the power source, whether V-belts or multi-width chains,should be installed with the greatest care to assure maximum operating life with minimum ofunexpected or undesirable shutdowns due to drive failures. When installing the drive sheave of sprocket, make sure all grease or rust preventative isremoved from the shaft and the bore of the drive. Remove all burrs or rough spots from the shaft,key, and keyway. Fit key to the keyways in both the shaft and drive and install key into shaftkeyway. Coat pinion shaft with a light coating of anti-seize compound or light oil and install the drivesheave or sprocket hub. Tighten hub bolts as indicated below: When a wrench or length of pipe is used to increase leverage in tightening draw-up bolts, it isimperative to adhere to the wrench torque values given in the chart below. This adherence isimportant, because in mounting the hub, the tightening force on the bolts is multiplied many timesby the wedging action of the tapered surface. This action compresses the hub for a snug fit on theshaft. If the bolt-tightening forces are extreme, bursting pressure is created in the hub of themounted pulley; this pressure may cause the pulley to crack. The hub bolts should always betightened alternately and progressively.
destroy V-belts rapidly. The sidewalls must be straight. Sheave grooves must be free of dirt,rust or other extrusions, which could damage the V-belts.b) Adjust V-belt for proper tension Adjust the belt tension by moving the sheaves apart until all of the sag has just been eliminatedfrom the tight side of the belt and some of the belts on the slack side. Then increase the givencenter distance. For example: on 2540mm(100″) Center distance, after adjusted center distancethen increase additional 13mm(1/2″). On 3180mm(150″)center distance, after adjusted centerdistance then increase additional 19.5mm(3/4″). DO NOT OBTAIN BELT TENSION BY PICKING UP END OF PUMP AND ALLOWING BELTS TO TIGHTENUNDER WEIGHT OF PUMP AS END IS BEING LOWERED TO THE GROUND.1.2.4.2. Chain Drivea) Installation Proper installation and maintenance of the sprocket and chain drives are essential if good servicelife is to be obtained. Since many factors, such as chain width, center distances, speeds, and loadsmust be considered when determining the allowable tolerance for sprocket alignment; no good“rule of thumb” can be applied. The chain alignment must simply be held as nearly perfect aspossible. A more precise alignment can be made by stretching two steel wires (piano wire) alongone face of the two sprockets, one above and one below the centerline, and moving one of thesprockets until the wires touch at four points. This will determine that the centerlines of the drivesare parallel and the faces of the sprockets are square.b) Drive chain lubrication The pump drive chain lubrication system on the majority of F series of pumps is an independentsystem having its own oil pump, reservoir and drive. Fill chain case to the indicated level with anon-detergent oil. Lubricant brand is as follows: Ambient temperature above 32º F(0ºC) SAE-30/N100 Ambient temperature above 32º F(0ºC) SAE-20/N68 For temperatures below 0ºF, consult a reputable lubrication dealer for recommendations. The usage"s lubricant should match to lubricate relevant specification or lubrication manualestablished according to the specification. Since this is an independent system, it will require the same maintenance or service attentionemployed on any other piece of machinery, including: z Daily check of oil level. z Daily check on condition of oil. z Frequent check on oil pressure. (5-15psi) (0.352-1.06kg .cm2). z Volume of oil being applied to chain. z Condition of nozzles in spray tube. z Condition of oil pump drive (V-belts or chain) NOTE: 1. Oil pressure may be adjusted with the pressure relief adjusting screw on the rear of the pump housing. 2. Pressure drops may also indicate suction and discharge filter screens need cleaning.
F-series pumps must have a positive head (pressure) for satisfactory performance. Theoptimum suction manifold pressure is 20~30 psi (0.14~0. 21Mpa) for maximum volumetricefficiency and expendable parts life. A 5 x 6 centrifugal pump with 40h.p 1150-rpm electric motorbest supplies this head pressure. This type of drive requires a device to automatically start and stopthe centrifugal pump motor simultaneously with the triplex pump. On DC electric powered a signalcan usually be supplied from the DC control panel to energize a magnetic starter when the mudpump clutch airline will provide a set of contacts for energizing the magnetic starter when clutch isengaged. The suction lines should be piped with valve arrangements so the charging pump can beby-passed so operation can be continued in event of charging pump failure or for maintenance.Operation without a charging pump can be improved by replacing the suction valve spring with aweaker spring. Suction dampener is a very effective aid for complete filling of the liners and dampeningpulsations in the suction line, which results in a smoother flow in the discharge line. CAUTION: Do not pipe the return line from the shear relief valve back into the suction system as a relief valve operation will cause a sudden pressure rise in the system vastly greater than the system pressure ratings, resulting in damage to manifold, suction dampener and centrifugal pump.
1.4. The Preparation of Power End F-series mud pump has been completely assembled and test operated before being shipped to thefield. Unless otherwise instructed, the lubrication is drained from the power end. Before operatingthe pump, the following must be performed or checked.
Before installing lubricant, open inspection door in cover and check oil reservoir for possibleaccumulation of condensation, etc, and drain and flush by removing the pipe plugs on each side ofthe pump. Refer Item 2.Fig.7. Add the proper type and quantity of lubrication in the power end.Refer to lubrication plate on pump frame for type and quantity required. Recheck oil level after pump has operated for a period of 15 minutes. Shut pump down and allowapproximately five minutes for the oil level to equalize, Check at oil level gauge, Item 1, Fig 7.It isusually necessary for 3 gallons (10L) of oil to be added due to a certain amount being retained inthe crosshead area and frame cavities.
10 6 5 6 Fig. 4 ⑴diaphragm stuffing box and mud apron (2) Bolt (3) Shim (4) Sealing ring (5) Spring (6) two-lip seal (7) Sealing ring (8)O-ring (9) Locking spring (10) Bolt (11) Bolt (12) O-ring With reference to Figure 4A, remove the diaphragm stuffing box and mud apron (1) androtate pump so that crosshead is at the front of the stroke, Thoroughly clean the front of thecrosshead and the face of the crosshead extension rod. Insert alignment boss on crossheadextension rod into the crosshead bore and tighten the retainer bolts (2) to the following torque,350~370ft.lbs(475~500N.m), at last tightened with iron wire. Thoroughly clean mudapron and the face of frame, on the “A” place Fig. 4 is with the shim ③and tighten bolt⑩to thefollowing torque, 90~120ft.lbs(120~160N.m) Thoroughly clean the hole and the end face of diaphragm stuffing box plate, exterior surface ofdiaphragm stuffing box and surface of flange. Coating the exterior surface of diaphragm stuffingbox with light oil and install O-ring seal (4). Install diaphragm stuffing box on the diaphragmstuffing box plate then tighten bolt (11) to the following torque: 12~18 ft .lbs (16~24N.m). The diaphragm stuffing box packing assembly consists of two double lip oil seal (6), an oil sealring (7), an O-ring (12) O-ring (8)and a lock spring (9). Install the assembly as follows:a) Remove left pressure spring (5) from double lip oil seal (6) and place seal in the inner (power end) position on the crosshead extension rod, with lip toward power end. Replace the pressure spring in the seal lip and slide the seal into position in the stuffing box. SEE NOTE BELOWb) Install the O-ring (12) into Oil Seal ring (7). Insert O-ring (12) and oil seal ring (7) over rod and slide it into stuffing box bore.
1.5. Spray Pump Assembly Spray pump assembly consists of spray pump, water tank and spray nozzle etc. it is used forflushing and cooling piston and linear during pump operated. Proper attention must be paid at all times to assure adequate cooling fluid is being applied to thepiston and liner assembly. Stoppage of the cooling fluid will result in almost instant failure of thepiston rubbers and possibly extensive damage to the liner bore. Stationary spray type have been used on F-series pumps Ref. Fig 5.It consists of a fixture (1), apipe (2) and a spray nozzle (3), it make cooling fluid spray to piston and linear. Adjust coolingwater supply to the manifold and inspect spray nozzle operation very often making sure the nozzleis pointed directly at the piston.
Fig. 5 (1) Fixing frame (2) Steel pipe (3) Spray Nozzle (4) Soft pipe Cooling fluid be transfused from pump (Item 3 Fig .7) and Water tank (Item 5. Fig. 7) to themanifold on the frame. Adjust regulating valve (Item 4 Fig .7) to apply as much water as possibleto the liners without splashing back on the crosshead extension rods and diaphragm stuffing boxplate. If water is allowed to splash on the crosshead extension rods, some of the water will workback into the power end to contaminate the lubrication oil. The cooling fluid is returned from the crosshead extension rod compartment to the settingchamber, and as the fluid overflows through the filter screen between the two sections of the tank,the solids are allowed to settle out. The filter screen will catch much of the foreign material floating
1.6. The assembly of Fluid End Parts A cross-section through the fluid end for F-1300/1600 is shown in Fig, 8. With reference to Fig 8,clean and assemble the fluid end parts in the following manner: Note: All of the parts in this fluid end assembly are designed with metal to metal seating to alleviate friction wear from breathing action encountered in modern high pressure pump operation. For this reason it is essential that all parts be clean and free of rust, nicks and burrs before being assembled.
5 4 3 2 1 Fig. 8 F-1300/1600Fluid end assembly (1)Wear plate seal (2)Wear plate (3)linear flange (4)linear sealing ring (5)linear lock (6) Linear (7) linear locking ring (8)piston rod (9) piston (10) piston sealing (11) nut (12) Allocation disc (13) valve rod guider (14) plug board (15) cylinder head sealing ring(16) Cylinder head plug(17)-cylinder head (18) valve cover sealing ring (19)-mud apron(20) Valve cover Note: Placing the starting thread at 5 o’clock position makes engaging the liner lock threads][much easier. Place liner seal (4) in counter bore of wear plate (2). Apply thin coat of grease to ID of liner lock(5) and slide over rear of liner (6). Install two-piece liner lock ring (7) in liner groove and O-ring tohold them in position. Slide liner-handling tool over liner up against liner lock ring and tightensetscrew to secure it in place. Hoist liner assembly into position with jib hoist. Apply liberal coat ofgrease to liner lock threads. Align the starting thread of the liner lock (5) to the 7 o’clock positionand insert the liner into the liner thread ring (3) screw liner lock in until liner seats in position.Tighten with sledgehammer on hammer lugs.
The piston rod clamps are machined as one piece and then sawed in half. The two pieces are withmatching numbers on each half and connected by chain. The two pieces with the same matchingnumbers should always be kept together as a set. Install the clamp around the rod end flanges.Tighten bolt to the following torque values: 330N.m (245ft.ls). before the clamps are installed,mud apron (19) should be installed on the end of crosshead rod. When rods and rod clamp are new a gap in excess of 5.5mm could be present between the twohalves of the clamp, This is satisfactory provided the faces of the rods are seating metal to metal.As wear occurs, the halves will pull closer together. Clamping action will be lost when a gap nolonger exists. At this time clamps must be replaced. Install splash plate on rear of liner.
Insert the lower valve guide (13) through the alignment ring and position the guide over thevalve stem. Start the lock plate (14) and draw it down, compressing the valve spring and seating thevalve guide in the tapered slot. Insert allocation disc (12) into pump head hole and Install head seal(15) on cylinder head plug (16). Coat seal and O.D. of plug with light oil. Screw a 1 M length ofpipe into the threaded opening on the plug. Using the pipe to balance the plug slide it straight intothe fluid end opening. Apply a liberal coat of grease to the cylinder head threads and screw thecylinder head (17) in against the plug (16). Tighten cylinder head with wrench provided and sledgehammer. Fluid leakage through the weep hole will indicate a defective seal or loose cylinder head. Shouldon time Replace seal or tighten cylinder head. DO NOT plug weep hole as this can result in severedamage to cylinder head threads, thread rings, etc, in event of a liner seal failure.
The suction flange has a standard thread connection 12" (305mm)and is custom made to matchthe companion flange on the pump suction manifold. An O-ring seal seals off the connection.Thoroughly clean O-ring groove and face of flanges before making up connection. Tighten flangebolts to 490~665N.m.
(6) Discharge spool (7)-gasket ring (8)nut An accessory manifold connect with discharge manifold by flange. Before assembly thoroughlyclean ring joint groove, install ring (4) and tighten the flange bolts (5) to 1625N.m. torque. Toassure uniform make-up of the ring joint connection, tighten the nuts in a criss-cross order. The shear relief valve (3) is installed on the discharge manifold for the purpose of protecting thepump from excessively high-pressure overloads. The relief valve must be installed so that is will be
directly exposed to the mud. DO NOT PUT ANY TYPE OF SHUT OFF VALAE betweenthe relief valve and the manifold. Pipe the discharge side of the relief valve directly into the mud pitwith as few turns in the line as possible. If the turn must be made, the elbow should be over120º.IT IS NOT RECOMMENDED for the discharge side of the relief valve to be piped into the suctionline of the pump. The mounting for KB-75 pulsation dampener (1) is a flange with R-39 ring gasket. Beforeinstalling dampener, thoroughly clean ring groove and ring, and after setting dampener into place,tighten the nut (8)to 1020N.M torque. to insure uniform make-up, tighten nuts in a criss-crossorder. Precharge dampener before starting up pump. Precharge pressure should not be more thanmaximum of 4.5Mpa. Dampener should be charged with nitrogen or air. Do not charge withinflammable and explosive gas such as oxygen and hydrogen etc. (with reference this instructionmanual“dampener”)
1.7. Dampener Assembly Proper installation and usage of dampener can availably reduce the pressure fluctuation ofdischarge system therefore obtaining more smooth fluid. For the sake of acquiring long life span ofdampener, usually make pressure of pump and Precharge pressure of bladder to keep the suggestionproportion. (Precharge pressure should not be more than 2/3 of the pump discharge pressure, or amaximum of 4.5Mpa.)
1.7.1. Installation (see Fig.10) The lifting lug installed on the shield of pressure gauge ○ 8 is used for lifting dampener assembly.Before assembly thoroughly clean gasket ring ○ 1 and groove of mating flange and coat withgrease. Lifting the dampener to the corresponding position of mud pump discharge line, rotate nut (R4)to 1085N.m (800ft.lbs) torque. Assure the connection part is flat and aligned by alternantlytightening the nuts.
a set of gas charging device is attendant when equipment leave factory(gas charging hoseassembly of dampener)please Operate as following procedure: (See Fig. 11)a) Remove shield of pressure gauge of dampener, rotate valve cover of exhaust about 1/4-1/2 turn to release the air pressure existed in pressure gauge area, then remove the exhaust valve.c) Connect hose to the nitrogen cylinder valve and charge valve of dampener.d) Open the charge valve of dampener.e) Slowly open the nitrogen cylinder valve, use this valve to adjust incoming gas of dampener.f) When the pressure gauge of dampener indicates pressure required then shut the nitrogen cylinder valve.g) Shut the charge valve of dampener.h) Remove hose, cover the shield of pressure gauge, then install the exhaust valve. For getting best result, Precharge pressure should not be more than 2/3 of the pump dischargepressure, or a maximum of 4.5 Mpa. (650psi) Warning: 1. Only charge with compressed nitrogen or air. Do not charge with inflammable and explosive gas such as oxygen and hydrogen etc.2. When make maintenance to the dampener, insure both the dampener pressure gangue and the pump pressure gangue indications is zero. Low pressure can’t be exactly shown by the dampener pressure gangue, which may cause an accident.
M10×110 (20)Nut M10(21)Capscrew M3×8 JA-3shear pin safety valve constructer refers to Fig 12. When the pump charging pressure exceeds the rating pressure under a given liner, the pistonmoves up until attach the shear bar and power it raise up, and finally the bar breaks the shear pinand high pressure mud flow quickly. Change the position of shear pin can adjust the release pressure value. The operation is simpleand reliable. Each classification work pressure is marked on the shear bar. When adjust the pressure, just to dois put the shear pin in the relevant hole according to the given pressure. Note: There must be only one shear pin in the shear bar one time! Adjust the pressure with theliner changes.(Refer to Section 1.1.2) 。Wire, arc welding or other alternative material are strictlyforbidden, otherwise the valve pressure is affected which maybe an reverse accident.
2. Lubrication Proper lubrication of the moving parts in any piece of machinery is the most important singlefactor affecting its ultimate life. To obtain maximum trouble-free service life from the power end ofpump, it is necessary to perform routine maintenance care and an inspection to insure the properamount of CLEAN lubricant is being provided on the fiction surface of moving parts.
3.1 Minimum Operating Speeds The F-Series pumps utilize the controlled flow oil bath splash and pressure system to lubricatethe entire power end. The type of pressure system provided in each individual pump will govern theminimum SPM at which the pump can be operated, F-1300/1600 mud pump have the pressurelubrication system, and which can be operated at 25 SPM (at oil pressure of 0.035 Mpa)
CAUTION: The pressure lubricating system can be provided with an externally mounted oil pump driven through V-belts or an internally mounted oil pump driven from the main gear. When an internally mounted oil pump is used, the direction of rotation of the pinion shaft must be as shown in Fig. 13.
The controlled flow splash lubrication system is the same for all F-Series pumps, regardless ofthe type of oil pump drive provided for the pressure system In the controlled flow splash system,the main gear picks oil up from the reservoir, and when the teeth mesh with the pinion, the oil isdisplaced into various troughs and compartments in the frame. With reference to Figure 15, the oilthrown into oil trough (7) is directed through the oil tube (8) to the two pinion bearings.
3.3 Pressure Lubrication System The pressure lubrication system, incorporating the oil pump for the F-series pumps, is shownin Figure 15: In this system, filtered oil is supplied to the pump through the suction filter (1) and isdischarged from the pump into the manifold block (2) and nozzle (3A). Oil is distributed to themain bearing oil line (4) and the crosshead compartment manifold block (4A) located above thecrosshead compartment. The crosshead compartment manifold block (4A) distributes oil to thecrosshead, crosshead bearings and extension rods. A pressure gauge (5) is mounted on the back wall of the frame to show oil pressure beingmaintained in the manifold block. The oil pressure will, of course, vary with the speed of the mainpump, however if a sudden pressure drop or increase occurs, refer to the section on maintenance oflubrication system for possible cause.
(9) Lubrication pump A pressure relief valve (6) is mounted to the manifold block (2) to keep excess pressure fromdamaging oil pump and drive. The relief valve is preset at 0.27Mpa (40 PSI) and must be tight( toprevent adjusted pressure change ). When installing the internally mounted oil pump (9 Fig .15), position pump so that the backface of the drive gear is flush and parallel with the edge of the main gear, and gear teeth have0.60~0.90mm backlash.
Fig. 16 (1) Oil pump (2) V-belt (3) guard A typical layout for the pinion shaft driven oil pump is shown in Fig. 16.The oil pump (1) ispiped into the oil system through the suction and pressure connections on the bottom inside wall ofthe power frame. Do not adjust V-belt drive (2) too tight. Over tightening can cause prematurefailure of the pump. To prevent possible injury, always install guard (3) over V-belts before puttingpump into service.
2.4 Maintenance of Lubrication System Adequate lubrication of the moving parts is, as stated, the most important single factoraffecting the ultimate service life of the pump, CARE AND MAINTENANCE of the system is thesole responsibility of the operator or crew to which it has been assigned, and the extent to whichthis is applied will determine the amount of trouble – free service life that will be obtained. The lubricant recommendations shown below, on the nameplate on the side of the pump, arethe result of extensive long-term field tests and can validate to wear away (include gear, bearingand guild cross head). Substitutions should be made only in extreme emergencies.
ONCE EACH TOUR, check and maintain oil level at the FULL mark on the bayonet gauge.PUMP MUST BE SHUT DOWN and allowed to stand idle for approximately five minutes to allow
oil level to equalize. ONCE EACH SIX MONTHS, or more often if oil becomes contaminated with abrasiveparticles or corrosive compounds, drain and flush the oil reservoir then fill in new lubricant. Oildrains are located on either side of the pump frame. During the flushing procedure, thoroughlyclean the oil troughs and the compartment in top of the crosshead guide. Also clean or replace thefilter element in the air breather cap and clean suction screen. Remove covers from settlingchamber and purge out contaminants before adding new oil. Routine inspection on condition of oil should be made as condensation of moisture in the air,intrusion of mud, water or dirt, can necessitate a more frequent oil change. Contamination should be drained out of the pump through the clean out covers located on theframe wall underneath the crosshead inspection doors. Once each month, remove clean out covers on both sides of pump to drain contaminated oilfrom setting chamber. Approximately 15-gallons of oil be lost; replenish the main reservoir tocompensate for the amount drained out. Once each week, remove one of the lower 1/2" cap screws that secure the clean out cover tothe frame to drain off water condensate. ONCE EACH TOUR, check oil level in main reservoir. Maintain at full mark on dipstick tothe manifold block. If loss of pressure occurs, check for: z Clogged suction screen z Low oil level z Slipping V-belt drive z Broken or loose connections z Damaged or worn oil pump z Defective Relief valve For an abnormal increase in oil pressure, check for: z Plugged oil lines z Contamination causing oil to be viscous z Relief valve inoperative z Defective pressure gauge z Other conditions
Inspect the condition of the main gear teeth and pinion gear teeth for any indications ofabnormal wear. During the initial break-in period there will be some pitting on the face of the gearteeth. This is referred to as“ initial pitting ”and is not harmful to the life of the gear. However, ifroutine inspection indicates the degree of pitting continues to increase, immediately contact thepump manufacturer for a more thorough inspection of the gear.
3.2 Roller Bearings Anti-frication bearings are adopted by BSF series mud pumps. A roller bearing is a precisely built machine within itself; therefore, careful handling isrequired in order to obtain the long service life and high load carrying characteristics associatedwith anti-frication bearings. The main bearings are self-aligning spherical roller bearings. The pinion shaft is mounted onstraight roller bearings. The eccentric bearings are straight roller with thrust plates on each side to
Data T0.050~T0.109 T0.115~L0.018 L0.203~L0.076 Note: T-shrink range L-space range The pinion is an integral part of the shaft leaving only the installation of the bearings and oilseal spacer to complete the assembly. The running clearances of the bearings are predetermined by their precision fit to the shaft andthe bearing carrier. When performing maintenance or overhaul, make sure the fits show in chart IIis obtained. When installing the pinion shaft assembly in the pump observe the following precautions:a) Insure pinion bearing carrier gasket (1) and oil seal carrier gasket (2) are in place and in good condition.b) When installing the pinion bearing carrier (3) and the oil seal carrier MAKE SURE THE CARRIERS ARE INSTALLED WITH DRAIN HOLES AT THE TOP to correctly position oil troughs and align drain holes.c) Remove burrs, dents or gouges from the OD of the oil seal spacer (5) before sliding oil seal carrier (4) into place. Exercise care when sliding lip of seal over end of shaft to prevent it from being damaged by the sharp edge of the keyway. Also pay particular attention to insure oil seal lip IS NOT TURNED UNDER by edge of spacer when sliding seal onto the spacer.d) Tighten pinion bearing carrier bolts (6) to the approximate torque 190 ~ 225N.m (140-165ft .lbs)
D G 19 H Fig.181) Mount gear on flange Thoroughly clean mating faces of ring gear and flange and bolt flange into position. Tightenflange bolts (2) to the torque: 2455 N.m (1810ft .lbs) Note: If runout on face of gear is checked while crankshaft is mounted in the pump frame, the running clearance in main bearings will require that a simultaneous set of dial indicator readings be taken at the end of the shaft and the face of the gear; the actual face runout at any point being the difference between these
readings.2) Install the outer races of the eccentric bearings (13) and the outer race retainer ring (3) in the three eccentric straps. Outer race retainer ring must be positioned so that oil scoop is at the bottom when pump is at mid-stroke. Tighten retainer bolts (4) to the torque 60~90 N.m (44~66ft .lbs) : safety wire heads. NOTE: The inner and outer races of the eccentric bearings are matched and must not be intermixed.3) Install the outer race of the crosshead bearings (19) in the three eccentric straps .It is preferred that the outer race assembly be “pressed” into position of frozen in “dry ice” or a deep freeze until it can be inserted into the bore. Under emergency circumstances, the outer race assembly can be installed by using a large torch and heating the eye of the eccentric strap . DO NOT EXCEED 149℃(300°F) (Use Temil Stick) and DO OT USE WATER to cool the strap. NOTE: The inner and outer races of the crosshead bearings are matched and should not be intermixed.4) Install the inner race of the crosshead bearing on the crosshead pin and mark according to their respective eccentric strap positions. Remove all nicks and burrs before shrinking race into place. Refer to bearing fit Position H Chart III.5) Install inner race of the center eccentric bearing on the shaft. Slide center strap into position and install inner race clamp (5). Tighten socket head screws (8A) in clamp to the torque 60~ 90 N.m (44~66ft .lbs) .6) Install snap ring (7) in the groove on RH eccentric and shrink inner race of eccentric bearing on shaft. After sliding the RH eccentric strap into position, install inner bearing retainer (14).Tighten inner race retainer bolts (8) to the torque 60~90 N.m (44~66ft .lbs)7) Install the LH eccentric bearing (other than for snap ring) and eccentric strap under the same procedure outlined in step 6 above.8) Place main bearings (9) in the main bearing carriers (10 RH and 11 LH) and install outer race retainer (12) and retainer bolts (15). Tighten bolts to the torque 60~90 N.m (44~66ft .lbs):9) After installing the two main bearing spacers (16), shrink main bearings (9) on each end of the shaft. Install inner race retainers (17) and retainer bolts (18) .Tighten retainer bolts to the torque: 60~90 N.m (44~66ft .lbs)
3.5 Installing Crankshaft Assembly in Frame In order to obtain a more precise fit between the main bearing housing and the frame bore on BSF-Series pumps, the installation procedures outlined below are to be followed (Refer to Fig. 19,20)1) Place a piece of wood between eye of eccentric strap and crosshead guide (as shown in Fig. 20) to protect guide from scoring or gouging as the straps are sliding into position.2) Rotate the main bearing carrier so that the two flat spots (180° apart) are parallel with the main bearing bolt holes, and slowly lower the crankshaft into position. (The flat spot provides clearance for the main bearing bolts.)3) After placing crankshaft in the frame, and before installing the main bearing covers, check the rollers in the main bearings to assure that each row of rollers in each bearing is equally loaded. Equal loading is obtained by positioning the floating bearing carrier. Assure the number of inner and outer rollers supporting the weight of the crankshaft in each bearing is same, and
The crossheads in the pumps can be installed through the front (fluid end) or back end of thecrosshead guide . Refer to Fig.20 When installing crossheads, and observe the following precautions:
Fig.21 Fig.21ASeat crosshead pin in tapper bore by bumping large end with a light blow, and add adjusting shimsbetween crosshead and crosshead pin retainer (individual shims required for each matchedcrosshead and retainer). Tighten retainer bolts (3 and 4,Fig.21,21A) to the following torque andsafety wire: 225~240 N.m (165~175ft. 1bs) DO NOT EXCEED THESE VALUES. USE TORQUE WRENCH. NOTE: To pull the crosshead pin, remove the four crosshead retainer bolts (4) and screw two of the bolts into the “jack screw” holes (5). Tighten the two jack screw bolts until the pin breaks loose. Complete removal of crosshead pin retainer plate (2) and slide pin out of bore.5) Check running clearance of crosshead by sliding long “feeler” gauges between crosshead and upper guide bore. The clearance should not be less than 0.508mm (0.020″). Check with long feeler gauge over entire surface of crosshead. NOTE: Less running clearance at center of crosshead can be caused by “swelling” from over tighting the crosshead pin retainer bolts (4). If present, loosen pin and retighten into place by using the make-up torques shown in paragraph 4. ATTACHMENT: If old crossheads are to be reused, inspect the sliding surfaces for wear or scoring .If necessary, the crossheads may be switched to opposite sides of the pump and rotated 180º to provide a smooth surface for the bottom of the crosshead. The center crosshead can be rotated 180º and the crosshead pin installed from the opposite side of pump.
In order for the pistons to run normally in the liners, the crosshead must travel in a straight linealong the horizontal centerline of the frame bore. To check and adjust crosshead alignment, proceedas follows:1) Remove diaphragm stuffing box from the diaphragm plate, (Fig,21).Do not remove the plate.2) Position crosshead at the extreme front of its stroke. With inside calipers or telescoping gauges, accurately measure the distance from the diaphragm plate bore to the crosshead extension rod at the top and bottom. Compare the two measurements to determine the position of the rod relative to the centerline of the bore.3) Rotate pump to extreme rear of stroke and take measurement again at the same place. Compare these measurements to the ones taken at the front of the stroke to determine if crosshead is running horizontally.4) If the centerline of the extension rod is more than 0.381mm (0.015″) low in the diaphragm plate bore, shims should be inserted under the lower guide to bring the extension rod back to center, provided there is ample clearance between the top of crosshead and upper crosshead guide. It is normal for the lower guide to wear more at the rear due to heavier loading at this point because of the angle of the eccentric strap. It is permissible to shim the guides on a taper if is done accurately to provide firm support for the guide. Do not shim guides to less than 0.50mm (0.020″) clearance between upper guide and crosshead. The large crosshead clearances are acceptable due to characteristics of triplex pump operation, the crosshead pressure is always on the lower guide. Note: If the mud pump must run in reverse situation ,please order the reverse pump F-1300R/1600R.5) Cut shims from steel shim stock long enough to reach completely across the guides. Cut tabs on the side to bend down over frame supports to hold them in place. Refer to items 3 and 4 under Installation of Crosshead Guides.
For many years, the fluid end of a pump was considered a non-wearing part which did not causeany concern other than possible infrequent repairs or replacements resulting from fluid cuts orwashouts. However, the higher pressures of the present-day drilling requirements have resulted inhigher stresses being imposed on the fluid end which, when combined with the corrosivecharacteristics of the drilling fluid, have resulted in the demand that more and better maintenancebe given to the fluid end parts and pieces if a reasonable operating life is to be obtained. A view ofthe obvious points is as follows:1) Make sure all valves on the discharge side of pump are opened before pump is put into operation. Kicking pump in against a closed valve can often be the start of a fatigue crack. An open crack may not necessarily occur at the precise moment, however, a small crack could occur and start the process of “corrosion fatigue failure”2) Do not engage pump clutch when prime mover is running at a high rate of speed. Which can cause undesirable shock loads against both power end and fluid end.
3) Properly maintain pressure relief valve to assure it is set for the pressure rating on the liner size being used. Refer to the description about the relief valve.4) Do not operate the pump for an extended period of time if a severe fluid knock is present.5) Properly prepare fluid end for storage. When pump is to be shut down or not operated for a period of ten days or more, it is recommended that the fluid end parts such as liners, pistons, rods, etc, be removed from the pump and the fluid end be flushed out completely with fresh water, After a thorough flushing, apply grease or a rust preventative to all of the machined surfaces such as valve pot cover threads, valve pot cover gasket surfaces, valve seats, liner bores, etc. The parts removed from the pump including liner, piston rods, etc., should of course be protected correctly. This will not only extend the life of the fluid end through resistance to corrosion,but will also protect the expendable parts still left in the pump and maintain them in good condition for installation in the pump at the next start-up period. The fluid end assembly for these triplex pumps consists of three forged cylinder blocks,complete with valve pot covers and cylinder heads, a suction manifold, and a discharge manifold.
4. Maintenance of Pump Proper maintenance of the pump in time is the necessary measure to assure the pump working and prolong the service life. For using any pump, maintenance should be paid more attention to.
4.1 Daily Maintenance 1) After stopping the pump, check the oil level of power end, at least once a day. If chain drive is used, the oil level of chain box should be checked. 2) Check the working situation of liner and piston, it’s normal that a little mud is taken out with piston. If there is leakage, the piston should be changed. Check the abrasion of liner inner bore, if the abrasion is severe, the liner should be changed in time. 3) Check the liner compartments of the frame. The mud and contamination should be cleaned. 4) Check the water tank of spray pump. The water or oil should be supplied if there is not enough. The polluted water should be changed and the water tank should be cleaned.
5) Check if the pressure of discharge pulsation dampener meets the requirements.6) Check the reliability of relief valves, if necessary, they should be changed.7) Check the lubricating oil pump for the variation of pressure gauge, if the pressure is very low (lower than 0.035Mpa) or no pressure, check if the suction and discharging filter screen are plugged.8) Loose the coupling of piston rod every day, check if the pyramidal face of coupling and the junction face of piston rod and extension rod are clean, rotate the piston rod a quarter round and tighten. The purpose of doing that is to make the wearing face evenly and prolong the service life of liner and piston.9) Before tightening the valve cover, the lubricating grease should be coated on the threads and be checked once four hours for loosing.10) Check the alarm bore of valve covert seal and liner seal (including the seal between the wearing plate and cylinder), if the mud discharges, the relative seal ring should be changed.
2) Check the whole pump completely every two years or three years, check if the main bearing, connecting rod bearing, crosshead bearing, input shaft bearing are worn or outworn. They should be changed if they can’t be used any more.3) Check the wear of gears, if they are worn sharply, the drive shaft and the driven shaft should be turnaround installed to use the face that isn’t worn. For the convenience of maintenance, checkpoints are listed in chartVII and Fig.24.
4.5 Cares should be Taken for the Following in Maintenance1) Before tightening the coupling connecting the extension rod and piston rod, the 25°taper face should be cleaned.2) When changing the liner, the liner seal ring should be changed as well.3) After stopping the pump in winter, the mud in the valve compartment and liner should be discharged and cleaned completely.4) Cover each inspection hole to avoid the sand dropping into the lubricating oil.5) The discharge pulsation dampener is only allowed to charge inert gas (such as nitrogen) or air. No inflammable and explosive gases are allowed such as oxygen, hydrogen etc. Chart VII Maintenance List
Interval No Maintenance Daily 1 Check the oil level after stopping the pump, if it is too low, it should be added to required level. Daily 2 Check if the readings of pressure gauge of lubricating oil pump are normal. When the pressure is too low, the cause should be found at once. Daily 3 Check if the dampener works normally Daily 4 Fill the cooling lubricant up to the spray pump water tank when it’s not enough. Change it when it deteriorates. Daily 5 Check the liner compartments. Clean it when necessary. Daily 6 Check if the plunger liner seal leaks, change it when necessary. Daily 7 Check the piston and liner for leakage, change them when necessary. Daily 8 Loose the coupling of piston rod one time daily, rotate the piston rod a quarter turn and then tighten the coupling back again. Daily 9 Check if the valve bonnets are loose every four hours. Coat lubricant on the thread when tightening. Daily 10 Check if the safety valves are reliable. Daily 11 Check if the pre-charging pressure of discharge pulsation dampener is normal when stopping the pump. Daily 12 Observe the alarm bore, if the mud is discharged, the related seal ring should be changed. Weekly 13 Disassemble the valve cover and clean it, coat it with molybdenum disulfide complex calcium base grease. Weekly 14 Check the inner sleeve of valve guide, if it’s worn, it should be changed. Weekly 15 Check the suction and discharge valve body, valve seat and valve rubber, change the damaged one. Weekly 16 Check if the locknuts of piston are corrosive or damaged. Change if they are damaged (normally, change after using three times). Weekly 17 Check the filter screen of lubricating system. Clean it if it is plugged. Weekly 18 Loosen the plug of drain flange, discharge the dirt and water in the oil pool. Monthly 19 Check the bolts of fluid end, the loose or damaged bolts should be tightened or changed. Monthly 20 Check the seal ring in the packing box, the worn one should be changed at least once every three months
5. Troubleshooting During the running of the pump, if there are troubles, the reason should be checked and thetrouble should be solved, otherwise, they will affect the normal working of the pump.
5.1 Trouble of Fluid End Trouble Cause Troubleshooting1.The pressure readings 1.The charging piping is not 1. Tighten the flange bolts ofbecome low and the discharge sealed off and the air gets into charging piping or change thereduces or no mud discharged. the pump. gasket. 2.The suction filter screen is 2. Stop the pump and clean the plugged. suction filter screen.2.Uneven discharge. The 1. A piston of a valve is worn 1. Change the damaged piston andpressure gauge fluctuates. The out or damaged. check the valve to find if it’scharging piping has abnormal 2. There is air in the pump damaged or plugged.noise. cylinder. 2. Check if the charging piping and valve cap are sealed off.3.There is severe slap in the 1.The piston nuts are loose. 1.Tighten the piston nuts.liner. 2.The liner cover is loose. 2.Tighten the liner cover. 3.The suction is not good 3.Check the reason of improper caused water dash. suction.4.The mud leakage from the 1.The valve cap is not 1.Tighten the valve cap.alarm bore of valve cap, tightened. 2.Change the seal ring.cylinder and liner seal. 2.The seal ring is damaged.5. The discharge pulsation 1.The charging connector is 1.Clean the connector.dampener can’t be charged or it plugged. 2.Change the bladder.leaks after charging. 2.The bladder of the pulsation 3.Repair or change the needle dampener is broken. valve. 3.The needle valve is not sealed.6.The diesel is overloaded. The discharge filter drum is Remove the filter screen and clean plugged. it.
Note: Besides the above estimated trouble, if other abnormal phenomena are found, the reasons should be found according to the trouble spot. After troubleshooting, the pump can run normally.
6. Storage1) When the pumps are not used for a long time, they should be stored.2) Before storing, clean it carefully, empty each part of fluid end and clean it with water.3) Discharge the engine oil in the bottom of gear box of power end completely and remove the deposits.4) Coat viscous lubricants on the finished surface of all bearings, crossheads, gears, piston rods, extension rods etc.5) Coat grease on the machined surface of each parts of fluid end.6) Cover the suction inlet and discharging outlet with blind flange.7) The nose end cover, rear cover and the inspection hole cover of crosshead should be covered.
7. Explains for Order1) Provided range of mud pump -Completely MUD PUMP basic parts; spray pump; pulsation dampener; safety value; tools;spare parts for one time change of rubber seals. -Not including sprocket and big skid. -If not be special required by users, spray pump is droved by belt and lubrication pump is innerdroved style by big gear. -Normally, 170liners and pistons are assembled in the pump when it is transported to users.2) F-series mud pumps divided into two basic styles, one is metric screws pump, the other is American style screws pump. Users choose it due to their own demands and declare when ordering.3) In according to the reverse rotation requirement of ZJ32, ZJ45 drilling rig, users ought to order F-1300R/1600R reverse pump.Follow characters belong to the reverse pump:1) The space between upper guide and crosshead is 0.25-0.40mm.2) Upper guide and lower guide can exchange.3) Connecting the oil pump oppositely.

GDEP is the original creator of the drilling pump and continues to set the standard for durable, high-quality drilling pumps that can withstand the world’s toughest drilling environments. Starting with our PZ7 and rounding out with the market"s most popular pump, the PZ1600, our PZ Series of pumps are the perfect choice for today"s high-pressure drilling applications.


 8613371530291