
how many kwh does a mud pump use price

Mud pump is one of the most critical equipment on the rig; therefore personnel on the rig must have good understanding about it. We’ve tried to find the good training about it but it is very difficult to find until we’ve seen this VDO training and it is a fantastic VDO training about the basic of mud pumps used in the oilfield. Total length of this VDO is about thirteen minutes and it is worth to watch it. You will learn about it so quickly. Additionally, we also add the full detailed transcripts which will acceleate the learning curve of learners.
Powerful mud pumps pick up mud from the suction tank and circulate the mud down hole, out the bit and back to the surface. Although rigs usually have two mud pumps and sometimes three or four, normally they use only one at a time. The others are mainly used as backup just in case one fails. Sometimes however the rig crew may compound the pumps, that is, they may use three or four pumps at the same time to move large volumes of mud when required.
Rigs use one of two types of mud pumps, Triplex pumps or Duplex pumps. Triplex pumps have three pistons that move back-and-forth in liners. Duplex pumps have two pistons move back and forth in liners.
Triplex pumps have many advantages they weight 30% less than a duplex of equal horsepower or kilowatts. The lighter weight parts are easier to handle and therefore easier to maintain. The other advantages include;
• One of the more important advantages of triplex over duplex pumps, is that they can move large volumes of mud at the higher pressure is required for modern deep hole drilling.
Triplex pumps are gradually phasing out duplex units. In a triplex pump, the pistons discharge mud only when they move forward in the liner. Then, when they moved back they draw in mud on the same side of the piston. Because of this, they are also called “single acting.” Single acting triplex pumps, pump mud at a relatively high speeds. Input horsepower ranges from 220 to 2200 or 164 to 1641 kW. Large pumps can pump over 1100 gallons per minute, over 4000 L per minute. Some big pumps have a maximum rated pressure of over 7000 psi over 50,000 kPa with 5 inch/127 mm liners.
Here is a schematic of a triplex pump. It has three pistons each moving in its own liner. It also has three intake valves and three discharge valves. It also has a pulsation dampener in the discharge line.
Look at the piston at left, it has just completed pushing mud out of the liner through the open discharge valve. The piston is at its maximum point of forward travel. The other two pistons are at other positions in their travel and are also pumping mud. But for now, concentrate on the left one to understand how the pump works. The left piston has completed its backstroke drawing in mud through the open intake valve. As the piston moved back it instead of the intake valve off its seat and drew mud in. A strong spring holds the discharge above closed. The left piston has moved forward pushing mud through the now open discharge valve. A strong spring holds the intake valve closed. They left piston has completed its forward stroke they form the length of the liner completely discharging the mud from it. All three pistons work together to keep a continuous flow of mud coming into and out of the pump.
Crewmembers can change the liners and pistons. Not only can they replace worn out ones, they can also install different sizes. Generally they use large liners and pistons when the pump needs to move large volumes of mud at relatively low pressure. They use a small liners and pistons when the pump needs to move smaller volumes of mud at a relatively high pressure.
In a duplex pump, pistons discharge mud on one side of the piston and at the same time, take in mud on the other side. Notice the top piston and the liner. As the piston moves forward, it discharges mud on one side as it draws in mud on the other then as it moves back, it discharges mud on the other side and draws in mud on the side it at had earlier discharge it. Duplex pumps are therefore double acting.
Double acting pumps move more mud on a single stroke than a triplex. However, because of they are double acting they have a seal around the piston rod. This seal keeps them from moving as fast as a triplex. Input horsepower ranges from 190 to 1790 hp or from 142 to 1335 kW. The largest pumps maximum rated working pressure is about 5000 psi, almost 35,000 kPa with 6 inch/152 mm linings.
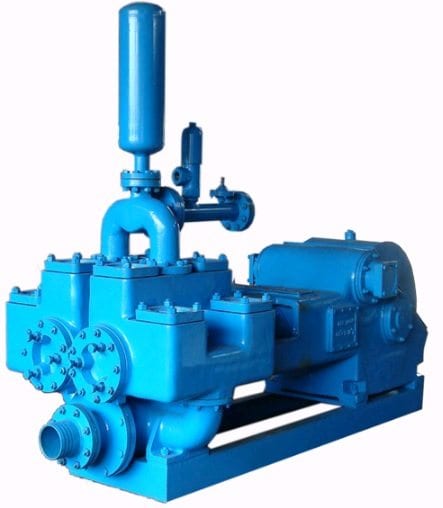
A mud pump has a fluid end, our end and intake and the discharge valves. The fluid end of the pump contains the pistons with liners which take in or discharge the fluid or mud. The pump pistons draw in mud through the intake valves and push mud out through the discharge valves.
The power end houses the large crankshaft and gear assembly that moves the piston assemblies on the fluid end. Pumps are powered by a pump motor. Large modern diesel/electric rigs use powerful electric motors to drive the pump. Mechanical rigs use chain drives or power bands (belts) from the rig’s engines and compounds to drive the pump.
A pulsation dampener connected to the pump’s discharge line smooths out surges created by the pistons as they discharge mud. This is a standard bladder type dampener. The bladder and the dampener body, separates pressurized nitrogen gas above from mud below. The bladder is made from synthetic rubber and is flexible. When mud discharge pressure presses against the bottom of the bladder, nitrogen pressure above the bladder resists it. This resistance smoothes out the surges of mud leaving the pump.
Here is the latest type of pulsation dampener, it does not have a bladder. It is a sphere about 4 feet or 1.2 m in diameter. It is built into the mud pump’s discharge line. The large chamber is form of mud. It has no moving parts so it does not need maintenance. The mud in the large volume sphere, absorbs this surges of mud leaving the pump.
A suction dampener smooths out the flow of mud entering into the pump. Crewmembers mount it on the triplex mud pump’s suction line. Inside the steel chamber is a air charged rubber bladder or diaphragm. The crew charges of the bladder about 10 to 15 psi/50 to 100 kPa. The suction dampener absorbs surges in the mud pump’s suction line caused by the fast-moving pump pistons. The pistons, constantly starts and stops the mud’s flow through the pump. At the other end of the charging line a suction pumps sends a smooth flow of mud to the pump’s intake. When the smooth flow meets the surging flow, the impact is absorbed by the dampener.
Workers always install a discharge pressure relief valve. They install it on the pump’s discharge side in or near the discharge line. If for some reason too much pressure builds up in the discharge line, perhaps the drill bit or annulus gets plugged, the relief valve opens. That opened above protects the mud pump and system damage from over pressure.
Some rig owners install a suction line relief valve. They install it on top of the suction line near the suction dampener. They mount it on top so that it won’t clog up with mud when the system is shut down. A suction relief valve protects the charging pump and the suction line dampener. A suction relief valve usually has a 2 inch or 50 mm seat opening. The installer normally adjusts it to 70 psi or 500 kPa relieving pressure. If both the suction and the discharged valves failed on the same side of the pump, high back flow or a pressure surge would occur. The high backflow could damage the charging pump or the suction line dampener. The discharge line is a high-pressure line through which the pump moves mud. From the discharge line, the mud goes through the stand pipe and rotary hose to the drill string equipment.

A mud pump is a reciprocating piston/plunger pump designed to circulate drilling fluid under high pressure (up to 7,500 psi (52,000 kPa)) down the drill string and back up the annulus. A duplex mud pump is an important part of the equipment used for oil well drilling.
Duplex mud pumps (two piston/plungers) have generally been replaced by the triplex pump, but are still common in developing countries. Two later developments are the hex pump with six vertical pistons/plungers, and various quintuplex’s with five horizontal piston/plungers. The advantages that Duplex mud pumps have over convention triplex pumps is a lower mud noise which assists with better Measurement while drilling and Logging while drilling decoding.
Use duplex mud pumps to make sure that the circulation of the mud being drilled or the supply of liquid reaches the bottom of the well from the mud cleaning system. Despite being older technology than the triplex mud pump, the duplex mud pumps can use either electricity or diesel, and maintenance is easy due to their binocular floating seals and safety valves.
A mud pump is composed of many parts including mud pump liner, mud pump piston, modules, hydraulic seat pullers, and other parts. Parts of a mud pump:housing itself
Duplex pumps are used to provide a secondary means of fuel transfer in the event of a failure of the primary pump. Each pump in a duplex set is sized to meet the full flow requirements of the system. Pump controllers can be set for any of the following common operating modes:Lead / Lag (Primary / Secondary): The lead (primary) pump is selected by the user and the lag (secondary pump operates when a failure of the primary pump is detected.
Alternating: Operates per Lead / Lag (Primary / Secondary) except that the operating pump and lead / lag status alternate on consecutive starts. A variation is to alternate the pumps based on the operating time (hour meter) of the lead pump.

VATVA GIDC, Ahmedabad 195, Pushpak Industrial Estate, Old Nika Tube Compound Phase I, GIDC, Vatva, VATVA GIDC, Ahmedabad - 382445, Dist. Ahmedabad, Gujarat
Ramnath Industrial Park, Rajkot Ramnath Industrial Park, Kothariya Ring Road, Beside Murlidhar Way Bridge Aaji dem, Near Ramvan, Ramnath Industrial Park, Rajkot - 360002, Dist. Rajkot, Gujarat
mahila college circle, Bhavnagar FIRST FLOOR PLOT NO 851/B-4 K K AVENUE ROAD, KRUSHNANAGAR SHANTAM BUNGLOWS Blood Bank Road, mahila college circle, Bhavnagar - 364001, Dist. Bhavnagar, Gujarat
Amraiwadi, Ahmedabad No. 16, Bankar Estate, Near Anup Estate, Behind Bharat Party Plot National Highway No. 8, Amraiwadi, Amraiwadi, Ahmedabad - 380026, Dist. Ahmedabad, Gujarat
Near Chhotalal Cross Road, Odhav, Ahmedabad 6, Agrasen Estate Opposite LIG Quarters, D 44 Road, Near Chhotalal Cross Road, Odhav, Ahmedabad - 382415, Dist. Ahmedabad, Gujarat
Odhav, Ahmedabad 11, Karma Industrial Park, Kathwada, Odhav Ring Road Circle, Kathwada Singarva Road GIDC, Odhav, Ahmedabad - 382430, Dist. Ahmedabad, Gujarat
Sarkhe Highway, Ahmedabad No. 19, Ground Floor, Yogeswar Complex, Opposite Sola Overbridge, Near The Fern Hotel Gulab Tower Road, S.G Highway, Thaltej, Sarkhe Highway, Ahmedabad - 380054, Dist. Ahmedabad, Gujarat
Pumps tend to be one of the biggest energy consumers in industrial operations. Pump motors, specifically, require a lot of energy. For instance, a 2500 HP triplex pump used for frac jobs can consume almost 2000 kW of power, meaning a full day of fracking can cost several thousand dollars in energy costs alone!
So, naturally, operators should want to maximize energy efficiency to get the most for their money. Even a 1% improvement in efficiency can decrease annual pumping costs by tens of thousands of dollars. The payoff is worth the effort. And if you want to remotely control your pumps, you want to keep efficiency in mind.
In this post, we’ll point you in the right direction and discuss all things related to pump efficiency. We’ll conclude with several tips for how you can maintain pumping efficiency and keep your energy costs down as much as possible.
In simple terms, pump efficiency refers to the ratio of power out to power in. It’s the mechanical power input at the pump shaft, measured in horsepower (HP), compared to the hydraulic power of the liquid output, also measured in HP. For instance, if a pump requires 1000 HP to operate and produces 800 HP of hydraulic power, it would have an efficiency of 80%.
Remember: pumps have to be driven by something, i.e., an electric or diesel motor. True pump system efficiency needs to factor in the efficiency of both the motor AND the pump.
Consequently, we need to think about how electrical power (when using electric motors) or heat power (when using combustion engines) converts into liquid power to really understand pump efficiency.
Good pump efficiency depends, of course, on pump type and size. High-quality pumps that are well-maintained can achieve efficiencies of 90% or higher, while smaller pumps tend to be less efficient. In general, if you take good care of your pumps, you should be able to achieve 70-90% pump efficiency.
Motor efficiency is also an important factor here. Motor efficiency depends on the fuel type, whether electricity or hydrocarbon, which in turn depends on availability and cost.
AC motors can achieve 90%+ efficiency when converting electrical to mechanical energy. Combustion engines are much less efficient, with typical efficiency ratings coming in at ~20% for gasoline and ~40% for diesel. Your choice of engine or motor type will depend on the availability and cost of fuel or electricity in your area.
Electric motors are more efficient than combustion engines, but site location and the cost of fuel can make the choice of combustion engines more practical.
Now that we have a better understanding of the pump efficiency metric, let’s talk about how to calculate it. The mechanical power of the pump, or the input power, is a property of the pump itself and will be documented during the pump setup. The output power, or hydraulic power, is calculated as the liquid flow rate multiplied by the "total head" of the system.
Remember: we’re trying to find the ratio of power in to power out. Since rations require equal units on both sides, we"ll have to do some conversions to get our hydraulic power units in HP. You"ll see how this is done in the example below.
IMPORTANT: to calculate true head, you also need to factor in the work the pump does to move fluid from the source. For example, if the source water is below the pump, you need to account for the extra work the pump puts in to draw source water upwards.
*Note - this calculation assumes the pump inlet is not pressurized and that friction losses are minimal. If the pump experiences a non-zero suction pressure, or if there is significant friction caused by the distance or material of the pipe, these should be factored in as well.
Every foot of water creates an additional 0.434 PSI of pressure, so we"ll find the elevation head by converting the change in elevation in feet to the suction pressure created by the water.
You"ll notice that the elevation head is minimal compared to the discharge pressure, and has minimal effect on the efficiency of the pump. As the elevation change increases or the discharge pressure decreases, however, elevation change will have a greater impact on total head.
Obviously, that’s a fair amount of math to get at the pump efficiency, considering all of the units conversions that need to be done. To avoid doing these calculations manually, feel free to use our simple pump efficiency calculator.
Our calculations use static variables (pump-rated horsepower and water source elevation) and dynamic variables (discharge flow and pressure). To determine pump efficiency, we need to measure the static variables only once, unless they change.
If you want to measure the true efficiency of your pump, taking energy consumption into account, you could add an electrical meter. Your meter should consist of a current transducer and voltage monitor (if using DC) for electrical motors or a fuel gauge for combustion. This would give you a true understanding of how pump efficiency affects energy consumption, and ultimately your bank account.
Up until this point, we’ve covered the ins and outs of how to determine pump efficiency. We’re now ready for the exciting stuff - how to improve pump efficiency!
One of the easiest ways to improve pump efficiency is to actually monitor pumps for signs of efficiency loss! If you monitor flow rate and discharge (output power) along with motor current or fuel consumption, you’ll notice efficiency losses as soon as they occur. Simply having pump efficiency information on hand empowers you to take action.
Another way to increase efficiency is to keep pumps well-maintained. Efficiency losses mostly come from mechanical defects in pumps, e.g., friction, leakages, and component failures. You can mitigate these issues through regular maintenance that keeps parts in working order and reveals impending failures. Of course, if you are continuously monitoring your pumps for efficiency drops, you’ll know exactly when maintenance is due.
You can also improve pump efficiency by keeping pumps lubricated at all times. Lubrication is the enemy of friction, which is the enemy of efficiency (“the enemy of my enemy is my friend…”).
The best way to ensure lubrication is to monitor lube tanks or sumps and make sure you always have lubrication on hand. You can also monitor lubricant consumption for significant changes. If lubricant usage goes up, it could signal that friction has increased in the system.
A fourth way to enhance pump efficiency is to ensure your pumps and piping are sized properly for your infrastructure. Although we’re bringing this up last, it’s really the first step in any pumping operation. If your pumps and piping don’t match, no amount of lubricant or maintenance will help.
Pipes have physical limits to how much fluid they can move at a particular pressure. If pipes aren’t sized properly, you’ll lose efficiency because your motor will have to work harder. It’s like air conditioning - if your ductwork isn’t sized appropriately for your home, you’ll end up paying more on your energy bill.
In this post, we’ve given you the full rundown when it comes to calculating and improving pump efficiency. You can now calculate, measure, and improve pump efficiency, potentially saving your business thousands of dollars annually on energy costs.
For those just getting started with pump optimization, we offer purpose-built, prepackaged solutions that will have you monitoring pump efficiency in minutes, even in hazardous environments.
As electricity rates continue to rise, several factors contribute to this. Climate-related events over the past few years, the rising cost of natural gas, and the current conflict in Europe are just a few and they show no signs of stopping. While the likelihood of a decrease in rates is far less possible than an increase, finding ways to save money on electricity can be tricky if you overthink it. While there are several organizations out there that can offer you different ways to save money by signing up for various products, the commonsense approach of conservation will save you money every time.
It’s easy to think this way when you are at home. Making sure lights are turned off when they aren’t being used, turning off televisions that aren’t being watched, and keeping an eye on the AC are just a few. But how do we implement the conservation of electricity in our MUDs? Water and wastewater plants take a lot of electricity to run and it’s not as simple as remembering to turn a light off to conserve energy. Director involvement in the conservation process begins with educating them on what steps they can take to help their plant to run more efficiently.
Equipment upgrades at your plant are a good place to start. At your wastewater plant, the blowers used in the aeration chambers run 24/7 and consume a lot of the plant’s energy. Making sure you are using turbo blowers instead of conventional ones is one way to save energy. The turbo blowers are about 10-20 percent more efficient and are smaller and quieter than conventional blowers. This may seem like a small amount but the annual savings are easily noticed when budget time comes around.
Pumps at the wastewater plant and the lift stations also consume a lot of electricity as there are several that are running constantly and others that come on as needed during peak usage times. Making sure that your district is using energy-efficient pumps and having the floats (sensor mechanisms that tell the pump when to turn on) set correctly are sure ways to conserve.
Operational modifications are another way to conserve energy at your plants. Energy-efficient lighting should be installed at the plants and only used at night. This seems like a simple one, but I can’t tell you how many plants I’ve been in that are all running their lights during the day. Installing a SCADA, which is an automated system that can monitor the plant and collect important data, can save you time and energy as it will help control the total process. It also will give your operator some peace of mind when daily maintaining your facilities.
Another way for your district to conserve energy is by joining an aggregation program such as the one Acclaim offers. Aggregating with other districts can save your district a lot of money by combining your load profile with other districts to procure a better rate per kWh. With all the volatility in the market today, it is best to lock in a lower rate now and avoid an impact on your budget in the future.

About 100 years ago, windmills were used to move water from one place to another. Today’s new and improved version of accomplishing that task are well pumps. Well pumps, like windmills are especially useful for crop irrigation, but they have numerous other applications.
Today, well pumps provide water to homes and farms. Not only can they be used to move water to distant locations, well pumps now transport oil, natural gas, and chemicals. There are basically three different types of water well pumps. 1) centrifugal pumps, 2) jet pumps, and 3) submersible pumps.
The difference between these pumps has to do with the depth of water in which they will be installed. Non-water well pumps also include well stimulation pumps. No matter what type of pump is used, the components on the output side of pumps are very much alike. Well pumps do not run continuously. Instead they transport water or other materials to a storage tank where air compression takes place. The air pressure in the tank then moves the water to it’s destination. When the air pressure reaches a pre-determined level in the tank, the well pump activates again, replenishing the tank.
Well pumps are generally used to carry potable water from below the surface of the ground for residential or commercial use. Various types of well pumps are available including submersible pumps, jet pumps, bladder pumps and mud pumps. Primarily, well pumps are used for well water collection, but they are also used to unload storage tanks, barges, and small tankers.
Natural gas, oil, ash slurries, chemicals, and wastewater represent a few other substances that are extracted by well pumps. They are powered by a wide variety of sources including hand well pumps, solar well pumps, AC/DC power, gas or diesel engines, and hydraulic power. Well pumps are employed in commercial service industries, construction, mining, and fuel production concerns, although their primary use remains in water distribution services for municipalities and agriculture.
Aerobic septic system or aerobic treatment unit (ATU) failure rates & repair costs: this article discusses Aerobic Septic System Failure Rates & Costs.
This website provides designs and products for aerobic septic treatment units (ATUs) for onsite waste disposal, also called fine bubble aeration systems. We address aerobic septic system design, features, inspection, repair, and maintenance. Product sources are also listed.
Typically Aerobic Septic supplies cost $200-$300 / year to include disinfection tablets and the annualized cost of septic effluent filter replacement.
Typically aerobic septic inspections cost between $200 and $800 / year, dependign on where you live and the level of service you require, and whether or not septic tank pumping is required (not an annual expense).
Here are some typical septic system regular operating costs using several eptic system maintenance companys data as well as data from septic authorities in U.S. states [1][2].
The effluent pump does not run continuously and is instead operated by a timer (dosing systems) or by a float that responds to effluent level in the effluent chamber of the aerobic septic tank.
Watch out: The complete cost of operating AND maintaining an aerobic septic system has to add to the above the cost of aerobic septic maintenance inspections, minor repairs, and periodic septic tank pumping.
Watch out: don"t skip aerobic septic system maintenance inspections; failure to properly inspect and maintain aerobic septic systems is cited by experts as the number one explanation for costly aerobic septic system failures.
Remember we calculate the total number of watt-hours of your pump then divide by 1000 to get Kilowatt hours or Kwh - as Kwh is how electricity rates are expressed.
From this and noting you report your pump is costing $40./ month to run, (how did you figure that out?) your actual cost is about 3 x the calculated cost.
Consider measuring or having an expert (so you"re not shocked or killed) the actual current draw or AMPS on your aerobic septic system circuit, and compare that to the motor data label for RLA (Running Load Amps)
In terms of cost per kilowatt hour (kWh), Massachusetts can be pricey. As of January 2019, the average retail price of electricity in the residential sector was 22.57 cents per kWh. That puts Massachusetts at the third highest rate in the nation.- Retrieved 2020/10/18 original source: https://providerpower.com/power-to-help/average-electric-bill-rates-consumption-massachusetts/
It is unlikely that you could simply turn off your aerator on an aerobic system and treat it as a conventional septic: the level of treatment and disposal of effluent would be inadequate.
Except for specially-engineered aerobic treatment septic systems for which the designer and manufacturer specify that a particular chemical is required such as disinfectants
eptic treatment additives are unnecessary, do not improve the system"s function, in some cases can damage the system (such as by breaking up and sending solids out into the absorption system) and the use of at least some such products is actually illegal in many jurisdictions.
Continue reading at AEROBIC SEPTIC SYSTEM MAINTENANCE COSTS or select a topic from the closely-related articles below, or see the complete ARTICLE INDEX.
AEROBIC ATU SEPTIC OPERATING COSTS at InspectApedia.com - online encyclopedia of building & environmental inspection, testing, diagnosis, repair, & problem prevention advice.
Note: appearance of your Comment below may be delayed: if your comment contains an image, photograph, web link, or text that looks to the software as if it might be a web link, your posting will appear after it has been approved by a moderator. Apologies for the delay.
Only one image can be added per comment but you can post as many comments, and therefore images, as you like.You will not receive a notification when a response to your question has been posted.
New York State Department of Health, APPENDIX 75-A WASTEWATER TREATMENT STANDARDS - INDIVIDUAL HOUSEHOLD SYSTEMS , [PDF] New York State Department of Health, 3 February 2010, retrieved 3/1/2010, original source: https://www.health.ny.gov/regulations/nycrr/title_10/part_75/appendix_75-a.htm
[2] Clearstream at Clearstream Wastewater Systems, Inc. , 4899 US Hwy 69 South, Lumberton, Texas 77657, Tel: 800-586-3656, Website: http://www.clearstreamsystems.com.
Our recommended books about building & mechanical systems design, inspection, problem diagnosis, and repair, and about indoor environment and IAQ testing, diagnosis, and cleanup are at the InspectAPedia Bookstore. Also see our Book Reviews - InspectAPedia.
HOME INSPECTION SERVICES and also extensive HOME INSPECTION EDUCATION and home inspection-related PUBLICATIONS. Alan Carson is a past president of ASHI, the American Society of Home Inspectors.
Thanks to Alan Carson and Bob Dunlop, for permission for InspectAPedia to use text excerpts from The Home Reference Book & illustrations from The Illustrated Home. Carson Dunlop Associates" provides extensive home inspection education and report writing material.
Special Offer: For a 5% discount on any number of copies of the Illustrated Home purchased as a single order Enter INSPECTAILL in the order payment page "Promo/Redemption" space.
TECHNICAL REFERENCE GUIDE to manufacturer"s model and serial number information for heating and cooling equipment, useful for determining the age of heating boilers, furnaces, water heaters is provided by Carson Dunlop Weldon & Associates
Special Offer: Carson Dunlop Associates offers InspectAPedia readers in the U.S.A. a 5% discount on any number of copies of the Technical Reference Guide purchased as a single order. Just enter INSPECTATRG in the order payment page "Promo/Redemption" space.
Special Offer: For a 10% discount on any number of copies of the Home Reference Book purchased as a single order. Enter INSPECTAHRB in the order payment page "Promo/Redemption" space. InspectAPedia.com editor Daniel Friedman is a contributing author.
Special Offer: For a 5% discount on any number of copies of the Home Reference eBook purchased as a single order. Enter INSPECTAEHRB in the order payment page "Promo/Redemption" space.
Special Offer: Carson Dunlop Associates offers InspectAPedia readers in the U.S.A. a 5% discount on these courses: Enter INSPECTAHITP in the order payment page "Promo/Redemption" space. InspectAPedia.com editor Daniel Friedman is a contributing author.
The Horizon Software System manages business operations,scheduling, & inspection report writing using Carson Dunlop"s knowledge base & color images. The Horizon system runs on always-available cloud-based software for office computers, laptops, tablets, iPad, Android, & other smartphones

15 years ago I spent $30 on a Kill-a-watt meter that astoundingly more than paid for it the first month and identified some real wasteful things (Cable box, Stereo system, TV, dehumidifier, refrigerator). I simply stopped using some things and gradually replaced others. I have a 16×32 in ground pool the gets light use. Found the water looked great when running the filter only 1.75 hours/day = about 50 KWH/Mo. New appliances spend some time on the kill-a-watt; thirsty ones get returned! New TVs are amazing; my 55” 4K Samsung costs me about 1 cent per hour.
Actually my present electric bill is higher because I have switched from oil heat to a Mini-Split heat pump. 1st year went from using 380 gallons+ of oil to using 34 gallons and 2200 KWH electricity. I don’t heat the whole house, but wasn’t doing that with oil either. I did the install; after $900 utility rebate and $500 tax credit it paid for itself first year and cut heating cost in half!
Hot water was coming from the oil burner which I refused to leave running all the time. Big improvement: installed a $200 electric on-demand hot water heater. A fast shower uses about .65kwh or about 10 cents @ my high $0.169/kwh cost (New Hampshire). A gas or propane on-demand heater would make sense for higher usage.
As previously stated, the best tool to enable savings has been ability to instantly measure and see energy consumption. I found very simple ways to do this. I attached an accessory to my electric meter that gives me an instant reading of my cost for the month as well as instant usage cost per hour. Also installed a separate electric meter for my heat pump circuit (used utility meters cost about $25 on eBay) and made it so I could see instant usage cost per hour and see all these anytime from my phone. Oil burner was simple: just attach a minute meter to the burner motor. (Calculated I use 0.622 gal/hour) Accuracy has been consistently over 98%, but I haven’t bought oil in over 2 years!

This website is using a security service to protect itself from online attacks. The action you just performed triggered the security solution. There are several actions that could trigger this block including submitting a certain word or phrase, a SQL command or malformed data.

If you ended up on this page doing normal allowed operations, please contact our support at support@mdpi.com. Please include what you were doing when this page came up and the Ray ID & Your IP found at the

Whether you live in a rural area or simply prefer getting your water from a private source, installing a well on your property has numerous benefits. You won’t have to pay a monthly water bill, and you’ll have some control over your water’s mineral and chemical contents. However, drilling deep enough to access clean water can be expensive, and you’ll need to store and purify the water once it gets to the surface.
On average, drilling a water well costs$3,500–$15,000, depending on several geological and technological factors. You may be able to dig a shallow well yourself, but it’s best to hire a professional contractor for a well that will provide water for an entire home. This guide outlines the well installation process and its costs.
Though $3,500 to $15,000 is a wide range, it’s hard to narrow it down without knowing the specifics of your property. The cost of your project depends on the following factors.
The deeper you need to dig, drill, or drive, the longer the job will take and the more labor it will require. Most residential wells need to be at least 50 feet deep and have an average depth of 300 feet, but how far you need to drill to hit water depends on geographic factors. Accessing state and local geological surveys and learning about existing wells in your area will give you a better idea of the depth you’ll need. The table below includes price ranges for various depths.
Shallow, residential water wells are the least expensive to dig or drill. Sand point wells, which are shallow and can be driven by hand or machine, are similarly inexpensive but don’t usually provide a home’s entire water needs. Geothermal wells are relatively inexpensive on their own, but installing one costs tens of thousands of dollars.
Artesian wells that drill into an aquifer are more costly to drill but less expensive to run. Irrigation wells are the most expensive because they handle the highest volume of water, though residential irrigation is much less pricey than commercial irrigation.
Digging is the least expensive way to create a well, but it’s limited to about 100 feet in depth. Digging can also be thwarted by highly compacted or rocky soil. You can create a shallow well of up to 50 feet by driving a small-diameter pipe into the ground and removing the soil from inside. However, most residential-scale well projects require a drill to excavate.
Modern well systems consist of much more than a hole in the ground and a bucket on a rope. Here are some mechanical components that go into a working water well.
Well-casing pipe supports and protects the well’s walls, so it needs to be sturdy. This pipe is typically made from polyvinyl chloride (PVC), the most affordable option ($6–$10 per linear foot). Galvanized or stainless steel casing is also available for a premium ($30–$130 per foot). Steel may be necessary for earthquake-prone areas, as it’s much less susceptible to cracking and breaking. Casing pipe costs $630–$2,400 depending on its length.
Most wells need electrical wiring to operate the pump and pressure switch. These components aren’t expensive ($50–$150), but a licensed electrician needs to install them, costing $150–$500.
Some people assume that well water is cleaner than municipal water, but municipal water goes through a strict treatment process that water from private wells doesn’t. If you’re using a well for drinking water or other residential applications, you’ll need a purification system to rid the water of contaminants before you can use it. Whole-home water treatment systems cost $500–$3,000, plus another $200–$400 for installation.
Once the water is brought to the surface and purified, it needs to be stored and pressurized so you can use it in your home. A 2-gallon water tank can cost as little as $100, but if you’re going to use well water for most of your needs, you’ll probably need a large pressure tank that costs between $1,400 and $2,400.
One of the most critical parts of the well system is thewater pump, which brings groundwater to the surface. A hand pump for a shallow well can cost as little as $150–$500, but most electronic pumps cost between $300 and $2,000, depending on how powerful they are. A shallow well can sometimes use an aboveground surface pump, but a deep well usually requires a powerful, more expensive submersible pump that sits below the water line and pushes the water up. Some artesian wells can get away without using a pump system since the groundwater is already under pressure and may be pushed to the surface naturally.
Your location determines your climate, water table depth, and type and condition of the bedrock. It will also affect labor costs. For example, Florida is a relatively inexpensive place to dig a well because it has a high water table and an average cost of living. The price is higher in desert states like California, Texas, and Arizona.
You’ll need to check with your state and local government about permits for any project that involves digging in the ground. Permits can cost anywhere from $5 to $500 depending on where you live, but a well drilling company can help you determine which ones you need.
The farther a well is located from your house, the more expensive materials and labor will be. You’ll require longer pipes and electric lines, usually at an additional cost of $50–$150 per linear foot.
Drilling an existing well deeper is less expensive than installing an entirely new well. Redrill fees are usually $300–$600, and a professional can typically complete the job in a day.
Dry and rocky soil conditions, as well as dense bedrock or heavy clay, can make well drilling more difficult and thus more expensive. You may require heavy or specialized machinery, which can add up to 150% of the base price to your total.
Before drinking water from your well, you’ll want to test its quality to make sure it’s safe. Do-it-yourself (DIY) water testing kitsare available for $50–$150, but if this is going to be your home’s primary water supply, you should hire a pro. This can cost between $100 and $500, but it’s well worth checking for the presence of viruses, bacteria, fungi, heavy metals, radon, pesticides, and other contaminants.
If you’re installing a well to live off the grid, you’ll also need a way of dealing with wastewater that doesn’t involve hooking up to the municipal water system. Many professional well drillers can install a well and septic system at the same time, which will save you money on labor. Aseptic tank installationcosts $2,000–$7,000 on its own or $5,000–$22,000 when combined with a well system.
One benefit of installing your own well is that you’ll no longer need to pay municipal water bills. You’ll only need to pay for the electricity to operate the pump (about $3–$4 per month), plus maintenance costs of $100–$250 per year. Compared to a monthly utility bill of $20–$40, you can save up to $500 a year.
It’s possible to install a well yourself, but it’s more complicated than digging or drilling a hole in the ground. Here’s what you can expect from the process, whether you do it yourself or hire a professional.
Well installation professionals have the tools and experience to drill plus install the casing, pump, well cap, and other hardware. They also know how to adjust the process if they encounter anything unexpected under the soil and can help you apply for permits. You’ll pay at least $1,500 in labor costs on top of the well equipment and may pay $10,000 or more for deep wells in poor soil conditions.
Digging or driving a shallow well in an area with a high water table is within the capability of dedicated DIYers. However, you must ensure you go deep enough to get to truly clean water beneath the contaminated runoff in the upper layers of soil. These shallow, driven wells also provide a limited water supply. You can rent a drill rig for $600–$800 per day for larger, deeper wells, but this will only give you the borehole; you’ll also have to install all the hardware yourself.
Wells require maintenance and occasionally require repair. Here are signs that you may need a professional well company to do an assessment. You may only have to pay a service fee if yourhome warranty covers well pumpsor well systems.
Drilled or dug wells can last as long as the walls hold up, but the equipment that runs them usually needs to be replaced every 20–30 years. The pump may fail, or the casing pipe may develop leaks. Replacements can cost up to $10,000 in materials and labor. You can extend your equipment’s lifespan by performing regular checks and maintenance or by hiring a well company to do these for you.
It’s also possible for a well to run dry. This isn’t likely or always permanent since aquifers and other sources may need time to fill back up. A well may fill with sediment over time, which will need to be pumped and cleaned out. In rare cases, you may need to dig deeper or find a different fracture to regain water flow.
It’s widely claimed that having a functional well will raise your property value, but there’s no data on how much of a return on investment (ROI) you can expect. The consensus is that a well that yields drinking water will add more value than an irrigation well, but a nonfunctional or contaminated well will be a liability. Wells are generally more valuable in rural areas or where people want to live off the grid.
Research your yard’s soil and the depth you’ll need to drill before purchasing a DIY well drilling kit. Just because the kit can go 100 feet into the ground doesn’t mean you’ll hit clean water.
It’s important to acknowledge that many DIY well drilling kits are sold within the “doomsday prepper” market. These kits are unlikely to be sufficient if you intend to use your well to fulfill most or all of your residential water needs. You’re better off at least consulting with local professionals who will know about your area’s geological features and water levels before starting the project. These professionals can help you make informed decisions about well installation.
A properly installed well can save you money on your utility bills and provide a private, unmetered water source. Make sure to budget for the drilling of the actual borehole and the equipment needed to pump and store the water, as well as water testing and purification if you intend to drink it. Your system should last for many years once it’s set up.
It can be worth it to install a well, depending on your needs and budget. Drilling a private well is a large investment, but if you live in a rural area or an area with poor water quality, it could increase your property value. Consult with local professionals before beginning to drill or dig.
The average well installation cost is $3,500–$15,000, including drilling and the casing, pump, and storage tank. Price can also depend on the depth of the borehole, ranging between $25 and $65 per foot.
The cost to hook a well up to a home’s plumbing system depends on the machinery used to pump and carry the water. Piping and electrical lines cost $50–$150 per foot, a purification system costs $300–$5,000, and a pressurized storage tank costs $1,400–$2,400.
The time it takes to install a well depends on its depth and the conditions of the soil and bedrock, but drilling can usually be completed in a day or two. Installing the pump system takes another day. After that, it depends on how long and extensive the pipes and electrical system need to be. The whole process should take about a week.

Given all the attention being paid to solar power these days, you might be surprised to learn that one of the most promising solutions to high energy costs isn"t up in the sky but buried deep under your lawn.
Super efficient geothermal heat pumps provide clean, quiet heating and cooling while cutting utility bills by up to 70 percent. "With this technology, everybody could be sitting on top of their lifetime energy supply," says TOH plumbing and heating expert Richard Trethewey.
In principle, a geothermal heat pump functions like a conventional heat pump, by using high-pressure refrigerant to capture and move heat between indoors and out. The difference is that conventional systems gather their heat—and get rid of it—through the outside air. Geothermal systems, in contrast, transfer heat through long loops of liquid-filled pipe buried in the ground.
As our cave-dwelling ancestors discovered long ago, if you go far enough underground, the earth"s temperature stays at a constant 50 degrees or so, no matter how hot or cold it gets outside. So while a conventional "air-source" heat pump struggles to scavenge heat from freezing winter air or to dump it into the summer swelter, its "ground-source" counterpart has the comparatively easy job of extracting and disbursing heat through the 50-degree liquid circulating in its ground loop.
That"s why it takes only one kilowatt-hour of electricity for a geothermal heat pump to produce nearly 12,000 Btu of cooling or heating. (To produce the same number of Btus, a standard heat pump on a 95-degree day consumes 2.2 kilowatt-hours.) Geothermal systems are twice as efficient as the top-rated air conditioners and almost 50 percent more efficient than the best gas furnaces, all year round.
Another advantage is that there"s no need for a noisy outdoor fan to move air through the compressor coils. Geothermal units simply pump liquid, so they can be parked indoors, safe from the elements. Most come with 10-year warranties, but they can last much longer. In the 29 years since Jim Partin, one of the technology"s earliest adopters, installed one in his Stillwater, Oklahoma, house, he"s replaced only two contact switches.
Heat Pump Parts:As with ordinary heat pumps, the refrigerant in a geothermal heat pump runs in a loop through a compressor, condenser, expansion valve, and evaporator, collecting heat at one end and giving it up at the other. The direction of refrigerant flow, which is controlled by the reversing valve, determines whether heat is moving into the house in winter (shown) or being pulled out of it in summer. With the addition of a desuperheater, residual warmth from the system can also supplement a conventional water heater, further reducing energy bills.
Despite these benefits, only 47,000 geothermal units were installed last year in the U.S. That"s just a tiny blip compared with the approximately one million conventional heat pumps sold during the same period, even though ground-source heat pumps cost about the same to buy.
Here"s the rub: You have to bury a lot of pipe—about 1,500 to 1,800 feet for a typical 2,000-square-foot home. (The actual length should be calculated by an expert, based on the optimal heating and cooling loads for the house.) A setup that size could cost as much as $20,000 to install, depending on soil conditions and how much digging and drilling is involved.
A house on a big lot, for instance, might be able to use pipes laid horizontally in long, 4-foot-deep trenches. Houses on small lots or rocky ledges could require three or four holes drilled about 300 feet straight down, a much more costly process.
Even with this significant front-end investment, geothermal systems are so energy-stingy that the payback period is remarkably brief. A study by the Air Force Institute of Technology calculated that it takes on average just seven to eight years to recoup costs.
Your actual break-even point depends on local utility rates, excavation/drilling costs, how well your house is insulated, the efficiency of the model you choose, and what incentives your state or utilities provide. A good installer who"s knowledgeable about heating and cooling as well as your local geology will be able to make those calculations for you.
The current federal incentive is limited to the standard $300 tax credit for Energy Star HVAC installations. (Canadians retrofitting an existing home with geothermal qualify for a $3,500 federal grant.)
Some forward-thinking utilities have offered low-interest loans to homeowners willing to adopt the technology. "It"s a win-win arrangement," says Steve Rosenstock, energy solutions manager at the Edison Electric Institute, an association of utilities. "The utilities reduce peak demand for heating and cooling as their customers dramatically lower their electric bills."
What it is:An electrically powered heating and cooling system that transfers heat between your house and the earth using fluid circulated through long loops of underground pipes.
How it works:An indoor heat pump uses a basic refrigeration cycle—evaporation, compression, condensation, and expansion—to capture and disburse heat from and to the ground to warm the house in winter and cool it in summer.
Advantages:Cuts home heating and cooling bills by 30 to 70 percent. Eliminates noisy outdoor compressors and fans. Reduces greenhouse gas emissions by the equivalent of planting 750 trees or taking two cars off the road.
What to look for:For federal tax credits, pumps must meet Energy Star efficiency standards. For closed-loop systems, you need an EER of 14.1 and a COP (coefficient of performance) of 3.3.
Where to get it:To find manufacturers, visit the Geothermal Heat Pump Consortium website. To find trained installers and designers who know the local geology and how to size systems for maximum efficiency, go to the International Ground Source Heat Pump Association"s website.
What it costs:$15,000–$20,000 installed for the system, including ground loops, heat pump, and controls. The Database of State Incentives for Renewable Energy provides up-to-date information on state incentive programs.
Can I retrofit one?Retrofitting a ground-source system is not difficult, as long as burying the ground loop is feasible. A house will need ducts to distribute cool air on hot days. Those same ducts can provide warm air in winter.
Some geothermal heat pumps can hook up to an existing air handler, other units come with their own integral air handler. Houses with hot-water heating can use geothermal systems, too, although additional radiators may be needed because these systems do not reach the higher temperatures of fuel-fired boilers. (That"s not a problem for radiant floor heat, which operates at lower temperatures.)

A well-placed suction stabilizer can also prevent pump chatter. Pump chatter occurs when energy is exchanged between the quick opening and closing of the reciprocating pump’s valves and the hammer effect from the centrifugal pump. Pump isolation with suction stabilizers is achieved when the charge pumps are isolated from reciprocating pumps and vice versa. The results are a smooth flow of pumped media devoid of agitating energies present in the pumped fluid.
Suction stabilizer units can mitigate most of the challenges related to pulsations or pressure surges, even in the most complex piping conditions. The resulting benefits prevent expensive unplanned downtime and decrease costs and inconvenience associated with system replacements and repairs.
Drilling for oil and natural gas is a complex process, but advanced technology has made the job more efficient and productive while providing less impact on the environment. Want to see how the oil and gas industry does it? Click each numbered component in the drawing to learn more.
1. Some people believe that oil and natural gas companies can explore for oil wherever they want. This is not true. Companies must secure permission from the owner of the mineral rights, whether the owner is a private citizen or the government. Many mineral owners and the government allow oil and natural gas companies to compete to drill on their land. The companies assume all the costs and risks of drilling and, in return, pay the mineral owners a portion of what they find and a signing bonus to secure the drilling rights. The share of the production paid by the company to the mineral owner is called a royalty payment.
The drilling derrick is used to position and support the drill string. Modern drilling equipment comes in a wide range of sizes. Many wells can be drilled with equipment that requires far less space than in the past.
Drill rigs now run on electricity to supply the power to turn the bit and raise and lower the drill pipe and casing. Since most drilling occurs in remote areas, the electricity is supplied by electric power generators that run on diesel fuel. These generators make drilling rigs much quieter than in the past.
The drill bit uses three conical shaped cutting surfaces to grind rock into rice-sized particles. The newest bits drill 150 percent to 200 percent faster than similar bits just a few years ago! The drill string consists of lengths of pipe fastened to each other and to the drill bit. The drill string transmits power from the top drive to the drill bit.
As the drill cuts into the rock, drilling mud is added to the hole. This helps cool the drill bit, and the mud is circulated to bring cuttings to the surface. The weight of the drilling mud keeps the hole open. It also helps counteract the pressure of any gas or fluids encountered along the way, in this way preventing a well from loss of control or "blow out.”
Protecting the aquifer from contamination is a major concern of the oil and natural gas industry. Casing made of steel or high-tech alloys is lowered into the hole and cemented into place to protect fresh water aquifers. The casing also keeps the hole open so that oil and natural gas can be brought to the surface.
To reduce waste, the drilling mud is passed through a sieve where the ground rock particles or cuttings can be removed. Then the mud is recycled back into the hole.
Dirt and rock cuttings are removed from the hole and temporarily stored nearby. Holding areas are carefully sited, lined and often times covered with nets to protect local wildlife.
All aspects of the drilling operations are closely monitored to ensure efficient drilling and safety. Electronic sensors measure drilling rates, vibration, pressure, rock type, mud properties and many other drilling parameters. Computers monitor operations and collect data from inside the well. With advanced communications technology, drilling personnel can share and review this data with engineers and geologists located thousands of miles away. If a problem is detected, the rig can be safely and quickly shut down.


 8613371530291