
mud pump for 100 feet dug wells in stock

On average, drilling a water well costs$3,500–$15,000, depending on several geological and technological factors. You may be able to dig a shallow well yourself, but it’s best to hire a professional contractor for a well that will provide water for an entire home. This guide outlines the well installation process and its costs.
The deeper you need to dig, drill, or drive, the longer the job will take and the more labor it will require. Most residential wells need to be at least 50 feet deep and have an average depth of 300 feet, but how far you need to drill to hit water depends on geographic factors. Accessing state and local geological surveys and learning about existing wells in your area will give you a better idea of the depth you’ll need. The table below includes price ranges for various depths.
Shallow, residential water wells are the least expensive to dig or drill. Sand point wells, which are shallow and can be driven by hand or machine, are similarly inexpensive but don’t usually provide a home’s entire water needs. Geothermal wells are relatively inexpensive on their own, but installing one costs tens of thousands of dollars.
Artesian wells that drill into an aquifer are more costly to drill but less expensive to run. Irrigation wells are the most expensive because they handle the highest volume of water, though residential irrigation is much less pricey than commercial irrigation.
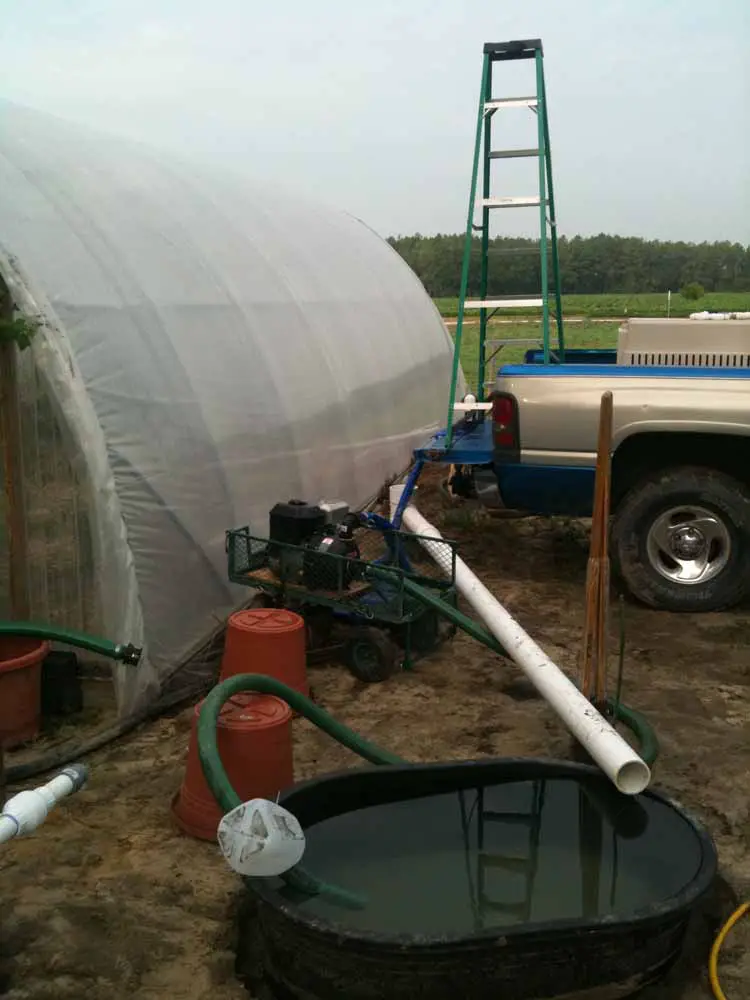
Digging is the least expensive way to create a well, but it’s limited to about 100 feet in depth. Digging can also be thwarted by highly compacted or rocky soil. You can create a shallow well of up to 50 feet by driving a small-diameter pipe into the ground and removing the soil from inside. However, most residential-scale well projects require a drill to excavate.
Well-casing pipe supports and protects the well’s walls, so it needs to be sturdy. This pipe is typically made from polyvinyl chloride (PVC), the most affordable option ($6–$10 per linear foot). Galvanized or stainless steel casing is also available for a premium ($30–$130 per foot). Steel may be necessary for earthquake-prone areas, as it’s much less susceptible to cracking and breaking. Casing pipe costs $630–$2,400 depending on its length.
Most wells need electrical wiring to operate the pump and pressure switch. These components aren’t expensive ($50–$150), but a licensed electrician needs to install them, costing $150–$500.
Some people assume that well water is cleaner than municipal water, but municipal water goes through a strict treatment process that water from private wells doesn’t. If you’re using a well for drinking water or other residential applications, you’ll need a purification system to rid the water of contaminants before you can use it. Whole-home water treatment systems cost $500–$3,000, plus another $200–$400 for installation.
Once the water is brought to the surface and purified, it needs to be stored and pressurized so you can use it in your home. A 2-gallon water tank can cost as little as $100, but if you’re going to use well water for most of your needs, you’ll probably need a large pressure tank that costs between $1,400 and $2,400.
One of the most critical parts of the well system is thewater pump, which brings groundwater to the surface. A hand pump for a shallow well can cost as little as $150–$500, but most electronic pumps cost between $300 and $2,000, depending on how powerful they are. A shallow well can sometimes use an aboveground surface pump, but a deep well usually requires a powerful, more expensive submersible pump that sits below the water line and pushes the water up. Some artesian wells can get away without using a pump system since the groundwater is already under pressure and may be pushed to the surface naturally.
Your location determines your climate, water table depth, and type and condition of the bedrock. It will also affect labor costs. For example, Florida is a relatively inexpensive place to dig a well because it has a high water table and an average cost of living. The price is higher in desert states like California, Texas, and Arizona.
You’ll need to check with your state and local government about permits for any project that involves digging in the ground. Permits can cost anywhere from $5 to $500 depending on where you live, but a well drilling company can help you determine which ones you need.
Before drinking water from your well, you’ll want to test its quality to make sure it’s safe. Do-it-yourself (DIY) water testing kitsare available for $50–$150, but if this is going to be your home’s primary water supply, you should hire a pro. This can cost between $100 and $500, but it’s well worth checking for the presence of viruses, bacteria, fungi, heavy metals, radon, pesticides, and other contaminants.
One benefit of installing your own well is that you’ll no longer need to pay municipal water bills. You’ll only need to pay for the electricity to operate the pump (about $3–$4 per month), plus maintenance costs of $100–$250 per year. Compared to a monthly utility bill of $20–$40, you can save up to $500 a year.
Well installation professionals have the tools and experience to drill plus install the casing, pump, well cap, and other hardware. They also know how to adjust the process if they encounter anything unexpected under the soil and can help you apply for permits. You’ll pay at least $1,500 in labor costs on top of the well equipment and may pay $10,000 or more for deep wells in poor soil conditions.
Digging or driving a shallow well in an area with a high water table is within the capability of dedicated DIYers. However, you must ensure you go deep enough to get to truly clean water beneath the contaminated runoff in the upper layers of soil. These shallow, driven wells also provide a limited water supply. You can rent a drill rig for $600–$800 per day for larger, deeper wells, but this will only give you the borehole; you’ll also have to install all the hardware yourself.
Wells require maintenance and occasionally require repair. Here are signs that you may need a professional well company to do an assessment. You may only have to pay a service fee if yourhome warranty covers well pumpsor well systems.
Drilled or dug wells can last as long as the walls hold up, but the equipment that runs them usually needs to be replaced every 20–30 years. The pump may fail, or the casing pipe may develop leaks. Replacements can cost up to $10,000 in materials and labor. You can extend your equipment’s lifespan by performing regular checks and maintenance or by hiring a well company to do these for you.
It’s also possible for a well to run dry. This isn’t likely or always permanent since aquifers and other sources may need time to fill back up. A well may fill with sediment over time, which will need to be pumped and cleaned out. In rare cases, you may need to dig deeper or find a different fracture to regain water flow.
It’s widely claimed that having a functional well will raise your property value, but there’s no data on how much of a return on investment (ROI) you can expect. The consensus is that a well that yields drinking water will add more value than an irrigation well, but a nonfunctional or contaminated well will be a liability. Wells are generally more valuable in rural areas or where people want to live off the grid.
Research your yard’s soil and the depth you’ll need to drill before purchasing a DIY well drilling kit. Just because the kit can go 100 feet into the ground doesn’t mean you’ll hit clean water.
It’s important to acknowledge that many DIY well drilling kits are sold within the “doomsday prepper” market. These kits are unlikely to be sufficient if you intend to use your well to fulfill most or all of your residential water needs. You’re better off at least consulting with local professionals who will know about your area’s geological features and water levels before starting the project. These professionals can help you make informed decisions about well installation.
A properly installed well can save you money on your utility bills and provide a private, unmetered water source. Make sure to budget for the drilling of the actual borehole and the equipment needed to pump and store the water, as well as water testing and purification if you intend to drink it. Your system should last for many years once it’s set up.
It can be worth it to install a well, depending on your needs and budget. Drilling a private well is a large investment, but if you live in a rural area or an area with poor water quality, it could increase your property value. Consult with local professionals before beginning to drill or dig.
The average well installation cost is $3,500–$15,000, including drilling and the casing, pump, and storage tank. Price can also depend on the depth of the borehole, ranging between $25 and $65 per foot.
The cost to hook a well up to a home’s plumbing system depends on the machinery used to pump and carry the water. Piping and electrical lines cost $50–$150 per foot, a purification system costs $300–$5,000, and a pressurized storage tank costs $1,400–$2,400.
The time it takes to install a well depends on its depth and the conditions of the soil and bedrock, but drilling can usually be completed in a day or two. Installing the pump system takes another day. After that, it depends on how long and extensive the pipes and electrical system need to be. The whole process should take about a week.

This website is using a security service to protect itself from online attacks. The action you just performed triggered the security solution. There are several actions that could trigger this block including submitting a certain word or phrase, a SQL command or malformed data.

Drilling a well by hand is a lot of work, but it can be done with the right equipment. Whether you’re looking to drill a shallow or deep well, this skill is perfect for those seeking self-reliance.
Wells are normally drilled on private land where city or rural water isn’t available. It’s possible to hire a licensed professional to provide this service but you can expect to spend several thousand dollars. If you want to save money, you can do it yourself, but prior to getting started, you need to research local regulations.
Once you receive a green light to move forward, it’s time to learn more about your land. Go to thecounty agriculture extension office to find out what soil type you have. This could include sand, clay, rock, or a combination.
The local courthouse may also have well drilling logs from professional well drillers. These will include things like when they hit first water, what type of soil condition they encountered, and how deep they drilled the well. This could be helpful information but do remember that every property is different. The very first step might be determining how deep you need to drill.
The final thing to do before drilling is to contact utility companies to make sure you don’t hit any underground pipes or lines. Sometimes this information can be found on your original land plot, but it’s always good to double-check.
Drilling a shallow well is a pretty simple task, going down about 25 feet or so when you hit first water (at least in my location). This type of well could be drilled in a weekend by hand using a general purpose, extendable post-hole auger.
This type of well can be cased off with a manual pump and used for irrigation. This would be more of an emergency setup that could also provide water needs at a weekend cabin in the countryside.
Shallow wells have a difficult time keeping up with average water usage. It’s estimated each person uses between 80 and 100 gallons of water a day. Imagine storing 20, 5-gallon jugs a day per person.
Professional well diggers will often recommend a depth of 200 feet or more, but remember, for hundreds of years every well in this country was hand-dug and that’s how people survived.
In addition to the drill, you’ll also need a very powerful air compressor to run the equipment. These can easily cost two or three times as much as the drill. A couple of ways to keep costs down include purchasing a used compressor, or purchasing a new one and then after the project is completed, selling the almost-new equipment for a few hundred dollars less than what you paid.
This brings us to the drill setup. This will require a day of planning before drilling begins. Most home improvement stores will carry almost everything you need.
Step 1: After purchasing the necessary supplies and choosing the drill location, begin digging the main drill hole with an auger or post-hole digger. Dig about 4 or 5 feet. Then, if necessary, cut the 8-inch PVC to fit the hole, allowing 4 inches to stick above ground. In the side of the PVC pipe aligned with the settling pond (see Step 2), drill a hole large enough to insert the 2-inch connecting PVC pipe.
Step 2: Dig a shallow settling pond 10 feet behind the well, no less than 4 feet across. Then dig a shallow 8-inch ditch connecting the pond to the well hole. Connect these spaces with 2-inch PVC pipe and cover. This pipe will transfer clean water from the pond to the drill hole. The pipe opening in the pond will need covering with netting so debris doesn’t flow back into the well.
Step 4: Attach 1-inch PVC pipe to the pneumatic drill using PVC glue and secure with duct tape to prevent leaks. Use a marker every 5 to 10 feet so you can keep track of how far down you have drilled. Rest the other end of attached PVC pipe in the 55-gallon drum. While the drill is running, mud and water will enter the pipe through small holes above the drill and be pushed up by the compressed air, traveling through the pipe into the drum and settling pond to be cycled back into the well hole.
Note: Depending on your soil type, you may not need the 8-inch PVC. Our soil, for example, is hard clay and stable enough to keep the hole from collapsing without the pipe.
Drilling a well with this tool can take anywhere from 15 hours to weeks depending on the soil type, so make sure a chair is handy and you’re working with at least three people. One to operate the compressor, another to drill, and a third for breaks.
The air supply to the drill should never be turned off while the drill is underwater. If this happens, you’ll have to stop drilling and clean the motor before starting back up. This can take time and delay progress, which means it’s important that your drill team understands the process from start to finish.
Begin by filling the well hole with water. Turn the drill on before inserting, and then begin drilling. The bit will drill through all soil types, but when it hits clay or rock the process will slow down. Don’t get frustrated, just keep drilling and, before you know it, first water will be hit.
Move the drill in an up, down, and side-to-side motion as this will help the drill drive through the soil. The motion should be constant but not forceful; the drill will do the work. When you reach the point of needing to add more pipe, pull the running drill from the hole and, once it’s out of the water, turn the air pressure off. As you add pipe, secure each addition with PVC glue.
Add the next several feet of pipe and start again. Once the desired depth is reached, it’s time to case off the well. Casing is a matter of inserting SDR 35 pipe and securing in place with pea gravel and concrete. To do so, drill a hole through both sidewalls of the first piece of pipe, 2 or 3 inches from the bottom so you can attach the rope to lower the pipe into the well. When the top of the pipe is even with the ground, apply PVC glue and attach the next piece of pipe. Let dry for 15 minutes and then continue to lower down and add pieces as you go to meet the depth of the well. The last piece of pipe will be cut about 3 feet above ground level and capped off.
Pour pea gravel between the casing and the dirt. Next, mix the concrete and pour between the ground and casing. This will prevent the well from becoming contaminated from runoff. Once this is complete and you’ve added a well pump, you’ll need to run the well for a couple of days until the water is clear, and it’s always a good idea to get the water tested before using it for drinking.
Drilling a well can be a long process, but if you can save money and learn a new skill at the same time, why not give it a try? It’s a matter of getting back to basics and doing more for yourself.

A: Well drilling completion times vary from a half day to three days or longer. Drilling time is affected by many factors including time to set up, difficult drilling formations and weather. All of these factors vary from site to site and well to well. These are also factors that we have no control over. In addition, the time it takes to develop each well is different. Because of these variables there is no way for us to give a fixed time for well completion.
Q: Yes. Artesian and Floridan Aquifer wells are permitted in your area. They can be drilled for several different purposes(home use, geothermal, irrigation, etc.). PWD drills many Floridan Aquifer wells and keeps a record of each one. Call our office for more information on Floridan Aquifer wells in your area.
A: Florida is fortunate to have one of the most porductive aquifers in the world, the Floridan Aquifer. When drilling a Floridan Aquifer well, PWD can guarantee the quantity of water the well will produce.
Unlike Floridan Aquifer wells, shallower wells access aquifers that have unpredictable characteristics. PWD will guarantee a minimum of 10 gallons per minute from wells other than Floridan Aquifer wells.
A: PWD has over 100 years of records of wells drilled in Northeast Florida. With your property address, we consult our records to see what wells are availble in your area.Floridan Aquifer wells are availble in all areas of Notheast Florida.
A: “Salt & Pepper” wells, or Intermediate wells are normally 3″ or 4″ in diameter and are drilled to depths of 220-320 feet. At this depth water is withdrawn from a aquifer that consist of clays and sands that resemble salt & pepper.
A: Part of the drilling process includes removing cuttings from the borehole we drill during well construction. To contain & dispose of the cuttings we usually dig two pits beside the drilling rig. These pits vary in size based on well size & depth. Generally they are +/- 3ft wide x 6ft long x 4ft deep. Drilling fluid is circulated through the pits where the cuttings settle out and the drilling fluid is reused. We will cover the pits when the well is complete.. For a period of time the covered pits will be soft.
If you do not want pits dug in your yard there is a solution. We can use portable above grade pits instead of digging the pits. When we use the above ground pits we also bring a vacuum tank to remove all of the drill cuttings and fluid from your yard. This does require an additional crew member, an additional truck, the vacuum tank to dispose of fluid and drill cuttings off site, therefore there is a charge for this service. We will be glad to price this service for you upon request.
A: Wells that “go dry” are generally shallow/surficial wells that are less than 50′. These wells depend on rainfall to replenish the water table. Partridge Well drills wells that are usually deeper and penetrate a confined aquifer. This means that our wells are not directly dependent on rainfall. The water level may rise and fall in these wells, but they do not go dry.
In cases where the power is lost or is not available and a pump is required to pull the water out of the well, PWD can install a pitcher pump or hand pump(pictured to the right) to access the water without power.
A: It is your choice. We have to mix a drilling mud for the drilling process and dispose of it when we are finished The mud(shown in this picture to the right) is composed of water, sand, and clay. Typically we pump this mud onto the property where the well is drilled. However, we do offer an upgrade where we can use a special truck to contain the drill mud and remove it from your property.

Ok! This is not an easy task, and I recommend that anyone thinking about doing it AT LEAST consider having the well pump identified as the failed component by a professional prior to undertaking it. In my case, the water in my house stopped working (on a Friday night, of course). I know my system pretty well and was able to determine that the fault in my system COULD NOT BE ANYTHING BUT my well pump motor before I took any action. Guess what? I called the plumber anyway. If nothing else, you"ll pay $60 to have your diagnosis confirmed and maybe even get an estimate that will provide you with the motivation to do the job on your own. (My estimate to pull and replace the well was $2400... By following these steps I was able to do the job myself for less than $400!)
So this is what we start with. The drawing is not to scale, but essentially most wells look a bit like this. There are several different variations on what ends up being pretty much the same thing. In my case, the casing (which is the steel pipe that everything fits into and goes into the ground) has a 6" diameter. Some casings can be as narrow as 4". If you"re doing something like this on your own, wider is better! A 6" well casing gives you plenty of room to work on your own. Narrower casings can make things... complicated.
The well used in this example is relatively shallow. It only runs about 100"-120" deep. Some wells can run to depths of hundreds (or thousands!) of feet. In the case of anything deeper than about 250" I would recommend that you have it pulled by a pro. Why? Because it"s HEAVY! And there are special tools that contractors have to lift the pump from that kind of depth. Look at it this way: Even if you have someone else pull the well, you can do the repair/replace action on your own once it"s out of the ground, and still save money. ;)
My well was dug about 25 years ago. One of the things that happens with older wells is that, over a period of several years, silt from the aquifer can seep into the bottom of the casing. That"s a bad thing. Why? Because the silt builds up to a depth that"s too close to the pump, and the pump ends up sucking up the silt and muck from the bottom of the well, and then pushes it into your house! (You"ll see the result of this kind of thing in the following pictures.)
The weight of the whole pump assembly hangs on the water hose that the pump uses to push water into the house. Up near the top the water tube hits what"s called a "pitless connector," where it makes a hard right turn toward the house.
See how the pump looks a bit like a bottle made of two pieces? The bottom part is the motor. The top part is the impeller that sucks the water out of the well and sends it to the house.
When one turns on the sink to wash one"s hands or when we flush a toilet, we tend to think that we"re pulling water directly from the well to do it. In actuality, we"re not! In a properly outfitted house, you"re pulling water from a pressurized tank that acts as sort of a "middle man." (Some artesian wells don"t have this set up, but let"s pretend they do!)
When you turn on the water to wash your hands or flush your toilet, the amount of water stored in the pressure tank is reduced. Reduced water in the tank means reduced pressure. The pressure switch on the tank is set up so that it knows what point to turn ON the pump (pulling water up from the well to replace what you"ve used), and what point to turn OFF the pump (to keep your system from exploding). Having a pressure tank does two things for you:
Ideally, your well pump should be able to push more water than above-average household use will require. (Most houses are recommended to have a pump that will support 5 gallons per minute.) That way, more water per minute is pushed up from the well than you can (normally) expect to be able to get out of a sink, or a shower. By having a pump that exceeds your practical use, the pressure tank is able to maintain steady flow. There will always be more water available to the tank than you can pull from the tap. With the right pump, you can have two showers, a sink and a toilet all flowing at the same time without any discernible drop in pressure.
Once you"ve made your wrench, you just stick it down into the well, thread it into the connector and get ready to PULL. While you do that, make sure someone is holding onto the safety rope! If anything goes wrong, and your partner happens to NOT be holding the rope, the well pump will fall into the abyss... lost forever.
Once the cap is off, take a look down the well with a flashlight. You should see something that looks a little like this image (which I "borrowed" from a google search, because I forgot to take my own picture). You"ll see utter and complete darkness at the bottom of the well... maybe some water, if it"s shallow... and the pitless connector on the inside of the casing. You"ll also see your safety rope, and the electrical wires that power the motor.
As you can see, the pitless connector is where the water makes "a hard right turn" out of the well and toward your house. It"s a pressure fitting, and it"s usually made of brass. On most wells they"re about 4" down from the top of the well... which means they are usually BURIED... which is scary.
"Why are they buried?" You may be wondering. "It"s awfully inconvenient for them to be down so far in the well." Yes! It is... but that"s just the way it has to be. Pitless connectors have to be located BELOW the frost line for your area. If they aren"t, all it will take is one really cold night to freeze up. As I mentioned above, the connectors are usually brass. Brass is a soft metal. It doesn"t take much for it to split.
Seriously. Very gentle taps with a hammer as you turn the wrench should do the trick. It will allow for you to thread the pipe fully. It worked beautifully for me.
B) Try to pull it up without being 100% confident that it"s got a good connection. Nice and snug! If you don"t have a snug connection, you take the chance of dropping everything down to the bottom of the well. If that happens, get yourself a shovel and a checkbook.
It"s very important that you NOT get any kinks in the water line (the black tube). So, pulling the pump is definitely a two person job. As one person pulls it up out of the well, the other person walks it (in a straight line or in a curve) away from the well.
Dogs are really helpful to have around when doing a job like this. Moral support is important. Especially when, after a couple of minutes pulling up the well pump, you realize that you"ve been making some very poor decisions about exercise and eating habits.
Keep in mind, the well pump (itself) usually weighs about 50 lbs. The water trapped in the tube also holds significant weight. The deeper the well, the more weight you"re dealing with. Plus, there"s that whole "physics and leverage" thing to deal with.
Bottom line: I"m guessing that I had to pull a 70lb weight, nearly 100 vertical feet. It"s quite a job. Forearms, back, hips, biceps... all of them hurt the next day.
Furthermore, up until this point, I had no idea what kind of well pump was down there. They come in various configurations of power, voltage, number of wires, and number of gallons per minute. Normally, the Horsepower Rating is written (as a courtesy) on the underside of the well cap. No such luck here. I had to pull it up just to find out what it was. You may be in the same boat when it"s time to do yours.
Turns out that mine was a 3/4 HP Jacuzzi. They sold out to a company called Franklin Electric years ago. Since it was just the motor that fried, it might have been possible to order a replacement motor (which would generate significant savings), but that might have taken days or weeks to find/deliver. I didn"t want to measure the amount of time I was without water in terms of "days or weeks." Plus, this pump was so clogged with gunk that it wasn"t worth taking the chance on another failure. A whole new pump was definitely required.
Note: This is one of those moments where it"s good to get along with your neighbors. Thanks to mine, we were able to hose off the motor to find out exactly what the specs were. (See, the source of my water was sitting on the ground... Hence I had no water with which to hose off the pump!) The worn out pump ran on about 8 amps, and pushed about 6.8 gallons per minute. It"s a 220V, two-wire motor. That"s exactly the sort of thing you need to know when you"re buying a replacement. Make notes or take pictures of this information and take it with you to the store.
Let"s take a look at the cleaned-off pump. You"ll note the two pieces, (like in my drawing). The far left is the electric motor. The dirty clyinder in the middle-left is the impeller. The black stuff in the middle is a WHOLE LOT of electrical tape, covering the spliced electrical connections for the motor and the check valve that keeps water from flowing back into the well. The thing that looks like a bulb (toward the right) is called a "torque arrestor." Remember how I told you that my well casing is 6" wide? Well... the well pump is only 4" wide. The Torque Arrestor rubs up against the well casing and keeps the pump from spinning at the bottom of the well.
Also, did you notice that everything is resting on a couple of saw horses? Yet another application in which such a simple tool can be incredibly useful. If you don"t have a set I highly recommend picking a couple up for the purpose of doing this job. The ones I"m using are quite inexpensive, lightweight and strong.
In most cases there are going to be salvageable components. For mine, the torque arrestor was in pretty good shape, as were the hose clamps that held them onto the water line. Once you get them all off, set them in a safe place for later.
Since I knew that the well pump had been sitting in muck for who knows how long, it seemed like a good idea to shorten the length of the water tube. As you can see, I walked off about 10" of tube length from the well pump and prepared to make my cut. (By the way, I used a set of ratcheting pipe cutters. If you don"t have a set of these, they go for about $11 at home depot and they make life SO much easier when you"re doing plumbing.) Making the tube shorter would result in a shallower suspension and (hopefully) preserve the life of the new pump.
YUCK! That"s a 1" tube so full of compacted muck that it really restricted the flow of water to my house. NO WONDER THE PUMP FAILED! Keep in mind, we"ve done testing for harmful bacteria and a slew of other things on our well and it"s always come up clean... but still. Ew!
Before we head to the store to buy the replacement pump, we needed to make sure that the shopping list included EVERYTHING. We already knew we needed the well pump and the water line, but what kind of shape was the pitless adapter in? I know it looks rough, but it"s actually not that bad. I gave it a quick scrub under the garden hose, and inspected the O-Ring.
I genuinely recommend that you do a little searching around on the web for a replacement pump before jumping in your car and assuming that Home Depot or Lowes will have the one you need, in stock. I got extremely lucky. I didn"t search before I got in the car. The nearest store happened to have the pump I needed. I later learned it was the only one in stock within 30 miles of me! As luck would have it, it also turns out that this one produces TEN gallons per minute at a lower rated amperage than the original. (Hooray for improvements in technology!)
This Flotec pump had a sticker price of under $340. Since it was Memorial day, they gave me the 10% Veteran"s discount at Home Depot, (shameless plug for businesses that respect military service). In the end, it wound up costing me a little over $300. GOOD DEAL!
Note: This model did not come with the check valve, or the reducer needed to get down to the 1" spur I would need for the water line. Sadly, home depot didn"t carry the right check valve, or spur, for this pump. I had to go somewhere else for that.... a place that did NOT offer the Veteran"s discount and hence shall not be named in this instructable.
I got everything home and started throwing it together. Note that I DID NOT use pipe dope. I used Teflon tape. Pipe dope isn"t always safe for potable water, so it"s recommended that you just stick with Teflon.
Looking at the close-up picture of the assembly, there"s a 1 1/4" stainless nipple threaded into the top of the well pump, a 1 1/4" check valve (brass) and a stainless steel reducer (aka "spur") that goes into the hose line. I used my salvaged hose clamps to secure the new water line to the reducer.
Some people may read this and wonder, "What is a check valve?" It"s basically a valve that only allows fluids to move in one direction. Water can flow into your house when the pump pushes it, but it can"t drain back into the well when the pump stops. This is a vital component, because when your system gets pressurized the check valve keeps all the water in your house from dumping back down into the well. Kind of a big deal.
While you"re at the hardware store make sure to pick up a set of crimp connectors for the electrical connections. It should come with two connectors and some heat-shrink material. Strip a clean bit off of the wires coming from the house and crimp the connectors with a good pair of pliers. Slide the heat-shrink material over the connection and then heat it with a heat-gun, or a butane torch. (A lighter doesn"t get hot enough to do a good job.)
Once you get to this point, you"re ready to make sure the well pump is working. I forgot to take a picture of that part, but it goes like this: Get a BIG bucket (like a 10-20 gallon plastic tub) and use your awesome neighbor"s hose to fill it up with water. Then submerge the assembled well pump into the water, making sure water covers the impeller intakes.
Then put your cell phones to good use. Have your assistant go down into the basement and flip the breaker that will turn on the pump. You should immediately see it sucking water out of the tub at a rapid rate. If it does, the pump is ready to go back down in the hole!
Feed the pump back into the casing slowly, using the safety rope. Line up the pitless connector, using a flashlight. Slide it into place and then seat it fully by giving it a couple of downward whacks with a hammer until you feel it seated properly.
For the pressure tank to work correctly, the ambient pressure (while completely drained) has to be -2lbs from the pressure at which you want the well pump switch to kick on. I like my water pressure to be between 55 and 75 psi. That means, the ideal air pressure for the bladder in the tank was about 53 psi. I hooked up an air compressor and filled it until it reached that point.
Not performing this step will cause a variety of problems, not the least of which is "short cycling." If you have too little (or too much) air in the tank it can throw off the actual volume of water the tank will hold. That can lead to the pump constantly switching on/off... which eventually burns out the pump, or the pump switch. Not good.
What you"re looking at here is a well pump switch. They come pre-set for 30/50 and 40/60. The first number is the psi at which the switch will sense the pressure in the system is too low, and it will turn the pump on. The second number is the number at which the pressure in the system makes the switch say "Okay... that"s enough."
This well switch is brand new. I bought it the night before I replaced the well pump, hoping that it would fix my well problem. Obviously, it didn"t.
Anyway, I don"t like it when my water pressure is set for 40/60. I like it to be at about 55/75. This particular model of well switch is adjustable. With a few turns of this nut, I can raise the ratio to the place where I want it.
You have to be VERY careful when you do this, and I don"t recommend that anyone try it. The reason I do it, is that it lets me make my adjustments without constantly having to reset the breaker. I tweak it, and let the pressure tank fill up. I then use the valve underneath to release water pressure. As I release the pressure, I watch the gauge to see what point the switch kicked on. Once I adjusted it to the point where the pump flipped on at 55 psi, I was good to go.
First, you have to calculate the volume of water that"s in the well. In my case, I"m going to guess that it"s about 70" of total water space in a 6" tube. Using the formula πr²h (3.14159x9x840) you get a total volume of about 23,750 cubic inches. That"s about 102 gallons of water occupying the well at its fullest point.
Proper chlorination requires 3 pints of 5% chlorine bleach per 100 gallons of water in the well, PLUS 3 pints of the same to sanitize the plumbing inside the house. That"s a total of 6 pints of 5% chlorine bleach. A gallon is 8 pints, so a single gallon will be enough to do the job AND sanitize the well cap before I put it back on.
Here"s what you do: Dump about 3/4 of the gallon of bleach in the well (with the water pump still on, so you can still use your hose). Then run your hose down the well to circulate the bleach. This process WILL pull bleach water into your house, so don"t plan on using the water during this process. Run the hose for about an hour to get the water from the bottom all the way back up to the top, ensuring that the chlorine mixes with ALL the water in the well. Then use the remaining 1/4 of the bottle to sanitize the well cap. Put the cap back on and go inside.
Repeat the process using the HOT water. It"s going to take a little longer for the bleach smell to show up, because the water from the well is going to have to make it through your water heater, and then up through the hot water pipes.
Go to sleep. It has to sit for at least 12 hours, undisturbed. No sinks. No flushies. No washies. The next day, hook up your hoses and start purging. DON"T SUCK THE WELL DRY WHILE YOU DO IT. Also, DON"T DRAIN THE BLEACH WATER INTO THE LEECH FIELD FOR YOUR SEPTIC SYSTEM. Remember, there were about 100 gallons in the well, so figure out how many gallons per minute you push through the hoses and stop when you hit about 150 gallons through the system. In my case, that was about an hour and a half.
Make sure you dump the water someplace safe. Run each tap for a couple of minutes. Give the toilets a flush or two. Then test the water for chlorine content to make sure it"s safe to drink with a kit you can get from the hardware or pool supplies store. Keep running the water until the test comes back at safe levels to drink.
Thanks for reading! I really hope that this instructible is helpful for those of you that find yourself in a spot of trouble, and for anyone that"s just curious about how this process works. It was my first time going through it, and the main reason I put this together was that I couldn"t find a really good resource that guided me through the whole thing, step-by-step. This is my way of paying the world back for all of the little kindnesses I"ve experienced in life. If you ever find yourself in a similar position, regardless of the topic, I would ask that you consider doing the same. You never know who you might be helping!
I"ll spare you all the details of what I went through to figure out the problem. Bottom line: When I replaced the well pump, I probably should have replaced the electrical wiring going down to the pump. Two reasons for this:
1) The wire I inherited was some kind of specialized, 12 gauge, submersible pump wire. Old school. Prone to problems. It didn"t have a ground wire, which I thought was weird at the time but figured the previous pump had been working for years without it... so... made due with what I had.
2) That old school wire can go bad on you. Even with a torque arrestor in place the pumps can spin inside of the casing, which twist the power line. If given enough time, the wire will eventually break... which is what happened to me.
The moral of the story: Replacing your electrical wiring only costs about $150 (if you go with the high-end, 12 gauge, no-casing, submersible wiring you can get at places like Lowe"s). The good thing about the newer stuff is that it doesn"t tend to break when it gets twisted up. If you don"t want to have to pull your well pump up out of the casing again, just to change the wiring three years after you did the job, maybe take care of it while you have it out of the ground the first time.
Just looking at the pictures of the slimy red gunk in your pipe and around your pump makes me think you should do some googling on "Iron Bacteria". I can"t be certain but it could be a possible cause of your issues.
When selecting the replacement pump don"t just assume that the last guy chose the perfect pump for the job. After all there could be a reason the original pump failed. I would recommend going back to basics and select a pump based on:
Pump ends are made up of a stack of impellers. Each impeller increases the pressure developed by the impellers below it (without increasing flow). So a shallow well might need a six impeller pump, while a deep one will need more. Perhaps twenty or more. The upshot of this is that there are hundreds of motor/pump end combinations to choose from, and while it"s not a particularly exact science it"s important to choose one that will operate happily in your application. You should be able to find pressure/flow charts on pump company websites and catalogues.
Sorry, got a bit carried away there. My brother and I used to own a pump company (Pumpmaster Australia) so pumps have played an important role in my life.
Iron bacteria! Thank you for the tip. We"re in a situation here where the house had two owners before we bought it in 2011. The first owners were amazing. The second owners were really nice folks, but the word around the neighborhood (and the evidence we"ve seen around the house) is that they were not "maintenance people." We"ve gradually been replacing the big-ticket items as they fail from the years of neglect. I"ve already replaced most of the plumbing between the well pump switch and the house, including the water softener and neutralizer. They were both so clogged up with gunk that the valve systems failed. (Nothing like a mouth full of salt water after a regeneration!)
We"ve had the well checked for harmful bacteria a couple of times. It always comes up clean. I don"t know for sure if they test for stuff that isn"t particularly harmful. Now that you"ve mentioned it, it"s definitely on my radar. I had never considered that bacteria might be the cause of the sediment sticking to the plumbing.
Hi. I don"t have a solution for cleaning out your pipe, but I"m not a plumber. I"m sure there must be a way. Maybe you could put the question to the Instructables community via a forum topic.
I guess you live in a place with cold winters. I"ve never seen a pipe buried so deep. That must really complicate things. Bores in Australia just have the pipe coming straight out the top of the well. No need for that pitless connector.
I don"t need to fix a well nor do i own a house or a well but this was so well written and interesting I had to read the whole thing it"s interesting how these things work look forward to more instructabels from u in the future thanks for the great ible
2) This was my first "ible." It has been so well received that I think I am now hooked. You will definitely be seeing more from me, and I hope they are as entertaining and informative as it appears this one has been.
3) Service is as service does. I"m just glad to be useful. Whether it was in uniform, or in my own back yard, it"s all the same: A little bit of effort can make the world better, often in ways we did not anticipate.
Yep, works fine....Started out knowing jack shit about well pumps, about to call a pro for a emergency repair in a rural area...sent your instructable to my brother, mom, and dad...we all reviewed it, made notes, shopping list...printed/saved it to have on hand...got it done no problem....like seriously a life saverReplyUpvote
Side note for those reading this. Your probably passed this point and its a rare case but possibly note for the future. The other night we were struck by lightning. After a little over a $1000 of repairs to my electrical system ( not including labor, im an electrician) i got power restored but didnt think of testing my well pump. It was only running on one leg (120 v not the 240v its supposed to) . It was operating at a severely reduced rate and potentially energized my water. I dont think i need to get into why its bad and unsafe but if this happens make sure you mention to a qualified electrician doing the damage inspection that you have a well. There is alot of components to an electrical system and your well can be easily overlooked. Make sure you well pump gets megared ( insulation tested) before its put back into service. It also a good test for suspected pump failure aswell. Its a pass or fail test. If its within specs your safe if its not it needs to be replaced
You sir, are a scholar and a gentleman! Thanks to your amazing and detailed description, I felt confident enough to tackle this task, which I managed to do, start to finish. I’m now enjoying the amazing water pressure and volume of a brand new deep well pump! I owe you a big debt of gratitude.
Hey, my DIY husband is attempting this on a 95° day with high humidity. Just wanna thank you for the great instructions/images. He"s not in the mood to answer questions, yet I"m the one running to the hardware store. Especially helpful was the pictures of the gunk in the pipes. Instead of gagging and running away, I simply nodded my head and agreed to get more pipe. Another marriage saved!
I, for the first time, just completed this project too. I however had a bad tank that I replaced as well. The tank is likely what took the pump out. Anyway, between watching dozens of YouTube videos and a lot of reading, I was confident enough to tackle this. Just for those that are wondering, total cost was $950, and I got 2 different quotes of $2800 and another at $3100 to do this job! The whole project took about 12 hours total, 2 days off from work, and some help from my awesome brother! Lastly, and I should have led with this, but this instructable is seriously the absolute best one for this project out on the internet that I found. He really covers everything! Thanks for sharing. It truly helped to give me the confidence needed to tackle this. I saved $2,000! Full disclosure though, I am an extremely accomplished DIYer, I own many, many tools, and have a strong knowledge of plumbing, electrical, and carpentry. I occasionally help a good friend with his home improvement business.More CommentsPost Comment
Bedrock wells are drilled below the topsoil and groundwater into bedrock, tapping the cracks in the rock that carry water deep underground. The average bedrock well in New Hampshire is between 100-feet and 500-feet deep, but drilling depth can go up to 1,000 feet.
To access the water, a pipe is installed into the bedrock, called a casing, and a pump to carry the water to the surface and into the home. The casing protects the well from possible contaminants at or near the level of ground water. Learn more about well drilling.
A drill bit at the end of a long pipe is rotated into the ground. It crushes the rock as it goes until the right depth is reached. A water and mud slurry is pumped down through the drill bit to clear the crushed rock out of the well. This rotary process is the most common and least expensive way to drill a bedrock well. A well can also be drilled using the percussion process which uses a falling weight to pound and pulverize the rock at the bottom of the well.
When you decide to install a bedrock well, you should set aside a few days for the work. It usually takes about a day to complete drilling, and another day to install the pump.
How deep the drilling company must dig determines the basic cost, since most companies charge by the foot. A well drilling company can get a good idea of how deep the bedrock well will need to be by examining your property, the average well depth for your area, the geology and other factors. If after an initial drilling, there is adequate water available for your family’s needs, then the drilling can stop. If not, the drilling will continue until an adequate water source is found.
During the drilling process we monitor the water flow to ensure there is enough water available at the source to provide adequate water for your family, lawn or business. We constantly monitor the water flow, so you can be confident that we will never drill a well that is deeper than it has to be.
In New Hampshire, the median yield for a bedrock well is 6.5 gallons per minute. The average American household needs 100 to 120 gallons per person per day, and a flow rate of about 6 to 12 gallons per minute.
If the well does not meet these standards, there are ways to try to get more yield from the well. Hydrofracking was originally created for the oil industry, but has become a useful tool in well repair and drilling. A bit is inserted into the well which blasts the bedrock with highly pressurized water to open cracks in the bedrock in hopes of creating new paths for the water inside. This method uses no chemicals. Skillings & Sons has a 98 percent success rate with fracking, a record so good we offer a guarantee.
Some municipalities have requirements relating to location, construction and water quality of private wells but there are no state requirements regarding well water quality or quantity in New Hampshire for private domestic wells. If you are selling or buying a home with a well, remember that the owner is required to disclose the location of the well, its age, any malfunctions, date of the most recent water test and any problems with water quality that test may have uncovered.
In 1984, the state began keeping records of all new wells. The information is available to the public in an online database. If you want to know about your well or those in your surrounding area, the database can help.
Most bedrock wells in New Hampshire deliver safe drinking water, but the geology of the state and other factors do sometimes lead to contaminants in water. Some of the most common, naturally occurring contaminants are arsenic, bacteria, radon, radium and uranium. You can determine the presence of these contaminants by conducting tests, which Skillings & Sons can help you with.
Of course, there is sometimes a risk of man-made contamination, which can be revealed in a water quality test. Homeowners with wells should be mindful of the activities on and around their property to ensure the well does not become contaminated. Improperly applying fertilizer or pesticides, inappropriate disposal of motor oil, solvents and other harmful substances, or living close to an industrial area could all put your well at risk.For more information about bedrock well water contamination in your area, contact the NH Department of Environmental Services.
In New Hampshire, well-drilling contractors must be licensed, but homeowners can drill a well with the help of a contractor if it is on their own property. Skillings & Sons believes that it is vital the water coming into your home is clean and plentiful. Hire a licensed professional to do the work, as it will affect your life for years to come. Contact us for a water well drilling or water pump replacement estimate.

Vast expanses of lush green fields are multiplying in the Arizona desert, forming agricultural empires nourished with billions of gallons of groundwater in the otherwise parched landscape.
Arizona’s groundwater levels are plummeting in many areas. The problem is especially severe in unregulated rural areas where there are no limits on pumping. The water levels in more than 2,000 wells have dropped more than 100 feet since they were first drilled. The number of newly constructed wells is accelerating, and wells are being drilled deeper and hitting water at lower levels.
As the groundwater is depleted, Arizona is suffering permanent losses that may not be recouped for thousands of years. These underground reserves that were laid down over millennia represent the only water that many rural communities can count onas the desert Southwest becomes hotter and drier with climate change.
Unfettered pumping has taken a toll on the state’s aquifers for many years, but just as experts are calling for Arizonato develop plans to save its ancient underground water, pumping is accelerating and the problems are getting much worse.
Big farming companies owned by out-of-state investors and foreign agriculture giants have descended on rural Arizona and snapped up farmland in areas where there is no limit on pumping.
Buying property from struggling small farms and homeowners, they’ve drilled wells a thousand feet deep or more, often spending more than half a million dollars per well to irrigate tens of thousands of acres of hay, corn, pistachios and other thirsty crops, with the expectation that they’ll soon be raking in profits.
In unregulated rural areas where water tables are dropping, homeowners and politicians are calling for the state to step in to halt well-drilling, or create new rules to limit pumping.
In these predominantly conservative communities, where the ethos is to take care of yourself and be wary of government regulation, prominent local officials are suggesting a moratorium on drilling, or the formation of new managed areas where drilling would be restricted.
In an unprecedented examination of the state’s groundwater, The Arizona Republic analyzed water-level data for more than 33,000 wells throughout Arizona, including some records going back more than 100 years, and nearly 250,000 well-drilling records.
The investigation found the water levels innearly one in four wells in Arizona’s groundwater monitoring program have dropped more than 100 feet since they were drilled, a loss that scientists and water experts say is likely irrecoverable.
Nearlyhalfof the wells with five or more measurements have dropped more than 50 feet at some point since record-keeping began. And that’s only in a limited number of wells whose owners agreed to be voluntarily monitored.
"In our firm, what we are having farmers come and ask us is, "Is there enough water for X period of time?"" Glotfelty said. "And if we say, "OK, there"s enough water to last 50 years, and it"s going to result in several hundred feet of water level drawdown," we give them that answer and they"ll go forward with their farm."
These farmlands, which are forming circular islands of emerald green in the desert, are swiftly draining aquifers. People who live nearby are increasingly living in fear that their water may soon run out.
Rodney Hayes’ well went dry in July, as his wife, Nancy Blevins, was washing the dishes. Their pump burned up when the water level dropped, and the two, who live near a giant Saudi Arabian hay farm in Vicksburg, had to look for water elsewhere.
They hauled water, 100 one-gallon bottles at a time, from a friend who lent her tap. They dreamedabout getting water back on for even a few hours a day.
Regions where pumping isn’t restricted — from Mohave and La Paz counties in the west to Cochise County in the southeast — have become hotspots where groundwater is being quickly depleted.
While the water tables drop year after year, the political system seems paralyzed and incapable of limiting pumping or helping residents who are saddled with the costs.
So the status quo stays in place: Large farms continue to pump out vast quantities of water. Homeowners continue to bear the costs. And this irreplaceable supply of water continues to drop.
Some areas of the state have dropped so much that the water likely won’t naturally recover in our lifetimes. The McMullen Valley, surrounding Salome and Wenden in the desert about 40 miles northeast of Quartzsite, has seen the average water level in state-monitored wells drop by 184 feet since the 1950s. The average well in the Gila Bend basin has dropped by 162 feet.
In Pinal County, in the Maricopa-Stanfield basin around Maricopa, monitored wells have declined by 125 feet since the 1950s. In the area around Vicksburg, where the 10,000-acre Saudi hay farming operation opened five years ago to ship hay back home, the average water level has dropped 120 feet since the "50s.
But in rural areas without regulation, average water levels across all monitored wells in the state have dived in recent years and are threatening to surpass all-time lows hit in the mid-1980s.
“Those are big numbers, and it’s probably not reversible,” Glennon said. "A 50 or 100-foot drop is a big drop. And that makes it much more expensive for everyone to use what water there is."
In those unregulated rural areas of the state, the overuse of water is getting worse. Large commercial farms are ramping up, drilling wells and pumping billions of gallons from stressed aquifers every year.
With water tables falling, state drilling records show that more and more wells are being drilled, and they’re being drilled deeper. The wells in the overstressed Willcox basin were drilled 358 feet deeper on average in 2018 than they were in 2010. Nearby in San Simon, wells were 211 feet deeper.
In the Wellton-Mohawk basin, which straddles Interstate 8 on the way to Yuma, the average well was drilled 741 feet deeper in 2018 than in 2010. In the Hualapai Valley around Kingman, where large corporate farms have spurred calls for regulation, wells were drilled an average of 280 feet deeper than eight years ago.
There are no state or national standards that determine how big a drop in a well is problematic. The only standard Arizona has for wells is a rule inside managed areas that a well cannot be built if it will drop a neighbor’s well by more than 10 feet over five years. Applying that standard to all monitored wells statewide reveals that 20 percent of wells dropped more than that during at least one five-year period.
In many areas, there are only rough estimates of how much extractable freshwater remains underground, and it’s unclear how much longer overpumping could continue until aquifers approach a point where the remaining water is too deep to pump economically.
“My concern is really about the future,” said Jay Famiglietti, who leads the Global Institute for Water Security at the University of Saskatchewan. “How long can it really go on before, in the case of Arizona, the water is gone?”
Famiglietti, a former NASA scientist, has used measurements from satellites to study groundwater worldwide, and has found that many of the world’s large aquifers are declining.
Groundwater levels have been falling in many areas across the United States, and the problem has been especially pronounced in farming areas of the West, from the productive nut and fruit orchards of California’s Central Valley to the cornfields atop the Ogallala Aquifer in the High Plains.
For companies growing crops like alfalfa and corn, Arizona offers economical land, a sunny climate with several growing seasons, and cheap, readily available water from wells. As these farms pump more water, the collective costs are passed on to neighbors and homeowners. While the water tables decline beneath their homes, wells have been going dry.
“Half of me feels like we ought to just sell out now, if we can get a good price, and get the heck out of here before we run out of water,” Goodman said. “The other half says, "you love it here. You’ve worked for 20 years to build this place up." So I don’t think I should be forced to sell my home just to feel safe. But I don’t feel safe.”
Near the Goodmans" house, where there are two dirt runways for Bill’s aviation hobby, new industrial wells have been drilled beside Highway 60. Goodman said all the pumping in McMullen Valley is gradually taking a toll on their well.
In her town and elsewhere in the state, calls for regulation have been growing. People have been clamoring for politicians and water officials to act to safeguard groundwater before it disappears.
More than 50 miles south of Goodman"s home, in the remote desert straddling the Maricopa-Yuma County line, a ghost town stands as a reminder of the potential consequences of unchecked groundwater pumping.
An abandoned hotel, with its windows boarded up, lies at the base of a rocky hill. This was once a popular hot spring resort, an oasis for travelers to stop and rest.
The Agua Caliente hot spring has a history that goes back well before Arizona became a state, said Matt Bischoff, a historian who has studied the area.
A Spanish mission was built there in 1774 and in the 1800s the springs became a resort for people traveling by horse and stagecoach along the trail that followed the Gila River.
The road near the Agua Caliente ghost town is lined with dead mesquite trees. Their roots no longer reach the water, and their branches have been transformed into brittle charcoal-gray skeletons.
The hotel shut down after the war, when the completion of the highway allowed drivers to bypass Agua Caliente. But it was groundwater pumping from farms, Bischoff said, that drew down the water table and dried up the springs.
Nearly 40 years ago, Arizona adopted a landmark law regulating groundwater in Phoenix, Tucson, and populated, mostly urban areas. The law left the rest of the state without rules limiting drilling or pumping.
“Outside of the active management areas, you can drill a well of any size, and any place you want, and pump as much as you like,” said Kathleen Ferris, the former Department of Water Resources director whohelped draft the Groundwater Management Act.
But there’s only been one addition to regulated areas since the groundwater law was approved, and that expansion occurred in 1981. Five recent efforts to limit groundwater pumping in three different counties — Cochise, La Paz and Mohave — have failed.
“So the only thing that they can do outside of (managed areas) is to require that wells be drilled in conformance with well construction standards and by a licensed well driller and that they"d be registered with the department,” said Ferris, now a senior research fellow at Arizona State University’s Kyl Center for Water Policy.
The Department of Water Resources can also create ne


 8613371530291