
mud pump gear ratio calculator brands
We provide hydraulic components & repair services for industrial applications like paper mills, saw mills, steel mills, recycling plants, oil & gas applications and mobile applications, including construction, utility, mining, agricultural and marine equipment. This includes hydraulic pumps, motors, valves, servo/prop valves, PTOs, cylinders & parts.

Pumps tend to be one of the biggest energy consumers in industrial operations. Pump motors, specifically, require a lot of energy. For instance, a 2500 HP triplex pump used for frac jobs can consume almost 2000 kW of power, meaning a full day of fracking can cost several thousand dollars in energy costs alone!
So, naturally, operators should want to maximize energy efficiency to get the most for their money. Even a 1% improvement in efficiency can decrease annual pumping costs by tens of thousands of dollars. The payoff is worth the effort. And if you want to remotely control your pumps, you want to keep efficiency in mind.
In this post, we’ll point you in the right direction and discuss all things related to pump efficiency. We’ll conclude with several tips for how you can maintain pumping efficiency and keep your energy costs down as much as possible.
In simple terms, pump efficiency refers to the ratio of power out to power in. It’s the mechanical power input at the pump shaft, measured in horsepower (HP), compared to the hydraulic power of the liquid output, also measured in HP. For instance, if a pump requires 1000 HP to operate and produces 800 HP of hydraulic power, it would have an efficiency of 80%.
Remember: pumps have to be driven by something, i.e., an electric or diesel motor. True pump system efficiency needs to factor in the efficiency of both the motor AND the pump.
Consequently, we need to think about how electrical power (when using electric motors) or heat power (when using combustion engines) converts into liquid power to really understand pump efficiency.
Good pump efficiency depends, of course, on pump type and size. High-quality pumps that are well-maintained can achieve efficiencies of 90% or higher, while smaller pumps tend to be less efficient. In general, if you take good care of your pumps, you should be able to achieve 70-90% pump efficiency.
Now that we have a better understanding of the pump efficiency metric, let’s talk about how to calculate it. The mechanical power of the pump, or the input power, is a property of the pump itself and will be documented during the pump setup. The output power, or hydraulic power, is calculated as the liquid flow rate multiplied by the "total head" of the system.
Remember: we’re trying to find the ratio of power in to power out. Since rations require equal units on both sides, we"ll have to do some conversions to get our hydraulic power units in HP. You"ll see how this is done in the example below.
IMPORTANT: to calculate true head, you also need to factor in the work the pump does to move fluid from the source. For example, if the source water is below the pump, you need to account for the extra work the pump puts in to draw source water upwards.
*Note - this calculation assumes the pump inlet is not pressurized and that friction losses are minimal. If the pump experiences a non-zero suction pressure, or if there is significant friction caused by the distance or material of the pipe, these should be factored in as well.
You"ll notice that the elevation head is minimal compared to the discharge pressure, and has minimal effect on the efficiency of the pump. As the elevation change increases or the discharge pressure decreases, however, elevation change will have a greater impact on total head.
Obviously, that’s a fair amount of math to get at the pump efficiency, considering all of the units conversions that need to be done. To avoid doing these calculations manually, feel free to use our simple pump efficiency calculator.
Our calculations use static variables (pump-rated horsepower and water source elevation) and dynamic variables (discharge flow and pressure). To determine pump efficiency, we need to measure the static variables only once, unless they change.
If you want to measure the true efficiency of your pump, taking energy consumption into account, you could add an electrical meter. Your meter should consist of a current transducer and voltage monitor (if using DC) for electrical motors or a fuel gauge for combustion. This would give you a true understanding of how pump efficiency affects energy consumption, and ultimately your bank account.
Up until this point, we’ve covered the ins and outs of how to determine pump efficiency. We’re now ready for the exciting stuff - how to improve pump efficiency!
One of the easiest ways to improve pump efficiency is to actually monitor pumps for signs of efficiency loss! If you monitor flow rate and discharge (output power) along with motor current or fuel consumption, you’ll notice efficiency losses as soon as they occur. Simply having pump efficiency information on hand empowers you to take action.
Another way to increase efficiency is to keep pumps well-maintained. Efficiency losses mostly come from mechanical defects in pumps, e.g., friction, leakages, and component failures. You can mitigate these issues through regular maintenance that keeps parts in working order and reveals impending failures. Of course, if you are continuously monitoring your pumps for efficiency drops, you’ll know exactly when maintenance is due.
You can also improve pump efficiency by keeping pumps lubricated at all times. Lubrication is the enemy of friction, which is the enemy of efficiency (“the enemy of my enemy is my friend…”).
A fourth way to enhance pump efficiency is to ensure your pumps and piping are sized properly for your infrastructure. Although we’re bringing this up last, it’s really the first step in any pumping operation. If your pumps and piping don’t match, no amount of lubricant or maintenance will help.
In this post, we’ve given you the full rundown when it comes to calculating and improving pump efficiency. You can now calculate, measure, and improve pump efficiency, potentially saving your business thousands of dollars annually on energy costs.
For those just getting started with pump optimization, we offer purpose-built, prepackaged solutions that will have you monitoring pump efficiency in minutes, even in hazardous environments.
As an SPX FLOW brand, Lightnin serves the challenging waste and water treatment sector, as well as the processing of solvents, fertilizers, food/beverages, pharmaceuticals and biofuels. The mixers and agitators, that are custom designed and fabricated, are used for equalization, neutralization, flocculation, aeration, sludge mixing, flash mixing and general blending purposes. The Lightnin industrial mixer portfolio covers both portable and larger fixed-mount units. All Lightnin equipment is designed to provide prolonged trouble-free operation regardless of the specific application demands. Through the proprietary gearbox and impeller technologies developed in recent times, we can offer the market advanced mixing solutions that are far more compact and power-efficient than ever before. They also have significantly greater operational lifespans, thanks to anti-fouling mechanisms and other state-of-the-art features. Consequently, customers are able to raise their productivity levels and avoid costly downtime issues, while also keeping the energy consumption involved to an absolute minimum.

In our important role as hydraulic pump manufacturers, we are aware of the large number of variables that need to be considered when choosing the right pump for the specific application. The purpose of this first article is to begin to shed light on the large number of technical indicators within the hydraulic pump universe, starting with the parameter “pump head”.
The head of a pump is a physical quantity that expresses the pump’s ability to lift a given volume of fluid, usually expressed in meters of water column, to a higher level from the point where the pump is positioned. In a nutshell, we can also define head as the maximum lifting height that the pump is able to transmit to the pumped fluid. The clearest example is that of a vertical pipe rising directly from the delivery outlet. Fluid will be pumped down the pipe 5 meters from the discharge outlet by a pump with a head of 5 meters. The head of a pump is inversely correlated with the flow rate. The higher the flow rate of the pump, the lower the head.
What is the head of a pump? As mentioned earlier, the head corresponds to the actual energy that the pump delivers to the fluid. The Bernoulli equation is applied between the pump’s inlet and outlet sections:
However, during the design stage, P1 and P2 are never known (as there is no physical element yet and therefore it is not possible to effectively measure the pump’s inlet and outlet pressure).
At this point we can easily calculate the head losses of the system, and therefore choose the correct size of the pump to achieve the desired flow rate at the resulting equivalent head.
The pump head indicator is present and can be found in the data sheets of all our main products. To obtain more information on the technical data of our pumps, please contact the technical and sales team.

This article will focus on understanding of MWD signal decoding which is transmitted via mud pulse telemetry since this method of transmission is the most widely used commercially in the world.
As a basic idea, one must know that transmitted MWD signal is a wave that travels through a medium. In this case, the medium is mud column inside the drill string to mud pumps. Decoding is about detecting the travelling wave and convert it into data stream to be presented as numerical or graphical display.
The signal is produced by downhole transmitter in the form of positive pulse or negative pulse. It travels up hole through mud channel and received on the surface by pressure sensor. From this sensor, electrical signal is passed to surface computer via electrical cable.
Noise sources are bit, drill string vibration, bottom hole assemblies, signal reflection and mud pumps. Other than the noises, the signal is also dampened by the mud which make the signal becomes weak at the time it reaches the pressure sensor. Depth also weaken the signal strength, the deeper the depth, the weaker the signal detected.
Rock bit may create tri-lobe pattern. This pattern is created by the cones of the bit on the bottom of the hole. While drilling, the bit’s cones ride along this tri-lobe pattern and makes the bit bounce or known as axial vibration. As the bit bounces, back pressure is produced at the bit nozzles and transmitted to surface. The frequency of the noise created by bit bounce correlates with bit RPM. The formula to calculate its frequency is 3*(bit RPM)/60. When the bit bounce frequency match with MWD signal frequency, decoding is affected.
Lateral vibration occurs when the drill string is moving laterally, perpendicular to the hole centre of bore hole. Since the MWD transmitter or pulser is a mechanical device, the lateral vibration disturbs the pulser movement to create signal, especially the poppet valve type pulser. Rotary pulser is less affected by lateral vibration.
Lateral vibration may be caused by axial vibration or lack of drill string stabilization due to enlarge bore hole. The same as axial vibration, to reduce lateral vibration the string SPM and weight on bit must be altered.
BHA components that have moving mechanical parts such as positive mud motor and agitator create noise at certain frequency. The frequency produced by these assemblies depends on the flow rate and the lobe configuration. The higher the flow rate and the higher the lobe configuration creates higher noise frequency.
Thruster, normally made up above MWD tool, tends to dampen the MWD signal significantly. It has a nozzle to use mud hydraulic power to push its spline mandrel – and then push the BHA components beneath it including the bit – against bottom of the hole. When the MWD signal is passing through the nozzle, the signal loses some of its energy. Weaker signal will then be detected on surface.
Important to note that the surface computer has been programmed to detect a signal with certain signal width and certain signal separation. When the computer sees this wider signal and/or two signals which are not correctly separated, the computer will set these signal as false ones and will not be decoded or decoded incorrectly.
The common sources of signal reflection are pipe bending, change in pipe inner diameter or closed valve. These are easily found in pipe manifold on the rig floor. To avoid the signal reflection problem, the pressure sensor must be mounted in a free reflection source area, for example close to mud pumps. The most effective way to solve this problem is using dual pressure sensors method.
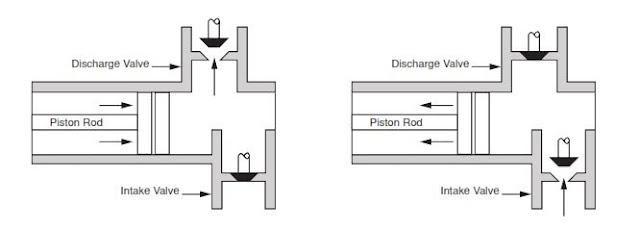
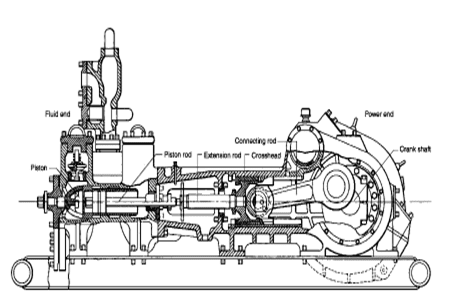
Mud pump is positive displacement pump. It uses pistons in triplex or duplex configuration. As the piston pushes the mud out of pump, pressure spikes created. When the piston retracts, the pressure back to idle. The back and forth action of pistons produce pressure fluctuation at the pump outlet.
Pressure fluctuation is dampened by a dampener which is located at the pump outlet. It is a big rounded metal filled with nitrogen gas and separated by a membrane from the mud output. When the piston pushes the mud the nitrogen gas in the dampener will be compressed storing the pressure energy; and when the piston retracts the compressed nitrogen gas in the dampener release the stored energy. So that the output pressure will be stable – no pressure fluctuation.
The dampener needs to be charged by adding nitrogen gas to certain pressure. If the nitrogen pressure is not at the right pressure, either too high or too low, the pump output pressure fluctuation will not be stabilized. This pressure fluctuation may match the MWD frequency signal and hence it disturbs decoding, it is called pump noise.
When the pump noise occurs, one may simply change the flow rate (stroke rate) so that the pump noise frequency fall outside the MWD frequency band – and then apply band pass frequency to the decoder.
The formula to calculate pump noise frequency is 3*(pump stroke rate)/60 for triplex pump and 2*(pump stroke rate)/60 for duplex pump. The rule of thumb to set up dampener pressure charge is a third (1/3) of the working standpipe pressure.
Sometime the MWD signal is not detected at all when making surface test although the MWD tool is working perfectly. This happen whenever the stand pipe pressure is the same with the pump dampener pressure. Reducing or increasing test flow rate to reduce or increase stand pipe pressure helps to overcome the problem.
When the MWD signal wave travels through mud as the transmission medium, the wave loses its energy. In other words, the wave is giving some energy to the mud.
The mud properties that are affecting MWD signal transmission is viscosity and weight. The increasing mud weight means there is more solid material or heavier material in the mud. Sometimes the mud weight increment is directly affecting mud viscosity to become higher. The MWD signal wave interacts with those materials and thus its energy is reduced on its way to surface. The more viscous the mud and the heavier the mud, the weaker the signal detected on surface.
Aerated mud often used in underbalance drilling to keep mud influx into the formation as low as possible. The gas injected into the mud acts as signal dampener as gas bubble is compressible. MWD signal suffers severely in this type of mud.
Proper planning before setting the MWD pulser gap, flow rate and pump dampener pressure based on mud properties information is the key to overcome weak signal.
The further the signal travels, the weaker the signal detected on the surface. The amount of detected signal weakness ratio compare to the original signal strength when it is created at the pulser depends on many factors, for example, mud properties, BHA component, temperature and surface equipment settings.

The bike gear ratio is the number of thebike chainring teeth number divided by the sprocket teeth number for one turn of crank that will generate a distance.
For example: for a road bike with wheels diameter 700 mm with a 52 theet chainring and a 12 teeth sprocket , the distance generated by one turn of crank will be 9.52 meters. The rotation speed of the cranks of the bike crankset is generally between 50 and 100 turns per minute so a bicycle speed with this gear ratio betwwen 28.5 km/h and 57.1 km/h .
This parameter is one of the most important criteria when you are looking for performance or when you want to prepare an unusual, such as a race. Choosing the right gear means personalizing your bike drivetrain in order to find the best personol compromize between strength and velocity so it"s guaranteed to make the best of your own potential.
The number of sprockets on a cassette has quickly changed in recent years from 5 to 12 speed today. This progess has permited the progressiveness of the gear change in the number of teeth of the largest sprocket. Today the number of teeth of the smallest sprocket from a cassette has decreased, it is now possible to obtain a cassette provided with a small sprocket of 10 teeth and a large sprocket of 50 teeth, this range width allows to generate new gears values and remove one or two chainrings. Indeed the improvement of the chains flexibility, the increase of therear derailleur makes it possible to create shiftings provided with a chainring and 12 sprockets on the same cassette, the advantage of this type of configuration is to be able to remove the chainrings shifter, the front derailleur and one or two chainrings, the weight gain is obvious.
In order to limit the power of the youngest, the gear of the minimes is limited to 7.01 meters corresponding to a chainring of 46 teeth and a sprocket of 14 teeth. For cadets, the distance for a crank turn is limited to 7.62 meters, the equivalent of a 50 teeth chainring and a 14 teeth sprocket. Since 2020, juniors are no longer limited in gear in France and the restriction will be lifted by the UCI in 2021.
Based on the theoretical formula for the bike gear ratio calculation,here is a indicative table of bike gear ratio for wheels diameter 700 mm without taking into account the thickness of the tires:
The 2020 World Road Time Trial Championship took place on September 25 in Imola, the favorite Italian rider of the event Filippo Ganna was crowned world champion with a 60x11 gear, covering the 31.7 kms of the event. at an average of 57.6 km / h in front of Belgian Wout Van Aert who was beaten by 26 seconds.

Our mission is to provide the world with free and easy-to-use calculators to solve your daily problems. Gone are the days of looking up formulas and blasting away on your physical calculator with a notepad to figure out your problem. Now, software built into websites and apps can do that for you. This can be anything from calculating your monthly payment on a mortgage or figuring out how many calories you can eat to lose weight.

Some bikes are geared towards fast rides both on and off-road, while others are set up to carry luggage on long-haul adventures, well off the beaten track.
Deciding on the best gravel bike for your needs partly depends on your requirements as a rider – where and how you ride – and its specific configuration, from gearing and wheel sizes, to tyre width and finishing kit.
All three share wider gear ranges than equivalent road bike groupsets, although they each feature different numbers of gears, or ‘speeds’ on the cassette. Shimano GRX has options for 10-speed or 11-speed setups, SRAM XPLR uses a 12-speed cassette, while Campagnolo Ekar pushes on further to 13 sprockets.
Besides gearing, these gravel bike groupsets have been designed to contend with the increased braking demands of gravel riding. Shimano’s GRX brakes take Servo Wave tech from the company’s mountain bike groupsets to increase braking power and modulation for steeper, more technical descents.
Many new gravel bikes will have gears that give you the lowest ratios of 1:1 or below. That should enable you to climb steep, loose off-road ascents when unladen, and also gives you more range to load up your gravel bike for multi-day bikepacking trips.
SRAM has a range of 12-speed wireless gearing options designed for off-road riding. Its XPLR groupsets offer gravel-appropriate gearing at the Red, Force and Rival levels, with a single-chainring drivetrain (see below) matched to a 10-44t cassette and an appropriate rear derailleur.
The downside of lower gearing is you may run out of top-end gears if you’re descending on tarmac, though the reality is you’ll normally have plenty of gears for fast riding.
It’s worth considering the type of riding you’re expecting to do when choosing a gravel bike or a new groupset. Be realistic – and honest – about the type of riding you’ll be doing, and what gearing you need as a result.
As well as lower ratios, a smaller chainring means bike designers can more easily add clearance for wider tyres, supporting another trend in gravel bike design.
Meanwhile, on the back of the bike, the latestrear derailleurscan handle much larger cassettes, once again ensuring a wider range of gears for off-road riding andbikepacking.
Whereas older rear derailleurs designed for road bikes might just about squeeze in a 30-tooth largest sprocket, many modern road rear mechs can handle 34 teeth, giving you a couple of easier gears for climbing. SRAM 12-speed derailleurs can handle a 10-36t cassette with two chainrings.
With a 1x groupset (pronounced ‘one-by’, as a single-chainring setup is known), you save a little weight by dispensing with the front derailleur, plus there’s less to go wrong and less chance of mud build-up. They are also designed to keep the chain in place and running smoothly when you’re riding over bumpy ground.
That said, once you take account of overlaps in ratios between the large and small chainrings in a two-ring setup, and unusable combinations at the high and low ends of the cassette, the actual number of unique gears isn’t that different.
A single-ring setup means you can access all gears sequentially too, rather than needing to swap chainrings to access your higher or lower ranges; no more cross-chaining.
If you’re wanting to ride mainly fast on the road and on smoother terrain, a double-ring chainset could give you a few more high-end ratios and smaller jumps between gears, while if you’re looking to tackle harder terrain, you may appreciate the chain retention benefits and simplicity of a single ring.
SRAM allows you to mix and match its road and mountain bike components, meaning you can use a super-wide cassette on your gravel bike, as pictured here.Want even lower gears? So-called ‘mullet’ builds mix a road chainset and shifters with a mountain bike rear derailleur and cassette for an ultra-low gear range.
Using Shimano’s electronic Di2 components, you can pair GRX shifters with an XTR or Deore XT Di2 MTB rear derailleur. Both MTB derailleurs can handle an 11-42t cassette in double-chainring configuration, or 11-46t with a single chainring.
It’s an option also promoted by SRAM with its AXS 12-speed wireless electronic components. Here, theAXS Eagle MTBrear derailleur is designed to work with an Eagle 10-52t cassette, giving really low ratios when paired, say, with a 42-tooth chainring.
With the release of SRAM XPLR, we might see fewer of these mullet builds though, because you can now run a 10-44t cassette with a 1x chainring, bridging the gap between MTB Eagle gearing and SRAM Wide.
SPD pedals often have minimalist skeleton designs. This helps with mud shedding, but results in a small contact area between your pedals and your shoes. Depending on how stiff your shoes are, this can sometimes be felt through the sole and may reduce pedalling efficiency.
That can add comfort to the ride, as well as increasing grip on off-road terrain and letting you run even lower tyre pressures. With a large tyre, the rolling circumference of a 650b wheel is similar to a 700c with a narrow tyre, so gearing and handling should end up similar.
How wide you go will depend largely on the terrain you ride and your frameset’s clearance. If you live somewhere with a wet climate, it’s a good idea to leave some room for mud too.
How muddy it is will also influence your tyre choice. In dry conditions and on finer gravel surfaces, you can usually get away with a file tread such as the Panaracer GravelKing SK or a semi-slick design, with a smooth centre, such as theWTB Byway.
If it’s wet or muddy, you’ll need something with more grip from a knobbly tread pattern. Schwalbe’s G-One range goes from the small knobs of the G-One Speed through to the G-One Ultrabite, while Continental offers the Terra Speed and Terra Trail for varying conditions.
In wet or muddy conditions, large widely-spaced knobs can improve grip and also help to shed mud. A tighter-packed tread won’t work as well in wet conditions but will usually roll faster on tarmac or more hard-packed gravel surfaces.
With a wide 650b tyre – something in the 45mm+ range – 35psi is a good starting point. Check out an online tyre pressure calculator likethis one from SRAMfor a more precise guide, which takes many more factors into account.
If you’re looking to take some vibration out of your existing ride, adjustable suspension stems and seatposts are available from the likes of Cane Creek and Redshift.
You’ll usually get mudguard and rack mounts, although gravel bikes don’t tend to come fitted with either of these accessories as standard – they’re more likely to be found oncommuting bikesandtouring bikes.

Pump curves are calculated based on water which has an SG of 1. If a fluid has a higher specific gravity than water, then the head will show the same, but the pressure will increase since Pressure is a function relative to fluid calculated by multiplying Head x Specific Gravity.
The presence of solids will also effect the absorbed power. Wastewater which contains sewage is typically assumed to have an SG of 1 due to the large ratio of water to solids. However slurries or sludges can have a density 2 or 3 times higher, affecting the motor power accordingly.
The pressure supplied by a pump for each application is fluid dependent and relative to fluid density thus pressure will change according to the fluid’s specific gravity
Density and pressure directly affect the power absorbed by the motor during operation. The amount of power absorbed by a motor during operation is multiplied by the SG to calculate the power absorbed.
Care must be taken where a pump curve shows a high NPSH is required. A fluid with a low specific gravity, must be checked against the NPSH required carefully.
Cavitation can occur if the inlet pressure is below that required by the pump, which can arise when the SG of the fluid is not accounted for correctly, when determining the NPSH available.
Positive Displacement Pump CurveA PD Pump curve will not be affected in the same way as a centrifugal pump curve by the specific gravity of a fluid, as flow rate will remain constant. However, the absorbed power will increase, with the pressure produced remaining fluid dependent.


 8613371530291