
mud pump maintenance training free sample
Terminology; Calculating total head, horsepower, and available vs required NPSH; Pump performance; Head capacity; Efficiency; Horsepower curves; Pump selection

When things are running smoothly it’s easy to overlook common maintenance chores and rationalize that it’s not worth the time to regularly inspect and replace parts. But nothing could be farther from the truth. The reality is that most facilities have several pumps performing a variety of functions that are integral to the successful operation of the plant. If a pump malfunctions it can be the cause of an entire plant shut down.
Pumps are the cogs in the wheel that keep your facility functioning efficiently, whether they are used for manufacturing processes, HVAC, or water treatment. To keep pumps running properly, a regular maintenance schedule should be implemented and followed.
Consult the original manufacturer’s guidelines. Consider the timing to schedule your maintenance. Will lines or pumps have to be disabled? Select a time when the system is down and use common sense when deciding the time and frequency.
Get to know your system and make a point to observe your pump while it is still running. Make note of leaks, unusual sounds or vibrations and unusual odors.
Make sure machines are properly shut-down before performing your maintenance and/or systems check. Proper isolation is important not only for electrical systems, but for hydraulic systems as well.
Lubricate the motor and pump bearing per manufacturer’s guidelines. Be sure not to over lubricate. More bearing damage occurs as a result of over greasing than under greasing. If the bearing has a vent cap, remove the cap and run the pump for 30 minutes before reinstalling cap. This will allow excess grease to work its way out of the bearing.
Many pump manufacturers advise against the use of oil, petroleum jelly or other petroleum or silicon based products for elastomer seal lubrication. Using such products could cause seal failure due to swelling of the elastomer. P-80 rubber lubricants are temporary, once dry the lubrication ceases and parts stay in place. Additionally, these lubricants will not reactivate in the presence of water and they will not dry out rubber parts.
Keep your facilities running smoothly. Try P-80® temporary rubber assembly lubricants for your pump maintenance needs. Visit www.ipcol.com to speak with a specialist and request a sample for testing.

Everyone agrees that reactive maintenance is probably the worst pump reliability strategy. Maintaining equipment only after it breaks can mean unexpected downtime, emergencies, rush charges, overtime, and replacement of expensive parts.
The best pump reliability strategy is not either preventive or predictive maintenance, it’s a combination of the two, strategically applied. In this post, we’ll discuss the differences between predictive and preventive maintenance and when it’s best to use them.
Many operators rely heavily on “reactive” maintenance rather than preventing and planning for future repairs. As discussed in our eBook, 36 Ways to Kill Your Pump, “reactive” maintenance accounts for unplanned equipment downtime and increased costs.
Preventive and predictive maintenance programs extend the overall life of the equipment and result in fewer unplanned breakdowns. The choice is not one or the other, it’s a combination of the two.
Preventative maintenance is any variety of scheduled maintenance to a pump or other piece of equipment. Generally, it includes scheduled routine maintenance, such as equipment calibration, greasing, oil change, and analysis.
One of the biggest ways to prevent failures is to make sure your equipment is properly aligned and balanced. Misalignment and pump unbalance are the two most common reliability problems for rotating equipment. Laser alignment also fits within this category since its a service completed upon installation, setting the pump up for success.
These programs are designed to keep your maintenance costs low by preventing costly failures before they happen. If you need a preventative maintenance checklist, you can download one here.
Up to 50% of damage to rotating machinery is directly related to misalignment. Misalignment can cause increased vibration, premature seal and bearing failure, and increased power consumption. An unbalanced pump causes similar issues, such as vibration, which can be easily avoided with the right preventative maintenance measures.
Predictive maintenance services are used to monitor the condition of equipment over time. Vibration analysis, for example, measures the vibration of the equipment while it is still in service. This allows the technician to see the change in vibrations over time to predict when a problem may occur, and why.
Predictive maintenance should be part of routine maintenance for pumps and rotating equipment that absolutely can NOT go down. Operators and maintenance managers get a glimpse into the future life of the pump as it"s running today. This allows them to plan for repairs and avoid unexpected downtime.
Not all pumps are equally important in a manufacturing process, so not all pumps should receive the same maintenance plan. It wouldn’t make sense to spend time and money on vibration analysis for a pump in a non-essential application.
Before creating a maintenance plan, place the pumps into categories. This will help determine how much time and money to invest in each one. Use these categories to get started:
Regularly maintaining pumps will extend the life of your pump. When a pump is properly maintained, the parts that need replacing are usually the less expensive wear parts.
Check shaft alignment – believe it or not, shaft alignment can change! Thermal growth and machine movement due to load shifts can cause pumps to move out of alignment.
Up to 50% of damage to rotating machinery is directly related to misalignment. That’s huge. Machine vibration, bearing damage, premature seal wear, and coupling damage are all examples of issues pumps experience when misaligned.
For the most accurate alignment, we always recommend laser alignment. It’s the most accurate method available (to .0001), and once familiar, an operator can align a pump/motor very quickly. It is the most expensive method to get into if doing alignments in-house and can be difficult to learn at first. But when looking for long-term results, the laser align method is the better choice.
Precision rebuild or precision maintenance is the practice of rebuilding a pump as close to OEM specifications as possible. Attention to detail is required for precision rebuilds.
Precision rebuilds are proven to reduce failures and should be a central piece of a pump reliability strategy. If the team lacks capacity, tools, or expertise to rebuild pumps to OEM standards, look for a capable local shop.
Add taps with isolating ball valves into piping on the suction and discharge sides of the pump. Use these to mount pressure indicators to ensure the pump is performing properly.
Read the pump manual and follow each step in the procedure. The procedures therein give the best possible instruction for long and trouble-free life for the pump.
Upon start-up, record the pump performance baseline data – amps, suction pressure, discharge pressure. This is handy when troubleshooting issues, should they arise.
Vibration monitoring is a very helpful tool for predicting pump failures. Some manufacturing facilities have a vibration technician on staff to take readings on critical pumps. These technicians may read the results themselves or send them to a firm that can interpret the readings and provide a report.
Unfortunately, this is not a skill easily attained by a maintenance team. It requires expensive equipment and a great deal of training to be an effective vibration technician. Unless the facility has a large population of critical equipment, this is a service best hired out.
Arguably the most important piece of a preventative/predictive maintenance plan... The TRAINING! Training isn’t just for the maintenance team, it’s for everyone in contact with pumps, operators especially! Failure prevention is everyone’s responsibility.
The maintenance team is the keeper and protector of equipment in the facility. Train operators on the signs of failure so they can report it quickly. Show them how to properly start-up or shut down a pump and how their actions will affect other parts of the system.
If all these steps were do-able by a maintenance team alone, everyone’s reliability goals would be already met. Some of the steps we’ve laid out require specialized training, tools, or specialized training on tools to make them effective. It’s likely the team doesn’t possess all these as they’re expected to know how to fix every machine in the plant. Hire outside help where it makes sense.
Look to a preventative maintenance program and predictive maintenance measures to save on annual maintenance costs and unscheduled downtime. We recommend working with your local equipment supplier to schedule a preventative or predictive maintenance program for your pumps.
Need more information about our preventative and predictive maintenance services? We are happy to help businesses in Wisconsin and upper Michigan. Got a noisy, underperforming pump? Consider our FREE Bad Actor Pump Assessment!

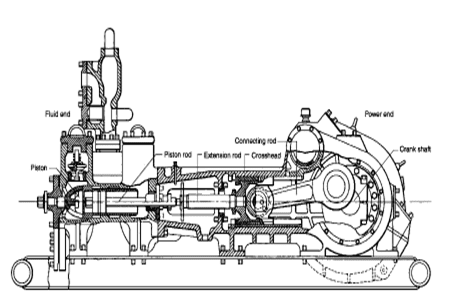
If you run a mud rig, you have probably figured out that the mud pump is the heart of the rig. Without it, drilling stops. Keeping your pump in good shape is key to productivity. There are some tricks I have learned over the years to keeping a pump running well.
First, you need a baseline to know how well your pump is doing. When it’s freshly rebuilt, it will be at the top efficiency. An easy way to establish this efficiency is to pump through an orifice at a known rate with a known fluid. When I rig up, I hook my water truck to my pump and pump through my mixing hopper at idle. My hopper has a ½-inch nozzle in it, so at idle I see about 80 psi on the pump when it’s fresh. Since I’m pumping clear water at a known rate, I do this on every job.
As time goes on and I drill more hole, and the pump wears, I start seeing a decrease in my initial pressure — 75, then 70, then 65, etc. This tells me I better order parts. Funny thing is, I don’t usually notice it when drilling. After all, I am running it a lot faster, and it’s hard to tell the difference in a few gallons a minute until it really goes south. This method has saved me quite a bit on parts over the years. When the swabs wear they start to leak. This bypass pushes mud around the swab, against the liners, greatly accelerating wear. By changing the swab at the first sign of bypass, I am able to get at least three sets of swabs before I have to change liners. This saves money.
Before I figured this out, I would sometimes have to run swabs to complete failure. (I was just a hand then, so it wasn’t my rig.) When I tore the pump down to put in swabs, lo-and-behold, the liners were cut so badly that they had to be changed too. That is false economy. Clean mud helps too. A desander will pay for itself in pump parts quicker than you think, and make a better hole to boot. Pump rods and packing last longer if they are washed and lubricated. In the oilfield, we use a petroleum-based lube, but that it not a good idea in the water well business. I generally use water and dish soap. Sometimes it tends to foam too much, so I add a few tablets of an over the counter, anti-gas product, like Di-Gel or Gas-Ex, to cut the foaming.
Maintenance on the gear end of your pump is important, too. Maintenance is WAY cheaper than repair. The first, and most important, thing is clean oil. On a duplex pump, there is a packing gland called an oil-stop on the gear end of the rod. This is often overlooked because the pump pumps just as well with a bad oil-stop. But as soon as the fluid end packing starts leaking, it pumps mud and abrasive sand into the gear end. This is a recipe for disaster. Eventually, all gear ends start knocking. The driller should notice this, and start planning. A lot of times, a driller will change the oil and go to a higher viscosity oil, thinking this will help cushion the knock. Wrong. Most smaller duplex pumps are splash lubricated. Thicker oil does not splash as well, and actually starves the bearings of lubrication and accelerates wear. I use 85W90 in my pumps. A thicker 90W140 weight wears them out a lot quicker. You can improve the “climbing” ability of the oil with an additive, like Lucas, if you want. That seems to help.
Outside the pump, but still an important part of the system, is the pop-off, or pressure relief valve. When you plug the bit, or your brother-in-law closes the discharge valve on a running pump, something has to give. Without a good, tested pop-off, the part that fails will be hard to fix, expensive and probably hurt somebody. Pop-off valve are easily overlooked. If you pump cement through your rig pump, it should be a standard part of the cleanup procedure. Remove the shear pin and wash through the valve. In the old days, these valves were made to use a common nail as the shear pin, but now nails come in so many grades that they are no longer a reliable tool. Rated shear pins are available for this. In no case should you ever run an Allen wrench! They are hardened steel and will hurt somebody or destroy your pump.
One last thing that helps pump maintenance is a good pulsation dampener. It should be close to the pump discharge, properly sized and drained after every job. Bet you never thought of that one. If your pump discharge goes straight to the standpipe, when you finish the job your standpipe is still full of fluid. Eventually the pulsation dampener will water-log and become useless. This is hard on the gear end of the pump. Open a valve that drains it at the end of every job. It’ll make your pump run smoother and longer.

Cavitation is an undesirable condition that reduces pump efficiency and leads to excessive wear and damage to pump components. Factors that can contribute to cavitation, such as fluid velocity and pressure, can sometimes be attributed to an inadequate mud system design and/or the diminishing performance of the mud pump’s feed system.
Although cavitation is avoidable, without proper inspection of the feed system, it can accelerate the wear of fluid end parts. Over time, cavitation can also lead to expensive maintenance issues and a potentially catastrophic failure.
When a mud pump has entered full cavitation, rig crews and field service technicians will see the equipment shaking and hear the pump “knocking,” which typically sounds like marbles and stones being thrown around inside the equipment. However, the process of cavitation starts long before audible signs reveal themselves – hence the name “the silent killer.”
Mild cavitation begins to occur when the mud pump is starved for fluid. While the pump itself may not be making noise, damage is still being done to the internal components of the fluid end. In the early stages, cavitation can damage a pump’s module, piston and valve assembly.
The imperceptible but intense shock waves generated by cavitation travel directly from the fluid end to the pump’s power end, causing premature vibrational damage to the crosshead slides. The vibrations are then passed onto the shaft, bull gear and into the main bearings.
If not corrected, the vibrations caused by cavitation will work their way directly to critical power end components, which will result in the premature failure of the mud pump. A busted mud pump means expensive downtime and repair costs.
To stop cavitation before it starts, install and tune high-speed pressure sensors on the mud suction line set to sound an alarm if the pressure falls below 30 psi.
Although the pump may not be knocking loudly when cavitation first presents, regular inspections by a properly trained field technician may be able to detect moderate vibrations and slight knocking sounds.
Gardner Denver offers Pump University, a mobile classroom that travels to facilities and/or drilling rigs and trains rig crews on best practices for pumping equipment maintenance.
Program participants have found that, by improving their maintenance skills, they have extended the life of fluid end expendables on their sites. They have also reported decreases in both production and repair costs, as well as reductions in workplace hazards.
Severe cavitation will drastically decrease module life and will eventually lead to catastrophic pump failure. Along with downtime and repair costs, the failure of the drilling pump can also cause damage to the suction and discharge piping.
When a mud pump has entered full cavitation, rig crews and field service technicians will see the equipment shaking and hear the pump ‘knocking’… However, the process of cavitation starts long before audible signs reveal themselves – hence the name ‘the silent killer.’In 2017, a leading North American drilling contractor was encountering chronic mud system issues on multiple rigs. The contractor engaged in more than 25 premature module washes in one year and suffered a major power-end failure.
Gardner Denver’s engineering team spent time on the contractor’s rigs, observing the pumps during operation and surveying the mud system’s design and configuration.
The engineering team discovered that the suction systems were undersized, feed lines were too small and there was no dampening on the suction side of the pump.
There were also issues with feed line maintenance – lines weren’t cleaned out on a regular basis, resulting in solids from the fluid forming a thick cake on the bottom of the pipe, which further reduced its diameter.
Following the implementation of these recommendations, the contractor saw significant performance improvements from the drilling pumps. Consumables life was extended significantly, and module washes were reduced by nearly 85%.
Although pump age does not affect its susceptibility to cavitation, the age of the rig can. An older rig’s mud systems may not be equipped for the way pumps are run today – at maximum horsepower.

Schematic of the circulating system: The drill bit, drill collar, annulus, drill pipe, kelly and swivel are depicted in the upper right. Drilling mud flows through the mud return line upon its return to the surface from the hole to the shale shaker, then to the adjacent desander, desilter and degasser back to the mud tank. Mud passes through the suction line, and the mud pump circulates the mud through the discharge line, the stand pipe through the rotary hose and the swivel, back to the kelly and into the drill
If the mud level increases, it may be a sign that a kick is in progress. A kick is an entry of water, gas, oil, or other formation fluid into the wellbore during drilling. It occurs because the pressure exerted by the column of drilling fluid is not great enough to overcome the pressure exerted by the fluids in the formation drilled. If prompt action is not taken to control the kick, or kill the well, a blowout may occur.
A comprehensive range of mud pumping, mixing, and processing equipment is designed to streamline many essential but time-consuming operational and maintenance procedures, improve operator safety and productivity, and reduce costly system downtime.

The 2,200-hp mud pump for offshore applications is a single-acting reciprocating triplex mud pump designed for high fluid flow rates, even at low operating speeds, and with a long stroke design. These features reduce the number of load reversals in critical components and increase the life of fluid end parts.
The pump’s critical components are strategically placed to make maintenance and inspection far easier and safer. The two-piece, quick-release piston rod lets you remove the piston without disturbing the liner, minimizing downtime when you’re replacing fluid parts.
Many things go into getting the most life out of your mud pump and its components — all important to extend the usage of this vital piece of equipment on an HDD jobsite. Some of the most important key points are covered below.
The most important thing you can do is service your pump, per the manufacturer’s requirements. We get plenty of pumps in the shop for service work that look like they have been abused for years without having basic maintenance, such as regular oil changes. You wouldn’t dream of treating your personal vehicle like that, so why would you treat your pump like that.
Check the oil daily and change the oil regularly. If you find water or drilling mud contamination in the oil, change the oil as soon as possible. Failure to do so will most likely leave you a substantial bill to rebuild the gear end, which could have been avoided if proper maintenance procedures would have been followed. Water in the oil does not allow the oil to perform correctly, which will burn up your gear end. Drilling mud in your gear end will act as a lapping compound and will wear out all of the bearing surfaces in your pump. Either way it will be costly. The main reasons for having water or drilling mud in the gear end of your pump is because your pony rod packing is failing and/or you have let your liners and pistons get severely worn. Indication of this is fluid that should be contained inside the fluid end of your pump is now moving past your piston and spraying into the cradle of the pump, which forces its way past the pony rod packing. Pony rod packing is meant to keep the oil in the gear end and the liner wash fluid out of the gear end. Even with brand new packing, you can have water or drilling fluid enter the gear end if it is sprayed with sufficient force, because a piston or liner is worn out.
There is also usually a valve on the inlet of the spray bar. This valve should be closed enough so that liner wash fluid does not spray all over the top of the pump and other components.
Liner wash fluid can be comprised of different fluids, but we recommend just using clean water. In extremely cold conditions, you can use RV antifreeze. The liner wash or rod wash system is usually a closed loop type of system, consisting of a tank, a small pump and a spray bar. The pump will move fluid from the tank through the spray bar, and onto the inside of the liner to cool the liner, preventing scorching. The fluid will then collect in the bottom of the cradle of the pump and drain back down into the collection tank below the cradle and repeat the cycle. It is important to have clean fluid no matter what fluid you use. If your liners are leaking and the tank is full of drilling fluid, you will not cool the liners properly — which will just make the situation worse. There is also usually a valve on the inlet of the spray bar. This valve should be closed enough so that liner wash fluid does not spray all over the top of the pump and other components. Ensure that the water is spraying inside the liner and that any overspray is not traveling out of the pump onto the ground or onto the pony rod packing where it could be pulled into the gear end. If the fluid is spraying out of the cradle area and falling onto the ground, it won’t be long before your liner wash tank is empty. It only takes a minute without the cooling fluid being sprayed before the liners become scorched. You will then need to replace the pistons and liners, which is an avoidable costly repair. Make a point to check the liner wash fluid level several times a day.
Drilling fluid — whether pumping drilling mud, straight water or some combination of fluid — needs to be clean. Clean meaning free of solids. If you are recycling your fluid, make sure you are using a quality mud recycling system and check the solids content often throughout the day to make sure the system is doing its job. A quality mud system being run correctly should be able to keep your solids content down to one quarter of 1 percent or lower. When filling your mud recycling system, be sure to screen the fluid coming into the tanks. If it is a mud recycling system, simply make sure the fluid is going over the scalping shaker with screens in the shaker. If using some other type of tank, use an inline filter or some other method of filtering. Pumping out of creeks, rivers, lakes and ponds can introduce plenty of solids into your tanks if you are not filtering this fluid. When obtaining water out of a fire hydrant, there can be a lot of sand in the line, so don’t assume it’s clean and ensure it’s filtered before use.
Cavitation is a whole other detailed discussion, but all triplex pumps have a minimum amount of suction pressure that is required to run properly. Make sure this suction pressure is maintained at all times or your pump may cavitate. If you run a pump that is cavitating, it will shorten the life of all fluid end expendables and, in severe cases, can lead to gear end and fluid end destruction. If the pump is experiencing cavitation issues, the problem must be identified and corrected immediately.
The long and the short of it is to use clean drilling fluid and you will extend the life of your pumps expendables and downhole tooling, and keep up with your maintenance on the gear end of your pump. Avoid pump cavitation at all times. Taking a few minutes a day to inspect and maintain your pump can save you downtime and costly repair bills.

This example models a triplex pump with a predictive maintenance algorithm that can detect which parts of the pump are failing simply by monitoring the pump output pressure.
The Simscape model of the pump can be configured to model degraded behavior due to seal leakage, blocked inlets, bearing wear, and broken motor windings. MATLAB code shows how to accelerate testing by reusing results from previous simulations. The model can be used to generate training data for the machine learning algorithm and can be used to test the deployed algorithm. MATLAB Live Scripts show you how to develop the algorithm.
Mechanical, hydraulic, and electrical parameters are all defined in MATLAB which lets you easily resize the pump. The pump housing is imported from CAD.
Read the e-book “Predictive Maintenance with MATLAB”https://www.mathworks.com/content/dam/mathworks/tag-team/Objects/p/93060v00_Predictive_Maintenance_e-book_v04.pdf


 8613371530291