
mud pump valve cover gasket free sample
A wide variety of mud pump valve cover seal options are available to you, You can also choose from new, used mud pump valve cover seal,As well as from energy & mining, construction works , and machinery repair shops. And whether mud pump valve cover seal is provided, {2}, or {3}.
A valve cover gasket is an engine component designed to protect cylinder head hardware from the elements and prevent oil from escaping the engine. Typically, the gasket is made of plastic, rubber or cork to create a tight seal between the engine cover and engine, acting as a two-way barrier.
The valve cover gasket is an essential motor component. During operation, engine intake and exhaust valves open and close rapidly. This process generates a considerable amount of mechanical action, requiring a hot oil shower for lubrication. However, if the gasket becomes damaged, it can no longer maintain a seal between the oil and the valve cover, leading to engine damage. In the event of a failure, debris and small particles could get between the pistons and the cylinders, causing wear and tear to the components. Moreover, if engine oil escapes, then metal could grind against metal, shortening the life of the engine.
While manufacturers do their best to make gaskets that prevent engine oil from entering the motor, these components can fail over time. Engine oil is acidic, so it slowly eats away at rubber seals, fatiguing them. Once they fail, the oil is then free to circulate in other parts of the engine, causing damage.
A faulty valve cover gasket is not a problem that will leave a vehicle stranded at the roadside. However, at the same time, you can’t afford to ignore it for long. After a few dozen miles, the fault will begin to damage the engine and your maintenance costs will rise.
A faulty valve cover gasket may allow engine oil to escape the motor, causing the “low oil” engine light to appear on your dashboard. If engine oil is low, it can lead to friction inside the engine, causing the engine temperature to rise, eventually leading to failure and even fires. If you notice the low oil light is on, you’ll want to check the status of the gasket first before moving onto other possible causes.
Cracked and worn valve cover gaskets accumulate compressed oil underneath which can then drip into other high-temperature areas of the engine, such as fuel intake or cylinder heads, leading to a burning smell. The odour is distinctive to any experienced mechanic and can lead to excess smoke in the exhaust when you switch on the engine.
In some cases, oil leaks from the gasket are so bad that they can drip down onto the spark plug galley and inside the plugs themselves causing misfires and engine performance issues. Sparks may, in some cases, ignite the oil, leading to fires. Engines may also fail to run smoothly and make strange sounds as you apply the gas.
Labor costs can vary significantly because of differences in valve cover gasket accessibility. Most manufacturers make valve cover gaskets that do not need any additional engine disassembly. However, some require the removal of other components, such as turbo plumbing, for servicing, adding to the overall cost.
The signs of a faulty gasket are obvious: engines that spew out smoke, rough performance, and chronically low engine oil. However, replacing a faulty valve cover gasket involves following a careful, sequential process.
In general, locating engine oil leak problems can be tricky. There are many places where oil could escape. The telltale signs that the valve cover gasket is the culprit is:
Sometimes, valve cover gasket leaks can drain down the back of the engine, mimicking other kinds of leaks, such as oil pan or main seal leaks. However, you can usually rule these out quickly. A faulty gasket will usually only leak oil while the engine is running.
If you believe that you might have a faulty valve cover gasket, monitor your engine closely and do not allow oil levels to drop below the manufacturer’s recommendations. As stated above, allowing an engine to run on low oil is dangerous and could cause catastrophic failure.
In many cases, you may not have a faulty valve cover gasket at all. Instead, engine vibrations and oil action may have wriggled it loose over time, causing the seal to lose contact with the surrounding metal, allowing oil to escape.
Try tightening the gasket to the manufacturer’s specifications, preferably with a torque wrench and then see whether that prevents oil from leaking. If it does, then you can safely assume that you have dealt with the problem.
If the oil leak continues after routine tightening, then allow the engine to cool and follow service manual instructions to gain access to the valve cover. In most cases, the valve cover gasket is easily accessible. However, in turbocharged vehicles, you will need to remove the plumbing first. Once you do that, remove anything else in the way, including PCV hoses, spark plug brackets and throttle cables.
Valve covers protect the engine from the elements and prevent oil leaks. Remove all of the valve cover bolts and lift the valve cover upwards and away from the rest of the components. If the valve cover does not want to move, try gently tapping it with a rubber mallet. This action will help to loosen the unit if fitted to a tight manufacturer specification.
When removing the valve cover, do not allow anything to fall into the engine. Make sure that you do not drop any tools into the internal compartment that might damage the surfaces. To prevent this, you may want to cover the engine with a rag.
Once you have access to the underside of the valve cover, remove the gasket and fit the new one. Most valve covers have a groove where the gasket sits, making it easy to replace by hand. If you need to use scrapers to remove the existing gasket, do not use metal as this could damage the underside of the unit, causing leaks. Silicone or plastic will suffice.
Whether you need to apply silicone to the new valve cover gasket depends on the manufacturer. Only apply silicone if the service manual asks for it. Otherwise, skip this step.
Before applying silicone, clean the entire surface of the valve cover, making sure that you remove all of the oil. After you apply silicone, make sure that you leave it to cure before you fire up the engine. If you don’t allow time for curing, it will fail, causing leaks.
Once you replace the valve cover, re-install the gasket and tighten the bolts with a torque wrench to the recommended tightness. Do not overtighten as this may damage the new gasket.
Are you looking for quality valve cover gaskets? Then you’re in the right place. Here at MEGA, we offer a massive selection of quality replacement gaskets for many makes and models of vehicles. Gasket materials include silicone, cork, ACM, NBR, viton and more. Auto parts are available for a wide array of manufacturers, including Nissan, Toyoto, Mazda, Honda and others. Check out our gasket selection guide : Concise Gasket Material Types For Gasoline And Selection
MEGA has been supplying quality auto parts since 1979. Our gasket kits are now renowned and admired across the world for their quality and longevity. Our two main brands: MEGA and SUPERSEAL take engine gasket performance to new levels, providing drivers, businesses and other vehicle users with unrivalled reliability.
MEGA Gasket manufacturers and supplier are among the leading after-market options around the world. As a Taiwan-based business, we aim to deliver quality at a reasonable price, helping more motorists reduce the long-term maintenance cost of owning their vehicles.
established since 1979, granted ISO 9002 in 1999 and updated to ISO 9001:2015 in 2017, and the main production is for automobile and all kind of engine gaskets. MEGA have profuse experience and good reputation in Taiwan. Learn more about MEGA Gasket manufacturer and supplier.

If your engine is misfiring or running rough, it might be due to a leaking valve cover gasket. This relatively inexpensive part can cause all sorts of problems if it’s not fixed in a timely manner. In this post, we’ll take a closer look at what a leaking valve cover gasket is and what you can do to fix it. We’ll also discuss some of the symptoms of a leaky valve cover gasket so that you can troubleshoot the problem yourself. Thanks for reading!
A leaking valve cover gasket can cause a number of engine performance issues, including a rough idle. The valve cover gasket seals the top of the engine, and if it leaks, oil can drip down onto the valves and cylinders.
A leaking valve cover gasket can also cause oil to leak into the combustion chamber, which can cause knocking and pinging sounds. In some cases, a leaking valve cover gasket can also trigger the check engine light. If you notice any of these symptoms, it’s important to have your vehicle inspected by a qualified mechanic as soon as possible.
A leaking valve cover can cause a variety of problems. First, it can allow oil to leak into the engine, causing the engine to run less efficiently and potentially overheat. Second, it can allow oil to drip onto hot surfaces such as the exhaust system, leading to fires or smoke. Third, it can cause oil levels to drop, leading to premature wear on engine parts. Finally, it can lead to an increase in emissions, potentially damaging the environment. As a result, it is important to have a leaking valve cover repaired as soon as possible.
Valve cover gaskets are one of the most common sources of oil leaks in engines. They are located between the valve cover and the cylinder head, and their main purpose is to keep oil from leaking out of the engine. Over time, however, they can become hard and brittle, allowing oil to seep through.
In some cases, an oil leak can also be caused by a faulty valve cover itself. If the gasket is not properly seated, it can cause an oil leak. In addition, if the bolts that hold the valve cover in place are loose, they can also allow oil to leak out. In most cases, a valve cover gasket can be replaced without too much difficulty. However, if the leak is severe, it may be necessary to replace the entire valve cover.
When conducting a valve cover gasket replacement, it is recommended that you also replace the following items: the PCV valve, spark plugs, and spark plug wires. The PCV valve is located on the valve cover and helps to regulate the pressure in the crankcase. Over time, the PCV valve can become clogged with oil and debris, which can cause it to stick open or closed. As a result, it is important to inspect the PCV valve when replacing the valve cover gasket and replace it if necessary. In addition, spark plugs and spark plug wires should be replaced every 30,000 miles.
However, if they are more than five years old, it is recommended that you replace them sooner. By replacing these items at the same time as the valve cover gasket, you can help to ensure that your engine is running smoothly and efficiently.

One of the common signs that you might have a valve cover leak is that tell-tale oil spot or puddle on your driveway or garage floor after having parked your car overnight. While not an emergency to panic over, if your engine’s oil level has gone too low for too long, it can lead to serious damage to your engine.
Bear in mind that oil leaks can result in other ways unrelated to the valve cover gasket; however, a close visual inspection of the area where the valve cover(s) attaches to the cylinder head(s) can easily rule out or confirm a leaking valve cover.
Fortunately, for many cars, a valve cover gasket replacement service is one that opens itself up to DIY car maintenance that you can do at home with just a few simple tools. However, even though with the help of a Haynes or similar auto repair manual, ofttimes the devil is in the details and you can make a simple mistake that will still leave you with a leaking valve cover.
As an example of some of the mistakes commonly made during a valve cover gasket replacement, here is a useful recent video from the Toyota Maintenance YouTube channel where “Peter” finds a few mistakes made by someone else as a DIY maintenance fix for a leaking valve cover. Please note while the video is on a Toyota, the basics of typical valve gasket replacement shown apply to many other makes and models as well.

The Chevrolet small-block engine was a brilliant piece of engineering, attested by the fact that well over 100,000,000 have been built. However the first generation was not as oil-tight as later generations. The gaskets between the valve covers and the heads are common culprits. They often weep, leak and seep. A good part of the problem is that until 1986, only four bolts located around the perimeter attached small-block valve covers. Compounding that problem are flimsy stamped steel valve covers on base models and a narrow, rough sealing surface on the cast-iron heads made leaks nearly inevitable.
On the bright side, valve cover leaks are about the least expensive oil leaks to fix. And valve cover removal is one of the easiest and most trouble-free ways to look inside your engine. Plus, if your engine compartment is looking a little dreary, replacing or refurbishing the valve covers provides a major improvement at relatively little cost. Due to the popularity of Chevrolet small-block and big-block engines, the choices in aftermarket valve covers are staggering.
We will pay particular attention to 1955-"86 small-block valve covers and gaskets. Big-blocks utilized seven bolts instead of the four on the first-generation small-blocks. Later generations of small-blocks (and first-gen engines starting in 1986) utilized "center bolts" instead of the "perimeter bolts" of the first generation. These and other design changes greatly improved sealing at the valve covers. Regardless of the design, the following information on valve cover considerations and gasket options is of value when replacement is needed.
From the first small-block engines in 1955 until head modifications in 1959, valve covers had a staggered-bolt pattern (the upper boltholes were a little over an inch closer together than the lower boltholes). That design may have been to ensure that the covers were not installed upside down. In any case, a prime consideration is whether the cover you need is a staggered or straight-across design. For those that have the earliest staggered-bolt heads but want to choose from the many more styles of the later straight-across bolt valve covers, an adapter is available.
An essential consideration for engines with high-performance aftermarket valvetrains is the internal height of the valve cover so that there"s sufficient clearance to the rocker arms when the valves are open. Note that a little extra height also can be gained by using thicker than stock gaskets.
Another essential consideration is the external height of the valve cover. In some engine compartments, there"s very little clearance between it and the brake booster, air conditioning compressor, alternator or other components. The intake manifold, EGR valve or exhaust manifolds can also cause fitment issues.
A fourth important structural consideration concerns the openings in the valve covers. The early Chevy V-8s had none. These engines had oil fills and/or breathers on the intake manifold and some had a road draft tube on the rear to vent the engine. Later valve covers have openings for vents, PCV valves and oil fills. The size, number and location of these holes in the valve cover varied from year to year and even varied between engine options. Because of that, many aftermarket valve covers have no holes. If holes are needed in those covers, customers must either machine or drill them to suit their particular application.
The above considerations are structural and are critical. But they are fairly easy to inspect and measure to determine what you need. Cosmetic considerations are an entirely different story. There are so many choices for Chevrolet engines. For example, Summit Racing offers well over 100 styles for small-blocks alone. We"ll leave those aesthetic considerations entirely up to you while we look at the numerous gasket options
It used to be simple. Valve cover gaskets were cork or cork with a rubber binder. These are still available and are good choices for many applications. They conform well to the narrow, rough mating surface of early small-block cast-iron heads. This is important with the relatively low clamping force of perimeter bolt covers, especially the stamped-steel covers. The cork gaskets are generally the least expensive but they compress over time, requiring that the cover bolts be retightened occasionally.
After many years cork gaskets can compress too far and become hardened. It"s a common practice to cement these (and other types of gaskets) to the valve cover to hold them in place during installation and to keep the gasket attached to the valve cover during removal. On the lower gasket surface, Permatex Form-A-Gasket No. 2 or other non-hardening sealers can be applied to better seal against the head when the gasket compresses or the bolts loosen.
Cork valve cover gaskets are also available with a steel core laminated in between cork layers. A steel core prevents valve cover gaskets from being sucked in by high vacuum or pushed out due to excessive blow by. Although this occurrence is uncommon on stock engines, the metal layer also helps cork gaskets retain their dimensions. Old cork gaskets can dry out and shrink. These multilayered gaskets retain the ability of cork gaskets to seal against rough surfaces and are a popular choice today.
Rubber valve cover gaskets have been an option for many years. For race applications, they have the added advantage of standing up to repeated removal and installation of the valve cover. The rubber material is relatively hard compared to cork and therefore sometimes does not conform as well to rough surfaces, especially with the few focused pressure points of perimeter bolt stamped-steel valve covers. However, if valve covers are not likely to be removed, rubber gaskets can be coated on both sides with RTV or other sealants for a long-lasting, leak-free seal.
An example of the newer types of valve cover gaskets is Fel-Pro"s molded silicone gasket with a laminated steel core. These gaskets additionally feature steel compression limiters enabling the bolts to be tightened without overly compressing the silicone. These have garnered good reviews and represent the high end of valve cover gaskets at over $50 for a pair.
One more consideration when choosing valve cover gaskets brings us back to the early small-blocks with the staggered-bolt valve covers. This staggered designed is still an issue today because some valve cover gaskets have both staggered and straight boltholes (six holes total) to accommodate both designs. These six-hole gaskets have to be trimmed to fit some valve covers. And the extra holes create a thinner sealing area near two of the cover bolts.
Although valve cover gaskets don"t necessarily need sealers or cements, it"s a common practice to glue the gasket to the valve cover. There are a number of sealant choices, too. For this application, Permatex No. 1, RTVs or Permatex High Tack gasket sealant work well. Tip: after gluing the gasket to the cover, place the gasket on a flat surface and place a weight on top of the cover until the sealant dries. Then remove any excess sealant to prevent it from being an eyesore on the outside or going into the engine from the inside.
Before replacing the valve cover gaskets, check to make sure that they are the cause of oil drops on your floor. Feel for oil on the head around the lower rear corner of the cover. That"s a primary problem area. The gaskets can also leak at the top of the valve cover causing oil to puddle at the edge of the intake manifold. Identifying the source of the leak in this area gets tricky because, although much less likely, the intake manifold gasket can also seep oil.
The seals at the front and rear of the intake manifold are another potential source of oil leaks. While inspecting the rear of the engine, also examine the oil pressure line or sender and the distributor gasket. Back to the top of the engine; inspect any rubber grommets on the valve cover. They frequently harden and seep oil when they dry and shrink.
Moving below, inspect the underneath of the engine for oil leaks at the rear main seal, front main seal, fuel pump gaskets and dipstick tube. In any case, you can follow along for tips on replacing the valve cover gaskets. On early small-blocks if they aren"t leaking now, it"s likely they will be at some time.
1. Inspect the bottom of the valve cover at the rear. If it"s shiny with oil then you can be pretty certain your valve cover gaskets need replacing. However, if it feels like your valve cover bolts are bottoming out, you might just need to add a flat washer or two to stop the leaking.
2. If oil is puddling near the intake manifold, that"s also a common sign of valve cover gasket failure. Oil can also seep past the intake manifold gasket near its center but that is much less common.
3. Traditional cork gaskets are still a popular choice and can seal well against the rough narrow sealing surface of cast-iron heads. However, cork tends to compress over time, requiring valve cover bolts to be retightened. Eventually the cork gasket compresses too far in its center allowing oil to get by.
4. Remove the valve covers and remove any sealant or gasket from the heads. Avoid the drain hole to keep these bits from falling into the engine. Soak up the oil by the lower rear and front head bolts to spot any debris that is hiding under the oil.
5. Clean out the boltholes in the head by turning a 3/16-inch drill bit by hand. Over the years gasket material or sealant can build up in the bottom of the hole, preventing the bolts from tightening on the valve cover.
6. Screw a bolt all the way into each hole and then unscrew it counting how many full turns before it comes out. Also note if the threads bind during the last few turns; that will make it difficult to tell how much pressure is being placed on the gasket. If the bolt bottoms out when installing the valve cover it doesn"t matter how good the gasket is—it will leak. After the boltholes were cleaned, these 1973 heads allowed just over nine turns.
7. Block off the baffles when scraping the old gasket and cleaning the valve cover. The baffles help prevent oil droplets from being sucked into the PCV valve, vent tube and hoses. Also note the projections on the inside of this factory valve cover. These drippers aid in oiling the rocker arm pivot.
8. It is essential to place some type of straightedge against the gasket surfaces of stamped-steel valve covers to see if they are bent. They usually are deformed near the bolt holes and they won"t seal until that"s fixed. Support the upper surface of the flange on a block and tap on the lower surface near the bolthole until it is straight again.
9. There are many choices in valve cover gaskets. There are even choices in cork gaskets. In addition to cork gaskets being available in a number of different thicknesses, cork gaskets can also have a steel layer laminated in the center as seen here.
10. Mr. Gasket offers a 0.325-inch thick cork gasket. This extra thickness can provide increased clearance for aftermarket valvetrain components or it can help prevent the valve cover from hitting the intake manifold.
11. This silicone Fel-Pro gasket from Summit Racing is a good example of high-end sealing. In addition to its laminated metal core, it has metal sleeves around the boltholes to prevent the gasket from being crushed too far. This also allows the bolts to be tightened to the point that they are less likely to loosen up.
12. Paragon"s gasket has cork bonded with rubber for better dimensional stability. The extra bolthole enables it to be used on the early small-blocks that had valve covers with staggered bolts. The thickness is similar to OEM gaskets at about 9/64-inch.
13. Paragon also offers original style valve cover bolts, screws and retainers. The factory retainers are often missing but they are essential to distribute the force of the bolts on the thin stamped-steel valve covers. Note that the factory bolts used with aluminum valve covers have 3/8-inch hex heads.
14. The choices in aftermarket valve covers are extensive. Holley"s new Vintage Series finned aluminum valve covers with Chevrolet script come in natural cast finish, polished, satin black or factory orange with machined fins. Holley-scripted models are also available with or without PCV and oil fill holes (and these come with pre-installed internal oil baffles).
15. Three critical structural considerations in selecting a valve cover are the internal height for clearance with aftermarket valvetrain, external height for clearance with nearby components and any holes needed for a breather tube, PCV valve or oil fill. The latter two considerably narrow the choice on some cars.
16. This is a good time to inspect all the rubber grommets on the valve covers. They harden over time to the extent that pieces can break off and fall inside during removal. Be aware that the grommets made for steel valve covers have a narrower channel than the ones for aluminum valve covers. Paragon offers these original style grommets plus new emblems and stickers to restore factory covers.
17. It"s important to check to see how far the bolt goes through the valve cover and gasket. At least three threads should be showing, especially when used with aluminum heads. However, more than five threads extending out can be a problem with some stock heads because the boltholes are relatively shallow. Our 1-inch long bolts worked well with the Holley Vintage Series covers and a thick gasket.
18. Permatex High Tack is popular for gluing the gasket to the valve cover. This holds the gasket in place during installation and keeps it attached to the cover during later removal for valve adjustment or other work. Permatex Ultra Copper Silicone RTV also works well in this application. Both are available from Summit Racing.
19. A thin coat of Permatex No. 2 on the lower surface of the valve cover gasket helps make it oil tight, especially on the narrow sealing surface of early small-block cast-iron heads. It also helps keep the oil in when gaskets compress or cover bolts loosen. Permatex No. 2 is non-hardening so the covers can be removed later without breaking the gaskets.
20. Make sure that the valve cover has clearance with the intake manifold. The upper lips of factory aluminum valve covers were trimmed in this area. Similar trimming can often be done on aftermarket valve covers when needed.
21. Holley also makes finned die-cast aluminum air cleaners in their Vintage Series. These come in 3-inch and 4-inch heights with a choice of premium dark red or natural paper air filter elements. A center stud, wing nuts, and gaskets are included.
22. The exterior surface of unpainted aluminum valve covers can tarnish over time. Tip: spray a little Corrosion Block on a cloth and wipe aluminum parts to protect them. It can even help restore a little sheen to an old valve cover, as seen on the right side.
23. The combination of the Holley Vintage Series valve covers and matching air cleaner add a substantial amount of bling to an engine compartment. Replacing valve covers or gaskets is one of the easiest at-home projects. And with no drips, your garage floor will look better, too.

MUD PUMP PERFORMANCE CHART PUMP MAX MAX STROKE LINER SIZE IN INCHES MODEL I.H.P. S.P.M. LENGTH 4 4 1/2 5 5¼ 5½ 5¾ 6 6¼ 6½ 6¾ 7 7 1/4 7 1/2 MAX-P.S.I. 5000 5000 5000 5000 4714 4313 3960 3650 3380 3130 2910 2713 2535 12”A-1700-PT 1700 150 G.P.R. 1.96 2.48 3.06 3.37 3.70 4.05 4.41 4.78 5.17 5.11 6.00 6.43 6.88 G.P.M. @ 150 R.P.M. 294 372 459 506 555 608 662 717 776 767 900 965 1032 MAX-P.S.I. 5000 5000 5000 5000 4714 4313 3960 3650 3380 3130 2910 2713 2535 10”A-1400-PT 1400 150 G.P.R. 1.63 2.07 2.55 2.81 3.09 3.37 3.67 3.98 4.31 4.65 5.00 5.36 5.74 G.P.M. @ 150 R.P.M. 245 311 383 422 464 506 551 597 647 698 750 804 861
BASED ON 100% VOLUMETRIC EFFICIENCY AND 90% MECHANICAL EFFICIENCY FLUID END TYPE MODEL OF PUMP SIZE OF PUMP OEM 5000 PSI OILWELL A-1700-PT / A-1400-PT 7-1/2” X 12” / 10”
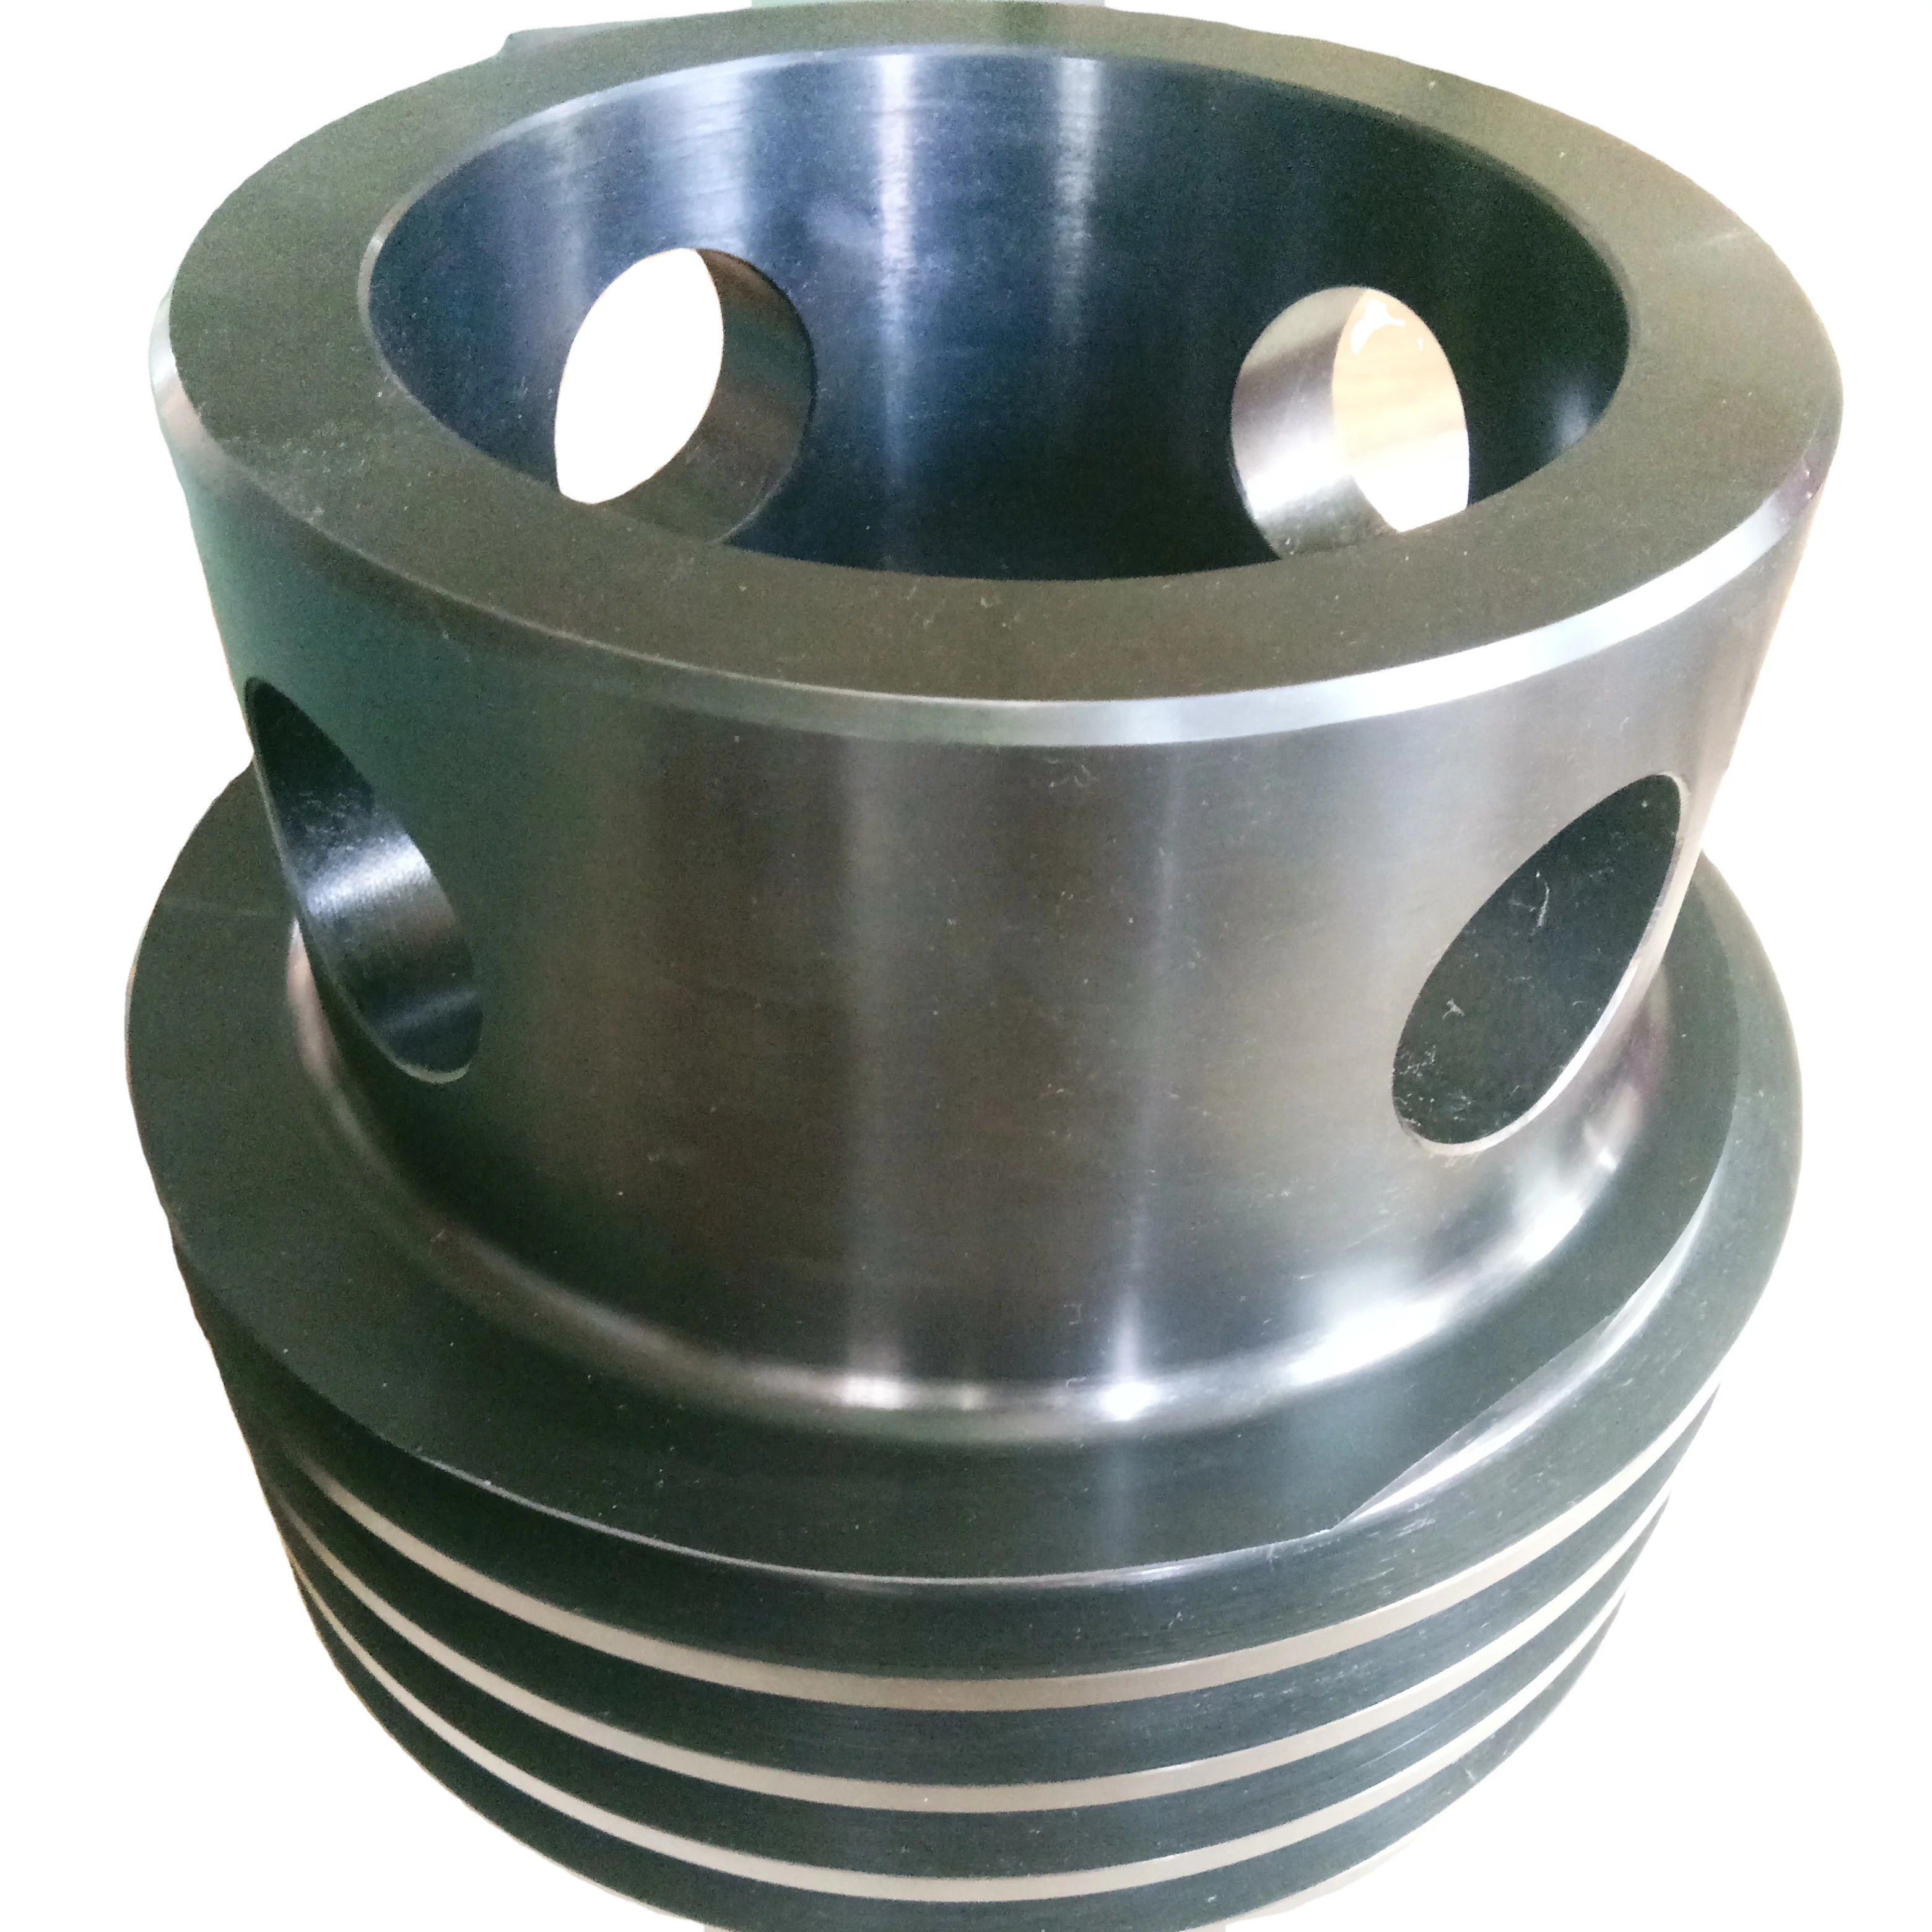
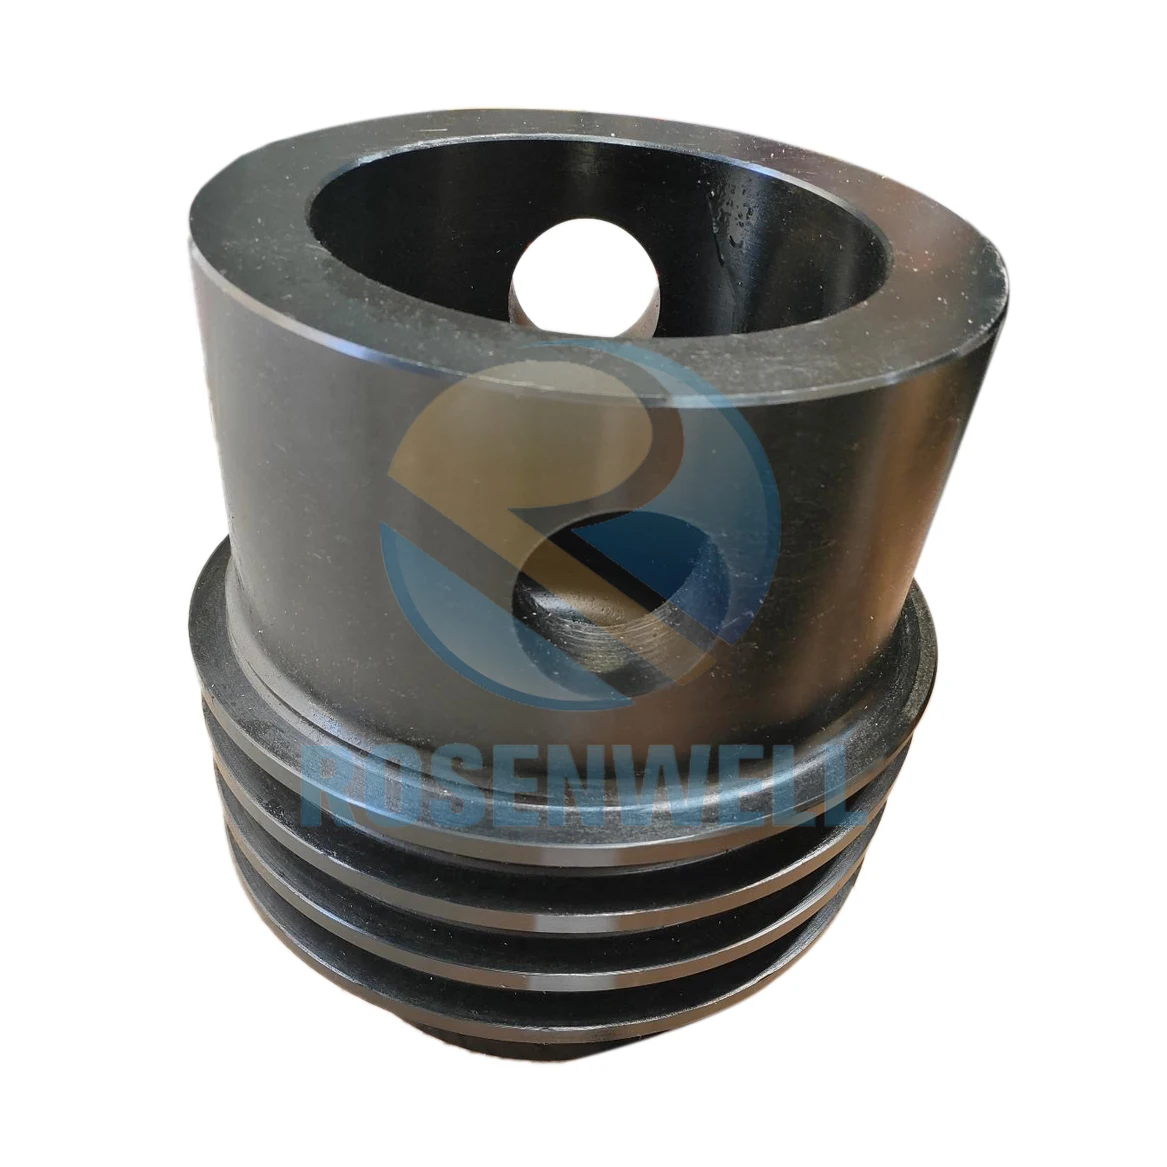
ITEM QTY. NO. PART NO. DESCRIPTION REQ’D 1 1388YXX LINER REFER TO GUIDE TO ORDERING CHART ON PG. 6 FOR TYPE (G); (Y); AND FOR BORE SIZE (XX) 3 2 2974-XX LINER GASKET (REFER TO GUIDE TO ORDERING CHART FOR TYPE AND SIZE (XX) 3 3 8488-4 WEARPLATE 3 4 2974-1 WEARPLATE GASKET (ALSO AVAILABLE IN URETHANE P# 2974-1U) 3 5 XX-BYY PISTON (REFER TO GUIDE TO ORDERING CHART FOR SIZE (XX) AND FOR TYPE (YY) 3 5A 2932 PISTON BUSHING (FROM 1-5/8” TO 1-1/2” STRAIGHT BORE) 3 6 568-225 PISTON SEAL 3 7 1290HW-25 PISTON ROD (WITH 1 ½-8 ELASTIC STOP NUT) 3 8 API-4ESN PISTON ROD NUT 3 9 1290W2 PISTON ROD CONNECTING STUD (WITH WATER HOLE) 3 10 1290HW1 SUB ROD 3 11 1290CW ROD CLAMP (WITH WATER JACKET) 3 11A 1200H30 HOSE (1/2” X 30” WITH 1/2” MALE X 3/8” MALE CONNECTIONS) 3 11B 1200120 PIPE (3/8” X 12” GALVANIZED AND THREADED ON ONE END) 3 11C 4018-94 BOLT (5/8-11 GRADE 8 BOLT WITH LOCK NUT AND WASHER) 6 12 1200G90 PONY ROD 3 13 SEE PAGE VALVE COMPLETE 6 14 SEE PAGE VALVE INSERT 6 15 SEE PAGE VALVE SPRING 6 16 SEE PAGE VALVE SEAT 6 SWTM1700 HYDRAULIC SEAT PULLER KIT COMPLETE (REFER TO TOOLS SECTION IN CATALOG) 1 4475-3A SOUTHWEST HP QUICK-CHANGE VALVE COVER ASSEMBLY: (QTY PER ASSY CONSISTS OF ITEMS 17-24) 17 4475 VALVE COVER FLANGE 1 18 4575 SCREW GLAND 1 19 4675-3A PLUG (COMPLETE WITH VALVE GUIDE; BUSHING; AND SCREWS) INCLUDES ITEMS 21, 22, & 23 1 20 P129 HP VALVE COVER PLUG NITRILE SEAL (ALSO AVAILABLE IN URETHANE SEAL USE P# P129U) 1 21 4775-3R VALVE GUIDE (COMPLETE WITH BUSHING #4700I) 1 22 4700I VALVE GUIDE BUSHING (ALSO AVAILABLE IN URETHANE P# 4700IU) 1 23 4016-99 VALVE GUIDE SCREW 2 24 4015-2 VALVE COVER STUD (WITH SW PART# HHN1250-7 1 ¼-7 HEAVY HEX NUT) 12 OILWELL VALVE COVER ASSEMBLY: (QTY PER ASSY CONSISTS OF ITEMS 22, AND ITEMS 25-28) 25 80500003 VALVE COVER 1 FLUID END TYPE MODEL OF PUMP SIZE OF PUMP OEM 5000 PSI OILWELL A-1700-PT / A-1400-PT 7-1/2” X 12” / 10”
ITEM QTY. NO. PART NO. DESCRIPTION REQ’D 26 80400003 VALVE GUIDE 1 27 80432236 VALVE GUIDE CAPSCREW 2 28 AJO229R VALVE COVER GASKET 1 29 4016-76 POWER END STUD (WITH SW PART# HHN1750-8 1 ¾-8 HEAVY HEX NUT) 12 30 80381003 LINER ADAPTER SLEEVE (STEEL) (ALSO AVAILABLE IN BRONZE PART# 80381003B) 3 31 6588-4 LINER ADAPTER NUT 3 31A 80067236 LINER ADAPTER SET SCREW 9 32 4018-70 SUCTION MANIFOLD CAPSCREW (WITH LOCKWASHER) 24 33 8588-50A SUCTION MANIFOLD 1 34 80102003 SUCTION MANIFOLD GASKET 3 35 8488-51D DISCHARGE MODULE 1 36 8488-52S SUCTION MODULE 1 37 8388A DISCHARGE MANIFOLD 1 38 568-345 DISCHARGE MANIFOLD GASKET 3 39 4017-2 DISCHARGE MANIFOLD STUD (WITH SW PART# HHN1375-8 1 3/8-8 HEAVY HEX NUT) 12 40 9070017 PONY ROD SEAL 41 9060023 PONY ROD BAFFLE
**POLYURETHANE SEALS AVAILABLE** OEM 5000 PSI A-1700-PT/A-1400-PT GUIDE TO ORDERING PISTONS LINERS LINER GASKET SIZE FAIL-SAFE DUAL-DURO® BLACK CAT GRAYLOY ZIRCONIA RUBBER URETHANE 4" 76BFS 76BDD 76BBC 1388G06 1388ZIR06 2974-06 2974-06U 4 1/4" 77BFS 77BDD 77BBC 1388G07 2974-07 2974-07U 4 1/2" 78BFS 78BDD 78BBC 1388G08 1388ZIR08 2974-08 2974-08U 4 3/4" 79BFS 79BDD 79BBC 1388G09 2974-09 2974-09U 5" 81BFS 81BDD 81BBC 1388G1 1388ZIR1 2974-1 2974-1U 5 1/4" 82BFS 82BDD 82BBC 1388G2 2974-2 2974-2U 5 1/2" 83BFS 83BDD 83BBC 1388G3 1388ZIR3 2974-3 2974-3U 5 3/4" 84BFS 84BDD 84BBC 1388G4 2974-4 2974-4U 6" 85BFS 85BDD 85BBC 1388G5 1388ZIR5 2974-5 2974-5U 6 1/4" 86BFS 86BDD 86BBC 1388G6 2974-6 2974-6U 6 1/2" 87BFS 87BDD 87BBC 1388G7 1388ZIR7 2974-7 2974-7U 6 3/4" 88BFS 88BDD 88BBC 1388G8 2974-8 2974-8U 7" 89BFS 89BDD 89BBC 1388G9 1388ZIR9 2974-9 2974-9U 7 1/4" 91BFS 91BDD 91BBC 2974-10 2974-10U 7 1/2" 92BFS 92BDD 92BBC 2974-11 2974-11U
NOTE: DUAL-DURO® AND GRAYLOY® ARE REGISTERED TRADEMARKS OF SOUTHWEST® OILFIELD PRODUCTS. VALVES & SEATS (OEM OILWELL A-1700-PT/ A-1400-PT) STAINLESS PULLER HEAD TYPE VALVE INSERT SPRING SEAT PULLER HEAD SPRING STYLE SOUTHWEST (Full Open) 777-8B N/A 941 N/A 877-7 SWTM4250 SPLIT JAW SWTM40-SN SPLIT JAW FULL OPEN-ROUGHNECK SWND-7V2 N/A SW5710-115L N/A SWND-7S1 SWND-7PH PANCAKE FULL OPEN-ROUGHNECK SWTM40-SN SPLIT JAW SWND-7V2H N/A SW5710-115L N/A SWND-7S1 (High Temp) SWND-7PH PANCAKE FULL OPEN-ROUGHNECK SWTM40-SN SPLIT JAW SWND-7V1 SWND-7I SW5710-115L N/A SWND-7S1 (w/Replaceable Urethane Insert) SWND-7PH PANCAKE3 WEB DOUBLE ANGLE O-RING SWR0500110 SWR0514275 SWR0513744 SWR0514790 SWR0509309 SWTM3-7T 3 WEB (High Temp) SWR0520502 SWR0520501 SWR0513744 SWR0514790 SWR0509309 SWTM3-7T 3 J HOOK 3 WEB STANDARD PLATE SWR0505062 SWR0504893 SWR0513937 SWR0514423 SWR0509309 SWTM3-7T 4 WEB SWU5C-EEF SWUDD-7B SW5710-110 N/A SW7DD-B1 SWTM4-7 4 J HOOK 4 WEB (High Temp) SWU5C-EEFHT SWUDD-7BHT SW5710-110 N/A SW7DD-B1 SWTM4-7
API-4 ESN PISTON ROD NUT NO MORE THAN ONE MAN ON 3" WRENCH/CHEATER COMBINATION4018-94 BOLT 150 MAXIMUM4016-99 VALVE GUIDE SCREW 44 64 894015-2 VALVE COVER STUD 669 970 13384016-76 POWER END STUD 1057 1533 21144018-70 SUCTION MANIFOLD CAP SCREW 188 282 3764017-2 DISCHARGE MANIFOLD STUD 1057 1533 2114

Full-Open Valves . . . . . . . . . . . . . . . . . . . . . . . . . . . . . . . . . . . . . . . . . . . . . . . . . . . . . . . . . . . . . . . . . . . . . . 3
Mud-Pump Gear Sets . . . . . . . . . . . . . . . . . . . . . . . . . . . . . . . . . . . . . . . . . . . . . . . . . . . . . . . . . . . . . . . . . 13


 8613371530291